METAL GEAR SOLID V: THE PHANTOM PAIN

METAL GEAR SOLID V: THE PHANTOM PAIN

97 ratings
100% Achievement Guide: MGS5 - The Phantom Pain Part 2
By Cynic 0055
This is a comprehensive 100% Achievement guide detailing a step-by-step walkthrough to take you from 0 all the way to 100%. If you are looking for a particular Achievement or Collectible, use Ctrl+F & type it into the search bar for more direct help.

I run support & debug help on all my guides. If you have any questions, problems, or find errors in the guide itself, do not hesitate to leave me a comment & I will get back to you as soon as I am able to. Happy Hunting!
   
Award
Favorite
Favorited
Unfavorite
Introduction:


Achievement Breakdown: (42)
Story Related: (12)
Secondary Objectives: (6)
Character: (6)
Collectibles: (11)
Slay: (1)
Miscellaneous: (5)
Online: (1)


This is Part 2 of 2 Achievement Guides for The Phantom Pain. Part 2 covers all Mission Tasks, S Rank, the final Side Ops, & the last mop up Achievements including building/disarming a Nuclear Weapon. Part 1 covers natural story progression up to Mission #43 – Shining Lights, Even In Death, 134/157 Side Ops, & Collectibles.

For building a Nuclear Weapon, we will need a whopping 750,000 GMP, 75,000 Fuel Resources, & 50,000 Minor Metal. GMP is easy enough to obtain, but Materials can be extremely grindy. After fully developing Mother Base, try hoarding these Materials to at least these requirements if possible. Due to how complicated nukes make things, this task will be saved until the very end of the game.

After completing all the Mission Tasks for a given Mission, we will have to go in & earn an S Rank on them. There are a lot of factors that go into an S Rank; some Missions you can get lucky & earn it by completing the Mission Tasks.

Some tips for S Rank are as follows:

1. Dispatch Missions: Take advantage of Dispatch Missions that destroy certain equipment for the enemy Soldiers. The most important being Night Vision Goggles & Riot Suits as they make earning an S Rank almost impossible.

2. Reloading Checkpoints: If you reload a Mission from a Checkpoint, it will impact your Mission Time & score. However, it will undo everything since the last Checkpoint meaning if you trigger Reflex Mode, get alerted, get hit, etc. it will become undone. The only thing that will carry forwards is the time wasted.

3. Restarting Mission: Restarting the Mission is just that; a full reset of the Mission for you to try again entirely.

4. Rank Limiting Gear: There are certain Support actions or Equipment that will limit the Rank we can earn on a Mission. These include the Chicken Hat, Stealth Camo, Sleeping Gas, or using Support Artillery Strikes.

Positive Points:

1. Mission Time: How long you take to do a Mission is factored into your final score; the faster the better. Cut scenes also add onto your Mission Time, so always opt to skip them when you can. Pausing the game will not pass time, but idling in your iDroid menu will.

2. Tactical Takedowns: Each successful Tactical Takedown will give us 1000 points each.

3. Headshots: Each successful Headshot (lethal or nonlethal) will give us 1000 points each.

4. Neutralization: Each successful Neutralization (lethal or nonlethal) will give us 200 points each.

5. Accuracy: Total shots landed/missed will be averaged to contribute a score. The more you miss, the less points you will get.

6. Markings: Each Soldier Marked will give us 30 points each.

7. Effective Interrogations: Each Interrogation that results in any new information will give us 150 points each.

8. Prisoners Rescued: Each Prisoner extracted will net us 5000 points.

9. No Retries: Never reloading from a Checkpoint will give us 5000 points.

10. No Kills: Taking no lives in a Mission will give us 5000 points.

11. No Reflex: Never incurring Reflex Mode in a Mission will net us 5000 points.

12. No Enemy Combat Alerts: Never entering combat with an alerted enemy for the entire Mission will net us 5000 points; entering Reflex Mode does not void this.

13. Perfect Stealth, No Kills: Never killing a single enemy or triggering Reflex Mode at all will net us 20,000 points.

14. Mission Tasks: Certain Mission Tasks can be completed for an extremely easy point bonus while others are way too time consuming or involve killing difficult enemies.

Negative Points:

1. Enemy Combat Alerts: Each combat alert will cost us -5000 points each.

2. Hits Taken: Each hit taken from an enemy will cost us -100 points each.

If you completed Metal Gear Solid 5 – Ground Zeroes, you can import your Save file to The Phantom Pain to unlock some unique Outfits as well as unique Staff Members for Mother Base. The Outfits will need to be Developed & cost resources to make, however you will slowly unlock the transferred Staff Members as you complete Missions; the first set will come after Mission #3 – A Hero’s Way & the last unlocked after Mission #12 – Hellbound.

Note that you are actually able to import your own music into the game as well to use for your Helicopter arrival theme & just to listen to. In your Phantom Pain game folder, there will be a Custom Soundtrack Folder. Simply place any extra music you want into it, & it will appear in game!

For those interested, here is an organized list of all the Achievements/Secret Achievements. This is how I derive my Achievement Breakdowns & the first reference I create before I begin my 100% journeys.
https://steamcommunity.com/sharedfiles/filedetails/?id=3060360836

*Guide contains major spoilers.
Sequence 1: Flashback
1. Mission: N/A
2. Side Ops: 134/157
3. Key Dispatch Mission: 18/20
4. Blueprints: 25/26
5. Key Items: 11/20
6. Achievements: 28/42
-----------------------------------------------------------------------------------------------------

To progress the story after finishing Mission #43 – Shining Lights, Even In Death, we will need to complete/replay some Missions marking this as the perfect time to begin our Mission Task/S Rank playthrough. The final Side Ops are locked behind Mission #46 – The Man Who Sold the World; we will save this for the very end of the game to witness the true ending of the game…

Mother Base – Recap:

Codename Butterfly Emblem: The Butterfly Emblem … is confusing. If you do not know what I am talking about, we can earn the Codename Butterfly Emblem Front by using Quiet often during Missions. When you equip the Emblem Front in the Customization, it will halt Quiet’s story progress. Doing this will lock us out of Side Op #150 as well as Mission #45; two things we need for our 100% completion.

The problem is that Quiet will disappear from the game after we complete Mission #45 as part of the story. By using the Codename Butterfly Emblem, Quiet will not leave us… but we also will not be able to do the two Missions.

Do not equip this as part of your Emblem.

There is a way we can recover Quiet by completing Mission #11 – Cloaked In Silence seven times (sparing Quiet each time) & it will change into a brand new Mission where we can bring Quiet back to Mother Base as a Buddy again. This has no story implications as it is “cannon” Quiet leaves, but at least we can still use her broken skills during Missions again.

Key Dispatch Missions: Since we have finished Mission #32 – To Know Too Much, we will have the Battle Walker unlocked. This means we can finish the final Key Dispatch Missions. These are all S Rank Difficulty & have low chances of success. They may take multiple attempts at the cost of some of our Combat Teams lives. Do not give up; this is what their sole purpose is essentially for…

Mother Base: Keep in mind as we play that we need: 1000 enemy Soldier Fulton Extractions, all seven Mother Base Platforms at Level 4, as well as all eight Teams at Level 50 or above (this includes our Security Team).

Development: When you have GMP to spare, keep developing new Weapons & Equipment for the Locked & Loaded Achievement if you have not already unlocked it. Apart from essential gear for your build, cycle through Developing the cheapest to expensive items first. Be sure to keep at least 100,000 GMP as “savings” for deployment however or emergencies…

Important S Rank Gear: Before we begin earning S Rank on some of the more difficult Missions, there are some Weapons & pieces of equipment that will make your life much easier. Put these ahead of all others & try Developing them to the highest Grade you can.

1. Wormhole Fulton Device
2. Your best non lethal Pistol
3. Your best lethal Assault Rifle
4. A good lethal & a good non lethal Sniper Rifle
5. The Brennan LRS-46 Sniper Rifle (to Grade 6)
6. The CGM-25 Rocket Launcher
7. All Bionic Arm Upgrades (Mobility, Precision, & Medical)
8. Hand Grenades, Sleep Grenades, C-4, EMN Mines
9. Battle Dress
10. Parasite Suit & Armor Parasite Consumable


Contrary to what you might assume, I find that using Camo Fatigues (Black Ocelot) much more effective than the Sneaking Suits. I found that I was detected way more often at further distances than I should have been while wearing Sneaking Suits. I was able to get much closer to enemies, avoiding detection, while wearing the Black Ocelot Camo.
Sequence 2: Shalashaska
1. Missions: Awakening, Phantom Limbs
2. Mission Tasks: 8/284
3. S Rank: 2/47
4. Side Ops: 135/157
5. Key Dispatch Mission: 18/20
6. Blueprints: 25/26
7. Key Items: 11/20
8. Achievements: 28/42
-----------------------------------------------------------------------------------------------------

See the Mission Scoring breakdown in the Introduction before starting…

Mission #0 – Awakening:
Mission Tasks:
1. Completed the Mission without triggering Reflex Mode
2. Completed the Mission without allowing the Man On Fire to attack even once after meeting up with Ocelot

S Rank & all Mission Tasks can be earned in the same playthrough; skip all cut scenes as soon as you can. Constantly check during the initial section of the Mission whether or not it is something you can skip or not to save you time…

Disable Reflex Mode: When we take control of Snake at the start of the Mission, go into Options – Game Settings & turn Reflex Mode to Off.

Skipping Cut Scenes: There are a lot of cut scenes on this Mission. Be on point & pay attention to skip them all to save yourself time.

Pay Attention to Ishmael: Ishmael will guide us through the Mission & prevent us from getting caught. Follow him & his commands to a T.

Combat #1: Our first combat situation will occur when we pick up our AM D114 Pistol. There will be two enemy Soldiers to kill; we cannot enter Reflex Mode or our Task will be voided. Taking damage is alright.

Combat #2: When we enter the burning entrance way to the hospital, there will be around five enemy Soldiers here. Without Reflex Mode active, try your best to sneak to the entrance & escape. If you are discovered, waste no time & sprint to the entrance to trigger a cut scene with the Man On Fire.

Mission Task #1: If we made it to the entrance to the hospital without triggering a single instance of Reflex Mode, we will complete this Mission Task.

If you trigger Reflex Mode, reload your last Checkpoint & try again.

The Chase: Waste no time & skip all cut scenes to reach the chase sequence with the Man On Fire on horseback.

Mission Task #2: We cannot allow the Man On Fire to hit us with his fireballs at all. To stun him, we need to shoot him with our S1000 Shotgun. Do not shoot blindly at him. Whenever he gets within range for the aiming reticle to turn red, shoot at him. While most of his attacks are sounded by a ringing, it is not always the case. If he gets too close, shoot him.

If you get hit, reload your last Checkpoint & try again.

S Rank: S Rank for this Mission is all about time. As you will see by my score, I got hit quite a few times, got alerted, & also reloaded a Checkpoint twice (once for triggering Reflex Mode & another for getting hit by the Man On Fire). Speed is the key for this S Rank; earning the two Mission Tasks even after reloading Checkpoints will net us 10,000 bonus points as well.


Mission #1 – Phantom Limbs:
Mission Tasks:
1. Pinpointed Kazuhira Miller’s whereabouts*
2. Extracted Kazuhira Miller*
3. Extracted the Commander from Wakh Sind Barracks
4. Completed the Mission without being discovered by the Skulls
5. Secured the Rough Diamond hidden in Spugmay Keep
6. Extracted the Transport Truck driver

Mission Task #5: As soon as the Mission begins, we will need to complete Ocelot’s tutorial. As we hear him speak, scan off to your right to see some cliffs beside us; we can skip these cut scenes.


As soon as we are able to, drop off of D-Horse & climb onto the cliff to collect the Rough Diamond for this Mission Task. It will require us to do a Crack Climb up to it.

Mission Task #6: Take D-Horse & immediately set a charge for Da Wialo Kallai. Give the Guard Posts a wide berth as well as the village & ride around to the Northern road junction entering it. From here, use the INT Scope to look into the village & you should see a parked Transport Truck; this is the default position for the Truck before it gets driven between Guard Posts.

The Soldier that is standing right beside it smoking a cigarette is the driver we need to Extract. Wait here until a they enter into it & begins driving it towards us. When ready, clip it with some silenced bullets to stop the truck & have the driver exit. Then knock them out & Extract them to complete this Task; alternatively, we can just enter into the village to take them out but beware there are other Soldiers around & it may cost you your Reflex Mode bonus.

Mission Task #3: With this done, ride hard to Wakh Sind Barracks in the far North of the Mission area. Carefully make your way to the compound at the Northern end of the base & Interrogate a Soldier here to learn of the location of its Commander; it will be a Soldier wearing a red beret.

The Commander is typically inside one of the six Soldier dorms located at the top of the Wakh Sind Barracks compound. Knock them out & Extract them to complete the Mission Task.

Mission Task #4: After we retrieve Miller, do not go to the marked Landing Zone for Exfiltration. Instead, go into your iDroid & select a new one North of the village near Guard Post 11. Doing this will prevent the Skulls from spawning & let us complete this Mission Task.

S Rank: For an easy S Rank, ride straight to Da Gwhandi Kar, no kills or Reflex Mode, obtain Miller & swap Landing Zones to evade the Skulls in as fast of time as possible.
Sequence 3: The Absence of Words
1. Missions: Diamond Dogs, A Hero’s Way, A Quiet Exit
2. Mission Tasks: 18/284
3. S Rank: 3/47
4. Side Ops: 136/157
5. Key Dispatch Mission: 19/20
6. Blueprints: 25/26
7. Key Items: 12/20
8. Achievements: 29/42
-----------------------------------------------------------------------------------------------------

Mission #2 – Diamond Dogs:
Mission Tasks:
1. Completed the Fulton Extraction training*
2. Extracted Staff, raising your R&D Team’s Level*
3. Developed the Cardboard Box, & completed basic training*
4. Completed restrain training
5. Completed strike training

There is no score for this Mission; we do not earn S Rank on it.

Mission Task #4: After we have Developed the Cardboard Box, Ocelot will tell us we can summon a Helicopter & leave. Before we do that, stay near Ocelot & he will eventually tell us to practice our CQC. Once he says this, approach any Staff Member & a tutorial will pop up asking us to restrain one of them. Let Ocelot finish what he says as we restrain the Staff Member, then choke them out. With that done, Extract the Staff Member & we will complete the Task.

Attempting this without Ocelot’s direction will not complete the Task.

Mission Task #5: After the last Task, we now need to do our strike training. Walk up to any Staff Member & repeatedly punch them to knock them out with a combo. When they are down, Extract them to complete the Task.

Mission #3 – A Hero’s Way:
Mission Tasks:
1. Eliminated the Spetsnaz Commander*
2. Neutralized the Spetsnaz Commander from long distance (100m or more)
3. Extracted the Spetsnaz Commander
4. Picked a Haoma in the desert between Da Shago Kallai & Spugmay Keep
5. Secured the Processed Materials hidden in Da Shago Kallai

For this Mission, you will want to bring your best Tranquilizer Sniper Rifle with a Silencer on it; you can always Customize a Sniper Rifle to better suit your needs. I used a Customized Grade 4 Renov-ICKX TP. Bring D-Dog along if you want an easier time spotting the Haoma.

This Mission is best done during the daytime for the best shot at the Spetsnaz Commander.

Mission Task #4: To start, choose the Landing Zone that is North of Guard Post 25. As soon as we land, begin running South towards this marked area. There are actually two Haoma here but only the North Western one counts for the Mission Task.


Mission Task #5: Now make your way to the far West side of Da Shago Kallai. Here, there will be a long concrete bridge. Being mindful of the patrolling Soldier nearby, stand at the end of the bridge (on the village side) facing the North West. Drop down off the side of the bridge to your right & look underneath it where it connects to the stone to find a crate of Processed Materials resting on some rocks under the bridge; this is near the very first column of the bridge, not where you can pass through to the other side.

Mission Task #2: Now it is time for us to snipe the Commander; this Mission Task can be saved for our S Rank if you prefer.

Make your way over to the far East side of Da Shago Kallai & get up to the top of a rectangular patrol building that has a Ladder going on top of it; this should give us a good view of the main HQ. If it is not past 6:00am, use a Phantom Cigar to pass the time. Note that you can use whatever vantage point works best for you, this is just the one I ended up using.

In the daytime, look through your INT Scope at the main HQ’s second floor where the exposed wooden overlook is. Scan around to find a Soldier with a red beret; this is the target. With him Marked, we can see just how far away he is from us. Correct your distance, & use your Sniper Rifle to knock him out once he is further than 100m away from you. If you miss the Headshot, quickly follow up with another body shot to knock him out fast.

Mission Task #3: Not the most ideal circumstances, but with the Commander asleep, we need to quickly get into the base to retrieve & Extract him.

S Rank: S Rank is actually extremely simple & involves the Sniper Rifle method, only lethal this time. Take D-Horse & your best lethal Sniper Rifle, ideally Silenced, & get to your vantage point during the daytime. Mark & snipe the Commander & Exfiltrate the Hot Zone as fast as possible on horseback for S Rank.


Mother Base:

The Exiling of Emmerich: After we have completed three or four Missions/Side Ops, we will unravel the next part of the story & have to return to Mother Base.

Key Item #12 – Emmerich’s Research Notes: Unlocked after witnessing the exile of Emmerich.

Key Dispatch Mission #19 – Secure the Bridgeheads: The next Key Dispatch Mission is another S Difficulty one that will take 2 hours & 59 minutes to complete… so 3 hours. It will require three Walker Gears & the Battle Gear to complete.

Afghanistan - Free Roam:

Side Op #135 – 112 Intel Agent Extraction: Go to Da Ghwandai Khar & locate the Intel Agent via Buddy or Interrogation; they are being held in the main command center where the cell is located in the center of the area.

Plot twist… the Intel Agent will be Kojima himself. Unfortunately, you can only unlock him as a Staff Member if you previously Extracted him during Ground Zeroes; which also would have meant you could have completed this Side Op much sooner.

Side Op #136 – 150 Secure Quiet: With Emmerich exiled, the story will progress & we will receive word that Quiet has abandoned Mother Base. Completing this Side Op will immediately launch us into the following Mission. It is very difficult & I highly recommend wearing your best Battle Dress as well as bringing a CGM Rocket Launcher.

Go to Guard Post 4 in Afghanistan & enter inside the main barracks to find an Intel File. Read it to complete the Side Op.

Mission #45 – A Quiet Exit: This Mission will immediately initiate after we read the Intel File. Quickly reach Lamar Khaate Palace & a cut scene will ensue of Quiet’s epic escape. Afterwards we will have to fight an entire army of Tanks, APCs, Soldiers, & a Gunship at the end. This is a very difficult Mission & we will be requiring constant Supply Drops to restock our Launcher Ammo. Fortunately, Quiet does drop Supply Flares that bring in Supply Drops for us, but do not solely rely on them.

Leave the regular Soldiers for Quiet to dispose of & focus on destroying the enemy Tanks & APCs with your CGM Launcher.

It took me many, many tries to beat this Mission.


Achievement #29 – Disappearance: Complete A Quiet Exit Mission.
Story Related. Complete Mission #45 – A Quiet Exit to unlock this Achievement.

Roll Credits.
Sequence 4: On Butterfly Wings
1. Missions: Cloaked In Silence, [Extreme] Cloaked In Silence, C2W
2. Mission Tasks: 32/284
3. S Rank: 6/47
4. Side Ops: 136/157
5. Key Dispatch Mission: 19/20
6. Blueprints: 25/26
7. Key Items: 13/20
8. Achievements: 30/42
-----------------------------------------------------------------------------------------------------

Mother Base:


Achievement #30 – Army: Raise all Teams/Units to Level 50.
If you have been building Platforms on Mother Base & your FOB, you should be able to house at least 100-150 Staff Members per Platform. Complete Dispatch Missions to obtain higher level Staff or Extract enemy Soldiers to increase a Teams Level.

If all you need is a higher Defence Team, if you have the Staff to spare, swap out some high-level Staff Members from the Combat Unit temporarily into the Defence Team to boost its Level.

If you have not already been doing so, be sure to keep chipping away at leveling all the Platforms on Mother Base; we need them all at Level 4. You can Level your FOB as well, but I do not recommend Leveling its Platforms beyond 2 until Mother Base is maxed out.

Mission #11 – Cloaked In Silence:
Mission Tasks:
1. Eliminated Quiet*
2. Determined what to do with Quiet*
3. Neutralized Quiet without hitting her with lethal Weapons
4. Neutralized Quiet with non firearm attacks

As part of the story, Quiet has now left the game, but not permanently. If we replay this Mission seven times, it will change into a new one, & we are able to be reunited with our top gun again.

Mission Tasks #3-4 + S Rank: We can complete all Mission Tasks as well as earn an S Rank on this Mission in two swift motions. When the Mission begins, take cover & Mark Quiet. Then select a Supply Drop & choose a cheap Weapon like the Water Pistol & drop it directly onto Quiet’s position. Poke in & out of cover to keep her engaged without relocating & eventually our Supply Drop crate will land on top of her, taking out half of Quiet’s health. Do this a second time to finish the Mission.


[Reunion] – Cloaked In Silence: Replay this Mission five more times without killing Quiet & Mission #11 will go from being called [Flashback] to [Reunion]. Replay this Mission one final time by knocking her out & we will re-acquire Quiet at the same Bond level she was when we lost her.

There are no extra cinematics or “story” involved with her return. This is purely just for game reasons for us to be reunited with Quiet again to use in Missions.

Mission #40 – [Extreme] Cloaked In Silence:
Mission Tasks:
1. Eliminated Quiet*
2. Determined what to do with Quiet*
3. Neutralized Quiet without hitting her with lethal Weapons
4. Neutralized Quiet with non firearm attacks

Since we are already familiar with this Mission, we may as well complete the higher Difficulty version of it. We will once again be exploiting the Supply Drop method for this Mission to complete all Tasks & earn an S Rank, but there is a catch. If a Supply Drop gets too close to Quiet, she will evade it & move to a new location. To prevent this, we need to bait her into shooting at us before it hits her as a distraction. When the Supply Drop gets under 10m away from her, pop out of cover to get her to fire at us. Do it too soon, & she will evade the Supply Drop; the timing can be a bit frustrating. I find just staying behind the short wall we start at is the best place to be.

It will take at least five Supply Drops to knock her out this time. What’s worse, is that getting hit by Quiet is an instant kill regardless if you have Battle Dress on! Be careful, as sometimes Quiet will run down to the creek below & begin healing in the water; if you see a rainbow above the creek, it means she is down there.

This is an expensive Mission due to how many Supply Drops we will be doing so be sure you have GMP to spare; we will get a big payout when we beat it!


Key Item #13 – Handkerchief: We will receive this Key Item for completing Mission #40.

Mission #4 – C2W:
Mission Tasks:
1. Identified the Comms Equipment at the Eastern Communications Post*
2. Destroyed the Comms Equipment at the Eastern Communications Post*
3. Secure the Rough Diamonds hidden near the Eastern Communications Post
4. Destroyed the Transmitter at the Eastern Communications Post
5. Extracted two Prisoners being held at Da Wialo Kallai
6. Extracted the Materials Container from the Eastern Communications Post

We will do two separate runs for all Mission Tasks & S Rank. Since we are doing two separate runs, take your time completing our Mission Task run & try farming a bunch of Soldier Fulton Extractions if possible/available.

Mission Task #5: Bring D-Dog along with us for the Mission & make your way over to Da Wialo Kallai. Enter into the village from the Southern road, & if D-Dog is with you, he should pick up the locations of the Prisoners in a ruined building a little ways ahead; they are in two separate parts of the building but close by.

Mission Task #3: Now head to the Eastern Communications Post. Head all the way around & approach it from the South where the dirt road leaves the main road. Follow the dirt road along, past two Grey Wolves, to where there is a curve in the road leading towards the ECP; there will be some Wormwood here.

Across from the Wormwood, start climbing up the nearby small rock mound to the left of the dirt road (West side) to find the Rough Diamonds. If you are having trouble always sliding down, try diving on top of the rock instead.

Mission Task #4: There are two buildings to be found at the ECP. Go inside the one with the red Soviet flag outside it to find the Transmitter.

Mission Task #6: There are two Materials Containers to be found at the ECP; Extract either one of them to complete the Task. I strongly recommend only Extracting one of these Containers however as if you Extract both we will be unable to complete this same Mission Task for Mission Mission #33 – [Subsistence] C2W & you will have to pass quite a bit of time for it to respawn...

The Anti Air Radar: As a final objective, destroy the Anti-Air Radar trailer (the grey trailer on wheels that has a radar dish spinning on top of it) by shooting it with a rocket or throwing two Grenades under it. This will allow us to earn a very easy S Rank on this Mission if you did not unlock it during this run.

S Rank: This is a very simple S Rank, but only if you destroyed the Anti-Air Radar at the Eastern Communications Post. If you were not able to, quickly go to the ECP in free roam & destroy it first.

You may want to apply some Applique Armor to our Helicopter before we begin.

Start the Mission again, but this time deploy at the High Danger Landing Zone at the ECP. As soon as the Mission begins, get on the Gatling Gun & begin destroying the three Comms Equipment dishes on the buildings. You need to destroy them fast before the Helicopter gets to the Landing Zone; once the objective is complete & you get to the Landing Zone, the Helicopter will raise back up & Exfiltrate with us.
Sequence 5: A Nation Divided
1. Missions: [Subsistence] C2W, Over the Fence
2. Mission Tasks: 43/284
3. S Rank: 8/47
4. Side Ops: 136/157
5. Key Dispatch Mission: 19/20
6. Blueprints: 25/26
7. Key Items: 13/20
8. Achievements: 31/42
-----------------------------------------------------------------------------------------------------

Mother Base:


Achievement #31 – Locked & Loaded: Develop 300 or more Development Items.
As we replay through all the Missions, be sure to stay on top of Developing new Weapons & gear. To start of course prioritize gear you actually want & use; Developing all the Items for a single Buddy also nets us a Heroism reward. When that is done, just begin chipping away at the cheapest Items available & eventually this Achievement will unlock.

If you need GMP, sell Medicinal Herbs, Artillery, or Vehicles you do not need. Reluctantly if you have a surplus of a certain Materialos such as Minor Metal for example, you can sell some of it as well for massive amounts of GMP.

Mission #33 – [Subsistence] C2W:
Mission Tasks:
1. Identified the Comms Equipment at the Eastern Communications Post*
2. Destroyed the Comms Equipment at the Eastern Communications Post*
3. Secure the Rough Diamonds hidden near the Eastern Communications Post
4. Destroyed the Transmitter at the Eastern Communications Post
5. Extracted two Prisoners being held at Da Wialo Kallai
6. Extracted the Materials Container from the Eastern Communications Post

This Mission plays out identically to the original version of the Mission & we will once again do two runs of it. There are a few things to note for this Mission however as it is a [Subsistence] type. We cannot use the Chicken Hat, Reflex Mode, deploy with any Buddies or equipment, & cannot resupply with Supply Drops.

We will begin with only our Bionic Arm & a set of Olive Drab uniform. We must locate all Weapons & gear as we play. We do not have Reflex Mode so play very cautiously; we cannot afford to get bogged down into a firefight. The Mission also begins ASAP, so it may end up being daytime when we do the Mission.

Mission Task #5: To start, make your way over to Da Wialo Kallai; you can make a pit stop at Guard Post 23 to loot some Weapons if you desire. Enter into the village from the Southern road, & make your way to where the Prisoners are being held to Extract them; they will be in the same spot as in the previous Mission.

If you cannot remember where that is, carefully sneak up behind a Soldier or two to Interrogate them for the Prisoners locations.

Mission Task #3: Now head to the Eastern Communications Post. Head all the way around & approach it from the South where the dirt road leaves the main road; you want to get here as fast as possible before the sun rises. Follow the dirt road along, past two Grey Wolves, to where there is a curve in the road leading towards the ECP; there will be some Wormwood here.

Across from the Wormwood, start climbing up the nearby small rock mound to the left of the dirt road (West side) to find the Rough Diamonds.

Explosives: There are a few Soldiers at the ECP that are holding Killer Bees; we will need these to destroy the Comms Equipment. We can also find Hand Grenades in the same building as the Transmitter.

Mission Task #4: There are two buildings to be found at the ECP. Go inside the one with the red Soviet flag outside it to find the Transmitter; destroy the Transmitter to complete the Mission quickly.

Mission Task #6: Before we leave, there are two Materials Containers to be found at the ECP; extract either one of them to complete the Task.

S Rank: This is a very simple S Rank, but only if you destroyed the Anti-Air Radar at the Eastern Communications Post. If you were not able to, quickly go to the ECP in free roam & destroy first.

You may want to apply some Applique Armor to our Helicopter before we begin.

Start the Mission again, but this time deploy at the High Danger Landing Zone at the ECP. As soon as the Mission begins, get on the Gatling Gun & begin destroying the three Comms Equipment dishes on the buildings. You need to destroy them fast before the Helicopter gets to the Landing Zone; once the objective is complete & you get to the Landing Zone, the Helicopter will raise back up & Exfiltrate with us.


Mission #5 – Over the Fence:
Mission Tasks:
1. Extracted the captive Engineer*
2. Fulton Extracted the Engineer through the hole in the facility’s basement ceiling
3. Extracted the Prisoner plotting to escape from Wakh Sind Barracks
4. Extracted the Four Wheel Drive patrolling between outposts
5. Secured the Blueprint at Wakh Sind Barracks

D-Dog & stealth is recommended for this Mission; we also need the Balloon Fulton Device, not the Wormhole Fulton Device for Mission Task #2. It is highly likely you will unlock S Rank while completing all the Tasks.

Mission Task #4: Choose the Landing Zone that is East of Wakh Sind Barracks to deploy. As soon as we land, turn around & face South, down the road towards Guard Post 11… & wait. In under 10 seconds, our Four Wheel Drive will arrive with a single Soldier in it. The vehicle needs to be Extracted for the Task, not the Soldier.

Mission Task #3: Now get to Wakh Sind Barracks & head up to the compound at the top of the hill. Once inside, get up on top of the main entrance archway & we can find the escaped Prisoner close by hiding behind a rock.

Mission Task #4: We should have obtained this Blueprint during our very first playthrough of this Mission; if not, it can be found inside the top left Soldier dorm of the six found in the North East corner of the compound.

Mission Task #2: Enter into the basement of the stone ruins inside the compound & rescue the Engineer. Once we have him, search the ceiling down here to find a hole in it. Place the Engineer down & place a Balloon Fulton on him to Extract him through that hole; be sure it is at a 100% chance of success so the Extraction will not fail.

S Rank: Completing this Mission with all its Tasks in good time will let you easily acquire an S Rank. After Extracting the Engineer, exit the ruins using the stairs nearby to the Western entrance & we can find a Materials Container. Climb on top of the Container & Fulton Extract it while standing on it; while this happens, be sure to hold A to grab the Balloon or we will fall off & not be Extracted with it.
Sequence 6: No, Not the Bees!
1. Missions: [Total Stealth] Over the Fence, Where Do the Bees Sleep?
2. Mission Tasks: 54/284
3. S Rank: 10/47
4. Side Ops: 136/157
5. Key Dispatch Mission: 20/20
6. Blueprints: 26/26
7. Key Items: 13/20
8. Achievements: 32/42
-----------------------------------------------------------------------------------------------------

Mother Base:

Key Dispatch Mission #20 – Prevent the Coup d'état: Our final Key Dispatch Mission will be S Difficulty & take 2 hours & 22 minutes. It will also require three Walker Gears as well as the Battle Gear.

Blueprint #26 – BULLHORN SG: Complete the Key Dispatch Mission to unlock this Blueprint. This is at long last our final Blueprint to collect.


Achievement #32 – Deployment: Complete all 20 Key Dispatch Missions.
The latter Key Dispatch Missions can become tedious due to their high failure rate. Stick with it, & continue to try them again until you luck out. Our Combat Unit & Walker Gears are essentially solely for completing these so do not worry if we lose lots of them; we can always collect more.

If you are running low on S Rank Combat Staff Members, complete Online Dispatch Missions to receive more. For farming Walker Gears, there are a few Missions you can farm them from, but Mission 15 – Footprints of Phantoms is definitely the fastest per effort.

Mission #39 – [Total Stealth] Over the Fence:
Mission Tasks:
1. Extracted the captive Engineer*
2. Fulton Extracted the Engineer through the hole in the facility’s basement ceiling
3. Extracted the Prisoner plotting to escape from Wakh Sind Barracks
4. Extracted the Four Wheel Drive patrolling between outposts
5. Secured the Blueprint at Wakh Sind Barracks

D-Dog is recommended for this Mission; we also need the Balloon Fulton Device. This is a Total Stealth Mission meaning that we cannot be detected at all our it will be a game over; the Chicken Hat & Reflex Mode are also disabled.

Mission Task #4: Choose the Landing Zone that is East of Wakh Sind Barracks to deploy. As soon as we land, turn around & face South down the road towards Guard Post 11… & wait. In under 10 seconds, our Four Wheel Drive will arrive with a single Soldier in it. The vehicle needs to be Extracted for the Task, not the Soldier.

Mission Task #3: Now get to Wakh Sind Barracks & head up to the compound at the top of the hill. Once inside, get up on top of the main entrance archway & we can find the escaped Prisoner close by hiding behind a rock.

Mission Task #4: Very carefully make your way through the compound & get to the Soldier dorms. Lure out the Soldier inside the top leftmost dorm & carefully eliminate them so we can loot the Blueprint inside.

Mission Task #2: Enter into the basement of the stone ruins inside the compound & rescue the Engineer. Once we have him, search the ceiling down here to find a hole in it. Place the Engineer down & place a Balloon Fulton on him to Extract him through that hole; be sure it is set to 100% so the Extraction will not fail.

S Rank: Once the Engineer has been Extracted, quickly escape the ruins using the stairs & Exfiltrate via Fultoning a Materials Container while standing on it/grabbing the Balloon.


Mission #6 – Where Do the Bees Sleep?:
Mission Tasks:
1. Secured the Honey Bee*
2. Eliminated the Skulls
3. Secured the Honey Bee with its ammunition intact
4. Extracted the Prisoner who cannot speak
5. Extracted 2 Snipers at the Mountain Relay Base
6. Eliminated the Gunship

To start, deploy with D-Dog or D-Horse as well as a good Launcher to take out the Gunship & potentially the Skulls; if you do not have the ammo for it, we can deploy D-Walker to dispatch the Skulls instead. Be sure to make a “guns blazing” Loadout for D-Walker if you plan to use him…

Mission Task #5: To start, get to the Mountain Relay Base as fast as you can. When we arrive, get past the first checkpoint with two Soldiers & face the Western end of the bridge where a watchtower is. Carefully assess the Soldiers here (there should be around three) & one will be a Sniper. For me, it was the one standing in the tented area beside the watchtower. Knock them out & Extract them.

We can find the second Sniper near the Eastern entrance checkpoint to the MRB or down along the scaffolding below the bridge depending on how long you have taken.

Mission Task #4: If you are fast, we can find the mute Prisoner kneeling at the opposite end of the bridge surrounded by Soldiers. If you have a steady hand & Reflex Mode on, you may be able to dispatch them all & rescue him.

If you were too slow or do not want to risk detection, he will be taken to Da Smasei Laman in a Four Wheel Drive & we can find him there instead leading the Soldiers to the Honey Bee in the ruins.

Be careful to not kill any of the Snipers if you are going guns blazing to capture the Prisoner at the MRB.

Mission Task #6: As we approach Da Smasei Laman, we will see an enemy Gunship patrolling around. Wait for it to get close, & carefully clip it once with a silenced Weapon to get its attention. It will home in on our position so crawl away carefully as it begins firing at our last known location. When it “stops” to hover, bust out your Rocket Launcher & snipe it in one shot before it can detect us.

The Honey Bee: Locate the Honey Bee inside the ruins to continue; do not use any of its ammo so we can unlock Mission Task 3.

Mission Task #2: With the Honey Bee collected, call in D-Walker for support or manually kill the 4 Skulls by yourself through whatever means necessary. Just do not use the Honey Bee.
For me, the Mission Task actually unlocked after only killing one of the Skulls…

Mission Task #3: Exfiltrate the Mission having not fired the Honey Bee once.

S Rank: If you were stealthy for the most part, it is highly likely you will earn S Rank completing all of the Mission Tasks.

If you didn’t, then S Rank is fairly simple. Deploy with D-Horse & a good Grenade Launcher or Assault Rifle & ride straight to Da Smasei Laman evading the Gunship as well. Collect the Honey Bee & carefully kill the four Skulls again. When they are dead, destroy the Anti-Air Radar trailer & move our Landing Zone to Da Smasei Laman for a fast Extraction.
Sequence 7: Who Monsters Fear
1. Missions: Red Brass, Occupation Forces
2. Mission Tasks: 68/284
3. S Rank: 12/47
4. Side Ops: 136/157
5. Key Items: 13/20
6. Achievements: 32/42
-----------------------------------------------------------------------------------------------------

Mission #7 – Red Brass:
Mission Tasks:
1. Eliminate the Commander of the company stationed at Da Wialo Kallai*
2. Eliminate the Commander of the platoon stationed at Da Shago Kallai*
3. Eliminate the Commander of the platoon stationed at Wakh Sind Barracks*
4. Extracted the Commander & the Soldiers riding in his vehicle (4 total)
5. Extracted the 3 Commanders
6. Listened to the end of the 3 Commanders' conversation
7. Extracted 2 Prisoners being held at Da Ghwandai Khar

This Mission may require two to three playthroughs for all Missions Tasks & S Rank.

Mission Task #7: To start, deploy with D-Dog at the Landing Zone South of Da Ghwandai Khar. Quickly make your way to the village & D-Dog should be able to locate the Prisoners; one will be in the basement of the main command center & another will be located in a building near the top Northern end of the village.

When the Prisoners are Extracted, we need to get to Da Wialo Kallai as fast as we can; you may want to Supply Drop a Four Wheel Drive. Do not kill any Soldiers in Da Wialo Kallai; if need be, knock them out! I will explain why in Mission Task 4.

Mission Task #6: The three Commanders (if uninterrupted) will meet up in the building directly East across the street from the main command center in Da Wialo Kallai near the center of town.

You need to get to this building before the final Commander arrives & the conversation begins. Obviously this is easier to do at nighttime. There are a few ways to do this: get on the buildings roof, crawl prone as close as you can, & or use your INT Scope to zoom in & pick up what they are saying with the microphone.

The conversation is long, so be sure you are in a good position that won’t get you caught.

Mission Task #5: When the conversation is over, quickly enter into the building with a tranquilizer Pistol, trigger Reflex Mode, & incapacitate all three Commanders for Fulton Extraction. You may need to carefully knock out some Soldiers before you can get inside.

Mission Task #4: With the Commanders taken out, we now need to locate the Soldiers who arrived with them via Four Wheel Drive. There were two Commanders that drove here, each with three Soldiers. If you did not see the Soldiers get out of the Four Wheel Drive… then we cannot confirm or deny that it could be anyone here at Da Wialo Kallai. So… we must knock out all Soldiers in the vicinity of the meeting building.

If you are still hidden, the Soldiers will actually migrate back to the Four Wheel Drives they came in & wait for their Commanders to eventually return to them. This will give them away to us, but we need to be quick in case they drive away.

If you accidentally killed one of them, or this just doesn’t work, then the alternative would be to do a second run of the Mission with D-Horse & intercept the two Vehicles on the roads from Da Shago Kallai & Wakh Sind Barracks.

S Rank: If you were able to pull off all Mission Tasks in a single run, you will most likely earn an S Rank; especially if you killed no one & had no Combat Alerts.

If not, then for the best S Rank run, get to Da Wialo Kallai without being detected/killing anyone & wait for all three Commanders to arrive. When they do, knock them out & Extract them, then Exfiltrate the Mission. Your Mission time plus all the Bonuses should earn you a good Rank.


Mission #8 – Occupation Forces:
Mission Tasks:
1. Secured the Deployment Plans*
2. Eliminated the Colonel*
3. Eliminated all the Tanks*
4. Extracted the Colonel
5. Eliminated the Colonel & all the Tanks before they reached Da Smasei Laman
6. Extracted the Prisoners being held at Qarya Sakhra Ee
7. Extracted all Tanks

This is a fast paced Mission & needs to be done timely if you want to catch the convoy before it reaches Da Smasei Laman. For Extracting the Tanks, be sure to equip the Balloon Fulton & not the Wormhole; the Balloons don’t make the others panic for some reason. Bring wither C-4 or EMN Mines.

Mission Task #1: Deploy near Qarya Sakhra Ee with D-Dog & quickly get to Qarya Sakhra Ee. As soon as you can, Interrogate a Soldier here to learn of the locations for the Deployment Plans.

Mission Task #6: While we are here with D-Dog, we can locate a Prisoner in the same room as the Comms Transmitter near the center of the village.

Mission Tasks #2, 3, 4, 5, 7: Now for the trickiest part. With the locations marked of where the convoy is, we now need to lay down our nonlethal ambush. Do not be afraid to reload a Checkpoint if this goes South.

There will be two Tanks & an APC that we need to Extract on the road. Find a place to hide as close to the road as you can where we have good cover. A little ways down the road from you, place some C4 & lie in wait; alternatively, lay down some EMN Mines. After the convoy is right beside you, detonate the C4 (which should be ahead of them but not under them) to get the convoy to stop. Quickly pop out of cover now & begin Balloon Fultoning Vehicles carefully; if possible Extract the Colonel first as the Tanks won’t carry on making them easy targets.

S Rank: If you did not kill anyone at Qarya Sakhra Ee, got no Combat Alerts, & completed all Mission Tasks in one run you are basically guaranteed S Rank.
Sequence 8: Scorched Earth
1. Missions: [Subsistence] Occupation Forces, Back Up Back Down
2. Mission Tasks: 81/284
3. S Rank: 14/47
4. Side Ops: 136/157
5. Key Items: 13/20
6. Achievements: 32/42
-----------------------------------------------------------------------------------------------------

Mission #49 – [Subsistence] Occupation Forces:
Mission Tasks:
1. Secured the Deployment Plans*
2. Eliminated the Colonel*
3. Eliminated all the Tanks*
4. Extracted the Colonel
5. Eliminated the Colonel & all the Tanks before they reached Da Smasei Laman
6. Extracted the Prisoners being held at Sakhra Ee Village
7. Extracted all Tanks

S Rank: Everything we did in the original Occupation Forces still applies to all Mission Tasks. The twist is that we have no equipment & will not have access to Reflex Mode. Speed is still essential, but so is patience. We will not have D-Dog either so you will have to go off memory where that Prisoner was; I would still Interrogate a Soldier for the Deployment Plans.

This may get messy, so do not worry about killing people. So long as the convoy isn’t alerted, we can do whatever we need to get through Sakhra Ee Village.

When we have the Deployment Plans, we need to set up our ambush. Since we have no C4 or Grenades… we need to get creative or use our own bodies. To be creative, wait until the Colonel’s truck is very close by us & take a shot into the air with a Weapon. If we are still in cover, we won’t get seen, but they will stop. Rush out to Fulton the Truck then rush over to the Tank that passed us to Extract it. That leaves the last Tank which might be a tad further back. Wait for the Tank to catch up, take a shot into the air behind cover, sneak out & Extract it.

If you killed too many people, took too many hits, or retried too many times & did not get S Rank we can shorten this down. Land at the Landing Zone close to Guard Post 7 & begin heading down the road West until you have a good vantage of the road/good cover. Wait for the convoy to get close, fire your shots to stop them, Extract them all.


Mission #9 – Back Up, Back Down:
Mission Tasks:
1. Eliminated an Armored Vehicle*
2. Eliminated multiple fighting Vehicles or Gunships
3. Eliminated all Armored Vehicles without receiving a resupply or Fire Support
4. Secured the Weapon the Transport Truck was carrying
5. Extracted an Armored Vehicle
6. Extracted 4 Soldiers searching for the escaped Prisoner
7. Extracted 6 Prisoners
8. Extracted 3 Tanks

This is one of my least favourite Missions & is quite a pain to complete; it will require multiple playthroughs for us to earn all Mission Tasks. Some equipment you may want is: C-4, ATB-Mines, ENM-Mines, Decoys, & a powerful Rocket Launcher (ideally a CBM). We will also be relying on D-Horse for this Mission. Note that reloading a Checkpoint during this Mission will always put us back at the very beginning of the Mission!

Mission Tasks #1 & #5: For the first run through, we will be focusing on these Mission Tasks. For Mission Task #3, we cannot resupply with a Supply Drop so we need to pack everything in with us. Deploy with D-Horse & any large Vehicle such as an APC, Tank, or Truck; I will explain why soon.

To start, deploy at the North Landing Zone above Yakh Oboo Supply Outpost at night. As soon as we are down, position our Vehicle in the middle of the road facing South. It needs to be facing down the road & not sideways; for whatever reason, Vehicles will not consider it a blockade if it is sideways.

Now, we wait for the APCs to start arriving. All of them will come South to North. For an S Rank, do not get spotted at all; getting spotted by any of the Vehicles will automatically downgrade our Rank to a B or lower. Ignore all other Mission Tasks.

When the first APC arrives around the 12 minute mark, they should stop in front of our Vehicle barricade. Quickly sneak up behind them & Fulton Extract the Vehicle to complete Mission Task #5.

Mission Task #2: It is easiest to Fulton the Vehicles, but so long as we have one, we can now swap to using Mines & C-4 to destroy them so long as our barricade stays intact. The next three APCs will now arrive at: 10:20s, 7:00s, & 6:00s.

A Prisoner in a Four Wheel Drive will come to us driving North to South; you can collect him for more points if you want.

Mission Task #4: After eliminating four APCs, the Truck with our Weapon will come down the road towards us North to South. Stop the Truck & pick up the CBM to complete the Task.

Mission Task #3: The final three APCs will arrive at 4:00s, & at 0:30s. The last two arrive together & with very little time left on the clock. For these two, it is easiest to destroy them with Mines or C-4. When they are destroyed, we will complete this Mission Task if we never received a Supply Drop.

It is imperative that we eliminate all 7 APCs before the timer runs out or the Soviet reinforcements we need to Mission Task #8 will not arrive!

Mission Task #8: Do not Exfiltrate the Hot Zone yet. Stay where we are & eventually Soviet reinforcements will arrive in the form of three Tanks & a Gunship. Do not get spotted by any Tanks or we will be automatically downgraded to a B Rank!

There is no Mission Task for the Gunship, but taking it out will earn us a decent amount of points.

Wait for a little bit, & one of the Tanks will arrive at our blockade from the North. Wait for it to stop, sneak up behind it, & Extract it. Really take your time to sneak up on the Tanks; they will not leave the Mission area so we have all the time in the world to do it properly & not get detected.

For the other two Tanks, you may have to saddle up D-Horse & carefully intercept them. Having Decoys or ENM Mines can be handy for dealing with them.

The two Tanks patrol the roads between Wakh Sind Barracks & Guard Post 8, & Lamar Khaate Palace & Guard Post 12. Lay down a blockade of a Decoy or ENM Mine & wait for the Tank to encounter it to easily Extract them.

S Rank: If you eliminated all 7 APCs, 3 Tanks, & the Gunship we will earn a 160,000 point bonus. Couple that with any other bonuses & you will most certainly earn an S Rank, even if you take a while to complete the Mission… as I did.

I probably restarted this Mission over 10 times…
Sequence 9: No Me Importa
1. Missions: Back Up Back Down, [Extreme] Back Up Back Down, Angel With Broken Wings
2. Mission Tasks: 95/284
3. S Rank: 16/47
4. Side Ops: 136/157
5. Key Items: 13/20
6. Achievements: 32/42
-----------------------------------------------------------------------------------------------------

Mission #9 – Back Up, Back Down: (cont)

Mission Task #7 – Prisoner 1: Play this Mission again; this time will go very differently. Pack some C-4 & a good Rocket Launcher just in case, but our focus will not be on the APCs. We will need to destroy only two them for the purposes of this run through. You can bring D-Horse for mobility or D-Dog to help scent out the Prisoners which I would recommend.

To start, deploy at the Landing Zone South of Guard Post 12. Immediately when we land, start walking North & we can encounter a wandering Prisoner to Extract.

The APCs: With the Prisoner Extracted, I recommend destroying the incoming APC from Lamar Khaate Palace for our first of two APCs. Intercept it on route to Guard Post 12. Once it is destroyed, a new APC will spawn South & begin driving North towards Guard Post 12 on a different Predicted Route. Quickly get over towards the start of a dirt route that leads into a canyon East of our position & get ready to ambush the next APC here. With two destroyed, we will spawn a new Prisoner; we no longer have to worry about the APCs anymore.

Mission Task #6: Once the APCs are destroyed, quickly begin heading down the dirt road into the canyon. Carefully follow the path along, & we will come across a group of 4 Soldiers searching for an escaped Prisoner. Get behind them, & incapacitate/Extract them however you can.

Mission Task #7 – Prisoner 2: On the mountain path where we took down the Soldiers, keep running down it until we catch up with the Prisoner; they will be walking East along the road. This is a time sensitive Prisoner & they will be executed if those Soldiers caught up with them.

Mission Task #7 – Prisoner 3: With two APCs destroyed, we will have spawned our Prisoner being transported by Four Wheel Drive. They will start at the Aabe Shifap Ruins & drive down towards the Hot Zone exit past Wakh Sind Barracks. Intercept them along the road before they leave & Extract the Prisoner.

Mission Task #7 – Prisoner 4: Now we can relax as all time sensitive Tasks are complete. Even when the Rebel Guerrilla operation ends, we can rescue the remaining Prisoners. For the next Prisoner, go to the Wakh Sind Barracks; they can be found in the compound ruins basement prison cell.

Mission Task #7 – Prisoner 5: Backtrack through the canyon path to Lamar Khaate Palace now & we can find the Prisoner locked in one of the prison units North of the palace near the Soldier dorms.

Mission Task #7 – Prisoner 6: Our final Prisoner is another escaped one. From the palace, head North along the road towards the bridge crossing the river North of Guard Post 12. At the bridge, drop down & follow the river along to the West all the way to the dead end where we can find a Prisoner hiding in the grass to the left of the log jam.

Mission 34 – [Extreme] Back Up, Back Down:
Mission Tasks:
1. Eliminated an Armored Vehicle*
2. Eliminated multiple fighting Vehicles or Gunships
3. Eliminated all Armored Vehicles without receiving a resupply or Fire Support
4. Secured the Weapon the Transport Truck was carrying
5. Extracted an Armored Vehicle
6. Extracted 4 Soldiers searching for the escaped Prisoner
7. Extracted 6 Prisoners
8. Extracted 3 Tanks

S Rank + Mission Tasks #1, 2, 3, 4, 5, & 8: Consult the description for Mission #9. The same strategy still stands except this time we will have no Reflex Mode. Since we cannot get spotted by the Vehicles anyways for an S Rank, this does not change much for us.


Mission Tasks #6 & 7: Consult the description above for Mission #9; again, the same strategies still apply except we do not have Reflex Mode. This is more relevant for this run through since we are encountering more Soldiers. If you can remember where all the Prisoners are, bringing Quiet instead of D-Dog can alleviate the Soldier threat.

Prisoner #2 that is escaping through the mountain canyon dies very quickly since the chasing Soldiers have Night Vision Goggles. Speed is of the essence!

Mission #10 – Angel With Broken Wings:
Mission Tasks:
1. Extracted the Mujahideen Prisoner called Malak*
2. Extracted the escort Vehicle (Armored Vehicle)
3. Extracted 3 Prisoners being held at Lamar Khaate Palace
4. Extracted 2 Prisoners being held at Yakho Oboo Supply Outpost
5. Listen to the last conversation between the transport truck driver & Malak

This will be another fast past Mission as the Prisoners at Lamar Khaate will slowly get executed, the Armored Escort Vehicle can leave the area, & we can miss the eavesdrop event. We will do two or three runs of the Mission.

Mission Task #2: For the first run, we will want to try to Extract the APC & rescue the Prisoners at Lamar Khaate Palace. Go to the Landing Zone with D-Dog & quickly rush to the entrance before the convoy leaves with Malak. Approach the convoy from behind, being mindful of the Soldiers, & use a Wormhole Fulton to Extract the APC.

If you need to, you can use Stealth Camo to accomplish this Task.

Mission Task #3: Apprehend Malak, but do not Extract him just yet. Using D-Dog, quickly navigate around Lamar Khaate Palace to Extract the three Prisoners. One Prisoner will be in the locked cell outside the Palace, one will be on the second floor of the Palace, with the final one being on the third floor.

Grab Malak & Exfiltrate out.

S Rank: Shortening the Mission to only Lamar Khaate Palace is a good way to get an S Rank, even if you took a lot of hits/missed. For a quick S Rank, deploy with D-Horse & a good Rocket Launcher. Destroy the escort APC, ride in & steal the Four Wheel Drive with Malak & drive it to our Landing Zone to Exfiltrate.


Mission Task #5: For this run, we need to get to Yakho Oboo Supply Outpost before the convoy does. Deploy with D-Horse, quickly Mark Malak & convoy, & ride to the Supply Outpost. It will take the convoy quite a while to reach it & they will take a few stops along the way. Hunker down outside the South Western wall of the main compound & wait for Malak to be lead inside. Out here, we can hear the final conversation between him & the driver perfectly.

Mission Task #4: Unlike the Prisoners at Lamar Khaate Palace, the ones here will not get executed. We can find them in the prison cells inside the main compound at the Northmost end.
Sequence 10: Black Honey
1. Missions: Hellbound, Pitch Dark, [Total Stealth] Pitch Dark
2. Mission Tasks: 113/284
3. S Rank: 19/47
4. Side Ops: 136/157
5. Key Items: 13/20
6. Achievements: 32/42
-----------------------------------------------------------------------------------------------------

Mission #12 – Hellbound:
Mission Tasks:
1. Make contact with Dr. Emmerich*
2. Extracted Dr. Emmerich*
3. Extracted 3 Walker Gears from the Central Base Camp
4. Extracted Dr. Emmerich without him taking damage
5. Secured the Glamour Model (Vertical) Poster at the Central Base Camp
6. Secured the Blueprint at the Central Base Camp

For this Mission, I recommend taking D-Dog along with you to sniff out any enemies; we need to be as stealthy as possible for a few of these Mission Tasks.

Mission Task #6: To start, exit Serak Power Plant & make your way over to the Afghanistan Central Base Camp. Without putting the base on alert, go to the bunker in the center of the base across from the bridge. We can enter into the bunker through doors along its sides. Inside, look for the Blueprint on one of the shelves.

Mission Task #5: Next, we need to collect the Glamour Poster. It can be found inside the garage located in between the bunker Huey is in & the ruined bunker at the West side of the base. Enter the garage & we can find this scandalous Poster right beside one of the doorways on the wall.

Mission Task #3: Now we have to carefully Extract the three Walker Gears patrolling around. Follow them, & either pull off a risky Headshot on them or hit them in the back or legs with a tranquilizer & wait for them to fall asleep. Do this undetected if you can, as trying to subdue a Walker Gear without destroying it would be very challenging.

Mission Task #4: Once we have Huey, it is time for us to escape. Simply get to the Helicopter without being spotted, & in turn, not taking any damage. Just be sure to take out the Soldiers firing at the Helicopter once it arrives.

When we need to evade Sahelanthropus, quickly get in behind some rocks & navigate to the bottom of the Hot Zone to hide. Once you find some good rocks, stay there & wait for Sahelanthropus to walk away; he will always return to the area around the first Landing Zone. Move the Helicopter to the second Landing Zone to escape.

S Rank: For S Ran, skip all the Cutscenes, & get to Huey as fast/stealthily as possible. When you have Huey, get him to the Helicopter without him taking damage for a boost. When we are in the Helicopter, try not to blindly fire the Gatling Gun as it will drastically reduce our Accuracy rating.


Mission #13 – Pitch Dark:
Mission Tasks:
1. Shut down the oil transfer pump*
2. Destroy the oily water separator tank*
3. Extracted 4 Child Soldiers being trained at Masa Village
4. Exfiltrate the Hot Zone before Mfinda Oilfield was sealed off
5. Extracted the Lappet-Faced Vulture that wandered into the burned-down village
6. Extracted 4 Walker Gears sealing off Mfinda Oilfield

For this Mission, we will need to complete two playthroughs, though we should be able to earn an S-Rank during one of the two of them. You will want to play this Mission at night, bring C-4, & D-Dog.

Mission Task #3: When the Mission begins, make your way to Bwala ya Masa to locate & Extract the four Child Soldiers. Their location will vary if it is daytime or nighttime. If it is night, they will be asleep in a building making neutralization much easier. If it is daytime, they will be out running a training drill near the center of the village; there will be other Soldiers around so this greatly increases our risk of detection. We cannot take too long as they will eventually leave the Mission area.

Mission Task #5: In case you never Extracted it during Part 1 of this guide, exit Bwala ya Masa & head along the North road leading to Mfinda Oilfield. Just before reaching it, we will enter the remnants of a burnt down village where a lone Lappet-Faced Vulture will be flying around; Extract it.

Mission Task #4: Enter Mfinda Oilfield & place some C-4 on the oily water separator & go to turn off the oil transfer pump. Detonate the C-4 & locate a Materials Container in Mfinda & Fulton Extract it/Extract yourself using it for the fastest Exfiltration method.

S Rank: We have quite a bit of lee-way on this Mission for our S-Rank as you can see from my terrible score (I assumed it was a bust).


Mission Task #6: When you are not in a hurry to leave Mfinda Oilfield after the main Tasks are completed, there will be four Walker Gears that will arrive in groups of two at either entrance. Dispatch their drivers & Extract the Walkers to complete the Task.

Mission #44 – [Total Stealth] Pitch Dark :
Mission Tasks:
1. Shut down the oil transfer pump*
2. Destroy the oily water separator tank*
3. Extracted 4 Child Soldiers being trained at Masa Village
4. Exfiltrate the Hot Zone before Mfinda Oilfield was sealed off
5. Extracted the Lappet-Faced Vulture that wandered into the burned-down village
6. Extracted 4 Walker Gears sealing off Mfinda Oilfield

S-Rank + Mission Tasks #3, 4, 5: The same rules for the original Pitch Dark Mission apply for this one except that it is mandatory to complete this at night. We cannot be detected at all or it is game over; if your time is still good, you can probably continue from the odd Checkpoint to still earn S-Rank. Since stealth is paramount for the Mission, I highly recommend bringing your best silenced Sniper Rifle for eliminating enemies at range.


Mission Task #6: Since Rank is no longer an issue, take your time with this Mission in setting up the final moments after both objectives are sabotaged. Either use a Sniper Rifle at range to carefully pick off the drivers or use Sleep Grenades to knock them out.
Sequence 11: Tour De Franca
1. Missions: Lingua Franca
2. Mission Tasks: 120/284
3. S Rank: 20/47
4. Side Ops: 136/157
5. Key Items: 13/20
6. Achievements: 32/42
-----------------------------------------------------------------------------------------------------

Mission #14 – Lingua Franca:
Mission Tasks:
1. Identified the Afrikaans Interpreter*
2. Identified the Viscount*
3. Extracted the Viscount*
4. Pinpointed the locations of the 4 Prisoners from an Intel File
5. Extracted 3 Prisoners being held at Kiziba Camp
6. Extracted a Materials Container from Kiziba Camp
7. Listened to all 4 Prisoners' interrogations

There is a lot going on with this Mission. It will take two runs for all Mission Tasks & for S Rank. This Mission is best done at night as we will be in amongst enemies for the majority of the time; be sure to have the Wormhole Fulton equipped & bring D-Dog to more easily locate enemies & Prisoners. Bring Phantom Cigars as well!

It should be noted that this Mission is super glitchy in the sense that if the pathing of the Interpreter & his bodyguard are interrupted at all in anyway, it will prevent you from hearing some of the Interrogations. Leave no bodies behind to be discovered! Do not attempt S Rank in the same run & do not be afraid to reload Checkpoints!

Mission Task #7 – Interrogation 1: Begin the Mission at the South Western most Landing Zone at nightfall. As soon as we drop out of the Helicopter, immediately begin sprinting Northward, towards our Mission Waypoint. As we run, a 4 Wheel Drive will be transporting the first Prisoner to the Interpreter.

Get to the outside of Kiziba where the vehicle stops, & the Prisoner will be walked to the Interpreter where they will have a conversation. You need to get into position with your INT Scope to listen in on this conversation before it begins to overhear the full first Interrogation.

Mission Task #7 – Interrogation 2: When this brief conversation is finished, they will all begin walking away; the Prisoner will be taken off in a different direction. Do not interfere with this Prisoner or the Soldier with him!

Instead, tail the Interpreter & his bodyguard as they walk to the next Interrogation scene. Follow them down the road to reach the next Prisoner & a Soldier watching him. Get into position, as close as you can ideally, & overhear the Interrogation before it begins with the INT Scope or by being close enough.

Mission Task #5 – Prisoner 1: The Interpreter will leave & get in a 4 Wheel Drive nearby to drive to the center of Kiziba Camp for the next two Interrogations. In that time, we need to quickly/carefully take out the Soldier nearby & Fulton this first Prisoner.

Mission Task #7 – Interrogation 3-4: As soon as the Prisoner is Extracted, sprint after the Interpreter & carefully get to the upper South Western end of the Kizaba Camp; on the hills above where the large central building is found (Extracting the previous Prisoner will Mark the location of the next ones for us). If you get to the hill fast enough, be sure to dispatch the patrolling Soldier up here near the tent & Anti Air Radar so we will not get discovered.

Once again, get into position carefully to overhear the Interrogations of the two Prisoners here.

Mission Task #5 – Prisoner 2-3: Now this is where it gets very tricky. We now need to Extract these two Prisoners without being discovered or interrupting the Interpreter at all; we cannot generate an Alert status at all. But if we wait too long before acting, the Prisoners will get executed.

As tempting as it is, do not shut off the Power Generator to turn off the lights as this will trigger a potential Alert status. Shooting the nearby lights is possible, but also very risky.

Once the Interpreter & the officer are far enough away, quickly Tranquilize or kill the Soldiers around the Prisoners. If they were not startled & continued into the central building, then you are good. With D-Dog, you should know where all the Soldiers are nearby & if they come to investigate you need to quickly take them out before they use their radios.

Take your time, take out Soldiers when necessary, then Wormhole Fulton everyone to get rid of the evidence. With these two Prisoners Extracted, as well as the first one, we will complete the Mission Task.

Mission Task #4: If the Interpreter was not Alerted, him & the officer will leave the central building after an hour or so (in game). Quickly finish Fultoning whoever is left from your cleanup, & quickly/carefully, sneak inside the central building to find the Intel File.

Once it is scanned, (skip the cutscene) we can find the location of where the Viscount is.

Mission Task #6: As the Interpreter begins walking away towards the final Interrogation location, we have a bit of time to complete this Mission Task as they will manually walk there. Just North of the central building, we can spot two Materials Containers; quickly Wormhole Extract them & continue following the Interpreter. Do not get detected while doing this.

Keep following them into the other half of Kiziba Camp where we can find the final two Materials Containers in the center of the area; you will want to dispatch the Soldier manning a spotlight on a watchtower overlooking them.

Be careful when Extracting the second two Materials Containers as they are on the path that the Viscount will take to get to the Interrogation location; you cannot get within 30m of the Viscount or he will collapse to the ground & will never get back up to walk to the Interrogation location which will void the Mission Task; reload the Checkpoint if this happens.

Mission Task #7 – Interrogation 5: With the Materials Containers dealt with, regroup with the Interpreter & continue following them to the Interrogation site. The Viscount will arrive there first, but it will not begin until the Interpreter arrives. It is safest just sticking behind the Interpreter to get there; once the two groups link up near the Interrogation house, it is safe to get closer & move in.
Once you arrive, like always, get in position close by to overhear the final Interrogation. If you did this correctly, we will complete the Mission Task after the Interrogation ends.

Mission Task #3: Now, bust inside the building where the Viscount & Interpreter are, knock the guy out & Extract everyone inside to complete the Primary Objective & this Mission Task.

Exfiltrate to complete the Mission.

S-Rank: Due to how long we took & potentially other reasons, it is unlikely you got an S Rank. To easily earn one, redeploy during the daytime with a Four Wheel Drive & D-Dog. Drive your way to the far Northmost end of Kiziba Camp while evading detection from enemies; you really have to swing wide of Kiziba Camp as there are many patrolling Soldiers in the outer area.

Drive up to the far North Eastern end of Kiziba Camp, beyond it entirely, towards the road the is at the North Eastern end of the Mission boundaries. Here, we can spot a Soldier & the Viscount past some small shacks underneath an open metal shelter. Dispatch the Soldier, Extract the Viscount, then quickly drive out of the Mission area to Exfiltrate under 5:00 minutes.
Sequence 12: I'm Mr. Stealy
1. Missions: Footprint of Phantoms, [Total Stealth] Footprints of Phantoms
2. Mission Tasks: 130/284
3. S Rank: 22/47
4. Side Ops: 136/157
5. Key Items: 13/20
6. Achievements: 33/42
-----------------------------------------------------------------------------------------------------

Mission #15 – Footprints of Phantoms:
Mission Tasks:
1. Eliminate all Walker Gears*
2. Extracted 2 Prisoners being held at Ditadi Abandoned Village
3. Extracted all Walker Gears
4. Picked a Digitalis (Lutea) at Ditadi Abandoned Village
5. Extracted a Truck from Ditadi Abandoned Village

For this Mission, deploy at night & bring Quiet with her best Guilty Butterfly rifle so that it is a Supressed Tranquilizer. For yourself, just standard Black Ocelot camo & regular Weaponry is fine. Quiet does all heavy lifting on this Mission & you can earn an S Rank in one playthrough if you do not kill anyone or get detected.

Mission Task #4: When we deploy, get Quiet to scout Ditadi Abandoned Village while we make our way around the far East side of the area. Above the village, is a massive rock formation. Go behind it, East side, & at its base before we can start climbing up the rock for a vantage we can find a Digitalis (Lutea). It will get marked on our map when we get close to it.

Mission Task #3: After the plant is secured, order Quiet to begin Neutralizing all the Soldiers in the area; her detection does not void ours. While this happens, drop below the rock formation on the West side where we can find the Walker Gears. Wait for Quiet to dispatch the nearby Soldiers, or help her out yourself to clear the area, then Fulton Extract all four Walker Gears to complete the Mission Task.

Mission Task #2: Though the Mission is technically completed, we have two other Mission Tasks to finish first. There are two Prisoners we need to Extract in Ditadi.

One of the Prisoners can be found inside a tent in the same area below the rock formation where all the Walker Gears were. The other Prisoner can be found in the center of the village in a burnt-out building.

Ideally, Quiet located them both during her Scout of Ditadi.

Mission Task #5: Another thing Quiet hopefully identified during her Scout, was the Truck. The Truck we need to Extract is located at the road junction at the South Western end of Ditadi.

Once the Truck is Extracted, Exfiltrate to complete the Mission; you can use it to drive to the Helicopter Landing Zone if you want so long as it is Extracted before you leave.

S Rank: If you did not earn an S Rank on your first run, do the exact same strategy but this time solely work towards Extracting the Walker Gears & waste no other time. Do not get detected or kill anyone with Quiet taking care of the Soldiers.


Mission #36 – [Total Stealth] Footprints of Phantoms:
Mission Tasks:
1. Eliminate all Walker Gears*
2. Extracted 2 Prisoners being held at Ditadi Abandoned Village
3. Extracted all Walker Gears
4. Picked a Digitalis (Lutea) at Ditadi Abandoned Village
5. Extracted a Truck from Ditadi Abandoned Village

S Rank + All Tasks: This Mission will play out identically to the previous version of it & we can use the exact same strategies as before. Get Quiet to do all the work while you Extract what is needed. The only difference in loadouts is that I do highly recommend that Quiet is equipped with the Sinful Butterfly this time instead.

The Soldiers will be much more well equipped & may have Riot Suits; Quiet can still handle it, but it will take a bit longer so be careful & patient. Remember that our Tasks have nothing to do with Soldiers, so once they are all complete, get out of there.

Use a second run through if you need to for S Rank.


Mother Base:


Achievement #33 – Architect: Construct all available Platforms for Mother Base.
For this Achievement, we need to get all 7 Platforms to Level 4. These Platforms are: Command, Combat Unit, R&D, Base Development, Support, Intel, & Medical; your FOBs do not contribute to the Achievement.

If you need more Materials (mainly Fuel Resources) consider completing Online Combat Deployments to obtain more. You can also use any of your obtained PF Points earned through your PF Grade – Weekly League to purchase Fuel Resources.
Sequence 13: Kiss the Coals
1. Missions: Traitors’ Caravan, [Extreme] Traitors’ Caravan
2. Mission Tasks: 146/284
3. S Rank: 24/47
4. Side Ops: 136/157
5. Key Items: 13/20
6. Achievements: 33/42
-----------------------------------------------------------------------------------------------------

Mission #16 – Traitors’ Caravan:
Mission Tasks:
1. Identified the escort unit (Armored Vehicle)*
2. Identified the Transport Truck*
3. Extracted the Transport Truck*
4. Eliminated the Skulls
5. Extracted the Transport Truck driver
6. Pinpoint the escort unit's estimated route from an Intel File
7. Listened to all the conversations between transport truck driver & outpost/Guard Post Soldiers
8. Extracted 3 Zero Risk Security Soldiers

This Mission will most likely require two playthroughs to complete the Mission Tasks & earn an S Rank. For our full Mission Task run through, we need to be prepared for Mission Task #4 to take on the Skulls. Be sure to bring your best Launcher, some explosives, & wear your best Battle Dress for the most armor. It is also good to bring Quiet along equipped with the Sinful Butterfly.

Mission Task #6: There is only one Landing Zone to deploy from; begin the Mission at night. As soon as the Mission begins, make your way over to Guard Post 14 as fast as you can; get Quiet to clear it out if you don’t want to be detected.

Enter inside one of the tents located here (the one with the barrel fire beside it) & we can find the Intel File.

Mission Task #7 – Conversation 1: With the Intel File collected, we now need to sprint as fast as we can to Nova Braga Airport. As we go, get Quiet to Scout the area out; make sure she is not hostile & will not start shooting Soldiers when she is done! The areas cannot be under Alert, or the Conversations will not happen…

The Transport Truck is located at the Western end of the airport on the other side of the terminal building. You need to get there before the Armored Vehicle escort arrives. If you miss the conversation, make sure to Mark everyone you can then reload your last Checkpoint to get there sooner; reload the Mission if you must.

When the escort arrives, you need to make sure you have a good view of the Truck & are close by to look into the garage behind the Truck. Shorty after the escort arrives, a CFA Soldier will speak with a Zero Risk Soldier about what is inside the Truck; this is the first conversation we can eavesdrop on using the INT Scope.

Do not get close to the Truck or else you will spring the Skulls inside it!

Mission Task #7 – Conversation 2: The next conversation is going to take place at Guard Post 12. Get to the Guard Post before the convoy & stake out close to the road where you get a good vantage point to use the INT Scope to eavesdrop; I had an issue triggering this conversation, if the driver gets out of the Truck but doesn’t speak to anyone, try getting a little closer.

Mission Task #7 – Conversation 3: The final conversation will take place at the Kiziba Camp. After the previous conversation, sprint to the Kiziba Camp as fast as you can to get into position near the camp’s South Eastern end; get Quiet to Scout the camp out as well.

The convoy will arrive & stop in the middle of the Southern/central area of Kiziba Camp & the driver will exit the Truck to speak with a nearby Soldier. After the conversation, we will hear from CFA CP over the radio, & when they finish we will complete the Mission Task.

Mission Task #4: With all the Conversations done, see if you can snipe the Zero Risk Truck Driver with a tranq. & knock them unconscious; we need to Extract them for Mission Task #5.

If you cannot manage it in time, you need to get close to the Truck to spring the Skulls out of the back of it. All Soldier in the area will become Wandering Puppets; again if you can, knock out all Zero Risk Soldiers (& Truck driver) unconscious before we begin fighting the Skulls.

When ready, engage Quiet & kill the Skulls; there are 4 Skulls we need to defeat.

Mission Task #5: Once the Skulls are eliminated, & you were sure to knock out the Truck Driver before or after they turned into a Wandering Puppet, go over & Extract them. If you are Quiet killed them than you will have to reload…

Mission Task #8: Before we complete the Mission, quickly sprint down South towards a T-junction in the road in between Nova Braga Airport & Guard Post 12. Here we can find four unconscious Zero Risk Soldiers near a Four Wheel Drive; Extract at least two of them to complete the Mission Task.

S Rank: If you did not earn an S Rank earning all Mission Tasks, bring the exact same setup as well as Quiet to earn an S Rank. As soon we deploy, sprint down to Nova Braga Airport & get to the Transport Truck.

Before the armored escort can even arrive, knock out all Zero Risk Soldiers near the Truck (at least three), & Extract as many as you can without triggering the Skulls. When the Skulls arrive, Extract the Truck, the Truck Driver, & at least two more Zero Risk Soldiers.

When everything is Extracted, run South through Nova Braga until you find some Materials Crates near the front entrance. Climb on top of one & Fulton Exfiltrate to complete the Mission.


Mission #37 – [Extreme] Traitors’ Caravan:
Mission Tasks:
1. Identified the escort unit (Armored Vehicle)*
2. Identified the Transport Truck*
3. Extracted the Transport Truck*
4. Eliminated the Skulls
5. Extracted the Transport Truck driver
6. Pinpoint the escort unit's estimated route from an Intel File
7. Listened to all the conversations between transport truck driver & outpost/Guard Post Soldiers
8. Extracted 3 Zero Risk Security Soldiers

S Rank + Mission Tasks: This Mission will play out identically to the regular version.
Sequence 14: Breathe In Smoke
1. Missions: Rescue the Intel Agents, Blood Runs Deep
2. Mission Tasks: 160/284
3. S Rank: 26/47
4. Side Ops: 136/157
5. Key Items: 13/20
6. Achievements: 33/42
-----------------------------------------------------------------------------------------------------

Mission #17 – Rescue the Intel Agents:
Mission Tasks:
1. Extracted the Intel Team member escaping through the forest to the North of the camp*
2. Extracted the Intel Team member being held at Kiziba Camp*
3. Extracted 2 CFA officials
4. Extracted Prisoner being held at Kiziba Camp
5. Extracted 4 search team reinforcements
6. Extracted the Transport Truck driver

For this Mission we will want to bring our best stealth loadout & D-Dog. S Rank & all Mission Tasks will require two separate playthroughs to complete. It is best to deploy at night…

Mission Task #5: To start, deploy at the Northmost Landing Zone above Guard Post 1. Rush down to Guard Post 1 at its Southern end to find two Four Wheel Drives with Soldiers getting into/or near them. You need to quickly dispatch & Extract these Soldiers before they get away; the first Four Wheel Drive will have three Soldiers in it while the second will have only one Soldier.

Mission Task #6: Shortly after the Four Wheel Drives go to leave Guard Post 1, & you hopefully Extracted them, a Truck will arrive at Guard Post 1 & stop. If you were quick enough & saw who drove it, track them down & Extract them. Otherwise, wait for them to return to the Truck before stopping them.

Mission Task #4: We can find a Prisoner in a building at the Northern end of Kizaba Camp close to the trenches where the escaped Intel Agent is found. The building is the Southmost building… at the North end if that makes sense? D-Dog will have no trouble finding him…

Mission Task #3 – CFA Official 1: One of our two CFA Officials can be found guarding the Prisoner; they are plain Soldiers wearing a Balaclava. Be sure to knock them out & Extract them.

Mission Task #3 – CFA Official 2: To get the other CFA Official to appear in front of us, we need to Extract one of the two Intel Agents for our Main Objective. Choose either one (I recommend the one that has escaped since it is slightly time sensitive), then make your way to the central building found at the Southern end of Kiziba Camp.

Once there, quickly go to the next Intel Agent here to rescue & take them into the hills nearby to keep them safe. Do not Extract them by Helicopter just yet however & stash them somewhere to return back to Kiziba Camp.

Both CFA Officials can be found around Kiziba Camp (like the one we already Extracted) but they will both group together after an Agent is Extracted making finding them easier. If one has been Extracted, than only the other Official will arrive.

When he arrives, tail him & knock him out for Extraction.

S Rank: For S Rank, deploy with D-Dog & a Four Wheel Drive. Drive down to where the escaped Intel Agent is & Wormhole Extract them. Return to your Four Wheel Drive & drive carefully around Kiziba Camp to the far side above where the second Intel Agent is. Pop down & carry him to the Four Wheel Drive then head to our Helicopter for Extraction.


Mission #18 – Blood Runs Deep:
Mission Tasks:
1. Eliminated the former rebel Mbele Soldier*
2. Eliminated the 5 Prisoners being held at Kungenga Mine*
3. Extracted the Child Prisoner(s)*
4. Extracted the former rebel Mbele Soldier
5. Complete the Mission by Extracting 5 Child Soldiers without the enemy discovering their escape
6. Eliminated the Gunship
7. Extracted 5 Snipers from areas near Kungenga Mine
8. Extracted 3 Armored Vehicles

Once again, there is a lot going on with this Mission & it will most likely require two runs of it to complete all Mission Tasks & earn S Rank. Equip good stealth equipment & be sure to bring your best Launcher as well as EMN-Mines.

We will want to bring D-Dog along with us too. We can earn S Rank in the same run if you maintain your stealth…

Mission Task #8 – Armored Vehicle 1: When we deploy at our only Landing Zone, make your way South down to Guard Post 9. The Armored Vehicle will be driving North towards Guard Post 9 then take the road leading out of it to the North East; lay down an EMN-Mine & wait for it; Extract it.

Mission Task #4: Now make your way over to the Bampeve Plantation. Carefully scan around the area until you locate the Soldier who is wearing a white shirt & blue beret; they are typically found at the far back North end of the base. Once you locate them, carefully knock them out & Extract them.

Mission Task #8 – Armored Vehicle 2-3: Now make your way over to the outside of Guard Post 7. When we arrive… wait. If you are careful enough, consider stealthily eliminated the Soldiers found here so we can make a good ambush for the vehicles.

Eventually, an Armored Vehicle will drive into Guard Post 7 from the West having gone through Bampeve Plantation. It will drive to the junction above the Guard Post, stop briefly, & then turn around to drive back to the plantation.

The second Armored Vehicle will arrive from the South driving Northwards, in between Guard Post 7 & Guard Post 13.

Mission Task #7 – Snipers 1-3: With the Armored Vehicles taken care of, make your way North past Kungenga Mine towards Guard Post 2. Head past the Guard Post to the forested area found South East of it & we can locate three Snipers with the help of D-Dog here; Extract them.

Mission Task #6: Taking out the Gunship is a moment of opportunity. Whenever the Gunship is nearby, & there is no one around, take some silenced pot shots at it using your Rifle to draw its attention. When it swivels around to fire at your last known position, crawl out of the way & wait for it to hover on the spot before launching a rocket at it to destroy it.

Mission Task #5: Now make your way into Kungenga Mine & get to the cavernous prison where the Child Soldiers are held. Fulton Extract the injured Child, then quickly/carefully use a Tranquilizer Weapon to knock out the other four Children & Extract them too; this is the easiest method for this Mission Task. Can’t be discovered if they were never there…

Mission Task #7 – Snipers 4-6: Our final three Snipers can be found down at the South end of the canyon leading out of Kungenga Mine where our Landing Zone is. Head South East along the plateau all the way to where the creek is located running East towards the Ngumba Industrial Zone; we can find the Snipers along the canyon leading towards it.

S Rank: If you did not earn an S Rank, redeploy & quickly kill the former Mblele Soldier quickly/quietly. Then get to Kungenga Mines & Fulton Extract all Child Solders, knocking out those you need to (each one rescued will give you 5000 Points).

When they are rescued, exit the prisons & locate a Materials Container nearby to Exfiltrate with.
Sequence 15: They're Pulling Me Under
1. Missions: On the Trail, Voices
2. Mission Tasks: 173/284
3. S Rank: 28/47
4. Side Ops: 136/157
5. Key Items: 13/20
6. Achievements: 33/42
-----------------------------------------------------------------------------------------------------

Mission #19 – On The Trail:
Mission Tasks:
1. Identified the subordinate of the PF commander, the Major*
2. Identified the PF commander, the Major*
3. Eliminated the PF commander, the Major*
4. Extracted the PF commander, the Major
5. Extracted the subordinate of the PF commander, the Major
6. Extracted the Prisoner being held at Munoko Ya Nioka Station, Guard Post 16
7. Listened to the conversation between the PF commander (the Major) & his subordinate

For this Mission, we will want to deploy at night, with good stealth gear, D-Dog, & a Four Wheel Drive. There is a Gunship prowling around, but if this is done at night it is easy enough to avoid; we are not required to destroy it.

Mission Task #6: Choose the Landing Zone that is to the North East of Guard Post 15 & as soon as we deploy, begin driving towards Guard Post 16; ignore your primary objective to go to Guard Post 15. We can locate the Prisoner we need at the South Eastern most building close to the road leading up to Guard Post 13; with D-Dog, locating the Prisoner is trivial. Find them & Extract them to safety; try not to put the Guard Post on Alert or else it may interfere with Mission progression.

Mission Task #1+3: With the Prisoner rescued, quickly return to your Vehicle & begin driving up the road North towards Guard Post 13. Drive up the road North of the Guard Post now towards Guard Post 13. As we are a little past halfway to the Guard Post, we can find the Major & his men down a side passage off the road’s right; D-Dog will begin Marking them when you get close so you know.

Once here, get out & wait on top of the nearby hills to survey the area, Marking the Major while at it. Wait for the Subordinate to arrive & then Mark him as well; he will take a pit stop in Guard Post 16 so be patient.

Mission Task #7: When the Subordinate arrives, listen in on their conversation with our INT Scope to complete the Mission Task.

Mission Task #4-5: With everything done prior, quickly incapacitate the two targets & incapacitate or eliminate the other Soldiers around; Extract both targets.

S Rank: S Rank is super simple to accomplish. Redeploy & this time head straight to the Major’s location. Knock him out, along with his nearby Soldiers (try not to kill anyone), Extract him, then drive out of the Hot Zone.


Mission #20 – Voices:
Mission Tasks:
1. Extracted Shabani*
2. Successfully hit the Floating Boy with an attack
3. Fought off the Man On Fire
4. Pinpointed route to Ngumba Industrial Zone, West Guard Post from an Intel File
5. Extracted an African Wild Dog near the Ngumba Industrial Zone, West Guard Post
6. Listened to the conversation about "the bodies at Munoko ya Nioka Station

For this Mission, we will deploy at night in our best stealth gear with D-Dog to help us locate enemies. You may potentially want to pack Stealth Camo along for the first Mission Task…

Mission Task #6 – Part 1: As soon as the Mission begins, we need to quickly get to the opposite side of Munko Ya Nioka Station. We cannot Alert any Soldiers or leave a single trace of our presence or we will void the conversation from occurring.

We need to get out the backside of the station by picking the locked gate without being detected, then very carefully when the spotlight isn’t fixed on it, climb into the back of the parked Transport Truck. Wait in the back of the Truck & a Soldier will come running down the road before getting in the Truck & driving away. While in the Truck, obviously, remain prone & enter into a fully flattened position right behind the Truck’s gate to be the most hidden.

Mission Task #4: The Truck will drive to Guard Post 20, where the driver will climb out for a brief conversation (not associated with a Mission Task) before getting back in to drive further North. When we stop at the Guard Post 20, quickly/carefully leave the back of the Truck & make your way towards a tent at the far North Eastern end of the Guard Post (not the one beside the watchtower) to find an Intel File.

Mission Task #6 – Part 2: With the Intel File collected, quickly return to the Truck & climb in back before the driver finishes his conversation. When he does, he will return to continue driving the Truck to Guard Post 17. When we arrive, quickly exit the Truck & use the cliffs to the right of the main gate to get past it so we do not have to pick the lock.

The driver will begin following the path down towards the river & make his way to Guard Post 17 in the Valley of Mist. Once there, he will make his way to the far end of the Guard Post & up the hill to the command tent where he will have a conversation with an officer. Out of the three conversations this Soldier has, this is the only one required for our Mission Task.

Mission Task #5: Before we carry on, if you have not already done so, take a side path at the top of Guard Post 17 near the command tent & we can come across two African Wild Dogs that we can Extract; two more can be found across the river from the lower portion of the Guard Post.

Mission Task #2: Now, progress through the Mission to Ngumba Industrial Zone & Extract Shabani. When we go to leave, we will be intercepted by the Man On Fire. Lure him under a water tower & destroy it so that he is doused in water & incapacitated for a few seconds.

When this happens, the Floating Boy will appear. As soon as he appears, begin shooting at him & he will dodge our shots. We need to make him dodge our shots 20-25 times; you will need to use the other water tower to incapacitate the Man On Fire to accumulate this many shots.

After he has dodged the required times, one of our bullets will strike him, completing the Mission Task.

Mission Task #3: As soon as we drive off the Floating Boy, run up to the Man On Fire & Fulton Extract them to complete the Mission Task.

Exfiltrate the Mission; if you were able to get the Perfect Stealth bonus for the Mission you should earn S Rank.

S Rank: If you were not able to get S Rank, redo the Mission & drive (or use D-Horse) to get over to the other side of Munoko Ya Nioka Station via the pass through Guard Post 16 & 20. Then carefully make your way along the river through the Valley of Mist, past Guard Post 17, & Extract Shabani.

With that done, complete the Man On Fire fight as we did previously by incapacitating him with the water towers. Only this time, immediately Fulton Extract him using a Wormhole to end the fight early.

Exfiltrate through the cave to complete the Mission.
Sequence 16: Here I Am, Send Me
1. Missions: The War Economy, [Total Stealth] The War Economy , Retake the Platform
2. Mission Tasks: 190/284
3. S Rank: 30/47
4. Side Ops: 136/157
5. Key Items: 13/20
6. Achievements: 33/42
-----------------------------------------------------------------------------------------------------

Mission #21 – The War Economy:
Mission Tasks:
1. Identified the Arms Dealer*
2. Identified the CFA Official*
3. Eliminated the CFA Official*
4. Extracted the CFA Official
5. Extracted the Arms Dealer
6. Listened to all 4 conversations between the Arms Dealer & the CFA Official
7. Secured the Blueprint the Gunship was carrying
8. Extracted the 3 Materials Container inside the Nova Braga Airport hangar

For this Mission we want a total stealth build, D-Dog, & our best Launcher to dispatch a Gunship with. As always deploy at night.

Mission Tasks #1-2: As soon as we deploy, we need to get to the main terminal in Nova Braga Airport. Quickly/carefully get across the tarmac to the Northern entrance to the terminal without being detected. Swing wide around the hangars on your approach to avoid most of the Soldiers & Walker Gears. As we approach the North side of the terminal, head up the nearby stairs to the second floor & carefully enter inside.

We can find the CFA Official beside the Comms Equipment in this room, pacing around. Find a safe place to hide & wait for the Arms Dealer to arrive in their Gunship. They will then come down the stairs to enter this same room to speak with the CFA Official.

Mission Task #6 – Conversation 1: Our first conversation takes place inside the terminal on the second floor where the CFA Official is waiting.

Mission Task #6 – Conversation 2: After their first conversation, the Arms Dealer & CFA Official will leave the terminal & begin walking North towards a hangar where a Transport Truck is waiting for them. The two will approach the hangar very slowly giving us the opportunity to approach from the back. As soon as they descend the terminal stairs, follow down behind them & get to the hangar as quick as you can to climb into the back of the Transport Truck to wait for them to have their next conversation close by.

Mission Task #6 – Conversation 3: After the second conversation, the two will climb into the Transport Truck & begin driving down to the Southern hangar for an inspection where the third conversation will commence.

There are three Precious Metals Containers in this hangar, we will need to Extract them for another Mission Task so remember this location… do not exit the back of the Truck!

Mission Task #6 – Conversation 4: With the third conversation done, they will re-enter the Truck to drive back to the terminal building. Wait for the pair to walk up the stairs to enter the building, then exit the back of the Truck to quickly follow them up. They will have the final conversation back at the Comms Equipment where this whole tailing escapade first began…

Mission Tasks #3-5: When the conversation ends, & we complete Mission Task #6, quickly move up & incapacitate the two for Extraction. If you want to remain undetected, you can move the bodies elsewhere before Fultoning them, otherwise, Wormhole Fulton them on the spot.

While the conversation is happening, swap out D-Dog for Quiet as we will definitely need her for what is coming…

Mission Task #7: Now for the climax. At this moment, if you were undetected when Extracting the two targets, the Gunship will be hovering on top of the roof waiting for them to arrive. Carefully get to the roof & use our Launcher to destroy the Gunship. Run up to where it was wrecked to find a Blueprint in its place; at this point, get Quiet to begin Cover Fire to distract all the nearby Soldiers.
Alternatively, we can lure the Gunship away from Nova Braga Airport by hitting it with silenced rifle rounds before we destroy it.

Mission Task #8: Before we Exfiltrate the Mission, quickly exit the terminal building before discovery, & return to the Southern hangar where conversation three took place to Extract all of the Precious Metals Containers here.

S Rank: To earn an S Rank easily, deploy with Quiet & your best Silenced Rifle at night. As soon as you land, get Quiet to Scout the airport before beginning to Cover Fire & create a diversion while also eliminating Soldiers. In the chaos, get to the terminal & enter inside to eliminate the CFA Official. Exit the terminal & either Exfiltrate via Materials Container or Helicopter.


Mission #47 – [Total Stealth] The War Economy:
Mission Tasks:
1. Identified the Arms Dealer*
2. Identified the CFA Official*
3. Eliminated the CFA Official*
4. Extracted the CFA Official
5. Extracted the Arms Dealer
6. Listened to all 4 conversations between the Arms Dealer & the CFA Official
7. Secured the Blueprint the Gunship was carrying
8. Extracted the 3 Materials Container inside the Nova Braga Airport hangar

S Rank + Mission Tasks: All the same tactics apply to this Mission as we used during the regular version. The hardest part is that detection will essentially fail the entire Mission making us restart the whole thing. Be extra diligent in Marking any & all Soldiers you come across for the whole Mission.

Note that the 3 Materials Containers in the Southern hangar will not have respawned for us yet. Before we complete our second run of this Mission, quickly replay short Missions like Mission 4 – C2W 2-3 times to respawn the Materials Containers.


Mission #22 – Retake the Platform:
Mission Tasks:
1. Eliminated the enemy Commander*

We will have already completed the Mission Tasks for this Mission since there is only one & it is mandatory; there is no Ranking for this Mission either…
Sequence 17: Kidnapper
1. Missions: The White Mamba, Close Contact
2. Mission Tasks: 203/284
3. S Rank: 32/47
4. Side Ops: 136/157
5. Key Items: 13/20
6. Achievements: 33/42
-----------------------------------------------------------------------------------------------------

Mission 23 – The White Mamba:
Mission Tasks:
1. Extracted The White Mamba*
2. Extracted the Prisoner being held at Masa Village
3. Extract the White Mamba without giving him the opportunity to resist
4. Secure the Rough Diamonds hidden near Masa Village
5. Extract 20 Child Soldiers

Bring your best stealth loadout with Sleep Grenades, D-Dog, & non-lethal Weaponry for this one. Bring your best Tranquilizer Sniper Rifle as well for Mission Task #3. Deploy at night.

Mission Task #5 – Child Soldiers 1-8: When we deploy, make a pit stop in to Guard Post 6 on the way to Masa Village. Here we can find 8 Child Soldiers garrisoned; carefully knock them out & Extract them all.

Mission Task #4: Before we leave the Guard Post, enter into the command tent to find a Large Rough Diamond on the table in its center; collect it.

Mission Task #5 – Child Soldiers 9: Head down the main road South to Masa & we can find a Child Soldier standing guard at the entrance.

Mission Task #5 – Child Soldiers 10-12: The next group of Child Soldiers can be found just below our position patrolling near the building with the Prisoner in it.

Mission Task #2: With D-Dog, you can easily spot where the Prisoner is located near the previous three Child Soldiers.

Mission Task #5 – Child Soldiers 13-14: The next pair of Child Soldiers can also be found close by where the Prisoner was.

Mission Task #5 – Child Soldiers 15-17: Before approaching the large beached ship, head further South into Masa Village to find three more Child Soldiers scattered around.

Mission Task #5 – Child Soldiers 18: Another Child Soldier can be found on guard at the Southern entrance to Masa Village.

Mission Task #5 – Child Soldiers 19-20: The final two Child Soldiers can be found on the beached ship in plain view. Knock them out, & very carefully go to Extract them.

Mission Task #3: Do not enter the ship! Instead, head North along the beach away from it until you can look up into its third floor with a good line of sight on Eli; the best place is along an outstretched dock on the beach.

Once you can see Eli’s head, at the very least the top of it, get into position with your Sniper Rifle & knock him out. If you miss, so long as you are not spotted, you can keep shooting at him. If he sees you, or you knock him out but the Mission Task does not complete, you will have to reload your last Checkpoint & try again; don’t forget to collect any Child Soldiers you missed.

S Rank: If you do not get S Rank right away. Then simply reload the Mission & b-line to Eli to snipe & Extract him in under 5 minutes.


Mission #24 – Close Contact:
Mission Tasks:
1. Extracted the Male Engineer*
2. Extracted the Female Engineer*
3. Extracted 6 Nubian Goats near Guard Post 20
4. Extracted 2 Four Wheel Drives
5. Extracted 4 Materials Containers from Guard Post 16
6. Picked an African Peach near Munoko ya Nioka Station
7. Extracted a Martial Eagle near Munoko ya Nioka Station

For this Mission, deploy at night, & bring D-Dog along with your best stealth loadout.

Mission Task #5: Choose the Landing Zone that is North of Guard Post 16, & quickly get to the Guard Post. The Materials Containers can be found in two groups, try not to get detected; if the Materials Containers are not all here, you will need to replay other Missions to get them to respawn.

Mission Task #4: With the Containers Extracted, take the path North of Guard Post 16 through the mountains to Guard Post 20. Get here as quick as you can & D-Dog will Mark the two Prisoners we need to rescue here. Begin carefully clearing the enemies around here & prepare for two Four Wheel Drives to arrive; we need to Extract these for the Mission Task.

One will arrive from the South from Munoko ya Nioka Station, & the other will come North from Guard Post 20 a minute or so afterwards. Ideally, you can be at Guard Post 20 before the first one arrives.

Mission Task #3: Extract both of the Prisoners to complete our Main Objective, but do not Exfiltrate the area just yet.

Search the hills around Guard Post 20 with D-Dog to locate & Extract 6 Nubian Goats; they respawn very quickly if you walk a ways away from the Guard Post & return to the area you collected them.

Mission Task #6: Next, head South from Guard Post 20 down towards Munoko ya Nioka Station. To the left of the Northern entrance gates, where the Machine Gun Emplacement is, we can find some rocks to climb up where an African Peach can be found; D-Dog will Mark it.

Mission Task #7: As our last order of business, go to the Southern entrance to Munoko ya Nioka Station. There are a few Martial Eagles that fly around the base that D-Dog will Mark. Be patient, & wait for one to land somewhere you can easily collect them unless you are a crack shot. At the South entrance, they will land on rocks at ground level making them very easy to collect.

S Rank: If you were fast, you may have unlocked S Rank on the first run. If not, then redeploy & bring Quiet (lethal or non-lethal) & get to Guard Post 20 as fast as you can. Clear out the necessary Soldiers, Extract the Prisoners, & Exfiltrate.
Sequence 18: A War On Language
1. Missions: Aim True, Ye Vengeful, Hunting Down, Root Cause
2. Mission Tasks: 218/284
3. S Rank: 35/47
4. Side Ops: 136/157
5. Key Items: 14/20
6. Achievements: 33/42
-----------------------------------------------------------------------------------------------------

Mission #25 – Aim True, Ye Vengeful:
Mission Tasks:
1. Extracted the Militants' XO*
2. Extracted the Child Soldiers' Commander*
3. Extracted the Prisoner who escaped from Guard Post 16
4. Extracted 12 Child Soldiers
5. Used a Vehicle to extract the Child Soldiers' Commander & the Militants' XO simultaneously
6. Picked a Digitalis (Purpupea) at Guard Post 16

For this Mission, as always, bring D-Dog, your best stealth loadout, & deploy at night.

Mission Task #3: When we deploy, make your way to the mountain pass that leads from Guard Post 16 to Guard Post 20. With D-Dog we can spot a Prisoner walking towards us that will head towards the road South of Guard Post 16; if left too long, he will wander close to two African Wild Dogs at the road & get killed so he needs to be Extracted fast.

Mission Task #4: Enter Guard Post 16 now & one by one knock out all Child Soldiers in the area & Extract them, save for the Child Soldiers’ Commander with the red beret. Do not Extract him yet (but he can be knocked out) as he is needed for a different Mission Task…

Some Child Soldiers will arrive at the Guard Post out on patrol so be aware of that; we need to Extract all 11 of them; the 12th Child Soldier will be the Commander.

Mission Task #6: As our last Task before Exfiltrating, head towards the large plateau that is West of Guard Post 16; it is visible from our Map. Getting near the plateau will Mark a bunch of Digitalis (Purpupea) as we draw near it with D-Dog. There is a group of three in the center of the plateau but only one of these three counts for the Task; collect all of them until it triggers…

Mission Task #5: Close by where the Commander was running, we can find a Prisoner tied up that will be the Militants’ XO. Collect him & the Commander, & place them in the Four Wheel Drive at the Northern entrance to the Guard Post.

Do not try to Fulton the Four Wheel Drive or the Militants’ XO will not Extract, failing the Task!
Instead, once the Child Soldiers’ Commander & Militants’ XO are loaded into the Four Wheel Drive, just drive the vehicle out of the Mission area to Exfiltrate.

S Rank: S Rank can easily be obtained on our first run of this Mission, especially if you can obtain the Perfect Stealth Bonus. The only thing will be your Mission time…


Mission #26 – Hunting Down:
Mission Tasks:
1. Eliminated the Trafficker*
2. Pinpointed the Trafficker's escape route from an Intel File
3. Eliminated the Trafficker before he reached Kiziba Camp
4. Extracted the Trafficker & 5 escort Soldiers
5. Extracted 4 Prisoners being held at Ditadi Abandoned Village
6. Extracted a Side-Striped Jackal near Kiziba Camp

Bring D-Dog, your stealth loadout, & deploy at night.

Mission Task #2: Deploy at the Landing Zone found just South East of Ditadi Abandoned Village. Head to it, & get to the top of the hill where those Walker Gears were found in Mission #15 – Footprints of Phantoms. We can find the Intel File on the table underneath a pavilion where the Comms Equipment is located (not in the two tents found here).

Mission Task #5: With the Intel File collected, use D-Dog to locate the 4 Prisoners found at Ditadi Abandoned Village. One is located immediately nearby us in the next little encampment; when we reach one, the others should become Marked nearby as well. Extract them all.

Mission Task #6: We now need to locate & Extract one Side-Stripped Jackal. They can be found in the grasslands in & around Guard Posts 10, 12, & 14; a pair can be found directly West of Ditadi Abandoned Village across the second road from it on route to the predicated path of the Trafficker.

If you do not find one on the way to the Trafficker’s predicated path, leave this until after he is Extracted so we do not fail the next Mission Task. Just keep your eyes open for Wild Animals Marked by D-Dog that are red…

Mission Tasks #1, 3-4: Look on your Map to see the Trafficker’s predicted route. Head about halfway onto it, if you have been making good time, & then begin walking down it away from Kiziba Camp. As you go, eventually, you will encounter six Soldiers & the Trafficker; knock out & Extract all six of them for these Mission Tasks.

D-Dog will Mark them for us. They are slow, & spread out.

S Rank: If you did not obtain S Rank during our first run, simply run to just North West of Guard Post 14 with D-Dog & lie in wait for the Trafficker & his escort. Extract them all & Exfiltrate for an easy S Rank under 5 minutes.


Mission #27 – Root Cause:
Mission Tasks:
1. Extracted the Intel Team member*
2. Extracted the Intel Team member before he can have an accident
3. Exfiltrated the Hot Zone with the Intel Team member by land

This Mission requires some very specific actions but is very easy to complete. Bring your stealth gear, deploy at night, & this time we will deploy with D-Walker or a Four Wheel Drive.

S Rank + Mission Tasks 1-3: After we deploy, ignore our objective marker & drive to the road that is in between Guard Post 7 & Guard Post 3; more towards Guard Post 7 than 3. Wait a little while, & Ocelot will tell us that the Intel Team member has escaped via Truck & is driving away. As this happens, they will appear coming down the road in front of us.

Get in front of the Truck, & the Intel Team member will fall out of it. Pick him up with D-Walker or load him into the vehicle, then Exfiltrate the area on land to complete the Mission Tasks as well as earn an S Rank.


Key Item #14 – Grand Master Certificate (Fulton): Extract 1,000 enemies
As we play through our S Rank Missions, & later the last few Side Ops, always always always Extract as many Soldiers as you can. Go out of your way to knock Soldiers out for Extraction. Even if their stats are not good, Extract them.

It is nicest getting this done as we play as opposed to having to farm this at the very end by going base to base, Guard Post to Guard Post Extracting Soldiers in Free Roam.
Sequence 19: Cipher's Abominations
1. Missions: Code Talker, [Extreme] Code Talker, Metallic Archaea, [Extreme] Metallic Archaea
2. Mission Tasks: 238/284
3. S Rank: 39/47
4. Side Ops: 136/157
5. Key Items: 14/20
6. Achievements: 33/42
-----------------------------------------------------------------------------------------------------

Mission 28 – Code Talker:
Mission Tasks:
1. Made contact with Code Talker*
2. Extracted Code Talker*
3. Extracted Code Talker without him taking damage
4. Eliminated the Skulls
5. Extracted the Skulls
6. Extracted the Armored Vehicle sealing off Lufwa Valley

This is a difficult Mission & will require us swapping Buddies halfway through. To start, we will want to deploy at night in our best stealth gear, our best Sniper Rifle, & with Quiet.

Mission Task #4: Make your way through the valley with Quiet until you encounter the four Sniper Skulls. With Quiet’s help, eliminate at least one of the Sniper Skulls; we do not need to kill them all!

Mission Task #5: When at least one Sniper Skull is defeated, we need to track down their body; it should be faintly Marked for us further ahead in the jungle. Approach the body & Fulton it to complete the Task.

Mission Task #3: Now make your way to the Mansion. Code Talker can be found down a basement passage in the immediate entry way of the North front entrance.

If you killed the Skulls, then there will be a lot of Soldiers in between us & the Landing Zone; use Quiet to clear them all out.

We will use the Landing Zone in the upper North Western corner of the map; if the Skulls are dead & there are Soldiers around DO NOT call the Helicopter yet or it will destroy our Armored Vehicle… or get itself destroyed instead.

Mission Task #6: If you chose to eliminate all the Sniper Skulls before retrieving Code Talker, enemy reinforcements will arrive. To the South will be a Gunship & blocking the bridge to the North Western Landing Zone will be an Armored Vehicle. For this Mission Task, we need to Extract this Armored Vehicle.

Carefully sneak towards the Landing Zone while Quiet begins clearing the way. Once at the Landing Zone area, without the Helicopter being called in, leave Code Talker behind. Now return to the nearby bridge crossing the river to the Mansion & sneak up behind the Armored Vehicle to Extract it.

S Rank: Eliminating the four Sniper Skulls while also bringing Code Talker to the Helicopter without him taking damage will definitely earn you an S Rank.

If you do not, replay the Mission but leave the Skulls alive. When you go to Extract Code Talker, all the Soldiers will be Wandering Puppets making it much easier to escape.


Mission #48 – [Extreme] Code Talker:
Mission Tasks:
1. Made contact with Code Talker*
2. Extracted Code Talker*
3. Extracted Code Talker without him taking damage
4. Eliminated the Skulls
5. Extracted the Skulls
6. Extracted the Armored Vehicle sealing off Lufwa Valley

Everything will play out exactly as it did in the regular version. Only this time, the Sniper Skulls can one shot kill us! You really need to be on your toes & stay hidden when sniping them with Quiet. You will want to bring your best Brennan Sniper Rifle with you; the Grade 6 Brennan LRS-46 can kill a Sniper Skull in three Headshots. It is also a good idea to give Quiet her Wicked Butterfly as opposed to Sinful Butterfly so that her Weapon is Silenced.

This arguably the hardest Mission in the game in my opinion; it took me longer to kill the Skulls than completing the Mission Tasks for Mission #45 - A Quiet Exit...

Mission Tasks #1-6: Quiet cannot take many shots on Extreme & will potentially need to be Extracted meaning you have to do the fight on your own; she can be redeployed fortunately after the Skulls are defeated. When Quiet moves to a new position after getting shot, tell her to Cease Fire & reset to trying to take more stealth shots off before getting detected again.

Try putting yourself in a position where you can only shoot at one Sniper Skull at a time; this works both ways & will keep you alive.

If you take more than three attempts more than 10 minutes long, consider just Restarting the Mission to give yourself a better Score.

The easiest way to take the Skull Snipers out is by sniping them outside of their effective range. Makes our shots much more difficult & them harder to see, but it also means they won’t retaliate, giving you all the time you need; use Supply Drops if you need more ammo.

S Rank: S Rank may require its own run, avoiding the Skull Snipers for the fastest time… Take D-Horse & race past the Skull Snipers, get to Code Talker, call your Helicopter & evade the Wandering Puppets for an easier time. You can also call yourself in a Tank to drive past all the Snipers as well…


Mission #29 – Metallic Archaea:
Mission Tasks:
1. Eliminated the Skulls*
2. Extracted Code Talker*
3. Complete the Mission without being grabbed by a Puppet Soldier
4. Extracted the Skulls

Unlike most Missions, you want to bring your biggest & strongest guns, the Battle Dress, & Quiet; a Launcher is highly recommended along with your best Secondary Weapon like a Tornado, Zorn, or other Revolver types.

S Rank + Mission Task #1-4: All Mission Tasks can be acquired in one run; just be mindful of not getting close to any Wandering Puppets & getting grabbed. The best way to defeat the four Skulls, is to run towards the hangar bay directly in front of where we crash. Get to the backside of it, & we can find a Ladder to climb up to the roof. So long as you do not get too close to the edge, the Skulls will not warp to us; you just have to be mindful of a few of their attacks. Bombard them with Quiet until they are defeated; call in Supply Drops if you need to.

Before Extracting Code Talker, be sure to approach one of the Skulls bodies to Fulton them. Try Fultoning as many as you can for Armor Parasites… these become relevant for our second last Mission.


Mission #42 – [Extreme] Metallic Archaea:
Mission Tasks:
1. Eliminated the Skulls*
2. Extracted Code Talker*
3. Complete the Mission without being grabbed by a Puppet Soldier
4. Extracted the Skulls

S Rank + Mission Tasks: Perform the exact same strategy as before for this Mission; except be extremely careful, as a lot of the Skulls attacks can one shot us this time.
Sequence 20: Metal Gear
1. Missions: Skull Face, Sahelanthropus, [Extreme] Sahelanthropus
2. Mission Tasks: 250/284
3. S Rank: 41/47
4. Side Ops: 136/157
5. Key Items: 16/20
6. Achievements: 33/42
-----------------------------------------------------------------------------------------------------

Mission #30 – Skull Face:
Mission Tasks:
1. Make contact with Skull Face*
2. Get information from Skull Face*
3. Extracted 4 Walker Gears
4. Obtained a Cassette Tape at OKB Zero
5. Extracted 7 red Materials Containers from OKB Zero
6. Extracted 3 Tanks from OKB Zero

For this Mission, we will deploy at night with our best stealth gear & D-Dog. There is a Gunship on this Mission so beware; we do not have to destroy it for any Mission Tasks. Alternatively, you can use Quiet to help with all the enemies, but this turns the Mission into more of a guns blazing ordeal where you are essentially going to be killing/knocking out every single Soldier in OKB Zero.

Mission Task #3 – Walker Gear 1: There are three main gates to OKB Zero & we can find each of our Walker Gears in front of them. For our first Walker Gear, make your way past Guard Post 1 & enter into OKB Zero & begin heading down the road towards the first main gate where we can find it wandering around in the center of all the stationed Soldiers.

Mission Task #3 – Walker Gear 2: Get past the first main gate, & we can find our second Walker Gear patrolling around in the central roaded sections of this area.

Mission Task #6 – Tank 1: Immediately on the other side of the first main gate, we can find a parked Tank that we can Extract.

Mission Task #3 – Walker Gear 3: After the second main gate, we can find our third Walker Gear patrolling around in the clustered area of OKB Zero with the walkways & small roomed buildings.

Mission Task #5 – Materials Containers 1-4: The first set of “red tier” Materials Containers we need to Extract will be found just after passing through the second main gate on the right side of the area; there will be four of them.

Mission Task #6 – Tank 2: Our next Tank can be found at the very far end of this section in front of the third main gate.

Mission Task #3 – Walker Gear 4: Our last Walker Gear can be found immediately on the other side of the third gate patrolling around.

Mission Task #6 – Tank 3: Our last Tank can be found immediately on the other side of the third gate.

Mission Task #5 – Materials Containers 5-7: The last three “red tier” Materials Containers will be found immediately on the other side of the third main gate. There will be two grouped together & one lone Container.

Mission Task #4: For our final Mission Task, take the massive stairwell up towards the helipad where Skull Face is. At the top of the stairs, follow the walkway along towards the helicopter landing. Underneath the helipad, do not take the immediate stairs up to it just yet. From here, instead, look to your left to see a smaller set of stairs leading back down to the lower floor.

Follow the lower floor back around to the top of the service elevator (which stairs we just came up) past all the construction equipment to find a stereo playing the Cassette “Heavens Divide”. Loot it.

S Rank: For S Rank, you need to get to the OKB Zero helipad as fast as you can while taking as little damage as possible. I prefer the stealth route, & just quickly/carefully making it to the helipad without being detected. But if you cannot manage, put on the Battle Dress with the Bandanna & ride D-Horse straight to it. Alternatively you could also in theory drive a Tank straight to it, but I feel like you would take too much damage & get destroyed.

The ending walking/driving/talking sequence can be fully skipped to save your Mission Time…


Mission #31 – Sahelanthropus:
Mission Tasks:
1. Destroyed Sahelanthropus*
2. Destroyed Sahelanthropus's head
3. Successfully hit the Floating Boy with an attack

For this Mission, we want our best heavy ordnance build. Bring the Battle Dress, Bandana, your best Launcher, Grenade Launcher, & a fast firing SMG or Pistol as a side arm for Mission Task #3. For a Buddy, D-Walker or Quiet should work. Time of day does not matter… Deploying with an AA Armored Vehicle can trivialize a lot of this fight as well.

Note that as crazy as it sounds, you can kill Sahelanthropus too fast!

Mission Task #2: When the Mission begins, run around along the road to find parked AA Armored Vehicles (or climb into the one you deployed). Enter inside them, zoom in, & open fire at Sahelanthropus’s head. If the Vehicle gets destroyed, go find the next one or swap to your Launcher. The head will eventually explode when it takes too much damage.

Mission Task #3: When Sahelanthropus dispels the Red Mist after it reaches around 4/10 of its health it will rust out all Vehicles making them unusable. The time it does this varies & ideally you can take out the bulk of its health before this happen.

After the Red Mist disappears, slow down your damaging. After Sahelanthropus engages into rail gun mode, wait it out behind rock walls until it begins searching for you again. When it does, carefully run around & evade its attacks until it will eventually trigger a slow motion attack. Briefly, during this slow motion, we can see the Floating Boy coming at us ahead of Sahelanthropus; swap to your side arm & shoot at him as fast as you can. It will only take one direct shot to complete the Mission Task.

S Rank: If you complete the Mission, unless it took you over an hour, you should get an S Rank. If not, & it is all that is left, deploy with an AA Armored Vehicle & use them to annihilate Sahelanthropus.


Mission #50 – [Extreme] Sahelanthropus:
Mission Tasks:
1. Destroyed Sahelanthropus*
2. Destroyed Sahelanthropus's head
3. Successfully hit the Floating Boy with an attack

S Rank + All Mission Tasks: This will play out exactly as before except Sahelanthropus will deal a lot more damage to us. Note that after the Red Mist disappears, you can call in a new AA Armored Vehicle & it will be functional…


Key Item #15 – Master Certificate (Elite): We will obtain this Key Item after completing all of the 12 bonus Missions (Extreme, Subsistence, & Total Stealth variations).

Key Item #16 – Grand Master Certificate (Elite): We will obtain this Key Item after completing all of the 12 bonus Missions (Extreme, Subsistence, & Total Stealth variations) but with an S Rank.
Sequence 21: Pieces of A Puzzle
1. Missions: To Know Too Much, Cursed Legacy
2. Mission Tasks: 262/284
3. S Rank: 43/47
4. Side Ops: 136/157
5. Key Items: 16/20
6. Achievements: 33/42
-----------------------------------------------------------------------------------------------------

Mission #32 – To Know Too Much:
Mission Tasks:
1. Extracted CIA Agent*
2. Extracted CIA Agent before his discovery by the search team
3. Extracted 4 search team Soldiers
4. Extracted the driver of the Transport Vehicle
5. Extracted 2 Prisoners being held in Shago Village & Lamar Khaate Palace
6. Extracted the Soviet Soldier plotting to assassinate the CIA Agent

This Mission will require two playthroughs to complete all Mission Tasks; we can earn an easy S Rank on the second run as well. Bring your best stealth loadout & D-Dog, as well as deploying at night.

Mission Task #5 – Prisoner 1: When we deploy, ignore the CIA Agent entirely for this run & they will eventually be apprehended & taken to Lamar Khaate Palace. While we wait for that to happen, go to Da Shago Kallai with D-Dog & head to the central command building. We can find the first Prisoner on the first floor of the HQ in the room with the Comms Equipment.

Mission Task #5 – Prisoner 2: With the first Prisoner collected, it is time to find the next. Avoid the area with the search team (there are four on Walker Gears), & head to Lamar Khaate Palace. Do not interrupt the search team or they will not take the CIA Agent to the palace.

Once at the palace, go to the North end of the area where the Soldier barracks & prison units are to find our last Prisoner. Again, do not set the base on Alert if you can help it or it may screw things up for us.

Mission Task #4: By this point, the search team should have found the Prisoner & a Four Wheel Drive will have left the palace to rendezvous with them. Keep your eyes open, & wait for the Four Wheel Drive to return with the Prisoner; we need to Extract the driver.

The driver will usher the CIA Agent into a building where they will wait. The driver will then get back into the Four Wheel Drive & head off; they must be knocked out before this happens, they cannot leave the Mission area!

Mission Task #6: With the CIA Agent waiting at the palace, we will eventually hear from Miller that someone is heading to Lamar Khaate Palace from Guard Post 12; this is our assassin. This event will only happen if the CIA Agent is brought to the palace.

A Soldier wearing a Balaclava will drive in & begin running toward the building where the CIA Agent is. We need to intercept them somewhere along the way & knock them out for Extraction.
With the assassin Extracted, Extract the CIA Agent to complete the Mission.

Mission Task #3: Replay the Mission now, & this time potentially bring some Sleep Grenades just in case the search time has Riot Suits on (hopefully they don’t). Redeploy & begin running in the direction of the CIA Agent with D-Dog & he will pick up the scent of the four members of the search team.

Carefully pick off each of the four members & Extract them before they can locate the CIA Agent. It is better to find the CIA Agent first, then intercept the search team members closest to him first; there is one specifically who is guaranteed to find him.

S Rank + Mission Task #2: By picking off the search team members, they cannot find the CIA Agent if they are Extracted… Alternatively move the CIA Agent a little ways a way off their patrol pathing to guarantee his anonymity. Only the actual Soldiers of the search team are required; their Walker Gears are optional Extractions…

You should get an S Rank by Extracting the CIA Agent before discovery…


Mission #35 – Cursed Legacy:
Mission Tasks:
1. Extracted 2 Containers*
2. Completed the Mission by riding a Fulton-Extracted Container out of the Hot Zone
3. Completed the Mission without discovery the Container Extraction
4. Pinpointed the Soldier's location from an Intel File
5. Extracted the commander of the Zero Risk Security force guarding the mansion
6. Recovered the Rough Diamonds snatched by the Common Raven near Lufwa Valley, Guard Post 8

S Rank can be earned in the same run as all Mission Tasks, but stealth is imperative. Choose your best stealth loadout, deploy at night, & bring D-Dog as well as some Sleep Grenades.

Mission Task #6: Choose the North most Landing Zone above the mansion to deploy. When we deploy, make your way over to the area immediately South East of Guard Post 8; it will be on the opposite side of the road from us around the corner of the rock face before the bridge.

When you get close to this area, there should be at least 8-10 Common Ravens flying around in a circle with around 4 African Wild Dogs close by; we can find our Rough Diamond in the center of the patrolling dogs.

Mission Task #5: With the Diamond collected, quickly make your way over to the mansion. Navigate carefully around to the backside of it & enter in through the door off of the Northern courtyard. We cannot put the mansion on Alert at all or our next Mission Task will fail!

Immediately upon entering this room, we can find a Zero Risk Soldier & a ZRS Commander wearing a red beret; this is the same room with the Comms Equipment. Extract him.

Mission Task #4: In the same room we found the ZRS Commander, we can find an Intel File; it will be on a table just before the exit doors further into the mansion.

Reloading a Checkpoint after collecting this Intel File will reset its completion!

Mission Task #3: Now for the tricky part; we need to Extract both Containers without a single Solder noticing their absence. Due to how close they all are, it is easiest to sneak up behind them all & knock them out; most will be in Riot Suits. Sleep Grenades are the most effective way to take out groups of them; use CQC for lone targets.

The moment the first Container is Extracted, we will trigger a timer for when the enemy Helicopters will arrive; at the end of the timer, the Mission will fail.

We can trigger Reflex Mode, so long as we do not actually trigger an Alert!

Mission Task #2: When the first Container is Extracted, take out all the Soldiers near the second one but be sure to Exfiltrate yourself will standing on the Container for its Extraction.
Sequence 22: Doomsday Party
1. Missions: Extraordinary, Proxy War Without End
2. Mission Tasks: 274/284
3. S Rank: 45/47
4. Side Ops: 136/157
5. Key Items: 16/20
6. Achievements: 33/42
-----------------------------------------------------------------------------------------------------

Mission #38 – Extraordinary:
Mission Tasks:
1. Secured the Film Canister*
2. Captured Spugmay Keep
3. Secured the Film Canister before reinforcements arrive
4. Extracted the Prisoner being held at Guard Post 24
5. Extracted a Griffon Vulture near Spugmay Keep

This Mission will take a few runs to complete, be sure to pack your best stealth loadout along with D-Dog. Deploy at night.

Mission Task #4: For our first run, deploy at the North most Landing Zone & make your way down to Guard Post 24 to the East. The Prisoner will be in the lone stone building at this Guard Post; Extract them.

Mission Task #2: With the Prisoner Extracted, quickly get to Spugmay Keep. We must now eliminate all the Soldiers searching for the Film Canister here; there will be 11 Soldiers if the reinforcements arrived. Beware, there will be enemies in Riot Suits!

Calling in Quiet to assist can be useful…

Mission Task #5: Collect the Film Canister wherever it ends up being, then search the skies for any Griffon Vultures; you should be able to hear them. Either snipe one from the skies or wait till it lands somewhere convenient to retrieve it.

Mission Task #3: This next run will be tied to our S Rank. There are three different spawn locations for the Film Canister. As we arrive in the Helicopter, be sure to correspond the fuzzy photo you receive in your iDroid with the three photo sets down below so you know what Canister you need to retrieve.

Quickly get to Spugmay Keep & collect the Film Canister; do not waste time calling a Helicopter & just sprint out of the Mission area.

If you want a different spawn, just Restart the Mission until it appears in a location you know of.

Spawn 1: This is the easiest of the three spawns as it is very close to where you enter Spugmay Keep. On approach, you will have the three archways in a line (the largest being in the center), go towards the Mortar on our side of the middle large arch, & we can find the Film Canister behind a pot next to a square slab of stone.


Spawn 2: The second spawn will be inside the archway closest to the Mortar that is at the far end of Spugmay Keep; the South Western most end through the arches on your right when entering. It will be in the crook of the last arch.


Spawn 3: The final potential spawn location will be at the very back of Spugmay Keep in the South Eastern corner. Here we can find three square columns in a row before the ruins stop to become rock bluffs. The Film Canister will be in the smallest square column to our right when we enter, on the side that faces back towards the middle column.


S Rank: We should earn an S Rank when attempting to complete Mission Task #3. Even if you get detected in the process, just keep sprinting away to Exfiltrate. As you can see from my own attempt, I killed people & got hit too many times… but still got an S Rank.


Mission #41 – Proxy War Without End:
Mission Tasks:
1. Eliminated the Gunship*
2. Eliminated 2 Tanks*
3. Eliminated 2 Armored Vehicles*
4. Extracted 2 Tanks & 2 Armored Vehicles
5. Extracted the armored column's Commander
6. Secured the Rough Diamond hidden by the armored column’s Commander
7. Secured the Blueprint carried by the Gunship

For this Mission, we need our stealth loadout while also packing an emergency Launcher for the Gunship in case things go South… Deploy at night & with D-Dog.

Mission Task #5: Deploy in between Guard Post 14 & 15 & immediately begin making your way down to Nova Braga Airport; ignore the predicated route to Guard Post 14. While we wait for the armored column to mobilize to the airport, consider eliminating some of the garrison here to pass time; do not leave bodies behind in the open or put the area on Alert however!

After the armored column rendezvous at Guard Post 14, the Gunship with the Commander will spawn & begin flying to its location. Once it arrives as well, the column will go to Nova Braga Airport.

Wait for the Gunship to land at the airport terminal, & the Commander will exit. The Commander will then walk through the terminal to the Western end of the airport where he will enter into the second floor of one of the office buildings. We can intercept him here & Extract him.

Mission Task #6: In the same room we Extract the Commander, we can find the hidden Rough Diamond. Go to the far end of the room where the exit door is (the far Western door to the room), at this door, there will be a metal shelf with cardboard boxes on it. Look on the third shelf from the bottom to find the Rough Diamond behind a box.

Mission Task #4 – 2 Tanks & 1 Armored Vehicle: Now is when it gets a bit tricky, we need to Extract the two Tanks & one Armored Vehicle at the airport; you can choose to destroy the Gunship first if you think that is easier.

Mission Task #7: If you have been undetected, the Gunship will just be hovering in place above the airstrip outside the terminal. Destroy it & collect the Blueprint it drops.

Mission Task #4 – 1 Armored Vehicle: After we Extracted the first Armored Vehicle, a second will be on route to the airport. Because of how long it will take, we may as well have completed the previous Tasks. After Extracting the first three Vehicles & destroying the Gunship for the Blueprint, just wait for the final Vehicle to arrive or intercept it yourself if you are confident…

The last Armored Vehicle will set up just outside the airport at its Eastern entrance.

S Rank: For S Rank, we need to Extract the Vehicles but do it much faster. This time, deploy with D-Dog & get to Guard Post 14. As quickly as possible you need to Extract all the Soldiers here or eliminate them & hide their bodies; we cannot trigger an Alert.

Once this is done, wait for the armored column to arrive, then carefully Extract them all. The lone Tank arrives first, then the Armored Vehicle/Tank pair, with the last Armored Vehicle arriving afterwards. Using EMN-Mines can be useful.

The Gunship will arrive before the last Armored Vehicle (in theory) giving you time to quickly destroy it with a Launcher; it will take 2-3 shots from a good CGM Launcher to get destroyed!
Extract the last Armored Vehicle & leave the Mission area, most likely on foot.
Sequence 23: Man Who Sold the World
1. Missions: Shining Lights, Even In Death, A Quiet Exit, The Man Who Sold the World
2. Mission Tasks: 284/284
3. S Rank: 47/47
4. Side Ops: 136/157
5. Key Items: 20/20
6. Achievements: 38/42
-----------------------------------------------------------------------------------------------------

Mission #43 – Shining Lights, Even In Death:
Mission Tasks:
1. Identified the person who sent the transmission*
2. Eliminated the infected*

All Mission Tasks for this Mission are mandatory & we will have completed them all during our first run through of it; no need to replay it. There is no Mission Rank required either.

Mission #45 – A Quiet Exit:
Mission Tasks:
1. Make contact with Quiet*
2. Eliminated the Soviet mechanized unit*
3. Obtained Quiet's Cassette Tape*
4. Extracted 7 Tanks & 7 Armored Vehicles
5. Complete the mission without Quiet taking damage

This is by far the hardest Mission in the game on top of having the hardest Mission Tasks. For this Mission, we want our absolutely strongest assault loadout. Bring your best CGM, EMN Mines, & you will also want to equip your best Parasite Suit with Parasite Armor cartridges as an Item. This will be intense.

Since we already start with Quiet, bring D-Horse in its best Battle Dress for speed.

This Mission will take many replays to re-memorize the order/location all Vehicles arrive in.

Mission Task #4: This is by far the hardest thing we will need to do in the game; we will be taking a lot of hits which is where the Parasite Armor comes in. Charge at the enemy Vehicles, doing your best to avoid fire, & Extract them. Use the Parasite Armor always, & when you run out, Supply Drop more in (ideally before using your last one). Constantly kill all Soldiers you come across as well to reduce damage taken.

If Quiet ends up destroying a Vehicle, you will need to reload a Checkpoint.

If you know you Extracted all Vehicles leading up to the mid Mission Checkpoint, then carry on from their; if you are unsure, Restart the Mission. You will know for sure if you succeeded when the firefight ends & we are carrying Quiet in the sandstorm…

Mission Task #5: This Objective is easier than it sounds. So long as you are the one drawing the fire, for the most part, Quiet will not take damage. She will only take damage if you fully lose the enemies aggro.

S Rank: If you do not earn an S Rank from Extracting all the Vehicles, replay the Mission but instead focus on going guns blazing & defeating the Vehicles from a far with our best Launchers.


Mission Task #3: If you have not already done so, we can collect Quiet’s Cassette Tape after our Mission Ranking screen. Do not enter the Helicopter yet, & instead head up the sandy hill following some delicate footprints. At the top of this hill, past some Golden Crescent Flowers, there will be some trees overlooking where the Helicopter is; this is where we can find the Cassette Tape.

Mission #46 – The Man Who Sold the World:
Mission Tasks:
1. Escape the hospital*
2. Eliminate 6 soldiers at the hospital entrance
3. Land 20+ shots on the Man on Fire

By now, you will have unlocked this Mission a long time ago. To unlock it, we need to have completed all 36 none bonus Missions, all Story Related Side Ops (the ones with the golden markers beside them), listen to all Story Related Cassette Tapes, as well as cumulatively built 28 Base Platforms between Mother Base & all your FOBs.

For the first run, do not skip any cinematics, as it will void our S Rank but this is the “true Ending” of the game… or at least it puts the entire thing into perspective.

Mission Task #2: Near the end of our journey through the hospital, we will need to fight or sneak our way out of the burning entrance to outside. Big Boss will leave to run “interference”, so we will be on our own. We are equipped with a Grade 4 Silenced AM D114 which is pretty powerful. Try to kill all enemies in the lobby with Headshots if you can… You cannot Mark, so take your time with your shots.

Mission Task #3: After we kill the 6 Soldiers in the lobby, go to leave, to trigger the next cinematic & the Man On Fire’s arrival. Before we flee, make sure you fire a minimum of 20 shots into him.

S Rank: Because of how long the cinematics are, it is unlikely you will obtain an S Rank on this Mission. Replay it, but this time skipping all cinematics to earn yourself an S Rank… our last S Rank.


Key Item #17 – The Codename: Big Boss: We will unlock this Key Item after completing Mission #46 – The Man Who Sold the World.

Key Item #18– Star of Bethlehem: We will unlock this Key Item after completing Mission #46 – The Man Who Sold the World.

Key Item #19 – Master Certificate (Standard): We will unlock this Key Item after completing Mission #46 – The Man Who Sold the World; it is for completing all 51 Missions in the game.

Key Item #20 – Grand Master Certificate (Standard): We will unlock this Key Item after completing Mission #46 – The Man Who Sold the World if you earned an S Rank on all other 47 applicable Missions…


Achievement #34 – Truth: Complete Truth The Man Who Sold the World Mission.
Story Related. Complete the secret Ending for Phantom Pain to unlock this Achievement.


Achievement #35 – Collector: Obtain all 26 Blueprints & 20 Key Items.
This Achievement will unlock after collecting our final few Key Items. If it does not unlock, check your Documentation tab & look through your Blueprints or Key Items to see if you are missing any.


Achievement #36 – Accomplished: Complete all 51 Missions.
Story Related. We will unlock this Achievement by completing every single Mission in the game, including the bonus harder difficulty Missions.


Achievement #37 – Elite: Complete all 47 applicable Missions with an S Rank.
Story Related. We will earn this Achievement after completing all ranked Missions with an S Rank.


Achievement #38 – Executed: Complete all 284 Mission Tasks.
The hardest Achievement in the game for sure, & the longest. There are 284 Mission Tasks across the 51 Missions in the game. If the Achievement does not unlock, it means you are missing some Mission Tasks. Scroll through the Missions to see which ones you missed.
Sequence 24: Let Them Eat Yellow Cake
1. Side Ops: 148/157
2. Achievements: 38/42
-----------------------------------------------------------------------------------------------------

We now are in the final mop up stretch of the game. With the Man Who Sold the World completed, we now unlocked our final 21 Side Ops to complete. We also need to build & disarm a Nuclear Weapon. Use this time to acquire the necessary resources for building the nuke.

Mother Base:

Nuclear Weapon Building/Dismantling: To construct a Nuclear Weapon, we will need 750,000 GMP, 75,000 Fuel Resources &, 50,000 Minor Metal. If you need Materials, try going to your PF Grade & checking out the PF Exchange; you can obtain 4800 Minor Metal or Fuel Resources for 1125 Points.

Building a nuke will give us -50,000 though by this point, you should be swimming in heroism with all our S Rank runs. You still may become “Demon Snake” … which is why this is best saved to the end.

It will also take quite a while to develop one, with a fully maxed out Mother Base, it will take 21 real world hours but can take longer; your FOBs will contribute to the time. After we build the nuke, we need to immediately dismantle it so we can unlock the Disarmament Achievement.

The biggest problems with building nukes is that other Players will most likely come to steal it. Sometimes it can be stolen mere minutes after it is built & you will have to painstakingly build a new one just so you can disarm it.

The best strategy against this, is to note exactly when the nuke will be finished building, then switch your game into Offline Mode (not Steam Offline Mode) & disconnect from Online Play. This way, when the nuke is built, it cannot be stolen by other Players & you can disarm it worry free.

Lastly, if you are good at FOB Missions, you can be the antagonist & steal someone else’s Nuclear Weapon to disarm. This is tricky to do as A it is extremely rare finding anyone advertising that they have a nuke unless it is a new Player. Or B, it is a very experienced Player & they have a well defended FOB. But if you can obtain one this way, that also works for disarming only.

Build Your Nuclear Weapon: There are two very important building methods for the nuke: Offline & Online. If you develop your nuke while you are disconnected from Metal Gear Online, your nuke can only be worked on while you play the game; if it takes 25 hours to complete, you need to be playing the game for that entire 25 hours.

If you start development on your nuke while you are Online, your nuke will be worked on when you are playing the game… & when you are not playing in the background.

There are pros & cons to both. Online is faster for obvious reasons but it is the most dangerous as it can finish completion while you are Offline & get stolen before you even get to disarm it; it is also only in your Online inventory! When building Online, you need to know 100% as soon as your nuke is finished so you can be there to receive it & immediately disarm it. Offline is much slower, but safer in theory, as you can be disconnected with the nuke still in your inventory for disarming.

Choose whichever method you prefer; I went with Online development & set a timer for 21 hours making sure I was playing the game & waiting with bated breath for its completion.

When you are ready, build your Nuclear Weapon, but set a timer so you know exactly when construction will finish so you can immediately disarm it! I cover the specifics of disarming the Nuclear Weapon at the bottom of the next Sequence.

Afghanistan - Free Roam:
While we wait for our Nuclear Weapon completion, we may as well polish off our final Side Op Missions…

Side Op #137 – 91 Mine Clearing 09: Go to Afghanistan with D-Dog & go to Guard Post 2 to disarm 12 Mines; deploy with some heavy ordnance as our next Side Ops will be within walking distance… Beware of the Brown Bear wandering around in the area too!

Side Op #138 – 103 Eliminate the Armored Vehicle Unit 11: We can find the Unit set up at Aabe Shifap Ruins. There will be a Gunship, 2 Armored Vehicles, 3 Snipers, & 3 Soldiers.

Side Op #139 – 124 Eliminate the Tank Unit 11: Redeploy at Sugmay Keep with heavy ordnance to take out a Gunship, 1 Tank, 3 Snipers, & 4 Soldiers.

Side Op #140 – 132 Eliminate the Wandering Puppets 05: Redeploy up near Lamar Khaate Palace & eliminate the 8 Wandering Puppets here.

Side Op #141 – 106 Eliminate the Armored Vehicle Unit 14: Reset Afghanistan at the ACC & redeploy at Lamar Khaate Palace to find a new garrison of Armored Vehicles here for us just outside it. There will be a Gunship, 2 Armored Vehicles, 3 Snipers, & 3 Soldiers.

Side Op #142 – 133 Eliminate the Wandering Puppets 06: Redeploy to Serak Power Plant & eliminate the 8 Wandering Puppets here.

Side Op #143 – 136 Eliminate the Wandering Puppets 09: Redeploy to Da Wialo Kallai & eliminate the 7 Wandering Puppets here; some may have Riot Suits on so Quiet will be useful.

Side Op #144 – 134 Eliminate the Wandering Puppets 07: While in the area, we can run/drive up to Da Ghwandi Khar & eliminate the 7 Wandering Puppets here as well.

Side Op #145 – 137 Eliminate the Wandering Puppets 10: Redeploy to Guard Post 4 & eliminate the 8 Wandering Puppets here; some will be in Riot Suits.

Side Op #146 – 139 Eliminate the Wandering Puppets 12: Redeploy to Qarya Sakhra Ee & eliminate the 8 Wandering Puppets here; they will all be wearing Riot Suits.

Side Op #147 – 138 Eliminate the Wandering Puppets 11: Redeploy or run/drive to Da Smasei Laman now & eliminate the 8 Wandering Puppets here; they will all be wearing Riot Suits.

Side Op #148 – 127 Eliminate the Tank Unit 14: For our final Side Op in Afghanistan, bring our heavy Weapons, & deploy East of the Afghanistan Central Base Camp. We need to eliminate a Gunship, 2 Tanks, 3 Snipers, & 3 Soldiers.
Sequence 25: You Are My Phantom
1. Side Ops: 157/157
2. Achievements: 42/42
-----------------------------------------------------------------------------------------------------

Africa - Free Roam:

Side Op #149 – 92 Mine Clearing 10: Now it is time to finish our final Side Ops in Africa. To start, go to Lufwa Valley & clear the last 12 Mines found around the old ZRS encampment.


Achievement #39 – Cleared: Complete all 10 Mine Clearing Side Ops.
We will unlock this Achievement after completing the final Mine Clearing Side Op.

Side Op #150 – 140 Eliminate the Wandering Puppets 13: Redeploy or sprint/drive to the area just East of Guard Post 2 to eliminate 8 Wandering Puppets.

Side Op #151 – 135 Eliminate the Wandering Puppets 08: Reset the area at the ACC & return to Lufwa Valley to eliminate 8 Wandering Puppets found at the Mansion.

Side Op #152 – 141 Eliminate the Wandering Puppets 14: Deploy at Bampeve Plantation to eliminate 8 Wandering Puppets.

Side Op #153 – 125 Eliminate the Tank Unit 12: Go to Guard Post 6 & defeat a Gunship, 1 Tank, 3 Snipers, & 4 Soldiers.

Side Op #154 – 142 Eliminate the Wandering Puppets 15: For our final Wandering Puppets Side Op, deploy to Bwala ya Masa & eliminate 8 Wandering Puppets; they will all be in Riot Suits, naturally.

Side Op #155 – 126 Eliminate the Tank Unit 13: For our final Tank Unit elimination, deploy to Nova Braga Airport & head to the location just South of it to eliminate a Gunship, 2 Tanks, 3 Snipers, & 3 Soldiers.

Side Op #156 – 104 Eliminate the Armored Vehicle Unit 12: Deploy to Mfinda Oilfield & we will need to eliminate a Gunship, 2 Armored Vehicles, 2 Snipers, & 4 Soldiers.

Side Op #157 – 105 Eliminate the Armored Vehicle Unit 13: For our final Side Op Mission, deploy to Ditadi Abandoned Village & we will need to eliminate a Gunship, 2 Armored Vehicles, 2 Snipers, & 4 Soldiers; the original garrison for the location may be present as well…


Achievement #40 – Achieved: Complete all 157 Side Ops.
If you have been following along with the guide, we will unlock this Achievement after completing the final Side Op. As of this point, all Side Ops are available to us & none can be missed.

Mother Base:


Achievement #41 – Deterrence: Develop a Nuclear Weapon.
When you are 10 or so minutes off when your Nuclear Weapon is ready, be sure to be waiting patiently in your iDroid.

After the timer runs out, we will be notified that the Nuclear Weapon has been built & we will receive the Achievement.


Achievement #42 – Disarmament: Dispose of a Nuclear Weapon.
With the nuke built, immediately go into the Resources tab & scroll over to Nuclear Weapons to view it. Scroll down to Nuclear Waste, & select it to transform your Nuclear Weapon into Nuclear Waste; the process happens instantly, & we will unlock our final Achievement by doing so.

If you built the Nuclear Weapon Online but disconnected from Metal Gear Online, you will have to reconnect to be able to interact with your nuke.
Conclusion:
Phantom Pain was an absolutely incredible game, & arguably an unprecedented entry into the stealth shooter genre. I was so enthralled with the story, having MGS5 being my only title in the series having played, that I needed to watch the Snake Eater “cinematic movie” to understand more of what was going on. Which helped immensely. I am extremely looking forward to Metal Gear Solid “Delta” though am saddened that there will most likely never be a Metal Gear Solid 6… As I said before… so much wasted excellence. I disagree with most fans (not that I can even call myself a hardcore MGS fan) & think that there was still more to be told in the stories of Big Boss & Venom Snake… Regardless, 100% took me 165 hours with so much time spent test running strategies for S Rank, Mission Tasks, & where to get Wildlife. I guarantee you can earn it faster!

If this guide helped you achieve 100%, rate the guide or let me know in the comments. Helps me know if I am doing things right!


100% Complete
Thank you for choosing Cynical Guides, & I will see you in the next one!

If you are interested in a little bit of patronage, support my projects & consider buying me a coffee. If not, no worries; my guides are, & will always be free content. Achievement Hunting is my passion, & writing these guides is a way for me to give meaning to a life long hobby!
https://www.buymeacoffee.com/cynic0055

Other Cynical Guides:
If you are looking for the guide covering naturally story progression up to Mission #43 – Shining Lights, Even In Death, 135/157 Side Ops, & Collectibles, click/Favourite the guide below.
https://steamcommunity.com/sharedfiles/filedetails/?id=3058014625
If you enjoy this game & my style of writing guides, be sure to check out my:
https://steamcommunity.com/sharedfiles/filedetails/?id=2816956708
Check out my profile for a full list of my works.
https://steamcommunity.com/sharedfiles/filedetails/?id=2992727030

14 Comments
Cynic 0055  [author] Apr 6 @ 2:50pm 
Thanks for bringing that up, Mouflon_TA, I am pretty sure this exact thing happened to me in a similar Mission & you have to wait for quite a while for the Containers to respawn... I added a note flagging this to people for C2W.
Mouflon_TA Apr 6 @ 11:55am 
Hi Cynic, as always, amazing guide! I haven’t finished my playthrough yet, but I have one suggestion for the C2W missions. I noticed that the material containers do not respawn between attempts. So, when I extracted both during my “standard” run, there were none left to extract when I returned for the “Subsistence” run. Maybe you could add a note in the guide for people to only extract one container to avoid soft-locking the objectives for the second run?
Cynic 0055  [author] Feb 26 @ 10:21am 
Congrats, Relyks20001! :cool_seagull: MGS5 is a super rewarding 100% in my opinion, & just a great game; HL2 will be a much more laid back 100%. :gordon:
Relyks2000 Feb 26 @ 3:58am 
Thanks so much for this guide! I just have my 24 hours (for me I guess) to wait for the nuke, then I'm off to your HL2 guide!
Relyks2000 Feb 26 @ 3:37am 
I watched this video about 25 (?) times in a row before trying "A Quiet Exit" S-rank and extracting the vehicles and I got it on my first try. Very helpful. It was frankly easier than in the video because I had the fully upgraded suit and armor.

https://www.youtube.com/watch?v=o0uPDsfTykU
Relyks2000 Feb 24 @ 2:54pm 
Very easy S-rank on mission 30 without having to worry about stealth.
https://www.youtube.com/watch?v=InVRP-XGTzo
asdfmoe29 Feb 23 @ 10:55am 
I find that in a hero's way it's pretty easy to use pentasimin and the fulton rocket launcher to snipe and swipe the commander. I have always seen that in the night, when the recon/red light backpack soldiers park their car and walk towards the main building, the commander will open the door and meet them outside once the soldiers are about half way to the door.
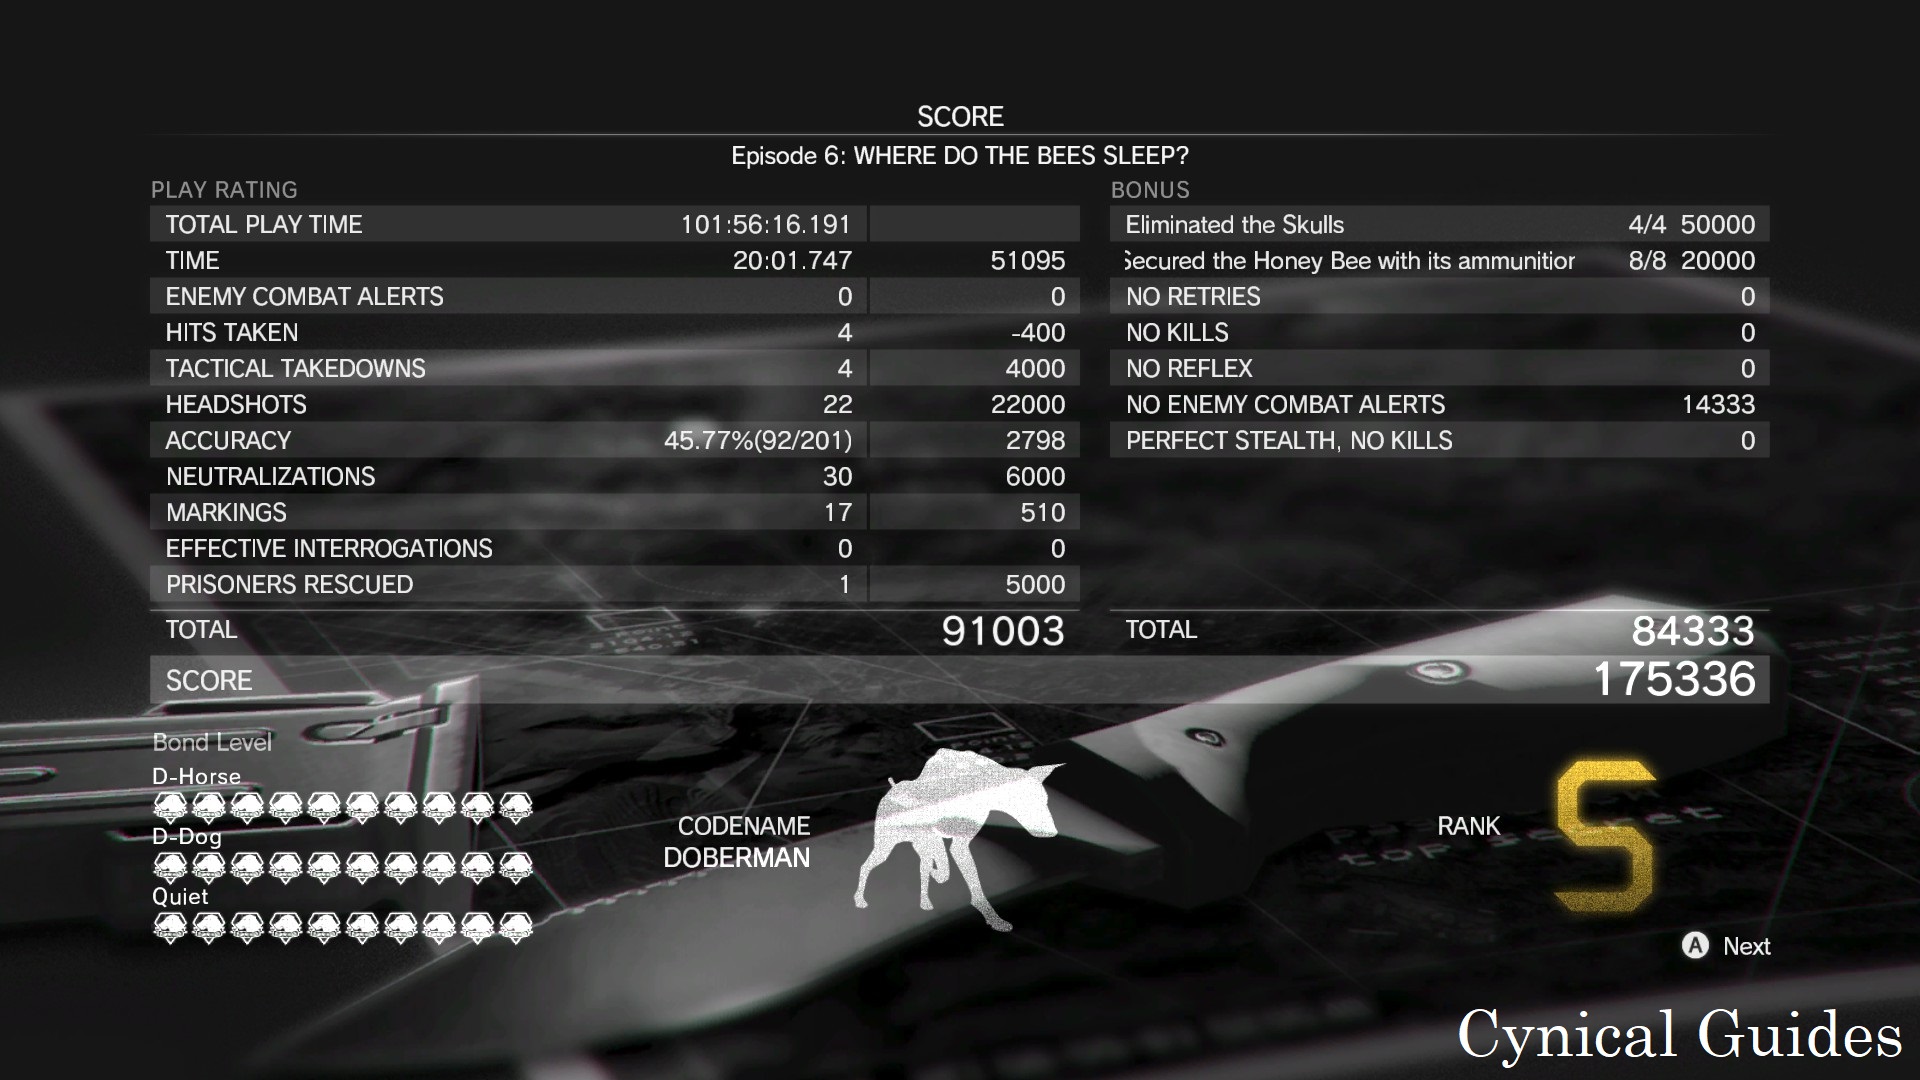
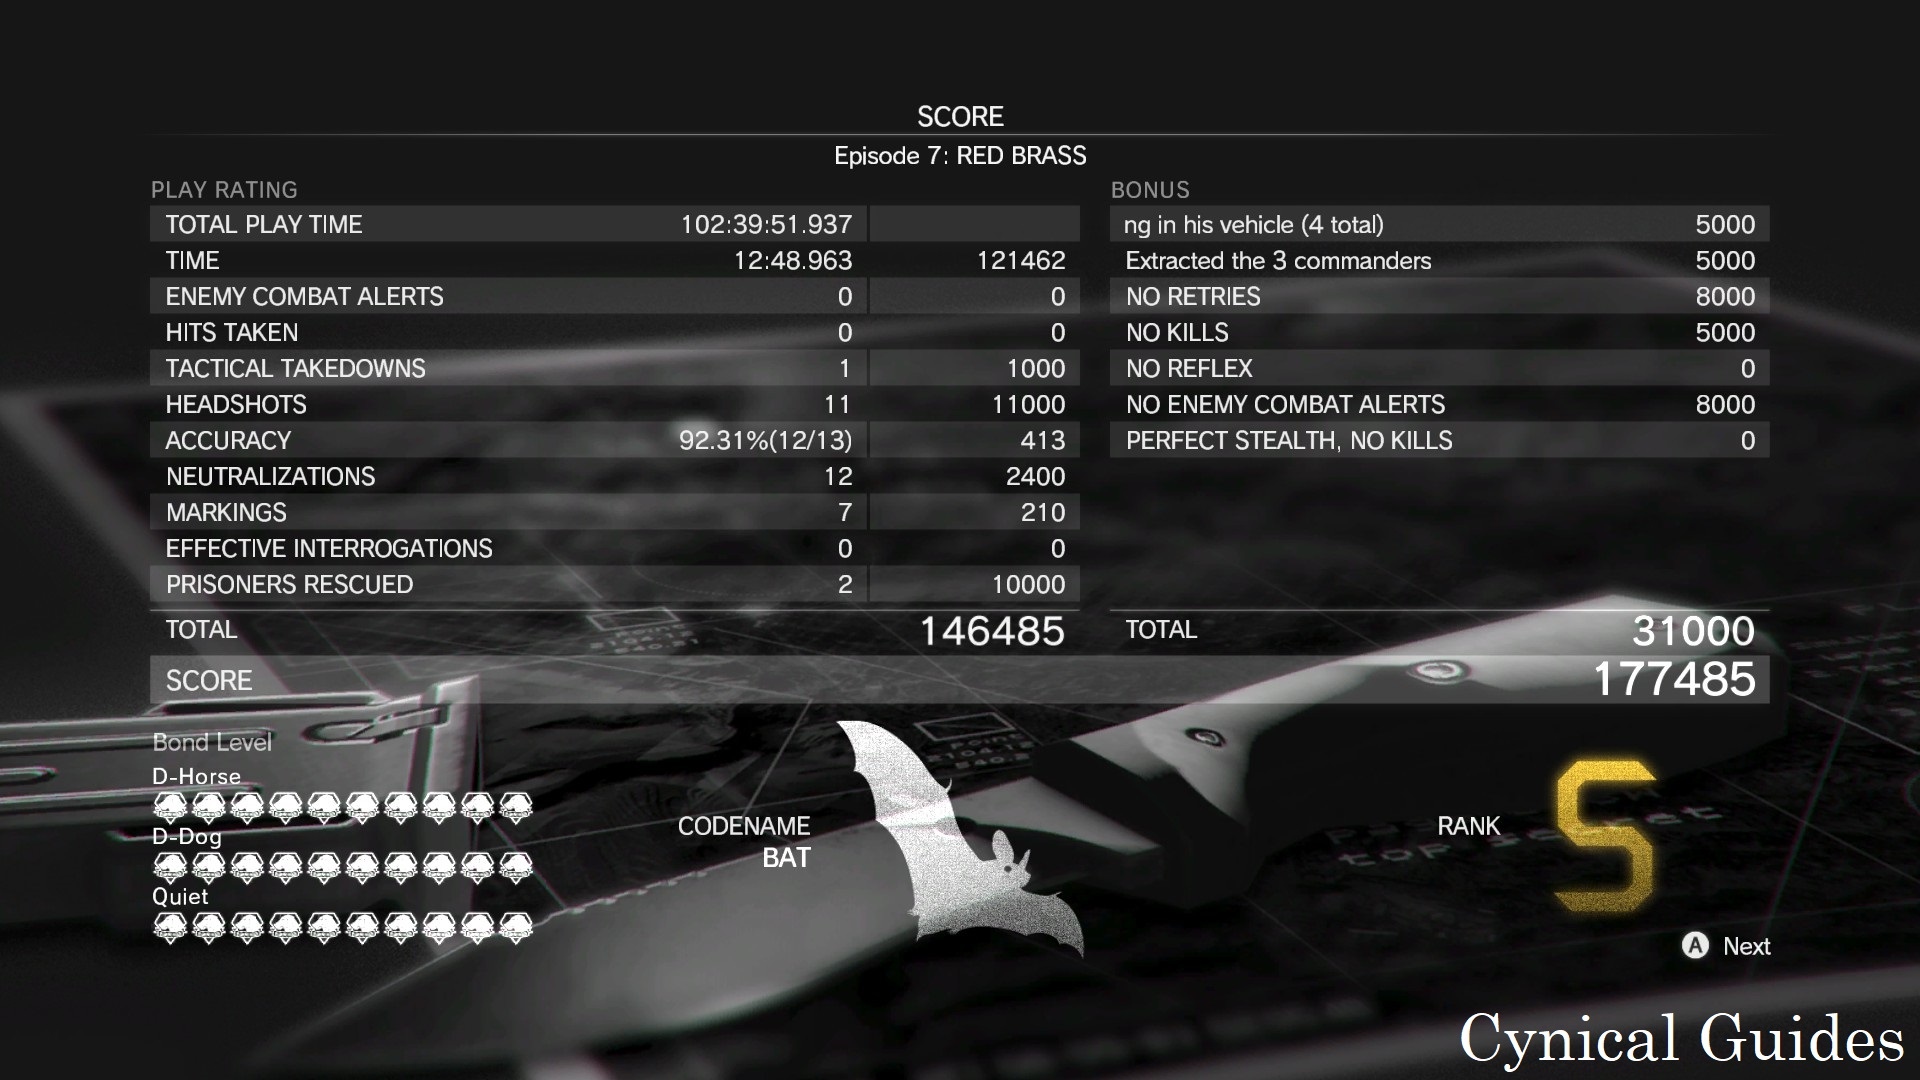
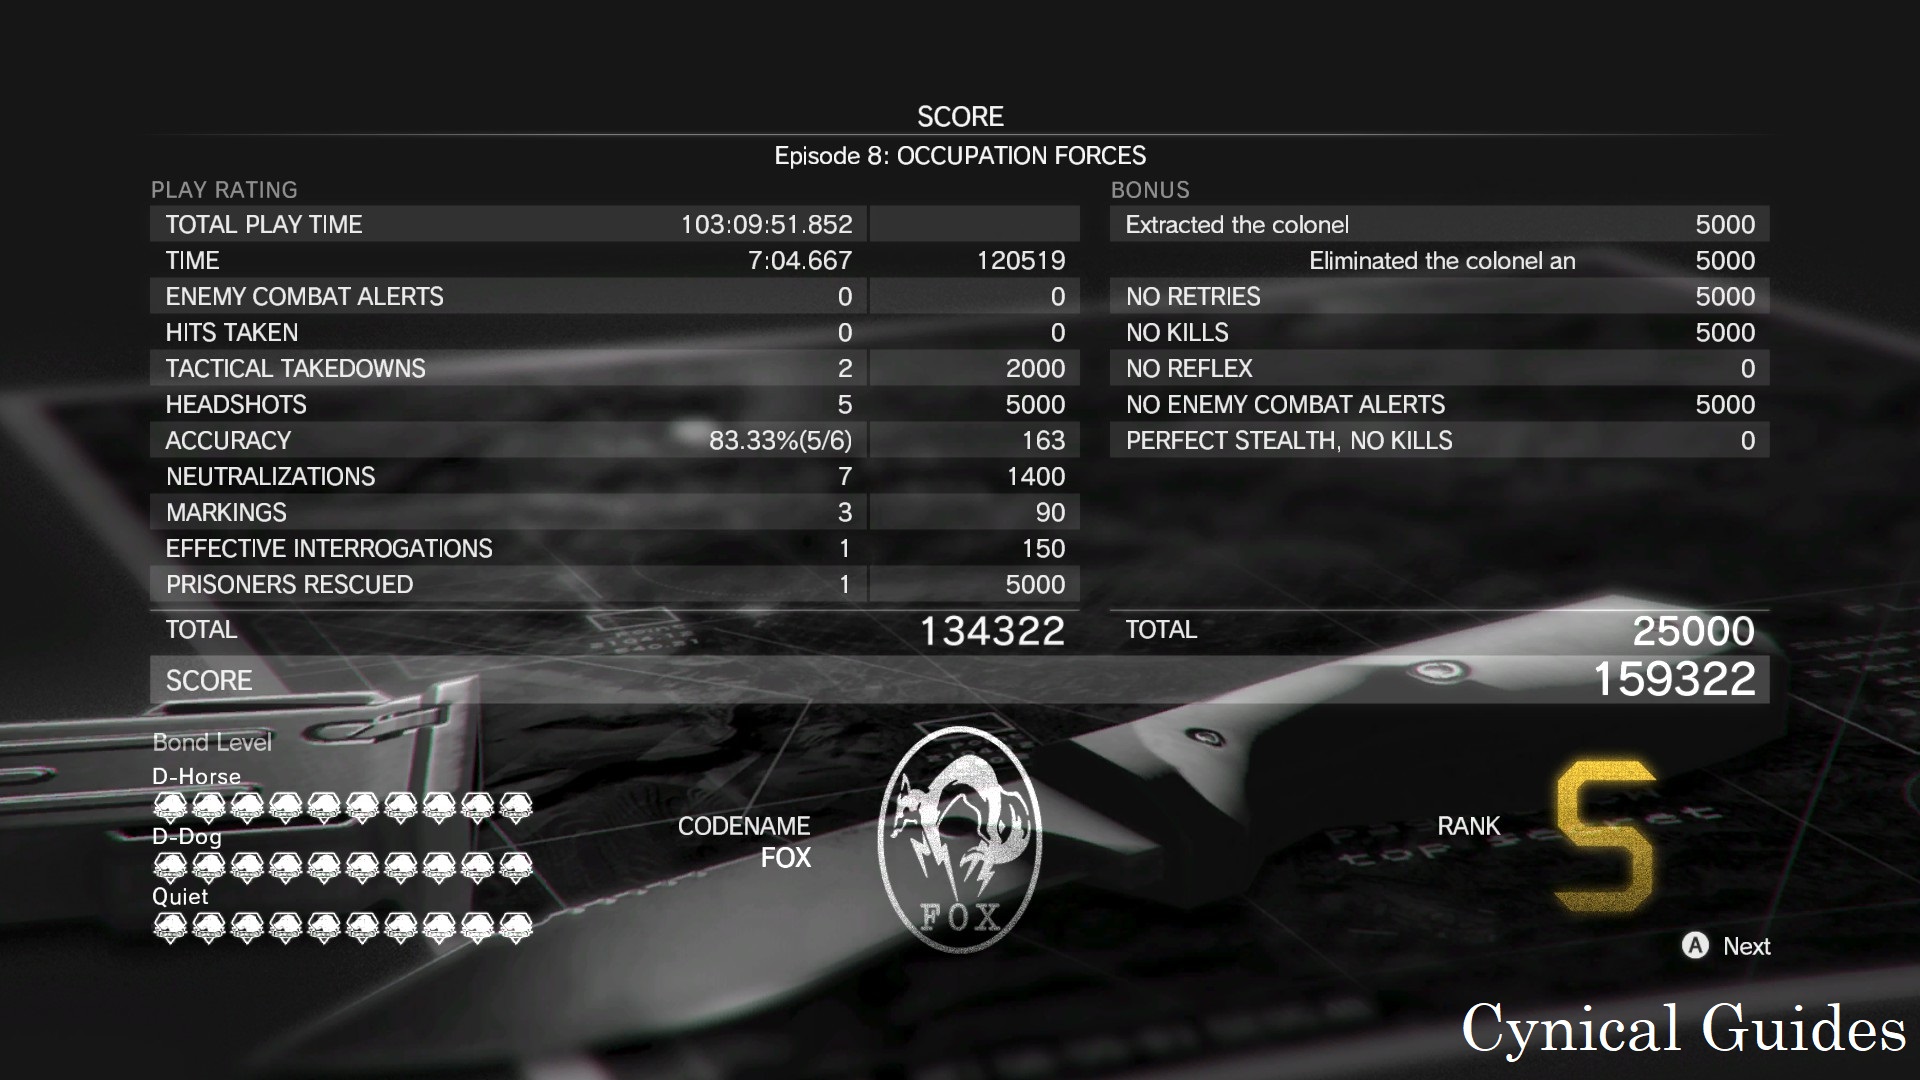
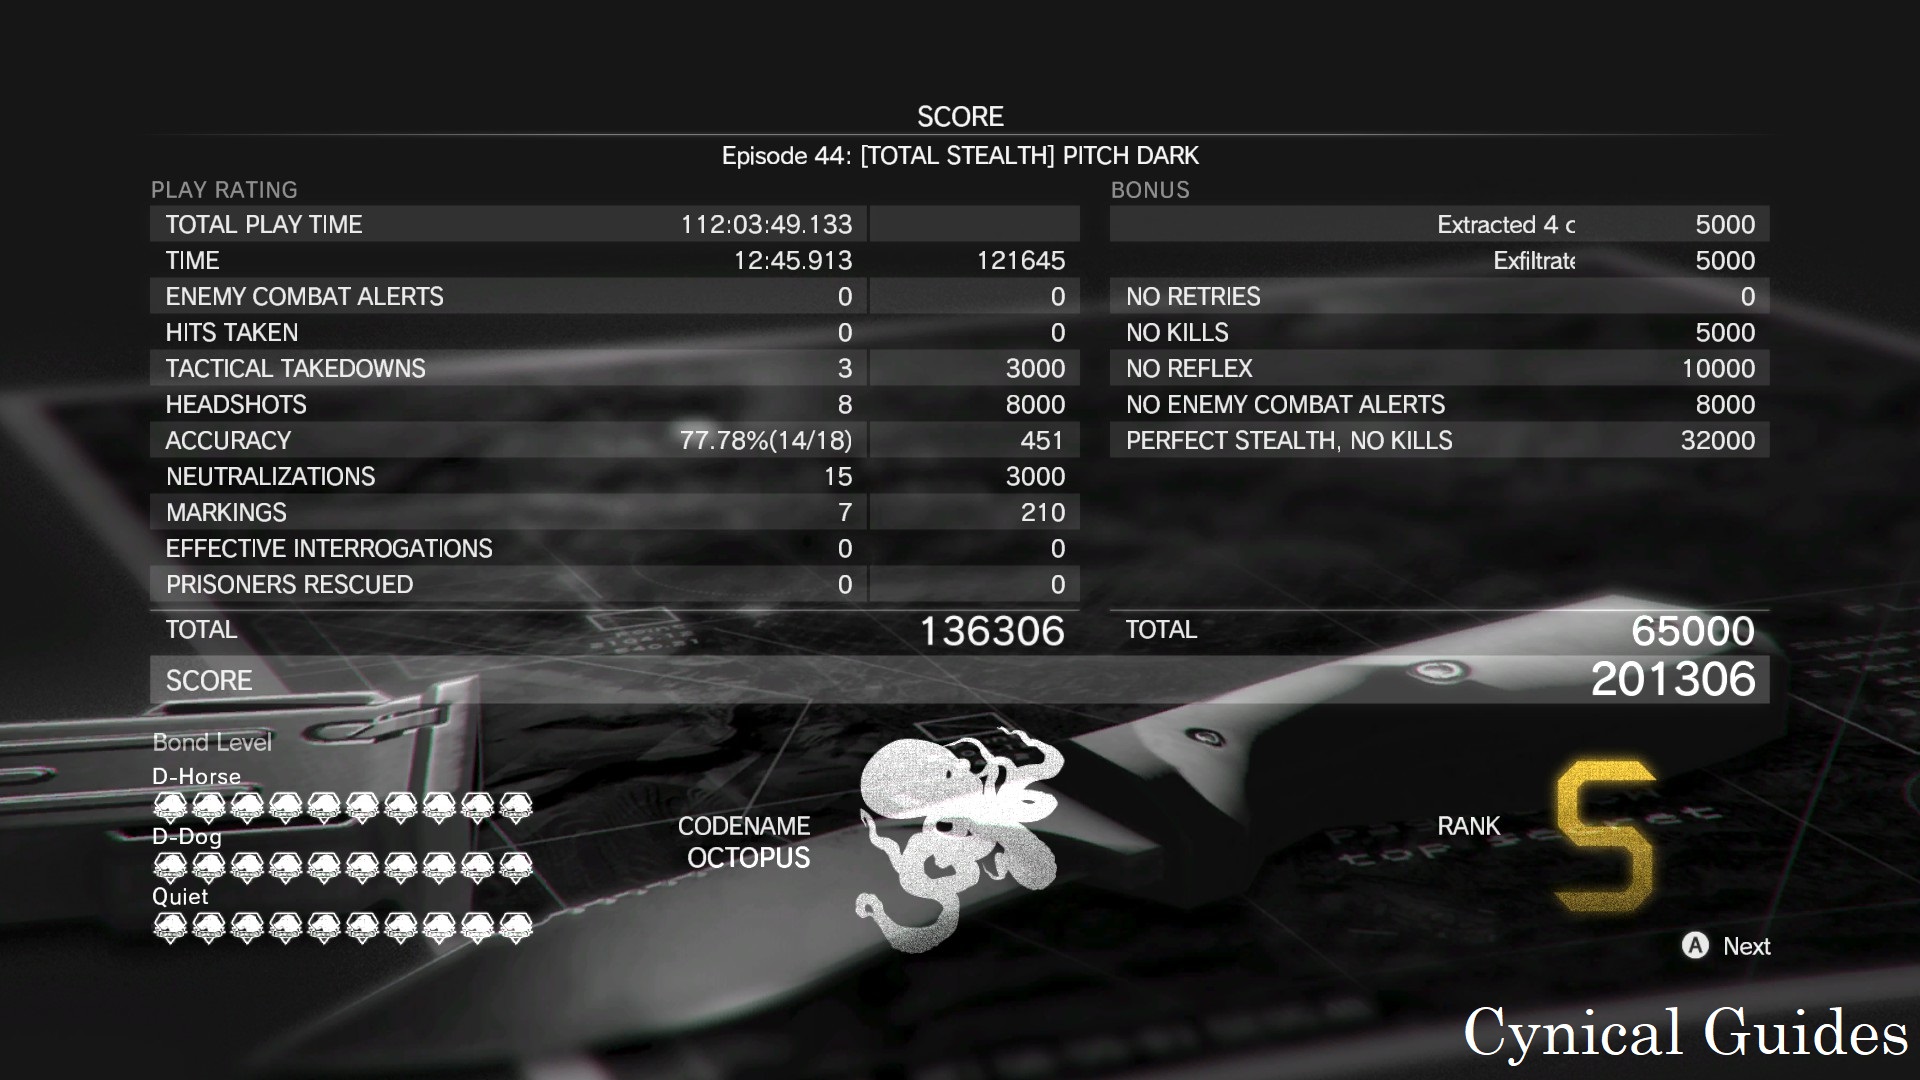
So, watch the soldiers in the car, take drugs when they get out, and then direct impact a guy exiting a door using a rocket launcher. Metal gear, ladies and gentlemen.
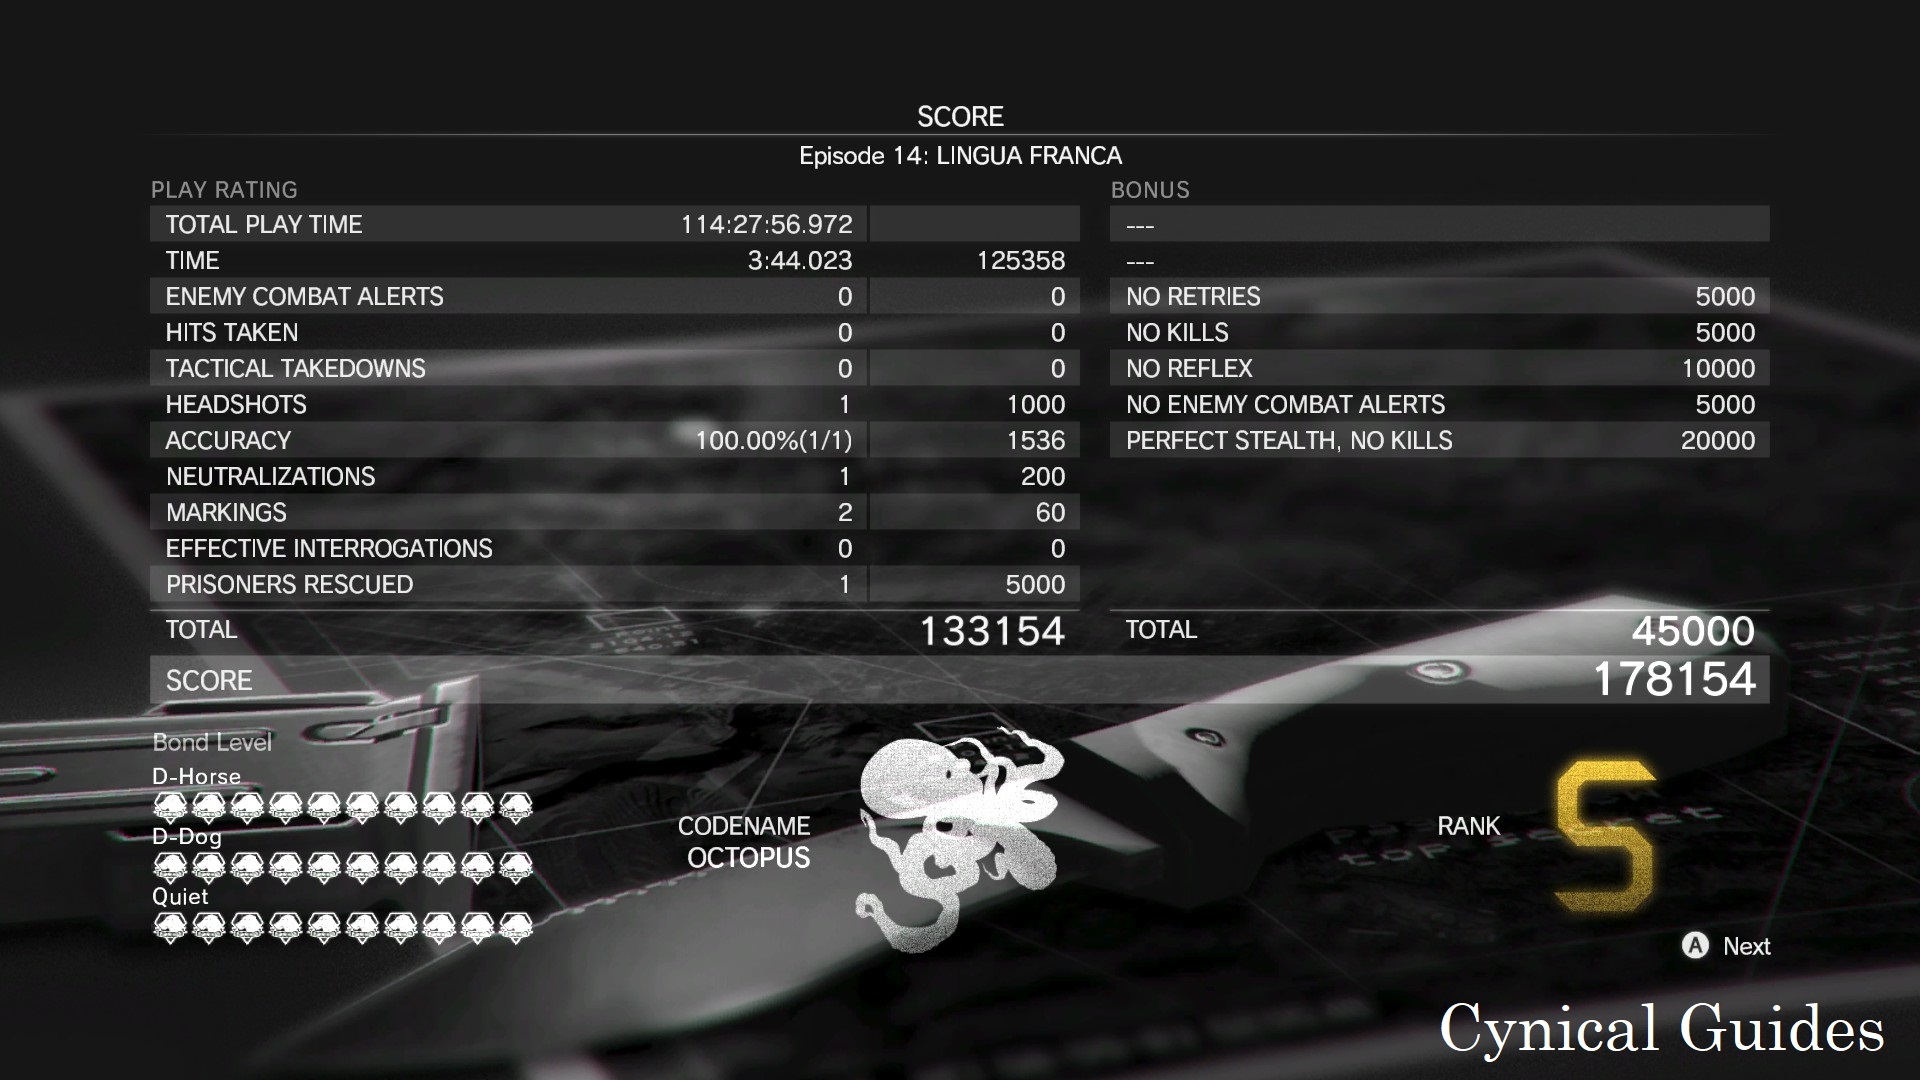
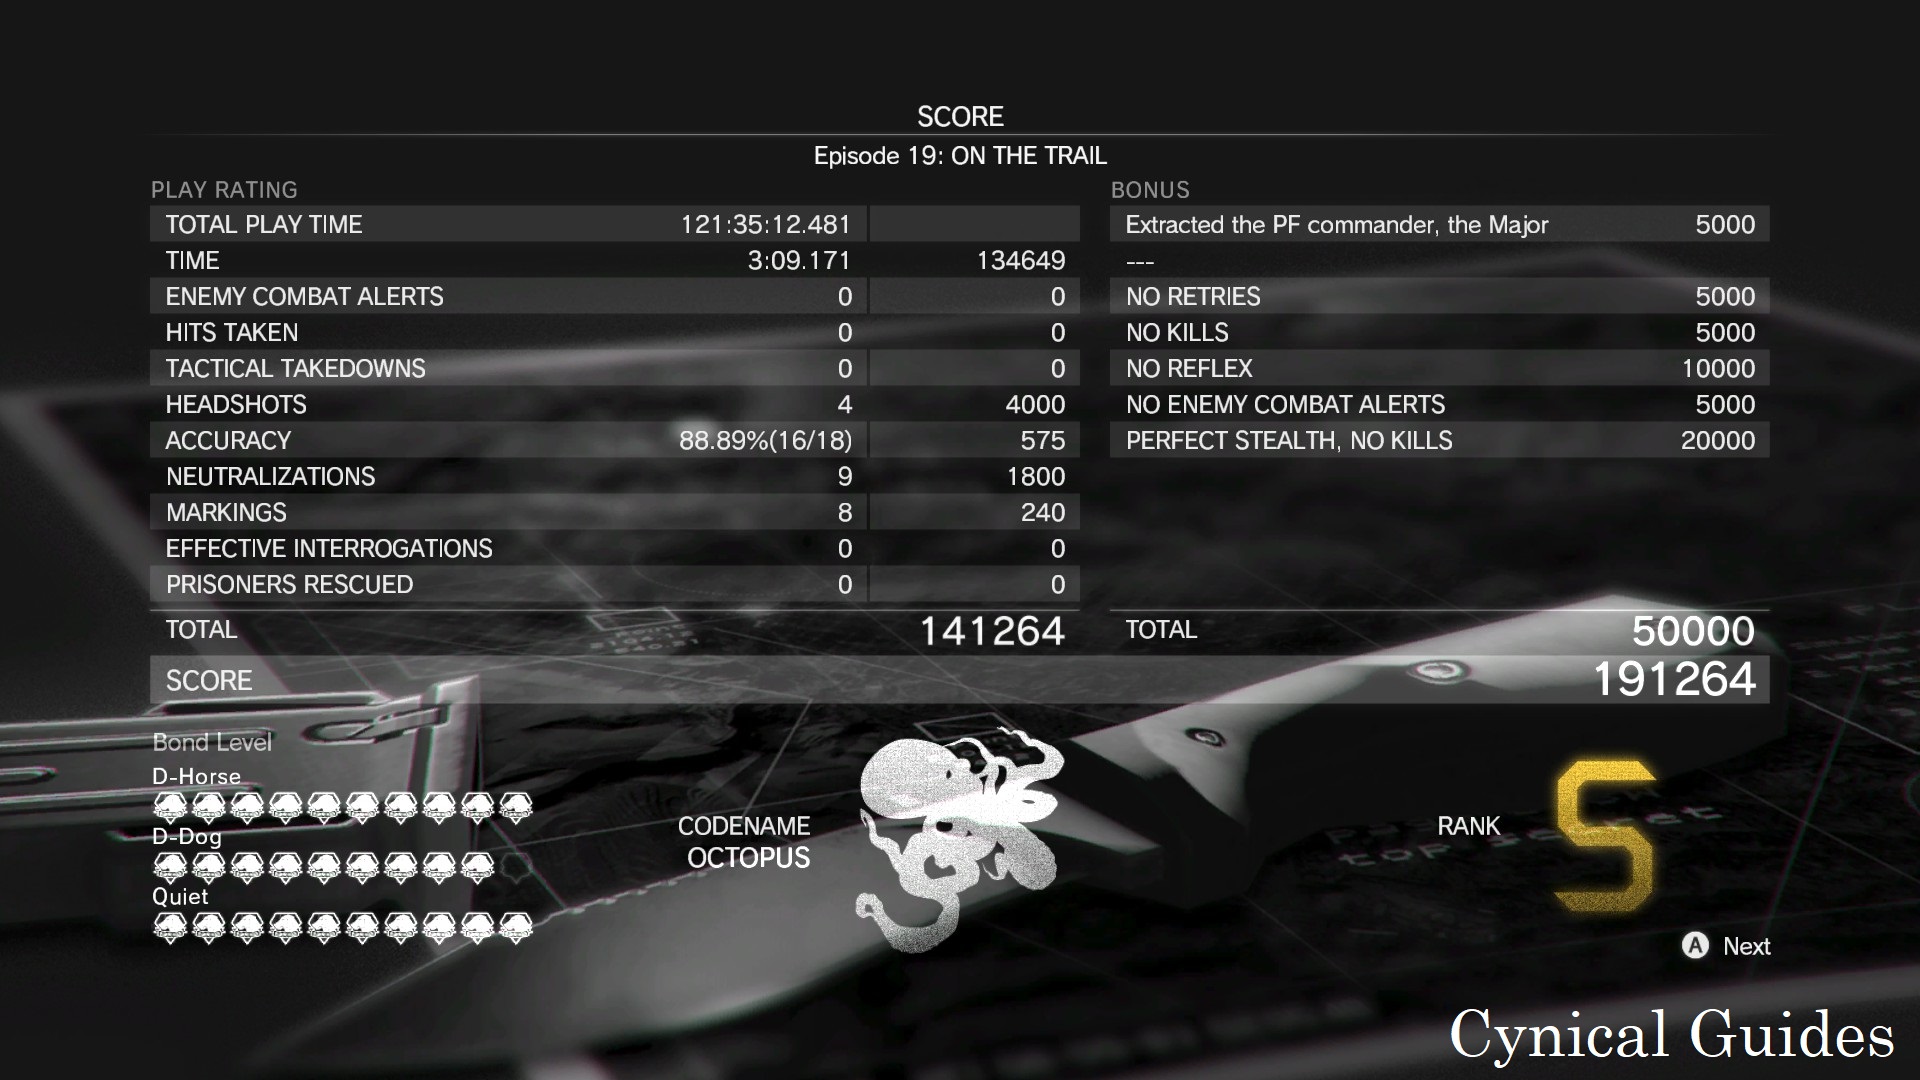
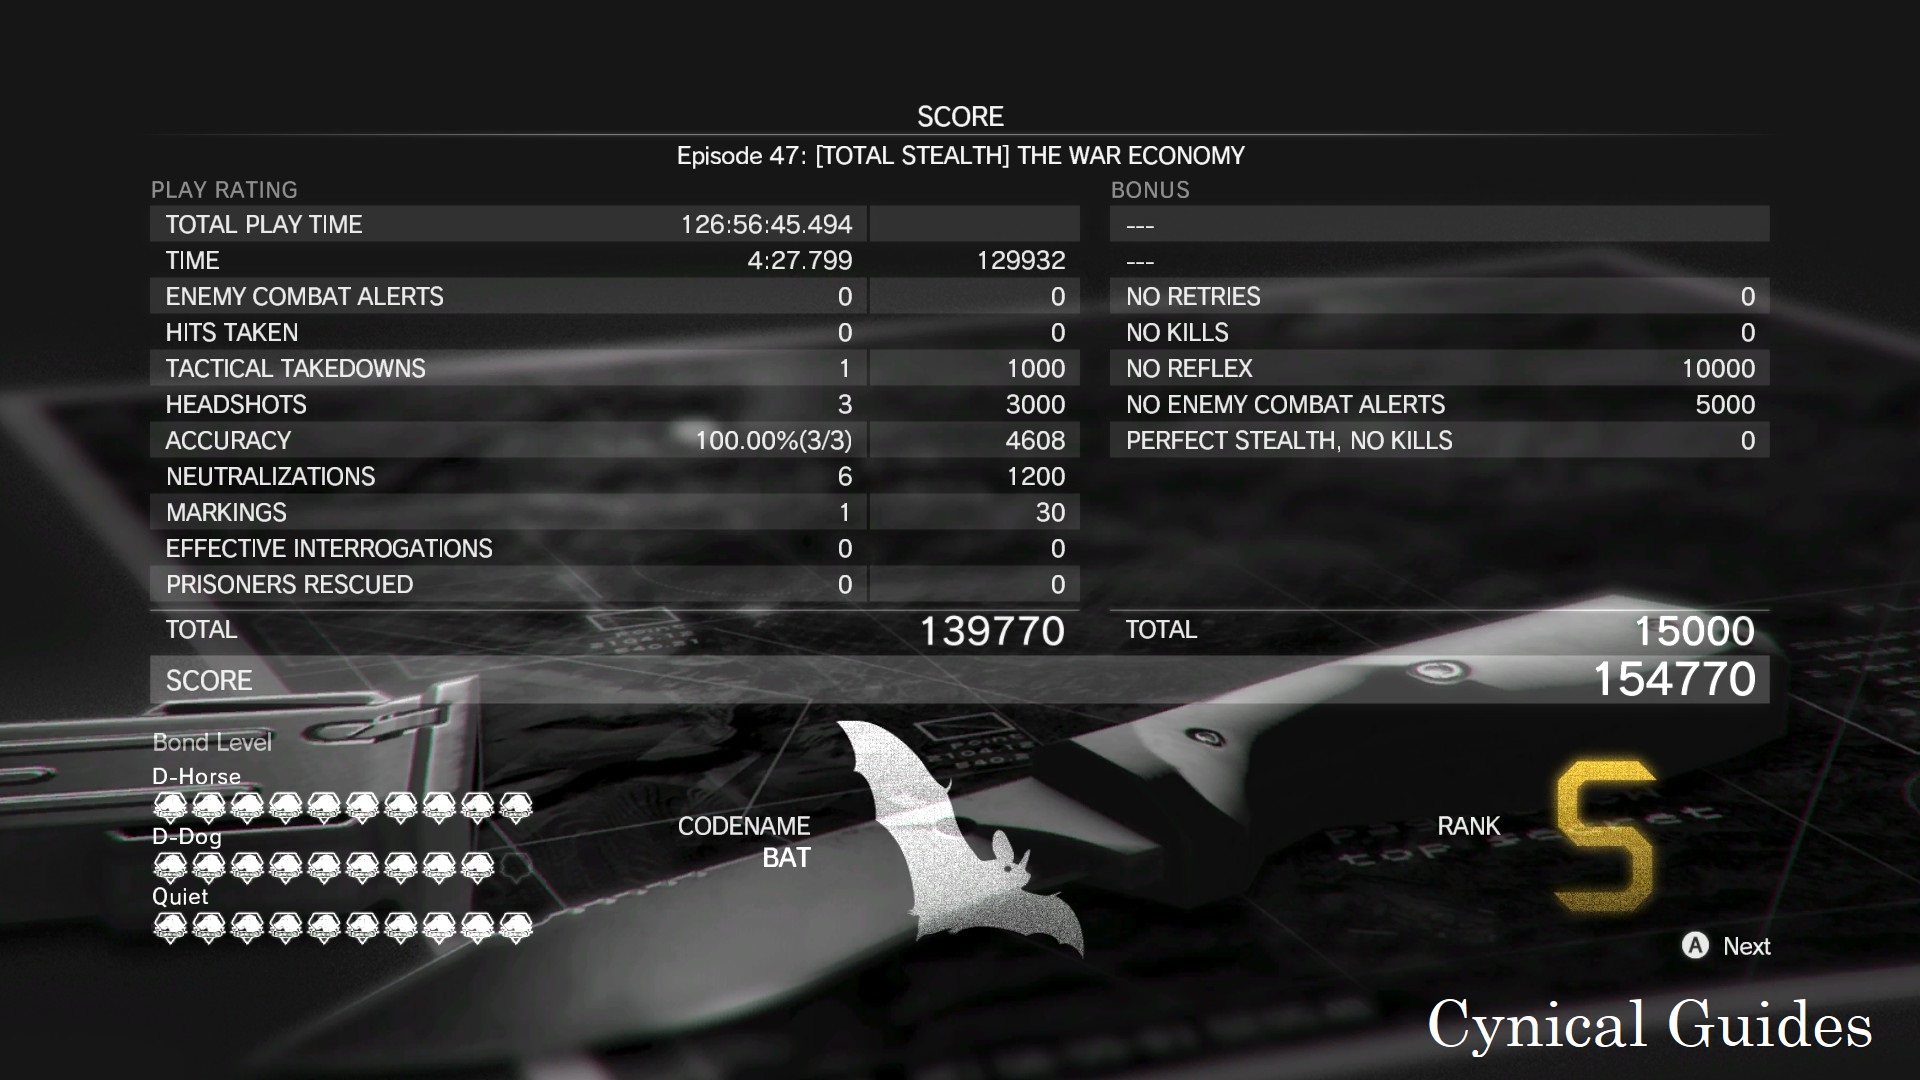
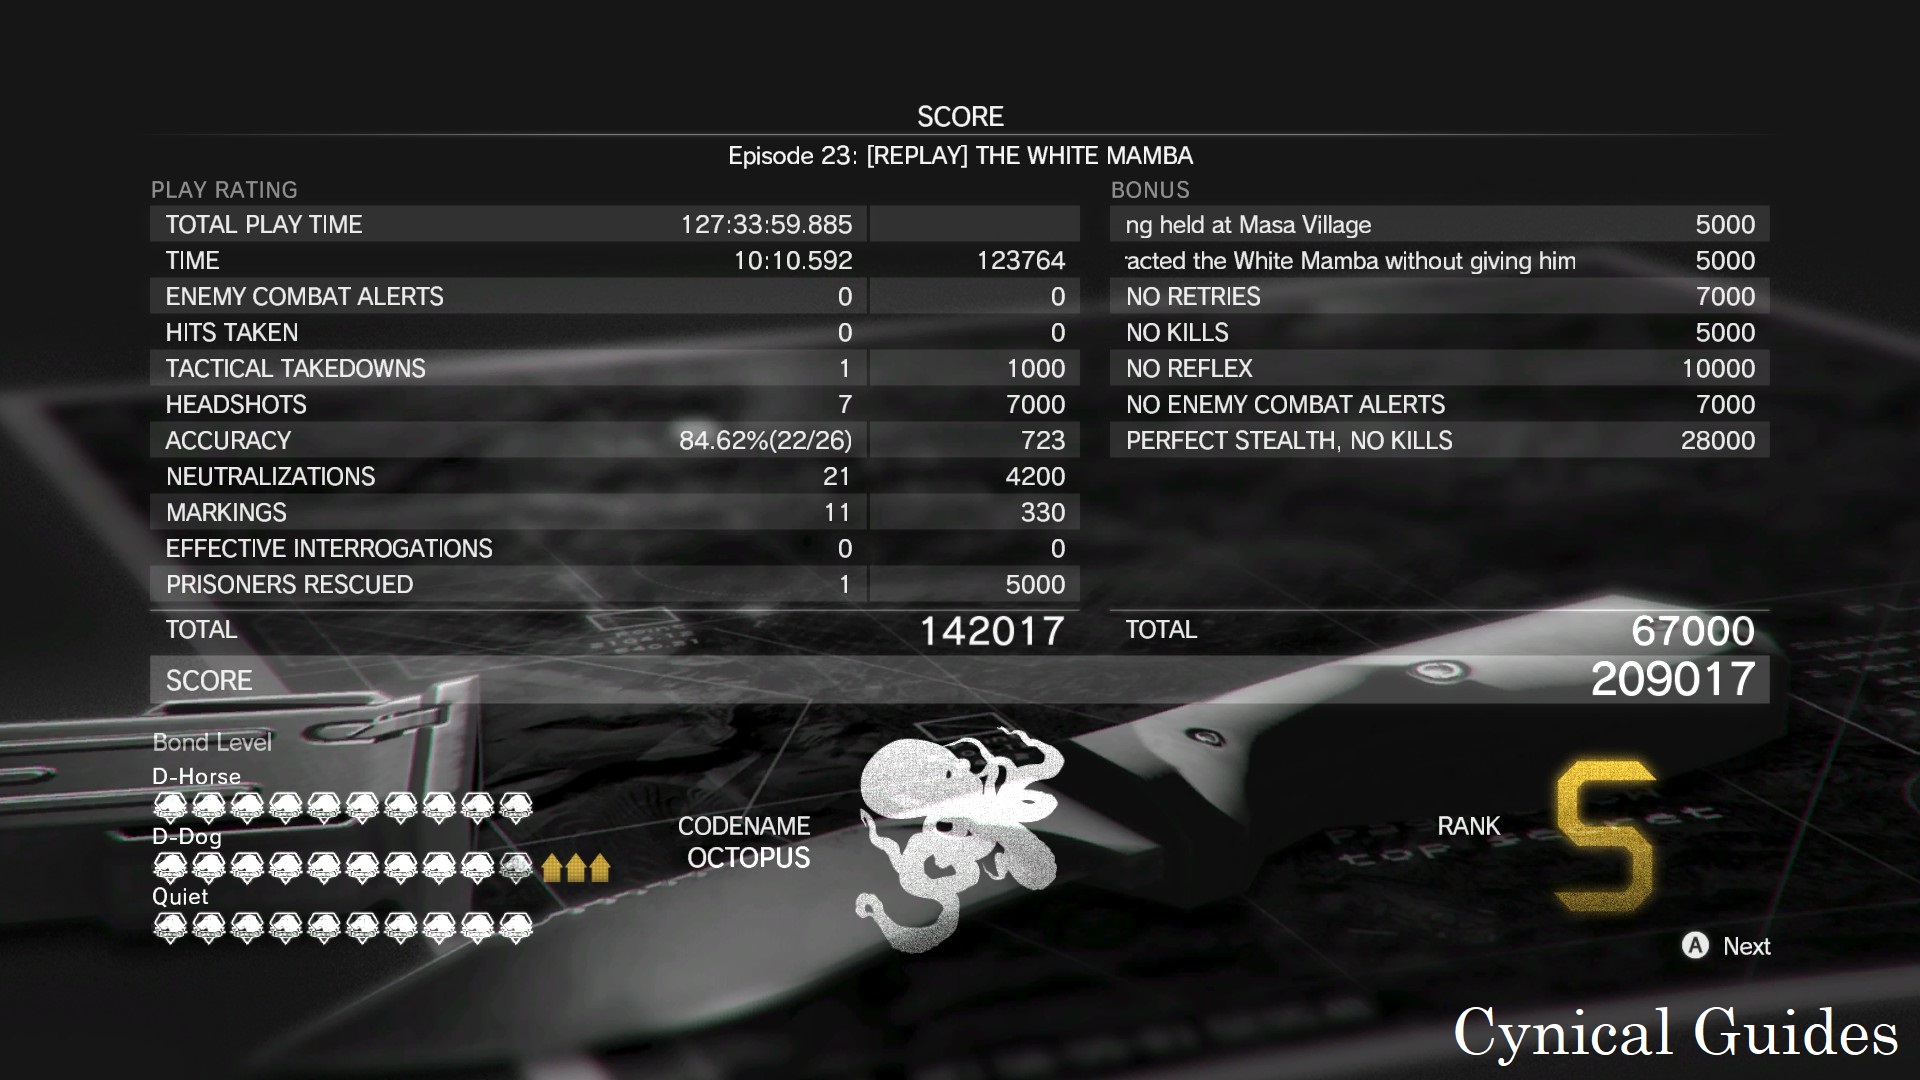
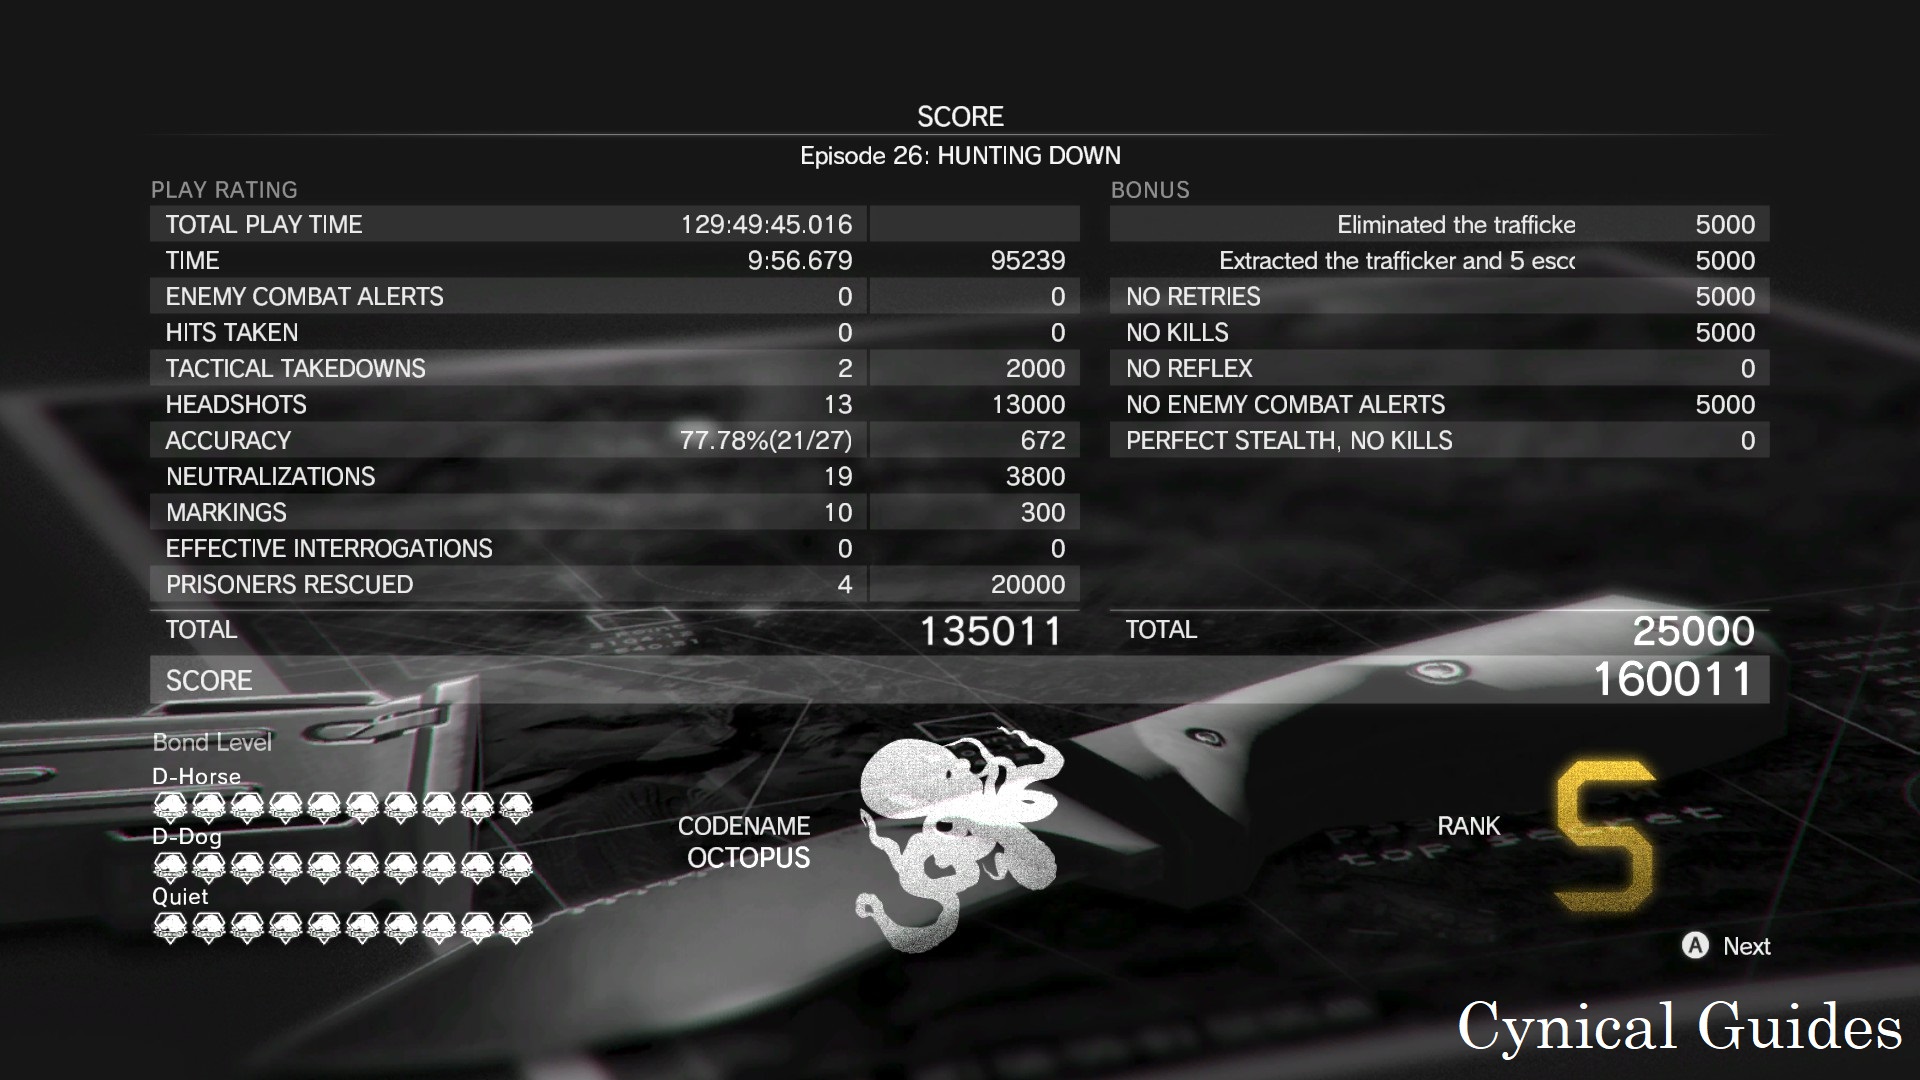
The fulton launcher doesn't limit the rank, somewhat surprisingly. It's just rarely bothered with due to the ammo and it's fickleness in a gunfight. That and no sniper rifle. But when all you're doing is shooting one guy one time from 100+ meters away it's perfectly fine.
Cynic 0055  [author] Feb 21 @ 5:00pm 
Hey Relyks2000, you are able to choose when you build the Nuke I believe. If you are in Online Mode, it will default/make you use your Online Materials but if you swap to Offline Mode, you can use your Offline Materials.

When I cover it at the end of the guide, I strongly recommend you swap the game to Offline Mode while your Nuke is being built anyways as no one can steal it if you are not around once it gets built. But even if you build the Nuke in Online Mode, you can still keep it safe by swapping to Offline Mode too.

I would just make your decision one the time comes & you will see what Mode Materials you have more of; you could have more or less of each depending on all the things you end up developing between now & then.
Relyks2000 Feb 21 @ 3:30pm 
Should I be doing online dispatch missions toward the nuclear weapon, or can I just use my offline material? Even though I still have quite a ways to go to get to that point of the guide, I have almost twice as much as I need offline. Should I switch to doing online missions instead?
Relyks2000 Feb 17 @ 6:22pm 
Mission 9 is annoying. S-rank here in a couple minutes first try.

https://www.youtube.com/watch?v=0Ok6k3hbsAc&t=198s