METAL GEAR SOLID V: GROUND ZEROES

METAL GEAR SOLID V: GROUND ZEROES

348 ratings
100% Achievement Guide: MGS5 - Ground Zeroes
By Cynic 0055
This is a comprehensive 100% Achievement guide detailing a step-by-step walkthrough to take you from 0 all the way to 100%. If you are looking for a particular Achievement or Collectible, use Ctrl+F & type it into the search bar for more direct help.

I run support & debug help on all my guides. If you have any questions, problems, or find errors in the guide itself, do not hesitate to leave me a comment & I will get back to you as soon as I am able to. Happy Hunting!
6
5
10
4
3
2
2
2
   
Award
Favorite
Favorited
Unfavorite
Introduction:

Achievement Breakdown: (16)
Story Related: (7)
Side Objectives: (7)
Collectibles: (2)
Miscellaneous: (2)


Ground Zeroes is the short prequel game to Metal Gear Solid 5 – The Phantom Pain. It consists of a single Main Mission & six smaller Missions all taking place in the same location, Camp Omega. Stealth is your greatest ally in this game & quite often so is playing non-lethally. In my guide, I have Camp Omega broken down into seven individual locations: Western Camp, Warehouses, Eastern Camp, Eastern Prison Camp, Heliport, Administration Compound, & Boiler Room. This will help us navigate & have an idea on where things are located; be the end of the first Mission you will have a pretty solid foundation on things…


For the Unlocked Achievement, we need to unlock all 53 Trials in the game. Unlocking the Trials will require four separate playthroughs of all 7 Missions in the game, though some may require less. Note that we only need to unlock the Trials & have them listed; we do not actually have to complete every individual Trial.

For every Mission we need to:
1. Complete the Mission on Normal
2. Complete any Trial on Normal (Fastest Marking of All Enemies)
3. Complete the Mission on Hard
4. Complete any Trial on Hard (Fastest Completion Time)

For the Hero Achievement, we also need to earn a S-Rank on all 7 Missions. This is challenging but will get easier the longer you play the game & get used to the mechanics. The requirements for S-Rank differ between Missions, but for the most part it relies on not being detected, not killing anyone, not reloading Checkpoints, & rescuing Prisoners. There are a lot of factors that go into it & you are allowed some leeway in certain areas if you excel at others.

If you plan on carrying on to Metal Gear Sold 5 – Phantom Pain, your Save File on Ground Zeroes can be uploaded & imported. A Sneaking Suit, two Skins, a Bionic Arm, & a bunch of special Staff Volunteers can be unlocked in game just by completing the Missions on Normal & Hard. The Staff Volunteers are the Prisoners we find throughout each Mission & must be extracted to be saved for transfer.

*Guide contains major spoilers.
Sequence 1: Insurgency
1. Main Mission: Ground Zeroes
2. XOF Unit Patches: 7/9
3. Cassette Tapes: 2/13
4. Achievements: 0/16
-----------------------------------------------------------------------------------------------------

Main Mission – Ground Zeroes (Normal):
To begin, first we will just focus on completing the Main Mission as well as locate all 9 XOF Unit Patches; do not worry about our Mission Score at the end. Use this time to familiarize yourself with the layout of Camp Omega, enemy patrol paths, where to stash bodies, etc. Feel free to cause as much chaos as you want though I highly recommend remaining undetected as it will make things much easier. Make it a habit of Marking any enemies we come across with our Binoculars so that we can track their locations. If you are detected, don’t be afraid to reload your last Checkpoint & try again; if you do reload, any unsaved XOF Patches or Cassette Tapes collected will have to be re-collected.


XOF Unit Patch #1: As soon as we take control of Snake at the start of the Mission, turn immediately to your left & walk over to the edge of the cliff where we can find our first XOF Patch beside a bush.

XOF Unit Patch #2: The next XOF Patch is actually stuck behind Snake’s ammo pack. Get into the prone position in a flat space then pull out one of your Weapons. With our gun pointed, roll back & forth on the spot (if you hold the roll, you will go farther) & a cinematic will trigger showing us how it got back there. The XOF Patch will then appear on the ground beside us to be picked up.

XOF Unit Patch #3: To get inside Camp Omega, we first have to evade the Soldier in the watchtower with the spotlight; sneak up the ladder to him & grapple him or just shoot him.

With him knocked out or killed, pick the lock on the front gates & enter into the Camp. Begin heading left over towards the Western Camp (where all the tents are); there will be two Soldiers patrolling near the tents with another in a watchtower nearby. From where we entered the Camp, drop down through the fences & we can see some dumpsters, a stack of wooden boards, & a wooden shack. Immediately in front of the wooden shack will be a pile of rubbish; we can find the XOF Patch in the center of the garbage.

XOF Unit Patch #4: From the tents, keep heading North through Camp Omega past the line of warehouses off our right; we need to get outside of Paz’s Cell to collect a Cassette Tape before we can go & rescue Chico. Stick to the shadows & go slowly to avoid being detected.

On the far North side of the Warehouses will be a small fenced off area with some transformers in it. Pick the lock to the gate to enter inside where we can find an XOF Patch on top of the leftmost transformer.

XOF Unit Patch #5: Exit the fenced area & keep heading North through the Camp to the next fence line on the hill above us. From here, walk left to find an open gate where we can start Marking the enemy Soldiers inside; there are quite a few here in the Heliport so be careful! You may want to slowly start clearing out some of the Soldiers by either taking them out with your Wu Silent Pistol or by sneaking up & grappling them. When dealing with bodies, always make sure they are stored in the shadows away from natural patrol paths.

In the center of the Heliport will be a line of four square heli-pads; we can find an XOF Patch on the ground in the center of the heli-pads just South of the orange & white windsock flag close to a small metal power bank. Very carefully crawl over to it to collect it.

XOF Unit Patch #6: We now have to get over to the North end of the Heliport… where quite a few Soldiers will be patrolling. To get there safely, try heading East around the Heliport where there are less Soldiers & more shadows. Once you hit the road at the East side, follow it up to the fences & follow them to the left. Go prone & crawl underneath the building that has a Security Camera on it & we can find a square grate removed from the floor back here that will let us enter the drainage channel. Crawl through the channel until you reach the far side where we can find an XOF Patch in behind some iron bars within the channel.

XOF Unit Patch #7: We now need to get into the Administration Compound close to where Paz is being held prisoner. Exit the drainage channel from the far side & follow the compound walls along to the North West where we can find a red door we can enter through. We now need to get onto the roof of the building off our left from where we enter.

Being mindful of the patrolling Soldier in this area, climb onto the first set of ventilation systems in front of us & use them to leap off of onto the nearby roof to our left. We can find an XOF Patch stuck to the cylindrical air vent on this roof.

Cassette Tape #1 – Chico's Tape 5: Missable. Evade the Security Camera now & head down the nearby stairs off our left to enter the Boiler Room. From here, take the next set of stairs down to our left & we will be in the area they are holding Paz. Sneak behind the nearby fuel tanks & we will overhear some Soldiers talking about a thrown out Cassette Tape. Miller will then mark it for us on our map. Do not free Paz yet or it will progress the Mission!

Backtrack out of the Boiler Room (you may want to dispatch/stash the Soldiers in the prison here first) & now take the other path available to us in the Boiler Room to exit out to the other side of the Administration Compound. Evading the patrolling Soldiers, sneak around to the far North West side of the compound to the waypoint left by Miller for the Cassette’s location; it will be on a dumpster in the alley way here.

This Cassette Tape is missable & will not appear if we rescue Chico before collecting it!

Cassette Tape #2 – Chico's Tape 2: With the missable Cassette Tape collected, we can now relax a bit & get back to the actual Mission Objectives. Before leaving the Administration Compound, from where we grabbed the last Cassette Tape, sneak across to the South end of us near the compound walls. Here we can find a ladder that will lead up to a walkway. Follow the walkway along over to another ladder that will take us up to the large watchtower on the Administration Compound walls; enter the tower office to find a Cassette Tape on the desk inside.
Sequence 2: Ground Zeroes
1. Main Mission: Ground Zeroes (Normal)
2. XOF Unit Patches: 9/9
3. Cassette Tapes: 5/13
4. Achievements: 4/16
-----------------------------------------------------------------------------------------------------

Main Mission – Ground Zeroes (Normal):


XOF Unit Patch #8: Leave Paz be in the Administration Compound & navigate your way back out over towards the Eastern Prison Camp where Chico is being held. While we head over there, make a point of stealthily dispatching as many Soldiers as we can to give us an easier time for when we extract Paz.

Head back the way you came through the compound, drainage channel, then down the road away from the Heliport. As we head down the road South, we can take a side dirt road to the close to the top end of the Eastern Prison Camp. Follow the dirt road down & it will end at a small guard station near the cliff edge overlooking the ocean. Climb on top of the guard station roof to find an XOF Patch here.

XOF Unit Patch #9: Head South now over to the Eastern Prison Camp fencing; there is a Soldier patrolling on the inside of the prison with a guard at either side of the fence along the road. Dispatch the Soldier at the entrance & possibly the one patrolling on the inside; we can find our final XOF Patch immediately inside the prison on the ground where we enter.

Even though we have all 9 XOF Unit Patches now, the Insignia Achievement will not unlock until we complete the Main Mission. Be extra sure that if you ever reload a Checkpoint before getting a new Autosave now & that you recollect the last few XOF Patches!

Cassette Tape #3 – Metal Gear Solid V: With the Soldiers taken care of & the last XOF Patch collected, use your Binoculars & Mark all of the Prisoners in the compound. There are five Prisoners total in the compound with one being Chico. From where Chico’s cell is, look in the cell directly behind him & pick its lock to find a Cassette Tape inside it.


Achievement #1 – Reunion: Reunite with Chico or Paz.
Story Related. Pick the lock to Chico’s cell in the Eastern Prison Camp & subdue Chico for extraction.

This will also unlock if we rescued Paz first.

Cassette Tape #4 – Chico's Tape 3: With Chico now subdued, Miller will send us the coordinates to where we can extract him. Pick up Chico & stealthily make your way over to the Landing Zone along the cliffside; we will receive this Cassette Tape from Chico after we place him down at the Landing Zone.

Call in an Extraction Chopper from the Menu on your iDroid to extract Chico. Wait for a minute or so & Morpho will come flying in to pick up Chico; we must manually put Chico in the Chopper ourselves to extract him.

We can return to the Eastern Prison Camp & ferry over all four of the other Prisoners kept there to be extracted as well. There is no Achievement associated for this, but is essential for when we attempt an S-Rank on this Main Mission. If you are feeling pretty good about your current score, extract the Prisoners for a massive boost to our score.


Achievement #2 – Rescue: In the "Ground Zeroes" Mission, rescue the Prisoner to be executed & extract him via Chopper.
With Chico extracted along with any other of the Prisoners you wanted, we now have a more high profile Prisoner to extract. Make your way over to the far Western Camp (the location with all the tents that is close to where we first started the Main Mission).

When we return here, if we have not alerted Camp Omega to our presence, we can find a new Prisoner close to that shack we found the XOF Patch near & three Soldiers keeping watch over them. Stealthily dispatch the three Soldiers & pick up the Prisoner. Take the Prisoner over to where we first began the Mission & call in an Extraction Chopper to rescue him; the Achievement will unlock as soon as we place them in the Chopper.

If the Extraction Chopper is detected & the base goes an alert, just reload a previous Checkpoint & it will undo the detection.

By Extracting this Prisoner, not only will we unlock the Achievement but we will receive Cassette Tape #5 – Chico’s Tape 4 when we complete the Main Mission as well.


Achievement #3 – Downfall: Clear the "Ground Zeroes" Mission.
Story Related. All that is left to do now is extract Paz & complete the Main Mission. Return to the Administration Compound & enter into the Boiler Room where we can find Paz. Cut her down & pick her up to take over to whichever Landing Zone is closest/safest for you. When we retrieve Paz, two new enemy Soldiers will spawn & patrol over to where Paz’s cell is; if they reach it they will notify everyone that she is missing & send the Camp into high alert; ambush/dispatch them to remain undetected.

Get Paz to a Landing Zone & put her in the Chopper; hop into the Chopper yourself to extract as well which will end the Main Mission unlocking the Achievement.


Achievement #4 – Insignia: Obtain all 9 XOF Unit Patches.
If collected all 9 XOF Unit Patches, we will unlock this Achievement at the very end of Main Mission – Ground Zeroes. This is after the final cinematic, closing credits, prequel game text, & yet another cinematic teaser for the actual Metal Gear Solid 5 game, The Phantom Pain.

With all that watched we will receive the post-Mission rewards screen where our Achievement will finally be unlocked.

Cassette Tape #5 – Chico's Tape 4: If you rescued the special Prisoner who was to be executed in the Western Camp, we will receive this Cassette Tape on our post-Mission rewards screen as well.
Sequence 3: Heaven's Divide
1. Main Mission: Ground Zeroes
2. Cassette Tapes: 5/13
3. Trials: 11/53
4. Achievements: 4/16
-----------------------------------------------------------------------------------------------------

After we complete the Main Mission – Ground Zeroes on Normal Difficulty as well as find all XOF Unit Patches we will have all 4 Side Ops & both Extra Ops unlocked to play through. We will also unlock the first 10 of 53 Trials for the game needed for the Unlocked Achievement.

Trial #1 – Fastest Marking of All Enemies (Ground Zeroes): Unlocked by completing Main Mission – Ground Zeroes on Normal Difficulty.

Trial #2 – Fastest Collection of All Mines (Déjà-Vu): Unlocked by completing Main Mission – Ground Zeroes on Normal Difficulty.

Trial #3 – Fastest Unlocking of All Doors (Déjà-Vu): Unlocked by completing Main Mission – Ground Zeroes on Normal Difficulty.

Trial #4 – Fastest Collection of All Mines (Jamais Vu): Unlocked by completing Main Mission – Ground Zeroes on Normal Difficulty.

Trial #5 – Fastest Unlocking of All Doors (Jamais Vu): Unlocked by completing Main Mission – Ground Zeroes on Normal Difficulty.

Trial #6 – Fastest Collection of All Mines (Déjà-Vu): Unlocked by completing Main Mission – Ground Zeroes on Normal Difficulty.

Trial #7 – Longest Range Headshot (Overall): Unlocked by completing Main Mission – Ground Zeroes on Normal Difficulty.

Trial #8 – Longest Range Headshot Tranq. (Overall): Unlocked by completing Main Mission – Ground Zeroes on Normal Difficulty.

Trial #9 – Furthest Distance Enemy Sent Flying (Overall): Unlocked by completing Main Mission – Ground Zeroes on Normal Difficulty.

Trial #10 – Longest Two-Wheel Driving Time (Overall): Unlocked by completing Main Mission – Ground Zeroes on Normal Difficulty.

Main Mission – Ground Zeroes (Fastest Marking of All Enemies):
With the Main Mission complete, we can now access Trials on our playthrough. Load up Main Mission – Ground Zeroes on Normal Difficulty again & when we go to Mark Soldiers, a counter will begin appearing out of 40. To complete the Trial, we must Mark all 40 Soldiers on the Mission.

Note that every Mission has Phases that will add more Soldiers onto the map & increase our counter; for Ground Zeroes there are three Phases:
1. Start Up
2. After we save Chico
3. After we save Paz

For the easiest time, do not save Chico or Paz to begin & instead Mark all 40 Soldiers currently on the map. That way even when new Soldiers appear, the Trial will already be completed & not be effected. Try to remain undetected throughout the Mission as if we are detected, reinforcements will be called in & add to our list of Soldiers to Mark. The locations of the Soldiers are also noted for their natural patrol paths; becoming detected or alerting the base will move Soldiers from their natural locations.

If an enemy is killed before we can Mark them, we will fail the Trial & have to reload our last Checkpoint. Note that you will need to re-Mark any Soldiers who came after your last Checkpoint!

South Entrance 1-5: When the Mission begins, Mark the first 3 Soldiers near the front gates & outside in the watchtower. Dispatch the Soldier in the watchtower & climb up the cliffs just South of the watchtower where we can overlook Camp Omega. Wait here on the cliffs for a bit, Marking all Soldiers we can see.

After a minute or so, 1 Soldier will drive by on the road below us in a Four-Wheel Drive; Mark him!

Wait for another two minutes & 1 Soldier will drive by in a Truck on the same road; Mark him!

Western Camp 6-7: Head over to the Western Camp now with all of the tents & we can spot 1 Soldier up in a watchtower with another 1 Soldier standing guard below the tower along the road.

Warehouses 8-12: Make your way over to the Warehouses now in the South portion of the camp. To start, Mark the 1 Soldier up in the watchtower near the AA Gun. Now make your way, North, down the road past the watchtower to the left of the warehouses where we can find 1 Soldier standing guard in front of a fence gate & an American flag.

As we near the fence gate, 1 Soldier will come rushing out from in between the warehouses before patrolling back in between them where he will link up with 1 more Soldier.

We can find 1 Soldier on the right side of the warehouses near the forklifts as well.

Eastern Camp 13-16: Ignore the Soldiers up in the Heliport for now & carry on over to the Eastern Camp with all the tents. It can help climbing on top of one of the warehouses for a vantage point. We can spot 2 Soldiers up in watchtowers, 1 Soldier patrolling on the road leading up to the Heliport, & 1 Soldier patrolling on the road close to the overpass leading up to the Heliport on the other side of the Eastern Camp.

Eastern Prison Camp 17-19: Now head over to where Chico is being held where we can find 1 Soldier patrolling on the road leading down from Eastern Camp, 1 Soldier guarding outside the prison doors with another 1 Soldier patrolling inside.

Do not interact with Chico’s cell or we will initiate Phase 2 of the Mission & more Soldiers will spawn!

Heliport 20-31: This is where the bulk of our Soldiers are going to be. 1 Soldier will be patrolling on top of the overpass bridge; from the overpass, climb on top of the nearby building on the East side of the Heliport for a vantage point.

Close to the building on the East side, we can find 1 Soldier patrolling. 2 Soldiers can be found guarding the Heliport entrance on the road from the Warehouses. 1 Soldier can be found at the far West end near an AA Gun. 2 Soldiers can be found patrolling a large square perimeter around the edges of the helipads. 4 Soldiers can be found guarding the front entrance to the Administration Compound beside an APC. A final 1 Soldier can be found on top of the Administration Compound walls in the watchtower overlooking the Heliport.

Administration Compound 32-36: Enter the Administration Compound now from the South entrance (not West entrance) & we can find 1 Soldier patrolling in between the ventilation systems on the ground.

Pass through the Boiler Room passageway over to the far side of the Administration Compound to find 1 Soldier guarding the stairs leading up. 2 Soldiers can be found to the right of the stairs in between the buildings. 1 Soldier can be found to the left of the stairs standing guard out in the open under some lights.

Boiler Room 37-40: The final 4 Soldiers can be found outside Paz’s cell in the Boiler Room.

If you are missing Soldiers, sprint around Camp Omega & fire off a non-silenced Weapon to carefully draw Soldiers out.

When the Trial is completed, finish the Main Mission by extracting Paz & Chico.

Trial #11 – Fastest Neutr. of All Enemies: Unlocked by completing Trial – Fastest Marking of All Enemies – Ground Zeroes on Normal Difficulty.
Sequence 4: Here's To You
1. Main Mission: Ground Zeroes
2. Cassette Tapes: 5/13
3. Trials: 15/53
4. Achievements: 5/16
-----------------------------------------------------------------------------------------------------

Main Mission – Ground Zeroes (Hard):
With Ground Zeroes completed on Normal Difficulty, we now get to playthrough it on Hard Difficulty. All we will have is the WU Silenced Pistol & it will only have half of its ammo capacity. As well, Soldiers will be able to detect us much easier making stealth a lot harder & take more time/patience. Ignore our Mission Score, & just focus on completing the Mission on Hard; abuse Checkpoint reload & Combat Reflex. Do not be afraid to go guns blazing & just kill everyone with an enemy's AM Rifle as well.

Trial #12 – Fastest Completion Time: Unlocked by completing Main Mission – Ground Zeroes on Hard Difficulty.

Trial #13 – Fastest Cell-to-Chopper Paz Rescue: Unlocked by completing Main Mission – Ground Zeroes on Hard Difficulty.

Main Mission – Ground Zeroes (Fastest Completion Time):
To unlock the rest of the Trials for Main Mission – Ground Zeroes, we now have to complete this Trial on Hard Difficulty. This is actually easier then it sounds; this Trial will automatically be completed just by finishing the Mission once again on Hard; the actual final time it takes you does not matter at all. Do exactly what you did the first time playing through on Hard Difficulty & complete it once more.

Trial #14 – Fastest Completion Time (Stealth, No Kills): Unlocked by completing Trial – Fastest Completion Time – Ground Zeroes on Hard Difficulty.

Trial #15 – Fastest Comp. Time (No Weapons Used): Unlocked by completing Trial – Fastest Completion Time – Ground Zeroes on Hard Difficulty.

This is the final Trial we need to unlock on Main Mission – Ground Zeroes.

Main Mission – Ground Zeroes (S-Rank):
It is now time for our S-Rank run; playing on Normal is much easier than attempting this on Hard.

Our bonuses towards our scoring are:
1. Prisoners Rescued: +3500 Points (each x4)
2. Escaped Prisoner Recovered: +3500 Points (x1)
3. No Kills: +3500 Points
4. No Reflex: +5250 Points
5. No Combat Alerts: +5250 Points
6. No Retries: +5250 Points

To make things easier, go into Options – Game Settings – Reflex Mode – Off.
You are allowed some margin for error, so long as you save all four Prisoners at the Eastern Prison Camp, get No Reflex, & get No Kills you should be allowed the odd Combat Alert & even a Retry or two.

Each Retry is worth -300 Points, & a Combat Alert is worth -300 Points as well.


Achievement #5 – Skilled: Clear any Mission (including the 4 Side Ops & 2 Extra Ops) with a S-Rank.
Story Related. We will unlock this Achievement after completing Ground Zeroes (or any of the Side/Extra Ops) with an S-Rank.

There is no known list telling how many Points you exactly need for an S-Rank for each Mission; it also differs from Mission to Mission. I will include my Mission Score screen for all of the S-Ranks but note that you are allowed some amounts of +/-.


We now have fully completed Main Mission – Ground Zeroes for our purposes.

31% Complete (Achievement completion not in-game Completion Ratio)
Sequence 5: The Eye & The Finger
1. Side Op: Eliminate the Renegade Threat
2. Cassette Tapes: 6/13
3. Trials: 16/53
4. Achievements: 7/16
-----------------------------------------------------------------------------------------------------

Side Op – Eliminate the Renegade Threat (Normal):
For the Depth Achievement, we must extract the two Targets as opposed to killing them. Remaining undetected is essential for this Side Op; do not be afraid to reload Checkpoints as our Mission Score is irrelevant for now. Note that this Side Op takes place during the daytime making stealth more difficult for us. Be sure to turn Reflex Mode back on if you disabled it for S-Rank on the previous Mission.

Cassette Tape #6 – Chico's Tape 6: When the Side Op begins, we will be in the South East corner of the map. Begin making your way South West, past the Eastern Prison Camp, over towards the first TGT Field of Movement area near the Warehouses. Make a point of dispatching the three Soldiers in between where our Mission begins & around the Eastern Prison Camp before carrying on & hide their bodies well.

When you see the AA Gun & a watchtower at the South end of the Warehouses, look over to the storage building off their right to see an orange door set into it. Approach the door & pick the lock to enter inside where we can find a Cassette Tape on the floor behind one of the shelves.

Target #1 – Palitz: Our first Target, Palitz, can be found patrolling around the Warehouses. If we take too long, a Four-Wheel Drive will come along & pick him up, taking him to different locations across Camp Omega.

His first location will be at the Eastern Prison Camp; if he is driven here this is an alright alternative to taking him at the Warehouses.

Take too long again & he will be driven up to the entrance of the Heliport & stay briefly up in a nearby watchtower which is a much worse location.

His third location after that will be back at the Warehouses again where he will slowly begin patrolling across into the Eastern Camp which is another ideal location but this takes quite a lot of time.

Ambush him where you can, & take him back to the cliffside Landing Zone where we started for the safest extraction.

Target #2 – Glaz: Glaz can be found inside the large watchtower on the Administration Compound walls overlooking the Heliport. After a while, he will begin patrolling the Administration Compound & head down into the Boiler Room before exiting out into the Heliport, slowly walking South to the top end of the road where the Warehouses are.

Ambush him where you can & take him back to the cliffside Landing Zone for the safest extraction.

With both Targets extracted, hop into the Chopper as well & exfiltrate the Side Op.


Achievement #6 – Depth: Clear the "Eliminate the Renegade Threat" Side Op by extracting both Targets.
If you successfully incapacitated & extracted both Palitz & Glaz, we will unlock this Achievement at the end of the Side Op.


Achievement #7 – Genesis: Clear a Side Op or Extra Op.
Story Related. We will unlock this Achievement as well after completing the Side Op.

Trial #16 – Fastest Marking of All Enemies: Unlocked by completing Side Op – Eliminate the Renegade Threat on Normal Difficulty.
Sequence 6: Peace Walker
1. Side Op: Eliminate the Renegade Threat
2. Cassette Tapes: 6/13
3. Trials: 21/53
4. Achievements: 7/16
-----------------------------------------------------------------------------------------------------

Side Op – Eliminate the Renegade Threat (Fastest Marking of All Enemies):
There are 32 Soldiers to Mark on this Side Op but the number will drop down to 30; stay undetected so Reinforcements do not arrive & do not kill any Soldier before they have been Marked. Move quickly on this Trial & make a point of killing anyone you Mark; Soldier’s locations really shift around the longer the Side Op goes on for making backtracking inevitable if you are not fast enough.

Eastern Prison Camp 1-5: When the Side Op begins, Mark the 1 Soldier on the hill ahead of us, the 1 Soldier walking up the road to the Eastern Camp, the 2 Soldiers that arrive at the Prison in a Four-Wheel Drive, & the 1 Solider already standing guard outside the Prison.

Eastern Camp 6-7: Head up the road to the Eastern Camp now & we can find 1 Soldier in a watchtower in the South East corner. Further down the road from the watchtower we can find 1 Soldier patrolling around on the road in between the Eastern Camp & the Warehouses.

Warehouses 8-13: We can find 1 Soldier up in a watchtower just to the South of the Warehouses. Across the road to the left, we can spot 1 Soldier guarding the road just above the Western Camp.

If you were quick, we can find 2 Soldiers & 1 Target patrolling around the Warehouses. When you find the Target, Tranquillize them for now & hide them for later; killing both Targets will enter the Side Op into Phase 2 adding in more Soldiers bringing our counter up to 38! It is easier sneaking up on Palitz then it is on Glaz who is best just killed after being Marked.

1 Soldier can also be found patrolling around the North end of the Warehouses or standing guard near the gate with the American flag with another 1 Soldier up in a watchtower over here as well.

Around this point, some Soldiers may leave Camp Omega & reduce our Marking counter from 32 down to 30.

Western Camp 14: If you have not already done so, pop over to the Western Camp & we can find 1 Soldier patrolling around down here.

Eastern Camp 15-16: From the Warehouses, carefully look over across the road to the Eastern Camp & we can find 2 Soldiers standing guard.

As of this point, if you took out all of the driving Soldiers, anything South of the Heliport should now be clear of Soldiers.

Heliport 17-26: Return to the watchtower to the North of the Warehouses & climb onto its roof to use as a vantage point to assess the Heliport; approach the Heliport fences to trigger a new Autosave.

Starting at the left side, we can see 1 Soldier near the AA Gun in the corner, 1 Soldier walking in between all the helipads, 2 Soldiers standing near the APC, 1 Soldier up in the watchtower, & 1 Soldier who does circuits around the right side of the Heliport/under the overpass on the road. You may need to wait around a bit for some of the Soldiers to appear from in behind buildings or fences.

1 Soldier can be found in the guard post across the overpass on the road leading out of Camp Omega.

If you were fast enough, you can also mark a Target & 2 Soldiers up in the watchtower on the Administration Compound walls. If you took too long, they will have moved on & we will find them elsewhere.

Dispatch the Soldiers outside the Heliport carefully; be sure to reload your Checkpoint if you are discovered.

Administration Compound 27-30: Enter the Administration Compound from the entrance behind the APC (be careful as one of our Targets may be approaching with 1 Soldier soon!)

1 Soldier can be found patrolling in the first area at the top of the entrance to the Boiler Room.
Our Target & 1 Soldier will meet us somewhere in the Boiler Room or close to the entrance/exit to the Heliport if you took too long & didn’t mark them in the compound wall watchtower.

Enter the Boiler Room, & pass through to the other side of the Administration Compound where we can find 2 Soldiers patrolling the right half of the area with 1 Solider patrolling in between the buildings to the left.

With the Trial complete, kill the last Target & exfiltrate the Mission.

Trial #17 – Fastest Neutr. of All Enemies: Unlocked by completing the Trial – Fastest Marking of All Enemies on Side Op – Eliminate the Renegade Threat.

Side Op – Eliminate the Renegade Threat (Hard):
Now we just have to complete this Side Op twice on Hard Difficulty. Since all we have to do is kill the Targets, do not worry about causing mayhem or being detected. First, kill a Soldier or two to get their AM Rifle Type 69 & some ammo. Then very quickly navigate to the Warehouses to kill Palitz first. If you are detected, he will climb into a Four-Wheel Drive near that gate at the Warehouses with the American Flag. Ambush him on the road as he will drive down South of the Warehouses then West past the Western Camp out to the exit.

With Palitz taken down, sprint over to the Eastern exit across from where the Heliport is. Glaz will enter a Four-Wheel Drive & head out of the Administration Compound to drive out the Eastern exit. Ambush him before he escapes.

There is a chance Glaz will escape which will Fail the Mission; just reload your Checkpoint & Palitz will stay dead but Camp Omega will be reset.

When both Targets are dead, exfiltrate the Mission.

Trial #18 – Fastest Completion Time: Unlocked by completing the Side Op – Eliminate the Renegade Threat on Hard Difficulty.

Trial #19 – Fastest Target Extraction of Both Targets: Unlocked by completing the Side Op – Eliminate the Renegade Threat on Hard Difficulty.

Side Op – Eliminate the Renegade Threat (Fastest Completion Time):
Repeat the exact same strategies you used for our first run of this Side Op on Hard Difficulty.

Trial #20 – Fastest Completion Time (Stealth, No Kills): Unlocked by completing the Trial – Fastest Completion Time on Side Op – Eliminate the Renegade Threat.

Trial #21 – Fastest Comp. Time (No Weapon Used): Unlocked by completing the Trial – Fastest Completion Time on Side Op – Eliminate the Renegade Threat.
Sequence 7: Rescuing Kojima
1. Side Op: Eliminate the Renegade Threat, Intel Operative Rescue
2. Cassette Tapes: 7/13
3. Trials: 24/53
4. Achievements: 8/16
-----------------------------------------------------------------------------------------------------

Side Op – Eliminate the Renegade Threat (S-Rank):

Our bonuses towards our scoring are:
1. Prisoners Rescued: +3500 Points (each x2)
2. No Kills: +2500 Points
3. No Reflex: +7500 Points
4. No Combat Alerts: +7500 Points
5. No Retries: +3750 Points
6. Both Targets Extracted: +7500 Points

S-Rank for this Side Op is not long, but it can be a bit tricky. Load up the Side Op on Normal Difficulty.

To start, begin making your way to the Eastern Prison Camp using our Wu Silent Pistol to knock out the Soldier ahead of us on the ledge. Wait for the Four-Wheel Drive to drop off a Soldier at the Prison & knock out the two left behind. Very quickly grab the two Prisoners in the Prison & dump them at the cliffside Landing Zone; we will load them onto the Extraction Chopper when we go to extract ourselves.

Now head up the road & navigate over to the South end of the Warehouses. Across from the watchtower here is the storage building with the red door that we can pick & can collect the M2000 Sniper-D. Get onto the watchtower here now & knock out the Soldiers. From up here we can spot both our Targets: Palitz patrolling below us & Glaz over in the watchtower on the Administration Compound walls.

Call in our Extraction Chopper over at the cliffs & look down the Sniper scope to kill Glaz. It may take a few tries getting the aiming of the Sniper down; it can be a bit tricky. Immediately kill Palitz & begin sprinting out to extraction. We need to stay undetected until we start killing our Targets! If need be, turn on Combat Reflex for an extra edge; otherwise just restart the Side Op if you are preemptively detected. The key to this S-Rank is how little time we waste, no Retries, no Combat Reflex, our two Prisoners, & only two kills. Time is the biggest thing that will get us the S-Rank.

Worst case, you will hopefully get an A-Rank on the Side Op (around 42,000-44,000 Points) which will let us use the M2000 Sniper-D immediately when we start the Side Op which will shave off more time to get us that S-Rank. This means you may have to do this twice. We need around 48,000 Points to earn an S-Rank.


Side Op – Intel Operative Rescue (Normal/S-Rank):
For the Pacifist Achievement, we cannot kill a single enemy during the entire Side Op. To do this, we will need to immediately swap to our Uragan-5 Pistol & knock out our enemies. With how linear this Side Op is, if you do not kill a single enemy & not reload Checkpoints too often, there is a high chance we can get an S-Rank right off the bat.

Side Op S-Rank Bonuses:
1. No Kills = +2500 Points
2. No Retries = +375 Points

Since we have unlimited ammo for our Uragan-5 Pistol, just unload on any Soldiers we see. When we link up with our Operative, we will need to defend them from RPG Soldiers & Four-Wheel Drives that will chase him down. Be very careful how you shoot Soldiers on buildings, if they fall off & die it will void the Achievement!

When we eventually get to the Heliport, a Soldier will climb into an AA Gun & begin firing at us. It is extremely hard to take it out with our Pistol; if you have managed to avoid being hit by RPGs so far, just take the damage.

When we land to extract the Operative, an APC will exit out of the Administration Compound & drive off our Chopper. We need to pick up the nearby FB MR R-Launcher & destroy the APC; destroying the APC does not actually count as an enemy death on this Side Op. It is mandatory we destroy it. Note that our RPGs splash damage CAN kill nearby Soldiers who are unconscious. Before approaching our Operative (or if you had to reload a Checkpoint) make a point of moving all of the unconscious Soldiers away from the area so we can freely attack the APC without worry; it will only take three rockets to destroy the APC.

With the APC down, grab the Operative & get him into the Extraction Chopper. But it isn’t over yet as we have one more section to complete as we extract. When the enemy Attack Chopper arrives, we have to snipe the RPG Soldier out of it with our Uragan-5 Pistol to progress.

Cassette Tape #7 – Chico's Tape 1: We will receive this Cassette Tape in our Mission Rewards after completing the Side Op.


Achievement #8 – Pacifist: Clear the "Intel Operative Rescue" Side Op without killing a single enemy.
If done correctly, we will unlock this Achievement at the end of the Mission. The APC at the end of the Mission does not count as a kill… even though someone is driving it. Be aware when you see Trial pop ups of “Farthest Distance Sent Enemy Flying…” as that means an RPG Soldier blew themselves or someone else up accidentally.

If you did not have to Retry too many times, you will walk out of this Side Op having already completed the S-Rank. If not, give it another go now that you know what to expect; fortunately, it is a short Side Op.


Trial #22 – Fastest Neutr. of All Enemies: Unlocked by completing the Side Op – Intel Operative Rescue on Normal Difficulty.

This is the only Trial for this Side Op on Normal Difficulty, this means we can move onto Hard Difficulty straight away.

Side Op – Intel Operative Rescue (Hard):
For Hard Difficulty, we no longer have to worry about being a pacifist & can kill at will. We really need to focus on our own survivability as it does not take many rockets from RPGs to destroy us. Since our Mission Score is not an issue though, just keep on Retrying if need be until the Side Op is complete.

Trial #23 – Fastest Completion Time: Unlocked by completing the Side Op – Intel Operative Rescue on Hard Difficulty.

Trial #24 – Fastest Shooting of all Moai: Unlocked by completing the Side Op – Intel Operative Rescue on Hard Difficulty.

Playing the Side Op on Hard Difficulty will unlock all available Trials as well meaning we are completely finished with it now.
Sequence 8: Camp Omega Heist
1. Side Op: Classified Intel Acquisition
2. Cassette Tapes: 8/13
3. Trials: 25/53
4. Achievements: 9/16
-----------------------------------------------------------------------------------------------------

Side Op – Classified Intel Acquisition (Normal/S-Rank):
This is primarily a stealth based Side Op; try not getting detected at all or setting off Alerts. We will be completing this Side Op very differently from how it is supposed to go; ignore all of Miller’s instructions about the Target. With how I have this first playthrough of the Side Op structured, so long as you do not get detected, kill anyone, use a Combat Reflex, or reload a Checkpoint you should be able to get an S-Rank on the Side Op right extremely easily. If you fail, just restart the Side Op completely; this whole Side Op using this method should take you under 10 minutes to complete.

For the Infiltration Achievement, we need to exfiltrate this Side Op by climbing into a the back of a parked Truck in the Administration Compound & getting driven out of the area by an enemy Soldier. Note that by resetting a Checkpoint, the Truck we need to exfiltrate on will also reset & have to drive its way back to the Administration Compound.

Cassette Tape #8 – Agent’s Recording: When the Side Op begins, we will be in the back of a moving Truck on route to the Administration Compound. Stay in the Truck until it stops inside, Marking Soldiers outside as we pass if you want.

When we are inside the Administration Compound & the Soldier exits the Truck, hop out of the back & make your way behind the nearby building underneath/over the barriers in our way. At the far side, climb up the ladder that leads to the walkway above & follow it down towards the watchtower on the Compound walls.

The Cassette Tape we need will be inside the tower on a desk. But beware, this is a trap & there is a Security Camera on the wall immediately off our left. We can disable the Camera by peaking through the tower windows & shooting it with our AM Rifle to avoid the Combat Reflex. Having any Camera destroyed will make some nearby Soldiers come & investigate it, but this is better than having the entire base Alerted.

Note that there is a second Cassette Tape to be found on this Side Op, but we will collect it while we are completing the Marking All Enemies Trial when we are forced to crawl through the Mission marking everyone.


Achievement #9 – Infiltration: Clear the "Classified Intel Acquisition" Side Op while riding in the back of a Truck.
With the Cassette Tape in hand, quickly drop off the Administration Compound walls & climb into the back of the Truck. There will be a Soldier going to investigate the Security Camera we destroyed so make sure you go prone while in the back of the Truck so we are not spotted. After a few minutes, the Soldier driver will return to the Truck & he will drive us out of Camp Omega, completing the Side Op & unlocking our Achievement.

This method is a guaranteed S-Rank if you followed it through with the bulk of the Points coming from a short Mission Time.


Trial #25 – Fastest Marking of All Enemies: Unlocked by completing the Side Op – Classified Intel Acquisition on Normal Difficulty.
Sequence 9: Love Deterrence
1. Side Op: Classified Intel Acquisition
2. Cassette Tapes: 9/13
3. Trials: 30/53
4. Achievements: 9/16
-----------------------------------------------------------------------------------------------------

Side Op – Classified Intel Acquisition (Fastest Marking of All Enemies):
There are 25 Soldiers to Mark on this Side Op; do not be detected or Reinforcements will be summoned. As with all Marking Trials, go slow, & meticulously work your way through each section of Camp Omega Marking/eliminating all of the Soldiers. New Soldiers will arrive if we: summon the Target with the spotlight or collect the Cassette Tape – Agent’s Recording. Do none of these & focus solely on Marking the Soldiers.

There is a bonus Cassette Tape that we will collect on this Mission as well since we will be finding all Soldiers; keep your eyes peeled for a unique bald Soldier. We need to Interrogate them so they drop the Cassette Tape for us…

Western Camp 1-3: As soon as the Side Op begins, hop out of the Truck into the Western Camp & look down the road we came from to see 2 Soldiers. 1 Soldier can be found close by us up in the watchtower here.

Warehouses 4-9: Leave the Western Camp now over to the Warehouses where we can find 1 Soldier in the watchtower at its South end. Quickly get on top of the watchtower here & use it as a vantage point for the Warehouses.

After we here the Soldier call out “open the front gates” on the radio, a Truck will pull up just below us & 1 Soldier will climb out; another 1 Soldier can be found patrolling near the storage building across from our watchtower. At this time, another 1 Soldier will come around the side of the storage building & walk towards the Truck; this Soldier will not have a hat & have back hair. It is our Target; do not kill him or it will fail the Side Op, knock him out instead.

Another 1 Soldier will be walking down the road near the gate with the American flag towards the parked Truck.

A final 1 Soldier can be found at the North end of the Warehouses in the watchtower.

Heliport 10-15: Climb on top of the watchtower at the North end of the Warehouses now & use it as a vantage point for the Heliport. From left to right, we can see 1 Soldier near a Four Wheel Drive & AA Gun, 3 Soldiers patrolling around the helipads, 1 Soldier in the watchtower, & 1 Soldier who patrols around the right side of the Heliport as well as down the road under the overpass.

Eastern Camp 16-20: While still on top of the watchtower, look over now into the Eastern Camp for Soldiers. We can spot 1 Soldier in the watchtower near the center of the camp on the road & 3 Soldiers patrolling in the camp/along the road.

At some point through out the Side Op, we need to Mark the 1 Soldier driver who makes runs from the Administration Compound & out of Camp Omega as well.

Eastern Prison Camp 21: Quickly run down to where the Eastern Prison is & we can find 1 Soldier patrolling the inside of the prison.

Administration Compound 22-25: Head over to the Administration Compound now & enter through the South entrance after dispatching the Soldiers outside.

We can find 1 Soldier in the entrance way patrolling around the vent blocks.

Enter into the Boiler Room now & we can find the 1 bald Soldier patrolling around down here; do not kill him, knock him out! Do not Interrogate him yet either or it will enter us into a new Phase & new Soldiers will spawn. Stash him somewhere safe & we will return for him shortly…

The final 2 Soldiers can be found patrolling the other half of the Administration Compound along the road near the Security Camera.

Cassette Tape #9 – Classified Intel Data: With the Trial safely completed, return to where you stashed the bald Soldier & give him a kick to wake him up. As soon as he stands up, grab him & Interrogate him for the Cassette Tape. He will not give it up right away, so tell him to “Spit it out” until he drops it for us to collect.

With the Tape collected, summon an Extraction Chopper at any location & exfiltrate the Side Op to complete it.

Trial #26 – Fastest Neutr. of All Enemies: Unlocked by completing the Trial – Fastest Marking of All Enemies on Side Op – Classified Intel Acquisition.

Side Op – Classified Intel Acquisition (Hard):
Use the exact same strategy we did to get S-Rank on this Side Op; ride the Truck into the Administration Compound, grab the Cassette Tape, ride the Truck out. Since we do not start with our AM MRS-4 Rifle to destroy the Security Camera, rush in & grab the Tape which will trigger a Save. Then reload your Checkpoint to reset Camp Omega, & wait for the Truck to roll into the Compound again; this unfortunately means we have to wait for a bit for the Soldier driver to return, but its still the easiest way to finish the Side Op…

Trial #27 – Fastest Completion Time: Unlocked by completing the Side Op – Classified Intel Acquisition on Hard Difficulty.

Trial #28 – Fastest Acquisition of Second Tape: Unlocked by completing the Side Op – Classified Intel Acquisition on Hard Difficulty.

Side Op – Classified Intel Acquisition (Fastest Completion Time):
Repeat the exact same strategies you used for our first run of this Side Op on Hard Difficulty.

Trial #29 – Fastest Completion Time (Stealth, No Kills): Unlocked by completing the Trial – Fastest Completion Time on Side Op – Classified Intel Acquisition.

Trial #30 – Fastest Comp. Time (No Weapon Used): Unlocked by completing the Trial – Fastest Completion Time on Side Op – Classified Intel Acquisition.
Sequence 10: The Name of the Enemy
1. Side Op: Destroy the Anti-Air Emplacements
2. Cassette Tapes: 10/13
3. Trials: 31/53
4. Achievements: 10/16
-----------------------------------------------------------------------------------------------------

Side Op – Destroy the Anti-Air Emplacements (Normal):
For this Side Op, we need to destroy 3/4 AA Guns with C-4 & exfiltrate the Camp. For the Extraction Achievement, we need to extract all 3 Prisoners found in the Eastern Prison Camp as well as a fourth Prisoner who can be found in Paz's cell in the Boiler Room. We will do this at the end as we go to leave Camp Omega...

Unfortunately, as soon as we begin the Side Op, Camp Omega will go on Alert making it impossible to give a linear set of directions; you will have to be opportunistic when it comes to Marking Soldiers. Ignore our Mission Score & just learn the layout of the Side Op; reload Checkpoints when needed.

AA Gun #1: We can find our first AA Gun just South of the Warehouses directly ahead of where we begin the Side Op; swap out your Throwable Magazine for our C-4. Before we enter Camp Omega, take this time to Mark as many Soldiers as we can before the Camp goes on Alert.

When we enter the Camp, the base will go on Alert after a minute & it will be difficult staying hidden. Have Combat Reflex on & don’t be afraid to lethally kill Soldiers who detect you. Approach the first AA Gun & place a brick of C-4 on it, but do not detonate it yet; we will do this at the end to avoid certain detection.

Take this time to start stealthily eliminating the Soldiers coming through to investigate the Warehouses to make our lives easier; we can stash their bodies inside the storage building across from the watchtower at the South end.

Eastern Prison Camp… Prisoners: When you are ready, begin making your way over to the Eastern Prison Camp. Dispatch the Soldiers here & transport the 3 Prisoners down to the cliffside Landing Zone; do not call the Extraction Chopper yet though as we will do this at the end.

AA Gun #2-3: After dropping off the Prisoners, begin making your way up to the Heliport now for our next two AA Guns. Be careful heading up the road to it though as it is covered in Mines! Walk along the hillside to avoid them; the road is safe once you are post the guard post.

Very carefully dispatch the Soldiers at the Eastern end of the Heliport & place C-4 on the first two AA Guns; the only other one is over at the South West entrance to the Administration Compound but we do not need to destroy it. You may need to reload a few Checkpoints attempting this as there are quite a few Soldiers here who can spot us. By this point, your Silencer for the AM MRS-4 Rifle will most likely have broken; switch to the Wu Silent Pistol unless you can guarantee you will not be overwhelmed by investigating Soldiers.

Cassette Prisoner: With all the C-4 placed, we now need to rescue our final Prisoner. Carefully enter through the South entrance of the Administration Compound & enter into the Boiler Room. Dispatch the Soldiers here & collect the Prisoner. Sneak the Cassette Prisoner down to the cliffside Landing Zone & place him with the others; be careful of the Mines still on the road!

The APC: With the Prisoners all safe at the cliffside Landing Zone, it is now time for us to detonate the C-4. Note that when they are destroyed, an APC will arrive & we HAVE to destroy it before we can extract or it will shoot us down. Sneak back over to the top of the road we came down & hide in the guard post at the top. Equip your C-4 & hold down Lt & press A three times to detonate the three C-4 bricks we placed on the AA Guns.

As soon as we do this, exit the guard post & place three more bricks of C-4 on the center of the road in front of us that leads up to the Heliport. Hide close by out of sight with a view of our C-4 & the APC will come rolling down the road from the Western Camp & past the Eastern Camp up to the Heliport; quickly detonate the C-4 immediately as it drives over our pile to destroy it.


Achievement #10 – Extraction: In the "Destroy the Anti-Air Emplacements" Side Op, rescue & extract all 4 Prisoners via Chopper.
With the APC destroyed, return to the cliffside Landing Zone & call in the Extraction Chopper. Load up the 4 Prisoners (without accidentally jumping in yourself) & we will unlock the Achievement as soon as the last one is inside the Chopper.

Cassette Tape #10 – Chico's Tape 7: We will receive this Cassette Tape at the end of the Side Op if you extracted the Cassette Prisoner located in the Boiler Room.

Trial #31 – Fastest Marking of All Enemies: Unlocked by completing the Side Op – Destroy the Anti-Air Emplacements on Normal Difficulty.
Sequence 11: Not So Stealthy...
1. Side Op: Destroy the Anti-Air Emplacements
2. Cassette Tapes: 10/13
3. Trials: 36/53
4. Achievements: 10/16
-----------------------------------------------------------------------------------------------------

Side Op – Destroy the Anti-Air Emplacements (Fastest Marking of All Enemies):
This is going to be the hardest of our Trials to complete for this game; definitely reload Checkpoints when needed. There are 42 Soldiers to Mark though reinforcements can be difficult to avoid if you are not careful. Do not destroy any AA Guns until the Trial is complete so that we do not enter Phase 2 or 3. The Soldier placements in the guide are also estimates due to erratic patrol paths; take this part with a grain of salt as it is highly likely some Soldiers may patrol into different areas than listed.

With how random this can be, I can only give an order of operations to the instructions & Soldier number estimates.

Camp Omega (Before Alarm) 1 ~ 10: We have around a minute or so to Mark Soldiers before the alarm goes off; use this time before we enter Camp Omega & Mark as many as you possibly can. Scour the Warehouses, Heliport, & the watchtower on the Administration Compound walls for around 8-10 Soldiers from our vantage on the cliffs. Use the AA Gun waypoints & look around them as well for Soldiers.

Camp Omega (After Alarm) 11 ~ 22: Stay outside Camp Omega on the cliffs where we start the Side Op & the alarm will eventually sound Alerting the base. Now once again, scan through all the locations of the base multiple times & pick up any Soldiers now on their new patrols.

As a rough estimate from our vantage there are 2 Soldiers in the Western Camp, 7 Soldiers in the Warehouses, 12 Soldiers at the Heliport, & 1 Soldier in a watchtower near the Eastern Camp.

Reinforcements 23 ~ 26: After around 4-5 minutes, a scripted group of Reinforcements will arrive in a Four Wheel Drive driving to the Warehouses from the Heliport. From our vantage outside the base we can Mark all 4 Soldiers in the car before they exit it.

Dispatching Soldiers: As of this point, it is unlikely you can spot anymore new Soldiers from our vantage outside Camp Omega. Carefully enter into the base & start dispatching Soldiers if needed (it is easier having them out of the way but it is not necessary).

Warehouses Vantage 27 ~ 29: When you are ready, climb onto the roof of the storage building at the South end of the Warehouses & use it as our next vantage point. Look over the Eastern Camp & areas of the Warehouses & Heliport we can now see to find some additional Soldiers to Mark.

Eastern Prison Camp 30 ~ 33: Place your C-4 on the AA Gun at the Warehouses & make your way through the Eastern Camp down to the Eastern Prison Camp. Be sure to mark the rest of the Soldiers at the far end of the Eastern Camp as we go.

There will only be 2 Soldiers patrolling around the Eastern Prison Camp.

Heliport/Warehouses (North) 34 ~ 36: Make your way up to the Heliport now & get ready for an irritating sequence to get into the Administration Compound. Before getting there, place the C-4 onto the two AA Guns at the Eastern end; clearing out the Soldiers when necessary. Note the 2 Soldiers guarding the North end of the Warehouses on the roadside leading up to the Heliport. There may be other hidden Soldiers patrolling the Eastern Camp as well so be sure to scan for them.

Administration Compound 37 ~ 42: If the base is not in full Alert, the Soldiers patrolling the Administration Compound will be more fixed in their patrols & easier to find. Enter the Administration Compound from the South entrance & there will be 1 Soldier in the first area near the Security Camera.

Enter into the Boiler Room & we can find 3 Soldiers either in the passageways or near the Cassette Prisoner’s cell.

Exit the Boiler Room into the other half of the Compound & we can find 2 Soldiers patrolling around near the Security Camera here.

If you are still missing Soldiers, & have not summoned any more than the scripted Reinforcements, very carefully backtrack/scan the Heliport, Warehouses, Eastern Camp, & Western Camp to find your last few Soldiers to complete the Trial.

When you are ready, get to the road leading down to cliffside Landing Zone & detonate the AA Guns. Place the C-4 in the center of the road leading up to the Heliport & wait for the APC to come by; we can summon our Extraction Chopper while we wait. Blow up the APC, & exfiltrate the area to complete the Side Op.

Trial #32 – Fastest Neutr. of All Enemies: Unlocked by completing the Trial – Fastest Marking of All Enemies on Side Op – Destroy the Anti-Air Emplacements.

Side Op – Destroy the Anti-Air Emplacements (Hard):
Completing this Side Op on Hard Difficulty is very… hard. Essentially, quickly navigate to the AA Gun at the Warehouses then the two at the Eastern end of the Heliport immediately trying to cover as much ground as possible before the alarm triggers. With all the C-4 placed, get to the road leading down to the cliffside Landing Zone & detonate them. Ambush the APC & exfiltrate. You only have the Wu Silent Pistol so be sure to grab a AM Rifle Type 69 from the first Soldier you dispatch. It is basically guaranteed you will be discovered so go in guns blazing; focus more on destroying the AA Guns than get bogged down killing Soldiers if you can help it.

Trial #33 – Fastest Completion Time: Unlocked by completing the Side Op – Destroy the Anti-Air Emplacements on Hard Difficulty.

Trial #34 – Fastest Destr. of Wooden Watchtowers: Unlocked by completing the Side Op – Anti-Air Emplacements on Hard Difficulty.

Side Op – Destroy the Anti-Air Emplacements (Fastest Completion Time):
Repeat the exact same strategies you used for our first run of this Side Op on Hard Difficulty.

Trial #35 – Fastest Completion Time (Stealth, No Kills): Unlocked by completing the Trial – Fastest Completion Time on Side Op – Anti-Air Emplacements.

Trial #36 – Fastest Comp. Time (No Weapons Used): Unlocked by completing the Trial – Fastest Completion Time on Side Op – Anti-Air Emplacements.
Sequence 12: Tactical Espionage Action
1. Side Op: Destroy the Anti-Air Emplacements
2. Extra Op: Déjà-Vu
3. Cassette Tapes: 11/13
4. Trials: 40/53
5. Achievements: 11/16
-----------------------------------------------------------------------------------------------------

Side Op – Destroy the Anti-Air Emplacements (S-Rank):
This is also a very difficult Side Op to earn S-Rank on. The best strategy involves using the FB MR R-Launcher which requires beating the Side Op with an A-Rank; an A-Rank requires a Mission Score of around 34,000 Points. This is best done on Normal Difficulty… With how quickly we can complete this using the R-Launcher method, restart the Side Op if you are detected at all to keep the No Reflex Bonus.

When the Side Op begins, collect the FB MR R-Launcher from the crate behind us at the far back of the rocks from where we start. Now climb down from the rocks & pick the lock to the South gates of Camp Omega & enter inside. Place down 3 bricks of C-4 in the center of the road directly in front of where the gate is; this is obviously for the APC.

Now climb back up to the rocks where we began & aim the R-Launcher at the AA Gun to the far Eastern end of the Heliport. Stay as far back from the edge as possible to stay out of sight of the Soldiers below us. Blow up the AA Gun at the far East end of the Heliport, then the one at the top of the road leading up from the Warehouses, with the last one directly below us. When they are destroyed, go prone & call in the Extraction Chopper to the Landing Zone directly behind us. Blow up the APC with our C-4 as it drives over it & exfiltrate the Side Op; make sure you are not spotted at all as you flee to the Chopper.

The key to S-Rank is No Combat Alerts, No Reflex, No Retries, & speed. Even though our Landing Zone will have Soldiers shoot at us as we fly away, it will not count as a Combat Alert.


62% Complete (Achievement completion not in-game Completion Ratio)

Extra Op – Déjà-Vu (Normal):
For the Reminiscence Achievement, we need to go & recreate all 7 of the Scenes in the Extra Op before we extract ourselves. Note that we begin the Extra Op without any Weapons so be careful & use hand to hand combat if necessary until you find a gun. Do not worry about S-Rank on this playthrough.

Cassette Tape #11 – Déjà-Vu Tape: When the Extra Op begins, make your way back down to where the cliffside Landing Zone is (watch out for the Mines placed in our way!). Just outside of the small cave here, we can find an up-raised rock in the ground with the Cassette Tape on top of it.

Scene #1 – Tank: For our first Scene, we will need to collect some Hand Grenades. The Hand Grenades can be found inside the storage building that is directly across from the watchtower at the South end of the Warehouses. Carefully sneak your way past the Eastern Camp & get over to the Warehouses where there will be 2-3 Soldiers patrolling near the storage building. Carefully dispatch them & pick the lock to the storage building to collect the Hand Grenades.

With the Hand Grenades, head over to the Western Camp now & we can find an APC parked at the execution grounds here. Approach the APC, & we can see that its top hatch is open; equip the Hand Grenades & aim one into it to recreate the Scene.

Scene #2 – Liquid: The rest of the Scenes all take place at the Heliport & in the Administration Compound. Make your way over to where the South entrance of the Administration Compound is on the Heliport & we can find a parked Four-Wheel Drive close by.

Climb inside it, turn off the lights to help not be detected, & drive it down the road leading away to the East from the Heliport until you drive underneath the overpass where we will recreate the Scene.

Scene #3 – Surveillance Camera: Return up to the Heliport & navigate over to the South entrance to the Administration Compound where we can see a Security Camera on the wall to the right of the bay doors. Directly in front of the Camera will be a green c-can against the walls of the Administration Compound; get into cover behind it & peer out at the Camera to recreate the Scene.

Scene #4 – Gunship: In the center of the Heliport we can see an Attack Chopper landed in the middle helipad with two Soldiers standing beside it. Sneak over to it using the shadows towards the front of the Attack Chopper & there will be two concrete road blocks on the other side of the road across from it. Get into cover behind one of the blocks & peer over it at the Chopper to recreate the Scene.

Scene #5 – Searchlight: Still using the shadows, sneak over to the West end of the Heliport now where we can see a random box of Smoke Grenades in the center of the furthest helipad. Wait until the spotlights move away from the helipad & quickly approach the box of Smoke Grenades & collect them to recreate the Scene.

If you rush it, the Soldiers manning the spotlights will detect you, so be patient!

Scene #6 – Mantis: Enter into the Administration Compound now through the West entrance. Just on the other side of the door, a little ways ahead, we can see a chain link fence enclosure off our left. Pick the lock to the gate & head inside over towards a transformer that has one of its panels removed. Disable the power systems & cause a black out, recreating the Scene.

Scene #7 – Moai: Our final Scene is located down in the Boiler Room. Carefully head down the stairs into the passageway & look along the left wall at the far end to see a Moai statue on a metal cabinet; approach it to recreate the Scene.

With all 7 Scenes recreated it is now time for us to extract. Back track out of the Boiler Room & head down the road to the left over towards where the bay door controls are. When facing the bay door, turn around & look at the building off our left & we can see an open vent we can crawl through. This is our extraction, baby.


Achievement #11 – Reminiscence: Recreate all 7 Scenes in the "Déjà-Vu" Extra Op.
If you followed along with the guide & recreated all 7 Scenes, the Achievement will unlock after we complete the Extra Op.

Trial #37 – Fastest Marking of All Enemies: Unlocked by completing the Extra Op – Déjà-Vu on Normal Difficulty.

Trial #38 – Fastest Extermination of All Crows: Unlocked by completing the Extra Op – Déjà-Vu on Normal Difficulty.

Trial #39 – Fastest Erasing of All Markings: Unlocked by completing the Extra Op – Déjà-Vu on Normal Difficulty.

Trial #40 – Fastest Completion of FOX Logos: Unlocked by completing the Extra Op – Déjà-Vu on Normal Difficulty.
Sequence 13: Psycho Mantis?
1. Extra Op: Déjà-Vu
2. Cassette Tapes: 11/13
3. Trials: 45/53
4. Achievements: 11/16
-----------------------------------------------------------------------------------------------------

Extra Op – Déjà-Vu (Fastest Marking of All Enemies):
This is by far one the easiest of our Trials as there are only 16 Soldiers for us to Mark without any Phases we have to worry about!

Eastern Camp 1-2: From where we begin the Extra Op, run up the hill over to the Eastern Camp & climb into the nearby watchtower for a vantage point; we can find 2 Soldiers patrolling at the top of the road that leads down to the Eastern Prison Camp.

Warehouses 3-8: Head over to the Warehouses now & we can find 1 Soldier standing guard along the fence line at the very far South end of Camp Omega near the road. We can find 1 Soldier patrolling around the AA Gun near the watchtower here & another 1 Soldier patrolling near the North side of the storage building close by. Look across the road to the West of the watchtower now & we can see 1 Soldier standing guard near the fence above the Western Camp.

We can find a final 1 Soldier in the watchtower at the North end of the Warehouses manning a spotlight & another 1 Soldier patrolling around the area beneath it.

Heliport 9-12: Head up to the Heliport now & look over to the very far East end near where the AA Gun is at the start of the overpass; 1 Soldier can be found beside a nearby FOX Hound flag. Another 2 Soldiers can be found standing in front of the Attack Chopper & 1 Soldier over at the South entrance of the Administration Compound near the Security Camera.

Administration Compound 13-16: Before we enter the Administration Compound, look up at its walls & we can see 2 Soldiers manning spotlights on it (the ones looking at the box of Smoke Grenades.

Enter into the Compound now through the West entrance & we can find 1 Soldier patrolling the road near the bay doors & our extraction point.

Pass through the Boiler Room (recreate the Moai Scene to complete our Mission Objective) & we can find 1 Soldier patrolling the area near the ventilation systems at the other end of the Compound.

With all Soldiers Marked & at least one Scene recreated, we can extract from the Extra Op.

Trial #41 – Fastest Neutr. of All Enemies: Unlocked by completing the Trial – Fastest Marking of All Enemies on Extra Op – Déjà-Vu .

Extra Op – Déjà-Vu (Hard/S-Rank):
S-Rank is extremely easy to obtain & can be completed in under 5 minutes. All we need to do is recreate four Scenes: Surveillance Camera, Gunship, Mantis, & Moai. Each Scene gives us 5000 Points, couple that with no Combat Alerts, No Kills, No Retries, & No Reflex & you should have more than enough Points to earn an S-Rank. Give Soldiers a lot of space & be sure to go slow around the Attack Chopper after recreating its Scene.


Trial #42 – Fastest Completion Time: Unlocked by completing the Extra Op – Déjà-Vu on Hard Difficulty.

Trial #43 – Fastest Extermination of All Rodents: Unlocked by completing the Extra Op – Déjà-Vu on Hard Difficulty.

Extra Op – Déjà-Vu (Fastest Completion Time):
Repeat the exact same strategies you used for our first run of this Extra Op on Hard Difficulty. With S-Rank out of the way, we only need to recreate a single Scene to unlock our Extraction; Gunship or Mantis are easiest since they are on our way.

Trial #44 – Fastest Completion Time (Stealth, No Kills): Unlocked by completing the Trial – Fastest Completion Time on Extra Op – Déjà-Vu.

Trial #45 – Fastest Comp. Time (No Weapons Used): Unlocked by completing the Trial – Fastest Completion Time on Extra Op – Déjà-Vu.
Sequence 14: Resurgence
1. Extra Op: Jamais Vu
2. Cassette Tapes: 12/13
3. Trials: 49/53
4. Achievements: 13/16
-----------------------------------------------------------------------------------------------------

Extra Op – Jamais Vu (Normal):
For this Extra Op we will be playing as the badass Raiden. For Phase 1, we must neutralize all 12 Soldiers & Snatchers at Camp Omega; Snatchers do not stay knocked out for long & are best dispatched lethally with our AM MRS-4 Rifle. Unfortunately for us, Snatchers look identical to regular Soldiers & we can only tell the difference by Marking them with our Binoculars. Regular Soldiers will appear as blue whereas Snatchers will have a green aura around them.

For the Hidden Achievement, we cannot be detected at all & have Soldiers enter Alert status. While it will not void the Achievement, refrain from killing any regular Soldiers if possible to keep our Mission Score high & help us not be detected.

Cassette Tape #12 – Jamais Vu: We can find this Cassette Tape in the identical location we found Déjà-Vu; on the rock near the cave at the cliffside Landing Zone.

Objective #1-2 – Eastern Camp: Head up the road now to the Eastern Camp. Mark the Soldier in the watchtower here & Miller will tell us to go Interrogate him. Do just this, & the Soldier will reveal the location of a Snatcher here in the Eastern Camp; incapacitate this Soldier to complete the Objective.

Approach the Snatcher now & dispose of him… lethally through whatever means you prefer so long as you are not detected. Killing it will complete our second Objective.

Objective #3-4 – Warehouses: Look over at the North end of the Warehouses & we can spot a Snatcher in the watchtower here manning a spotlight; eliminate them to complete the Objective.
We can find a second Snatcher patrolling down in front of this watchtower as well; kill them too for our fourth Objective.

Objective #5-7 – Heliport: Head up to the Heliport now & we can find a lone Soldier standing a little ways in front of the Administration Compound’s bay doors. Sneak up & incapacitate him & hide his body out of sight.

As soon as we dispatch that Soldier, a Four-Wheel Drive will come racing up to the Heliport. The driver is just a regular Soldier, but the passenger will be a Snatcher. They will do laps around the Heliport & occasionally stall the jeep at set spots before continuing around. Wait for the jeep to stall close to the bay doors at the top end of the helipads & carefully snipe Soldier driver with our Wu Silent Pistol to complete the Objective.

Immediately after incapacitating the driver, switch to your Rifle & dispatch the Snatcher as he climbs out of the Four-Wheel Drive for our seventh Objective.

Objective #8-10 – Administration Compound: Head over to the West entrance to the Administration Compound now & enter inside. Sneak over into the first section & we can find two Snatchers standing near some shelves ahead of us & a regular Soldier patrolling underneath a Security Camera.

Enter into the chainlink fence enclosure near us & disable the system power to cause a blackout. This will result in one of the three enemies to come & investigate: if it is a Snatcher kill them & if it is the Soldier then incapacitate them.

Incapacitating the Soldier & killing the two Snatchers will complete our Objectives.

Objective #11-12 – Administration Compound: Enter now into the Boiler Room & carefully enter the area with Paz’s cell in it where we can find the last two Snatchers. If you were very fast, one of the Snatchers will actually be coming down the stairs from above off our left instead; go slowly & listen for footsteps before going to Paz’s cell.

If both Snatchers are near the cell, use a Throwable Magazine to create a distraction & have them split up if they are standing beside each other. When there is enough distance between them… kill them.

With the Objectives complete an Extraction Chopper will arrive & we will be tasked with linking up with it. But the Extra Op doesn’t end here & we will soon by attacked by waves of Snatchers. Remember that for the Hidden Achievement we cannot be detected at all & have the enemy enter full combat with us which makes this pretty challenging & may cause you to reload a few Checkpoints.

Wave #1: Link up with the Chopper & get into position facing the bay doors of the Administration Compound in cover as this is where our first wave will come from. The Snatchers main focus is attacking the Chopper which distracts them from us killing their friends for the most part.

First, take out the RPG Snatcher in the watchtower on the walls. Then get prepared to fight the wave of Snatchers that come out through the bay doors; carefully/quickly pick them off with our Rifle.

Wave #2: The second wave will appear at the South end of the Heliport & consist of two RPG Snatchers. After dispatching them, quickly run & grab their FB MR R-Launchers!

Wave #3: Wave three will actually be an enemy Attack Chopper. Using the R-Launcher we just picked up, quickly snipe the Chopper once to destroy it.

Wave #4: Next wave will have a whole hoard of Snatchers streaming out of the bay doors of the Administration Compound. Quickly/carefully take them out with your AM Rifle or R-Launcher & do not get detected.

Be sure to hold onto at least two rockets for the R-Launcher for the final wave.

If you get detected & have to reload, you may not have access to the enemy dropped R-Launcher. If this is the case, quickly rush over to the storage building behind the watchtower on the Heliport & we can find one inside.

There will be three separate waves of Snatchers coming out of the Compound.

Wave #5: Our final fight will be another Attack Chopper though this one will need two rockets to destroy.

Once it is destroyed, hop in the Chopper & extract to complete the Extra Op.


Achievement #12 – Hidden: Clear the "Jamais Vu" Extra Op with 0 enemy combat statuses.
If you completed the Extra Op with No Enemy Combat Alerts, you will unlock this Achievement; a Combat Alert is done by failing a Combat Reflex & having an enemy openly shooting at you.


Achievement #13 – Accomplished: Clear all Missions (including the 4 Side Ops & 2 Extra Ops).
Story Related. If you have completed Main Mission – Ground Zeroes, all 4 Side Ops, & the 2 Extra Ops, you will unlock this Achievement after completing Extra Op – Jamais Vu.

Trial #46 – Fastest Marking of All Enemies: Unlocked by completing the Extra Op – Jamais Vu on Normal Difficulty.

Trial #47 – Fastest Extermination of All Crows: Unlocked by completing the Extra Op – Jamais Vu on Normal Difficulty.

Trial #48 – Fastest Erasing of All Markings: Unlocked by completing the Extra Op – Jamais Vu on Normal Difficulty.

Trial #49 – Fastest Completion of FOX Logos: Unlocked by completing the Extra Op – Jamais Vu on Normal Difficulty.
Sequence 15: The White Fox
1. Extra Op: Jamais Vu
2. Cassette Tapes: 13/13
3. Trials: 49/53
4. Achievements: 16/16
-----------------------------------------------------------------------------------------------------

Extra Op – Jamais Vu (Fastest Marking of All Enemies/S-Rank):
There are very few Soldiers/Snatchers on this Extra Op making this the easiest Marking Trial to complete. In Phase 1, there are only 10 enemies + the 2 enemies in the Four-Wheel Drive. The enemy locations are identical to where we found them last Sequence.

Take this time to try & shoot for an S-Rank if possible; do not kill any Soldier & do not get detected either. Complete the Extra Op as quickly as possible as well.


Achievement #14 – Hero: Clear all Missions (including the 4 Side Ops & 2 Extra Ops) with a S-Rank .
Story Related. If you have systematically gone through earning on S-Rank on all of the Missions, we will unlock this Achievement after completing Extra Op – Jamais Vu.

Trial #50 – Fastest Neutr. of All Enemies: Unlocked by completing the Trial – Fastest Marking of All Enemies on Extra Op – Jamais Vu.

Extra Op – Jamais Vu (Hard):
For completing this Extra Op on Hard Difficulty, we will use the exact same strategies as before, but this time we do not have to worry at all about Combat Alerts or our Mission Score. Just blast through the Extra Op… literally.

Trial #51 – Fastest Completion Time: Unlocked by completing the Extra Op – Jamais Vu on Hard Difficulty.

Trial #52 – Fastest Extermination of All Rodents: Unlocked by completing the Extra Op – Jamais Vu on Hard Difficulty.

Cassette Tape #13 – Zone of the Enders: We will unlock this final Cassette Tape after we have completed all 7 Missions in the game on Hard Difficulty.


Achievement #15 – Information: Obtain all 13 Cassette Tapes.
If you have been following along with the guide, we will unlock this Achievement after completing Extra Op – Jamais Vu on Hard Difficulty.

Extra Op – Jamais Vu (Fastest Completion Time):
Repeat the exact same strategies you used for our first run of this Side Op on Hard Difficulty.

Trial #53 – Fastest Completion Time (Stealth, No Kills): Unlocked by completing the Trial – Fastest Completion Time on Extra Op – Jamais Vu.


Achievement #16 – Unlocked: Unlock all 53 Trials.
Story Related. As listed in the Introduction, we will unlock all 53 Trials for all 7 Missions by:
1. Complete the Mission on Normal
2. Complete any Trial on Normal (Fastest Marking of All Enemies)
3. Complete the Mission on Hard
4. Complete any Trial on Hard (Fastest Completion Time)

If you did not unlock the Achievement, check the Trial Records tab on your Main Menu & cycle through the Missions to see which one you are missing. Most likely if this is the case, it will have been by not completing a “Fastest Marking of All Enemies” Trial.
Conclusion:
Metal Gear Solid has a bit of a steep learning curve but is very intuitive once you get the hang of it. All in all, Ground Zeroes is a great game & is extremely cinematic with Kojima literally directing it like a movie; this is just a taste of the awesomeness that awaits us in The Phantom Pain! The hardest part of our 100% is earning those S-Ranks & completing the Marking Trials. 100% took me only 25 hours to complete but may take you more or less time depending on your skill level & how comfortable you are with these kinds of games. Patience is the key to success.

If this guide helped you achieve 100%, rate the guide or let me know in the comments. Helps me know if I am doing things right!


100% Complete
Thank you for choosing Cynic, & I will see you in the next guide!

If you are interested in a little bit of patronage, support my projects & consider buying me a beer. If not, no worries; my guides are, & will always be free content. Achievement Hunting is my passion, & writing these guides is a way for me to give meaning to a life long hobby!
https://www.buymeacoffee.com/cynic0055

Other Cynical Guides:

If you enjoy this game & my style of writing guides, be sure to check out my:
https://steamcommunity.com/sharedfiles/filedetails/?id=3058014625
https://steamcommunity.com/sharedfiles/filedetails/?id=3060178562

Check out my profile for a full list of my works.

21 Comments
Limão, o Destruidor Feb 14 @ 9:05am 
Great guide, thanks :pleased:
snowystormy Feb 2 @ 2:05pm 
Also, for the first strategy laid out for S-Ranking the Side Op "Destroy the Anti-Air Emplacements" while it is required to get an A-Rank beforehand in order to have quick access to the FB MR R-Launcher, this is not as difficult as it may seem, as if you beat the Side Op with all possible bonuses, that is, No Combat Alerts, No Kills, No Retries, No Reflex, All 4 Prisoners Rescued, and without losing any helicopters, then it is automatically an A-Rank regardless of time, as even getting the maximum time penalty (-9999) isn't enough to lower your score past the A-Rank Interval.
snowystormy Feb 1 @ 10:48am 
I can't seem to edit my comment anymore, but the Smoke Grenades are actually on the nearest shelves, so it's even easier.
snowystormy Jan 31 @ 3:10pm 
Don't know if anyone's said it before but for the strategy outlined in this guide for S-Ranking the Side Op "Classified Intel Acquisition" (Hard) you don't need to either reload a checkpoint or get a gun, as there's some smoke grenades in the far shelves that are to the right of the ladder when coming from under the Control Tower. You can then climb the ladder and throw a smoke grenade inside the little hut, slip in and take the Cassette Tape then bail, skipping the Alert. Make sure to fall past the mini-ladder before jumping onto the thick shelves behind the Truck, then continue on as normal. This strategy can also be used on the normal difficulty to avoid the Alert, as the Security Camera is still operational, just blocked, although there is little reason to do this when you have a silenced gun.
Ze Jan 27 @ 11:19pm 
:VSnake: "You're pretty good." :Ocelot:
Got 'em all, appreciate the guide!
Cynic 0055  [author] Oct 8, 2023 @ 10:47am 
Hey Nescius, Thanks for bringing this up. Not sure why I thought the fourth one didn't count, but I updated the guide. :VSnake:
Nescius Oct 8, 2023 @ 1:55am 
"With the APC destroyed, return to the cliffside Landing Zone & call in the Extraction Chopper. Load up the 3 Prisoners we took from the Eastern Camp..."
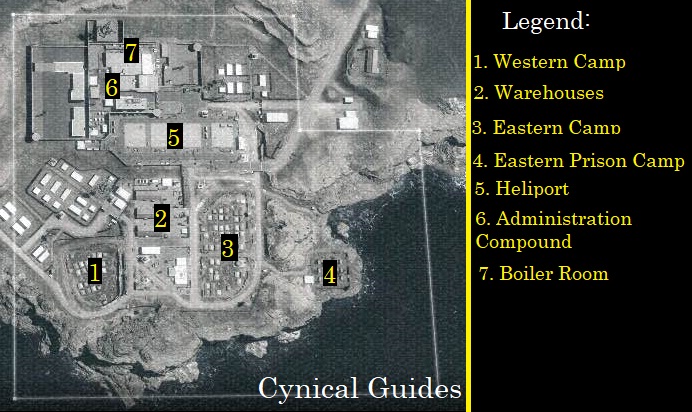
"For the Extraction Achievement, we need to extract all 3 Prisoners found in the Eastern Prison Camp; we will do this at the end as we go to leave Camp Omega."

this is false, you need all four. I did three, didn't get it, I did four, I got it.
Mageever Apr 5, 2023 @ 11:41am 
Could also use that route in the normal mode S rank if you don't want to have to deal with the guys on the helipad seeing you climb the ladder. Suppressed rifle really is OP. I only thought of going to get baldie's tape because I wanted to snag a rifle from the locked armory in the admin base.
Mageever Apr 5, 2023 @ 11:40am 
I will say, I think I could've just been really lucky that run, because the truck driver must've got into the truck and driven it while I was getting the tape. I got back to the truck and it was parked with the front towards the ammo rack, rather than the back. As the truck was leaving the base, he actually drove it backwards until he hit the junction right after the overpass, when he corrected himself.

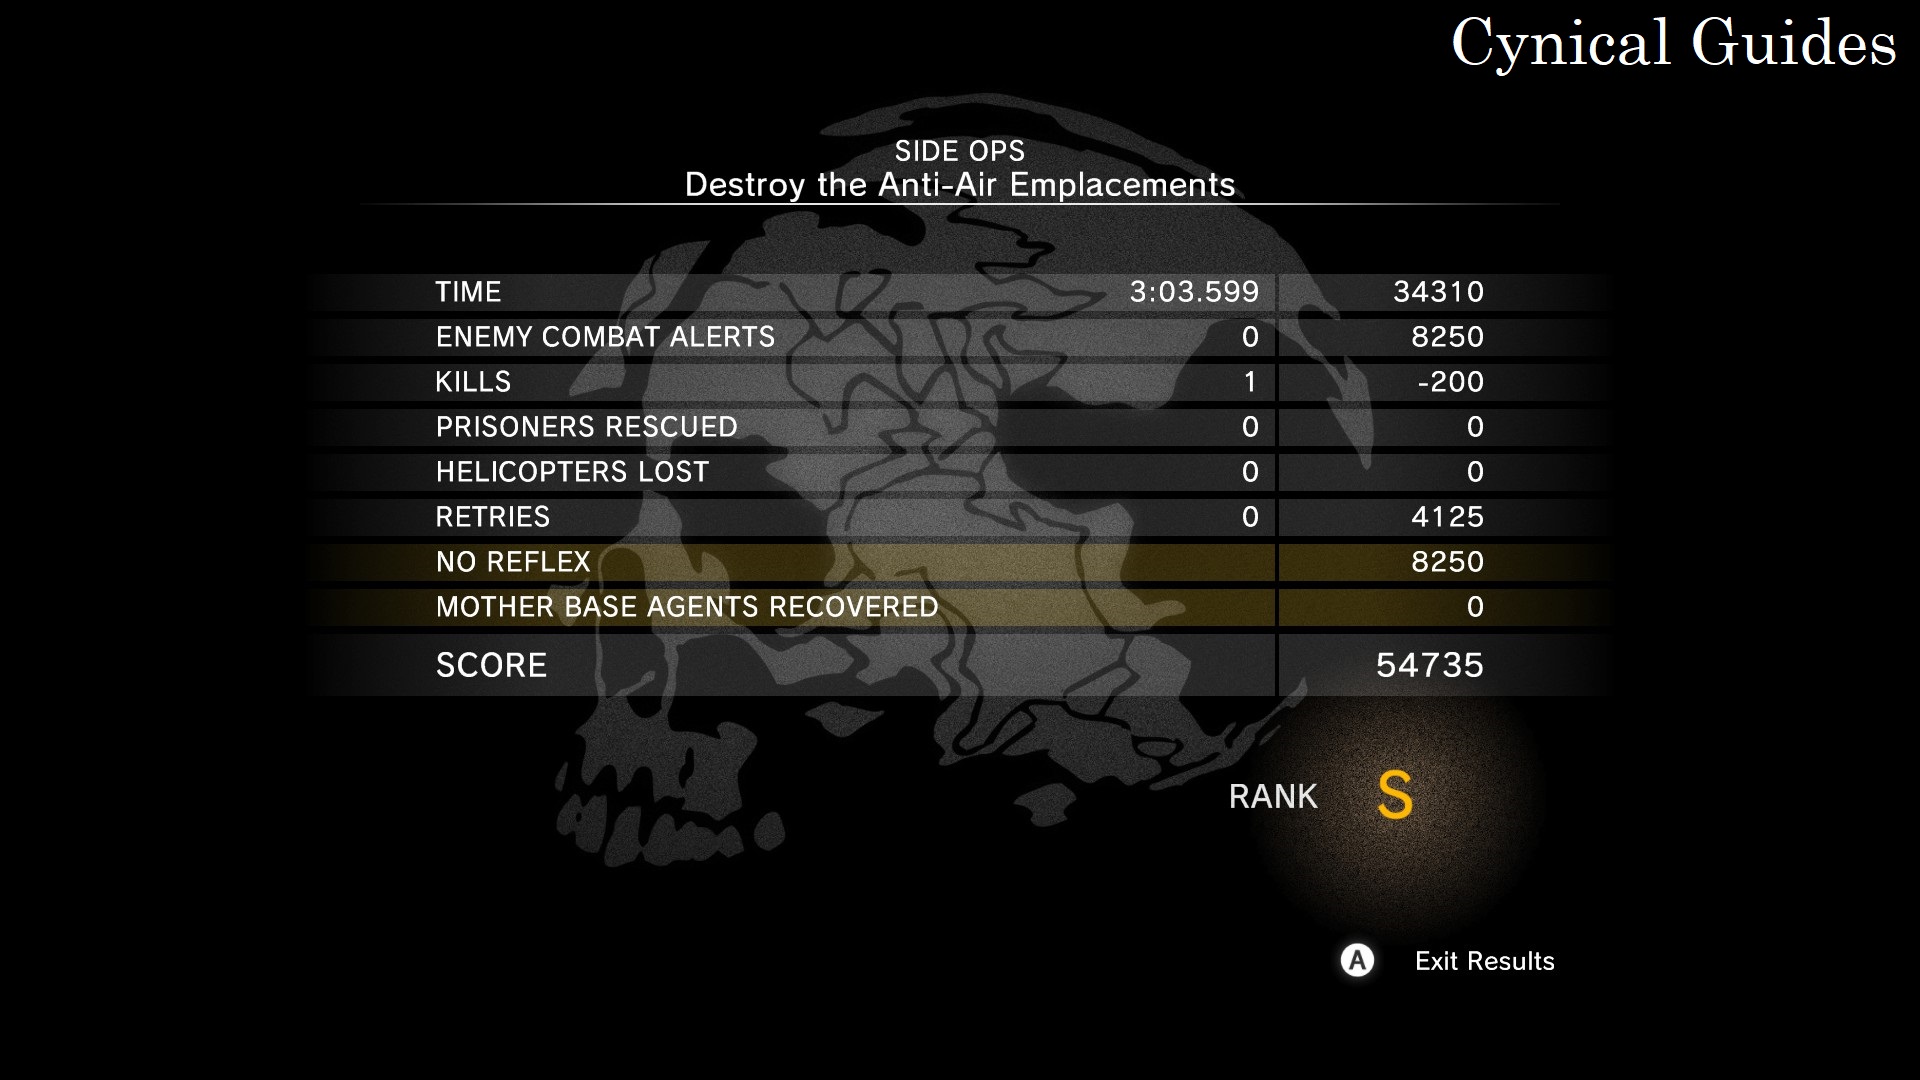
Also, it is just a hard completion, so you technically don't need an S rank. I probably could've fled the base guns blazing, or just by foot, but I forgot. Ended up getting a good run out of it, though!

(2/2)
Mageever Apr 5, 2023 @ 11:40am 
Been using the guide a lot recently. I was having trouble getting the truck to even show up/drive correctly after reloading the admin tower cassette checkpoint on the hard mode "Classified Intel Acquisition", and I found out that you can actually get a really easy S rank if you go for the bald guy with the secret intel instead.

I knock out the truck driver right away (while he's still in the truck), and then I take the back path to the ladder, sleep the guard crouching behind the box, then knocking out the next one or two guys that end up around there. Sneak past the camera and then head down to the boiler room. I got the tape and made my way back to the truck, and the driver's been woken up by another guard. Hop in the back last second and he drove me out. Got an S rank and about

(1/2)