METAL GEAR SOLID V: THE PHANTOM PAIN

METAL GEAR SOLID V: THE PHANTOM PAIN

124 ratings
100% Achievement Guide: MGS5 - The Phantom Pain Part 1
By Cynic 0055
This is a comprehensive 100% Achievement guide detailing a step-by-step walkthrough to take you from 0 all the way to 100%. If you are looking for a particular Achievement or Collectible, use Ctrl+F & type it into the search bar for more direct help.

I run support & debug help on all my guides. If you have any questions, problems, or find errors in the guide itself, do not hesitate to leave me a comment & I will get back to you as soon as I am able to. Happy Hunting!
3
   
Award
Favorite
Favorited
Unfavorite
Introduction:


Achievement Breakdown: (42)
Story Related: (12)
Secondary Objectives: (6)
Character: (6)
Collectibles: (11)
Slay: (1)
Miscellaneous: (5)
Online: (1)


This is Part 1 of 2 Achievement Guides for The Phantom Pain. Part 1 covers natural story progression, 134/157 Side Ops, all Wildlife & the bulk of the Collectibles. The guide ends after completing Mission #43 – Shining Lights, Even In Death. Part 2 picks up where Part 1 leaves off & covers all Mission Tasks, S Rank, the final Side Ops, & the last mop up Achievements including building/disarming a Nuclear Weapon.

There are 51 main Missions in the game however 12 of these are harder versions of previous ones. Each Mission has a set amount of optional Tasks we need to complete. Some of these are Story Related & earned through beating the Mission while others are more specific. There are also 157 Side Ops which are secondary Missions we can complete. We will unlock new Side Ops as we progress through the main Missions; I recommend completing them as they are unlocked before carrying on.

There is a morality stat in the game called Heroism that we will accumulate for completing Missions, Extracting Prisoners or Wildlife, as well as other means. For the Hero Achievement, we will need to accrue over 150,000 Heroism Points. This is not too difficult & will most likely come through natural progression. Killing Prisoners, Wildlife, & Staff Members will reduce our Heroism Points.

As we play, stockpile & Fulton Extract everything. We will need a large supply of Medicinal Herbs, Vehicles, & Materials. In worst case scenarios, we are able to sell our Resources for GMP. Base Development is a massive part of the game as well, though the game goes into detail on the tutorial of what that all is. The important thing to note is that we need to fully level all 6 Platforms to Level 4 for the Architect Achievement. This requires a MASSIVE amount of Materials (especially Fuel Resources) to accomplish… loot everything!

While there is an entire Online component to this game, as far as our 100% is concerned, it contributes very little.

The last thing to note is Nuclear Weapons. After we beat far enough into the game, we will have the option to build Nuclear Weapons. Save this until the very end of the game until we have nothing left to do. Not only is it expensive, they can be stolen from us by other Online Players raiding our base. I will go into more details regarding this in Part 2; just ignore Nukes & there won’t be any issues...

If you completed Metal Gear Solid 5 – Ground Zeroes, you can import your Save file to The Phantom Pain to unlock some unique Skins as well as unique Staff Members for Mother Base. The Skins will need to be Developed & cost resources to make, however you will slowly unlock the transferred Staff Members as you complete Missions; the first set will come after Mission #3 – A Hero’s Way & the last unlocked after Mission #12 – Hellbound.

Note that you are actually able to import your own music into the game as well to use for your Helicopter arrival theme & just to listen to. In your Phantom Pain game folder, there will be a Custom Soundtrack Folder. Simply place any extra music you want into it, & it will appear in game!

For those interested, here is an organized list of all the Achievements/Secret Achievements. This is how I derive my Achievement Breakdowns & the first reference I create before I begin my 100% journeys.
https://steamcommunity.com/sharedfiles/filedetails/?id=3060360836

*Guide contains major spoilers.
Sequence 1: Kept You Waiting, Huh?
1. Mission: Awakening, Phantom Limbs, Diamond Dogs, A Hero’s Way, C2W
2. Side Ops: 5/157
3. Blueprints: 1/26
4. Wildlife: 1/47
5. Achievements: 7/42
-----------------------------------------------------------------------------------------------------

Prologue – Awakening:

Online Creation: When the game begins, we will pick off right where Ground Zeroes ended… more or less. When we get asked about what our name is & what to alter our appearance to, this directly ties to our Online Character.

For the Main Campaign, we are still of course looking like & playing as Snake.


Achievement #1 – Awakening: Complete Prologue: Awakening Mission.
Story Related. Complete the Prologue & escape Dhekelia SBA Memorial Hospital to unlock the Achievement.

Mission #1 - Phantom Limbs:
We will still be locked into the next Mission we need to complete to progress; do not really need to worry too much about final scoring until much later on in our journey. For now, just focus on beating Missions, exploring, & looting as much Materials as you can.


Achievement #2 – Captured: Capture an Outpost or Guard Post.
This will come naturally as we playthrough the game & can be earned as soon as our first Mission. On our Map, go to any of the seven marked Guard Posts (24, 23, 19, 18, 15, 11, 09) & kill or knockout all of the Soldiers found there to unlock this Achievement.


Achievement #3 – Phantom Limbs: Complete Phantom Limbs Mission.
Story Related. Extract Kazuhira Miller from the Soviet base in Da Ghwandi Kar & escape the Skulls to complete the Mission & unlock this Achievement.

Mission #2 - Diamond Dogs:
This Mission is a simple tutorial on some of the game functions as well as how to Develop Items. Most importantly, it will be how we get the Fulton Recovery Device.

Mission #3 - A Hero's Way:
For this Mission, we will need to eliminate the Spetsnaz Commander found at Da Shago Kallai. If possible, try Extracting him for a better bonus…

D-Dog: Choose the Landing Zone that is North of Da Shago Kallai. Immediately when we begin the Mission, drop out of the Helicopter but do not get onto D-Horse just yet. Instead, stand still for a few moments & we will hear barking. Follow the barking a few paces forwards & we can see a little puppy; walk up & Fulton the poor boy to Extract him to unlock the bestest companion ever.

It will take a few Missions for him to become fully grown…

We can also find D-Dog on Mission 4 at the Landing Zone South of the Eastern Communications Post or on Mission 5 at the Landing Zone South of Wakh Sind Barracks or during Free Roam if you go to all three of these locations.


Achievement #4 – Extraction: Fulton Extract an enemy Soldier.
Simply knockout any enemy Soldier use the Fulton Extraction Device to Extract them; the Achievement will unlock as soon as they are recovered.

After we complete this Mission, we will also receive some of our Special Volunteers if we Extracted them during MGS5 – Ground Zeroes.

Afghanistan - Free Roam:

Side Op #1 – 01 Extract Interpreter (Russian): After we complete Mission #3 – A Hero’s Way, we will also unlock our first two Side Op Missions we can complete. To start, Extract the Russian Interpreter found at Guard Post 24.


Achievement #5 – Undertaken: Complete a Side Op.
We will unlock this Achievement after we complete any Side Op.

Side Op #2 – 11 Extract Highly Skilled Soldier 01: We can find our Highly Skilled Soldier to Extract just South of the Yakho Oboo Supply Outpost. The Skilled Soldier can be found on a tall rock plateau in the center of the marked area; he will have two other Soldiers with him so be careful. They are overlooking the Eastern bridge within the marked area.


Achievement #6 – Interrogation: Interrogate an enemy Soldier.
Since we secured that Russian Interpreter, we can now understand Russian. Grapple any (most) Soldier in Afghanistan & Interrogate them to unlock this Achievement.

Mother Base:


Achievement #7 – Platoon: Increase Mother Base Staff to 50 or more personnel.
Extract enemy Soldiers, complete Missions, & complete Side Ops to earn more Staff & Volunteers; it does not take very long at all to accumulate 50 personnel.

As soon as possible, Develop the INT-SCOPE 2 so that we can scan enemy Soldiers to see their stats & potential Skills. If you see a Soldier with A-S rank Stats or good Skills, be sure to knock them out & Extract them to add to our Staff. Developing C-4 as well qill come in handy in a lot of Missions to come…

Afghanistan - Free Roam:

Side Op #3 – 05 Secure the [RIOT SMG] Blueprint: Before we carry on in the Missions, we will have unlocked another new Side Op to complete. Go to Da Wialo Kallai & simply Interrogate a Soldier to find the location of the Blueprint.

Blueprint #1 – RIOT SMG: For the Collector Achievement, we will need to locate all of the collectible Blueprints in the game, the RIOT SMG will be our first…

Mission #4 - C2W:
Begin this Mission & make your way over to the Eastern Communications Post. Use Hand Grenades, C-4, or whatever you get your hands on & destroy the three Antennas to disrupt communications; Exfiltrate to complete the Mission.

After completing this Mission, we will unlock Challenge Tasks. While there is no Achievement for completing them, we do need to complete: Mark 500 enemies, Extract 500 enemies, & Extract 1000 enemies to collect three Key Items for the Collector Achievement.

Staff Management: Keep an eye on the Staff we unlock as rewards for completing Challenge Tasks & be sure to transfer them to their optimal Platforms to work at.

As well, look for Staff that have any version of the Troublemaker Skill. Typically, you will want to immediately dismiss them as they will begin injuring our other Staff. If their stats are really good & worth keeping, try also having a Staff Member with the Diplomat Skill to offset them.

Afghanistan - Free Roam:

Side Op #4 – 27 Prisoner Extraction 01: Return to the Eastern Communications Post & Interrogate an enemy Soldier to find the location of our Prisoner.

Side Op #5 – 47 Extract the Little Lost Sheep: For this Side Op, we need to scan the hillsides around Da Wialo Kallai & find the rogue Karakul Sheep. We can find the sheep trapped in the North Eastern corner of the base. Tranquilize it, & Extract it back to Mother Base to complete the Side Op.

Wildlife #1 – Karakul Sheep: We will obtain our first wild animal for the Conservation Achievement by completing this Side Op.

Going forward, at anytime you spot a wild animal, tranquilize & Extract them to collect them!
Sequence 2: Scouting Barren Lands
1. Mission: Over the Face, Where Do the Bees Sleep?
2. Invoices: 6/26
3. Side Ops: 9/157
4. Blueprints: 2/26
5. Wildlife: 1/47
6. Achievements: 10/42
-----------------------------------------------------------------------------------------------------

Mother Base:


Achievement #8 – Enhancement: Develop 50 or more Development Items.
This will come naturally as we complete Missions & playthrough the game earning GMP. If you want to quickly earn the Achievement, you can earn a bulk of Items to Develop through the Uniform Tab.

Base Facility Construction: When you have accumulated enough Resources to construct a new Platform, I strongly suggest you choose the Base Development Platform first. By doing this, we will unlock Automatic Mining which will give us free Resources every hour which will drastically speed up being able to construct other Platforms.

Afghanistan - Free Roam:

Side Op #6 – 2 Extract Interpreter (Pashto): Return to Afghanistan & head over to Guard Post 20. The interpreter will be a Prisoner that we will have to Exfiltrate.

Side Op #7 – 28 Prisoner Extraction 02: The next Side Op we can do is rescuing another Prisoner, this one being found at Da Shago Kallai. Interrogate a Soldier to find the Prisoner’s whereabouts & Extract them.

Invoice #1 – Da Shago Kallai: Just outside the village along the road, we can find an orange railed loading zone. If you approach it, we can collect an Invoice posted to a pole beside it which will unlock a Delivery Point.

Now if we hide inside any Cardboard Box while inside the Delivery Point, we can fast travel to any other Delivery Point we have unlocked; this can only be done in areas that have a Low Alert Level. Drop Points are very handy so we do not constantly have to travel via Helicopter. While individual Invoices do not count as Key Items, we will in fact obtain two of them by collecting all the Invoices in Afghanistan & all in the Invoices in Africa later…


Achievement #9 – To the Rescue: Extract a female Prisoner.
Whether it is through this Side Op or another one, eventually, we will come across a Prisoner who will turn out to be a woman; we will unlock this Achievement after they have been successfully extracted.

Side Op #8 – 12 Extract Highly Skilled Soldier 02: Search around Da Wialo Kallai for our Highly Skilled Soldier. He can usually be found patrolling around the streets with one other Soldier as a bodyguard; knock him out & Extract him.

Note that we will be able to replay this Side Op infinitely; we only have to beat it once for it to count.

Invoice #2 – Da Wialo Kallai: Before we leave the village, we can collect another Invoice found at the South entrance to the Village along the road

Invoice #3 – Eastern Communications Post: This Invoice is very simple to find. It can be found along the roadside just past the security checkpoint near the South Eastern entrance to the Communications Post.

Invoice #4 – Da Ghwandai Khar: Our next Invoice can be collected in Da Ghwandai Khar along the roadside at the North Western entrance.

We will collect the others as we come across them through Missions & Side Ops…

Mother Base:

Side Op #9 – 154 Target Practice (Base Development Platform): When we return to Mother Base, & we have constructed any Platform, we will have a new Side Op on them to complete Target Practice. There are 35 Targets we need to shoot in 5 minutes; for the most part, all the Targets can be shot from the roof where we begin the Side Op so do not waste too much time running around the Platform.

There are 7 Target Practice Side Ops in total, one for every Level 1 Platform we build; we unlock the Command Platforms Side Op at Level 2.

Mission #5 - Over the Fence:
For this Mission, we will be extracting a Soviet defector who is being held at the Wakh Sind Barracks.

Invoice #5 – Wakh Sind Barracks: We can find this Invoice just inside the Western entrance to the Wakh Sind Barracks along the roadside. It will be close to some Materials Containers & some lumber.

Blueprint #2 – UN-ARC: Interrogate a Soldier or two in Wakh Sind & you may learn of the location for this Blueprint. Enter into the main barracks compound & take a right, through the front gates, over towards some Soldier dorms. There are six dorms; our Blueprint can be found inside the dorm in the top left of the barracks here.

Mission #5 – Over the Fence: We can find the Target locked in a cell within the stone ruins in the main barracks compound. Pick the lock & get him outside for safe Extraction.

Mission #6 - Where Do the Bees Sleep?:
This is a big Mission & completing it will place us in the next arc of Chapter 1. Be warned that there will be Skulls on this Mission…

Invoice #6 – Mountain Relay Base: As we make our way to Da Smasei Laman, we will have to pass through the Mountain Relay Base. There will be a small checkpoint at the Southern entrance to the base with two Soldiers guarding it; we can find our Invoice/Delivery Point here as well.

Mission #6 – Where Do the Bess Sleep?: As we near Da Smasei Laman, check your map to see a Gunship; if you place a Marker on it, we can actually track exactly where it is in game. The Gunship patrols the road between Guard Post 14 & 17. Try timing your run so you are able to miss it. If it is getting close to you, find cover behind a good rock away from the road ahead of time so it does not spot you.

There is a Blueprint & an Invoice in Smasei Laman, but it is best to come back here after the Mission to collect them since detection is highly likely while trying to obtain them.

We can find the Honey Bee in the deepest cavern within the stone ruins at Smasei Laman; Extracting the Prisoner taken from the Mountain Relay Base to Smasei will give you the exact location.


Achievement #10 – Beekeeper: Complete Where Do Bees Sleep? Mission.
Story Related. Evade the Skulls Mist Unit & get to the extraction Helicopter after recovering the Honey Bee to unlock this Achievement.
Sequence 3: Diamond Dogs
1. Mission: Red Brass, Occupation Forces
2. Invoices: 8/21
3. Side Ops: 18/157
4. Key Dispatch Mission: 1/20
5. Blueprints: 4/26
6. Wildlife: 2/47
7. Achievements: 10/42
-----------------------------------------------------------------------------------------------------

Mother Base:

Visiting D-Dog: When we return to Mother Base after completing two Missions since his rescue, we will get to check up on little DD.

Intel Platform: We will unlock the Intel Platform after completing Mission #6 – Where Do the Bees Sleep?.

If you Extracted them during MGS5 – Ground Zeroes, we will also unlock our next set of Special Volunteers.

Side Op #10 – 153 Target Practice (Support Platform): When you increase the Support Platform to Level 1/4, we will unlock another Target Practice Side Op. In 5 minutes, shoot all 35 Targets; this is a very simple Side Op with all 35 Targets found in the warehouse directly ahead of where we start.

Side Op #11 – 152 Target Practice (R&D Platform): When you increase the R&D Platform to Level 1/4, we will unlock another Target Practice Side Op. In 5 minutes, shoot all 35 Targets.

Unlike the other Target Practice Side Ops, this one has a very specific route you need to complete to locate all of the Targets. MrReign has a good video tutorial you can check out with pretty forgiving time signatures.
https://youtu.be/7mjQ8RTGpCE
Alternatively, you may have unlocked the Side Op for the Intel Platform instead of one of these two Platforms…

Afghanistan - Free Roam:
If you have not already been doing so, be sure to ride D-Horse as much/often as possible to increase your Bond level with him; we need to rank it up to 10 to unlock the Trusty Steed Achievement.

Side Op #12 – 51 Extract the Wandering Mother Base Soldier 01: Now it is back to Afghanistan for some more Side Op missions. Deploy to the area in between Guard Posts 16 & 20 & search for a forlorn sole wandering the desert; deploy at night for our next Wildlife Extraction...

We can find the Old Mother Base Soldier wandering along a dirt road just North East of Guard Post 20, the road is marked on our map & cuts through the mountains to Guard Post 13.

Completing these Side Ops will reward us with Memento Photos. When we collect all 11 of them, we will unlock the Reminiscence Achievement.

Wildlife #2 – Brown Bear: In the same area we find the Old Mother Base Soldier wandering, if it is night time, we can typically find Brown Bears as well. Brown Bears can be found in mountain passes at night in Afghanistan. Be sure to hit them in the head multiple times with a tranquilizer round or prepare to be charged!

Side Op #13 – 13 Extract the Highly Skilled Solder 03: We can find this Skilled Soldier at Da Samasei Laman. In an undisturbed setting, we can find the Soldier near the command tent in the center of the area with the red Soviet flag beside it in the North East corner of Samsei Laman. Locate him with the INT Scope, & be sure to tranquilize him.

Blueprint #3 – PB SHIELD: While in the command tent, we can also find this Blueprint on the main war table; you can also Interrogate any Soldier in this area for the exact location.

Invoice #7 – Da Smasei Laman: We can find this Invoice in the center of Da Samsei Laman along the road leading to the ruins. It is directly beside the Anti-Air Radar trailer.

Side Op #14 – 61 Unlucky Dog 01: Our next Side Op will take us to the Yakho Oboo Supply Outpost. We can find the Prisoner locked inside a cell at the North most end of the Outpost within the compound walls.

Invoice #8 – Yakho Oboo Supply Outpost: Just South West of the Supply Outpost is a bridge crossing the river; we can find the Invoice here on the outpost side of the river.

For now, stay away from Aabe Shifap Ruins until we complete the next few Missions as entering them will trigger Mission #11 – Cloaked In Silence… Ignore any Side Op that takes us up past it for now.

Mother Base:

Side Op #15 – 155 Target Practice (Intel Team Platform): When you have upgraded the Intel Team Platform to Level 1/4, we will unlock this Side Op.

This is a bit more of a simpler Side Op though still requires a run down through the Platform; MrReign can show us the way should you need the help.
https://youtu.be/3mM8d_LdeBA

Mission #7 - Red Brass:
For this Mission we must assassinate or Extract three Soviet commanders who are meeting at Da Wialo Kallai. Get to Wialo Kallai & wait for the commanders to arrive; Extracting the commanders gives us a massive bonus…

Completing this Mission will unlock the Medical Platform for us to develop.

Afghanistan - Free Roam:

Side Op #16 – 62 Unlucky Dog 02: Return to the Aerial Command Center & return to Afghanistan to acquire more Side Ops. Go to Da Smasei Laman & Interrogate any Soldier here to find the location of our Prisoner; Extract them to complete the Side Op. Potentially, they may give you the location of a different Prisoner; our Target should be in the same cell.

Mission #8 - Occupation Forces:
You will want the GROM-11 Launcher developed for this Mission, some C-4… & some Hand Grenades.

Collect the Intel File in the main command center of Qarya Sakhra Ee. Doing so will mark the Soviet colonel & his Tanks on route to Da Smasei Laman. Lay an ambush for the two Tanks & Zi-GRA 6T Truck & destroy them all to complete the Mission.

Completing this Mission will unlock the Combat Unit Platform.

We will also unlock more Special Volunteers if you extracted them during MGS5 – Ground Zeroes.

Afghanistan - Free Roam:

Side Op #17 – 14 Extract the Highly Skilled Soldier 04: Go to Da Ghwandi Khar & Interrogate some Soldiers here to find the location of the Highly Skilled Soldier; Extract them to complete the Side Op.

Side Op #18 – Eliminate Heavy Infantry 01: Go to Guard Post 12 & we will find its garrison replaced by two Heavy Soldiers; kill them to complete the Side Op.

Mother Base:

Combat Deployment: Once we place some Staff into our Combat Unit Platform, we will be able to send our men on Dispatch Missions. There are many repeatable & optional Dispatch Missions to complete but there are a set of special Key Dispatch Missions as well. For the Deployment Achievement, we will need to complete all 20 Key Dispatch Missions…

Key Dispatch Mission #1 – Break through the Blockade Force: Key Dispatch Missions are marked by a flashing yellow circle beside their name. This is a simple E Difficulty Mission & will only take 10 minutes to complete.

Blueprint #4 – GEIST P3: We will receive this Blueprint by completing #1 – Break Through the Blockade Force.
Sequence 4: Ride A White Horse
1. Mission: Back Up, Back Down, Angel With Broken Wings
2. Invoices: 9/21
3. Side Ops: 25/157
4. Key Dispatch Mission: 7/20
5. Blueprints: 7/26
6. Wildlife: 3/47
7. Achievements: 13/42
-----------------------------------------------------------------------------------------------------

Afghanistan - Free Roam:

Side Op #19 – 52 Extract the Wandering Mother Base Soldier 02: We can track down another Old Mother Base Solider, this one wandering around West of Da Shago Kallai. They can be found in the center of the marked area; having a good Intel Team can improve finding them.

Side Op #20 – 93 Eliminate the Armored Vehicle Unit 01: For this Mission, you will either want some C-4 or a Launcher. The Vehicle Unit is found on a hill to the East of the road in between Yakho Oboo Supply Outpost & Guard Post 5.

There are 4 Soldiers & 1 APC.

Key Dispatch Mission #2 – Restore the DMZ: Our next Key Dispatch Mission is another E Difficulty one that will take 11 minutes to complete.

Blueprint #5 – WU S333: Completing Key Dispatch Mission #2 – Restore the DMZ will unlock this Blueprint for us.

Key Dispatch Mission #3 – Recapture the Coltan Mine: This is another E Difficulty Dispatch Mission that will take 22 minutes to complete.

Mission #9 - Backup, Back Down:
You will most definitely want a Launcher type Weapon for this Mission. There are many Armored Vehicles we will need to destroy for this Mission though fortunately, we only need to destroy a minimum of one to complete it.

Mission #10 - Angel With Broken Wings:
Let’s jump straight into the next Mission to get us all caught up. For this Mission, we need to Extract a Mujahideen Prisoner called Malak from the Lamar Khaate Palace.

There is a very important optional Prisoner we need to rescue on this Mission as well. They are a Transportation Specialist & will let us further Develop our Fulton to be able to Extract large Materials Containers, Trucks, & even Tanks!

There are three potential Prisoners found at the palace; Interrogate a Soldier to get their locations. One is in a prison cell found at the far North end of the grounds near the Soldier dorms. The other two or on the second & third floors of the palace, if possible try Extracting them all.

Wildlife #3 – Griffon Vulture: From where we land South of Lamar Khaate Palace, ride North towards it along the cliff walls & we will pass between a space just before the battlements where a burnt-out tank is. Look off to our right on top of the lone rock face & there will always be some Griffon Vultures roosting on top of it; tranquilize one & Extract it.

They can also be found… basically all over the palace grounds for this Mission as well.

Mother Base:


Achievement #11 – Cry Havoc: Make D-Dog available for deployment.
After we have completed Mission #10, we will be sent back to Mother Base for some R&R by Miller. When we arrive… nothing will happen. When we go to leave via Helicopter however, we will be intercepted by DD, fully grown & ready for action… Ocelot must have been giving him nothing but whole milk & steaks for the last couple weeks.

DD is probably the best Buddy in the game & his detection skills are insanely invaluable. For now though, let’s try sticking with D-Horse when we can to boost the rest of his Bond Level to 10.

Afghanistan - Free Roam:

Invoice #9 – Lamar Khaate Palace: With the Mission complete, return to Lamar Khaate Palace in free roam & we can find this Invoice along the curve in the road in front of the palace.

Blueprint #5 – BAMBETOV SV: While we are here, Interrogate some Soldiers until they give you the location of a Blueprint hidden in the palace. It can be found at the North end of the palace on the third floor beside the Radio Cassette of Maneater.

Key Dispatch Mission #4 – Search & Destroy Remaining Forces: Another E Difficulty Dispatch Mission; this one will take 22 minutes to complete.

Blueprint #6 – ZE’EV: Complete Key Dispatch Mission #4 – Search & Destroy Remaining Forces to acquire this Blueprint.

Side Op #21 – 67 Eliminate the Heavy Infantry 02: Go now to Guard Post 8 & head along the dirt road that runs above it to the North to find two Heavy Infantry patrolling. They are best killed with explosives.

Side Op #22 – 114 Eliminate the Tank Unit 01: Lastly before we return to Mother Base, we will need to destroy a Tank unit just outside of Da Ghwandai Khar. There will be one Tank along the road with three Soldiers beside it. A little ways up the road from them on a hill will be another two Soldiers beside a Mortar.

Mother Base:

Side Op #23 – 156 Target Practice (Medical Platform): When you have upgraded the Medical Platform to Level 1/4, we will unlock this Side Op.

Side Op #24 – 157 Target Practice (Combat Unit Platform): When you have upgraded the Combat Unit Platform to Level 1/4, we will unlock this Side Op.

Key Dispatch Mission #5 – Break Through the Cordon: Another E Difficulty Dispatch Mission but this one will take our unit 43 minutes to complete. They are getting longer…


Achievement #12 – Reinforcement: Develop 100 or more Development Items.
Keep Developing & upgrading our Weapons & equipment to unlock this Achievement. For bulk Development, just always create the cheapest available pieces of gear until their costs all slowly increase.

With our Transportation Specialist, be sure to Develop Cargo 2 in the Tools tab for our Fulton.

Afghanistan - Free Roam:

Side Op #25 – 115 Eliminate the Tank Unit 02: We have another Tank unit to dispatch located just East of the Lamar Khaate Palace. They will be set up on a dirt road in the center of the marked area. This time there will be two Tanks; one set up at either end of the road. There will be two Soldiers & a Mortar set up beside each Tank & there will be another two Soldiers patrolling in between them.

Key Dispatch Mission #6 – Liberate the Tanker: An E Difficulty Dispatch Mission that will take 32 minutes to complete.

Blueprint #7 – FB MR R-LAUNCHER: Beat the Liberate the Tanker Dispatch Mission. You unlock the FB MR ROCKET LAUNCHER.

Key Dispatch Mission #7 – Presidential Escort: A D Difficulty Dispatch Mission that will take 46 minutes to complete.

This will be our last Key Dispatch Mission until we beat further into the game…


Achievement #13 – Battalion: Increase Mother Base Staff to 250 or more personnel.
This will come naturally as we playthrough the game & begin expanding our different Platforms & Staff. By the end of the game, we will probably have well over five times this many Staff Members…
Sequence 5: Cards On the Table
1. Mission: Cloaked In Silence, Hellbound
2. Invoices: 11/21
3. Side Ops: 30/157
4. Key Dispatch Mission: 7/20
5. Blueprints: 7/26
6. Wildlife: 5/47
7. Achievements: 15/42
-----------------------------------------------------------------------------------------------------

Afghanistan - Free Roam:

Side Op #26 – 83 Mine Clearing 01: To best deal with this Side Op, it is easiest to deploy with D-Dog so he can detect the Mines. There are 7 Mines to collect for this Side Op; most can be found within a short distance of the thin road cutting through the marked area.

When disarming a Mine, be sure to disable it from behind or else it will explode!

Side Op #27 – 84 Mine Clearing 02: Reset Afghanistan from the AAC & return to unlock the next Mine Clearing Side Op. This next Side Op will take place in a mountain pass; there are 7 Mines to disarm.

Side Ops #28 – 94 Eliminate the Armored Vehicle Unit 02: Reset Afghanistan again & we will need to destroy an Armored Vehicle unit close to where we disarmed the Mines for Side Op #24.
For this Side Op we need to destroy an Anti Air APC, four patrolling Soldiers, & two Soldiers standing guard nearby the APC.


Achievement #14 – Apprentice: Complete a Mission using a Combat Unit Staff Member.
If you have not already done so, complete any main Mission as one of our Combat Unit Staff to unlock this Achievement. Personally, I think Mission #4 – C2W is the quickest/easiest Mission to do & can be run in under 5 minutes.

When you are deploying, go to the Select Character tab & choose any of your available Combat Staff to play as.

Simply complete the Mission & Exfiltrate to unlock the Achievement.

Mission #11 - Cloaked In Silence:
If all your previous Side Ops & Missions are complete, it is time for us to finally progress past the Aabe Shifap Ruins.

As soon as we enter the ruins, we will trigger this Mission & become under fire by an enemy sniper. Do not leave the Mission area & instead focus on apprehending the sniper; keep her alive & do not kill her. This is actually a pretty irritating Mission if you try to do it the legitimate way. If you have the GMP to spare, it is insanely easy.

As soon as the Mission begins or as soon as the sniper reaches a new position, Mark her, then quickly go into your iDroid & call in a Supply Drop. Do not choose ammo & instead choose the cheapest Weapon you currently have to deploy. When it is called, carefully pop out of cover occasionally to keep her interested & wait for the Supply Drop to arrive. If done correctly, the Supply Crate will land directly on the sniper dealing a substantial amount of non-lethal damage to her. It will only take two Supply Drops to knock her unconscious.

If you do not take a single shot at Quiet & take her out using solely the Supply Drops, we will complete all 4 Tasks for the Mission as well as earning an S-Rank most likely… Do not approach Quiet just yet & instead quickly read how to get the next Wildlife below first; reaching Quiet will end the Mission.

Wildlife #4 – Oriental Stork: For whatever reason, the Oriental Stork will spawn commonly during this Mission. Search for it roosting on top of the ruins to tranquilize & Extract.

Sparing Quiet: When we approach her, do not pull the trigger, & wait out the cut scene to put the gun down. Killing Quiet will void Missions & Achievements!

Afghanistan - Free Roam:

Side Op #29 – 48 Capture the Legendary Brown Bear: After completing Mission #11, we will unlock this new Side Op to complete. The Legendary Brown Bear is found within a small canyon just North of Guard Post 6; bringing D-Dog will guarantee detection of the bear.

Once you find it, you will need to pepper it with tranquilizer rounds. Either it takes so many, or my gun was so weak, but I need to call in a Supply Drop to restock my ammo after unloading every single dart into it.

Eventually, the bear will pass out, & we will be able to Fulton Extract it to complete the Side Op.

Wildlife #5 – Himalayan Brown Bear: A Wildlife species unique to this Side Op.

Side Op #30 – 82 Make Contact With Emmerich: To progress the main story, we will need to go to the Serak Power Plant & extract Dr. Emmerich.

Invoice #10 – Serak Power Plant: When we approach the power plant, we can find this Invoice at the Delivery Point shortly upon entering the area. The Delivery Point can be found beside the very first building on our right along the road.

Mission #12 - Hellbound:
Get to the far end of the Serak Power Plant & pass through the side door; this will complete the previous Side Op & begin this new Mission.

Invoice #11 – Afghanistan Central Base Camp: Dr. Emmerich will be taken to the Afghanistan Central Base Camp as part of Mission #12. When we arrive here, make your way to the very far North Eastern end of the camp to find the final Invoice off to the side near some warehouses at the Eastern entrance along the road.

If this is too risky for you, ignore it, & come back in free roam after we have completed the Mission…


Achievement #15 – Gears Turn: Complete Hellbound Mission.
Story Related. Locate Dr. Emmerich & Extract via Helicopter by whatever means necessary. Evading the Sahelanthropus can be quite the pain. There are only two different Helicopter extraction points we can use. It is easiest to get all the way down to the very end of the Mission area near the South most extraction point & hiding inside a building with Emmerich.

If the Helicopter is waiting at the first extraction point, Sahelanthropus will be further up near it. When you are ready, get as close as you can to the second extraction point & summon the Helicopter. Sahelanthropus will follow it, but if you are directly below where it lands, you should be able to escape.

Completing this Mission will unlock more Special Volunteers from Ground Zeroes if you rescued them…
Sequence 6: Sands
1. Mission: N/A
2. Invoices: 12/21
3. Side Ops: 37/157
4. Key Dispatch Mission: 10/20
5. Blueprints: 9/26
6. Key Items: 1/20
7. Wildlife: 5/47
8. Achievements: 16/42
-----------------------------------------------------------------------------------------------------

Afghanistan - Free Roam:
Continuing with Mission #13 – Pitch Dark will start the next arc of the game in Africa. Before we do that, we may as well do some final cleanup in Afghanistan first. Remember, if you see any Wildlife you do not have captured yet as we complete our last tasks… capture them! It is easiest doing it naturally as you come across them then to have to try to hunt them down later on…

Be sure to visit Quiet in her cell on the Medical Platform in between the odd Side Op as well; we need to visit her at least 3-5 times for her to join as us a Buddy!

Key Dispatch Mission #8 – Assist the Civilian Evacuation: Completing Mission #12 – Hellbound will unlock some new Key Dispatch Missions for us to complete. This one is a D Difficulty & will take 40 minutes to complete.

Side Op #31 – 15 Extract the Highly Skilled Soldier 05: Travel to Guard Post 4 & head South from it towards a cluster of abandoned buildings. Be very careful coming up the hill as there is a Sniper scanning the approach to the buildings; the Sniper is our Extraction target.

Side Op #32 – 06 Secure the [STUN ARM] Blueprint: Now that we have taken care of Quiet, the Side Ops beyond the Aabe Shifap Ruins are available to us again; you may have noticed this Side Op previously than see it disappear.

Go to the Serak Power Plant & Interrogate one of the Soldiers to get the location of the Blueprint. The Blueprint can be found in the offices to the far North East of the area in the furthest building on a table inside near the Comms Equipment.

Blueprint #8 – STUN ARM: Obtained through the previous Side Op.

Key Dispatch Mission #9 – Defend the Refugee Camp: The next Key Dispatch Mission is another D Difficulty one that will take 1 hour & 12 minutes… very specific.

Side Op #33 – 68 Eliminate the Heavy Infantry 03: Reset Afghanistan from our Helicopter & return to the Guard Post 4 area. This time there will be three Heavy Infantry, & they will have taken over Guard Post 4; dispatch them with explosives…

Side Op #34 – 29 Prisoner Extraction 03: Our next Side Op will be at the Afghanistan Central Base Camp. Find a Soldier or two further into the base & Interrogate them to find the location of the Prisoner. The Prisoner can be found at the North end of the base, past the center hangar base, & over to where the Soldier dorms are. The Prisoner will be in a green tent in front of the dorms.

Side Op #35 – 95 Eliminate the Armored Vehicle Unit 03: Reset Afghanistan again & make your way past the Central Base towards Guard Post 1. Be very careful on approach as almost immediately when we enter the marked area, we will be in range of a Sniper. Along the road there will be an APC, an Anti Air APC, & two Soldiers patrolling near them. On the hills to either side of the vehicles will be a Sniper & a Soldier near a Mortar.

Side Op #36 – 30 Prisoner Extraction 04: We can rescue another Prisoner found at the Mountain Relay Base; Interrogate a Soldier here to find their location.

Side Op #37 – 31 Prisoner Extraction 05: Reset Afghanistan for the last time to complete our final Side Op for now. The Prisoner is being held at Guard Post 14 & is pretty easy to spot.

Invoice #12 – Qarya Sakhra Ee: There is one final Invoice to find in Afghanistan, if you have not already collected it, at Qarya Sakhra Ee. We can find the Invoice along the road leading into Sakhra Ee from the Western entrance near a security checkpoint.

Key Item #1 – Master Certificate (Box): Awarded for collecting all Invoices in Afghanistan or in Africa; we will need to get the Invoices in Africa anyways for a second Key Item.

There are 13 Invoices in total to collect in Afghanistan found at:
Afghanistan Central Base Camp, Da Ghwandai Khar, Da Shago Kallai, Da Smasei Laman, Da Wialo Kallai, Eastern Communications Post, Lamar Khaate Palace, Mountain Relay Base, Qarya Sakhra Ee, Serak Power Plant, Wakh Sind Barracks, & the Yakho Oboo Supply Outpost.

If you did not get the Certificate, look on your Map at each of these locations to see if you have the Delivery Points marked on it to find the ones you are missing.

Key Dispatch Mission #10 – Destroy the New Fighter Aircraft: Another D Difficulty Dispatch Mission that will take 1 hour & 26 minutes to complete.

Blueprint #9 – AM MRS-71 Rifle: We will receive this Blueprint after completing the previous Key Dispatch Mission.


Achievement #16 – Trusty Steed: Raise Bond with D-Horse to the maximum.
This will come over time as we use D-Horse. If you have been exclusively using him, with D-Dog occasionally on the side, we will definitely unlock this Achievement before the end of our first tour in Afghanistan. There are 10 Levels of Bond to earn.
Sequence 7: Better Than PETA
1. Mission: N/A
2. Invoices: 12/21
3. Side Ops: 37/157
4. Key Dispatch Mission: 11/20
5. Blueprints: 9/26
6. Key Items: 2/20
7. Wildlife: 20/47
8. Achievements: 17/42
-----------------------------------------------------------------------------------------------------

Afghanistan - Free Roam:
As our final task, we will quickly go & collect the Wildlife in Afghanistan that can be obtained via Fulton & a few through Capture Cages. Later on we will unlock the Grade 4 Capture Cage & can return for the Super Rare to Ultra Rare Wildlife species. If have not already done so, be sure to Develop the Capture Cages to Grade 3. We can only place a maximum of 8 Capture Cages down!

We will be blowing a bit of GMP on Helicopter travel around Afghanistan; if you get too short on GMP, you can sell some of your Medicinal Plant stockpiles.

Note that there are potentially multiple locations to find Wildlife; having D-Dog along can be very helpful.

Caging Site – Da Wialo Kallai: Go to the Landing Zone East of Wialo & place down all eight Capture Cages a little bit spread out. Place the Cages in different environments too for a better spectrum such as in bushes, on top of rocks, on open sand, near trees, etc.

Wildlife #6 – Common Raven: Ravens are going to be one of the most common Wildlife we see in the game. They can be found pretty much near any named settlement, in trees, or on rocky outcrops; I got mine from Da Wialo Kallai in the village.

When you see them flying, Mark them, then patiently wait for one of them to eventually land somewhere. Quickly get over to them & knock them out with a tranquilizer to capture it.

Wildlife #7 – Gerbil: When you are ready, extract via Helicopter & return to the ACC to see what you collected in the Capture Cages.

Gerbils are going to be our most common reward found in our Capture Cages; they will be found anywhere.

Wildlife #8 – Leopard Gecko: Leopard Geckos are a Common reward & can be typically collected outside Da Wialo Kallai; can be caught all throughout Afghanistan.

Wildlife #9 – Black Stork: The Black Stork can also be collected outside Da Wialo Kallai in Capture Cages… don’t ask me how they got stuck in one. This is a Rare animal & may take a few attempts to collect; the Cage needs to be at least Grade 3.

Wildlife #10 – Bechstein’s Bat: Bechstein’s Bat can be caught in the Capture Cages outside Da Wialo Kallai; can be caught all throughout Afghanistan.

Wildlife #11 – Long Eared Hedgehog: The Long Eared Hedgehog can be caught in the Capture Cages outside Da Wialo Kallai; can be caught all throughout Afghanistan.

You may also see these guys ripping around in settled areas as well that you can actually walk over to & pick up.

If you did not obtain these Wildlife animals from Da Wialo Kallai, do not worry, & just keep placing down your Capture Cages anytime we redeploy to collect a new animal.

Wildlife #12 – Deathstalker: Even though it is a Common animal, this scorpion is actually pretty tricky to obtain. Their habitat is dry grass on sand that is in between rocks. Pretty specific but is technically all over Afghanistan.

I caught my Deathstalker in a Capture Cage set up at the Landing Zone just North of Spugmay Keep. This one may take a few attempts to collect.

Wildlife #13 – Oriental Ratsnake: Oriental Ratsnakes can also be caught all over Afghanistan but are more reliable at the Northern Landing Zone above Spugmay Keep. This one may take a few attempts to collect.

Wildlife #14 – Wild Donkey: Wild Donkeys are typically found along the road in between Guard Post 17 & Guard Post 20 near the Mountain Relay Base. They must be Fulton Extracted.

Wildlife #15 – Afghan Pika: Travel over to where Guard Post 4 is & place some Capture Cages around where the Landing Zone is; the Cage needs to be Grade 3 to catch the Afghan Pika.

Wildlife #16 – Cashmere Goat: To find the Cashmere Goat, during the daytime, deploy to the Aabe Shifap Ruins & we can find them running along the roadside; you may even see them as you fly to the Landing Zone.

Wildlife #17 – Grey Wolf: There are a few locations we can find Grey Wolves, the best I found was along the road just South from Guard Post 7 in a small canyon. Go to the Landing Zone South of Guard Post 7, & head up the road North towards it. Shortly near the Guard Post, you will see a small rocky gap off our right where we can find 2-3 Grey Wolves sleeping.

Wildlife #18 – Red Fox: For the Red Fox, we will need a Grade 3 Capture Cage. Go to the Landing Zone East of the Wakh Sind Barracks & place all your Cages in this area for the best chance of catching the fox.

Wildlife #19 – Russian Tortoise: The best place to catch Russian Tortoises is at the Landing Zone West of Da Shago Kallai. When we land, place all of your Capture Cages on the “sand dune” looking ground to catch a big ol’ turtle.

Wildlife #20 – Sand Cat: Go to the Landing Zone directly South East of Lamar Khaate Palace & place all of your Capture Cages down where we land for the best attempt at obtaining a Sand Cat.

If you prefer a video guide format or alternate locations for finding any Wildlife, check out this well done guide by classic PowerPyx.
https://youtu.be/dEzPe4lioso
This is all of the Wildlife we can obtain without a Grade 4 Capture Cage in Afghanistan.

Key Dispatch Mission #11 – Repel the Border Forces: Our last Key Dispatch Mission for now will be a final D Difficulty Mission that will take 1 hour & 1 minute to complete.

Key Item #2 – Master Certificate (Marking): All sources online say that this Key Item unlocks after Marking 500 enemies. For me, I Marked 500 enemies Sequences ago & I never obtained this Key Item. What triggered it for me was during the Wildlife hunts & Marking animals along with the Dummies set up by Soldiers.

Basically, Mark everything, this Key Item is guaranteed to unlock for you at some point. I just don’t quite now exactly when or why…


Achievement #17 – Prosperity: Earn a total of 10,000,000 GMP or more.
This will come naturally as we play through the game. If you have not already been doing so, always keep your Combat Units sent out on Dispatch Missions. This will bring in an infinite stream of GMP & Resources for us. If you are short on GMP, you can always sell collected Medicinal Plants, Placed Weapons, or Vehicles. Just be wary when doing that & be sure not to sell out your entire stock!

We will probably earn five times this much GMP by the end of our 100% journey…
Sequence 8: Midnight Mirage
1. Mission: Pitch Dark, Lingua Franca
2. Invoices: 16/21
3. Side Ops: 42/157
4. Key Dispatch Mission: 11/20
5. Blueprints: 12/26
6. Key Items: 2/20
7. Wildlife: 21/47
8. Achievements: 18/42
-----------------------------------------------------------------------------------------------------

Mission #13 - Pitch Dark:
When your business is finished in Afghanistan, it is time to carry on & deploy to Africa; you will want C-4 for this Mission. First, get to the Mfinda Oilfield. Be sure to keep your eyes open for new Wildlife!

Invoice #13 – Bwala ya Masa: Exit the jungle sanctuary we arrive in, & we will be above the village of Bwala ya Masa at its Southern entrance. Just past the watchtower & a small building, we can find our first Invoice for Africa.

Wildlife #21 – Lappet Faced Vulture: Approach the Mfinda Oilfield from the Western road & we will pass through a burnt down village close to the ocean along the road. When we enter the village, there will be a lone Lappet Faced Vulture circling the area; wait for it to land or shoot it out of the air with a tranquilizer to extract it.

This is also conveniently a Mission Task.

Invoice #14 – Mfinda Oilfield: Instead of entering the Oilfield straight away, carefully circle around the outside of it to the Eastern entrance. Pass through the gates here, & follow the walls along to the South & we can spot the Invoice along the wall behind two large buildings.

Blueprint #10 – KABARGA-83: Speaking of those buildings, head over to the North most of the two of them & enter into it to find this Blueprint on a shelf. Normally we could Interrogate a Soldier for its exact location… but we do not speak Afrikaans at the moment.

Mission #13 – Pitch Dark: Shutdown the power to the Transfer Pump & set some C-4 on the Separator Tank. Before detonating the Separator Tank, try getting out of the base & moving safe ways away as new enemies will arrive after our objective is done making Exfiltration harder.
D-Walker: After we complete the Mission, we will unlock D-Walker as our final Buddy. D-Walker is not sentient, & therefore we cannot develop a Bond with it. In short, there are no Achievements related to D-Walker.

Mission #14 - Lingua Franca:
Before we complete some Side Ops, it is best if we get ourselves an Afrikaans Interpreter to make our lives easier going forward. Though our main objective is to Extract the Viscount, be sure to also Extract the Afrikaans Interpreter as well. It is easiest if you begin this Mission at night…

Blueprint #11 – STUN GRENADE: If not alerted, the Interpreter will visit three Prisoners throughout the Mission. The third will be a woman, being held near the center of Kiziba Camp. Here there will be a central HQ building the Interpreter may stand in for a bit. It is where the Comms Equipment is, an Intel File, as well as our Blueprint.

Invoice #15 – Kiziba Camp: While in this neck of the woods, head over to the South Eastern side of the camp here & we can find the Invoice along the road just before reaching a crossroads; it will be beside a watchtower with a red metal roof on it.

If the Blueprint & Invoice are too dicey for you to obtain, come back here after the Mission to collect them.

Mission #14 – Lingua Franca: Tail the Interpreter to the Viscount or use the previously mentioned Intel in the comms building to locate our Target. Once they are together, do what is necessary & Extract both of them.

Mother Base:

Side Op #38 – 111 Visit Quiet: If you have visited Quiet in her cell a few times & witnessed a cinematic with her attempting to join you on a Mission, then we should receive this Side Op after completing Mission #14. You may be able to unlock this even if you have not seen the cinematic, I am unsure.


Achievement #18 – Speechless: Make Quiet available for deployment.
After we complete Side Op – Visit Quiet, we will unlock her as our Buddy to take out on Missions for us. Though we can Develop gear for her right away, we will only unlock the Achievement after we take the Helicopter back to the ACC.

We need to get Quiet’s Bond Level to 10 to unlock the War Buddy Achievement.

Africa - Free Roam:

Side Op #39 – 107 Extract the Legendary Gunsmith: With Mission #13 complete, we have now unlocked free roam in Africa & after Mission #14, we can now understand Afrikaans.

Go to Bwala ya Masa & Interrogate any Soldier around to find the location of the Legendary Gunsmith. They will be an enemy Soldier, so they will have to be apprehended & Fulton Extracted.

Side Op #40 – 85 Mine Clearing 03: It is time for another bout of Mine clearing; bring D-Dog along with you for this one. Go to the burnt out village area South West of Mfinda Oilfield & disarm the 8 Mines in the area.

Blueprint #12 – UN-AAM: Head over to Guard Post 1 South East of Mfinda Oilfield & there will be two buildings with doors on top of a hill nearby; our Blueprint will be inside one of them on top of a shelf. This Blueprint can be found all over Africa in various other places…

Side Op #41 – 3 Extract Interpreter (Afrikaans): Make your way over to the area just South West of Bampeve Plantation & we can a hidden shack off the road in the center of the marked area. Extract the Interpreter to complete the Side Op.

Invoice #16 – Bampeve Plantation: While we are close by, head up the Western road to Bampeve Plantation & we can find our Invoice/Delivery Point a short way inside just past a watchtower. It will have a Four Wheel Drive parked beside it.

Side Op #42 – 32 Prisoner Extraction 06: Our next Side Op takes place at Guard Post 12; Interrogate a Soldier or bring D-Dog to find their location. Watch out for the Sniper on the hill above the Guard Post.
Sequence 9: Only Time Will Tell
1. Mission: Footprints of Phantoms
2. Invoices: 17/21
3. Side Ops: 53/157
4. Key Dispatch Mission: 11/20
5. Blueprints: 14/26
6. Key Items: 2/20
7. Wildlife: 21/47
8. Achievements: 19/42
-----------------------------------------------------------------------------------------------------

Africa - Free Roam:

Side Op #43 – 96 Eliminate the Armored Vehicle Unit 04: Reset Africa at the ACC, & we will have some more Side Ops to do. This Side Op takes place just North East of Guard Post 11. Just off the road will be an APC, 2 Soldiers standing guard further down the road from it on a hill, a Sniper near a Mortar, & 4 patrolling Soldiers.

Side Op #44 – 110 Extract Materials Containers: We can find the Materials Container in the center of the marked area; it is in the exact same spot where we found that Afrikaans Interpreter. Extract the Container to complete the Side Op.

Invoice #17 – Ditadi Abandoned Village: To get to our next Side Op, we will need to pass through the Ditadi Abandoned Village. There are three roads going through the village; we can find the Delivery Point along the North Eastern road close to the crossroads.

Blueprint #13 – G44: From the Delivery Point, begin heading South East through the village up to the top of a hill where a massive boulder looms over head. Below it, will be two tents & the Comms Equipment. We can find this Blueprint in one of the tents on top of a pallet in front of a chalkboard.

Side Op #45 – 70 Eliminate the Heavy Infantry 05: Head South now down to Guard Post 15 to find it taken over by Heavy Infantry. There are 4 of them in total we need to kill.

Blueprint #14 – ISANDO RGL-220: This Blueprint can be found in multiple locations. For us, since we are already here, we can find it in one of the tents at Guard Post 15 on a table.

Side Op #46 – 17 Extract the Highly Skilled Soldier 7: Keep heading South now down to just above Guard Post 23. As soon as we enter the marked area beware, as there are two Snipers doing sweeps. The Skilled Soldier will also be found right beside an APC.

The best way to do this, is to very careful sneak up to the APC & Extract it; destroying it has a high chance of killing our Target. Extract the APC & knock out the Skilled Soldier for Extraction. Alternatively, you can try luring the Target away, but that is harder to do without also alerting the APC.


Achievement #19 – Man’s Best Friend: Raise Bond with D-Dog to the maximum.
Keep using D-Dog as we play through all these Side Ops & eventually you should max out his Bond. I found his Bond increased way faster than D-Horse’s did.

When D-Dog is maxed out, switch to using Quiet & max her Bond out next. Quiet does not follow us around like D-Dog does. To properly use Quiet, you can scroll up or down on your iDroid Map to choose Sniping Points or Scouting Points for Quiet to deploy to ahead of us.

Afghanistan - Free Roam:

Side Op #47 – 16 Extract Highly Skilled Soldier 06: Before we continue with the main Missions, we have unlocked more Side Ops we can complete back in Afghanistan. Land down near Guard Post 20 & we can find the Skilled Soldier at the base; watch out for two Snipers set up in the cliffs on either side of the Guard Post.

Side Op #48 – 33 Prisoner Extraction 07: Our next Side Op will take us to Spugmay Keep; D-Dog is useful for this one or at least using your Sonar (Bio-Detector). We need to locate a Prisoner who is hiding from searching Soldiers here. The Prisoner can be found just East of the ruins, behind a rock close to where the Sniper is.

Side Op #49 – 69 Eliminate the Heavy Infantry 04: Deploy to Guard Post 7 & we can find three Heavy Soldiers patrolling the road to Qarya Sakhra Ee.

Side Op #50 – 116 Eliminate the Tank Unit 03: Deploy near the Aabe Shifap Ruins where we can locate our next Side Op; do not actually choose the Ruins Landing Zone however & instead land further away… we’ll get shot down.

This one is bad. For this Side Op, we need to destroy a Tank, two patrolling Soldiers, two Soldiers near a Mortar… & take down a Gunship. Be sure to bring heavy fire power with you!

Side Op #51 – 108 Extract the Legendary Gunsmith Again: If you began the first part of this Side Op in Africa, we can complete part two here in Afghanistan. Go to the Afghanistan Central Base Camp & we can find the Legendary Gunsmith at the target range near the Southern end of the camp; he is a Prisoner & will need to be Extracted.

Side Op #52 – 109 Extract the Legendary Gunsmith Yet Again: After resetting Afghanistan from the ACC, we can finally obtain the true Gunsmith through this Side Op. Go to the Yakho Oboo Supply Outpost where we can find the Gunsmith being held as a Prisoner inside the main fort.

Extracting him will allow us to Customize our Weapons!

Side Op #53 – 72 Eliminate Heavy Infantry 07: For our final Side Op, deploy near Guard Post 20 & head up the dirt road leading North away from it through the canyon to shortly find two Heavy Soldiers. Two more Heavy Soldiers can be found patrolling below the dirt road just above the main road leading to Guard Post 16.

Mission #15 - Footprints of Phantoms:
When all of our Side Ops have been completed, it is time for us to continue on with the main Missions. There are four Walker Gears that we need to take care of at the Ditadi Abandoned Village; if possible, Extract them all to complete a Task. The Walkers can all be found at the very top Eastern point of the village.
Sequence 10: Dormant Stream
1. Mission: Traitors’ Caravan, Blood Runs Deep
2. Invoices: 18/21
3. Side Ops: 61/157
4. Key Dispatch Mission: 12/20
5. Blueprints: 16/26
6. Key Items: 3/20
7. Wildlife: 21/47
8. Achievements: 20/42
-----------------------------------------------------------------------------------------------------

Mission #16 - Traitors' Caravan:
Locate the Intel File found at Guard Post 14 to find the route of our target convoy Truck; Interrogate a Soldier here for its location. The convoy is leaving Guard Post 18, stopping at Nova Braga Airport, & heading up to Mfinda Oilfield. Once the route has been determined, simply pick a location & camp there for an ambush, or begin heading along the road in its direction to intercept the convoy.

The convoy is made up of our target Truck & a lone APC leading the way. Trailing behind the convoy will be a Tank however so be careful! The Truck must be Extracted.

When the driver of the Truck is killed, or you get too close to the Truck, an ambush will be revealed, & four Skulls will emerge from the back of the Truck. If possible, as driving the Truck out of the Mission area is difficult, go prone immediately when the Skulls arrive. Very carefully, swinging wide, crawl around to the back of the Truck & Fulton Extract it.


Achievement #20 – Caravan: Complete Traitors’ Caravan Mission.
Story Related. Complete Mission #16 – Traitor’s Caravan to unlock the Achievement.

Africa - Free Roam:

Side Op #54 – 53 Extract the Wandering Mother Base Soldier 03: With Mission #16 complete, we will unlock a couple more Side Ops in Africa. Go to Bwala ya Masa & bring D-Dog with you or get Quiet to Scout out the village to locate the Old Mother Base Soldier; they are wandering around the center of the marked area. Carefully sneak up & tranquilize them for Fulton Extraction.

Side Op #55 – 34 Prisoner Extraction 08: Go to the Bampeve Plantation & locate the Prisoner by Interrogation or with a Buddy. The Prisoner can be found inside one of the huts on the North West side of the road in the plantation.

Side Op #56 – 117 Eliminate the Tank Unit 04: This Side Op takes place in the middle ground between Guard Posts 18, 15, & 19. Once again, there will be a Gunship in this Side Op so plan accordingly!

We need to destroy a Gunship, a Soldier with a group of two Snipers on a hill, & a Tank with four Soldiers beside it.

Side Op #57 – 18 Extract the Highly Skilled Soldier 08: Reset Africa at the ACC & go to Mfinda Oilfield for this Side Op. Interrogate a Soldier or use a Buddy to locate the Skilled Soldier. They can be found patrolling with a bodyguard near the oil transfer tank at the North end of the base.

Key Dispatch Mission #12 – Recapture the Port Facilities: This Key Dispatch Mission technically becomes available to us after we complete Mission #16 – Traitors’ Caravan, but may take the odd Side Op/passage of time to actually unlock. When it does, it will be a B Difficulty Mission that will take an hour & 23 minutes to complete.

It will require the Combat Unit to deploy with an APC…

Blueprint #15 – LPG-61: Complete Key Dispatch Mission #12 to receive this Blueprint.

Mission #17 – Rescue the Intel Agents: When you are ready, it is time to begin the next Mission. We will need to Extract both of the Intel Agents to complete the Mission; having D-Dog with us for this can be very useful. One agent will be a Prisoner at Kiziba Camp while the other has escaped & will be limping away from it with a whole host of Soldiers in the area trying to track him down.

The captured agent will be located where that Female Prisoner was at the Southern end of Kiziba Camp when we were trying to locate the Viscount in Mission #14 – Lingua Franca. The wandering agent can be found near the center of the marked area to the North East of Kaziba Camp; when he stops wandering, he will fall down somewhere here… Be careful as there are some Heavy Soldiers in the team that are tracking down the missing agent!

Afghanistan - Free Roam:

Side Op #58 – 35 Prisoner Extraction 09: With Mission #17 complete, we will unlock some new Side Ops to complete in Afghanistan. Go to the Aabe Shifap Ruins & locate the Prisoner via Buddy; the Prisoner can be found in the center of the marked area. She is bait, & the area will be encircled by Snipers so be careful.

Side Op #59 – 36 Prisoner Extraction 10: Reset Afghanistan at the ACC & we can now travel down the Lamar Khaate Palace for another Prisoner Extraction. Determine the location of the Prisoner via Interrogation or Buddy, & Extract them. The Prisoner will be held in the cells to the North of the palace’s exterior near the Soldier dorms.

If you imported a previous Save from Ground Zeroes, you will be able to also complete Side Op - 112 Intel Agent Extraction. If not, we will unlock it later through beating more Missions.

Side Op #60 – 86 Mine Clearing 04: Go to the area around Guard Post 14 with D-Dog & remove the 8 Mines found in the trench line South of the Guard Post.

Side Op #61 – 73 Eliminate the Heavy Infantry 08: Reset Afghanistan at the ACC, & return to Guard Post 14 to dispatch some Heavy Soldiers for our final Side Op. There will be 5 Heavy Infantry that will have taken over the Guard Post that we will need to eliminate.

Mission #18 - Blood Runs Deep:
When ready, begin the next Mission to continue; beware, we will encounter a Gunship on this Mission so plan accordingly…

Blueprint #16 – URAGAN-5: As we make our way towards the Kunenga Mine, we will need to pass through Bampeve Plantation. While we are here, Interrogate a Soldier or two & they will direct us to where a Blueprint is stashed. It will be found at the Northern end of the plantation inside a green tent near a watchtower & two Gun Emplacements.

Mission #18 – Blood Runs Deep: One of six of our targets will be found amongst the Soldiers at Bampeve Plantation. The other five will be found at Kunenga Mine.

Invoice #18 – Kungenga Mine: Enter into the Kungenga Mine grounds from the main roadway & begin following it along inside the property fence line. Follow it along past the first set of buildings towards a watchtower where our Delivery Point can be found just beside it.

Mission #18 – Blood Runs Deep: Break into the actual mine itself & locate the final five targets… which will complicate things as they will outbid our client. Escort them to safety at the Landing Zone South West of the mine; be weary of the Gunship as it patrols the area!

Key Item #3 – Children’s Reward: We will receive this Key Item automatically after we complete the Mission.
Sequence 11: Factory of the Dead
1. Mission: On the Trail, Voices
2. Invoices: 20/21
3. Side Ops: 70/157
4. Key Dispatch Mission: 12/20
5. Blueprints: 16/26
6. Key Items: 4/20
7. Wildlife: 22/47
8. Achievements: 22/42
-----------------------------------------------------------------------------------------------------

Africa - Free Roam:

Side Op #62 – 37 Prisoner Extraction 11: This Side Op takes place just outside Bwala ya Masa. The Prisoner can be found on the roof of a small shack along the road guarded by four Soldiers.

Side Op #63 – 97 Eliminate the Armored Vehicle Unit 05: Head over to a roadway just West of Ditadi Abandoned Village to find our targets near its center. On either side of the road will be two Soldiers with Mortars, an APC, a Tank, & two patrolling Soldiers.

Side Op #64 – 4 Extract Interpreter (Kikongo): For the next Side Op, head to Guard Post 16 & we can Extract our final Interpreter for our Support Unit. Either Interrogate a Soldier or use a Buddy to find the location of the Interpreter; they will be a Prisoner we need to Extract.

Side Op #65 – 71 Eliminate the Heavy Infantry 06: The last Side Op will take place at Guard Post 22. There will be four Heavy Soldiers that will have taken over the Guard Post that we will need to eliminate.

Invoice #19 – Nova Braga Airport: Since we have not progressed far enough into the main Missions, the entire South of Angola-Zaire will have no available Landing Zones. Since we are already down here, as we make our way back North, pop into Nova Braga Airport to locate another Invoice.

Enter into the airport base from the main South Western entrance & take a left around a fence line to spot the Invoice & Delivery Point near some Materials Crates.


Achievement #21 – War Buddy: Raise Bond with Quiet to the maximum.
Keep completing Side Ops & Missions with Quiet & eventually you will raise your Bond with her to 10.

Honestly, it is a bit of a toss up which Buddy is better. D-Dog is definitely the best for stealth… but Quiet can be pretty broken as well with her “Cover Me” ability. Having her massacre Guard Posts or bases does contribute to your Neutralizations, but when she gets detected, you stay hidden, & contributes to other Mission Ranking bonuses.

Mission #19 - On the Trail:
When ready, begin the next Mission… Locate the Major’s subordinate at Guard Post 15 & follow them to the Major so we can eliminate them. There is a Gunship on this Mission so beware; as always, I like placing a Marker on Gunships so that I can always track how far away they are from me.

The subordinate will enter a Four-Wheel drive & head to Guard Post 16. After a brief stop, they will then drive part way up the road towards Guard Post 13 before stopping & meeting a large group of Soldiers where the Major will be.

Extracting both the subordinate & the Major if possible will complete two Tasks.

Mother Base:

Side Op #66 – 151 Target Practice (Command Platform): Our final Target Practice Side Op can be unlocked after we have fully leveled the Command Platform to Level 4. It is the cheapest one to max out, so I suggest completing it first before getting the other Platforms beyond Level 2 or 3.

This one is fairly simple & all Targets can be shot from the nearby heli-pad. There are three hard to see Targets at the very top of the large tower as well as two Targets on either side of the heli-pad on the lower walkways.

Africa - Free Roam:

Key Item #4 – First Aid Manual: Before we carry on with our Side Ops, head over to Bwala ya Masa village first. To get the First Aid Manual to appear, you need to complete Mission #18 & then complete another Mission afterwards which we have just done.

At the village, Interrogate any Soldier & they will tell you where the Blueprint is located. It will be on a shelf in one of the shacks close to the water at the South end of the village.

Though it is technically a Blueprint, it counts as a Key Item instead.

Side Op #67 – 74 Eliminate the Heavy Infantry 09: Leave the village now & head towards Guard Post 11 for a new Side Op. In the hills to the West of it, will be three groups of two Heavy Soldiers we will need to eliminate.

Side Op #68 – 19 Extract the Highly Skilled Soldier 09: Next, head over to Guard Post 10 & locate the Skilled Soldier to Extract. They will just be patrolling around the Guard Post with another Soldier.

Side Op #69 – 63 Unlucky Dog 03: Next we will return to Nova Braga Airport to find a two pinned down Staff Members that we will need to rescue. One can be found on the roof of the long building in the center of the marked area on the Eastern side of the airport. The other will be in the main airport terminal building on the highest part of the rooftop as well.

Side Op #70 – 20 Extract the Highly Skilled Soldier 10: Lastly after we reset Africa in the ACC, head to Guard Post 5 to locate a final Skilled Soldier. This will be a bit trickier than the normal Side Ops of this kind. We can find the Skilled Soldier, who is a Sniper, South East of the Guard Post.

Be careful as there will be a full on Tank on the road near the Guard Post as well!

Mission #20 - Voices:
This is a key Mission that has an Achievement involved with completing it.

Invoice #20 – Munoko ya Nioka Station: To reach our objective at the Ngumba Industrial Zone, we will need to pass through Munoko ya Station. After we get past the gates, head down the road a little ways until you reach the main encampment. We can find the Invoice near the center of the camp by the road.

Wildlife #22 – African Wild Dog: Make your way to the Valley of Mist where Ngumba Industrial Zone is & we will have to follow a river to our objective since the bridge is broken. As we sneak past a security camp, look along the opposite side of the river to find two African Wild Dogs; they will attack us so be careful.

Tranquilize one & Extract it; we will also complete a Task for doing so as well…

Mission #20 – Voices: After we find Shabani, we will need to evade the Man On Fire. Once Miller says we need to switch Landing Zones, select the one at the North end of the Industrial Zone. When it is close to arriving, you need to blow up one of the water towers with the Man On Fire underneath to temporarily stun him so we can safely escape; trying to Extract the Man On Fire while he is stunned will make him disappear!


Achievement #22 – Voices: Complete Voices Mission.
Story Related. Complete Mission #20 – Voices to unlock the Achievement.
Sequence 12: All the Sun Touches
1. Mission: N/A
2. Invoices: 20/21
3. Side Ops: 75/157
4. Key Dispatch Mission: 14/20
5. Blueprints: 17/26
6. Key Items: 4/20
7. Wildlife: 37/47
8. Achievements: 22/42
-----------------------------------------------------------------------------------------------------

With Mission #20 – Voices complete, we will have entered another new arc of the game… & a scary one at that. Before we continue, we may as well do a final comb over of Africa for our Wildlife like we did in Afghanistan; one less thing to worry about going forward.

As well, for two Key Items we need to complete 500 & 1000 Fulton Extractions of enemy Soldiers. By this point, I hadn’t even hit 300. Keep this in mind as we play going forward. If at anytime you spot a Soldier with an A+ stat or higher, definitely Fulton them!

Africa - Free Roam:

Key Dispatch Mission #13 – Destroy the Uranium Centrifuges: With Mission #20 – Voices complete, we will unlock two more Key Dispatch Missions. This one will be a B Difficulty Mission that will take 1 hour & 29 minutes to complete.

Blueprint #17 – HAIL MGR-4: Complete the Dispatch Mission to receive this Blueprint.

Side Op #71 – 75 Eliminate the Heavy Infantry: Before we go Wildlife hunting, complete these next few Side Ops. Their will be six Heavy Soldiers to eliminate at Guard Post 3.

Side Op #72 – 54 Extract the Wandering Mother Base Soldiers 4: A new Old Mother Base Soldier can be found wandering just to the South West of Nova Braga Airport.

Side Op #73 – 21 Extract the Highly Skilled Soldier 11: A Highly Skilled Soldier can be found at Munoko ya Nioka Station. They can be found close to the Western entrance by the gate.

Side Op #74 – 38 Prisoner Extraction 12: Next up, head down the road to Guard Post 17 in the Valley of Mist. The Prisoner can be found under a small ruined brick shelter in the center of the marked area.

Side Op #75 – 39 Prisoner Extraction 13: For the last Side Op, return to Guard Post 3 & search the center of the marked area to find our Prisoner.

Wildlife #23 – Boer Goat: Now to collect some more Wildlife if you have not already found them. Remember that if you call back your Helicopter to the Landing Zone immediately after leaving it, it will cost 0 GMP. It will only wait around for a minute or so before leaving, but it can definitely save you GMP if you are fast!

For the Boer Goat, go to Guard Post 11 in the daytime & follow the road North towards the marked area for Side Op – Eliminate the Armored Vehicle Unit 04. Just before reaching it, you should spot some Goats off your left; they will be solid brown or brown/white.

Wildlife #24 – Side Striped Jackal: Go to the Landing Zone North East of Guard Post 1 during the daytime & follow the dirt path close by until you are directly East of it. Here we should find some Side Striped Jackals.

These can be found in a few locations.

Wildlife #25 – Rock Hyrax: In this area East of Guard Post 1, place down some Capture Cages in the tall grasses close by rocks to catch this animal; it may take a few attempts…

Wildlife #26 – Emperor Scorpion: One of the more common Capture Cage Wildlife we may obtain in the process of trying to catch the rarer specimens near rocky areas.

Wildlife #27 – Black Mamba: One of the more common Capture Cage Wildlife we may obtain in the process of trying to catch the rarer specimens near rocky or grassy areas.

Wildlife #28 – Okapi: Go to the Landing Zone South of Mfinda Oilfield during the daytime & we can find one or two of these rare ungulates wandering around.

Wildlife #29 – Martial Eagle: Go to the North Western entrance to Munoko ya Nioka Station & place your Capture Cages on the rocky cliff right across from the fences to the North of the station here.

Wildlife #30 – African Fat Tailed Gecko: Though a bit tricky to collect, we may obtain this reptile in the process of trying to catch the rarer specimens with our Capture Cages in rocky terrain.

Wildlife #31 – Nubian: This more common goat species can found directly North East of Guard Post 4 just below the shack where Side Op – Extract Materials Container is.
They can be found all over Africa.

Wildlife #32 – Rainbow Agama: While we are still here, place Capture Cages in the dry grasses underneath the Landing Zone to try to catch this lizard. It can be found in a few locations, but dry grass is its habitat.

Wildlife #33 – Grant’s Zebra: We can find our classic Zebra just outside Nova Braga Airport during the daytime. Go to the Landing Zone direct East of the airport & head West towards the marshes nearby to find a herd of Zebras. They are bigger animals so it will take more than one tranquilizer to knock them out.

Wildlife #34 – Four Toed Hedgehog: Next up, go to the South Eastern entrance to the Kiziba Camp & look for a small pond near the crossroads. Place your Capture Cages in the grasses here for a good chance of catching this animal.

Wildlife #35 – Trumpeter Hornbill: One of the more common Capture Cage Wildlife we may obtain in the process of trying to catch the rarer specimens near water sources.

Wildlife #36 – African Bullfrog: Go to the Valley of Mist near Guard Post 17 & place your Capture Cages directly in the river underneath the broken bridge for a chance of catching this amphibian.

Wildlife #37 – Namaque Chameleon: Go to the Landing Zone North East of Guard Post 22 & place down your Capture Cages where we drop down for a chance to catch this reptile.

If you prefer a video guide format or alternate locations for finding any Wildlife, check out this well done guide by classic PowerPyx.
https://youtu.be/dEzPe4lioso
Our final ten Wildlife specimens to collect will either need a Grade 4 Capture Cage, locked behind Side Ops, or are just a pain to collect. We will finish them off later on after obtaining our final Capture Cage.

Key Dispatch Mission #14 – Crush the Drug Cartel: Our next Key Dispatch Mission is B Difficulty & will take 1 hour & 24 minutes. It will also require a Tank to accompany our Combat Unit.
Sequence 13: Private Forces
1. Mission: The War Economy, Retake the Platform
2. Invoices: 21/21
3. Side Ops: 80/157
4. Key Dispatch Mission: 14/20
5. Blueprints: 19/26
6. Key Items: 5/20
7. Wildlife: 37/47
8. Achievements: 23/42
-----------------------------------------------------------------------------------------------------

Mission #21 - The War Economy:
When ready, begin the next Mission. Note that while we can obtain the Blueprint – MACHT 37, it will drop from a Gunship. So unless you plan on destroying it this Mission, it is best saved for later. Our next opportunity to collect it is after we complete Mission #23 at Kunenga Mine.

This Mission will be interrupted as soon as we deploy…

Mission #22 - Retake the Platform:
As soon as we deploy & drop out of the Helicopter for Mission #21, we will receive an Emergency Mission that R&D Platform has been taken over by enemies. You need to abort Mission #21 right away & head back to Mother Base or else we will begin losing Staff Members.

When you are deploying to Mother Base, be sure to choose silenced Weapons & a Stealth Suit. If we are detected at all during the Mission, our Staff Member hostages will begin dying; this is a high stakes Mission!

We need to assassinate the invader’s commander to end the Mission; they can be found at the very top of the R&D Platform.

There is no Mission Rank for this one either, Mission #22 serves as a sort of tutorial for what FOB Missions are; the Online portion of this game.

Mother Base:

FOBs: We now have Forward Operating Bases unlocked. To start, our first FOB will be free; future bases will cost MB Coins. There are no Achievements pertaining to FOBs (but one that we will unlock shortly); do not spend any real world currency on MB Coins, unless you want to…

Our FOBs can be staffed just like Mother Base, but is independent of it. Always put Mother Base first & have all your best Staff there. The FOB is a bonus base that we can use to boost our production, mainly Resource generation.

The problem with FOBs, & where our Achievement is concerned, is that they can be invaded by other Online Players. It will play out similarly as Mission #22 where we will be invaded & you must abandon everything to go & defend a Platform. Only the FOB can be invaded, not Mother Base, which is why if you fail you won’t entirely be messed up.

Put some GMP into your Security Devices & your Security Team for good measure; FOB insurance is a scam, do not waste money on it. As for the Security Team, I recommend going in Advanced Settings & reduce the Guard Rank to either B or A. Do not waste A+ or above Staff Members (for now at least) on an FOB because they can be killed or captured during an invasion. Losing some Materials is better than losing essential Staff Members.

In later game, FOBs are pretty useful for earning PF Points which we can trade for in game resources.


Achievement #23 – Intruder: Play an Infiltration FOB Mission.
With FOBs unlocked, go over to the Missions tab of your iDroid & go to FOB Missions. Choose any Online Player’s FOB to invade & this Achievement will unlock as soon as we deploy; we do not actually have to complete it. When it is unlocked, we can just abort the Mission. We will lose the GMP for our deployment & a little bit of Heroism Points, but that is it.

If you plan on finishing the FOB Mission, I recommend courtesy & good karma; use non-lethal Weapons & do not capture any of their Staff Members.

Regardless of whether or not we finish the FOB Mission, the Online Player will be notified of our invasion & we will be targeted as a Rival. There is a chance they may retaliate, hence why showing good faith is important as it will lesson that chance… in theory.

Mission #21 - The War Economy:
Where were we? Go back into Mission #21 & let’s finish this. The Arms Dealer will arrive at the airport in a Gunship which will then begin patrolling the area; if you are going guns blazing, you can destroy the Gunship for an early Blueprint.

The Arms Dealer will be dropped onto the roof of the airport terminal & is wearing a suit. The Arms Dealer will enter into the second floor of the airport terminal to meet with the CFA Official who will already be there waiting. Extracting them both will fulfill two Tasks…

Africa - Free Roam:

Side Op #76 – 8 Secure the [ANTITHEFT Device] Blueprint: With Mission #21 done, we have more Side Ops to mop up. While doing these, since we now have an entire FOB to Staff & 1000 Soldiers to Fulton, go out of your way to Extract any half decent enemy Soldier!

For this Side Op, go to Guard Post 11 & search the two tents for this Blueprint which will be on a shelf; for an exact location, Interrogate a Soldier.

Blueprint #18 – ANTITHEFT DEVICE: Complete the Side Op to unlock this Blueprint.

Side Op #77 – 9 Secure the [GUN-CAM DEFENDER] Blueprint: Next up, head to Nova Braga Airport & Interrogate a Soldier here for this Blueprints location. It will be in the Western portion of the airport before the terminal in the upper floor of a larger building.

Blueprint #19 – GUN-CAM DEFENDER: Complete the Side Op to unlock this Blueprint.

Side Op #78 – 87 Mine Clearing 05: Grab D-Dog & deploy near Guard Post 20 to go & dispatch some Mines; there are 9 Mines in total to disarm.

Side Op #79 – 40 Prisoner Extraction 14: Deploy near Kunenga Mine & get past it down to the canyon beyond & we can find the Prisoner near the marked areas center beside a tent.

Invoice #21 – Lufwa Valley: To reach the next Side Op, we need to pass through the Lufwa Valley. The Invoice can be found immediately upon entering Lufwa Valley at the end of the road just before reaching the mansion.

Key Item #5 – Grand Master Certificate (Box): We will receive this Certificate after collecting all of the Invoices in both Afghanistan & Africa; all 21 Invoices.

Side Op #80 – 76 Eliminate the Heavy Infantry 11: Pass through Lufwa Valley to reach our Side Op destination & eliminate the 6 Heavy Soldiers in this area.
Sequence 14: Quarantine
1. Mission: The White Mamba, Close Contact, Aim True, Ye Vengeful
2. Side Ops: 87/157
3. Key Dispatch Mission: 14/20
4. Blueprints: 22/26
5. Key Items: 5/20
6. Wildlife: 37/47
7. Achievements: 23/42
-----------------------------------------------------------------------------------------------------

Afghanistan - Free Roam:

Side Op #81 – 7 Secure the [IR-Sensor] Blueprint: Head to Afghanistan, Qarya Sakhra Ee, & Interrogate an enemy Soldier for the location of this Blueprint. The Blueprint can be found in a small hut at the topmost Southern end of the base.

Blueprint #20 – IR-SENSOR: Complete the Side Op to collect this Blueprint.

Side Op #82 – 10 Secure the [UA-DRONE] Blueprint: Go to the Afghanistan Central Base Camp now & repeat the process. Interrogate a Soldier here for the location of the Blueprint; it will be found in the open maintenance hangar on the East side of the marked area.

Blueprint #21 – UA-DRONE: Complete the Side Op to collect this Blueprint.

Mission #23 - The White Mamba:
For this Mission, we need to locate & Extract the White Mamba, the leader of a Child Soldier brigade.

We cannot kill any Child Soldiers or Interrogate them. They can only be tranquilized or knocked out.

White Mamba can be found sitting on the plastic chair throne set up on the third floor of the beached fishing boat in the Western corner of Bwala ya Masa. When you find him, we will have a challenging fight ahead of us. We need to stun him with tranquilizers or rubber bullets & knock him down with CQC. Each time he will run away & we need to reengage him or sneak up behind him for more CQC. It takes around 5-6 knock downs to actually subdue him.

Alternatively, he can be taken out with a well placed tranquilizer Sniper Rifle shot to the head from afar!

Africa - Free Roam:

Side Op #83 – 41 Prisoner Extraction 15: Travel to Nova Braga Airport & locate the captured Prisoner here. The Prisoner can be found inside a hangar by in the center of the marked area.

Side Op #84 – 98 Eliminate the Armored Vehicle Unit 06: Deploy just outside Munoko ya Nioka Station (not where the marked area is) & make your way over to where the marked area is.
We will need to destroy a Gunship, a Tank, an APC, four patrolling Soldiers, & two Snipers.

Side Op #85 – 77 Eliminate the Heavy Infantry 12: Reset Africa at the ACC & go to Guard Post 20 where some Heavy Soldiers have taken over. There are seven Heavy Soldiers we need to eliminate here.

Blueprint #22 – MACHT 37: Once Mission #23 is completed, we can now go & find this Blueprint in free-roam Africa. Deploy to Kungenga Mine & Interrogate a Soldier for the location of the Blueprint; the Blueprint can be found in a tent near the center of the marked area for the next Side Op.

Side Op #86 – 55 Extract the Wandering Mother Base Soldiers 05: We can find another Old Mother Base Staff Member wandering around the canyon immediately South of Kungenga Mine.

Side Op #87 – 22 Extract the Highly Skilled Soldier 12: Reset Africa at the ACC & go to the Landing Zone South of Guard Post 13. Make your way up the hill towards the center of the marked area where we will approach some Dummies. When we near, the Skilled Soldier will be a Sniper on the hill above us with three other Soldiers accompanying him.

I initially attempted this Side Op coming through Kungenga Mine & the Skilled Soldier never spawned; I think we must approach from the South using the alternate Landing Zone.

Mission #24 - Close Contact:
When ready, begin the next Mission… beware, that Mission #24 & Mission #25 will send us into the second last arc of Chapter 1 & it is a doozy. When the Missions are completed, we will be basically locked into completing Missions #26-#29 as fast as we possibly can!

For Mission #24, get to Guard Post 20 & we can find both Prisoners we need to Extract there; one may have escaped & is wandering around outside the Guard Post. Depending on how long it takes you to arrive at the Guard Post, the Female Prisoner will be loaded onto a Four Wheel Drive & be taken through Munko ya Nioka Station.

The Virus: The fact that both Prisoners will be placed in a new Mother Base Quarantine Platform is foreshadowing for what is to come… After we complete Mission #25, Mother Base will be afflicted by the Virus & Staff Members will begin dying. To cure it, we will need to speed run to complete Mission #29; we will have no time for Side Ops or nothing.

From this point on if you complete Challenge Tasks that have Staff Members as rewards, do not collect them! Hold onto these rewards & wait until we complete Mission #29.

Mission #25 - Aim True, Ye Vengeful:
This will be a point of no return for us. Get ready…

We need to reach Guard Post 16 & Extract the militant’s XO as well as the commander of the Child Soldiers. We can find both of them near the center of the marked area; using the vantage point Ocelot marks for us can be useful to locate everyone. If you are quick to tranquilize most of the Child Soldiers, we can Extract the Child Commander by placing him inside the nearby Four Wheel Drive & Fultoning it; the XO will need to be manually taken by Helicopter.

Mother Base:

Quarantine: Upon completing Mission #25, we will get a notification that the Quarantine Platform has been constructed & Miller will tell us that there is a Virus spreading around Mother Base. As of now, the clock is always ticking, & new Staff will continue to be infected if the game is not paused. Keep this in mind & try not to waste time idling the game if you can help it.

For spoilers, the Virus is spread via the Kikongo Language; don’t ask me how. Any Staff Member who knows the language is a carrier & if not Quarantined, will begin spreading the infection to our other Staff Members. As quickly as you can, sift through all our Staff Members & select all who know Kikongo to move into Quarantine. It is imperative to do this pre-emptively!

Double or triple check your Staff to make sure you caught them all to keep the others safe. If you have active Combat Deployments on the go, keep in mind who is on them & when they return so you can quickly scoop up any that speak Kikongo. Try not to Extract anyone who knows Kikongo during this time as well for risk of spreading the Virus to our healthy Staff.

Yes… all our Platforms level & efficiency is going to be absolutely wrecked. But this is an unavoidable consequence as the Virus will do this anyways at the cost of Staff Member lives. Due not waste GMP on Development & hoard it for Deployment costs until the Virus is cured. Out of my 731 current Staff Members at the time, 291 of them spoke Kikongo & had to be Quarantined. In the time it took me to Quarantine them all, three Staff Members died…
Sequence 15: Metallic Archaea
1. Mission: Hunting Down, Root Cause, Code Talker, Metallic Archaea
2. Side Ops: 92/157
3. Key Dispatch Mission: 14/20
4. Blueprints: 23/26
5. Key Items: 7/20
6. Wildlife: 44/47
7. Achievements: 24/42
-----------------------------------------------------------------------------------------------------

Mission #26 - Hunting Down:
After all our Kikongo speaking Staff have been Quarantined, we must quickly begin this next Mission to start working towards Mission #29! Again, refrain from Extracting any Soldiers that speak Kikongo if possible.

Go to the Ditadi Abandoned Village & Interrogate any Soldier to learn of the location of the Intel File which will tell us that the Target is headed to Kiziba Camp. The Target will be walking on foot with some Soldier bodyguards. If you are relatively quick finding the Intel File, you should be able to intercept him walking backwards along his predicted route. Extracting the Target fulfills a Mission Task…

After each Mission, go back to Staff Management to search for Kikongo speaking Staff that may have popped up as a Volunteer or from the Brig into one of our healthy Platforms.

Mission #27 - Root Cause:
Ignore our new Side Ops, & continue on with the next Mission. Get to Guard Post 7 & Interrogate a Soldier for the Prisoners location. Extract them to complete the Mission.

Mission #28 - Code Talker:
As we approach Lufwa Valley, four Skull Snipers will appear to impede us in the mist. Slip past them as best as you can along the cliffs & get to the mansion where Code Talker is.

Interrogate two Soldiers to learn of Code Talkers specific location; it will be in the basement underground.

Blueprint #23 – BRENNAN LRS-46: Interrogate a third Soldier at Lufwa Valley & we can learn of the location for this Blueprint. Enter through the main entrance of the mansion & make your way to the library. Head up the stairs to the mid level in it, & we can find the Blueprint on a cupboard close to the exit doors to the library.

Mission #28 – Code Talker: To get to the basement where Code Talker is, go to the first room after the main entrance, & we can find a door leading down across from the stairs that lead to the second floor. Retrieve Code Talker, then very carefully take them to a Landing Zone for Extraction; the Skulls will be hindering us along the way.

Mission #29 - Metallic Archaea:
This Mission will pick up where a strangely timed “To Be Continued” leaves us off in Mission #28… should have just roped the two Missions together without the ACC intermission.

But because it did, we can now properly prepare; this is a high octane Mission with zero stealth. Bring the heavy weapons… Quiet is extremely useful for this Mission!

We need to defeat all four Skulls to clear the mist & extract Code Talker.


Achievement #24 – Immortal: Complete Metallic Archaea Mission.
Story Related. Complete Mission #29 – Metallic Archaea to unlock the Achievement.
Competing this Mission will finally cure the vocal cord infection & stop the Virus. We no longer have to worry about it anymore…

Key Item #6 – Skulls Machete: Complete Mission #29 to unlock this Key Item.

Mother Base:

Side Op #88 – 113 Eli’s Challenge: Return to Mother Base & go to the R&D Platform to face Eli once again in a duel.

Key Item #7 – Conch Shell: Complete the Side Op to unlock this Key Item.

Africa - Free Roam:
With the Virus safely cured, we can now go all out on Fulton Extracting enemy Soldiers for the Key Items of reaching 1000 Extraction; try Extracting anyone with an A stat or higher.

Side Op #89 – 42 Prisoner Extraction 16: Go to Munoko ya Nioka Station & locate the Prisoner via Interrogation or Buddy. Be very careful on this one as there will be a Gunship patrolling the base!

Side Op #90 – 88 Mine Clearing 06: Go to Guard Post 22 & remove the 9 Mines positioned just East of the area.

Side Op #91 – 118 Eliminate the Tank Unit 05: Reset Africa at the ACC & go to Nova Braga Airport. Here we can find a Gunship, a Tank, two Snipers, & five Soldiers to eliminate.

Side Op #92 – 43 Prisoner Extraction 17: Next, go to the area marked on our map & Interrogate a Soldier or bring a Buddy to locate the Prisoner.

Afghanistan - Free Roam:

Wildlife #38 – Caracal: Needs Capture Cage Grade 4. Upgrade your Capture Cage to Grade 4 if you have not already done so, & let us “quickly” mop up our last few Wildlife. Remember to immediately redeploy your Helicopter wherever you land so it costs us no GMP for our Wildlife excursions!

For the Caracal, go to the Landing Zone immediately South East of Yakho Oboo Supply Outpost (it will be within the Side Op – Extract the Highly Skilled Soldier 1). Place all of your Capture Cages in the sand immediately where we drop out of the Helicopter to catch a Caracal.

Wildlife #39 – Blandford’s Fox: Go to the Aabe Shifap Ruins & follow the road North East towards Guard Post 4. Place your Capture Cages here on top of rocks in this area with none on touching the ground to catch the fox.


Africa - Free Roam:

Wildlife #40 – African Civet: Go to the Landing Zone in the piece of land in between Guard Posts 4, 5, & 9 to place down your Capture Cages immediately below the Helicopter to catch the Civet.

Wildlife #41 – Tree Pangolin: Go to the Landing Zone East of Nova Braga Airport & place down your Capture Cages directly under where we land to obtain the Tree Pangolin.

Wildlife #42 – Tsuchinoko: Go to the Landing Zone in between Guard Posts 2 & 8 & head to this location. Place your Capture Cages in the small stream just North of the road crossing for a chance to catch this Ultra Rare snake.


Wildlife #43 – Marsh Mongoose: Go to this location South of Kiziba Camp to place down your Capture Cages inside the waters of the marsh for a chance to obtain the Marsh Mongoose.


Wildlife #44 – Honey Badger: The Honey Badger can technically be caught in both Afghanistan & in Africa. Go to the Landing Zone East of Kiziba Camp & head South to this location to place your Capture Cages in the tall dry grass for a chance to catch the badger.
Sequence 16: Sins of the Father
1. Mission: Skull Face, Sahelanthropus
2. Side Ops: 97/157
3. Key Dispatch Mission: 15/20
4. Blueprints: 25/26
5. Key Items: 7/20
6. Wildlife: 47/47
7. Achievements: 27/42
-----------------------------------------------------------------------------------------------------

Africa - Free Roam:

Wildlife #45 – Leopard Tortoise: Though only an Uncommon Wildlife type, the Leopard Tortoise is actually really difficult to catch. There are a lot of guides out there that have this or that location sited as the “best spot to catch them” but for the most part, they were caught there out of pure luck on the randomized spawning.

The waterfall location is pure luck; tortoises don’t actually live in or near water, that’s what turtles are… As far as I am aware, no “guaranteed spawn location” exists.

Since there is a chance for them to spawn anywhere, I farmed my Tortoises at the Landing Zone South of Mfinda Oilfield placing the Grade 4 Capture Cages directly under where you land. I caught my Tortoise at this location, first try here actually, but only caught one of them (I also spent numerous attempts trying out other player’s locations with no success). This will take more than a few tries…

The final two Wildlife animals are tied to Side Ops we will unlock later; as of now, we technically no longer have to worry about grinding Wildlife ever again!

Mission #30 - Skull Face:
Now it is time to finish the final two Missions of Chapter 1. When ready, begin Mission #30; there is an enemy Gunship in this Mission so plan accordingly.

Mission #31 - Sahelanthropus:
Jump into the next Mission to end Chapter 1 & pick off where Mission #30 left off. You will want to pack your best Launcher for this Mission; spawning an Anti Air APC can really simplify the upcoming fight…

This is our final boss fight of the game & we must destroy Sahelanthropus; we will be using a lot of Supply Drops to restock our Rocket Launcher. First, locate as many Anti-Air APCs as you can & use them to destroy the white cylinders found on the Metal Gear’s back & around his waist. After he hits around half health, a red mist will appear that will rust all Vehicles making them unusable. The mist does disappear but the Vehicles will all remain wrecked.

After this happens, we need to switch to our Rocket Launcher to damage it. When Sahelanthropus is below half health, he will begin firing powerful lasers at us; getting hit by them is an instant kill so be extremely careful! As well, he will begin leaping into the air at us & trigger Reflex Mode. When this happens we need to switch to our Primary Weapon to shoot the Floating Boy (fake Psycho Mantis) or we will also be instantly killed; you can use your Rocket Launcher to hit him, but only if a Rocket is loaded as it takes too long to reload it in time.


Achievement #25 – Skull: Complete Sahelanthropus Mission.
Story Related. Kill Sahelanthropus & deal with Skull Face once & for all to complete Mission #31 & unlock this Achievement.


Achievement #26 – Hero: Obtain the Codename "Hero."
There are two conditions to unlock this Achievement. The first, is to beat Mission #31 – Sahelanthropus. The second is to have over 150,000 Heroism Points. If you have been following along with the guide & being more or less a completionist, you should have more than enough to unlock the Achievement. If not, stick with it, & continue on into Chapter 2; you shouldn’t have too much more to go…Collecting all 47 Wildlife will give us a bonus 10,000 Heroism Points if you are still needed more, so keep that in mind.

Though we now have the option to do so, do not build a Nuclear Weapon until this Achievement is unlocked as it will radically reduce our current Heroism Score by -50,000 Points!

Mother Base:

Key Dispatch Mission #15 – Defend the Pipeline: With Mission #31 complete, we have now unlocked the final six Key Dispatch Missions for us to complete. This one is a B Difficulty Mission that will take 2 hours & 14 minutes to finish & requires a Tank.

Blueprint #24 – ZORN-KP: We will receive this Blueprint upon completing this Key Dispatch Mission.

Africa - Free Roam:

Blueprint #25 – FLAMETHROWER: With Mission #31 complete, go to Munoko ya Nioka Station in Africa & Interrogate a Soldier here to find the location of this Blueprint. It can be found inside a metal building where the Comms Equipment is located.

Side Op #93 – 56 Extract the Wandering Mother Base Soldier 06: Go to the area marked on our map East of Guard Post 20 to find a wandering Old Mother Base Soldier we will need to Extract.
This time, the moment the Old Mother Base Soldier is discovered, they will permanently stay invisible & undetectable. Try very hard to snipe them before this happens or else you will be in for a rough time… They do reappear, but only after several minutes have passed.

Bringing Quiet & equipping her with her Guilty Butterfly tranquilizer rifle trivializes these Side Ops from here on…

Side Op #94 – 119 Eliminate the Tank Unit 06: Deploy near Lufwa Valley & head over to the area in between Guard Post 2 & 8 where we went to catch Tsuchinoko. Here we can find two Tanks & six Soldiers to eliminate or Extract.

Side Op #95 – Capture the Legendary Ibis: Go to the mansion in Lufwa Valley now & bring D-Dog to help you locate the Legendary Ibis. It is a large bird, so always search the skies in this area. Searching during the daytime can make spotting the bird easier since it is a beautiful bright blue colour. The bird usually frequents the area just South of the mansion near the Zero Risk Security tent near the wooden bridges over the river.

Be very careful shooting the Ibis out of the air as there is the potential for it to fall onto an out of reach place or down in the “insta-kill river” below.

Wildlife #46 – Jehuty: Captured during the previous Side Op.

Side Op #96 – 78 Eliminate the Heavy Infantry 13: For this Side Op, go to Guard Post 14 & we can find eight Heavy Soldiers patrolling around the abandoned buildings to the East of the area.

Side Op #97 – 50 Capture the Legendary Jackal: For our last Wildlife, go to the area around Guard Post 22 with D-Dog & search the area to the North West. Anubis will be accompanied by a pack of Side Striped Jackals.

Wildlife #47 – Anubis: Captured during the previous Side Op.


Achievement #27 – Conservation: Extract all 47 Wild Animal species.
If you have been following along with the guide, we will unlock this Achievement after obtaining our final two Wildlife species.
Sequence 17: Rulers & Language
1. Mission: To Know Too Much, Cursed Legacy
2. Side Ops: 113/157
3. Key Dispatch Mission: 16/20
4. Blueprints: 25/26
5. Key Items: 10/20
6. Achievements: 27/42
-----------------------------------------------------------------------------------------------------

Africa - Free Roam:

Side Op #98 – 64 Unlucky Dog 04: Return to the mansion at Lufwa Valley & locate the lost Staff Member via Interrogation or by Buddy. There is a Gunship patrolling the area so be careful. We can find the first Unlucky Dog at the Zero Risk Security camp where we were hunting Jehuty. The second Unlucky Dog will be North East of the mansion underneath a waterfall.

Side Op #99 – 25 Extract the Highly Skilled Soldier 15: Return to the mansion in Lufwa Valley once again & Interrogate a Soldier or bring a Buddy to locate where the Skilled Soldier is inside it.

Side Op #100 – 99 Eliminate the Armored Vehicle Unit 07: Lastly, go to the area just South of Nova Braga Airport. We will need to eliminate a Gunship, two Tanks, a Sniper, & five Soldiers.

I am unsure if they got spooked by me destroying the Gunship, but I found 2/5 of the Soldiers in behind the airport walls; took me a while to find them…

Afghanistan - Free Roam:

Side Op #101 – 23 Extract the Highly Skilled Soldier 13: Go to the marked area East of Guard Post 25 & bring D-Dog to locate where the Skilled Solider is; they will be around the center of the marked area.

Side Op #102 – 44 Prisoner Extraction 18: Go to Qarya Sakhra Ee & Interrogate a Soldier or bring a Buddy to locate the Prisoner.

Side Op #103 – 57 Extract the Wandering Mother Base Soldiers 07: Deploy South of Yakho Oboo Supply Outpost & locate the Old Mother Base Soldier.

Side Op #104 – 24 Extract the Highly Skilled Soldier 14: Travel to the Afghanistan Central Base Camp & locate the Skilled Soldier via Buddy or Interrogation. They can be found observing the shooting range from on top of a building.

Side Op #105 – 65 Unlucky Dog 05: Go up to the OKB Zero base & locate the two Unlucky Dogs via Buddy or Interrogation. They are located near the back end of the base in two separate buildings.
This is our final Unlucky Dog Side Op to complete!

Side Op #106 – 26 Extract the Highly Skilled Soldier 16: Reset Afghanistan at the ACC & return to OKB Zero to locate a Skilled Soldier to extract.

Side Op #107 – 122 Eliminate the Tank Unit 09: Lastly, go to the roadway North of Yakho Oboo Supply Outpost where we can find a Tank Unit to destroy. There will be a Gunship, a Tank, three Snipers, & four Soldiers.

Mission #32 - To Know Too Much:
Simply go to the marked area of the last known location of the CIA Agent & Extract them to complete this important Mission.

Mother Base:

The Battle Gear: Completing this Mission will unlock the Battle Gear for us to use allowing us to continue with the Key Dispatch Missions…

Key Dispatch Mission #16 – Rescue the Peacekeepers: The next Key Dispatch Mission will be a S Difficulty Mission that will take 2 hours & 14 minutes to complete. Not only does it require a Walker Gear, but it also requires the Battle Gear as well that we unlocked. It will also be very difficult with a substantially lower chance of success.

Afghanistan - Free Roam:

Side Op #108 – 128 Eliminate the Wandering Puppets 01: This will be a new Side Op type that has 15 instances we will need to complete. Go to Yakho Oboo Supply Outpost & we will find a host of Wandering Puppets staggering around inside the main base fortification; there will be seven of them total to kill.

Side Op #109 – 45 Prisoner Extraction 19: Return again to the OKB Zero base for the too-many-ith time & locate another Prisoner via Buddy or Interrogation; the Prisoner can be found near the center of the marked area in a locked room.

Side Op #110 – 143 Extract the AI Pod: Now for a Story Related Side Op to complete. Go to the Afghanistan Central Base Camp & head to the center silo bay in the middle of the marked area. Enter inside it & interact with the nearby terminal to set the AI Pod to launch mode to complete the Side Op.

Key Item #8 – Strangelove’s Memento: Complete Side Op – Extract the AI Pod to unlock this Key Item.

Side Op #111 – 144 Secure the Remains of the Man On Fire: Go to the Yakho Oboo Supply Outpost & enter the main compound where we can find the Man On Fire’s corpse in the center of the landing platform.

Key Item #9 – Man on Fire (Corpse): Complete Side Op – Secure the Remains of the Man On Fire to unlock this Key Item.

Side Op #112 – 89 Mine Clearing 07: Go to Guard Post 7 with D-Dog & dismantle the 11 Mines found just South East of the post.

Side Op #113 – 100 Eliminate the Armored Vehicle Unit 08: Search for the Armored Vehicle Unit in the marked area in between Guard Post 19 & Da Ghwandai Kar. Here we can find an APC, a Sniper, & six Soldiers to eliminate.

Mission #35 - Cursed Legacy:
Jump ahead to Mission #35 so we can continue on with the Chapter 2 story. The bulk of the Missions unlocked during Chapter 2 are simply harder difficulty versions of some of Chapter 1’s Missions; there is no point in completing these until we are ready to begin our Mission Task/S-Rank cycle of our 100%.

Deploy at the Landing Zone South West of the Lufwa Valley mansion & bring D-Dog along with you to sniff out enemies. Begin making your way towards the mansion & D-Dog will find some enemies. Go to them, & they will be guarding Resource Containers we need to Fulton extract; be careful as some are Heavy Soldiers. If you can Interrogate a Soldier, you will be able to have both Resource Containers marked on your map.

After Extracting the first Container, we will see a timer of when the enemy retrieval Helicopters will arrive to take the Containers. We will only have 9 minutes to collect them, which if you chose the South West Landing Zone, will be plenty of time.

Key Item #10 – Quiet's Examination Report: We will receive this Item after watching Quiet’s interrogation cut scene after completing this Mission.
Sequence 18: The Big Macs of Kazuhira Miller
1. Mission: Extraordinary
2. Side Ops: 130/157
3. Key Dispatch Mission: 17/20
4. Blueprints: 25/26
5. Key Items: 11/20
6. Achievements: 27/42
-----------------------------------------------------------------------------------------------------

Africa - Free Roam:

Key Dispatch Mission #17 – Eliminate the Dictator: The next Key Dispatch Mission will be another S Difficulty one that will take 2 hours & 32 minutes to complete. It will require two Walker Gears as well as the Battle Gear.

Side Op #114 – 145 Search For the Escaped Children 01: To find our first of five escaped Children, we need to go & look for them at Mfinda Oilfield; a Gunship will be present so watch out! Bringing D-Dog along is recommended.

Enter the Oilfield base from the Eastern entrance, & make your way left inside the base towards the two warehouse buildings nearby; we can find the Child inside the warehouse furthest from where we enter.

Side Op #115 – 120 Eliminate the Tank Unit 07: Reset Africa at the ACC & return to the Landing Zone East of Mfinda Oilfield. Go to the marked area around Guard Post 1 & we can find a Gunship, two Tanks, two Snipers, & four Soldiers to eliminate.

Side Op #116 – 129 Eliminate the Wandering Puppets 02: Go to Nova Braga Airport & eliminate the eight Wandering Puppets inside the main airport terminal building.

Side Op #117 – 121 Eliminate the Tank Unit 08: We have another Tank Unit to eliminate, this one being outside Munoko ya Nioka Station. There will be a Gunship, a Tank, three Sniper, & four Soldiers.

Side Op #118 – 46 Prisoner Extraction 20: Reset Africa in the ACC & return to Munoko ya Nioka Station to track down a Prisoner; there will be a Gunship here as well. Locate them Interrogation or Buddy; they can be found inside a yellow crate like building in the center of the marked area.

This is our last Prisoner Extraction Side Op.

Side Op #119 – 90 Mine Clearing 08: Travel to Guard Post 3 with D-Dog & search around the area to dismantle the eleven Mines found in the cliffs above the post.

Side Op #120 – 101 Eliminate the Armored Vehicle Unit 09: Go to the marked area in between Guard Posts 2 & 8 & we can find a Tank, an APC, three Snipers, & three Soldiers to eliminate.

Side Op #121 – 146 Search for the Escaped Children 02: Our next escaped Child can be found in the Lufwa Valley mansion; Interrogate a Soldier or use you Buddy to find them.

Side Op #122 – 58 Extract the Wandering Mother Base Soldiers 08: Reset Africa at the ACC & return to Lufwa Valley. Bring Quiet along equipped with the Guilty Butterfly tranquilizer rifle to easily complete the Side Op.

Side Op #123 – 79 Eliminate the Heavy Infantry 14: Go to Guard Post 5 & eliminate the eight Heavy Soldiers here.

Afghanistan - Free Roam:

Key Item #11 – Master Certificate (Fulton): We will unlock this Key Item for Fulton Extracting 500 enemy Soldiers; Prisoners, allies, objects, or Wildlife do not contribute to this. Remember during every Side Op or Mission to keep your eyes open for any A+ Soldier or higher to Fulton Extract; there is a good chance you may need to grind out the last few Extractions at the very end of the game to reach 1000 for the final Key Item…

Side Op #124 – 147 Search For the Escaped Children 03: Go to the Aabe Shifap Ruins with D-Dog; the Child can be found near the center of the marked area on the opposite side of the road. Beware of bears!

Side Op #125 – 148 Search For the Escaped Children 04: Go to the Lamar Khaate Palace with D-Dog; the Child can be found near the center of the marked area on the third floor of the palace.

Side Op #126 – 149 Search For the Escaped Children 05: Go to the Da Smasei Laman with D-Dog; the Child can be found inside the network of caves surrounded by a horde of Wandering Puppets.

Mission #38 - Extraordinary:
For this Mission, we need to go to Spugmay Keep to retrieve a hidden Film Canister before the enemy does. Before we head there, first go to Guard Post 24 & we can find a Prisoner here who is a Noise Control Specialist unlocking new silenced Weapons for us!

Go to Spugmay Keep now, & there will already be enemies searching around; killing all here & who arrive later will earn us a Mission Task.

There are three different spawn locations for the Film Canister. Take a look at the Screenshot sets below & match your blurry picture with them to find its location.

Spawn 1: This is the easiest of the three spawns as it is very close to where you enter Spugmay Keep. On approach, you will have the three archways in a line (that largest being in the center), go towards the Mortar on our side of the middle large arch, & we can find the Film Canister behind a pot next to a square slab of stone.


Spawn 2: The second spawn will be inside the archway closest to the Mortar that is at the far end of Spugmay Keep; the South Western most end through the arches on your right when entering. It will be in the crook of the last arch.


Spawn 3: The final potential spawn location will be at the very back of Spugmay Keep in the South Eastern corner. Here we can find three square columns in a row before the ruins stop to become rock bluffs. The Film Canister will be in the smallest square column to our right when we enter, on the side that faces back towards the middle column.


Africa - Free Roam:

Side Op #127 – 59 Extract the Wandering Mother Base Soldiers 09: With Mission #38 done, we have more Side Ops to do. Go to the area South of Guard Post 10 & bring Quiet along equipped with the Guilty Butterfly tranquilizer rifle to easily complete the Side Op.

Side Op #128 – 60 Extract the Wandering Mother Base Soldiers 10: Go to the Aabe Shifap Ruins now & bring Quiet along equipped with the Guilty Butterfly tranquilizer rifle to easily complete the Side Op.

This is the last extraction of a Wandering Mother Base Soldier Side Op; we will unlock the Reminiscence Achievement later on as we progress further into the story…

Side Op #129 – 130 Eliminate the Wandering Puppets 03: Go to Da Shago Kallai & eliminate the eight Wandering Puppets in the main Soldier HQ.

Side Op #130 – 80 Eliminate the Heavy Infantry 15: Go to Guard Post 17 & eliminate the eight Heavy Soldiers in the area.
Sequence 19: You're All Diamonds...
1. Mission: Proxy War Without End, Shining Lights, Even In Death
2. Side Ops: 134/157
3. Key Dispatch Mission: 18/20
4. Blueprints: 25/26
5. Key Items: 11/20
6. Achievements: 28/42
-----------------------------------------------------------------------------------------------------

If you have not already been doing so, be sure to try to focus on maxing out all seven of Mother Base’s Platforms to Level 4 for the Architect Achievement. This requires a lot of Materials, primarily Fuel Resources, to achieve. If you are low on Fuel Resources, send some Combat Units on Far Waters Exploitation Online Dispatch Missions or purchase them using PF Points.

Mission #41 - Proxy War Without End:
When ready, begin the next story Mission; you will want to bring your heaviest of ordnance for this Mission, there will be lots of Armored Vehicles…

There will be four separate groups we need to eliminate: a lone Tank, an APC & a Tank, another lone APC, & A Gunship at the end!

Key Dispatch Mission #18 – Recapture the Oilfield Facility: This Key Dispatch Mission is a S Difficulty & will take 2 hours & 6 minutes to complete. It will require two Walker Gears & the Battle Gear.

Mother Base:

A Second Outbreak!: The Mission that comes next will trigger a mini-outbreak in our Quarantine Platform; the Mission is automatically unlocked after we complete three Side Ops or Missions. Before we proceed, pay attention to the directions below!

The Mission will “randomly” select Staff Members from our Security Team & our R&D Team; this Mission requires us to kill anyone infected! To prevent us from losing S Rank level soldiers, go into the Security Team & R&D Team to give your important Staff Members a Direct Contract. This prevents them from being deployed on any Mission or Dispatch Mission & will keep them. Keep your hard-earned S Rank Staff safe!

I unfortunately learned this when it was too late… & lost ten S Rank Staff Members from my R&D Team. :’(

Africa - Free Roam:

Side Op #131 – 81 Eliminate the Heavy Infantry 16: Go to Guard Post 1 & eliminate the eight Heavy Soldiers here.

This is the last Eliminate the Heavy Infantry Side Op.

Side Op #132 – 123 Eliminate the Tank Unit 10: Head to the marked area just outside Ditadi Abandoned Village & eliminate the Gunship, two Tanks, two Snipers, & four Soldiers.

Side Op #133 – 102 Eliminate the Armored Vehicle Unit 10: Go to Nova Braga Airport & eliminate a Heavy Gunship, two Tanks, three Snipers, three Soldiers.

Completing this Side Op (or enough Side Ops) will unlock our next Mission on Mother Base. Ignore it for now, & let’s quickly wrap up the last few Side Ops available first. There are no consequences for delaying…

Side Op #134 – 131 Eliminate the Wandering Puppets 04: Go to the Landing Zone to the North of Guard Post 17 (not the Southern one) & enter into the Valley of Mist from this side with D-Dog.

There will be 8 Wandering Puppets in the cliffs above the marked area.

Mother Base:

Paz: If you have not already done so, it is time for us to uncover a massive in game secret found on the Medical Platform. Deploy to the Medical Platform & head to the center of the Platform in between the buildings where the stairs lead up. Head up to the third floor & search around for a blue lit door we can enter inside where we can find Paz; this technically became available when we Extracted the very first Wandering Mother Base Soldier.


Achievement #28 – Reminiscence: Obtain all 11 Memento Photos.
Now that we have completed all ten Extract the Wandering Mother Base Soldiers Side Ops, we have the ten Memento Photos we need. Give Paz one of the Memento Photos for her to have a memory; she will then need to rest. Exit her room & bust out a Phantom Cigar to pass time for an entire day (24 hours) & re-enter Paz’s room to give her another photo.

Chain smoke Cigars until you have given Paz five of the Memento Photos & we will get a new cut scene. Smoke more Phantom Cigars & continue to give Paz the last few Memento Photos. If you need more Phantom Cigars, step outside & Supply Drop some more in to you.

After all Memento Photos have been given to Paz, wait one more day & go see Paz for a new cut scene. When the cut scene finishes, exit Paz’s room & search the wall close to the building entrance to find a final Memento Photo; it is to the left of the door leading outside. Collecting this Photo will unlock the Achievement; re-enter Paz’s room for a final cut scene.

Mission #43 - Shining Lights, Even In Death:
When ready, it is time to complete our next Mission & try to fix this mini-outbreak. Staff Members from our Security Team & R&D Team who are labeled as Symptomatic will be on this Mission… & most likely perish.

Staff Members will die during this Mission, & we will lose a chunk of Heroism; we can recover that so do not worry. Make your way to the very top of the facility & find who sent the message.
With that done… we must kill every Staff Member we come across… there is no non-lethal way to do this. This is such a brutal Mission.

We will find a lone Staff Member who is not infected at the very end of the Mission on the bottom floor. We will complete all 2/2 Tasks through Mission progress.
Conclusion:
This marks the end of Part 1 of this Achievement guide. In Part 2, we will obtain our final 14 Achievements involving Mission Tasks, S Rank, as well as finishing the last few Side Ops, Key Dispatch Missions, & mop up Achievements. What an incredible game… there was definitely meant to be one more installation for V & Diamond Dogs before Metal Gear was put on indefinite hiatus with the parting of Kojima. So much wasted excellence…

If this guide helped you achieve 100%, rate the guide or let me know in the comments. Helps me know if I am doing things right!


66% Complete
Thank you for choosing Cynical Guides, & I will see you in Part 2!

If you are interested in a little bit of patronage, support my projects & consider buying me a coffee. If not, no worries; my guides are, & will always be free content. Achievement Hunting is my passion, & writing these guides is a way for me to give meaning to a life long hobby!
https://www.buymeacoffee.com/cynic0055

Other Cynical Guides:
If you are looking for the guide covering all Mission Tasks, S Rank, the final Side Ops, & the last mop up Achievements including building/disarming a Nuclear Weapon, click/Favourite the guide below.
https://steamcommunity.com/sharedfiles/filedetails/?id=3060178562
If you enjoy this game & my style of writing guides, be sure to check out my:
https://steamcommunity.com/sharedfiles/filedetails/?id=2816956708
Check out my profile for a full list of my works.
https://steamcommunity.com/sharedfiles/filedetails/?id=2992727030

22 Comments
Relyks2000 Feb 16 @ 4:34pm 
I know what you mean about the dispatches. Took me three tries for the first tough one using the highest rated guys. Then I did the second one on the first try just using A rated guys only (because it had the same %success likelihood).

Btw - I used this and be Sahelanthropus on my first attempt only getting hit once. I didn't have that fancy launcher from the video at the time, so it took me twice as long, but still "easy".

https://www.youtube.com/watch?v=mnsfXHKHroI
Cynic 0055  [author] Feb 16 @ 2:49pm 
Hey Relyks2000, yeah I think around Key Dispatch Mission #16 the difficulty increases pretty steeply & even if you have good Combat Staff, the failure odds are really high. Not sure if it was #16 specifically, but there was one Key Dispatch Mission that took me 5 attempts to finally clear (& I had good teams for it too).

That is interesting to note about both Paz & the Hero Achievement. While, for me at least, I definitely got the Achievement prior to doing Mission 43, I am wondering if anyone else had to beat it before progressing giving Paz photos too.

I am also just about to read that site you linked below about the Hero Achievement. I am curious to see what causes the differences in what score you need to unlock it. Probably something I will need to address in the guide. :ManOnFire:
Relyks2000 Feb 16 @ 8:32am 
Only one thing else to add: I did the Paz meetings up till the first cutscene, but was unable to get progress to the full achievement with her until after I had completed mission 43. Even using 3-4 cigars, I would enter her room and she would just be sleeping. On to part 2. Thanks!

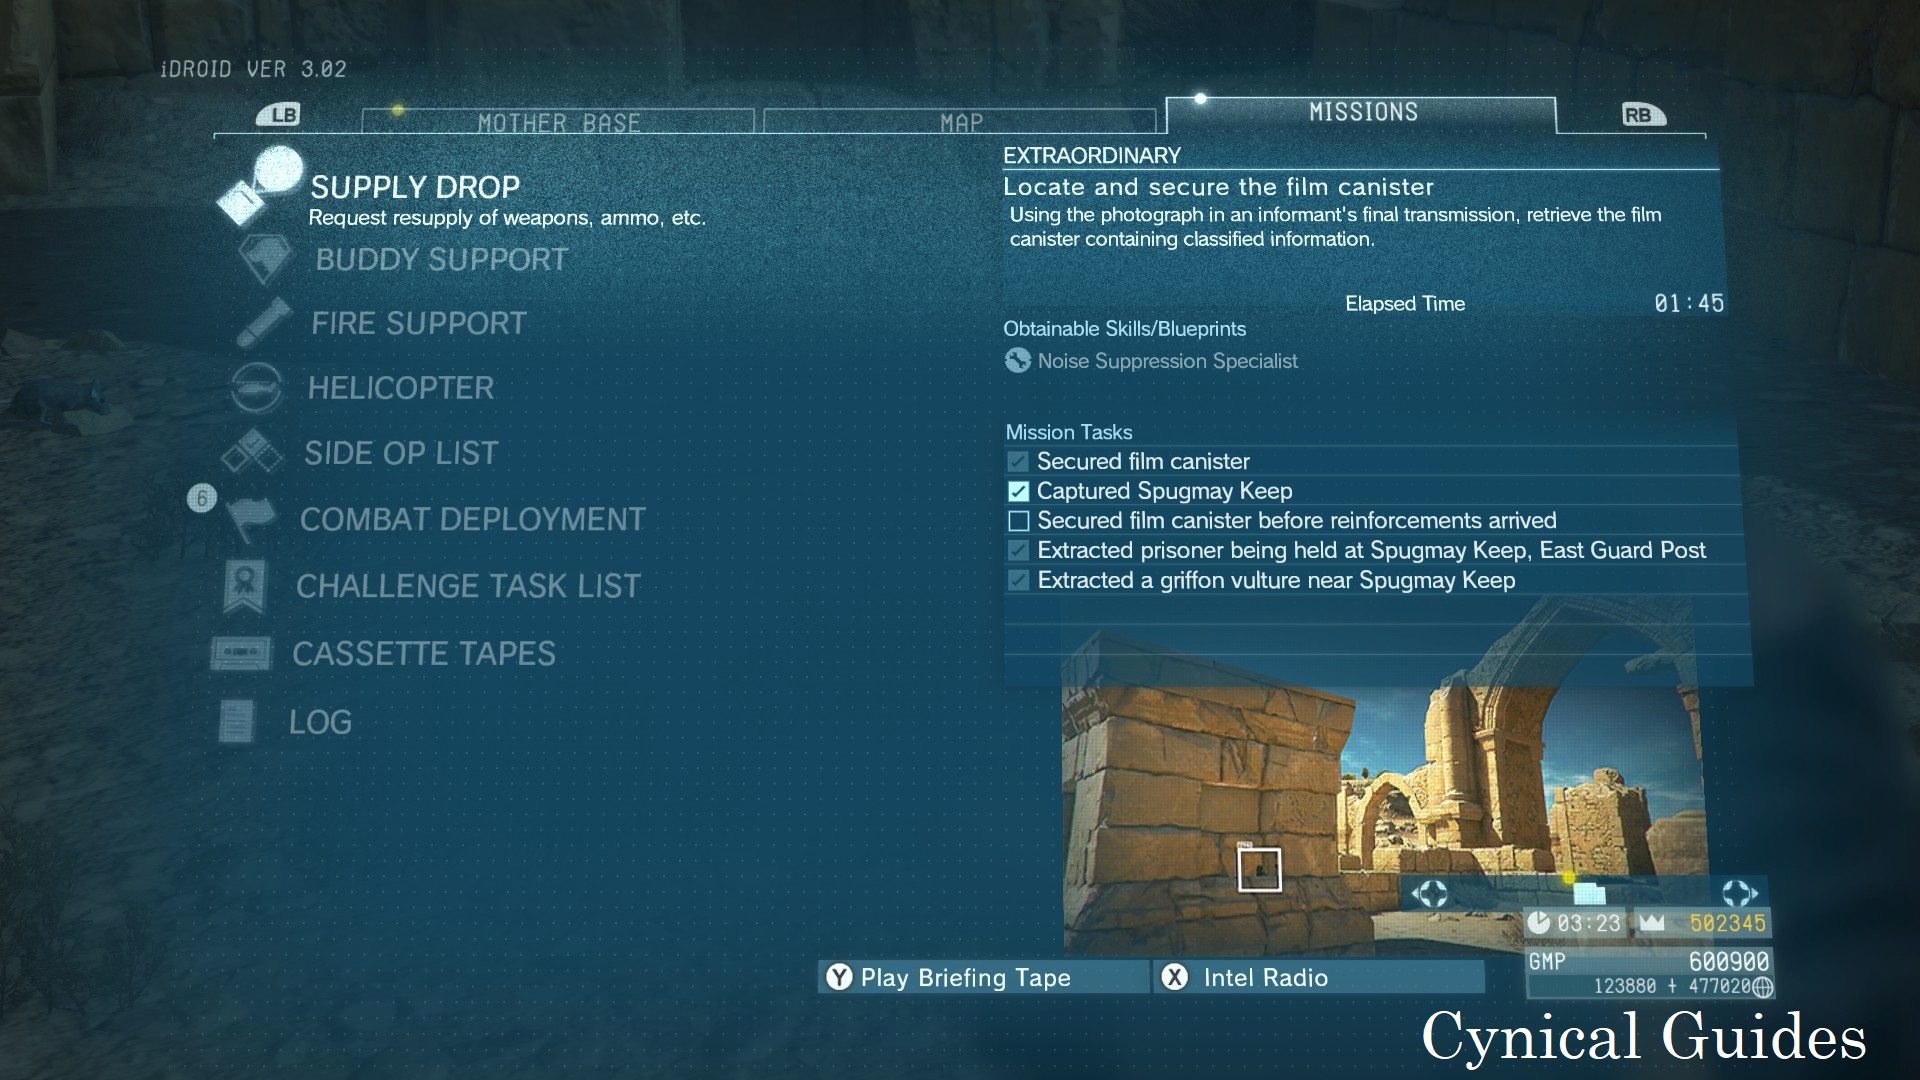
Oh, and for the Dispatch Missions, I got #16 on the third try, thankfully. Going forward, I'm going to start sorting the staff with an emphasis on combat, to make sure my percentage chance is as high as possible. Otherwise just luck, I guess.
Relyks2000 Feb 15 @ 8:19pm 
Did you have some kind of trick for the later Key Dispatch Missions? I started #16 (Rescue the Peacekeepers) when you noted it in the guide, but I've failed it the first two times. I'm now up to mission 41 and still on that one, but you passed #17 and now are on to #18.
Relyks2000 Feb 15 @ 9:45am 
FYI the "Hero Achievement" apparently doesn't pop at 150,000 for everyone. I was at 194,000 going into mission 32 and didn't get it till after that mission. I'm not sure why there can be a difference.

Here is one link that suggests some get it above 180,000:
https://www.playstationtrophies.org/game/metal-gear-solid-5-the-phantom-pain-ps4/trophy/119562-hero.html

Here is a link saying over 200,000:
https://gamefaqs.gamespot.com/boards/718564-metal-gear-solid-v-the-phantom-pain/72543597
Cynic 0055  [author] Feb 1 @ 5:05pm 
Hey Relyks2000, yeah exactly. If the Soldier has any Stat that is an A, Extract them; then you can assign them to whatever department that they have an A in. It doesn't matter if their other stats aren't great as all that matters is the the one that influences the department they are working in if that makes sense.

By "A or higher" I am referring to A, A+, A++, S, S+, S++. Soldiers who only have B, C, D, or E ranks as their highest stat I would ignore.
Relyks2000 Feb 1 @ 1:30pm 
Oh maybe I'm stupid. The letter is a grade as in how good they are at the various skills? It seems to flash with one specific skill that is the highest. Maybe you just mean look for ones that are grade "A".
Relyks2000 Feb 1 @ 1:25pm 
"If you see a Soldier with A-S rank Stats or good Skills, be sure to knock them out & Extract them to add to our Staff"

Does this mean try to extract anyone with a flashing skill of anything "A through S" or is there such a skill that shows up that is hyphenated "A-S"? Pretty much all of them I'm seeing are A through E right now. Take them all?
Cynic 0055  [author] Dec 20, 2024 @ 2:32pm 
Haha I felt the same way, svillaf91gg. All in all though, it is not too difficult of a 100% but just with HOW MUCH stuff you have to earn it, it feels extremely overwhelming & very stressful at times. I promise though that getting an S Rank on all the Missions after beating everything else is actually quite fun. Tedious at times since you have to replay Missions multiple times to complete all the objectives, but still really fun. Quiet really simplifies a lot of it since, while you cannot kill people or by discovered in some Missions... Quiet can be & do all the work for you!

Witcher 3 is another amazing 100% & I highly recommend it! One of my top favourite games of all time; also extremely proud how that guide came out.
svillaf91gg Dec 20, 2024 @ 2:11pm 
Insanely helpful guide. From all the guides you've made, this one been by far the most helpful of all, given the fact this game is an absolute behemoth.

Will rest a little bit from the game, finish other games that have almost completed (Batman Arkham Origins SinglePlayer and Control) before moving with Part 2, which seems like another steep hike.

2 games that had me really worried were this one, and Witcher 3, but after this guide I can say I'm more fearless now so maybe I'll tackle Witcher 3 sometime next year, after having recovered from this game and the Phantom Pain that its achievements are.