Team Fortress 2

Team Fortress 2

220 ratings
Custom MvM Missions: A Guide On How To Create Them
By Dayal and 3 collaborators
Ever since the Titanium Tank contest and now the upcoming Canteen Crasher jam, which Potato's Custom MvM will try to continue to do annually in a similar manner, there's been a lot more interest in creating custom MvM missions. In this guide I'll try to sum up some guidelines on what to do and what not to do when designing your own mission.
3
7
   
Award
Favorite
Favorited
Unfavorite
Introduction To Mission Design
Hello, my name is Dayal.

I've been making custom MvM missions for almost 3 years now and playing them for even longer. I've played my fair share of bad missions, even created a few to boot. On the other hand, I've designed a couple great missions. Some examples are Peak Performance for Titanium Tank and Fiber-Ops + Onsen Onslaught for the upcoming Canteen Crasher event.

Throughout the years, I've come to realize what makes missions that are well designed and fun to play, and what elements can ruin them. Granted, fun is subjective, and what I might find fun doesn't necessary apply to you. But I can guarantee you that these guidelines and tips will improve your overall mission designing skills.

Big thanks to Jakapoa for proofreading and filling in the gaps. And to Sntr and Deathrowboat for proofreading this guide and correcting me on some mistakes and misinformation.


With that out of the way, here are the subjects I want to talk about:

  • What defines a popfile?
  • How to make a subwave, wave and mission.
  • Guidelines on how to use regular bots.
  • Guidelines on how to use giants/tanks.
  • Guidelines on how to use support.
  • Guidelines on how to use custom bots.
  • In what way does the map impact the mission?
  • A couple of advanced tips and tricks.
  • Summary of how to create a well paced mission.
  • How to properly test a mission.

If you already know how to make a popfile and you are quite confident with your skill in it, I suggest you skip to the guidelines sections. The first 2 are moreso an introduction in how to properly write a popfile for a mission.

Before I can start explaining how to make your own popfile. There are a few things I need to make clear. A popfile is a basic textfile, meaning that you can edit the contents via a text editing program. Most people, myself included, will suggest using Notepad++ to work on your popfiles. It's easy to learn and allows for quick editing, at least if the formatting of the popfile is decent. Another bonus of Notepad++ is that you can customize your syntaxes, e.g. using custom colours. I'm pretty sure there's one online specifically for popfiles.

In order to get a better understanding of popfiles and how to balance them, I highly recommend on analyzing already existing official popfiles. Most of them are well paced and have a good difficulty for their respective tour. If you know how certain missions work out when playing them, looking at their popfiles will surely clear up a thing or two. Allowing you to have a better grip on what to do.

Here's a link to Sigsegv's github[github.com] with all the official popfiles, including a couple of fixes to address some typos in them. That's all what I wanted to talk about.

So let's start, shall we?


What Defines A Popfile?
A population file, or popfile for short, is standard text file with the extension .pop
Not that much to argue about. It contains all the info of what makes an MvM mission.

This is a simple example of a popfile of the 1st wave of Mannslaughter (expert Mannworks).
Note that the text behind the // prefixes gets ignored, they can be used to write notes.


This example was taken from Sigsegv's github, he has every official popfile there. A copy of this file can be downloaded using the link in the introduction section.

This is the general layout of a popfile. In order to make readings easy, 99% of the people build their popfile in this manner. I'll explain what each component does from top to bottom.

------------------------------

References


#base is used to reference other popfiles within your popfile. The above two files contain the majority of templates created by Valve, and are included in most official and custom missions. There's also robot_gatebot.pop, but it's only useful for when the map has a gate/point for robots to capture, since this file contains the gatebot variants. You can also include your own custom bot template popfile here, but I'll come back to that in a later section.

------------------------------

Wave schedule


These are the starting criteria. All the info needed for the mission to function needs to be inside WaveSchedule. The criteria behind the // are optional.
  • StartingCurrency: the amount of money you start the mission with.
  • CanBotsAttackWhileInSpawnRoom: variable to decide if bots are allowed to shoot in spawn. I would strongly suggest to keep this set to "No".
  • RespawnWaveTime: maximum respawn time, value starts at 2 seconds on wave 1, increases by 2 every wave until max. (except Scout, which remains at 2)
  • FixedRespawnWaveTime: makes respawn time a set value, leaving it out sets it to "No".
  • AddSentryBusterWhenDamageDealtExceeds: damage threshold a sentry needs to deal in order to spawn a Sentry Buster, leaving it out sets it to the default value of 3000.
  • AddSentryBusterWhenKillCountExceeds: kill threshold a sentry needs to have in order to spawn a Sentry Buster, leaving it out sets it to the default value of 15.
------------------------------

Bot templates


There are 2 types of templates, bot templates and wavespawn templates. Bot templates are used to store bots so that they can be used later in the popfile in an easy manner without clogging up the text. This is basically what robot_standard.pop, robot_giant.pop and robot_gatebot.pop are; popfiles with a big assortment of templates. This is the template for a Deflector Heavy. Which Valve, for whatever reason, didn't put in robot_standard.pop. In order to reference a template, here's an example:


This allows us to minimize clutter. Do keep in mind when making/referencing templates that they're case sensitive and don't count in spaces. It's advised when using a small amount of custom bots to keep them in the mission popfile itself. However, when you have a large amount of custom bot templates (or when you're planning on using them over multiple missions), it's advised to reference them in custom bot template files.

Templates names also don't have to be so complicated, you can name it Deflector_Heavy and reference it as such. Valve uses the T_TFBot prefix because they initially wanted to use wavespawn templates as well with the T_WaveSpawn prefix, but they abandoned that idea.

------------------------------

Wavespawn templates

Since Valve never used a wavespawn template, I used an example by Sigsegv.

While more complicated than a bot template, it can be used to shrink down popfile size quite significantly. Since they're barely used, I'll keep them for later. As to how you can reference a wavespawn template, here is how it's done.

If you don't understand it yet, no worries. I'll explain it in detail when we come to the advanced stuff.


What Defines A Popfile? (cont.)
Missions


Missions are used for support bots to do a specific objective. They're used in a different way compared to your typical support bots, however. There are 4 different objectives. Bots with any objective are not allowed to pick up the bomb.
  • Objective Sniper: forces bots to go to specific spots on the map and zoom in at a specific direction when on such spot. You can do a couple of creative things with this that I'll explain later.
  • Objective Spy: used for Spy bots. Nothing interesting.
  • Objective Engineer: used for Engineer bots. Nothing interesting either.
  • Objective DestroySentries: works on any bot, will change them to a Sentry Buster model and will lock them into solely going after the Sentry.
------------------------------

Starting of the wave


This is usually how the start of a wave is defined. It doesn't matter exactly what it means since this part is the same for every mission popfile, with a few exceptions. If you're unsure about which relays the map uses, eg wave_start_relay to start the wave, wave_finished_relay to end the mission, you can always check an already existing popfile. The majority of maps however will use the above relays.

------------------------------

Wavespawns


Wavespawns are the part you're going to work with the most. The bulk of the popfile, wavespawns define how 95% of the mission functions. This includes the type of bots, the location of and number that spawn, and the amount of money they drop. This information is define using the following parameters.
  • Name: names the wavespawn for future references.
  • WaitForAllSpawned: wavespawn waits untill another wavespawn has fully spawned.
  • WaitForAllDead: wavespawn waits untill another wavespawn is killed.
  • TotalCurrency: the amount of credits the wavespawn drops.
  • TotalCount: the amount of robots in the wavespawn
  • MaxActive: the amount of maximum bots in the wavespawn that are allowed at a time.
  • SpawnCount: the amount of bots that spawn.
  • WaitBeforeStarting: the amount of time in seconds before the wavespawn starts.
  • WaitBetweenSpawns: the amount if time in seconds between each SpawnCount.
  • Where: the name of the spawnpoint the bots will spawn. This differs from map to map.

Optional; value is either "0" or "1"
  • RandomSpawn: forces bots to spawn at different spawnpoints with the same name.
  • Support: puts the wavespawn in the support category, bots will spawn untill the wave ends.

NOTE: You can add "Limited" after Support to prevent the wavespawn from spawning endlessly. This is done in Metro Malice[github.com] wave 2's Spies and Bavarian Botbash[github.com] wave 3's Spies.

Now that we've got that out of the way, we'll try to make our own wave.


Step By Step
Now that we understand what each part is for, it's time to go over how it all fits together. A typical mission consists of five to eight waves total. In our tutorial we'll be creating a mission that is one wave long, consisting of three subwaves. You can go for a lower amount in the endurance mode, which has longer waves, but with a bomb on a reset timer. But for the sake of simplicity, we'll go with only one wave.

Subwaves are small waves within waves that help players recognize the structure easier. If everything blended together, there wouldn't be any consistency and players wouldn't find it memorable. Now subwaves can differ in number per wave.

For example, Bavarian Botbash has a 4-2-3-2-4-6-1 subwave construction. 4 subwaves in 1st wave, 2 in 2nd wave, etc. So mission creating is far from strict. Although, don't make 7 waves with 1 subwave each, or 7 waves with 6 subwaves each, it'll get boring fast. Variety is the spice of life.

You'll also need to consider the length of your (sub)waves. Having your subwaves be too long will bore your players, and having them be short will be wasteful. If you have waves that are way too long, it'll only make it more frustrating to retry it when you lose.

------------------------------

Let's start with the beginning; references, wave schedule along with the start of the wave. It's going to be advanced, so we can be quite lenient with the starting money.


------------------------------

Now we can really start on our first wave. For our example, we're going to use Rottenburg. Our starting money is 800 credits, so we need to consider what is doable for advanced for 800 credits. You can take a look at Hamlet Hostility[github.com] and Metro Malice[github.com] to get an idea what is manageable. Since they have roughly the same starting currency.

Let's add a couple of Huntsman Snipers along with some Blackbox Soldiers for our first subwave. Giant Demoknights with Über Medics paired with a mix of Shotgun Heavies and GRU Heavies for our second one. And for our final subwave, we can use a couple of Super Scouts and a big finale explosion with a large group of Demomen. As support we can use the usual Sentry Buster and 2 Snipers.


This is what it looks like in-game.

NOTE: Wave summary shows bots in the order they're written in, not in the order of what appears first. Giants first, then standard bots followed by support. Normally you should write it in chronological order though.

------------------------------

Missions


The popfile starts with missions, but they're usually added last. Their impact on the wave shouldn't be that big, because after all, they're just support. And support shouldn't be the main bulk of the wave, but more on that later. I also added the mission for Sentry Busters. They're a must-have in any MvM mission, atleast if you don't want the Engineer to be too good. The Sniper mission goes as follow:
  • BeginAtWave: defines which wave the support spawns on. In this case, the Snipers will spawn on wave 1.
  • RunForThisManyWaves: defines how many waves the mission will apply to. We only need to have the Snipers run for 1 wave, so we enter 1. If this value was set to 3 for example, the mission will apply untill the 3rd wave. But if BeginAtWave was set to 2 and the value for RunForThisManyWaves was still at 3, the mission will run untill wave 4.
  • InitialCooldown: there needs to be a period before the support spawns. For our mission, the Snipers will wait 60 seconds before they start spawning.
  • CooldownTime: there should also be a cooldown period after the Snipers are killed before the next batch is sent in. Here, if the Snipers die, there will be a 60 second period before the next Snipers will spawn.
  • DesiredCount: defines the amount of support bots will spawn.

Step By Step (cont.)
Subwave 1


I named the 1st subwave "wave1a", we'll use this name to reference it in other subwaves. I just name my subwaves this way purely because I like it. There's no correct way to do this, just use names you're the most comfortable with. Valve missions have no consistency regarding this either.

The first subwave consists of 35 Huntsman snipers, paired with 20 Black Box soldiers. The Snipers spawn in groups of 5 with the maximum amount of active Sniper bots capped at 10. There's a 10 second cooldown between each group spawn. The Snipers spawn at the main spawn, defined by "spawnbot".

The Black Box Soldiers spawn in a group of 5 as well, but there can only be 1 group active at a time. They have a 2 second delay, to prevent them from starting with the bomb. When 1 group dies, another one immediatly spawns. These Soldiers spawn at the side spawn, defined by the spawn name "flankers". The Huntsman Snipers give 150 credits, while the Soldiers only 100.

NOTE: The maximum amount bots possible at a time is 22! This does include Sentry Busters and support! If total SpawnCount in a wavespawn is set to higher than 22, bots will refuse to spawn! This is a common rookie mistake.

------------------------------

Subwave 2


The second subwave is named "wave1b". Wave1b waits before spawning untill wave1a is fully dead, this is defined by WaitForAllDead. As you may also have noticed, there's a Squad tag in this wavespawn. Wavespawns that have multiple robots in them need to have them inside a Squad, this causes the bots to stay as a group.

The bot first in the squad will be the squad leader, while all the other bots will be the squad members. Medics will always stay behind the leader, while every other class will be positioned in the front of the leader. The tag bot_squad_member informs the bots that they're in a squad.

Squads' SpawnCount will need to be a factor of the amount of bot inside the squad. In this case it needs to be 4, since we're planning on only spawning 1 squad at a time. There's also a general rule of money distribution between different wavespawns. Wavespawns with giants in them generally drop more money for less bots compared to your standard robot wavespawn.

There are also various attributes you can apply to bots. For the giant Demoknight, I used the attribute "AlwaysCrit". I think it's fairly obvious what it does. Attributes are mostly used when creating your own bot, so it's a topic for later. I would advice to not spam "AlwaysCrit", they're a cheap way to increase difficulty and 9/10 times they won't fix the issue.

Instead of Squad, you can also use RandomChoice. RandomChoice chooses between all the bots inside its brackets. In this case, it spawns 40 bots, but it chooses between Shotgun Heavies, or GRU Heavies. RandomChoice sort of keeps it 50/50. In our wave it chose 17/23, but this differs from playthrough to playthrough. Next time it can be 22/18 for example.

You can also change the ratios by adding more bots. You can add another Shotgun Heavy so that the ratio is 2 to 1, instead of 1 to 1. So the possible outcome in-game could now be 28/12, because there's more chance to spawn a Shotgun Heavy.

NOTE: It's highly advised to not use Squads in RandomChoice. They'll work, however, the squads won't be displayed in the wave display. Plus, totalcount/spawncount discrepancies will cause issues with icons and money distribution

------------------------------

Subwave 3


There isn't much to explain here, however, I do want to point out one thing. Instead of using WaitForAllDead, we're now using WaitForAllSpawned. The difference is that the latter waits when all bots have spawned before the wavespawn starts. You can combine the WaitForAllDead and WaitForAllSpawned to make the criteria to spawn more precise, but it's generally not needed.

We can now play this wave ourselves. Simply name the popfile for example: mvm_rottenburg_mission_guide.pop and put it in tf/scripts/population. If you don't have a population folder, you can make one yourself.

NOTE: This wave has not been tested. It might be that's it not advanced difficulty, or that it isn't well paced. This is what's testing is for. Which I'll explain in the last section.

NOTE: The .pop at the end is important to put, because if you don't, Notepad++ will save it as a .txt file. And MvM doesn't read .txt files.


Standard Bots Introduction
There are quite a lot of bots, and I really do mean a lot. An infinite amount if we account for custom bots as well. But let's focus on the official bots and their variants for now. And let's leave the custom bots for later. I'm going to sum up some guidelines for situations where certain bots can be a challenge or where they're downright annoying.

NOTE: Throughout this section, I'll go over different skill levels; easy, normal, hard and expert. The bot's difficulty depends on these skill levels, with easy being the easiest and expert being the hardest. I won't go over what each individual skill level does. However, I will go over what impact each skill level has on bots and in what situations each skill level is appropriate. If you want a more in-depth explanation of what these skill levels do, I suggest taking a look at Sigsegv's guide on this.


- Guidelines on Standard Bots: Scout
Scout bots

.png]
Scout bots are known to be fragile. They have an effective health pool of 125 hp, or 110 hp if they have the Sandman equiped. They don't pose a huge threat individually, but they're pretty strong in numbers.

Scouts are quite the versatile bot. You can use them as the main bulk of the (sub)wave, or use them as fragile support bots to keep the players occupied. However, their effectiveness drastically decreases as the players earn more money.


Stock "Scattergun" Scouts:
Class Scout


These are probably the strongest of the bunch. The Scattergun is no joke, even if it's slapped on a very fragile class. Scouts are strong early on in a mission, especially with skill levels on normal and above. The main reason for this is their high damage output on low money teams. Most beginner mission creators will think Scattergun Scouts will pose little threat and spam the hell out of them in early waves, but that's far from true.

If used early in the mission, consider their skill level. Easy AI will make them unpredictable, but their aim will be really bad. Anything higher than easy will make them land their shots fairly accurately. If used in early waves, my suggestion is to use the easy skill level (unless they spawn alone and are supposed to be the main bulk of the subwave). Then gradually increase their difficulty over the course of the mission. I'd generally avoid using expert AI, as hard AI is sufficient enough to challenge the players in the late game.

A downside of Scouts is that as the mission progresses and players get stronger, they lose their pushing powers. However, they still fulfill the role as great support bots. A great example is Mannslaughter's wave three. Giant Heavies are the main force of the last subwave, but they come with support Scouts. The support Scouts will ruin your day if you don't pay attention to them.

Another great example I can give of Scattergun Scouts' strength if AI above easy is Hamlet Hostility's wave one. A lot of average teams struggle with this wave due to the sheer amount of damage output Scouts can do. With minicrits on top of them, they are no joke.

------------------------------

Bat Scouts:
T_TFBot_Scout_Melee
T_TFBot_Scout_Fish (Unused)


Nothing too threatening about these guys. They are only threatening if they have crits and appear in early waves à la wave two Desperation/Mannslaughter. But then again, everything can be threatening with crits in early waves if you don't have the money to buy crit resistances.

Not much to say other than these are perfect for support bots. They aren't strong, but they are squishy enough to not be a grind if spawing in large numbers, along with being decent bomb carriers. Plus, a Sentry is able to take care of them pretty easily. You can put these in a lot of situations as long as you don't overuse them. You can choose if you want to set them on easy or hard AI.

------------------------------

Bonk Scouts:
T_TFBot_Scout_Bonk


While not particular threatening either, they do have some use other than being cannon fodder like their Bat Scout cousin. Thanks to the invulnerability of Bonk, they are able to reliably push the bomb further than other robots.

Using them as first bots in a wave, allows them to push the bomb a certain distance before dying. This is somewhat dependant on the map though. Maps with a large robot spawn, like Mannhattan and Coaltown, are less fit for Bonk Scouts as the bonk will wear off by the time they leave their spawn. A fix for this would be to increase the recharge rate on their bonk. But I'd advice against this, for the sake of consistency.

Bonk Scouts are also useful when spawned en masse. If the players are pushed back to hatch, Bonk Scouts can be a royal pain to take care of because they can deploy the bomb when under the effects of Bonk. So as a last subwave support spam, they're quite good at fulfilling that role.

------------------------------

League Scouts (both minor and hyper):
T_TFBot_Scout_Sandman
T_TFBot_Scout_Sandman_FastCharge


Ever since the Sandman nerf in Jungle Inferno, the effectiveness of League Scouts have dropped significantly. They can still fulfill a certain purpose, but they aren't nearly as strong as they used to be. They can be used effectively when paired with other bots that benefit a lot from slower players (Pyros, Heavies, melee bots, etc.). Even Super Scouts can be really useful if paired with League Scouts, preventing slowed players from chasing the Super Scouts.

If you want them to actually hit their baseballs reliably, I suggest on using hard AI on them. I'm not sure if this is still relevant, but crit Sandman balls used to stun players for two extra seconds on top of the stun duration. If this is still true, it means that crit Sandman balls will slow players for two more seconds. Might be a nifty trick to use if you want to slow players longer. (Apparently this still hold true.)

------------------------------

Jumping Sandman Scouts:
T_TFBot_Scout_Jumping_Sandman


I really wouldn't recommend using these. They are pretty useless in the sense that they don't have any particular niche to fulfill. Their sole purpose is to screw over classes like Soldiers, Demos and Snipers by jumping high in the air. But while doing so, they become really vulnerable to other classes. Their giant version is a different story though.

------------------------------

Force-a-Nature Scouts:
T_TFBot_Scout_FAN


While not having the same firepower as the Scattergun Scouts, they are quite useful. They're excellent for bomb pushes due their ability to push players away. For this reason they're also very capable to be gatebots. Their purpose isn't trying to kill people, but moreso annoying/stalling them. I'd advice to keep them on expert AI since that's where they shine.

They can be spammed in a lot of situations without too much trouble, but don't overuse them to the extend of annoying players. Their purpose is a gimmick, a knockback gimmick. Players don't like to be juggled around all too often. So use them sparingly.

------------------------------

Shortstop Scouts:
T_TFBot_Scout_Shortstop


The odd one of the bunch. Supporting an effective healthpool of 650 while moving 25% faster, they should be quite the force to be reckoned with, no? Not exactly, while they're indeed strong with a large healthpool, faster move speed and a weapon that can shred players when used by a bot, their downside is that they have easy AI. I will not suggest to bump this up to hard AI. Shortstop is a devastating weapon in the hands of a bot, at least when its aim is decent, which easy AI doesn't allow.

However, I like these bots a lot. They're only used once throughout official MvM, so using them in your mission will not be repetitive design, far from it. Because of how dumb they are, they can be used as a supportive bot in certain subwaves. Kind of like how they spawn in Empire Escalation. It is suggested to spawn them in groups rather than one by one. From experience, they're much more enjoyable to fight if in groups than one at a time.


- Guidelines on Standard Bots: Soldier
Soldier bots


Soldiers are probably the most prevalent bots in all of MvM. They're versatile, they're enjoyable to fight against, and they're quite customizable. Along with that, they also have good supportive capabilities thanks to their banners while still packing a punch of their own.

Soldier bots can be challenging in both groups and by themselves, although the latter is more applicable only in earlier waves. With their respective bulk and firepower, they're often considered the main force of the subwave. They are hardly ever used as support, other than a few occasions.


Stock "Rocket Launcher" Soldier:
Class Soldier


You can't go wrong with stock. They can offer a challenge in pretty much every situation. They're effective in early game as well as in late game. Soldier bots are quite competent. They'll try to shoot your feet unless you're too close, in which case they'll aim for the head. There are some things to consider when using them though.

Easy AI Soldiers are highly unpredictable with their shots. They'll still try to aim at your feet, but their lack of tracking makes them shoot in random directions. This might seem like a bad thing, but it can be used to your advantage. Maybe they'll shoot in a direction the player might not consider, and take damage as a result. Soldiers with normal AI and above will most likely always shoot at the feet while leading the shot a bit, so it's predictable to know where the rockets are going.

Soldiers in group are quite capable to weed out Sentries and Dispenser campers. They can also force a Sniper to hide for a while. However, you can use them solo. Desperation wave 1 is quite the challenging wave thanks to a small amount of expert AI Soldiers paired with Über Medics. So it isn't required to constantly use groups, if you use them in a smart way, they can be quite difficult when spawning alone. Normally, hard AI is good enough for Soldier bots.

------------------------------

Direct Hit Soldier:
Class Soldier with "The Direct Hit"
T_TFGateBot_Soldier_Normal_DirectHit_Crit
(Wave 2 of Coaltown Expert)
(Part 6 of Ghost Town 666)

Direct Hit Soldiers are quite powerful, but they're only really used by Valve in late game scenarios. Direct Hit Soldiers function a bit different compared to their stock counterpart. Instead of shooting at the feet, Direct Hit Soldiers will try to shoot at the torso. This makes sense, because Direct Hit doesn't have a large blast radius and bots don't benefit all that much from juggling players.

These bots have a very easy time dealing with stationary targets, like Sentries and Heavies. They also don't joke around with light classes like Scouts and Spies. But these are only advantages over stock Soldier in early game. Sentries will have way more health late game. Heavy can buy blast resistance and deflector upgrades. Scout and Spy can buy blast resistance as well.

So if you're planning on using Direct Hit Soldiers, I suggest to use them early/mid game, since in late game they kind of fall off. And as I said before, giving crits to bots in late game is kind of a cheap way to increase difficulty. It's useful in some cases, but it's better of being used in a clever way rather than: "Got to give all bot crits to increase difficulty!". Though I would advice to use them carefully in early/mid game, they can pack quite the mean punch. Direct Hit Soldiers are best set on hard/expert AI if you want them to be able to direct hit players.

There are a couple of bots you can pair them with. Blast Soldiers are an ideal partner for these bots. The former launches them in the air, while the latter airshots them with minicrits. Though, it seldom happens, it's funny nonetheless. League Scouts are also a great option due their ability to slow down players, making it harder to avoid the rockets.

Do note that the only templated version of Direct Hit Soldiers are gatebots. They will only function correctly on maps that operate on a gate system similar to Mannhattan.

------------------------------

Cow Mangler Soldiers:
Class Soldier with Cow Mangler
(Wave 4 of Bavarian Botbash)


While only used once, I might as well talk a bit about them since they're somewhat different compared to stock Soldiers. Like the Direct Hit bots, Cow Mangler bots don't aim for the feet, instead, they aim for the torso. It isn't that beneficial for them since no faster projectile speed, and they waste precious splash damage. But it's still a difference nonetheless.

I'd consider them a straight downgrade compared to stock Soldiers. I wouldn't advice using them, unless you're looking for a weaker version of the stock Soldier or you're planning on customizing them. But that comes later. If only there's a way to make them use their alt-click feature, right?


- Guidelines on Standard Bots: Soldier (cont.)
Soldier bots

Banner Soldiers: Buff Banner, Concheror and Battalion's Backup:
T_TFBot_Soldier_Buff_Banner
T_TFBot_Soldier_Extended_Buff_Banner


T_TFBot_Soldier_Extended_Concheror


T_TFBot_Soldier_Extended_Battalion


If there was one type of bot that is so commenly used in the custom MvM scene to the point where I actually despise them, it has to be the Banner Soldier. These bots appear so often in custom missions that they're not fun anymore. There are so many tropes surrounding them. Where to start?

People often think that because Banner Soldiers have an aoe buff, that they need to be used everywhere to support other bots. This is wrong on so many levels. Banner Soldiers do in fact support other bots, but they're also bots themselves, meaning they can also be the bulk of the wave. So you actually do 2 things when adding Banner Soldiers:
  • You increase the difficulty by adding a specific/multiple buffs to all the bots.
  • You add more bots that can shoot, thus increasing the difficulty even more.

There are a few common tropes with these bots. These are used so much to the point where I think every mission creator has at least used one of these once, myself included.
  • Obligatory triple banner usage, using all 3 Banner Soldiers in a squad.
  • Obligatory giant Battalion's Backup Soldier with giant Medic.
  • Obligatory Battalion's Backup Soldier spam to make giants more tanky.
  • Obligatory Battalion's Backup Soldier spam to weaken Sniper significantly.

When should you use these Soldiers then? Hamlet Hostility's wave 5 is a good example of when they're fun to fight. You have enough money to buy full crit resistance, to neglect the extra damage from the Buff Soldiers. The Banner Soldiers are the main bulk of the wave. They're not used to support many different bots; only a giant Deflector Heavy. In conclusion, you add banner Soldiers if they're the main push force of the wave, or they buff a minimal amount of bots.

When using Buff Soldiers, I would advice using them on their own, at least in early game. When paired with hitscan bots that can aim, they're extremely powerful. This becomes less of a problem the more money the players have. You can spam them in larger amount the further the mission goes on.

Conch Soldiers are, in my opinion, the least annoying ones of the bunch. They don't support the other bots with annoying buffs like no fall off damage, or 35% resistance along with crit immunity. These bots can be used in more situations without being too much of a nuissance. They do increase the movement speed of giants tremendously, so be careful.

Now to the Battalion Soldiers. As you can tell, these bots have by far the most annoying buff. First, they increase the survivability of every bot in their radius. Then they neutralize the Buff Banner, Marked for Death, and Kritzkrieg. And then they make playing Sniper a living hell. These might sound like good things, but you're making the mission more difficult at the expense of the players' enjoyability. This is something you should avoid. Battalion Soldiers do have their place, as long as you use them sparingly. If you use them solo, they're quite enjoyable. But the moment you start spamming them along with other bots, then you're using them wrong.

------------------------------

Black Box Soldiers:
T_TFBot_Soldier_RocketShotgun


These bots aren't exactly designed to kill players, their purpose is more or less survive as long as possible. Their rockets deal 66% less damage, adding in the factor they shoot 3 rockets at once, 1 salvo will deal around 1 rocket's damage. They do have a slighter larger blast radius, to guarantee they can health back easier.

As for their usage, they're quite general. There are a lot of situations these guys fit in. Though, due their rather unique design, I suggest to use them sparingly to keep their uniqueness. If you overuse them, they become less special. Due their low damage output and health regen for bots becoming less and less effective as the mission goes on, these bots are better used in early waves. I think Valve knew this as well considering they only appear in wave 2 Empire Escalation.

------------------------------

Blast Soldiers:
T_TFBot_Soldier_RocketPush


By far my favourite bot. There's just something enjoyable about being sent to the sky, at least in my opinion. Many share the opinion that these bots are really annoying and I get where they're coming from. They fire a 3 rocket salvo that sends anyone who gets hit flying.

Unlike Black Box Soldiers, these are rather gimmicky. As is with the Force-a-Nature Scouts, Blast Soldiers' purpose is to knock people around. They're also quite good as bomb carriers or gatebots. However, I would recommended to rarely use these bots. While I like them, many people don't purely because being knocked around isn't a fun game mechanic. Plus, using them too much ruins the experience of what makes these bots special.

As for bots you can pair these with, their strength lies in that they can pretty much knock people around. We can use this strength to prevent body blocking. Though sending people towards the skybox does make them difficult to kill, so it's best to use them in conjuction with bots that are less designed to kill players and rather capture gates/plant bombs. Examples are: Super Scouts, Steel Gauntlets, even a tank.


- Guidelines on Standard Bots: Pyro
Pyro bots


Pyro bots appear situationally, for both offense and support. They don't pose a big threat until they draw close. The most common variant uses the Flamethrower as means to punish close-quarters combat classes, like Scout, other Pyros and Spies.

While their dps isn't that great, it adds up in numbers. When using the Flamethrower, they're capable of reflecting back projectiles with perfect timing and accuracy, punishing unskilled Soldiers/Demos.

They can also use the Flare Gun as a way to be a minor threat from a distance.


Stock "Flamethrower" Pyros:
Class Pyro
T_TFBot_Pyro


While there maybe be only one type of Flamethrower Pyro, there's a bunch of stuff you can do with it. Pyro bots are hugely dependant on these factors: skill level, AlwaysFireWeapon and AlwaysCrit. Skill level dictates how effective they are with tracking and airblasting projectiles. AlwaysFireWeapon decides whether or not they use airblast.

On easy AI, they'll hardly do any tracking and have zero chance on airblasting. This makes them good candicates for AlwaysFireWeapon. This attribute forces bots to always "press" M1. So you basicaly have a spaztic Pyro spraying flames everywhere, good for guarding giants from Spies. This one is also capable of lighting Huntsman arrows on fire, although in my opinion, Pyro + Huntsman is a bit overused in the mission making scene.

On normal AI and above, they'll start airblasting and tracking to the point they'll even have a 90% chance to reflect incoming projectiles on expert AI. If you're planning on using Pyros as offensive classes and not supportive, be prepared to use a lot of them. Or you can just slap a Medic and crits on it. I know I said that adding crits is a rather cheap way to increase difficulty, but it's alright on Pyros. You can avoid their damage by just staying out of their range and Pyro's dps is bad to begin with.

When it comes to using them effectively, there are several ways. Pyros can be used as support by adding them in squads of giants, be it either for spychecking or reflecting projectiles, it's your choice. If used in group, you can couple of easy AI Pyros with hard/expert AI Pyros to shake things up.

Or as said earlier, you can pair them with Über Medics and use the AlwaysCrit attribute. Pyros can be used in a lot of scenarios, just mind that if you spam expert AI Pyros, you'll increase difficulty at the expense of Soldier's/Demo's enjoyability.

NOTE: Adding AlwaysCrit on Pyros that are capable of reflecting projectiles will result in reflected projectiles getting critboosted as well. Use this trick to create some hilarious moments where a Soldier delivers doom upon his whole team.

------------------------------

Flare Pyros:
T_TFBot_Pyro_Flaregun


These aren't exactly all that threatening, though there are some uses for them. They're pretty much the only bots that can cause afterburn from a ranged distance, if you don't account lit Huntsman arrows or custom bots. Because they aren't dangerous, they're pretty useful as extra bots that you can put alongside other bots without bumping the difficulty all that high.

Do remember that since they use the flare gun, any hits on burning players will turn into crits. This can be a useful way to add partial crits to an early wave without using AlwaysCrit.

------------------------------

Scorch Shot Pyros:
T_TFBot_ScorchShot
T_TFBot_ScorchShot_FastShot


There are two different versions of Scorch Shot Pyros. You've got the slow Scorch Shot Pyro and the fast Scorch Shot Pyro. The slow Scorch Shot fires slower and has a much shorter range, while the latter is the opposite. The slow ones are only used in the early days of MvM, while the faster ones are seen more in the Two Cities era.

There aren't exactly many uses for the slow Scorch Shot Pyro, though I must admit that they're funny and interesting to watch with their very slow projectiles. As for the fast Scorch Shot Pyro, they have a specific niche. They're by far the easiest bots that can apply afterburn without much trouble. So pairing them with bots that benefit from afterburn is a great start, like Huo Long Heater Heavies and whatnot.


- Guidelines on Standard Bots: Demoman
Demoman bots


Demo bots can give quite the smack. I'd even consider them to be the strongest standard bots. They're commonly used in groups. Alone they pose little threat, but when paired with multiple Demos, they can spam the crap out of everyone.

Due their massive amount of burst power, you rarely see these bots used as support, unless it's late game or they're a Demoknight. I love spamming these guys in large groups. There just something satisfying about seeing 20 or so pills flying your direction.


Stock "Grenade Launcher" Demos:
Class Demoman
T_TFBot_Demoman


We can do some silly stuff with Demo bots. These are the only bots where the easy AI is actually threatening. Their random tracking makes for some unpredictable shots that can still do some serious damage. But in order to have the best result possible, we can mix some hard AI Demo bots along with some easy AI bots. We can do this via the RandomChoice syntax. This ensures that the group cannot be outplayed so easily. Demo bots with a skill level of normal and above can be outplayed simply by circle strafing them. This doesn't apply to easy AI Demos.

Demos can be used in a similar fashion as Soldiers, aside from the solo part. They're quite general, meaning that they can fit almost everywhere. But I'd argue that the Demo bots are a bit stronger compared to Soldier bots. As said above, it's when they're in groups that they shine. You want to go for four bots at a time? Maybe even eight? Heck, why not 16? The more the goofier.

------------------------------

Demoknights:
T_TFBot_Demoman_Knight


Unlike their regular counterpart, Demoknights aren't particulary difficult. They fulfill a different purpose. Due their melee restriction they're more suited for the support role. On top of that, their shield charge is pretty useless because they usually cancel it by swinging their sword too early. In cases where they are used as the main push force behind a subwave, more often than not, they're just cannon-fodder.

While they lack power, they are quite capable in killing uncareful Scouts, Pyros and Spies because of the lack of a melee resistance upgrade. And since they mostly spawn in groups anyway, they can deal 2/3 swings in quick succession. Spawning multiple of them at once is certainly the way to go, since alone they pose little to no threat. In most cases, I use Demoknights as support bots to aid the main bulk of the wave. It's adviced to keep them on hard AI, since they're quite useless on easy.

------------------------------

Persian Demoknights:
no template, see note below*


Now these are a different story. There is different type of Demoknight that I call Persian Demoknight due their loadout. These are only seen in wave 4 of Bavarian Botbash and wave 6 of Hamlet Hostility. I like these guys purely because how much of an upgrade they are compared to their regular Demoknight counterpart.

So why exactly are they more threatening, they're still melee restricted, no? Mainly because of two changes to their kit. The first one is replacing the Chargin' Targe with the Splendid Screen. Being capable of dealing massive bash damage, which there's no resistance for. The second one is with the addition of "attack does not cancel charge". What this does is make them be able to deal charge damage way easier since swinging their melee does not cancel the charge.

Because they are way more dangerous, these bots can be used as the main bulk of the wave. And I would suggest to not use these guys as support, they're just that good. They can be pretty terrifying anywhere in the mission, doesn't necessarly have to be early or late game. Just use them wisely.

*There is a slight issue with these demos, as valve did not actually take the time to include them in the base template files. The code for them is as follows:

------------------------------

Samurai Demos:
T_TFBot_Demoman_Samurai


By far one of the most creative bots Valve has ever created and also one of the most dangerous bots. While it isn't made clear, Samurai Demos have a 50% damage bonus on both their shield bash as well as on their Half-Zatoichi. This results in 128 damage shield bashes and 98 damage swings, more if it (mini)crits due to shield charging. On top of that, they have the "attack does not cancel charge" attribute as well on their shield.

Do NOT use these bots a lot, they are really strong. The reason why they are manageable on Mannhattan is because of the map layout. They charge in a pit, leaving them vulnerable. I can guarantee you that if you spawn them on any other map, they'd wreck people. So use them very sparingly. If you do plan on using them, consider to use them alone.

------------------------------

Burst Fire Demos:
T_TFBot_Demo_Burst


Regular Demos spam less pills but at a higher frequency, Burst Fire Demos spam more, but at a lower frequency. Kind of sums them up pretty well. I'd say these bots work well when you spawn them in bursts, but with some reasonable amount of time inbetween each spawn. Similar how Empire Escalation wave 4 does it. The reason for this is that if you spawn them at a more frequent rate, you basically remove their only downside, which is their downtime of not being able to fire.

As a small trivia fact. Burst Fire Demos fire four pills when they spawn, but after that moment, they only shoot two pills. I'd say use them in bigger groups, but make sure that you have enough downtime inbetween each spawn to not make it too big of a spamfest.


- Guidelines on Standard Bots: Heavyweapons
Heavy bots


Well known for their ability to shred through the competition. Heavies are quite the menacing bots to face. With their tremendous 540 max dps, you won't survive long, even with 75% bullet resistance. And that's only the power of one single Heavy bot. Imagine 12 at once.

These bots are come in all sorts of forms. Be it either for a relentless push with their Minigun, or for tanky bussiness with their Fists of Steel. Even as cannon-fodder support with the GRU, they've got it all.


Stock "Minigun" Heavy:
Class Heavy


Quite the force to be reckoned with, though very easily countered by Sniper. Minigun Heavies are rather durable and have some frightening fire power. Due to these reasons they are rarely seen as support bots and are more often than not the main bulk of the subwave. When they have the easy skill level, they aren't exactly that dangerous, but they're still capable of killing. It's from normal and upwards that they can be dangerous.

When used in earlier waves, I highly suggest to use easy or normal AI. You can make them more difficult as the mission goes on. Heavy bots with good aim can crumble a solid defence, especially in early games. As an example, look no further than wave 3 Metro Malice. This wave absolutely punishes average players due the constant stream of hard AI Heavies.

How can you optimize the usage of Heavy bots? As with Soldiers, Heavies can be both used in group as well as solo situations. Though it is advised that if used solo to pair them with Über Medics. Naturally, in group they are more dangerous. You can mix a couple of hard AI Heavies with easy AI to balance it out. They aren't exactly the greatest bomb carriers, so it's better to often pair them with bots that are more suited for bomb carrying.

------------------------------

Deflector Heavies:
no template, see note below*


Deflector Heavies function mostly the same as just regular Heavies. They have quite the firepower and are often seen as the main push force. If you use them in solo fashion, their deflecting capabilities aren't that good. It's when they're in numbers that it shines. This perk is also quite useless if they're on easy skill level. I usually put them on hard AI.

I'd advice to not overuse Deflector Heavies. Heavy mobs are largely countered by splash damage, which both Soldier and Demo only have. But both classes use projectiles which Deflector Heavies counter, so you're kind of encouraging Sniper. And encouraging certain classes is something you want to avoid as mission creator. They also usually appear in later waves, so avoiding them early game is something you should probably do.

*Same deal as the Persian Demoknight, Deflector Heavy doesn't have an official template.

------------------------------

Steel Gauntlets (both regular and pusher):
T_TFBot_Heavyweapons_Fist
T_TFBot_Heavy_IronFist_Airblast


The true definition of a damage sponge. Steel Gauntlets support an effective healthpool of 1260 hp. They're rather unique in their design since they can challenge players into a melee duel, mainly due to their 100% damage vulnerability to melee damage. The regular version is rather mediocre in melee fights unless in groups. It's the pusher version that is more bothersome because of their 50% damage bonus.

Steel Gauntlets are best used to make room for other bots or to carry the bomb/cap a gate. Their primary focus isn't to kill players, but to back people off. They're also great bomb carriers because of the bomb buffs. Because they have such massive healthpool, they can stay alive longer, thus having more chance to get the bomb buffs. Gauntlets with tier 2 bomb buff are no joke, with health regen along with additional resistances to everything.

They're more enjoyable to fight against if they're not alone in the subwave. In earlier waves, they're really strong because no one, aside from Sniper and Spy, has the damage output to reliably take them out. But in later waves they kind of lose their strength. They're still good as support bots, but they aren't nearly as strong as they are in early game.

------------------------------

Heavyweight Champ KGB:
T_TFBot_Heavyweapons_Heavyweight_Champ


Only useful as support. They lack the strength and mobility to pose any real threat. You can compare them with the Bat Scouts, except that they're bulkier and slower. You can also use them in situations where you'd use Bat Scouts otherwise, like in (infinite) support. Though, Bat Scouts are very squishy, thus they aren't that grindy. KGB Heavies on the other hand are tankier and can kind of feel like a grind in earlier waves if used in mass support spam.

------------------------------

Heavyweight Champ GRU:
T_TFBot_Heavyweapons_Heavyweight_Champ_Fast


Same deal as the KGB Heavies, only useful as support. These bots are more or less the same as Bat Scouts, fast and squishy. Nothing else I can really say really. Use them in situations where you think Bat Scouts would fit otherwise.

------------------------------

Heavy Mittens:
T_TFBot_Heavyweapons_Gnome


Probably the goofiest bot around and only used twice. They're literally harmless, but damn can they give a good laugh. Originally they were suppose to represent actual gnomes, being small and having a pointy hat and beard, but Valve scrapped that idea for some reason.

Mittens are mostly used as a joke. They're anything but serious. Since they're unable to do any damage whatsoever, it's best that you pair them with bots that are capable of killing the players when they're laughing. Or with Super Scouts to deliver the bomb without much resistance. Or even with a tank so that the players are unable to damage it.

------------------------------

Shotgun Heavies:
T_TFBot_Heavyweapons_Shotgun


Shotgun Heavies don't really have much "umph" to them. They're basically fat Scouts.They're
somewhat dangerous in earlier waves, but they become a cakewalk in mid/late game. As the main push force in a subwave, they'll never get through. I'd advice to use them in groups because their damage output solo is rather bad. Since they aren't nearly as powerful as Scouts, you can set them on hard AI without any problems. On easy AI they'd just be way too stupid.


- Guidelines on Standard Bots: Medic
Medic bots


Just like in PvP, Medic bots are powerful. They allow for bots to have a better chance at breaking the defenses of the players. Their sole purpose is to empower other bots and to punish players for making mistakes.

Medic bots pop their über whenever they drop below 50 health. This isn't that big of a deal with Quick-Fix Medics, but über Medics can be a major problem. This forces players to have at least 1 class with the burst damage to reliably take care of them (eg Sniper or Demo).


Über Medics:
T_TFBot_Medic
T_TFBot_Medic_SlowRecharge
T_TFBot_Medic_QuickUber

There are three distinct versions of über Medics used by Valve. There are normal Über Medics (T_TFBot_Medic), which recharge ubercharge twice as fast and heal five times faster than normal. There are also Slow-Recharge Medics (T_TFBot_Medic_SlowRecharge), which recharge über 75% slower and heal five times faster than normal. The Slow-Recharge Medics are good for early waves in low-difficulty missions, as they will only pop once in their lifetime.

However, those two medics are inconsistently used throughout the game. I'm mainly going to talk about the Quick-Über Medic here (T_TFBot_Medic_QuickUber). They charge über 400% faster, but the downside is that they only have a five second über instead of eight seconds. They also heal much less thanks to a 90% heal rate penalty. These bots are designed to spam über, but they're bad at healing the targets.

Über Medics can be used with a lot different bots. However, they're best paired with bots that can be a threat when übered, rather than weaker bots. Bots like the KGB Heavy, FaN Scout, or Bonk Scout aren't exactly going to do a lot when übered. You can put them along with crazy combinations though. Why not with a crit Bat Scout for example? Or even a Hunstman Sniper? Make combinations that are whacky or goofy, maybe they just might work out.

If you pair them with giants, how do you use them effectively? Giants are always considered the bulk of the subwave. If they're too easily defeated for your own liking, you can add über Medics alongside them. However, make sure it's at a decently paced rate so that the Sniper/Demo doesn't get overwhelmed. As for the amount of über Medics, it depends on the situation. One Medic allows for other classes to still kill them reliably. When there are a large cluster of them, they can overheal each other, making the job for Sniper/Demo a bit more trickier. But do keep the 22 maximum amount of active bots in mind.

------------------------------

Quick-Fix Medics:
T_TFBot_Medic_QuickFix


These are just your general Quick-Fix Medics. They don't have any bonusses. Quick-Fix Medics are mostly used in lower difficulties as a way to teach players that they need to be taken care of first, without being punished for making mistakes, unlike the über Medics. That's not to say you can't use them in advanced or even expert.

Their main purpose is just to make bots slightly more durable with their increased healing rate. You can make the Medic bots more threatening by adding the attribute "SpawnWithFullCharge". That way they have a Quick-Fix über ready when they spawn, making them and their patient a bit more durable. They're not fully invincible like über medics, but can still be a pain to take down.

You can use them in situations where bots are too fragile, but adding über Medics to them would be too much. They're kind of like the perfect balance. There aren't exactly any wrong combinations with this Medic bot. The only bots I'd advice to not use them with are giant Scouts. In all honesty, any Medic on giant Scouts is a big no no in my book.

------------------------------

BigHeal Medics:
T_TFBot_Medic_BigHeal


A souped up version of the Quick-Fix Medic. These Medics heal at a rate 10 times faster than regular Quick-Fix Medics. This results in an effective 336 hp/s heal rate, 1008 hp/s if you factor in crit heals. They make their healing patient near invincible, almost guaranteed if you have a bunch of them on the same target. But their downside is that they can't charge über, with their 90% slower über build rate.

Opposed to the Quick-Fix Medics, I would advise to not use "SpawnWithFullCharge" on these bots. This would remove their only downside. I would also advise to not use these on regular bots, unless you use them sparingly. Spamming them can only result in disasters. On giants they're quite effective. They're not as effective as über Medics, but they can still cause some difficulty. You can spam as many as you like on giants.


- Guidelines on Standard Bots: Bowman
Bowman bots


Huntsman Snipers aren't exactly that strong, unless we're talking about the Rapid Fire Bowman. They are used quite a lot though in numerous missions, but they mostly end up being cannon fodder anyways.


Bowmen:
T_TFBot_Sniper_Huntsman


These are like many other bots, where their effectiveness drastically decreases as the mission goes on. They're way too squishy and don't have a lot of burst damage to really be used as the weight of the subwave. There are some scenarios where you can use them as such, such as if you spam them with crits in earlier waves. But as I said before, everything can be dangerous if you put crits on it in early waves.

Bowmen have a 50% damage penalty. This is probably because Valve thought they proved to be too strong with 120 damage dealing arrows spammed en masse with multiple Bowmen. However, this does not mean they only deal 60 damage; rather more like 85 damage. This is still somewhat of a decent damage number.

They use the hard AI by default, but you can bump them up to expert if you want. But they'd just be too stupid if they were on easy. As I said before, Bowmen are mostly used as support, since they're too squishy to pose any real threat. I also briefly mentioned that you can pair these with Pyros to create ignited arrows, but I kind of find that combo to be an overused gimmick. But who am I say to say what you can and can't do? It's your choice really.

------------------------------

Rapid Fire Bowmen:
T_TFBot_Sniper_Huntsman_Spammer


Now these are Bowmen on steroids. They don't have a damage penalty, fire slightly faster and have 1200 hp. But at the cost of having a bigger hitbox and moving slightly slower. If you speak from experience that these guys are threatening because of their appearance in Empire Escalation, I'll have to dissapoint you. They aren't exactly threatening. I said it a couple of times already, any bot with crits can be intimidating in early waves.

The reason why I use a different icon for these Bowmen is because this icon is supposedly the original intended icon for the Rapid Fire Bowman. For some reason Valve ditched the icon and used a regular Bowman icon instead. I found this confusing at first in Empire Escalation. But this is just for me, if you just want to use the regular Bowman icon, go ahead.

I must be honest here, I'm not so familiar with these bots, rarely do I use them. They aren't exactly the type of bot you'd spam or use in groups. I can sort of see them work as a flanking bot. Like how they function in Empire Escalation. They don't appear at the main spawn, but moreso on the flank when the players are busy taking care of bots from the main spawn.

------------------------------

On a side note, there is no giant version of the Bowman Sniper icon. Using both standard and giant Bowmen in the same wave will result in an icon conflict, and all Bowman icons will display as giant. Unless you use a nifty trick where you can use the same icon, but they're both displayed seperatly on the hud. Bowman use the icon "sniper_bow", however you can use the same icon but name it "Sniper_bow" with a capital "S". The game will recognize the icon, but it won't use the same value for both, thuis displaying them both seperately.

Though, if you don't want to use this trick, I recommend that you have any giant Bowmen use an unused Bowman icon, sniper_bow_multi. This will prevent any icon errors.


- Guidelines on Standard Bots: Mission Support
These aren't exactly the bots you'd use in the main wavespawn, but rather as support since they excell at that role way more than others. Hence why I made a seperate section for them.

Engineer bots


Engineer bots should only really be used as support. Forcing the players to kill Engineer bots in order to win the wave isn't exactly a fun task to do. So it's better to keep them in the support category. Also, Engineer bots have a very hard time functioning without "Objective Engineer".

There are two types of Engineer bots: TeleIn Engineers and Battle Engineers. The former teleports into the battlefield when the bomb has passed a certain point. The latter is regularly used to enter the battlefield via the spawnpoints.


TeleIn Engineers:
T_TFBot_Engineer_Sentry_Teleporter (can build teleporter)
T_TFBot_Engineer_Sentry_Battle_TeleIn (can not build teleporter)


TeleIn Engineers are often used in support missions, though it is possible to use them inside a wavespawn. They also come in two versions, Engineers that are capable of building a teleporter and Engineers that aren't. TeleIn Engineers that can build a teleporter have a healthpool of 500 hp, while the other one only has 275 hp. If Engineers teleport in, the Announcer will warn the players that an Engineer has spawned. There will also be a light blue beacon indicating where they have spawned.

TeleIn Engineers with teleporters are often used in larger maps to speed up the wave whenever the players are pushed back. A operating teleporter acts as a forward spawn for bots, letting them skip parts of the map. They are put in missions to force a downtime where the Engineer can't respawn, because it'll be annoying to constantly go looking for one. The teleporterless version is only used once in Empire Escalation wave 3. They were used in a wavespawn with the LIMITED support tag. You can also use these in a mission if you don't want to have a teleporter.

------------------------------

Battle Engineers:
T_TFBot_Engineer_Sentry_Tele_Battle (can build teleporter)
T_TFBot_Engineer_Sentry_Battle (can not build teleporter)


Battle Engineers also come in two versions, with and without a teleporter. They only have 275 hp and are only used as support that comes from the spawnpoints. These bots' purpose is to restrict an area during a subwave to give other bots some free space. I wouldn't advise using a lot at once, as Metro Malice wave 5 showed that they can be pretty annoying.

NOTE: If you spawn Engineers via regular support and not via mission support. You have to give them Attribute "IgnoreFlag"!

------------------------------

NOTE: In order for teleporters to properly function, you must include the name of the spawn that you wish to use the teleporter. For example, to have both spawns on Rottenburg use a teleporter, you must include this on the Engineer:
TeleportWhere spawnbot TeleportWhere flankers
The TeleportWhere will tell the game to have that spawn use the teleporter.

------------------------------

Sniper bots


Sniper bots are often used as a means to lock down an area. They can be quite a nuissance if not taken care of. They come in 3 different versions. Snipers indicate their position via a laser that points out where they're aiming at.

Unlike Engineers and Spies, Snipers don't have an Announcer warning. Instead the mercs will often call out when a Sniper has spawned, or you can also see it via the Sniper icon appearing in the wave info during the wave. They're also unable to perform headshots.

They must spawn via a mission in order to work properly.


Stock "Sniper Rifle" Sniper:
Class Sniper
T_TFBot_Sniper


These are by far the most common Sniper. You can't really go wrong with using these inside your waves. Just remember to not use them every single wave, as it can get boring fast.

------------------------------

Razorback Sniper:
T_TFBot_Sniper_Razorback


A slight upgrade compared to the Stock Sniper. They don't function any different, however they are equiped with the Razorback. Spies are unable to kill these ones unless he has the time to use the Revolver and when there aren't any other bots around. I kind of switch between these and the Stock Sniper, but there isn't exactly a difference that warrants the Razorback Sniper over the Stock Sniper and vice versa.

------------------------------

Sydney Snipers:
T_TFBot_Sniper_Sydney_Sleeper


A far more threatening Sniper. These ones are able to perform minicrit Headshots along with coating you in Jarate that weakens you against every bot. They are very strong in early waves due to players not having crit resistances. They are capable of one shotting 8/9 classes if there are no resistances applied or no overheal.

I'd use them sparingly since they are quite annoying. But, these bots are capable of increasing the difficulty of early waves quite significantly. So if you want to buff a wave and you don't know how, you can try out Sydney Snipers if you want and see how that goes.

------------------------------

Spy bots


While MvM Spies are easily distinguishable from real players, they aren't exactly made to fool players. They rely more on taking care of players that are busy shooting other robots or tanks. That's where they shine. This is why it's better to sync up their spawn with other bots. They might have an Announcer warning, but they can still do their job.


Spies:
Class Spy
T_TFBot_Spy


Spies are most often used as a mission support. However, you can also use them as regular support or as part of the main wavespawn. As regular support, you can use them in such a way to only spawn them once at a certain time where you would want Spies. Similar to how Metro Malice wave 1 and 2 accomplishes this. You can achieve this with a wavespawn and the LIMITED support tag. Do remember that Spies spawned via wavespawn can pick up the bomb, if you want to avoid this add the attribute IgnoreFlag.

As part of the main wavespawn, they function similar to wave 4 of Broken Parts or that Spy + Tank part in Caliginous Caper wave 666. Always spawn them alongside other bots, along with syncing them so that the Spies are killed around the same time the other bots are. It's no fun to hold a search party to find the Spies in order to progress the wave. You can also use WaitforallSpawned for wavespawns after the Spies to speed things up. Or just have nothing depend on the spies being killed, and leave them as a persistent threat.

Spies are capable of increasing the difficulty of a wave. Though, I'd advise to use them sparingly. Otherwise you'd increase the difficulty at the expense of the players' enjoyability, since you force players to constantly check their back. And I already said it numerous times, that's something we want to avoid as mission creators.


Giants Introduction
Same deal as with the standard bots, these sections are only for official templates.


- Guidelines on Giants: Scout
Giant Scouts


Giant Scouts are best for quickly moving the bomb and/or capturing a gate. With their incredibly fast movement speed, players have a hard time pursuing fleeing Giant Scouts. This means that if a Giant Scout gets past the defender's defences, it's almost always a guarenteed win for the robots.

Giant Scouts are only a threat in certain situations. If they spawn alone, they can easily be taken care off. It's when they spawn along other bots that they become quite dangerous. But when there are multiple bots on the field, it becomes a matter of multitasking. Which can screw up some things. Though you can use giant Scouts alone, but don't expect them to be a big threat.
Giant Scouts:
T_TFBot_Giant_Scout (unused)


An unused official template which I see as potential in custom MvM. Giant Scouts are simply Scouts with 1600 hp and all the stuff every giant has, like knockback resistance and whatnot. But unlike every giant, they don't have a move speed decrease, making them the fastest bomb carriers. Since they're only equiped with a Scattergun, they aren't exactly dangerous. So as a buff, I would suggest to give them a 50% damage increase, similar to giant Heavies.

The best way you can use giant Scouts is to spawn them 1 by 1 with a reasonable time interval and a decent total amount, like 4-6. They're designed mostly to carry bombs, so spamming them will prove to be quite annoying. If you decide to give them a 50% damage bonus they can be pretty strong, especially in early waves. Because as I said with the Scout part, Scattergun Scouts are really strong early game, but become significantly weaker the longer the mission goes on.

------------------------------

Super Scouts:
T_TFBot_Giant_Scout_Fast


Super Scouts are faster, but squishier compared to their giant version. They run at the maximum speed the Source Engine allows them to. Super Scouts are an odd bunch since they're only one of the three giants that have their AI not set on expert. Theirs is on easy AI. This makes them harder to predict, backstab and headshot. Since they only have a fish to hit people with, it's to no one's surprise that they're only there to plant the bomb/cap gate, or to harass players.

It's advised to use them along with other bots or in larger groups. They're not difficult to take care off alone, it's just that they punish mistakes really hard. They're also excellent bots to use throughout an entire wave. Valve did this in a couple of expert/advanced missions. If used this way, Super Scouts don't require a lot of fire power to be destroyed, though, they do require the attention of the players constantly.

------------------------------

Force-a-Nature Super Scouts:
T_TFBot_Giant_Scout_FAN


FaN Super Scouts have the same hp as Super Scouts, but they only move 10% faster and they have a Force-a-Nature instead of the fish. Pffft, clearly the fish is a superior weapon. Anyway, FaN Super Scouts function the same as regular Super Scouts. You can use them in situations where you'd use Super Scouts otherwise. They were primarly designed to deliver bomb or capture gates. Thanks to their FaN, they can push players out of their way.

------------------------------

Major League Scouts:
T_TFBot_Giant_Scout_Baseball


These are probably the weakest of the bunch. Not because they're bad, but because the two other giant Sandman Scouts are better. However, that doesn't mean they don't have a place. You see, the armoured version is too tanky to spam, while the jumping version is too annoying and dangerous to spam. So these are much safer to spam without annoying to players.

You can use these the same way you use giant Scouts. Though, you can pair them with bots that benefit from slowed down players, like Soldier, or Pyros. You can also use them in a similar version you'd use Super Scouts otherwise, throughout the entire wave. If they still had their complete stun mechanic, I would advice to not do this though, but they only slow down players now. Also, don't forget that crits that may or may not slow down for two more seconds.

------------------------------

Giant Jumping Sandman Scouts:
T_TFBot_Giant_Scout_Jumping_Sandman


These are probably one of the most annoying bots to have ever been created. Now I don't hate them per se, but they are unfun to fight against. Heck, Valve even wanted to give them a 50% movement speed increase, but it was scrapped, probably for the best. Unlike other giant Scouts, they only support a healthpool of 1200 hp.

Their Sandman also deals double damage, capable of dealing 70 damage bat swings, or 210 if critboosted. The baseball deals a total amount of 30 normaly, 45 if long distance, 90 if critboosted, and 135 if long distance and critboosted. So they are capable of killing players, especially ones who don't have crit resistances. These bots can be extremely dangerous and very annoying if used wrong.

In what situations do they fit? I would only use them in one subwave for the entire mission. They do fit as the main bulk of a subwave, but they will only be enjoyable to fight if the support that comes with it is reasonable to deal with. Similar to how the last subwave of wave 3 Metro Malice plays out. I would also recommended putting crits on it only in later waves.

------------------------------

Armored Sandman Scout:
T_TFBot_Giant_Scout_Baseball_Armored


They kind of fit the same role as Steel Gauntlets due to their 3000 hp. They aren't great at killing people, but they're good at making room for other bots. But they also suffer the same weakness as Steel Gauntlets. They're very good early game, but they lose their effectiveness late game. Best to use them sparingly in early game to respect the damage output of the players, while you can go a bit wild with them late game.

------------------------------

Giant Bonk Scout:
T_TFBot_Giant_Scout_Bonk


These guys used to be scary, but with the latest Bonk nerf, they became a bit of pushovers. Same deal as with other giant Scouts really. Similar to Super Scouts, their ai is set to easy. Useful if spawned throughout the wave, or in rapid succession, or in bursts à la Empire Escalation. You can also use them in a way you'd use regular Bonk Scouts. They're only useful to deliver the bomb, outside that, they're kind of useless. Remember, Bonked bots can't capture gates. Also, their name is only "Scout" which I find lazy and lame. Don't be like Valve, name them by their real name: "Giant Bonk Scout".


- Guidelines on Giants: Soldier
Giant Soldiers


The most common giant class, but that's to be expected. Soldiers are highly customizable and very applicable, so it's only natural they're the most common giant. There are a quite a few official versions as well. Always used as the main bulk in a subwave.

Giant Soldiers also don't have a consistent hp value. Some have 3800 hp, while others have 4200 hp. There's also a version that only has 4000 hp. So yeah, don't ask me why this is the case.


Giant Soldiers:
T_TFBot_Giant_Soldier


These bots are basically your standard Soldier bot, except with 3800 hp, expert AI and the attribute "HoldFireUntilFullReload", meaning they won't fire until their clip is fully loaded. They aren't exactly threatening; just tankier versions of regular Soldiers. While I suggested a 50% damage increase for giant Scouts, I wouldn't recommend doing it here. Giant Soldiers do a good job at their intended role.

These bots only prove to be quite dangerous in early waves, when the team doesn't have the damage output to reliably take them out nor the resistances to fully tank a clip. They lose their effectiveness as the mission continues, since they only have the damage output of a regular Soldier. You can use them in funny ways though. For example, you can use them as squad members to protect another giant. You don't see it often a squad of five filled with giants.

However, if creating a lower difficulty mission like normal or intermediate, these bots do fit in that setting, even in later waves. They can introduce the newer players how a giant functions. They have all the properties of a giant, higher health, slower movement, but they don't have the biggest damage output. So they're perfect to put them in a fight against newer players.

------------------------------

Giant Charged Soldiers:
T_TFBot_Giant_Soldier_Crit


Again an oddball in the giant section. Like the Super Scout and giant Bonk Scout, this is one doesn't have their AI set to expert, instead it's set to normal. Back in the early days of MvM, crit bots were a rare occurance, so crit resistance was an upgrade you'd rarely buy. Introducing the giant Charged Soldier. A weaker version of the giant Soldier, with slower firing speed and slower projectile speed, but it has crits. Though very weak against Sentries.

Despite being weak, it can pose a threat. They're only really useful in early game when people still need to consider buying crit resistances or upgrading their weapons. Late game they kind of become "meh". Their entire premise consists out of the crits, so yeah, buy crit resistance and you've basically countered them completly.

Though, in Mannslaughter wave 2, they are put to good use. The entire wave consists out of crit bots, but they're all weak. Making the choice of buying crit resistances or not a hard one. So a perfect giant to use in wave 1 or 2, where people can't decide if buying crit resistance is a necessity or not.

------------------------------

Giant Rapid Fire Soldiers:
T_TFBot_Giant_Soldier_Spammer


Probably the more applicable giant Soldier out there. While it seems they have an infinite clip, their firing and reload speed have been modified in a way to give the illusion they have one. Instead they just reload and then fire straight afterwards very rapidly. Regarding their effectiveness they're a straight upgrade compared to their regular version, even if their projectile speed is significantly slower.

They're kind of the perfect bot to put in any wave. Though wave 1 with 400 credits might be too much, but if you use them correctly, they might just work in that scenario. In earlier waves it's best to put them with minimal support, they have enough firepower to push through by themselves. Though in later waves you're safe to spam them more rapidly, or use more support with them.

------------------------------

Giant Burst Fire Soldiers:
T_TFBot_Giant_Soldier_Spammer_Reload


There are two version of the giant Burst Fire Soldier. One has regular damage and no crits by default, while the other one has double damage and crits on by default. There are some additional differences, but they aren't significant enough to mention seperately. I'm going to talk about the former.

The non-crit version was used only in Metro Malice's first wave. But they're kind of in the same boat as the giant Rapid Fire Soldier, in that they're very applicable. In earlier waves they have sufficient firepower to break through the defenses with minimal support. But as the mission goes on, they'll need more support or spam to really push through.

------------------------------

Giant Crit Burst Fire Soldiers:
T_TFBot_Soldier_BurstFire


The crit version of the Burst Fire Soldier, with double damage on top of that. For some reason...
Anyways, going by that they have crits and double damage, it's safe to say that these bots are not suited for early waves. Unless you decide to spawn them all by themselves, in which case they should be doable, but I highly recommend not doing this.

Where can you use these giants? Well, thanks to their double damage, they are quite threatening throughout whole the mission. Valve uses this giant in a reasonable manner. Not a lot of additional bots so that the players can focus it down pretty quickly. A lot of money so that the players can atleast take it out reliably and tank a rocket or so. Double damage crit rockets can deal up to 540 damage without any resistances.


- Guidelines on Giants: Soldier (cont.)
Giant Soldiers

Giant Banner Soldiers: Buff Banner, Concheror and Battalion's Backup:
T_TFBot_Giant_Soldier_Extended_Buff_Banner


T_TFBot_Giant_Soldier_Extended_Concheror


T_TFBot_Giant_Soldier_Extended_Battalion


The same rules I said with the regular banner Soldiers apply here as well. Just because they have an aoe buff, does not mean that you have to use them everywhere. The giant Soldiers last longer than your regular banner Soldier, so they have the chance to buff other bots for longer. Unlike their smaller versions, you can't spam them too much since they're giants.

You'd use them in situations where they won't buff too many bots to the point of annoyance. Pairing the giant Battalion Soldier with Über Medics is also a big no no, atleast in my book, mainly because this prevents Sniper from doing his job and just makes Demos job overall harder. While it seems like a good idea knowing how fragile Medics are, I can guarantee you that it only annoys players. A giant Battalion Soldier with a giant Medic is alright as long as it's in reasonable situations. But this is such an overused combo that I don't really find them any fun anymore.

------------------------------

Colonel Barrage:
T_TFBot_Giant_Soldier_SlowBarrage


Despite the name, it's not a boss. Colonel Barrage is just a different Burst Fire Soldier. They spam 30 rockets as opposed to only 9, though the rockets have a pretty big spread to them as well as having only a 50% damage bonus. The Soldier also has a small health regen to it of 40hp/s. There's a Major Crits version as well, but these 2 barely have any difference to them that I'll just talk about 1 of them.

I like Colonel Barrage, there's just something funny about seeing 30 or so rockets coming your direction. They aren't exactly a threat since the rockets are easy to dodge, unless he's right in your face. It's adviced to use these bots in later waves. Mainly due to their spam. While the rockets are easy to dodge from afar, they add up pretty fast, especially if you use multiple Colonel Barrages. These bots are pretty compatible with a lot of different support bots.

------------------------------

Giant Black Box Soldiers:
T_TFBot_Giant_Soldier_RocketShotgun


Most likely the giant that can filter out the less experienced players. Giant Black Box Soldiers proof to be quite the tough nut to crack with your average players. Understandably so though. They have a healthpool of 4200 hp and fire a 3 rocket salvo that heals 1000 hp each on hit. Though the rockets only do half damage, so they aren't really designed to kill players.

The same that applies to regular Black Box Soldier applies here as well. Giant Black Box Soldiers aren't good at killing people, but as a trade off, they're excellent at staying alive. Thus they're great for carrying bomb or capturing objectives. If you plan on using them, make sure they're in a situation where there isn't a lot going on so that the players can focus fire them.

They're also really powerful early game, due to players not having the damage output to reliably take them out before they can heal. So be careful when using them early on, don't try to force the players using a Heavy solely to reliably destroy one. That's bad mission design. Though they also suffer the same downside as the regular Black Box Soldier. The more money the players got, the less effective the giant Black Box Soldiers become. They aren't great against Sentries either.

------------------------------

Giant Blast Soldiers:
T_TFBot_Giant_Soldier_RocketPush


Like the Blast Soldiers, these guys also have a knockback gimmick, making them quite annoying if you spam them too much. They fire 10 rockets at a reasonable fast pace with each rocket being able to cause quite some knockback. They aren't exactly the strongest of the bunch since they have a -25% damage penalty on top of the Liberty Launcher's already existing damage penalty. Dealing around 51 damage a rocket, which adds up if you have 10 of them.

Since they aren't exactly the greatest at killing people, or Sentries for the matter, it's better to add some support with them. They are great at carrying bomb or capping gates because they can keep the players at bay or prevent them from bodyblocking. Same as with the Blast Soldiers, you can pair them with Direct Hit Soldiers or Super Scouts.


- Guidelines on Giants: Pyro
Giant Pyros


Definitely the easiest giants, no doubt about it. Giant Pyros are just... there really. They don't pose a big threat. However, that doesn't make them useless. While it's true that their damage output is lackluster for giant status, they still have their spot.

Giant Pyros only have a 3000 hp healthpool, which isn't anything to write home about. It's still something, but it's kind of "meh". Especially for their absence of damage output.


Giant Pyros:
T_TFBot_Giant_Pyro


These giants still are still somewhat dangerous if used early game, but they quickly lose effectiveness in wave 2 and onwards. They can still catch players off-guard if used with other giants, similar to wave 4 Mannslaughter, but they're still rather easy. They're often best paired with Über Medics or a giant Medic late game to give them a chance to get in close range.

They also can function like a flank bot. Spawning in the second spawn when the players are busy camping the other one. Whether or not you should use "AlwaysFireWeapon" or not depends on the situation. They are very capable of reflecting the projectiles. Enabling crits is also something that doesn't really matter. Giant Pyros are too slow to really get into range, so they'll never utilize the crits.

------------------------------

Giant Flare Pyros:
T_TFBot_Giant_Pyro_Flare_Spammer


These giants do have the range to be dangerous, but they totally lack the damage output. If they were to use the Flare Gun, then it'd be a different story, but these are using the Detonator. Dealing only regular Flare Gun damage on minicrits. They do have a 70% faster fire rate, but that's still only like 60 dps, so yeah...

I wish I could use these giants more often, but they're so bad. You can use them on wave 1 to have a giant that tanks damage for a low team damage output. But other than that, they're not useful. Maybe as giant cannon-fodder, you can use them like that.


- Guidelines on Giants: Demoman
Giant Demomen


Giant Demos can be pretty strong if they land their pills correctly. However, they're easily outplayed by just strafe circling them. Since they're rather bad at predicting their shots, they can't reliably hit people who are running circles around them.

They're always used as the main bulk of a subwave. Be it either for spam power, or for tanking a lot of damage early game. The healthpool varies a bit between 3000 hp and 3300 hp.


Giant Rapid Fire Demomen:
T_TFBot_Giant_Demo_RapidFire


There are 2 giant Rapid Fire Demoman versions. The Demo_RapidFire version is a 3000 hp giant Demo that fires pipebombs 50% faster and waits for a full clip before firing. Giant Rapid Fire Demos are kind of a hit or miss, at least this version. They function really well in expert missions where money is low, but fall short on missions where money is plentiful.

The main reason for this is that their burst damage comes in form of spamming 4 pills in rapid succession. 4 pills are quite devestating when the players have little money to spend on blast resistance or building health. But they're quite easy to dodge. In order to prevent the players from succesfully dodging all their shots, you can pair them with threatening bots that discourages getting close to the giants. Bots like Pyros, Heavies, or even Demoknights.

------------------------------

Giant Rapid Fire Demomen:
T_TFBot_Giant_Demoman


The second version of the giant rapid Fire Demos. This one functions identically to the giant Rapid Fire Soldier. In the sense that they both have an "infinite" clip. This giant Demo has 3300 hp. I consider these to be stronger than the other version. But both have their different functions. The first version fires their clip faster, but the downtime is longer, while the latter fires slower, but the downtime is shorter. So they both have something going for them.

Same deal as with the other version. Their shots are easy to dodge the closer the players are. He can spam out Sentry nests quite effective. So best that you pair them with bots that kind of forces players to hang out around the Sentry nest while discouraging them from getting close.

------------------------------

Giant Demoknight:
T_TFBot_Giant_DemoMan_PrinceTavish


Quite a speedy giant. The Booties' 10% movement speed increase is actually quite significant for giants. Thanks to that bonus they're the 3rd fastest giant without any Eyelander heads, following giant Scouts and giant Shotgun Heavy. As mentioned, giant Demoknight are capable of collecting Eyelander heads, each kill granting 7% extra movement speed. Which is quite a lot for a giant. These bots are also really tanky for early game Soldiers, Pyros and Demos thanks to the shield resistances.

Giant Demoknights are only really threatening early game. Desperation wave 1 really shows this. Like the Steel Gauntlets, they're also quite capable of making room for other bots, or capping gates/carrying bombs. They become pushovers the further the mission goes on, especially when there's a Heavy on the mercs' team. If you're planning on using them effectively, use them early game. If you want to still use them lategame, pairing them with a giant Medic might just do the trick.

------------------------------

Giant Burst Fire Demo:
T_TFBot_Giant_Demo_Burst


Same deal as with any other giant Demo, easily outplayed when being circlestrafed. However, these giants have a lot of burst damage. Maybe not as much as the Burst Fire Soldier, but they've got a clip damage of 1100 damage. Which is quite a lot considering no fall-off damage. Their strength relies in their spam, they can easily spam out Sentry nests and whatnot.

Alone they're pretty weak, so it's better to pair them with bots that can cover them. Huh, seems like every giant Demo is pretty weak on its own. So yeah, bots that prevent the players from getting close to them, exploiting their weakness. Though do mind that this isn't necessary to do, you can spawn giant Demos alone if you want.


- Guidelines on Giants: Heavyweapons
Giant Heavies


Giant Heavies are the most dangerous of the giants. With their 50% damage bonus, which result in a max damage output of 810 dps, they can shred through almost anything as long as they focus fire it.

Though the downside of this damage bonus comes at a cost of having limited range, which is a vision range of 1200 hu.

These giants have an effective healthpool of 5000 hp, making them the tankiest of the giants as well. An interesting fact about giant Heavies is that they're not effected by the slowdown of the Minigun spin-up.


Giant Heavies:
T_TFBot_Giant_Heavyweapons
T_TFBot_Giant_Heavyweapons_BrassBeast (unused)
T_TFBot_Giant_Heavyweapons_Natascha (unused)

There are 3 giant Heavy versions, one with stock Minigun, one with Brass Beast and one with Natascha. All 3 of have a 50% damage bonus, including already existing damage bonusses/penalties. Only one is really used, which is the stock Minigun one. I don't really see the need in the other 2. Brass Beast might work, but it has the 20% damage resistance when below half health and they don't suffer from the slower move speed when reved up. Giant Natascha Heavy is best avoided, they are quite annoying to fight against.

Giant Heavies are quite strong and often have enough firepower themselves to break through defenses in early waves. In later waves they require more support. That giant healthpool of 5000 hp becomes weaker and weaker the longer the mission goes on. Anything can be really used with giant Heavies, be it either standard bots or other giants. Just make sure that the players don't get overwhelmed.

------------------------------

Giant Deflector Heavies:
T_TFBot_Giant_Heavyweapons_Deflector


Giant Deflector Heavies are a straight upgrade from their regular counterpart. They're kind of in the same spot really. You're not always sure which one is better suited for the situation. Giant Deflectors sort of have better tankiness, but it's rather miniscule.

Though they do have a significant impact when paired with Medics, be it either regular Über Medics or giant Medics. Medics can be destroyed without popping them reliably with burst damage and most burst damage comes from projectiles, which Deflectors counter.

I think Valve as well didn't have a clear idea on when to use giant Heavies or when to use giant Deflectors. Since they rather switch inconsistently. You mostly have to figure out what feels better in said situation. Even after 3 years, I still have no clear idea when one is better used than the other. Though giant Deflectors are slightly more difficult to take down, but that's dependant on the team composition.

------------------------------

Giant Heal-on-kill Deflector Heavies:
T_TFBot_Giant_Heavyweapons_HealOnKill


Valve's rather lazy way of making giant Heavies more durable. It's no secret that giants become less and less threatening the longer the mission goes on. What were often walking robots of doom in wave 1 are only a cakewalk in wave 6. So Valve's answer to this was to make them able to survive longer by slapping a health on kill mechanic on them. I find this tactic to be lazy and unoriginal. You either use the giants in a smart way, or you don't.

There's a difference between the regular version and the gatebot version. Regular versions have 5000 hp, 1200 hu max vision range and 65% slower move speed. Gatebot versions have 5500 hp, 1600 hu max vision range and 60% slower move speed, as well as a slight lower rage giving scale.

Though this health on kill does come at the cost of only a 20% damage bonus instead of 50% and slightly slower movement speed compared to the other giant Heavies. Personally, I'm not a fan of these giants and I'd rather avoid them. You could use them in earlier waves to make them atleast somewhat threatening, but in later waves they really don't pose a threat at all.

------------------------------

Giant Heater Heavies:
T_TFBot_Heavyweapons_Heater


Did you know, giant Heater Heavies weren't introduced in Two Cities, but instead they appear in one wave of Doe's Doom? Two Cities popularized their usage. Anyways, there's a bit of a difference between the giant Heater Heavies. The gatebot version has a 20% damage bonus, while the regular version has no damage bonus at all.

No idea what's that about. Though, I don't see why you wouldn't add a 20% damage bonus to the regular version, they already have the damage penalty against non-burning players. These giants are also the only giant Heavy bot who don't have a max vision range.

Giant Heater Heavies are kind of a downgrade compared to regular giant Heavies. The ring of fire isn't that big of an issue considering how slow a giant Heavy is and Spy can easily avoid it. It's best to pair them with Pyros that are capable of putting the players on fire to give the giant Heater Heavies the damage bonus against burning players.

------------------------------

Giant Shotgun Heavies:
T_TFBot_Giant_Heavyweapons_Shotgun


Giant Shotgun Heavy are the 2nd fastest giant. This is thanks to their 30% movement speed penalty compared to the usual 50% all the other giants, bar Scouts, get. These giants fire 100 shots at a time, but with a 50% damage penalty, resulting in an overall damage output of 450 damage per shot. But they fire at a really slow interval. Also, they're capable of deflecting projectiles... I think.

Being the 2nd fastest giants in conjuction with having massive burst damage of 450 damage, it makes them quite the dangerous bot. Similar to giant Heavies, they have enough firepower to get through defenses, especially in early waves, maybe not as much later waves. They work really well if you have other bots occupying some part of the players.

------------------------------

Super Heavyweight Champs:
T_TFBot_Giant_Boxing_Heavy (unused)


Another unused giant template from Valve, no idea why this one wasn't used since it seems solid. Super Heavyweight Champs are giant KGB Heavies with a 40% faster swing speed and a 20% damage bonus. Though, since they're only melee restricted, it is to be expected that they're only useful in earlier waves since they lack the damage output to be any threat later waves.

I've never used this bot before. But since it can be easily outranged, I can definitely see them work as a flanking bot. 5000 hp is a lot of damage to put out early wave when not everyone can focus fire it. So yeah, you can use them on a flanking spawn along with other bots keeping the players busy.


- Guidelines on Giants: Medic
Giant Medics


Giant Medics are giants use to "add" an additional 4500 hp on top of the healthpool of the giant you're pairing the giant Medic (or whatever you're pairing the giant Medic with).

These giants are capable of increasing the difficulty quite significantly, well, mostly depends on which version you use. There are 2 different versions of giant Medics and they function identically to eachother aside from one big thing.


Giant Medics:
T_TFBot_Giant_Medic


Giant Medics were introduced in the update that introduced expert Gear Grinder to the game. These guys have 4500 hp and an outstanding +1990% heal rate, making the patient practically invincible aside from a crit sticky trap. Though, this version is able to pop their Quick-Fix über.

It'll pop it when its hp drops beneath 54 hp, so there is some leeway in trying to kill the giant Medic before it pops. When popping, it regains all its health back and makes itself and its patient immune to any damage and knockback for 8 seconds. Granting the ability to push without any resistance.

When should you use giant Medics? As I said before, giant Medics just add an additional 4500 hp on top of the giant they're pocketing, because the giant is immune to any damage unless the medic is killed first. Giant Medics are a bit too powerful early wave. You can use them in that setting, but the map has to be long enough so that one pop doesn't result in an automatic loss, like in Decoy or Mannworks.

NOTE: Don't use giant Medics on giant Scouts, it's horrible...

------------------------------

Giant Regen Medics:
T_TFBot_Giant_Medic_Regen


Giant Regen Medics are a different version. You can recognize this version by their hat they're wearing. They also heal at an absurdly high rate to grant its patient invincibility. But they're unable to pop. They have a 95% slower über build rate, meaning they'll never get an über ever. Unless you use "SpawnWithFullCharge", but don't do that. To give them some sort of bonus the other version doesn't have, they regenerate health at a rate of 40hp/s. Which isn't really a lot, but it's still something.

Why should you use this version over the other version? It's clear that the popable Medic is way more dangerous and applicable than the regen version. Giant Regen Medics are a great way to buff giants without adding too much difficulty. They're just a flat out 4500 hp buff to the giant and there's no risk in popping them.

So use them if you don't want the giant to get too much pushing force, but still want it to be more dangerous. These Medics are also good early game compared to the popable version. But they kind of become a grind in later waves due to how insignificant said healthpool becomes for late wave teams.

NOTE: If you plan on using giant Medics in a wave, I would suggest on not using Engineers with teleporters during that wave. Speaking from my own experience.


Tank Guidelines

Tanks are a rather peculiar entity. They're the only MvM entity that can scale properly in difficulty regardless of wave number. They can be a challenge in wave 1, while in wave 7 as well.

The best definition I can give to a tank is a DPS test. They're neither support nor the main force of the wave. Their sole existance is to be a ticking timebomb and to test the players' DPS.


Tanks:
template see below*


Tanks are entities that travel a set path that's decided by the map. They travel at a certain speed and a predetermined health value. These values are variables and thus can be changed. Tanks travel at a default speed of 75hu/s. While their health value can range in official popfiles from as low as 10000 to as high as 60000.

The health value you want to use mostly depends on the map and role you want to use said tank for. That's right, for as simplistic as a tank can get, you can give it different roles. As an example, the tanks on wave 4 Desperation are kind of a test to see if players can deal with it as fast as possible, if not, they can be punished heavily for it. While the tank on wave 2 Broken Parts forces the mercs team to split into two groups. One to deal with the tank, the other with the giant Heavy/Medic combo.

Tanks with lower health tend to mostly be a dps race, while tanks with higher health tend to be more orientated towards splitting up the players. Ofcourse this is dependant on the amount of money the players have. You also have the factor in the map and what weapons the players are using.

For example, you don't want to put a 40000 health tank on wave 2 on a map like Decoy or Mannworks. The reason why this works on Bigrock is because the map is twice as long as those two.

Now the weapons, just because a tank dies faster than you'd expect, doesn't mean it's a bad tank. Look at the weapons the players are using.

If the Pyro has a Phlog equiped, or the Soldier has Beggar's Bazooka along with Buff Banner, then it's only natural the tank dies faster. Don't go buffing the health of the tank all willy nilly, because next time the mission is played and the Pyro is using the Stock Flamethrower, or the Soldier is using the Stock Rocket Launcher, then all of the sudden the tank becomes too much. You DON'T want to enforce Phlog, Bazooka or crit canteens to destroy a tank. Bad mission design 101.

The usage of the tank is quite applicable. It's generally not adviced to spawn a tank by itself, because it's mostly a boring grind. But I don't mind this as long as it's used properly. You can spawn a high health tank with minor support, or with a small burst of strong bots. Or you can spawn a low health tank with other dangerous bots to reduce the grind a bit.

Here's an example of an expert mission of mine:

Wave 5 of Quetzal expert: Scorched Syntax

I spawn a 32000 health tank, which is pretty reasonable for expert. I use this tank to force one or two players from the team to go after it. While they're taking care of the tank, there are giant Heavy/Medic combos the other four players need to destroy. I know for a fact that these combos wouldn't that difficult to take care of if there were six players focussing them down. So I added a tank to make the wave more difficult. A clever usage of the tank without making the wave a grind.

------------------------------

Now that's all fine and dandy, but how do you add a tank?*
Tank wavespawn

A tank needs to be placed inside a wavespawn in order to make it work. You can name the wavespawn of the tank in here as well as all the other things, like credits, how many, etc. Do make sure that you only spawn 1 tank at a time though. Multiple tanks inside eachother isn't professional.
  • Health: How much health the tank has.
  • Name: The name of the tank that is used for relays. Using the name "tankboss" is often advised to make sure the tank explodes after planting the bomb for a visual effect.
  • Speed: The speed the tank travels at in hu/s.
  • Skin: Uses the alternate skin for final tanks. It can be left out if it's not the final tank.
  • StartingPathTrackNode: The node the tank starts at. This is very important to get right. An invalid value could spawn the tank at the hatch. This is one of the starting nodes for Rottenburg.
  • OnKilledOutput: Relay that gets activated when the tank is destroyed.
  • OnBombDroppedOutput: Relay that gets activated when the tank deploys the bomb.


Image of the final tank skin. Also indicates what tanks are gatetanks in the map Area 52.

------------------------------

As a small trivia. There's an unused icon that was supposedly meant for a blimp:

What the purpose of the blimb was exactly, no one knows, other than Valve. Many suggest that it was supposed to be a replacement for the tank in the map Mannhattan, but that's just a theory.


Support Usage
Introduction

Now you might have noticed that I used the word "support" a lot in recent sections. I don't mean the typical support that are labeled as such in the wave display. By support, I mean the bots you'd use to sort of aid the main bulk of the wave. This can count as infinite support, but not always. Regular wavespawns that count toward wave completion can be used as support as well.

Over my years of playing custom missions, I came to the realization that support usage and custom bots can make or break the mission. Wrong usage of support bots can make the wave a frustrating job. Custom bots revolving around specific gimmicks/counters can leave a sour taste in the mouths of some classes.

------------------------------

Recognizing support

So when does qualify something as support? That's the question we have to ask ourselves first before we start on this subject. Certain bots can be seen as support when their presence and pushing power is minimal. You can easily notice when something is/isn't support by following criteria:
  • Are bots able to survive long enough to be of any threat?
  • Are bots able to push through defenses by themselves?
If the anwer is yes to any of these questions, then your bots aren't support. The point of support bots is just that, to support. This is a common rookie mistake where people think that every single bot that spawns needs to be able to break through the defenses. This is far from true. Support bots are there to divide the players' attention so that it's less easy to focus fire the main bulk of the subwave. Thus aiding the strength of the subwave to survive longer and cause some havock.

It's not to say that support bots can't kill any player whatsoever, no. They can kill players, but you need to make sure it feels like it's the player's fault for dying and not the absurdity of the support bots. For example, dying to a continious stream of Minigun Heavies who are supposed to be support bots is a lot more unfair than dying to a couple of KGB Heavies.

------------------------------

Types of support usage

There are two main ways to use support bots. You can either spawn them in streams or in bursts. The difference in the two is that the former spawns bots in small amounts at a small time interval, let's say like 2 bots per 2 seconds for a total of 12 bots MaxActive. The latter spawns more bots, but at a larger time interval, like 8 bots every 15 seconds with a MaxActive of 8.

From personal experience, most people tend to lean more in the usage of stream support bots. While this isn't wrong to do, they use the wrong bots for it most of the time. Stream support usage often fails miserably. Bots you can use in such way should normally be fragile or melee restricted. Though, I must admit that the skill level of the bot also plays a huge part in this. Ten easy AI Heavies in a stream are more enjoyable to fight than ten hard AI Heavies. But remember that the support bots shouldn't be able to push through defenses and that they shouldn't feel like a grind.

Now the other type is burst. This one is more enjoyable to fight and is way easier to get right in my opinion. The reason for this is that burst spawns are easier to counter than stream spawns. Stream spawns exploit the weakness of reload times, fire intervals, health and ammo replenishment, etc. While burst spawns are more tolerable for this. It's also more satisfying to destroy 8 Soldiers in one go than 8 Soldiers total that spawn in groups of two. Which may or may not be a factor in why I find them more enjoyable.

Now the reason why burst support can also be more preferable, is that way, you can also use infinite support more flexibly. If used right, infinite support can be used as main bulk. You heard me right, as main bulk. Though there are some adjustments to make before this can be realized in a fun and enjoyable manner.

For example, you spawn a squad of 12 Soldiers and their job is to break through the defenses. They accomplish said task and they made room for other bots to go through. But the Soldiers die immediatly after. It's not the point to immediatly spawn another batch of 12 Soldiers right away, because this will result in a steamroll untill they arrive at the hatch. This isn't the definition of a fun time for the players. Since they aren't allowed any time to regain some ground. This wouldn't be possible with stream support.

------------------------------

Wrong bot compositions in stream spaws

I could explain what bots are more preferable to use in stream support. But I think it'd be easier to explain what not to do/use in stream support. As I said before, stream spawns are most of the time an absolute disaster to go through and could possibly ruin the experience of the mission, atleast from my experience. You want the missions to be memorable for good reasons, not for bad ones.

As an example, let me use a custom wave that left me a sour taste in my mouth. Do note though that this is not me trying to make the creators of this mission look bad. I'm just using this as a prime example of what to avoid when making your own missions.


You can see, there isn't a lot to deal with when it comes to beating the wave. Just three giant combos and a couple of regular bots. However, the support is what makes this wave terrible. All this support spawns in streams throughout all the wave mind you. Even the Spies spawn infinitely, they aren't used in missions.

As our first support bot, you can see we have Battalion Soldiers. This is already a bad start since infinite Battalion Soldier spam throughout the whole wave already punishes the usage of certain weapons, like Fan o' War, Kritzkrieg and Buff Banner. And makes the job of Soldier, Demo, Engineer and Sniper harder. On top of that, it buffs all the bots around it with a 35% resistance to all damage and 50% to Sentry damage.

As second bot we have crit Phlog Pyros. This isn't exactly too bad, but this does make playing as Pyro and Scout unfun. As third bot we have Spies, infinite Spy spam. This makes Heavy, Engineer and Sniper really unfun to play as. And as last, we have Mad Milk Scouts. In conjunction with crit Pyros, this makes Spy and Pyro even more unfun to play.

With these four bots active all the time in large numbers, it's almost impossible to push back when there's time inbetween giant combos. This means that the bots are capable to survive long enough to be threat, thus disqualifiying them as support bots. These four bots also make the job of 8/9 classes harder and/or unfun. So what this wave accomplishes is to give a difficult challenge at the cost of enjoyability. Which is something we want to avoid doing as mission creators. The mish mash of bots makes the wave unstructurized to play as well.

How can we fix this wave? For starters, we can structurize the support more, by removing 2 support bots. Which ones we can remove is dependant on the situation, but here it's quite clear. Battalion Soldiers and Spies make for a pretty unenjoyable experience for most of the players, so removing them would make the wave more tolerable. We could also limit the spawn interval of Mad Milk Scouts while increasing it slightly for the Phlog Pyros, making Spy's and Pyro's job slightly easier to do. Doing these things will certainly make the wave overall more enjoyable.

Things to keep in mind when designing a wave with stream support:
  • Bots need to spawn in a pattern to make the wave more structurized. A mish mash of 4 different support bots isn't exactly organized.
  • No need for too many different bots, a clear view on which bots spawn is needed.
  • Avoid Battalion Soldier spam at all cost. This is a cheap way to increase difficulty and doesn't fix the problem at all.


Custom Robots: Guidelines
Do's and don'ts when designing custom bots

When designing your own custom bots, there are a few things to consider. First things first and probably the most important thing: Don't use custom bots for the sake of using custom bots! When people start to design their own first few missions, it's almost a guarantee that it's filled to the brim with custom bots. Even I'm guilty of this. But this isn't necessary in the slightest.

A custom bot is mostly made to fill in a niche that other bots don't fit in. A good mission designer finds a good balance between the usage of custom bots and standard bots. Just because you have the possibility to use a lot of custom bots, it isn't necessary to do so. The official bot roster is already diverse enough to make an enjoyable mission out of it.

For example, my advanced Sequoia mission uses only 9 custom bots throughout 7 waves, while my expert Quetzal mission only uses 6 throughout 7 waves. And I consider them to be two of my best missions I've ever created. Even a lot of people find those missions enjoyable.

So when you start to create your own bots, take these things into consideration:
  • Is the bot enjoyable to fight against?
  • Are the bot's mechanics easy to read?
  • Is the bot consistent in comparison to other bots?

  • Enjoyability

    First point is obvious. The bot has to be enjoyable to fight against, otherwise people won't like it. You can't have a Soldier bot that deals 1000 damage per rocket and defend its existance with the excuse of: "But it's a challenge!" No, there's a difference between a challenge that is fun and made in a smart way and a challenge that just throws stupid bots at you that are totally unfair to fight against.

    A bot shouldn't be designed to counter a specific class in mind. You can have bots that are harder to deal with as a certain class, but that's to be expected. This is after all a class based shooter, so there's bound to be matchups that favour one class over the other. However, putting a Razorback on a giant because otherwise it's too easy dealt with by a Spy is a stupid design choice.

    Or using the Battalion's Backup on a bot because Sniper and Phlog Pyro are too strong against. This is why I'm not a fan of full Vaccinator resistance Medics, since they counter certain team compositions. Avoid these situations. Classes are designed in a way where they shine in one moment, but fail in an other one.

  • Readability

    Whether or not the bot's mechanics are easy to read is a factor in deciding if the bot is good or not as well. Higher health standard bots are easy enough to know they have more health thanks to being bigger. Far too often I see people increasing bots' hp without making it obvious. How am I suppose to know that that Medic has 300 hp when it is the regular Medic size?

    When I see a robot fire its weapon and it hits me, I should already get a vague understanding of what its niche is. When I die to it, I should be able to tell what it is. Far too often I die to a custom bot in a mission and I have no idea what the purpose of the bot is. I sometimes even have to resort to the mission creators themselves to ask what the gimmick of the bot is. This shouldn't happen in the first place.

    Weapon recognition can also help tremendously in reading bot mechanics. If that Soldier bot is using the Black Box, I can safely assume its mechanics are health related. If that Heavy is using the Fists of Steel, I'm 100% certain its mechanics are related to tanking a lot damage of the players and that they're possible suspectable to melee damage. Icons are used this way to help clarifying the mechanics of the bot as well. But custom icons are getting their own section.

  • Consistency

    Bots should be consistent compared to other bots of their caliber. For example, giants mostly have a consistent healthpool regarding a certain class. 3000-3300 hp for giant Pyros and Demos, 3800-4200 for giant Soldiers, etc. This makes sure that giants have a sort of consistency to them. So don't go increasing/decreasing the healthpool of giants willy nilly. No one likes 2000 hp giant Soldiers, or 4500 hp giant Demos.

    Yes, giants aren't that threatening anymore in late game. But that isn't an excuse to give a giant Heavy a healthpool of 8000 hp and call it "Giant Armoured Heavy". No, that's just cheap. Just accept the fact that giants become weaker the more money the players have. If you want a stronger giant, create a boss bot. I am aware Valve is guilty of this with the giant Armoured Sandman, but just because they do it, doesn't mean you should do it too. Besides, the giant Armoured Sandman has increased hp at the cost of slower movement speed, so there is a downside to it.

    Also, adding health on kill on giants is a lazy way to increase their survivability. If you do planning on using said mechanic, consider adding an additional downsides to the giant. Like, even slower movement speed, or less damage compared to other giants. But I just wouldn't advise on doing this. It's a rather cheesy buff. It inflates damage numbers and removes the consistency between giants. The only time I can sort of see this is being acceptable is when the bots use a weapon that has a health on hit/kill mechanics in PvP.

Custom Robots: Robot Types
Now that you know what you need to consider when designing your own custom bot, why don't I show a couple of examples of some various custom bots. Standard bots, gatebots, giants, even bosses. This should give you a good idea at how they look like in population form.

I'll show an example of a simple weapon change bot, a more complex custom bot and a common giant bot, which are those Samurai Demos or Steel Gauntlets.

Standard bots

A simple Heavy with the Huo Long Heater, easy to understand.


A functioning Kritzkrieg Medic with a custom icon. A bit more complex. It has way longer über duration to guarantee it never runs out and it pops its crits when it's under 200 health, but since Medics only have 150 hp, it means it'll pop it as soon as it spawns.


A common giant. A middle ground between the small Jumping Sandman and the giant version. The tag "bot_giant" is used for bots to make them immune to gate capture stuns. Remind it to put it on custom (common) giants that are used in missions on maps with gate captures.

------------------------------

Giant bots

A giant version of the Steel Gauntlet, works identically to a giant KGB Heavy except it wields Fists of Steel instead of KGB.

NOTE: In order for bots to have the giant attributes, like not getting bomb upgrades, not being one shot by backstabs, etc. You need to give it Attributes MiniBoss. This is very important!

------------------------------

Gatebots


Way more complex than a regular bot. This is a Crit-a-Cola Scout that will go for the gate captures. Gatebots need to have the tags "bot_gatebot" and the nav_prefer to the gate, along with the BehaviorModifier "push". On top of it, it needs to have the attribute "IgnoreFlag", so it won't go for the bomb and won't be able to pick it up. And ofcourse it'll need to have the gatebot hat to indicate it's a gatebot.

Default refers to the standard behaviour of the bot when it's a gatebot. RevertGateBotsBehavior refers to the behaviour of the bot when the gate is captured. So after the gate is captured, it'll lose its tags along with its BehaviorModifier and its IgnoreFlag attribute. Its gatebot hat will also no longer emit a bright light.

------------------------------

Boss bots


Bosses are more or less beefier versions of giants. This one has a healthpool of 50000 hp. What healthpool to use mostly depends on the length of the map and the amount of money the players have. Bosses should have the attribute "UseBossHealthBar", which will display its health on the hud.

This boss' gimmick is that it's basically a Rapid Fire Demo, but its fire rate will increase the lower its health goes. It's important to give bosses "rage giving scale" set to a value like "0.1". This will make sure items that require damage to charge up (eg Phlog and Buff Banner), will charge way slower when dealing damage to this bot. Health regen is an option, but isn't required.

Also, I'd appriciate it if you didn't copy this boss for your own mission.


Custom Robots: Examples
Reliable custom bots

So there are a couple of bots that are reliable enough to use consistently within missions. You have custom bots that are just simple weapons changes, like Iron Bomber Demos, or Tomislav Heavies. These are rather easy to make, but aren't that much different than their regular counterpart. Nothing wrong with using these though, but do remember that using them for the sake of diversity is a bad decision as a mission designer.

NOTE: Scouts using Pistols on hard/expert AI are way, way, way stronger than you'd expect. Use them carefully, especially in early waves.

Then there are bots that are different versions of already existing bots. You have a Steel Gaunlets, so why not make giant Steel Gauntlets? Or you have a Bowman, no reason to not make a giant Bowman. Although giant Bowman are rather weak. You can do it vice versa as well, you've got giant Charged Soldiers, you can easily make them as a regular version. They're even quite fun to use as a spam bot. Or why not a standard Burst Fire Soldier? Quite a few options.

As last I want to talk about some bots that you can commonly see throughout your custom MvM adventure. I use these bots myself as well, aside from the Vaccinator Medics, since they offer a nice change of pace, while not being all too different from their regular counterparts. Or not being too strange for the players to understand.

Icons come from Potato's MvM servers.

Crit-a-Cola Scouts:
scout_cola


Crit-a-Cola Scouts are pretty self-explanatory. The versions I use, have a 50% increase in recharge rate for the CaC. Mainly because 22 seconds is rather long time. Though, this isn't necessary. They either use the Stock Scattergun or the Bat in my versions.

The Bat CaC Scouts are mostly cannon-fodder, they don't pose any threat. The Scattergun CaC Scouts are more dangerous. They're in the perfect spot where if you don't want to use regular Scouts, but also don't want to put crits on them. Do remember that with the nerf to the CaC, Scouts get marked for death when they shoot.

I like to use cola scouts during early waves, where players won't have enough money for crit resistance. This let's the scouts pose as a real theat, without being too overbearing. Around later waves you can start using crits instead, as players should have crit resistance by then. You can use a giant version of this. If you're planning on using one with the Scattergun, make sure to add the 50% damage bonus similar to the giant Scout section.


Dragon's Fury Pyros:
pyro_dragon_fury_swordstone


A rather simplistic bot. A regular Pyro with the Dragon's Fury. Though they don't posses the ability to reflect projectiles. They're very applicable, you can use them in situations where you'd use regular Pyros otherwise. It's advised to put a max vision range on them, something like 800 hu.

The reason for this is because Dragon's Fury projectile is really unoptimized. Firing 1 fireball in PvP can already be an issue to some people. Imagine a situation where dozens of Pyros fire one at the same time. It'd seriously lag out some people's games. This is too prevent Pyros from spamming fireballs from across the map. A giant version can be quite useful. But its damage output would be rather low, so as a buff I'd suggest to increase the Dragon's Fury damage by 50%.


Gas Passer Pyros:
pyro_gascann


pyro_gascann_explode


Gas Passer Pyros are nice for when you want a little extra damage to a wave. The nice thing about the gas passer is that it can be customized in various ways. Here is an example of a basic gas passer pyro:


The "item_meter_charge_rate 0.5" allows the pyro to instantly regenerate the gas can, while the "fire rate penalty" determins how often the pyro will actually throw the gas can. The lowest you should ever set the fire rate is 2.5, as anything lower can become a nusance. If you intend to add special effects to the gas passer, you should increase the number by an aditional 200% (2.5 -> 4.5), as you don't want to spam players with constant hazards.

There are three main ways you can change how the gas passer functions.
  • You can give it "applies snare effect" 0.1 to make all players hit by the initial gas cloud become slowed, similar to the slow down on mad milk. This attribute should be used sparsely, as players hate being slowed down by any means.

  • You can give them "explode_on_ignite 1", which gives them the Explode on Ignite upgrade. This should never be used without a clear indication that they have this upgrade, and there should never be more than one eoi pyro active at a time. Any coated player will take an unavoidable 350 damage, which has the potential to wipe an entire team with a single shot. Honestly, the only reason I mention these is so that you understand that they should not be used unless you are very carefull with them.

  • As an alternative to using the eoi upgrade, you can change the duration and damage of the afterburn the gas passer applies with these attributes:
    • "weapon burn time increased"
    • "weapon burn time decreased"
    • "weapon burn dmg increased"
    • "weapon burn dmg decreased"
    This way, you can have gas passers that deal moderate ammounts of damage without being completely overkill. Do note that if a player is already on fire, any afterburn durration attributes will not be applied, but afterburn damage attributes will be applied. The best way to avoid this anoying bug is to not use bots that apply afterburn along side these pyros.
A way that I like to signal which type of gas passer the pyro has is to give them The Rusty Reaper, and apply a certain color to it using "set item tint RGB". For example:
ItemAttributes { ItemName "The Rusty Reaper" "set item tint RGB" 12073019 //red "head scale" 1.28 }
This will give the pyros a large red head.


Custom Robots: Examples (cont.)
Kritzkrieg Medics:
medic_kritz


I like these bots a lot. The way these Medics work is that they have a sort of infinite übercharge and that their pop threshold (hp threshold when Medics decide to pop, default is 54) is higher than their max hp value. They can critboost a certain bot indefinitely. You can do this to increase the difficulty in earlier waves. But you might be wondering: "Why not just use AlwaysCrit?" The reason for this is that unlike AlwaysCrit, there's counterplay to Kritz Medics, which is why I don't find them as cheap as opposed to the crit attribute.

A giant version would work similarly to a giant Regen Medic. They empower the healing target, but they don't have any means to survive themselves. They're just a 4500 healthpool addition with crits on top of that. I must admit, I use these quit a lot and I have no clue why.


Shield Medics:
medic_shield


These bots function a bit like über Medics. They make the bot invincible, but only from a specific angle for a longer period of time. In all fairness, you better use these bots sparingly. Not because they're bad, but more because they're a bit buggy. Medic Shields can mess with bot navigation, regardless of team.

Be it either the red Medic blocking bots with it, or a bot Medic blocking his own bots with it. Due this, bots can get stuck in narrow doorways, so yeah. Don't plan on using 5 or so at once. Giant Medics are more suited for Shield Medics. Mainly because they appear less frequently compared to regular Medics.


Vaccinator Medics:
medic_bullet


medic_blast


medic_fire


Personally, not a big fan of these. But since they appear frequently enough in custom missions, I might as well talk a bit about them. There are 2 types of Vaccinator Medics. Those who block all incoming damage from the damage type they're resisting. And those who block a large portion of the incoming damage of said damage type. I'm less annoyed by the latter since there's still some counterplay to them. But those who block literally all damage punish certain team compositions.

The best way to use them is to pair them with bots/giants while there aren't a lot of other bots around. That way, certain classes that have a damage type that isn't blocked by them can still reliably kill them. For example, if there's giant Heavy pocketed by 3 Blast Vacc Medics and the players have a team compositions that consists out of 1 Engineer, 1 Pyro, 1 Scout, 1 Demo and 2 Soldiers.

Those Blast medics already counter 50% of the players. So it's up to the Pyro to take care of the Medics, but there are a dozen of Pyro support. How is the Pyro supposed to take out the Medics? You see what I'm getting at here? Account for different team compositions, don't force the players to run a certain team composition to counter the Medics. Also, only use triple Vacc Medics if there's a reliable way to counter them.

Same deal goes with giant Vacc Medics. Giants are often countered by Heavy, since Heavy appears in most team compositions. So if you're planning on using a giant Bullet Vacc Medic, be very careful to not enforce the usage of a Spy to take it out reliably.


Custom Robots: Icons
When to use a custom icon?

Now that we've gone over how to properly create a custom bot and a couple of common custom bots. How about we going to go over the usage of custom icons? This will be a rather short section. Custom icons are used in a way to give more information about the bot composition that is coming. Pretty self explanatory.

But when should you use custom icons? From personal experience, custom icons are only necessary if the bot using it is mechanically different from the rest. For example, giant Heavies and giant Deflectors are fundamentally different. If both were using the same giant Heavy icon, there'd be confusion. When looking at the wave display, you won't know if it's going to be a giant Deflector Heavy, or just a regular giant Heavy.

Now in these situations I find a custom icon unnecessary. You have a Flare Gun icon for Pyros that are using a Flare Gun, but is it really necessary to use a custom Detonator icon if the Pyro is using a Detonator? In my opinion, no. However, is it bad to use a custom icon for said Pyro? No, it displays more information regarding the bot. But there won't be any confusion when people see a Detonator Pyro that's using the Flare Gun icon. Scorch Shot Pyros use it, so it's fine in my book.

Same goes for Soda Popper Scouts. It'd be neat if it had its own custom icon, yes. But it's far from necessary. Stock Scout icon will already display enough information about the Soda Popper Scout. It won't function any different compared to a Scout using the Scattergun. It'll still be a Scout with 125 hp that will shoot at people with its primary without any additional gimmicks.

Now as a custom bot example:
As you can see, this giant Soldier functions similarly to a regular giant Burst Fire Soldier. The only difference is that it fires in salvos of 4 rockets instead of 9 rockets. So it fires shorter burst salvos, but at a faster time interval. Is it necessary that this custom bot uses a custom icon? No, not at all. The mechanics of this bot almost overlaps those of the bot that it tries to mimic.

The players won't be confused, they'll understand that it's a Soldier that will fire in bursts with this icon:
soldier_burstfire


Even though Valve pretty much nailed it with the bot icons. There are still some bots left I wish had different icons. For starters, the giant Regen Medic could have a custom icon. Yes I know it has a hat on while the regular giant Medic does not. But you basically will never know it isn't able to pop, unless someone who knows tells you, or you look up the template of the giant Regen Medic. This is bad design. But atleast there's a hint to know they're a different version.

Now onwards to the giant Rapid Fire Demos. As I said before, there are 2 versions, both with the same name and same icon. The giant Rapid Fire Soldier uses its own icon that explains rather well what the mechanics of this bot are, so why can't the giant Rapid Fire Demo, T_TFBot_Giant_Demoman, have the same thing?

This is just a suggestion, but whenever you use the template, T_TFBot_Giant_Demoman use this icon as well for clarity:
demo_spammer


How to use custom icons?

That's all fine and well, but how do we give custom icons to bots? Well, for starters, we need to have custom icons. Potato's MvM community has a couple of good ones, leaning towards Valve quality. They are automatically downloaded when you join one of their servers. Custom icons go in the folder .../tf/download/materials/hud. Now that you have a couple quite a large amount of custom icons, we can use them.

Simply put the name of the icon, bar "leaderboard_class", into the section of ClassIcon. If it's done in a wrong way, you'll notice it right away with the bot being displayed as a checkerboard in the wave display. Custom icons are vtf files (Valve Texture File). In order to open these, we need a program called VTFEdit and can be downloaded here[nemesis.thewavelength.net]. This way you can check what the icons look like before using them

With VTFEdit, you can also implement your own custom icons. But since there are so many custom icons in Potato's MvM community, I don't see the need anymore to make icons yourself. There's a custom icon for everything already.


Using the Right Map
How map design impacts mission design
  • Spawnpoints

    It's no one's surprise that map design does impact how a mission plays. There are several things to consider when trying to make a mission for a map, be it either an official map, or a custom one. The first and formost are spawnpoint names.

    Different maps have different spawnpoint names. Rottenburg has the spawnpoints "spawnbot" and "flankers", while a map like Coaltown has the spawnpoints "spawnbot" and "spawnbot_giant". So if you're making a mission for a certain map, make sure you're using the right names. To be sure you have the right names, you can always check a popfile that is used for said map.

    The placement of the spawnpoints is also important to take into consideration. Coaltown's spawnpoints kind of blend together into this one path. so you can be a bit more lenient towards using which bots for which spawnpoint. The different spawnpoints still serve their purpose, but their placement comparison isn't as impactful as, let's say Mannhattan.

    Mannhattan's original spawnpoints are way different when you compare the 2. The top one gives bots a height advantage but at the cost of going through a narrow corridor. While the bottom one is way more open, but at the cost of giving bots a height disadvantage. So you need to be more tactful in spawning which bots where.


  • Bots' strength

    Certain bots also become stronger/weaker depending on the map. Maps that are enclosed favour splash damage classes more compared to maps that are open. Maps that have a more prominent high ground make Soldier bots weaker, compared to maps where high ground is less significant. Maps with only 1 spawnpoint, eg Bigrock, need a lot more force to push through defenses than a map that can use multiple spawnpoints.

    Giant Medics are way bigger of a threat in smaller maps, like Decoy. Since an über pop can cover a larger percentage of the map compared to a map that is double that length, like Bigrock. Super Scouts are stronger in shorter maps as well since there's less time for the players to react. So don't go around and add bots with 2 giant Medics on them on a map like Mannworks. It might work in certain situations, but it's a rather risky move.


  • Tank routes and healthpools

    Similar to spawnpoints, tanks also have a different spawn node depending on the map. A starting node on Rottenburg probably won't work on Mannworks. In order to have a better chance at knowing which starting node to us, go take a look at a popfile used by the map. Also do mind that certain maps can have multiple starting nodes for tanks. Maps like Mannworks and Rottenburg both have 2 starting nodes, one for each route.

    It's a given that tank healthpools are dependant on the map as well. A tank with 60k hp is way, way, way more absurd in a map like Decoy than it is in a map like Bigrock. So it's important to understand that you need to find a good balance on what healthpool is appropriate for the distance of the spawn to hatch and the amount money the players have at their disposal.


  • Wave structure

    Now map length can influence the wave structure quite a bit. On maps like Decoy, larger burst spawns can work more effectively. because when they're killed and a new batch spawns, it takes way less time to reach the bomb. However, Stream spawns are much more spammy in this map since bots have less time inbetween spawns when they die.

    However, it's the opposite for long maps. I'm going to use Teien as an example here. If you're spawning bots in bursts, expect some major downtime inbetween action if bots are able to push the players back quite a distance. Let's say a squad of 16 Soldiers reaches the hatch, but they get destroyed. Now another squad of 16 Soldiers spawn, they have to travel all that distance from spawn to hatch, that'll take a long time.

    And easy fix for this is to just use Engineers to shorten the distance between bomb and bot spawn. However, Engineers can be countered by the players. We can use stream spawns with perhaps a longer inbetween times. This way mercs will have something to do when being pushed back quite a bit and there won't be a long inbetween time. A disadvantage on using this method is that it can get a bit spammy, but as long as it's reasonable and not unfun to fight, it's alright.


  • Snipers' effectiveness

    While Snipers aren't an immediate threat, they can get quite powerful depending on the map's sightlines. Expert Coaltown relies on its Sniper spawns to increase the difficulty of the mission. Hatch area in Coaltown is wide and open, making Sniper sightlines everywhere. Doesn't make it any easier that the Sniper bots have a safe space on top of the middle building.

    This goes also somewhat for the map Decoy, but to a lesser extend. Snipers are usually less of a threat at bot spawn, but they become more and more dangerous when they come closer to having the hatch area in vision. They're designed in a way where they can keep they players locked down in the hatch area. But this is ofcourse dependant on the map's design.


  • Engineer nests

    Not every map is designed in a way where it can have Engineer nests. Maps like Mannworks and Coaltown don't have any Engineer nests whatsoever... sadly. So Engineers are unable to function in said map. You'll notice when a map doesn't have any Engineer nests, if you spawn one, it'll just stay in spawn. Do remeber that.


  • Specific map mechanics

    It is a possibility that maps have certain mechanics to them that are exclusive to them. Maps can have gates blocking of a forward spawn that only opens up when capped, like Mannhattan or Downtown. Or there are maps that have a gate that can be opened to reveal a shortcut for bots, like Area 52 or Sequoia. Area 52 has even the bonus to use tanks that either go around the gate, or cap the gate themselves. Then you also have Teien, which is able to spawn a tank that is armed with Sentry guns. So plenty of things to consider when you're making a mission for a certain map.

Advanced Tips and Tricks
There are a couple of things I want to discuss before we move on to the summary of the guide. Most of these are just advanced tips that may or may not improve the overall mission experience, but they're a neat thing to know nonetheless. These are the subjects I want to talk about:
  • Sniper objective versitility
  • Sentry Buster creation
  • Alternative Engineer viability
  • Navigation prefers usage
  • Wavespawn templates

Sniper objective versitility

Did you know that you can give the Sniper objective to bots that aren't Snipers? This can make for some fun and goofy moments. The Sniper objective forces bots to go to a specific spot on the map and stand there untill the bomb has moved forward. Doesn't sound really Sniper specific, now does it? It isn't that complicated to do either

All you need to do is change the Sniper template with a bot you want to use. A few examples I can give are Shortstop Scouts, Minigun Heavies (doesn't matter which minigun, I mostly use Brass Beast), Bowmen, be either standard version or rapid fire version, Rescue Ranger Engineers, Direct Hit Soldiers. Literally anything goes. Though, crit attributes won't be displayed on wave display and bots are only capable of using primary weapon with this objective... sadly.

And now for the most interesting bot, Cow Mangler Soldiers. Sniper objective Also forces bots to use alt-fire. Sniper bots do this to zoom in. And alt-fire stands for charged shot when using the Cow Mangler. Told you there was a way to make Cow Mangler Soldiers use the charged shot. Though in order to make this work properly, make sure to give them a very fast reload speed.


Sentry Buster creation

You can create your own Sentry Buster with their own little gimmick. You can give it different health, a hat, although it would look stupid a cosmetic, even a certain weapon. Heck, why not a different class? The only thing you'll need to do is spawn the bot in a mission and give it the objective "DestroySentries". That's it, the bot will automatically turn into a Sentry Buster model. Though do remember that Sentry Busters are giants so they'll need the attribute "MiniBoss" and the tag "bot_giant". Unless you want it to be a tiny Sentry Buster.

You can do all kinds of stupid stuff with this. You can give it an Iron Bomber and reduce the projectile speed significantly. That way it leaves a trial of bombs where it walks. You can sort of give it the Huo Long Heater's fire ring, although you do have to modify the weapon quite a bit so that it doesn't shoot... and the Sentry Buster won't have any animations, since Demos don't have a spin up animation for the Miniguns. You can even give it a banner, but don't annoy the players with this.

While this may seem fun and goofy to do, I would be careful with it. You can give the Sentry Buster some nice and creative gimmicks, but you shouldn't go over the top with it. You know what I mean?


Alternative Engineer viability

So you might be thinking: "Can you only use Engineers as Sentry nest builders?" The answer to that is no. Engineer bots are designed with only 1 objective in mind, which is to build Sentry nests. However, it's possible to override that objective. Put them in a squad, but as a squad member, not as leader. If they're in a squad, they'll follow the objective of being a squad member and not as a builder, but only when they aren't the leader (aka the first bot in the squad syntax).

You can use Engineers this way so that they utilize their primary or secondary (although the only viable secondary for Engineer bots is Pistol anyway). Though do keep in mind that whenever the squad leader is destroyed, Engineers will go back to their building objective. If you want to prevent this, type "ShouldPreserveSquad 1" at the start of your squad syntax.


Nav prefers

Certain maps have the benefit of containing nav prefers. While nav avoids are used to take care of the bomb path, nav prefers are used to force bots following a certain path. Though bomb bots will always follow the bomb arrows. This feature is mostly used to have bots follow an unusual path most bots won't even consider taking. This is excellent for flanking bots. Although some maps don't have nav_prefers, or they have different ones.

You simply need to put: Tag "name_of_nav_prefer" in the TFBot syntax and bots will follow the named nav prefer path, unless they're carrying the bomb, in which case, they'll just follow the bomb path. You can use the BehaviorModifier "Push" with this tag, so bots will go to hatch first, before going after the bomb. This isn't required though, it's just that bots won't properly use alternative routes if the bomb isn't at the hatch.

Here are some examples for custom maps:
mvm_underground

mvm_area_52

Although some maps' nav prefers can get complicated, they aren't required to make a good mission. They just add that extra bit of customization, a quality of life addition.


Wavespawn templates

I already touched this part briefly in the section of templates. But because wavespawn templates can get a bit more complicated, I'll try to explain them a bit here. Wavespawn templates are used to store the data of wavespawns, so that they can reduce clutter. I'm going to use a part of one of my custom missions and try to apply a wavespawn template in it. I never use them myself, but they're there for the people who want to use them.

This is the part we're going to shorten with the usage of wavespawn templates. As you can see, a lot of the parts are similar, so making a templat out of these wavespawns will be easy enough.

Now we took all the parts that are the same throughout all the wavespawns and we combine them in a wavespawn template, put it in the Templates syntax and give it a name. As I said before, template names can be anything you want, but for the sake of consistency, I just used a name that Valve would most likely use as well. Now the only thing we need to do is use the templates.

This is our final result. Look how much shorter it became. Now the problems with wavespawn templates are that they probably won't appear that often and they're harder to modify individually compared to bot templates. But they can reduce quite the clutter.


Mission Creating Summary
Now that we went over everything that I find important to know when designing your own mission. I'm going to go over a "brief" summary of all the noteworthy. And with brief I mean a pretty long one.

  • This one mostly depends from person to person, but I still find it an important part of mission writing. You should try to write your mission in an orderly fashion. Although as I said, some people prefer to write in their own style, which may or may not be neat. It's their choice, I'm not going to prehobit them from writing how they want. It's just that it's possible you may not find an error in your popfile and you have to resort to asking someone for help. When they check your popfile, they're overwhelmed with how chaotic the whole file is.

  • Mann vs Machines is a class based gamemode. This also applies to the bot team. Each bot has their own set of strengths and weaknesses. When designing your mission, keep this in the back of your head. A mission is more enjoyable if the waves are distinct from eachother and don't blend into this same mess. This is why I'm not a big fan of Coaltown expert. Every wave is blends into this giant Heavy with either a Tank or Super Scout. Different bots can be used for different roles. Some bots are specifically designed for one role, like support. But they can be used as push force if the conditions are right.

  • Giants are often used as a way to push through the defenses and perhaps make room for other bots. Most of them have the health and firepower to pose an actual threat for the players. Although their effectiveness drastically decreases as the mission goes. The dps of the players increases, thus making the health pool less and less of an issue. Don't let this convince you that you need to make giants more durable by giving them more health, orincrease their damage output out of nowhere. Giants have a consistent healthpool (most of them) that makes them predictable to fight, don't change this.

  • The giant behemoths that are called tanks serve as a means to either punish the players for their lack of dps, or to split up the players so that the bots have an easier time pushing through. How tanks function depends on how you want them to be and the size of the map.

  • Support usage is an often overlooked mission functionality. People think because it's supposed to be support that they can put everything they want in it. Remember the rules I gave to you to help identify what support bots truly are. Be sure that the support is enjoyable to fight against and that they don't overwhelm the players.

  • Custom bots can make the mission more interesting. Although it's important that custom bots have the purpose to fill in a specific niche that you're missing. Using them in the sense of: "Oh, I need a custom bot here to make the mission an interesting experience." is a bad mentality to have. The 3 guidelines I mentioned in the custom bot section are really of great significance.

  • A wave needs to have a certain flow to it. You can either go for the most used and probably the safest way to design a mission, by doing it subwave per subwave. Although you can also go for the more traditional MvM wave design, which is to blend subwaves together. The choice is yours. The former is easier to pull off and balance, while the latter is a more difficult experience to get right, but it can work well if done well.

  • Map design is an significant factor to take into account when designing your mission. A mission like Broken Parts (Bigrock advanced 1) will be hell on Decoy, while Desperation (Decoy expert) would be a rather boring experience.

  • The advanced tips and tricks I mentioned are a neat little addition to know, though they aren't required to make a good mission. They just make your mission more unique.

  • Always put the players' enjoyability first! You're creating MvM missions to give the people enjoyable and unique experiences. Not a frustrating mess.


Final Gauntlet, Testing
You have made your mission, now there's only one thing left to do: Test it! If only it were that simple, no? There's still a huge process that needs to be done before you can publish your mission. Your mission is never going to be right from the get go. Testing your mission requires time and effort to get right. It's not a simple playthrough and if went decently, it's done, no. You need to test it a couple of times before you can safely decide whether or not your mission is done or that it requires a rework.

Solo testing

Before you test your mission with a group, we need to make sure everything works. It's a possibility there are several errors in your mission that could prevent it from being completed, like certain bots not spawning. Or there's a chance that your popfile won't properly load, meaning that you have missed a { or a } or even a ". Yes, even a such a minor error can prevent the popfile from loading properly.

Or that certain bots don't work as you want them to. Maybe bots spawn at the wrong time, that's also possible. Don't worry though, these errors happen to everyone very frequently. They're issues that can only be seen through testing. They can be easily overlooked when writing your mission

You need to make sure that your popfile is named correctly. Many custom MvM maps use a version suffix, like b4, or rc3a, you'll need to include those in your popfile name as well. Don't use apostrophes in your name, as MvM would fail to read it then. You'll need to include the difficulty of your mission in the popfile name, atleast to make it clear to the players what difficulty they're up to when they want to play your mission. An example I use:
mvm_sequoia_rc3a_advanced_fiber-ops.pop

A way to make solo mission testing easier is to test wave per wave. Each time you finish writing a wave, you test the wave in-game. This way when the popfile doesn't load correctly, you'll know where the error might be hiding. This will also make it easier to finetune the mission. So it's not like you test 7 waves in one go. Then you need to change all 7 waves afterwards and test again. You can just write one wave, test it, finetune it and start writing on next wave. Doing it this way will make the process go smoother.

Here are a couple of cheat commands you can use to make solo testing doable on your listen server:
  • sv_cheats 1
  • currency_give 10000
  • addcond 11 (though loses its effect after winning a wave, needs to be reapplied)
  • addcond 72
  • addcond 91 (only works outside spawn)
  • tf_mvm_jump_to_wave x (with x being the wave you want to go to)

------------------------------

Group testing

Now that we have tested the mission ourselves and everything works properly, we can test it with a group. This is where it mostly goes wrong in my opinion. A good thing to pay attention to when testing your mission is what team composition was used. Naturally, different team compositions will result in different results. I stated a couple of times that enforcing certain classes is a bad thing to do as a mission designer. So when testing your mission, consider these:

  • Test your mission without Phlog Pyro and Beggar's Bazooka Soldier atleast once.
    Tanks are a staple in MvM mission creating, but getting the right health value doesn't happen often at the first try. Phlog Pyro and Beggar's Bazooka Soldier are tank melters. They have the highest and cheapest tank dps compared to other classes. So they're able to destroy tanks faster than other team compositions.

    If a Phlog Pyro is solo damaging a tank and the tank almost reaches the hatch before getting destroyed. That means that a regular Flamethrower Pyro won't be able to take it out in time. Thus enforcing a Phlog Pyro and/or Bazooka Soldier. You need to consider that not every team composition is going to have a Phlog Pyro or Bazooka Soldier. Balance the tank healthpool around stock Flamethrower or stock Soldier.


  • Never test your mission with Gas Passer Pyro.
    Gas Passer in its current state in MvM is way too overpowered and broken. It throws all the class balance out of the window and makes Pyro a one man army. So if you're testing a mission, make sure there's no Gas Passer Pyro attending the session. If there is, the mission will most likely look too easy. Giving you the illusion you need to buff the difficulty. But then you'll be balancing around the Gas Passer. Which is a thing you should avoid, balancing around certain mechanics.


  • Test your mission without Heavy atleast once.
    Heavy is the king of dps against giants. Heavy is extremely effective on low money missions. Using said class might give the impression that giants are too easily dealt with. But as soon as the mission is being played without a Heavy, suddenly the giants become too big of a problem. So testing the mission atleast once without a Heavy will give you the info if the giants are doable or not. There's no shame in giants being too easy if there's a Heavy on the team.


  • Test your mission without Medic atleast once.
    Mann vs Machines is notorious for its spam, which Medic negates entirely with its Projectile Shield. So in order to check if spam is manageable, you'll need to test the mission without a Medic. Or atleast a Medic who doesn't upgrade his Porjectile Shield.


  • Test your mission without Sniper atleast once.
    Sniper's strength lies in his long range combat. He has an easier time avoiding spam and he's capable of eliminating threatening squads quite easily. For example, a Sniper might be able to take out a group of Über Medics quite easily which may be too difficult for a Demo to take out reliably.

    There's also the problem of Sniper countering Heavy bots too much. If you look at Metro Malice wave 3, which is quite hard because of its Heavy spam, you'll see that the wave becomes way easier thanks to a Sniper. So if you have a Sniper on your team, a certain subwave with lots of Heavy bots might become easy. But when you test the same subwave without a Sniper, it might become too hard.


  • Test your mission without a Spy atleast once.
    While Spy is less problematic regarding giant damage compared to Heavy. There's still a reason to avoid using Spy in your testing session. Spy is famous for his ability to shred through giant Medics. If your mission has giant Medics, the waves they appear in might give the impression of being too easy when using Spy. But as soon as you play the same wave again without a Spy, it prooves too much of a hassle. Sadly, Gear Grinder has become a victim of this where people refund to Spy on the giant Heavy/Medic waves to pass them without too much trouble.


  • Test your mission without using canteens.
    A mission should be doable without using canteens.


  • Test your mission without using refunds.
    Refunds make everything easier. If your mission requires you to use refund to pass the wave, then it means that your mission is too hard and should probably require a nerf or a rework.

NOTE: After testing your mission with a group and it looks like you need to adjust the mission. Make sure to test the parts you've changed first alone to make sure you didn't make a mistake.

NOTE: Sometimes it's necessary to rework a wave entirely. Some concepts simply cannot work, be it either because they're too hard or they're too unfun to play, regardless of your efforts to change it.


FAQ
Frequently asked questions

Q: My mission doesn't appear in the mission vote option of the map.
A: Make sure you correctly named the map in your popfile's name and that there are no spaces or apostrophes in it. Custom maps often use version suffixes that need to included.


Q: When trying to load my mission, the hud displays "wave 0" and there are no bot icons.
A: This usually happens because of an error within your popfile. Make sure the amount of { is the same as } and that the total count of " is even. If this is not the case, you have quite the search ahead. Though, using a customized Notepad++ syntax for popfile writing, the search time can be decreased significantly. Your mission's information needs to in the WaveSchedule syntax as well.


Q: Some icons appear as a purple checkerboard, how come?
A: This is caused by either using an unknown template, or referring to a faulty icon. Make sure that the class icon has the correct name. If you're using a custom icon, it's required for the people playing the mission to have a way to download the icon, be it either via the server, or as a seperate download.


Q: I put giants in a wavespawn with Support 1, but the icons aren't outlined in red.
A: Giants that are used in support wavespawns won't have their red outline. I wouldn't advise on using giants as support anyway, unless specific circumstances.


Q: Bots aren't spawning, what can cause this?
A: You either have the wavespawn's SpawnCount set to a value higher than 22, or your wavespawn is using an incorrect WaitForAllSpawned/WaitForAllDead. Another possibility is the usage of wrong spawnpoint names. This error can be identified with a text message in console.


Q: Bots do spawn, but they won't leave the spawn area.
A: Bots are rather persistent and they won't leave the spawn area, unless there's an objective to do. Most of the time, this objective is either the bomb, or a gate. If there is no bomb however then bots won't leave spawn. The most likely reason why the bomb won't spawn is because you fired a wave start relay that isn't supported by the map. Check on each wave if the relay in StartWaveOutput is supported by the map. This issue rarely happens, but it's possible.


Q: My custom bots don't appear as giants and get instakilled by a backstab, but they do have the correct amount of hp.
A: Your bot is missing the Attribute "MiniBoss".


Q: Sniper bots who I gave crits aren't shown on the hud with a crit outline.
A: Bots that are spawned via mission support never have the crit outline.


Q: Why aren't my Engineer bots teleporting in?
A: Engineer bots only teleport in when the bomb has traveled a certain distance. Either that, or the map doesn't have any Engineer nests.


Q: The tank spawns at the hatch.
A: The tank is using an invalid StartingPathTrackNode, check if your tank is using a correct node that the map supports.


Q: My Banner Soldier or Medic doesn't pop its charge when required.
A: Your bot is missing the Attribute "SpawnWithFullCharge".


Q: I have a mission ready, any server I can test it on?
A: Potato's Custom MvM and Sigsegv's MvM Servers are both places where you can test your mission. Make sure to follow the instructions to get your mission on the server.


Conclusion
This concludes the guide. I hope this piece of text did atleast a somewhat good job at teaching you how to make missions. I'm planning to keep updating this guide as time goes on by adding pieces of information I missed, or with things I learned afterwards by playing and creating more custom missions, or with perhaps new MvM content... if that ever happens.

Remember, these are just guidelines. You don't have to follow them. If you're comfortable with your own style, by all means, stick to it.

So yeah, cya and have a nice day!


49 Comments
Devilbowser253 Sep 8, 2023 @ 5:33pm 
i'm not seeing it (though i might have missed it) but how do i check for the names of paths and spawns in a map?
ChristianGuyOfAction Sep 1, 2023 @ 2:19pm 
Just successfully wrote my first pop file thanks to this guide. Now I just gotta learn game balance! How hard could that be? :cuphead:
ham maggotson URF.IM Apr 12, 2023 @ 12:02pm 
Hey, how to use custom model on the robots?
ihaz Sep 18, 2022 @ 11:26am 
1. name like this mvm_mannhattan_insert_name_here

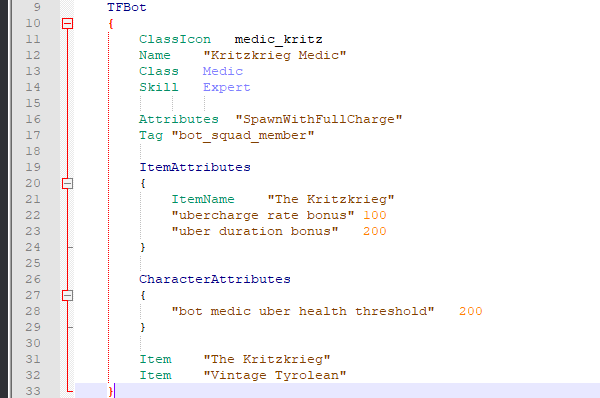
2. your probably using the wrong names, the actual names are different see here for the list: https://sigwiki.potato.tf/index.php/List_of_item_definitions
trashbin Jun 8, 2022 @ 9:37pm 
This is a nice guide, but I have two questions:

1. How do I give my mission an in-game title, similar to how mannhattan_advanced1 is called Empire Escalation?

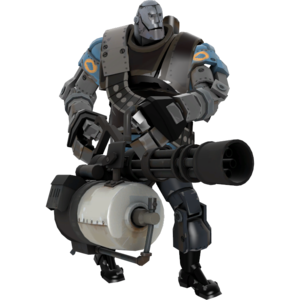
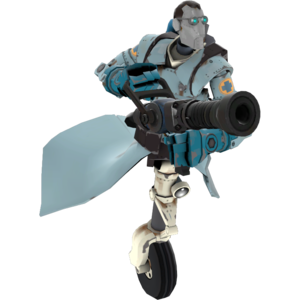
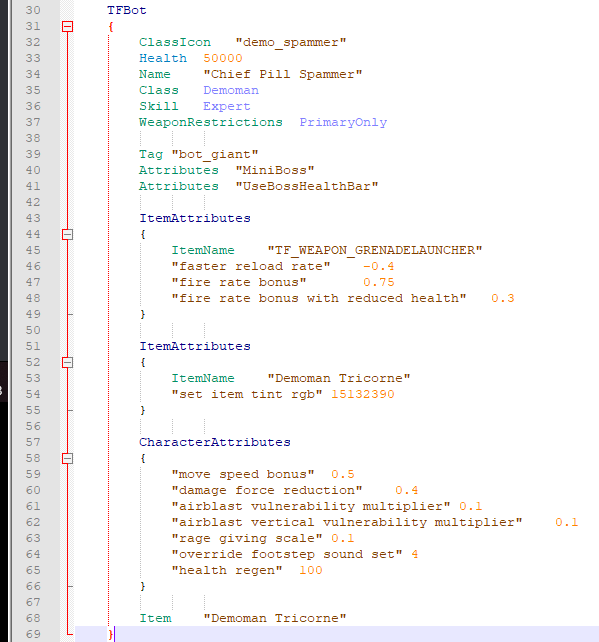
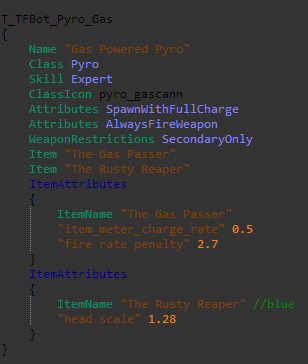
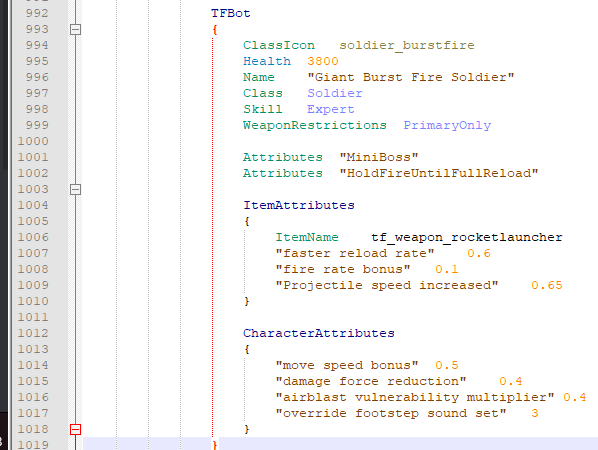
2. I tried giving some of my custom robots hats or weapons, but most of them did not appear. So like the person below me said, do you know of any guides for custom items on robots, or can you give us more information about the topic?
▼GoldenStone May 7, 2022 @ 6:56am 
is there a guide for custom head gears?
r [i] pzz [i] Mar 9, 2022 @ 7:34am 
it works except for when I click the generate button, it almost never works
Dayal  [author] Jun 4, 2021 @ 2:39pm 
It depends on the game you're basing it off really. Like there's nothing wrong with using custom bots only. It's just important when designing custom bots to keep in the back of your head:
a) Are these bots fun to fight against?
b) Is it clear what these bots do?
As long as the mission is fun, you should be fine.
StardustSpy Jun 4, 2021 @ 1:07pm 
If your making a mission based off something else e.g. another game, a joke, etc would it be better to use the normal templates Valve robots have and some custom bots or stick with the theme and go all custom?
W Jan 7, 2021 @ 4:08am 
if you want test with weapon like phlog or beggar
you must test without full party (4 is highest)

intermediate - must require lowest amount of good player is 2 mans
advanced - must require lowest amount of good player is 3 mans
expert - must require lowest amount of good player is 4 mans

for example
2 stock soldiers must do more dmg than 1 beggar soldier. although 2 stock soldiers if one people die. another one can backup your team while if 1 beggar soldier die is can't backup like 2 stock soldiers