Company of Heroes 2

Company of Heroes 2

35 ratings
Infantry Company
By MathiasCZR01
Hello and Welcome. By the request of others in the gaming community I have been asked to do a review about the US Infantry Company Doctrine. I will be doing a great in-depth review about the strengths and weaknesses of the doctrine. I hope to those reading this guide will enjoy it and perhaps learn something new about the Infantry Company.
   
Award
Favorite
Favorited
Unfavorite
Infantry Company General Overview
The US Infantry Company is a very Defensive and Supportive oriented Doctrine. It is perhaps one of the most defensive Allied doctrine out in the game. The Infantry Company is not a very spearlike-aggressive doctrine; instead the doctrine primarily relies on its ability to take and hold territory. This doctrine likes to advance more on a broadfront at a steady-pace in order to attack the enemy unlike other Allied strategys that perfer to strike deep into the enemy lines. The doctrine makes good use of defensive capabilities to hold territory at the frontline and advance slowly untill being assaulted by the enemy. Only to fend off and exhaust the enemy offensive and once again moveout to take and then hold more territory again and again.


With all the abilities considered the Infantry Company likes to utilize Rifleman Squads with great defensive tactics to "take and hold" territory throughout the map. While using M1919A6 Browning LMG to hit the enemy at incredibility long ranges. And then using the M7B1 'Priest' Howitzer to strike at the enemy from a safe and protected position.
Rifleman Field Defenses
Being unlocked at the start of the game at 0 CPs the Rifleman Field Defense allows all of your rifleman across the battlefield to build standard mines that can be used both against enemy infantry and enemy vehicles. The Rifleman also are granted the ability to build defensive emplacements wherever they wish such as sandbags and fighting positions. This ability is one of the main core concepts of the "take and hold" strategy employed by the Infantry Company. With every rifleman squad on the field being able to construct defenses on any point or territory of the map they can easily defend and push off the enemy. And once a battle is over for a specific spot, repeat the construction process again if territory is either gained or lost.


With the Field Defenses upgrade the Rifleman Squads can build 3 things.
Sandbags


Fighting Positions


General Purpose Mines


If your Rifleman aren't busy fighting, then they better be busy building!

Sandbags are the Riflemans best freind, being able to offer cover from enemy fire will make the battle more in your favor. Build sandbags around important areas where the enemy is commonly spotted, roads and pathways leading to the battlefield will make your enemies hardpressed to face you at the frontline. In the picture you can also build at capping points in order to have a means of defending your territory from the enemy even if its completely open and exposed.


Fighting positions can also be useful as they can be upgraded with an MG to cover a specific area of interest. Don't forget that you can also garrison your rifles inside the position to fight off the enemy and seek protection. The fighting position is not just for Rear Echelons.
60 Ammunition


Standard mines can also be built by the rifleman as a means of annoying enemy armor. The mines can damage engines if a vehicle runs over the mines or even destroy it. Due note that mines built by Rifleman take a significantly longer time to deploy.
30 Ammunition


Tips and Tricks of Field Defenses
  • Build Sandbags right next to a capping point and have it faced in the direction of the enemy advancement. The idea is that you can defend with rifles right in the center of the point and because the sandbag front is next to the cap flag the enemy cannot moveup to use the sandbags against you for cover cause they can't "click" it due to the capping flag being in the way.
  • Try and take up forward positions that are close to the enemy or even possibly pressuring them, and perhaps force or bait them into attacking you, when you have your field defenses up with sandbags and fighting postions.
M21 Mortar Half-track
200 Manpower


40 Fuel


The M21 Mortar Half-track is the first call-in ability of the Infantry Company, coming at around 2 Command Points. This fairly early game unit has some useful aspects about itself, its main role though is to hit enemy weapon crews such as MGs, Paks and other mortar teams. The Half-track is particularly useful against MGs teams and Mortar Crews because the unique advantage it has is that its mortar bombardment ability is more accurate then other mortars in the game. Meaning that it will consistently hit stationary targets such as weapon support teams. Though the trade-off is that the mortar rounds from the M21 don't do as much critical damage as that of other mortars of other armies. Another problem is that because of its great accuracy it has a lot of problems trying to track and hit moving infantry and thusly it may not pay of for itself in the long run. In all the M21 is a unit that should be called in to deal with axis opponents who are more defensive and like to use MGs to their advantage.


The M21 Mortar Half-track is also useful for calling down white phosphorus rounds that can both burn enemy infantry/weapon teams and blind them. This ability can be used for a prelude to your assault to blind them enemy and advance closer to them. In addition I find the phosphorus rounds to be very useful when trying to force out enemy infantry that are in buildings as the phosphorus does slow them down and increases their exposure to burning.

In all the M21 is an OK unit, its really not the greatest mortar unit out there, and most of the time it isn't really called into the battlefield as there are other better options to call upon. Its a 50/50 kind of unit, sometimes its good other times its completely useless. Best to save your resources for something else.

Tips and Tricks of the M21 Mortar Half-track
  • Use the M21 Half-Track specifically to hit MGs teams or Emplacements

  • Use the white phosphorus rounds to burn out buildings to prevent the enemy from using them
M1919A6 Browning Light Machine Gun
70 Ammunition


The Browning Light Machine Gun is hands down one of the best infantry weapons that the Allies have to offer on the battlefield. At 3 command points the Light LMG is unlocked at the base for free, meaning you don't have to spend any manpower or fuel into unlocking the weapon rack. And to equip a rifleman squad you need to spend 70 ammo for one gun, or 140 if you want a squad to be doubled equipped. The weapon itself does a lot of damage against exposed enemy infantry and the LMG acts like something of the equivalent Grenadier MG42. It is best employed for long range or medium range combat. It Should NOT be used for close range combat.


Also LMG Rifleman are pretty good when garrisoned when inside buildings as they can dish out an extreme amount of damage from their stationary position. (I don't know if its just me, but when I played there seems to be a greater accuracy buff for LMG rifles when their in buildings) Because of their great building gameplay LMG Rifles can perform rather well when put into Urban environment with lots of buildings that can be used. But be careful there is a disadvantage when using the M1919A6 Browning Light Machine Gun, the weapon is best employed at medium to long ranges ONLY. If the enemy is able to close the distance or ambush you from turning a corner from a hedgerow or from a city-like environment the riflemen be slaughtered. As the model with the LMG has to physically go prone in order to fire the Browning and with the enemy close they can simply run circles around you.

Tips and Tricks of the M1919A6 Browning Light Machine Gun
  • The Browning Light Machine Gun should only be used for Medium to Long range combat, it should never be used for close range.

  • It is a viable tactic to just save up your ammo and once unlocked upgraded all your rifles with the LMGs, but sometimes its even better to have mixed units consisting of BARs and M19 LMG. As the BARs can act as an offensive tool to kill the enemy at medium ranges while the LMGs can be used hit the Axis from longer ranges. In addition the BARs can protect LMG squads from close range infantry advancing or surprising you and the LMGs can hit targets that are too far away for the BARs.

  • Urban cities with lots of usable buildings are real good for the LMG rifles as they can be very annoying for the enemy to get rid off.

  • Give the LMGs to Rear Echelons and then make them uses their volley-fire ability upon the enemy, with the extra firepower they will be able to also suppress infantry.

Note: LMG Riflemen that are inside buildings will NOT deal out suppressive damage to the enemy. They instead just deal extra damage due to accuracy.

Time on Target Artillery Barrage
180 Ammunition


A pretty basic ability, call down a heavy artillery strike wherever you please, provided you see the target zone. This 180 ammo Artillery Barrage is somewhat different from that of other Barrages because it fires more heavier shells then that of other ordinary strikes at the trade-off of having to take more time to travel to the target marker. So when you call Time on Target Barrage it will take a rather long time to hit the enemy. So this ability should only be specifically used against Bunkers, OKW HQs, Pak-43s and LeFH-18 Artillery Positions.


Most of the time the Time on Target ability shouldn't even be used on standard Axis Infantry or even Weapon Support Crews as they can just simply walk away and the Artillery takes 'forever' to hit.

Tips and Tricks of Time on Target Artillery Barrage
  • If you have a defensive Axis opponent that has Pak-43s or LeFH-18s a single Time on Target Barrage will be able to completely destroy the weapon emplacements.
M7B1 Priest Howitzer Motor Carriage
480 Manpower


115 Fuel


The M7B1 Priest Heavy Artillery is the prime hard-hitter of the Infantry Company that can do a lot of damage if used correctly. It is unlocked at 9 Command Points. The Priest can be used in almost anyway possibly making it a rather very reflexable unit on the battlefield, it can be used for either Offensive, Defensive and Supportive purposes. This is the only Heavy Mobile Artillery unit in the game which makes the Infantry Company much more unquie then that of other doctrines because no where is exactly safe from the incredible range of the Priest. And if something is out of range the Priest can simply moveup to reach it, and if it is threated it can retreat back safely to Allied lines. The Priest is very good at bashing Axis opponents who dare try and entrench themselves. The Priest is good against any target due to its heavy gun, though mainly your primary targets for the Priest will be static defensive targets such as HQs, Bunkers, Weapon Support Crews, Other LeFH-18s, and above all PAKS, the Priest is an OUTSTANDING Pak-killer, so if you have an enemy who has a lot of Anti-Tank defense the M7B1 will proudly reduce them to dust.


The M7B1 Priest can annihilate mobile infantry forces, IF the Priest can hit them, and thats is a VERY big IF. The Priest does have some trouble when targeting infantry that can just avoid the barrages, so as an Infantry Commander don't depend solely on the Priest to protect yourself from enemy infantry or blobs. (Though the Priest can seriously punish blobers if their unlucky to get hit with a direct 105mm round.) In addition during a battle you will only need 1 or 2 Priests MAX to deal decisive blows to the enemy. The Priest can also do a lot of damage to enemy vehicles, if the enemy has Heavy Slow Vehicles such as King Tigers, Jagdtigers, and Elefant Tank Destoryers. These slow beasts are PERFECT targets for the Priest to pick on as they are vulnerable to being hit by multiple shells and take a long time to move out of the target zone.

Tips and Tricks of the M7B1 Priest Howitzer Motor Carriage
  • This is a high risk and reward tactic that can pay off, the closer the Priest is to its target zone the more accurate it will be, if you trying to hit blobed infantry or a strong enemy line the Priest can be used as sort of an assault gun by moving the Howitzer up to the front and engaging the enemy from its minimum bombardment range for short-range and VERY direct firepower. DO NOT use this tactic against enemy vehicles and tanks.

  • The Priest can be used to either soften up an enemy defensive position before an attack or can be used in a defensive matter in hitting your frontline territory that can prevent the enemy from advancing against you when they are making an attack as a means of buying time for yourself.

  • If you have a well built army and are floating resources, why not simply lease the Priest to your fellow teammates during a game? The more Priests there are the more your team can strike against the enemy in-mass.

  • Fat slow vehicles are perfect targets for the Priest to harass and even destroy.

  • If an enemy vehicle has been damage and is behind their lines repairing, have your Colonel or teammates send out a Scout Plane to have a look at the area and then bombard the vehicle being repaired. Chances are your opponent will not be paying attention to the repair duty and you could possibly kill both the vehicle and the repair crew / Pioneers.

Note: There is no limit to the amount of Priests you can get per-game.
Conclusion
This concludes my detailed review of the US Infantry Company. I hope that many of your will look at this doctrine differently then you have previously. And are able to employ the great defensive tactics of this doctrine to exhaust your enemies offensive and strike back with LMG infantry and Priest Artillery strikes. To only take their beloved territory and never give it back to them.

Credited Source:
http://www.coh2.org/guides/19066/u.s.-forces-commanders
14 Comments
MathiasCZR01  [author] Dec 17, 2015 @ 10:02pm 
Hello everyone, I' am announcing that due to the changes of this doctrine over time by Relic I have taken it upon myself to remodify this guide to reflect the current standing of this doctrine in the game.

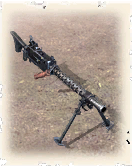
Though its sad to say that the M1919A6 Browning Light Machine Guns no longer suppresses, but their damage model has increased significantly so there is now a new trade off.

In addition mines have finally been fixed for the doctrine as the previous ones did not really perform all that well, but now you can count on the fact that these new mines will most certainly do damage just like any other mine in the game.
MathiasCZR01  [author] Oct 3, 2015 @ 9:11am 
Sure why not.
Ridcully Sep 4, 2015 @ 5:20am 
well, the mine seems bugged to me. it does as much damagae as the one bofre (even to inf). can someone confirm this?
MathiasCZR01  [author] Sep 3, 2015 @ 8:59pm 
I'll check and change the things that the updates did to the doctrine. As relic seems to be remkaing parts of the American Faction.
Ridcully Sep 3, 2015 @ 6:00am 
but now its possible to plant "real" mines! i was missing that, as i put down mines alot, if possible
unless specifically stated Sep 3, 2015 @ 2:51am 
Sadly, they removed defensive stance from riflemen. :(
Luebert Aug 29, 2015 @ 10:38pm 
cheers back fella this help me a lot when im playing on defense
MathiasCZR01  [author] Aug 27, 2015 @ 2:04pm 
Would be nice to see the commander get buffed. My only opinion in buffing the Infantry Company is to make the Half-track mortar a bit more useful in terms of damage. And give Rifleman the ability to build barb-wire.
Count Marius Aug 27, 2015 @ 8:17am 
Have you seen the patch notes for 3rd of Sept ? This commander will be buffed !
omar_uav Aug 25, 2015 @ 1:04pm 
riflemen not rifles :P.