Space Engineers
Няма достатъчно оценки
The Inventory Sorter and You!
От Merii
A guide on how to use the Clientside Inventory Sorter mod
   
Награда
Добавяне към любими
В любими
Премахване от любими
Introduction
Ever found yourself in a fight and realized you forgot to load ammo and repair parts into your grid? Tired of clicking 387 times to offload loot and ore? Is your sorter looping? You might just need to sort your inventory!

The Inventory Sorter is a mod that runs independently of any server or programmable block, and is used to sort the inventory of a grid on-demand rather than on timers like Programmable Block inventory sorter scripts. It reduces server load by doing all the sorting on the client, and simply sends a series of commands to the server after sorting is complete, as if you were dragging the items around yourself in the inventory screen.

This guide will cover basic and advanced configuration of the inventory sorter mod to help you get the most out of it that you can.
Getting Started
This section covers the most basic possible way to set up your base and mobile grids for inventory sorting.
  1. Name each container you want to put things in at your base one or more of the 6 types. For example, if you have 10 containers, name 4 of them "Base Components [P50]", 4 of them "Base Ingots, Ores [P50]", 1 of them "Base Ammo [P50]" and 1 of them "Base Tools, Bottles [P50]". You can also add numbers, e.g. Base Components 1, Base Components 2, etc. The word "Base" doesn't matter, but "Components" is a keyword meaning all components such as Steel Plate, and "[P50]" is the priority of the container.
  2. On your mobile grid, name each container something like "Mobile Container Any Item [P70]", optionally adding numbers or letters to indicate where the container is on the vehicle - for example, "Mobile Container L1 Any Item [P70]". "Any Item" is a shorthand way to say "Ores, Ingots, Components, Ammo, Tools, Bottles". Setting a lower priority (70) as compared to the base's 50 means when you sort items, it will take items out of your mobile grid to put them in the base.
  3. Open the Control Panel menu, select your cockpit, and click "Sort Inventory".
  4. Take a look at the window that pops up, then dismiss it and check your inventory. You should see that all items have been removed from your mobile grid and placed in your base.
  5. If you want to retain certain items in your mobile grid (e.g. a bottle and a set of tools), add the word "Special" to an otherwise unused block that has an inventory, for example your cockpit. After the cockpit is named something like "Mobile Cockpit Special", put a bottle and tools in it. Open up the Custom Data and make sure it's totally blank, then click Sort Inventory again. If you check the Custom Data now, you should see something like this, and the cockpit will now keep those items in stock every time you sort your inventory.
    [Inventory] Tool/AngleGrinder4Item=1 Tool/Welder4Item=1 Tool/HandDrill4Item=1 Bottle/HydrogenBottle=1

It should look something like this when you're done:

Now that you have a grasp on the basics and your grids are set up to sort, you should be good to go, but read on to find out about all of the other features of the sorter mod!
Basic Operation
Before we talk about configuring the sorting mod, we need to know how to run it!

There are three ways to trigger the sorter:
  • The "/sort" chat command - just enter "/sort" in the chat and the sorter will run if you are currently seated.

  • The hotbar of any cockpit or remote control - just drag the control block itself to your hotbar and select the Sort Inventory option.

  • The Control Panel menu of any seat or cockpit on the grid - even from bed!
The sorter cannot be run from Timer Blocks, Event Controllers or any other automated means, as it depends on your game client to do the bulk of the work, so you must trigger it yourself.

Result Display
When you run the sorter from the chat command or hotbar, the results will be displayed in the chat to avoid obscuring your view, but if the sorter is run from the Control Panel, the results will be displayed in a popup window.
Chat Results

Control Panel Results

The results will show the number of transfers requested, as well as any necessary items that may be required to fill requests from blocks on the grid or errors found when trying to determine what items were needed.
Basic Configuration
The Inventory Sorter was partially inspired Isy's Inventory Manager and thus uses very similar configuration language.

There are two kinds of container configuration directives: Type and Specific. There is also a priority for the container, and blocks like O2/H2 Generators and Guns will attempt to fill themselves with whatever they need even if you do not tag them.

Directives can be used on any block that has an inventory and a conveyor connection. This means that not just cargo containers can have directives - a block such as an Assembler or a gun can have directives. The requirement of having a conveyor connection does mean things that can't possibly give or receive items, such as Beds, are not possible to include in the sorting system.

Type Containers
Type containers use a part of the container's name to determine what to put in that container.

Type container category names are:
  • Ores
  • Ingots
  • Ammo
  • Components
  • Bottles
  • Tools
Simply naming a container something like "Ores Cargo Container" is enough to cause the inventory sorter to start putting Iron Ore, Stone, Cobalt Ore, etc. into that container when you run sorting.

If you want a container to accept any item, use "Any Item" in the name. This is equivalent to a type set of "Ores, Ingots, Components, Ammo, Tools, Bottles". For example, "Hauler Cargo Any Item" will allow the cargo to accept all possible items.

Priority
A priority system can be created by by adding "[P##]" in the container's name - for example, "[P10]". Lower numbers are higher priority - [P1] will be filled before [P20]. The possible priority range is between 1 and 250.

Containers will be filled in priority order if space is available and will never take from containers of the same or higher priority.

Untagged Block Filling
Certain untagged functional blocks will automatically fill themselves. For example, O2/H2 generators will attempt to maintain an amount of ice in themselves, guns will attempt to fill themselves with ammo, and Reactors will attempt to fuel themselves.
Ignoring Blocks
To disable the inventory sorter entirely for a specific block add, "Hidden" "Locked" or "!manual" to the name. The Inventory Sorter will then completely ignore the block.
Specific Containers
Specific container tags use the container's Custom Data to select items. These tags are placed in the names like a Type container, but cause additional, different behavior. The tags are:
  • Special
  • Limited
Special is an exclusive tag - combining Special with another tag such as Tools will not work and the container will be treated as Special only. Special containers use unique priority handling:
  • Special containers are considered highest priority above all other blocks except other Special containers.
  • If the mod config option AllowSpecialSteal is true (the default), Special containers will pull items from other special containers if necessary, depending on their relative priority.
  • If the mod config option AllowSpecialSteal is false, Special containers will only remove excess items and pull in needed items from other non-Special containers.
Limited is an inclusive tag: Type container categories and Limited tagging can be combined. "Cargo Container Limited, Bottles and Tools [P70]" is valid and will try to contain all bottles, all tools, and any items specified in the container's Custom Data. Priority affects limited containers normally and both limited and type containers participate in the same priority system.
Advanced Configuration
Special and Limited containers are the best way to make the inventory sorter work for you, because the Custom Data can be used to specify very intricate sorting directives.

The simplest way to create the custom data value needed is:
  1. Make sure the custom data is blank.
  2. Put the items you want in the container.
  3. Run the sorter.

When you open the custom data again, the contents of the container will have been copied into the custom data.

For example, if you put 6 steel plate in a container named Cargo Container Special and ran the sorter, you would be greeted with this in the custom data:
[Inventory] Component/SteelPlate=6
This is an inventory sorting directive to keep exactly 6 steel plate in the container.

If you took 3 out and put them in another container, then ran the sorter again, they will be returned to this container. If you put 3 more in and another container on the grid could accept them, the excess would be transferred out.

Special containers can have four different modes on a per-item-basis:
  • Normal: pulls in and stores the specified amount, removes any excess. Usage:
    item=100
  • Minimum: pulls in and stores the specified amount, ignores excess. Usage:
    item=100M
  • Limit: Only removes items in excess of the specified value. Any value below the limit is kept, but more is not pulled in. Usage:
    item=100L
  • All: Pulls in as many of the specified item as it can until the inventory is full. Usage:
    item=All

All is particularly useful to create a container that has just a few types of items, but tries to take as many as possible. For example, you could have "Base Cargo Container Construction [P70] Limited" that has the following custom data:
[Inventory] Component/Construction=All Component/Girder=All Component/BulletproofGlass=All Component/InteriorPlate=All

This container would contain only Construction Components, Girders, Bulletproof Glass and Interior plate, but would take as many as possible of each.

Combining "Limited" and Types
Type directives can be thought of as a broad spectrum "All" directive (in a way, something like "Ore/Any=All" is what the "Ores" type directive is in spirit, even though "Ore/Any" is not actually valid), but what if you want to be a bit more specific?

The "Limited" specific container tag can be combined with other types, such as Tools and Bottles. When using this tag, if you specify an item in the Custom Data that is covered by the Type directive, the Custom Data applies. For example, a "Tools, Limited" container would pull in any hand tools such as grinders, but if you wanted to explicitly disallow Basic tools, you could create a directive like this in the custom data:
[Inventory] Tool/AngleGrinderItem=0 Tool/WelderItem=0 Tool/HandDrillItem=0

This means that any tools would be put in this container, with the exclusion of Basic tools.

This also means if you used the following directive on a "Tools, Limited" container that only 2 Elite Grinders would be kept in the container, but as many of all other tools would be put their as possible.
[Inventory] Tool/AngleGrinder4Item=2
Untagged Blocks
Functional blocks such as guns or O2/H2 generators are considered non-special, high priority blocks and will attempt to fill themselves with whatever they need or get rid of things they don't want from other non-special containers.

To override these behaviors, add a Special/Limited tag or use one of the Lock keywords in the name.
  • Ice is added to or removed from O2/H2 generators to maintain around 70-80% fullness, but bottles will always be moved from generators to a Bottles container if one exists.
  • Bottles will always be moved from any tanks to a Bottles container if one exists.
  • Refinery inputs are left alone, but outputs are fully emptied.
  • If an assembler is in disassemble mode, its input (the ingots side) will be emptied, but if it's in assemble mode its output (the components side) will be emptied. The opposite inventory will be emptied if the assembler is off or not producing items. If the assembler is producing items, if it has too many of an input, that excess input will be removed to keep the assembler from clogging.
  • Reactor fuel will be filled or removed to make the reactor contain around 100 for Large Grid and 25 for Small Grid, unless there's not enough - then it will be equally distributed to all reactors.
  • Weapons will be fully filled with whatever ammo they want if they can only take a single type of ammo. If they can take more than one ammo type, make sure you specify which ammo to fill them with in the CustomData and tag them as Special.
  • Parachutes will be filled with canvas.
Priority System

The priority tiers in highest (will be filled first) to lowest:

Special [P0] ... Special [P255] (Default priority if unspecified in name) Untagged functional blocks like Guns or reactors (Default P0), and [P0] tagged cargo containers (don't tag stuff P0 yourself, let it stay reserved for functional blocks) Type (Ores, Ingots, Components, Ammo, Tools, Bottles) and Limited containers [P1] ... Type and Limited containers [P255] (Default priority if unspecified in name)
Excluding Grids
Whole grids can be excluded from sorting to allow you to trade with allies or preserve the state of an inventory within a ship when docked.

Add "[nosort]" to the name of a grid to exclude it and any connected grids. Add "[nosort]" to the name of a connector to exclude any connected grids from sorting.

Exclusions by both grid name and connector name are transitive.

For example, given this grid/connector topology, both Ship A and Ship B are excluded from sorting, if sorting is started from the Trade Station grid.
[Trade Station (Trade Connector [nosort]) <-> (Docking Connector) Ship A (Hangar Connector 1) <-> (Docking Connector) Ship B

The same behavior would apply if the tag was in the ship name as well:
Trade Station (Trade Connector) <-> (Docking Connector) Ship A [nosort] (Hangar Connector 1) <-> (Docking Connector) Ship B

Warning: Multiple Connections
If there are two or more connectors linking grids A and B, all connected connectors on one of the grids must be tagged with "[nosort]" especially if the connectors form a loop via other grids (e.g. Pistons or Hinges), or routes may form where sorting is allowed.

A topology like this provides a route to the ship and will cause unexpected item movement:
Station (Connector A [nosort]) <-> (Docking Connector A) Ship grid (Connector B) <-> (Docking Connector B)
Custom Data Creation
While it's possible to create custom data by simply throwing items in a container and running the sorter, what if you want to create a list containing all the prerequisites for many components, or a list of components that you don't have yet?

Get All Sortable Items Chat Command
The most raw view is to run a chat command:
/getallsortableitems


This will generate a list of all items that can be sorted and put the list in your clipboard. Paste it into Notepad or some other text editor to view the data.

The first section is a map of the the sortable ID to the display name so you can figure out what ID to use.

The second section is all items but in inventory custom data format. You can edit this section directly to remove item IDs and change numbers, then paste it right back into the game as long as you remember to keep the "[Inventory]" header.

Assembler Custom Data

All Assemblers (including survival kits and basic assemblers, as well as any modded assemblers) will have new buttons to help with this.


The resulting data can be pasted directly into the Custom Data of a Special or Limited tagged container to fill it with the prerequisites or results from the assembler.

Make Prerequisite Data
The "Make Prerequisite Data" button will open a window that will allow you to copy the prerequisites for the selected assembler's queue to the clipboard.

Given the following production queue:

Clicking the "Make Prerequisite Data" button will produce the following on a 3x efficiency world with no mods:

[Inventory] Ingot/Iron=767 Ingot/Gold=7 Ingot/Silicon=4 Ingot/Nickel=7

The numbers are rounded up, as the Custom Data directives do not allow partial items.

Make Result Data

The "Make Result Data" button will open a window that will allow you to copy the results for the selected assembler's queue to the clipboard. This is just the queue itself but is useful for getting it into text for or converting the display name of an item (Elite Grinder) to the inventory directive name (Tool/AngleGrinder4Item).

Given the following production queue:

Clicking the "Make Result Data" button will produce the following:

[Inventory] Component/SteelPlate=100 Component/Superconductor=10 Component/PowerCell=10

This is especially useful when using the Build Planner or something like a projector-to-assembler script to figure out what parts you would need to construct something, then putting those in a container to haul some place else.

Comments

If you want to leave yourself a comment in the Custom Data to explain to your future self or another person why you did something, put it on its own line with a leading semicolon:

[Inventory] ;Limit reactor Uranium because this is a cheap drone Ingot/Uranium=5
Building with Custom Data
It's nice to be able to create custom data from existing cargo, an assembler, or text, but what about if you want to make components for a blueprint? The sorter can do that too!

Make Data from Projection
Projectors (including modded projectors) now have a button called "Make Data from Projection".


This is compatible with the Multigrid Projector[github.com] plugin, and if that plugin is in use, will take into account any subgrids such as Wheels or Rotors in the blueprint. If the plugin is not in use, subgrids are not included in the results - it takes what the projector can give it.

This will open a window with the parts required to build the entire projection. This does not take into account any currently or partially built blocks - this is simply a raw accounting of the components required to produce the blocks in the blueprint. Any modded components are included, but any production chains (e.g. component 1 is used to produce component 2) are not.


Make Queue from Data

Instead of putting items in the inventory of the assembler, clicking the "Make Queue from Data" button will queue up items listed in the assembler's custom data, if possible.


This button is only enabled when the assembler has inventory Custom Data set and is not tagged Special or Limited.

Let's try it using the data we got from the projector!


Clicking the button and going to the Production tab shows the following queue - exactly what we need to produce the blueprint!


Queuing items this way does not clear the assembler's existing queue or alter it in any way, and the custom data is preserved, so if you have a set of items that you'd always like to be able to produce (for example, a missile's components) or, as demonstrated above, you want to queue required items for a blueprint, this is the way to do it.

Clicking the button again simply adds another copy of the data to the queue at the end.

Clearing Queues

If you want to clear the queues of one or more assemblers, all assemblers now include a Clear Queue button in the Control Panel, and if multiple assemblers are selected, the control panel button will clear all selected queues at once.
Production Quotas
WIP feature: Please report any issues!
For more complex production goals, the sorter supports quota production. It is strongly recommended to run the sorter before doing a quota check to redistribute items.

The quota system is simplistic but prioritizes preservation of existing jobs over replacement and includes custom logic to split queues over assemblers in tagged groups, but can work with Cooperative Mode instead if desired. Quotas can only be started by action (hotbar item) or button (in the Control Panel). There is no slash command to start quota production.

Quota Configuration
Configuring an assembler is done via the Assembler's Custom Data.

Defaults are shown in QuotaOptions, but the QuotaOptions section does not have to be present nor do all options in it have to be present. The defaults are shown below:
[QuotaOptions] AllowAssembly=true AllowDisassembly=false ClearQueue=false
  • AllowAssembly means that the assembler is allowed to create items when quota production is run. Defaults to true.
  • AllowDisassembly means that the assembler is allowed to disassemble items. By default, disassembly is disabled and must be enabled on each assembler that you want to disassemble items on.
  • ClearQueue clears the assembler's existing queue when the quota production is run. By default, the queue is not cleared, it is only merged with requested production.

Primary (see Quota Groups below) or single assemblers that are used as a "lead" assembler for cooperative mode must also have a Quota section. It looks like this:

[Quota] Component/SteelPlate=200000M Component/MetalGrid=100000 Component/Girder=5000L Tool/AngleGrinderItem=0

Ordering of the [Quota] section does matter - jobs are created in priority order, so the first item in the list is going to be the first item in the queue. If you have queued up something manually, the quota jobs are placed in front of of the current manual job.

M (minimum) means it will build to the amount and ignore any excess. L (limit) means it will disassemble any excess but not assemble any. No suffix means it will attempt to maintain an exact value, assembling if below the number and disassembling if above the number. M and no suffix behave the same if there are no assemblers that allow disassembly (the default).

Running Quota Production
Important: Only certain containers are considered when counting existing items. The same [nosort] and container ignore tag rules as the cargo sorter apply but all containers with the word "Cargo" in the name are considered to be quota containers. This can be changed in the global settings for the mod. This means that welders, connectors, etc. that have components in them will not be considered when checking to see how many items currently exist.

Run Sort first if you want to move everything to the correct place, then run Quota to top up or clean up. The "Clear Queue" button/action is also very helpful here if you're not sure what state your assemblers are in.


Quotas can also be started from the Control Panel:


Quota Groups
Quota groups are optional but are used to split jobs across multiple assemblers, much like cooperative mode. The difference is that assemblers in a quota group get the split job up front, whereas cooperative mode requires each cooperative assembler to pull from a primary assembler a little bit at a time.

Primary assemblers read quota data from that assembler's custom data. Secondary participates in load sharing and only reads assembler configuration (not items) from its custom data.

Assemblers in a "quota group" must have [Primary:QuotaGroupName] and [Secondary:QuotaGroupName] tags. The expected topology is that you have a single Primary and many Secondary assemblers. If you have multiple primary assemblers with the same tag, they act as a single primary and don't distribute to other primaries.

The Action hotbar item and button do not require a tag on the assembler for normal use. To use quota groups, you must use tags on the assemblers - the tag is how it can determine which assemblers should be used as secondaries. Game groups are not used for this purpose.

Co-op mode may cause issues but is not automatically disabled. If you want to keep using co-op mode, it is strongly recommended that you have a single primary assembler and leave all the secondary assemblers untagged to let co-op mode manage splitting of jobs.
Sort Profiles
Ever wanted to load up your grid for a specific purpose? Try Sort Profiles!

Here's a scenario where that might be useful: Let's say you normally go out mostly empty, to be able to pick up as much loot as possible, but sometimes you need to take off with a full complement of repair parts and additional ammo to fend off an attack.

Let's make a sort profile called "combat".

  1. Find one of your cargo containers and add the word "Combat" to the name, for example "Ship Cargo C3 Any Item [P90]" would become "Ship Cargo C3 Any Item, Combat [P90]".
  2. If you put items in the container and run "/sort combat", it will add a new "[Inventory:combat]" section to the Custom Data, or you can create custom data with one of the many other methods and add the tag to the [Inventory] section name yourself. It must be in the format "[Inventory:keyword]", with the keyword in all lower case.
  3. When you do "/sort combat", containers with the keyword "Combat" will be treated as Special containers with all that entails.

Overriding Priority for a Profile
If you need a container to be a different priority when using a sort profile, add a line that reads "Priority=5" or whatever the container's new priority should be to the "[Inventory:keyword]" section:

Ship Cargo C3 Any Item, Combat [P90]
[Inventory:combat] Priority=1 Ammo/LargeCalibreAmmo=150

This means that the container is Priority 90 when doing a normal "/sort" and Priority 1 when doing a "/sort combat"

Profiles for Existing Special and Limited Containers
The inventory sections for special and limited containers are merged together with the profile sections. This means that they retain their normal items, and the items don't need to be re-specified, but it does mean that you do need to mark items you don't want as 0 quantity to not accept them during a profile sort.

Consider the following:

Ship Cabin Cargo Special [P5]
[Inventory] Tool/AngleGrinder4Item=1 Tool/Welder4Item=1 Tool/HandDrill4Item=1 Bottle/HydrogenBottle=2 [Inventory:combat] Tool/UltimateAutomaticRifleItem=1 Ammo/UltimateAutomaticRifleGun_Mag_30rd=2 Bottle/HydrogenBottle=1

What this means is that during a normal sort, the cargo will be loaded with 1 of each Elite tool, plus 2 hydrogen bottles. When doing a "/sort combat" to use the combat profile, it will be loaded with 1 of each Elite tool, plus an Elite Rifle and 2 magazines, but only one Hydrogen bottle, not 2 as in normal operation.
Mod Configuration
Since the inventory sorter is 100% clientside, you can adjust certain aspects of it yourself to suit your playstyle.

The is generated the first time the mod is used and can be found on your computer in "%appdata%\Storage\####.sbm_CargoSorter\CargoSort.xml" where "####" is the steam mod ID.

The default looks like this:
<?xml version="1.0" encoding="utf-16"?> <CargoSorterConfiguration xmlns:xsd="http://www.w3.org/2001/XMLSchema" xmlns:xsi="http://www.w3.org/2001/XMLSchema-instance"> <SpecialContainerKeyword>Special</SpecialContainerKeyword> <LimitedContainerKeyword>Limited</LimitedContainerKeyword> <OreContainerKeyword>Ores</OreContainerKeyword> <IngotContainerKeyword>Ingots</IngotContainerKeyword> <ComponentContainerKeyword>Components</ComponentContainerKeyword> <ToolContainerKeyword>Tools</ToolContainerKeyword> <AmmoContainerKeyword>Ammo</AmmoContainerKeyword> <BottleContainerKeyword>Bottles</BottleContainerKeyword> <AnyContainerKeyword>Any Item</AnyContainerKeyword> <QuotaContainerKeyword>Cargo</QuotaContainerKeyword> <LockedContainerKeywords> <string>Locked</string> <string>Hidden</string> <string>!manual</string> </LockedContainerKeywords> <GasGeneratorFillPercent>0.8</GasGeneratorFillPercent> <ExpectedLargeGridReactorFuel>100</ExpectedLargeGridReactorFuel> <ExpectedSmallGridReactorFuel>25</ExpectedSmallGridReactorFuel> <AllowSpecialSteal>true</AllowSpecialSteal> <ShowProgressNotifications>true</ShowProgressNotifications> <ShowMissingItems>true</ShowMissingItems> <CopyResultsToClipboard>false</CopyResultsToClipboard> </CargoSorterConfiguration>

The options are as follows:
  • "SpecialContainerKeyword" - the keyword to look for in the container's name to figure out if it's a "Special" specific container.
  • "LimitedContainerKeyword" - the keyword to look for in the container's name to figure out if it's a "Limited" specific container.
  • "OreContainerKeyword" - the keyword to look for in the container's name to figure out if it's a Ore type container.
  • "IngotContainerKeyword" - the keyword to look for in the container's name to figure out if it's an Ingot type container.
  • "ComponentContainerKeyword" - the keyword to look for in the container's name to figure out if it's a Component type container.
  • "ToolContainerKeyword" - the keyword to look for in the container's name to figure out if it's a Tool type container.
  • "AmmoContainerKeyword" - the keyword to look for in the container's name to figure out if it's a Ammo type container.
  • "BottleContainerKeyword" - the keyword to look for in the container's name to figure out if it's a Bottle type container.
  • "AnyContainerKeyword" - the keyword to look for in the container's name to figure out if it can accept any possible item.
  • "QuotaContainerKeyword" - the keyword to look for in the container's name to figure out if the items contained within should be counted for production quota.
  • "LockedContainerKeywords" - A list of keywords used to ignore containers. Containers with names containing these keywords will not be sorted and will be totally ignored.
  • "GasGeneratorFillPercent" - The amount of ice to put in O2/H2 generators. This must be over 0.3 (30%) otherwise the generator will pull some itself, but should generally be less than 1.0 (100%) to leave room for bottles so that they can be filled.
  • "ExpectedLargeGridReactorFuel" - the amount of fuel (Uranium, usually) to put in a Large Grid reactor. This does not care if the reactor is large or small. Set to 0 to disable this feature entirely and let reactors manage themselves.
  • "ExpectedSmallGridReactorFuel" - the amount of fuel (Uranium, usually) to put in a Small Grid reactor. This does not care if the reactor is large or small. Set to 0 to disable this feature entirely and let reactors manage themselves.
  • "AllowSpecialSteal" - Allow Special tagged containers to steal from other lower priority Special tagged containers. If this is false, Special containers will never take from each other in any case.
  • "ShowProgressNotifications" - Display the number of transfers needed in the chat. This can reduce chat spam if you want to get rid of it. This does not affect the Control Panel window, the number of transfers is always displayed there.
  • "ShowMissingItems" - Display missing items from Special/Limited/functional blocks in the chat. This can reduce chat spam if you want to get rid of it. This does not affect the Control Panel window, the number missing items is always displayed there.
  • "CopyResultsToClipboard" - Enables copying missing items from the Control Panel sort results screen to the clipboard in a comma-delimited format for pasting into a spreadsheet program.
10 коментара
Merii  [автор] 18 дек. 2024 в 11:25 
@RoboRob: I'll do you one better - full quota production is released as WIP, let me know if you have any issues or comments.
RoboRob 18 дек. 2024 в 2:38 
Question: I've been running this for a couple of weeks and love it. However, I'm wondering if there is a way to place a queue in the assembler with what is missing from a special container. For example, if I have 2000 steel plates listed but only have 1500, could I get the script to queue the 500 missing? It's like what Isy does with Auto Crafting.
Merii  [автор] 14 окт. 2024 в 13:34 
No, and that's by design. There will not be a way to trigger this automatically. If you want automatic sorting, script-based solutions are your only option at this point.
Squeech 14 окт. 2024 в 12:12 
Is there some way to auto- trigger the sorting action in e.g. a set period or event?
Merii  [автор] 21 септ. 2024 в 14:22 
The comment character is a leading semicolon (;). See: https://spaceengineers.wiki.gg/wiki/Scripting/Handling_Configuration_and_Storage

Thanks for the feedback, and you're welcome! I've added a note to the guide re: comments.
A succulent Chinese meal? 20 септ. 2024 в 19:34 
I want to say thanks for this great mod and the efforts you have put in to make it work and have all these features!

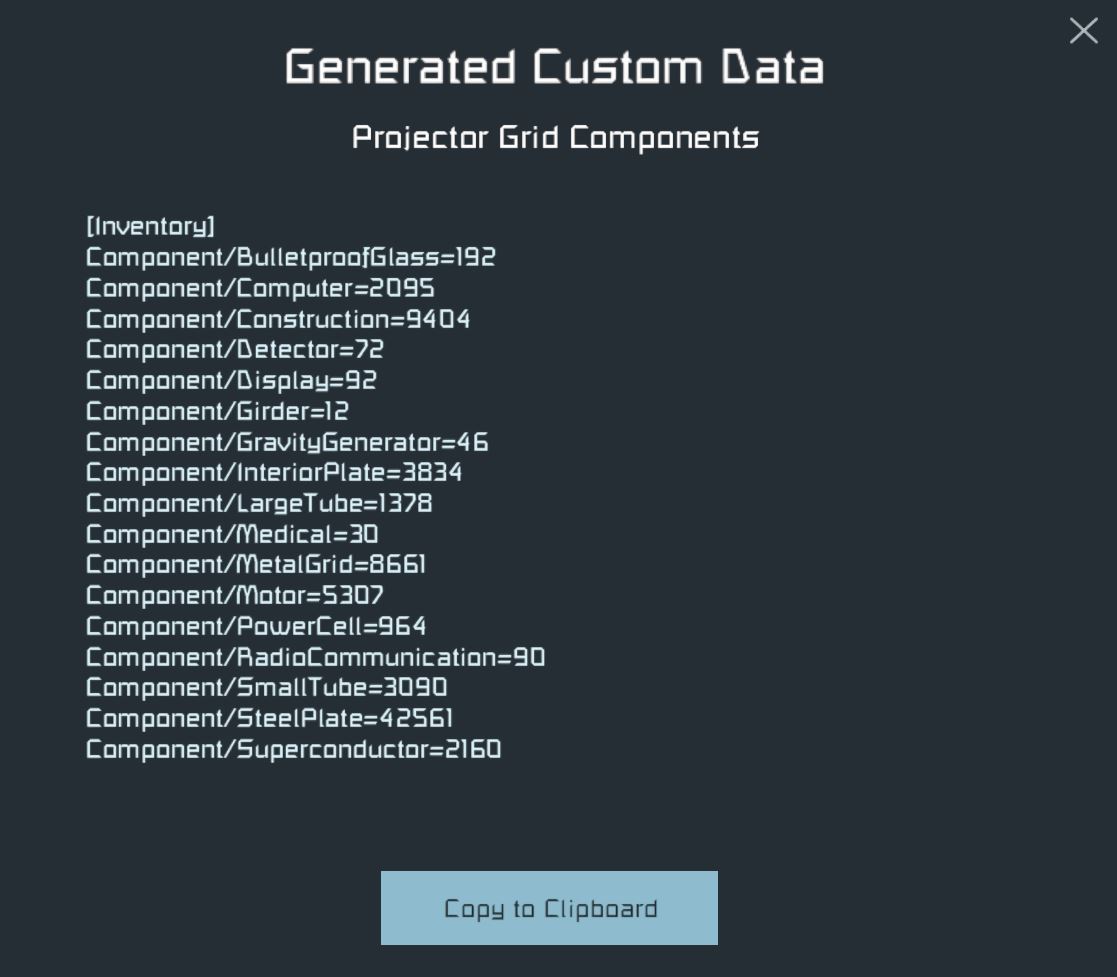
A question: does it currently have the ability to let the user leave comments in the custom data fields? I couldn't see this possibility in the above info.

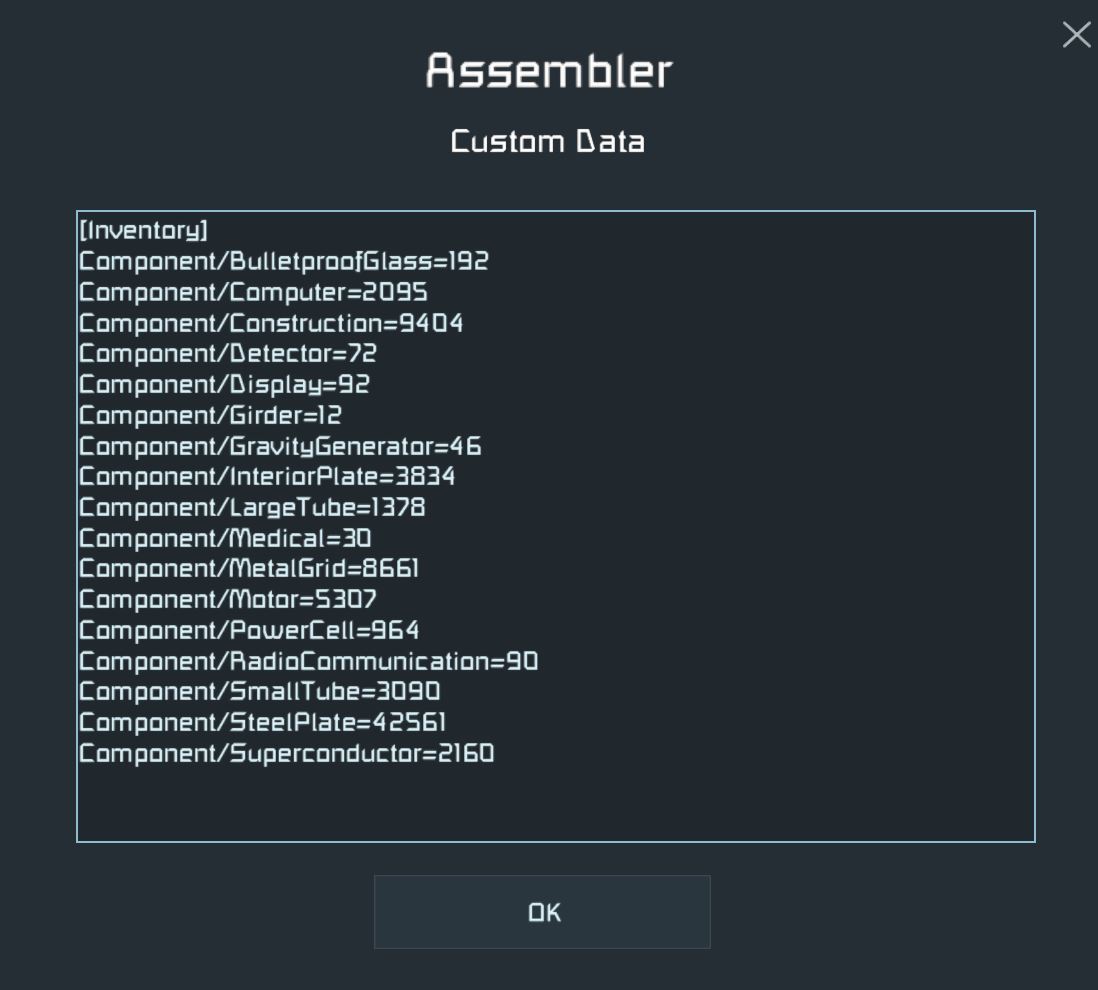
Example use is making special load outs and putting notes in the custom data to explain what it's for or any other notes we may want to put in the custom data block.

e.g the below (which I did try):

"[Inventory]

//reactor load out for combat

Ingot/Uranium = 3000"
Kev 18 авг. 2024 в 16:29 
Fair enough, inventory sorting time >:)
Merii  [автор] 17 авг. 2024 в 23:50 
Only if you feel like it is! It's as "cheaty" as any other plugin.
Kev 17 авг. 2024 в 22:54 
would this be cheating if i'm on an official keen SWH server?
Bumongus 24 юни 2024 в 1:24 
Thank you :steamhappy: