Euro Truck Simulator 2

Euro Truck Simulator 2

100 ratings
Animated accessories / passenger modding guide, for Euro truck simulator 2
By Willet.inc
In this guide, I will show you all my step that I did to my make co driver mod, and I will list a problem I run into and how I solve them in each step.
4
2
4
   
Award
Favorite
Favorited
Unfavorite
Introduction
This is a guide to show you how I mod my animated passenger mod. I do not claim that this is the right way to do it, just the way I get it to work.

I assumed that you have some experience with modding ETS/ATS, and know how to use Blender.
If not, I suggest that you look at some modding guides on youtube to see how to set things up and how to use the modding tools.

In this guide, I will show you all my step that I did to make Ada codriver mod, and I will list a problem I run into and how I solve them in each step.

Special thanks to Farcel for his helpful advice and his mod format.
And 鲁丁丁 for inspiration and his mod format.

The copyrights of Ada Wong models and related contents in this mod are owned by Capcom, Japan.
The basic
If you are familiar with ETS/ATS modding, you know that the game has a object type that can do animation, called “Mover”, which are used to create people and animated building in game.
But the Mover object type cannot be used as your truck accessory, directly.

And there is another object type, called “Locator”, which are slots that other objects can be attached to, like headlight slots on your truck’s bar.
Locator can be used as your truck accessory.

You see where this is going?
We can make an animated accessory/passenger for our truck by using a Locator as a item, and attached a Mover to said Locator.
Step 1: Prepare your Blender tool and folder.
First make a root folder (this In my case “AdaSeat”), inside make a “def” folder. This is a folder that contain a structure of in game file where your parts will go (watch some tutorial on Youtube for more info)
You can copy file structure from base game file, or my mod.

Your truck folder should look like this (in the picture, I change my root folder name later, sorry)


Inside should look like this


* The structure I show you is for seat accessory, your folder structure may look different if you try to mod for other part

Go back to root folder, make a “vehicle” folder, this is where material for your mod go.
Again copy a file structure from base game, for seat accessory it should be

\vehicle\truck\upgrade\interior_decors\toyseat\

Inside this folder create a new folder to contain your model texture, name it whatever you want, I name mine “ada_seat”


Copy all your model’s texture file into the folder you just create.
ONLY the texture file, other type of file may cause an error when you start modding


Go back to root folder make a new “unit” folder


Left it empty, for now

Your root folder should look like this


Open blender and set your SCS Root folder and Hookup folder to where you folder is


Step 2: Prepare your model
Whether it is your own or 3rd party model, it must be able to be imported and edited in Blender by whatever add-on you use

Model that I able to mod into a game so far
  • mmd
  • koikatsu
  • xps
  • source film

A bullet points that you must do to make your model work in game.


1.Vertices
Each object in your model must not have more than 65500 vertices. (Overall vertices can be more than this as long as each part of your model doesn't exceed this.)

You can check your object vertices by this step 1 -> 2 -> 3


There are many ways to reduce the number down. What I use are tri to quad, un-subdivide, decimate geometry, or just delete some part that I don't need like hair piece and accessory.


In this case I will delete her gun, harness, and bandage
And I will reduce a number of vertices of her back part, because no one will see it anyway.

2.Texture
All the material must have a texture file. Blender generated material will not work, if your model uses that you must make a new texture for your model.

File type of texture must be .tga
If your textures are other type of file, convert it all to .tga

Texture size must be the power of two (512, 1024, 2048,...) or your texture will not render ingame.
Texture that is too big like 10k+ will also give you an error.


3.Bone
Number of bones in your model must not exceed 255.
So delete the one you won't use.
AND DO NOT FORGET to weight paint object, whose bone you just delete, to a new bone. Or you will get an error during conversion
Step 2.5: Make a root object
Click SCStool, add root object, rename it. (When you name anything, only use lower case, number and _)


Parent your amature to the root object, select animated model


*Animeted root object can only contain 1 amature.
Step 3: Shading
Now let's convert your model material to the one that is used in the game.

In object mode, select object in your model, go to material tab, go down to scs shading.


1.Select the one you want to use, I always use diff.spec (I don't know what another one do)
Then select the model texture that you prepare (remember .tga file only)
*I don't know how to apply bump and normal map texture to the model, I only use the base texture.

2.Select the UV (just choose the first one)

3.If your texture is weirdly put on top of each other, try using “add” or “a” mode, or play around with the setting until it look good.

4.Adjust shininess and brightness

5,6 If these 2 options showup just click it

your model texture should show up. Do this to all material


If your model turns black after doing all this, check the object UV map, sometimes UV map is not aligned with texture. If the UV was bigger that the texture, try un-wrap it first


Step 4: Making animation
What you should know about animation

1. The game only accepts basic animation (location, rotation, scale)
Shapekey and IK animation will not work in game even if it's work in Blender

2. Any bone animation that is not put on the timeline will be reset to 0,0,0 value in game.

3. Maximum range of animation is 60 seconds, I don't know if there is a maximum frame.

4. Too much movement (like rotating joints more than 90 degrees) may cause in game animation to randomly scale up.

So, I suggest that you change a rest post to sitting position so your model don't have to move too much.
*Make a back-up save before you do this, in case you want to make another pose

You can do that by
1.Select object
2.Go to property tab
3,4 Copy your amature,


Apply the old one. Do this to all object.


Now select your bone
1.Go to pose mode
2.Pose->Apply->Rest pose


5. Position
Do not change character position yet. Wait until you see where it spawned in game first.

After you finish with your animation,
1.Select the amature. Go to scs animation tab.
2.Click +
3.Click add animation.
4.Define what will be your start and ending frame.
Define how long will animation be in seconds, the model fps will then be calculated and show to you in animation player tab.

Step 5: Test your model and adjust the texture file
Now time to test if your model could be exported properly.
1.Select Root object (just the root no need to select all hierarchy)
2.Choose selection
3.Click export, hit enter.


If there is an Error, that means it will fail when you export until you fix said error.

If there is a Warning, that means your model can still be export and use in game.

* I never have any problem using model with ton of warning massage.

** I recommend that you do not rename your bone like the Warning massage told you to. It can mess up bone weight, animation, and your model.

If you want to reread the massage you can see it at \ConversionTool\bin\win_x86\ mass_convert.log

in a picture I got ton of warning but no error, this model can be export just fine.


---------------------------------------------------------------
Here are errors that I encounter, so far

<ERROR> *** ERROR *** : ….: piece … has more than allowed number of vertices (65535)
Cause: Object vertices are more than 65535,
Fix: reduce numbers of your vertices

<ERROR> *** ERROR *** : ….Index outside array boundaries.
Cause: Object vertices are more than 65535, or texture file are too big (10k+)
Fix: reduce numbers of your vertices, scale down your texture (and make sure it’s size is power of two)

Object <name> from SCS Root <name> has … vertices which are not skinned to any bone, expected error during conversion!
Cause: Some of your object are not weight painted to any bone
Fix: Weight paint, auto weight or just delete those vertices. If you cannot find that unpainted vertices, select “loose vertices” in edit mode.

---------------------------------------------------------

After you fix every error, if you got any, head to folder where your texture is (again, make sure it is in root folder)
You will see that converter just made a new .tobj file with the same name as your texture.


Head back to Blender. Select material and change all your material texture from .tga to .tobj file.


Now lets try to export an actual mod folder
1,2,3 Repeat the same steps
4. Clean the old convert file from the converter (do this every time you try to export, to prevent an error)
5. Name your mod, click the right icon to choose if this mod is for ETS or ATS
Choose where your packed mod will go, you place it at \Documents\Euro Truck Simulator 2\mod so you don’t have to move it later.
DO NOT place your packed mod in root folder
I suggest pack your mod as folder to make editing easier, Click pack mod


If everything going correctly, cmd should run and close on it own, and if you go to your root folder you should see a new folder of your mod. Congratulations, your model will probably work just fine.
Delete that newly created folder, this is just for testing.
Step 6: Making a Hookup
Now we will make a file that tell the game where to look for your animation model.

Go to your hookup folder

1.Make an .sii file with notepad, rename it whatever
Inside type in
SiiNunit { animated_hookup : <hookup name> { model: "/vehicle/truck/upgrade/interior_decors/toyseat/<mod folder name>/<animated model name>.pmd" animation: "/vehicle/truck/upgrade/interior_decors/toyseat/<mod folder name>/<animated model name>.pma" } }
2. Name your hookup, I suggest you give it a more unique name than seat, to prevent conflict with others mod

3. .pma and .pmd file name should be the same as your animated object


Step 7: Making a Locator
1.Go to SCStool, add Root.
2.Rename you root object, make it different from animated model.
3.This time make it a Rigid model.
4,5 Add looks and variant


Next, we will add locator to the root object
Add empty object, I use arrow to make it easier to adjust position.


1.Add the empty object to the root object
2.Make it a locator, give it a name that reflect the variant it will use (in this case “default”)
3.Make it a model type
4.If you set a hook up folder correctly, It should be selectable in hook up tab


You are done setting up locator, for now.
Step 8: Set up a def folder
Go to your def folder


1.Go to \def\vehicle\truck\<truck’s name>\accessory\toyseat\ , create a .sii file, give it a unique name to avoid conflict with other mod.
Inside write…
SiiNunit { accessory_addon_int_data : <file name>.<truck’s folder>.<part folder> { name: "Part name" price: <price of your part > unlock: <level that will unlock it> icon: "" part_type: aftermarket exterior_model: "/vehicle/truck/upgrade/interior_decors/toyseat/<your locator file name>.pmd" interior_model: "/vehicle/truck/upgrade/interior_decors/toyseat//<your locator file name>.pmd" } }
2.Change these lines according to your folder and file's names.
3.You can left icon as blank for now, we will come back to it later
4.Your file name should be the same as your locator root file


Do this to all truck folders.

Now, time to export your mod, for real.
Step 9: Exporting your mod
Repeat the same exporting step, but this time select both animated and locator objects.


When exporting is done, go to your mod folder. You will see your animated and locator mod files


Move locator mod file (in my case ada_seat.pmg and ada_seat.pmd) to \vehicle\truck\upgrade\interior_decors\toyseat

move animated mod file (ada_anim.pmg. ada_anim.pmd and ada_anim.pma) to \vehicle\truck\upgrade\interior_decors\toyseat\<your texture folder> (in my case ada_seat)


Make sure that the file is in extract direction you write in your hookup .sii file.


and your truck .sii file

Step 10: Test your mod in game
If you didn’t set your package path to game mod folder, move your mod folder there (default path is : \Documents\Euro Truck Simulator 2\mod)

Open the game. Go to mod option, you should see your mod show up in mod selection screen now. Activate it.
When you are in game go to vehicle browser. Choose a truck and find your item in your assign position. Your item should show up.


If you don’t see your model or your model texture is all pink, open console and look at error log
It should tell you what went wrong
*except the one I show below, you can ignore that one.


If your game just CTD as soon as you choose your item, you can find log file at \Documents\Euro Truck Simulator 2\game.log.txt

---------------------------------------------------------------
Here are errors that I encounter, so far

<ERROR> [fs] Failed to open file …..' in the read_only mode.
Cause: Game cannot find said file in your mod folder
Fix: most of the time it is spelling error when you name you folder or writing in .sii file. Make sure that the path you write in .sii file actually point to that file location

<ERROR> [fs] Failed to open file ‘C:\Program file…..' in the read_only mode.
Cause: Your file directory should not contain any drive location, if this happen it is because Blender rename your file location without you knowing.
Fix: Go back to blender, look at object’s material tab and change it back. Do this for all object.


<ERROR> [dds] Incompatible image ….. : mipmap presence requires power-of-two image sides.
Cause: Your texture size is not power of two (512, 1024, 2048,….)
Fix: Chang it, duh.

My model proportion is all wrong
Cause: Model scale in blender are not 1,1,1
Fix: If you need to change your model size, apply it after you are done (Object mode, Object -> Apply -> Scale) So it become new 1,1,1

/<your locator file name>. pit: 21: missing AutoMat or Material paragraphs [token '}']
Fix: https://forum.scssoft.com/viewtopic.php?p=1849628#p1849628
#357 has a solution
thanks @囧呆 for report problem and solution
---------------------------------------------------------

Fix everything and reexport your mod, don’t forget to change .pmd, pma pmg location

If you don’t see any error massage but cannot find your model, try look around or look at exterior view of your truck. Sometimes the game just spawn your item way outside the truck.
Step 11: Position your item
Go back to blender, choose the amature (Not the root file)


Move and rotate it’s position until you satisfied.
Your model will look out of proportion if you adjust the scale. If you need to change scale, apply it after you finish by Object -> apply -> scale, make sure scale is at 1,1,1
Export it’s again (don’t forget to move .pmd .pmg and .pma file again.)

*Tip for quickly edit your mod
You don’t have to quit and restart your game when editing your mod file.
Just tab out of your game, editing or replacing your mod, go back into game, open console, type “game”
The game will reset back to pause menu and reload all the mod.


Keep adjusting the position until you’re satisfied.
Step 12: Position variant
For now, your item will be in the same position for all the truck. If you are satisfied with how it look, you can skip this part. But if you want to adjust a position for all individual truck you need to make a variant for you locator

For example, I feel like my character sit too far in the front when she is in Scania streamline, and I only want to adjust position for this one truck


1.Select the locator root file
2.Add a part, rename it to reflect what truck they control. (In this case, streamline)
3.Add a variant, rename it after part.
4.At the table link variant and part together. Make sure that each variant only link to a part with the same name.


1.Add a new empty object. Rename it to reflect the truck.
2.Put a new object in Locator group.
3.Assign it to the new part. And make sure that the old default object is assign to defaultpart.


Go to your def folder open truck folder (\def\vehicle\truck\scania.streamline\accessory\toyseat) open .sii file and change the variant to the new one you make.


Back to blender adjust a position of your locator object (in my case I will push it back a bit)


Re-export your mod, and see in game if the item is in a correct position.
Step 13: UK version
By default, the game will make UK version of the item by flip it (For some part, like bed, it's look fine). Which cause our character to turn their back on us. So we need to flip them back.


Go to Blender.
1.Select all hierarchy of the locator object. Duplicate it.
Rename root object and all it's variants (in my case, just add _uk)
2.Flip all the variant 180° ( again flip object not the root object)


Go to your def folder, open .sii file, add these line.
exterior_model_uk: "/vehicle/truck/upgrade/interior_decors/toyseat/<your locator root file>.pmd" interior_model_uk: "/vehicle/truck/upgrade/interior_decors/toyseat/< your locator root file >.pmd"
Do this to all trucks folder. And don’t forget to cursed the Brit for making you do this.


Go back to Blender, select all 3 root objects and export. You should get 2 more mod files for uk variant. Put it in the same place as normal version.


Cursed the Brit one more time and you are done.

After you check that everything is working correctly, I suggest that you delete your mod folder and export the new one.
Because if any unused file from older version of your mod is left over in the folder, it can cause an error when you try to upload it to stream
Step 14: Making a UI picture
Your awesome mode deserved a cool store picture.
Open blender and click this to clean all the leftover converted file


Now go to your ConversionTool folder open base folder


Inside create folder \material\ui\accessory\truck\upgrade\interior_decors

Inside the interior_decors folder create .tobj file with notepad, name it whatever.
In the file add this line. (in my case I replace <texture_name> with ada)
map 2d <texture_name>.tga addr clamp_to_edge clamp_to_edge nocompress
Making .mat file with the same name. In the file add…
material : "ui" { texture : "<.tobj_name>.tobj" texture_name : "texture" }

Now make create a ui picture, size 256*64
Save as .tga file with the same name

Your folder should look like this


Now go back to ConversionTool folder, click convert.cmd
After the cmd finished, you can retrieve your game ready files at /rsrc/base/@cache/

Move .mat and .tobj file to \material\ui\accessory


Copy the material folder and put it in your mod folder (DO NOT put it in your root folder, it can cause an error if you try to export your mod again)

And delete all file in ConversionTool/base folder it can cause exporting error if leftover

Now go to your mod folder (not root folder), open def folder and go to the truck .sii file
Add your picture name to this line, repeat for all truck


Step 15: Making multiple pose/character mod
If you want your mode to have multiple pose or characters, you must create a new folder and repeat all the step like you making a new mod.

If you use the same character, you can copy all texture file to your new folder and open the same blender project, just make sure to…
1. change root folder to your new folder
2. do not use the same name for object/folder/hookup file as your first item.
3. check that material’s texture use the file in your new folder, not the old one
The texture address should not show drive if it use file from your root folder


After you finish just put both mode file into the same folder.
If you use the same texture, it can be replace with no problem.

-----------------------------------------------------

Now you are done. But not really.
Please follow this guide for uploading your mod to steam, good luck.

https://modding.scssoft.com/wiki/Tutorials/SCS_Workshop_Uploader/How_to_upload_new_mod%3F
19 Comments
ysj0925 Apr 16 @ 11:41pm 
Please make pregnant woman co-driver
Willet.inc  [author] Mar 8 @ 7:35am 
Did you set up Hookup lib dir and mat substance lib? (I did't cover it in my guide)
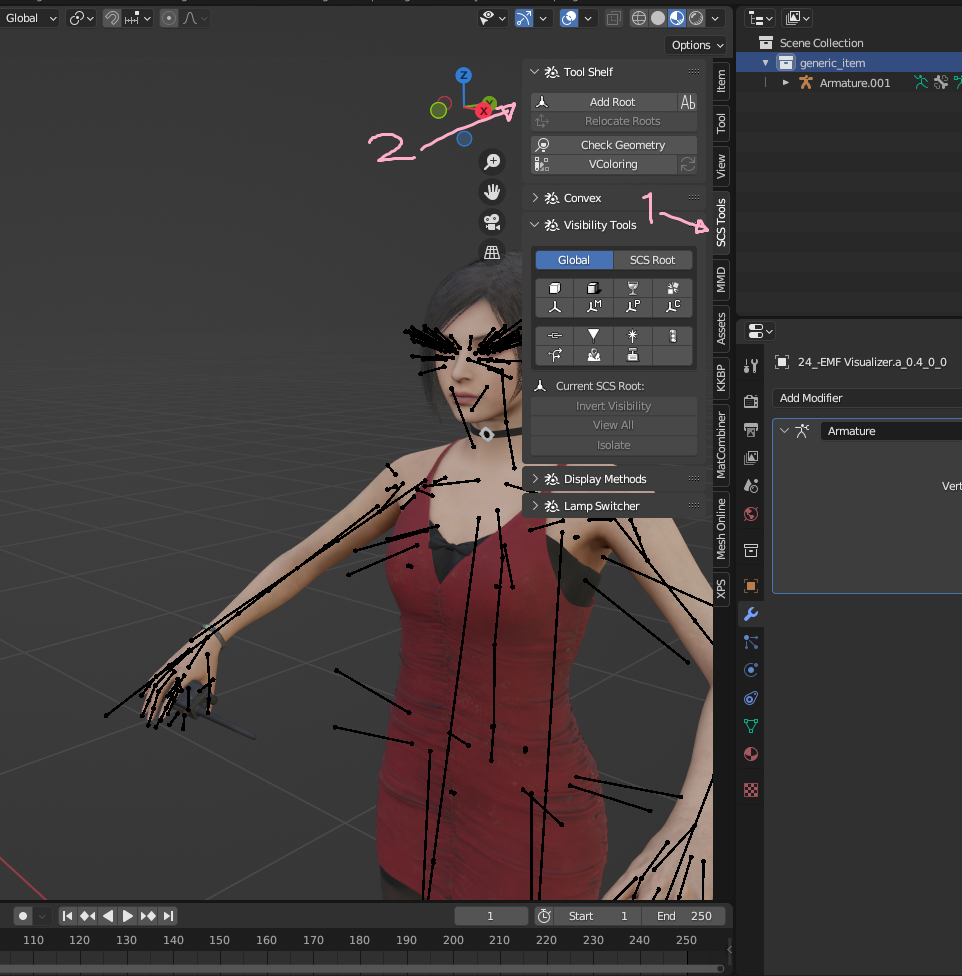
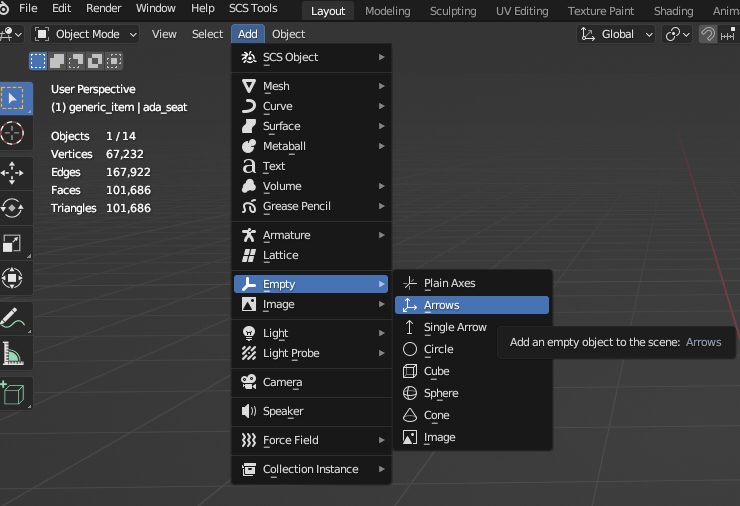
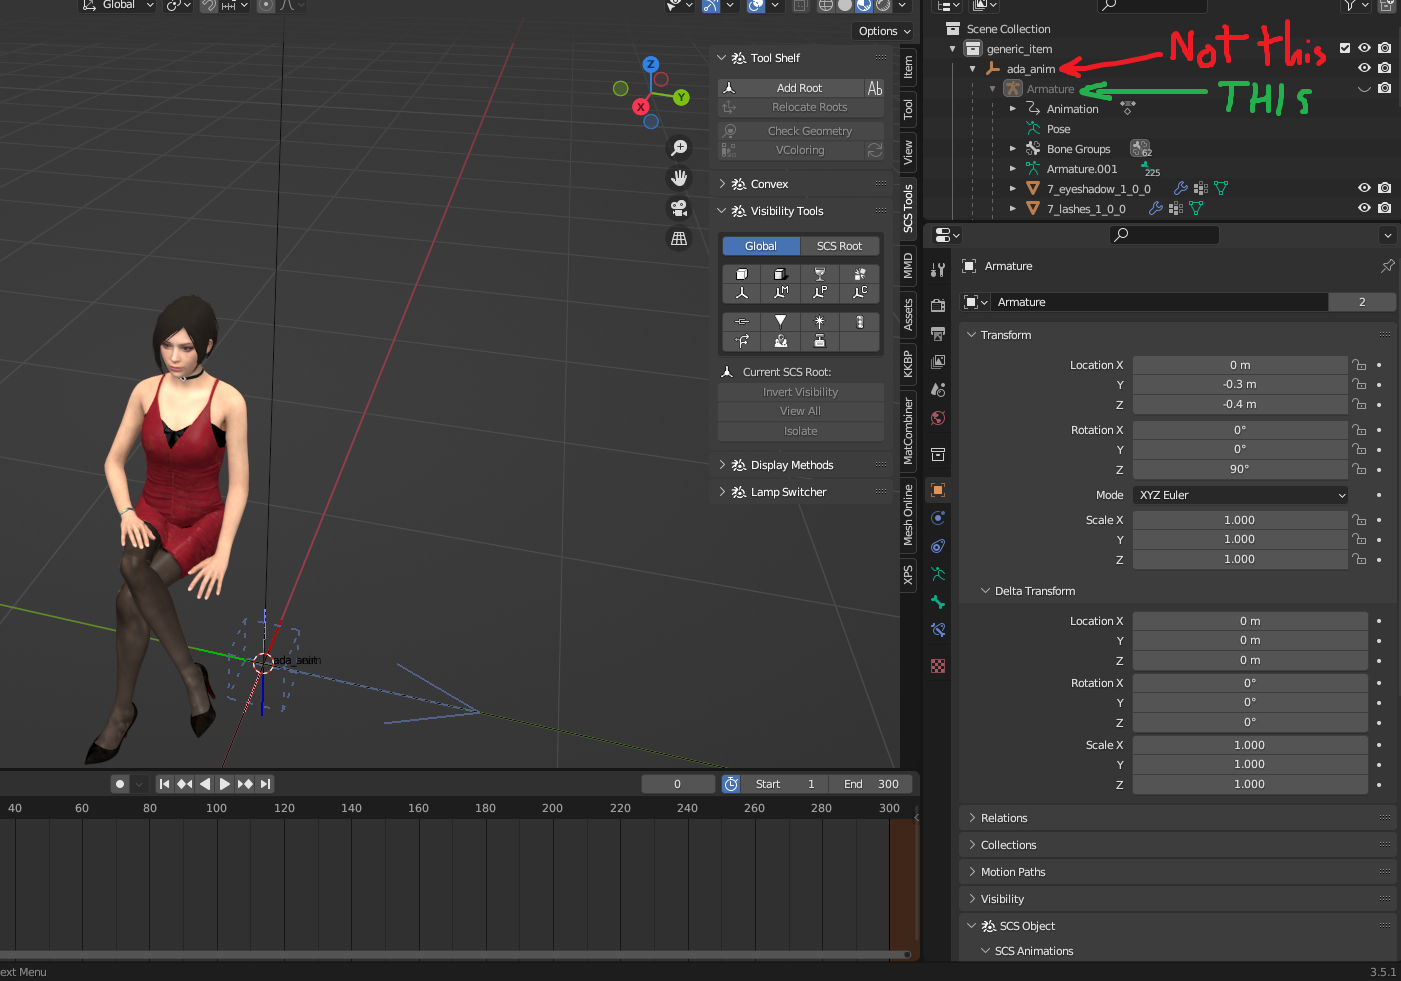
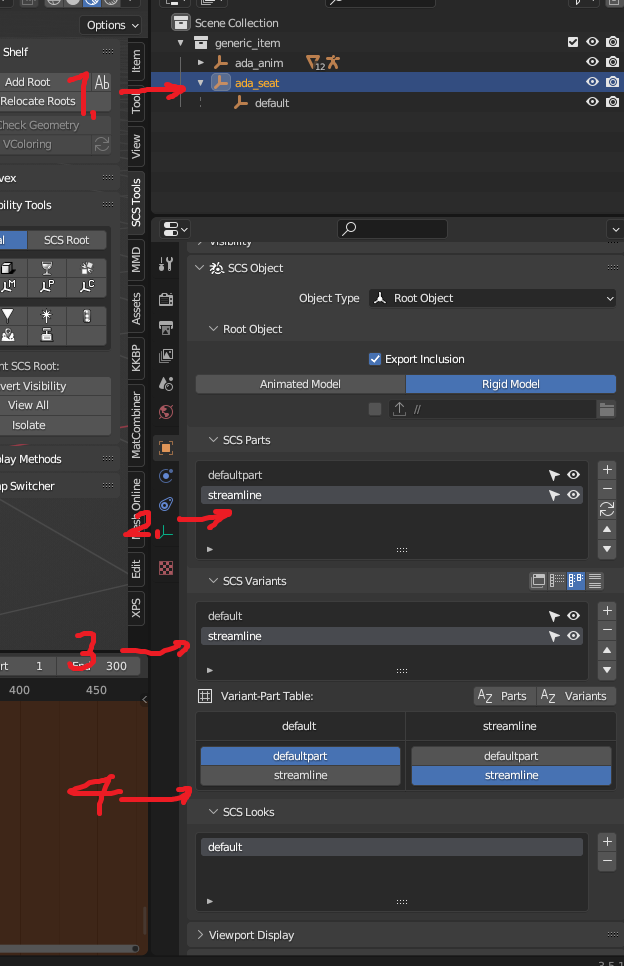
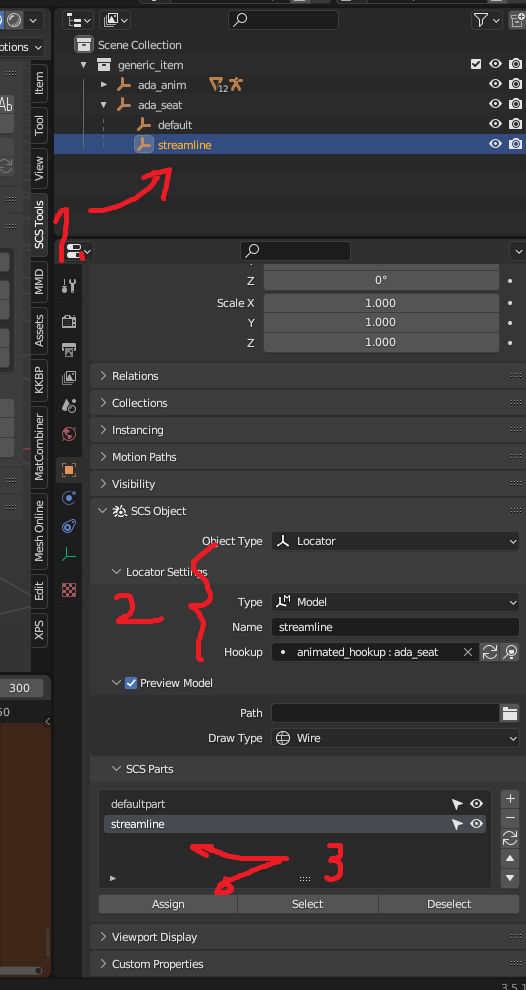
Try follow the guide to set up blender
https://www.youtube.com/watch?v=EslvVADClAE&t=826s

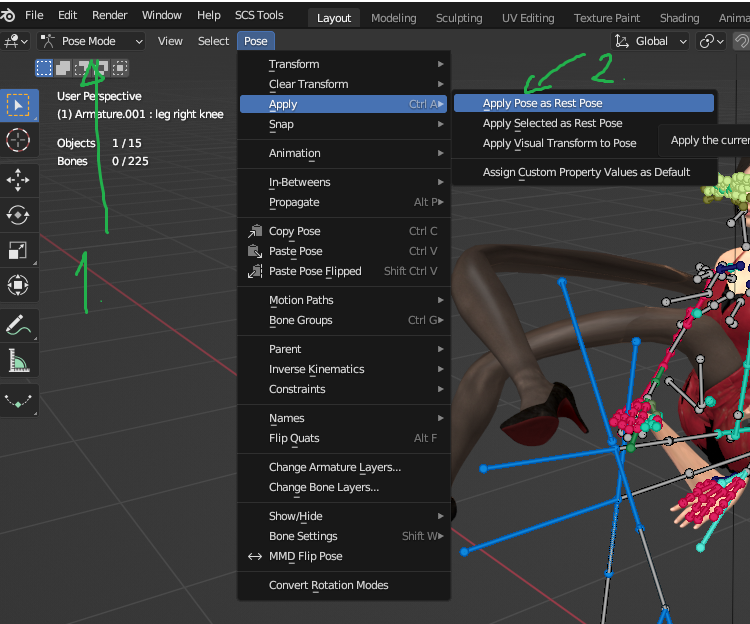
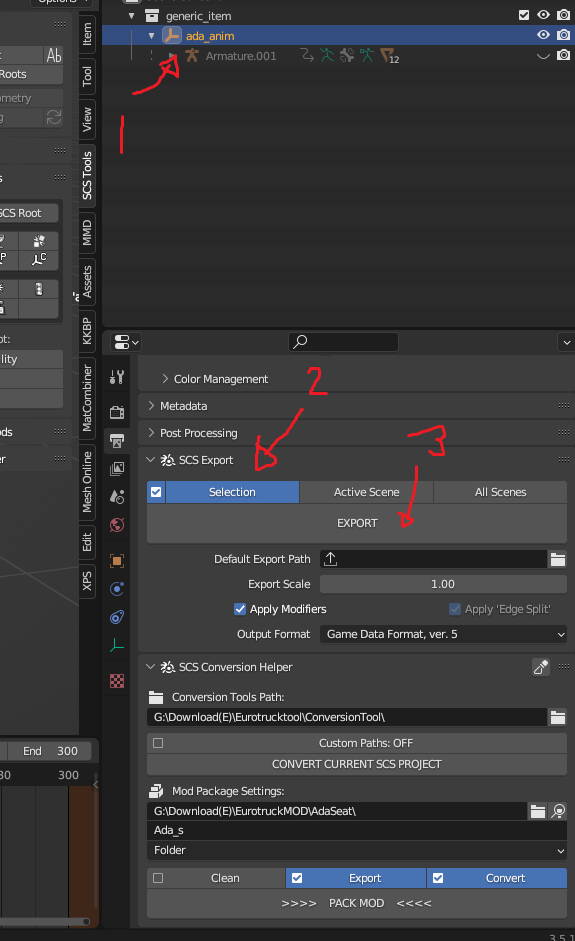
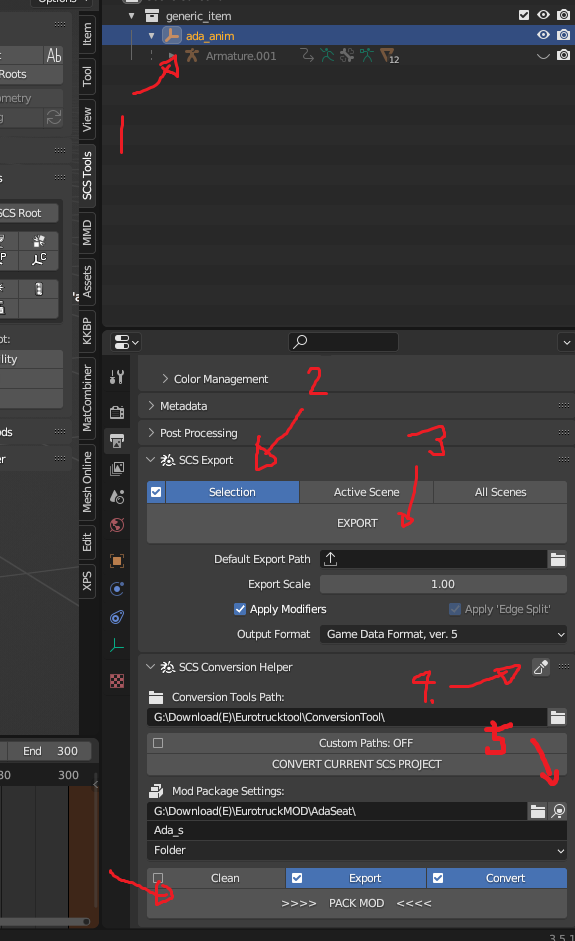
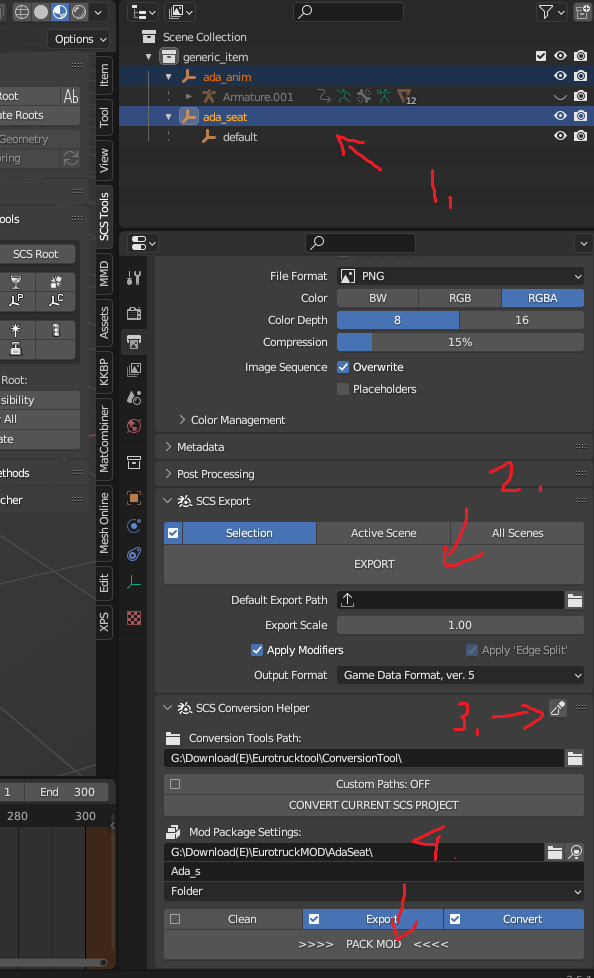
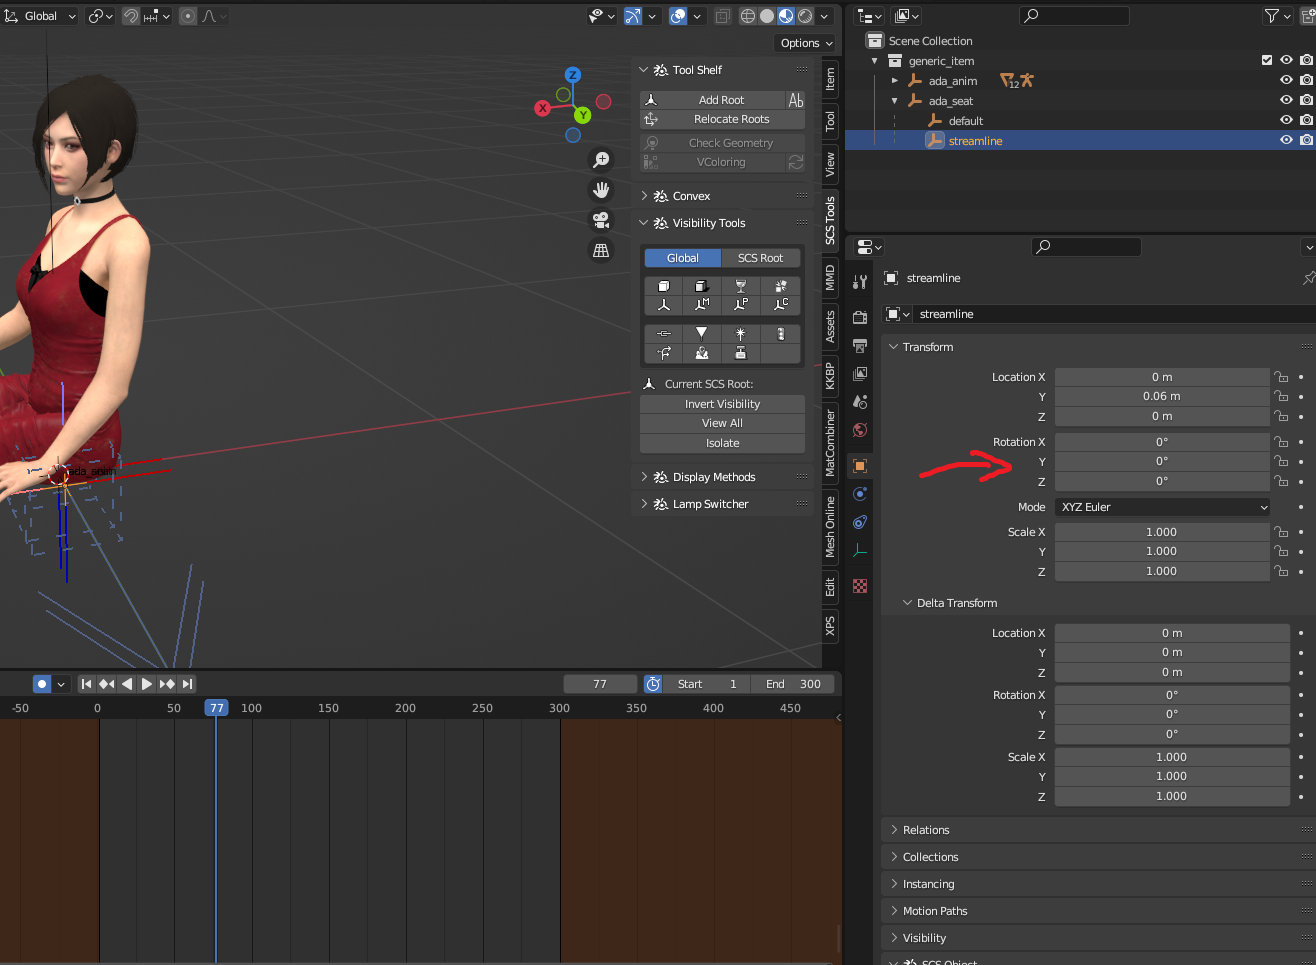
Which export step are you stuck at, 5 or 9?
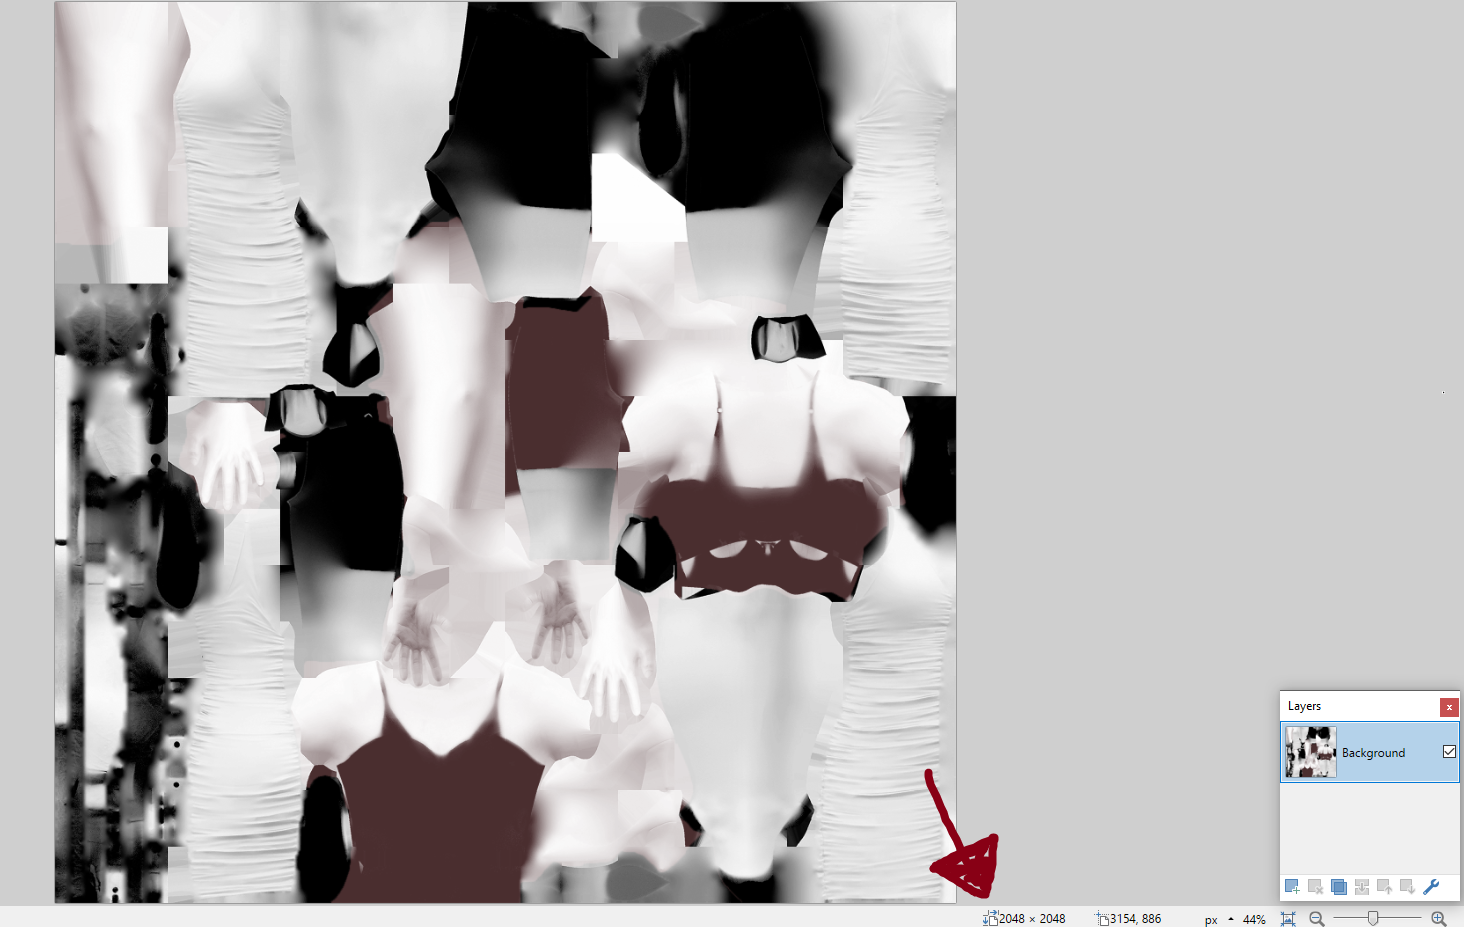
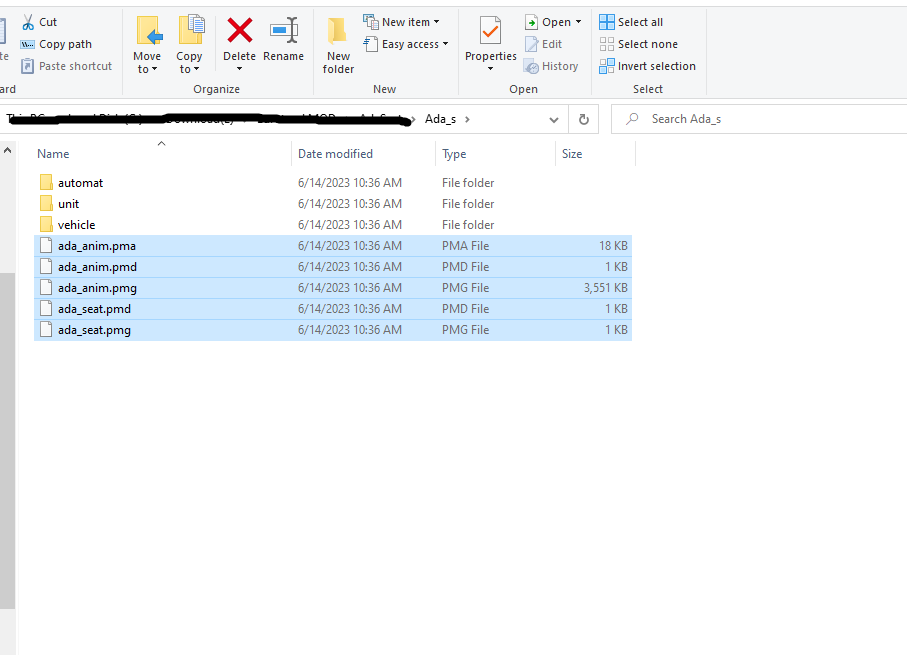
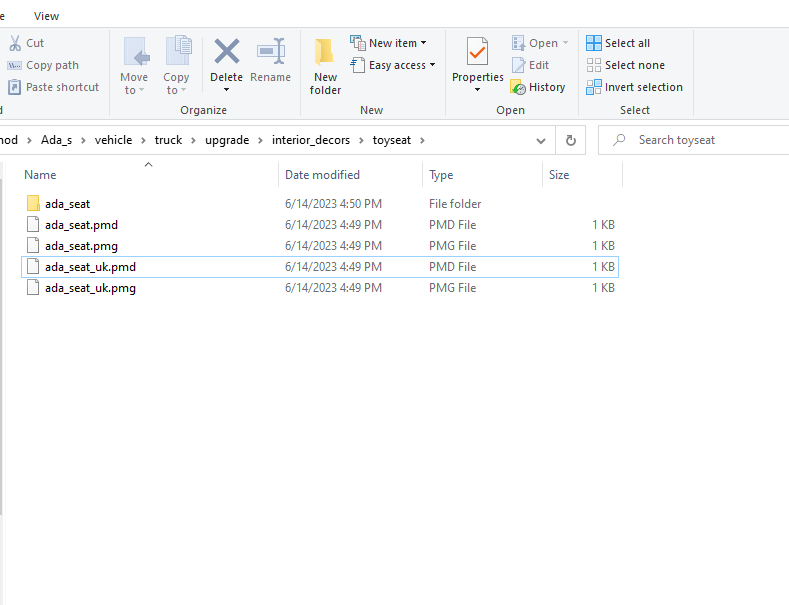
Make sure you click "Clean the old convert file" button before you click export
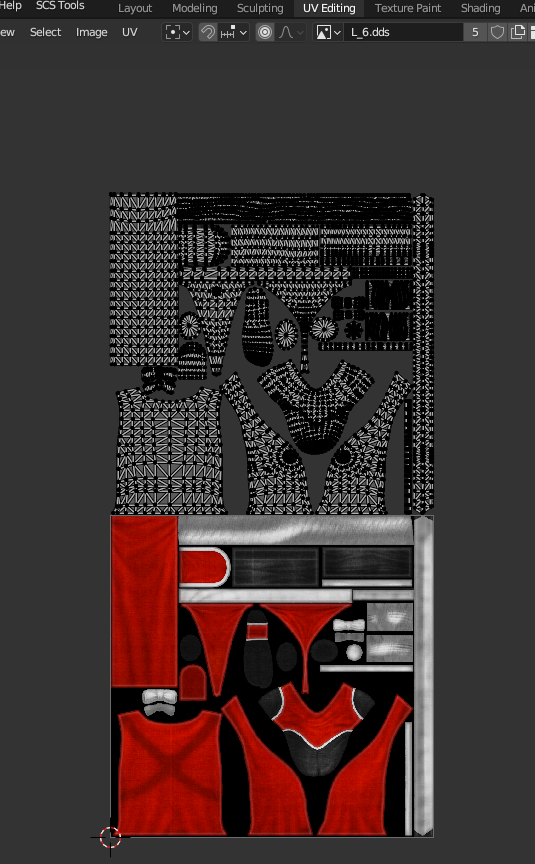
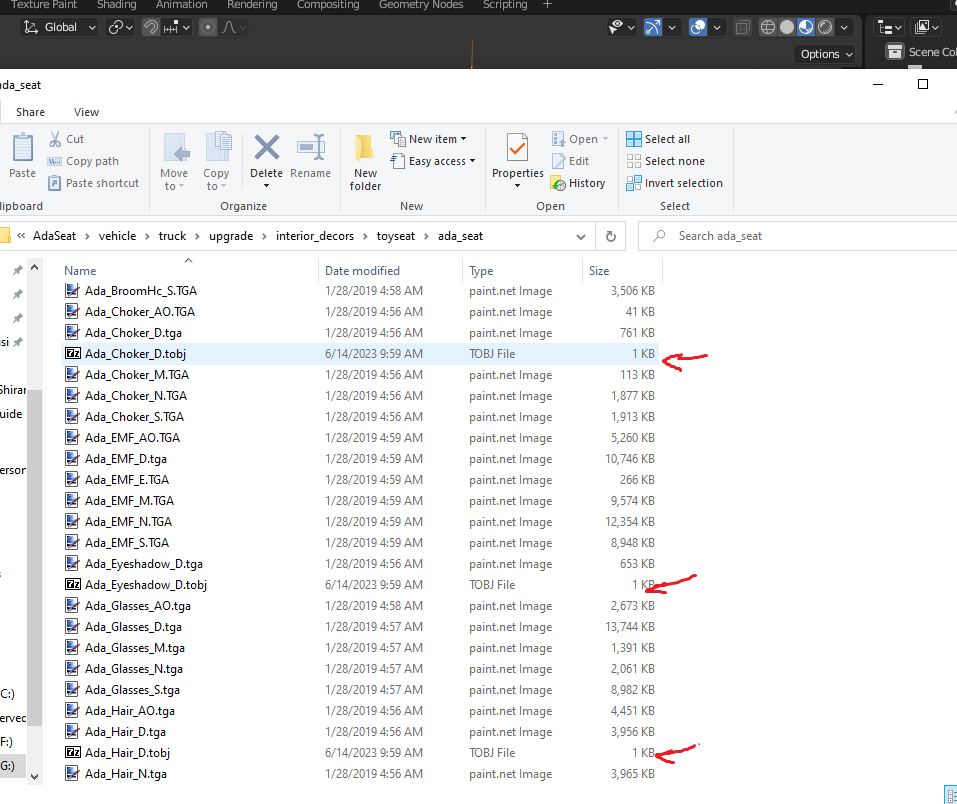
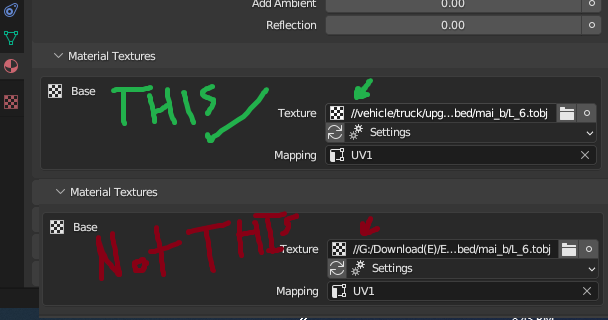
And check your texture folder, make sure that only your texture file are in there.
✪ Sharkey Mar 7 @ 11:48pm 
Hi Willet, That you for the guide, Question however I keep getting an Errors at export where its stating syntex error and unable to link Tobj files to the .pit file. I'm using a Koikatsu model so I converted the texture png's in photoshop but for some reason I keep getting these errors at mod pack stage. if you are able to advise and help with how you managed this with a koikatsu model I'd be much appreciated
Bimo Wahyu Saputro Feb 24 @ 2:56am 
wow, very good.
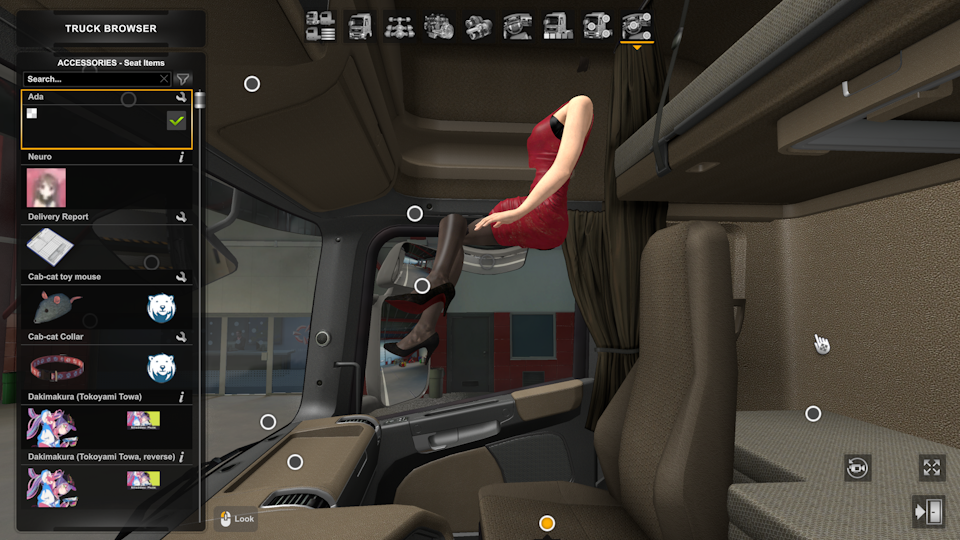
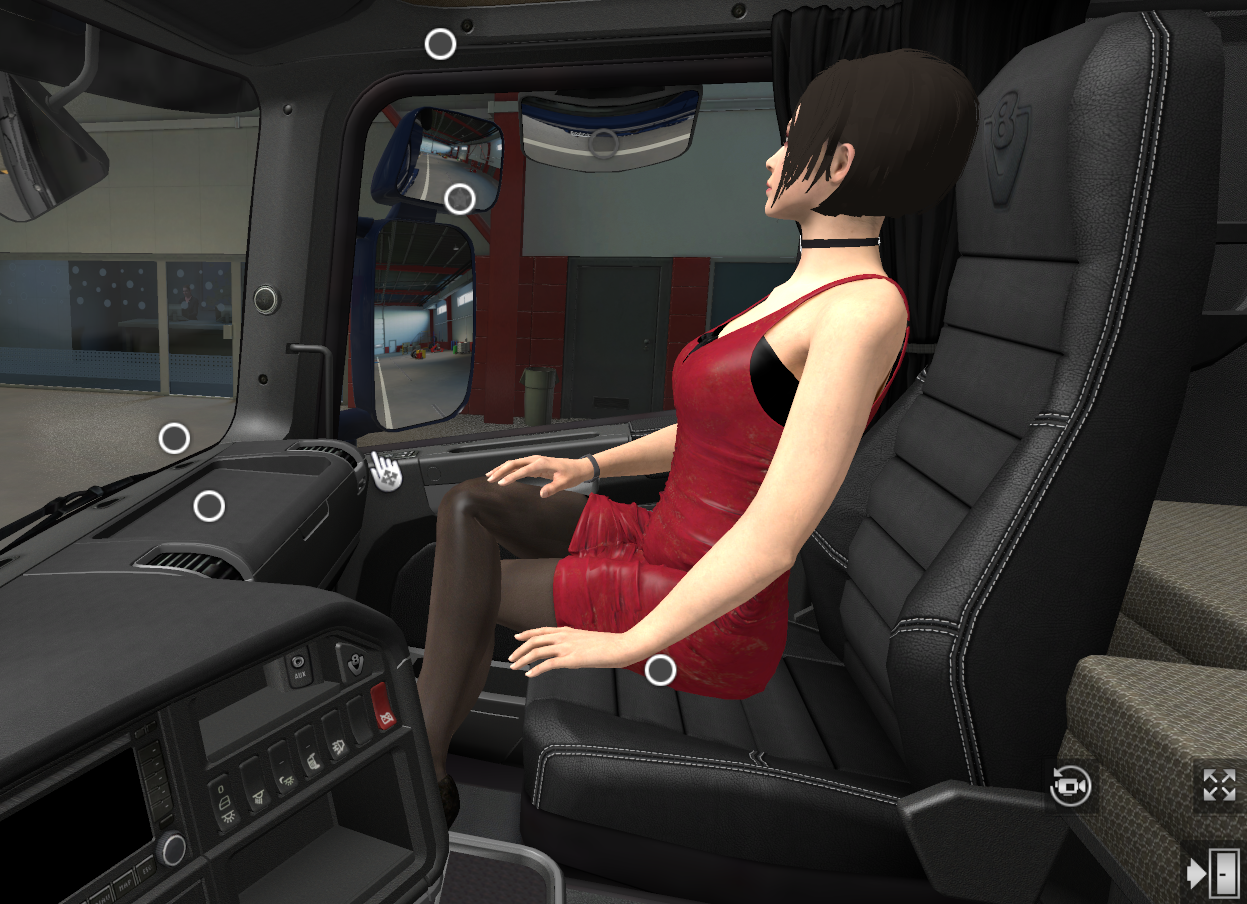
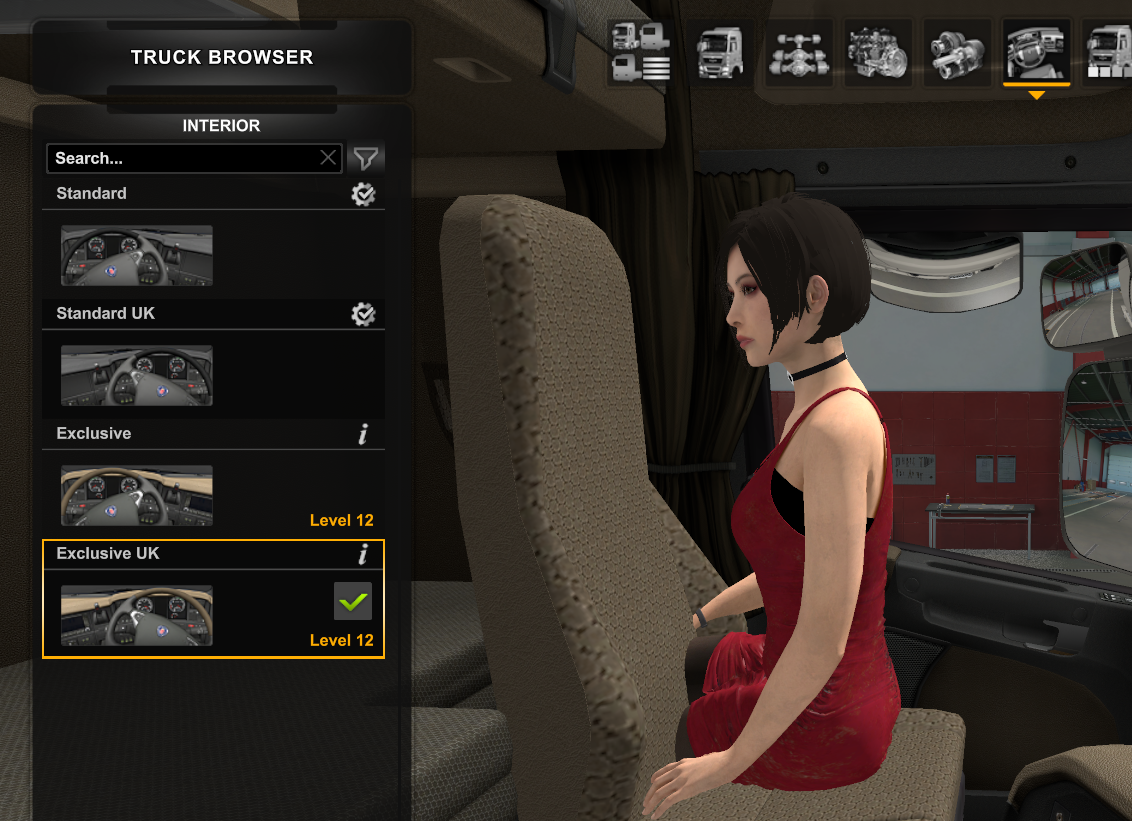
finally someone can implemented one of my mods.
tsaiyunjui Oct 19, 2023 @ 5:50am 
Ok,thanks
Willet.inc  [author] Oct 19, 2023 @ 5:14am 
Probably not gonna do video.
I mostly use XPS model and animated it with Blender. You can find XPS model on deviantart.
You can use MMD model too, but most MMD are too big, and required a lot of trimming

And you cannot import MMD animation to the game, like I said in the guide, the game only support basic animation (location, rotation, scale)
tsaiyunjui Oct 19, 2023 @ 3:09am 
Hey author, will you made a video tutorial of this and post it as a guide? I believe that it will help a lot. And where are you got the model and anim? Did you just use a MMD to make it?
丨囧呆丨 Sep 25, 2023 @ 3:29pm 
There is an error solution to tell everyone
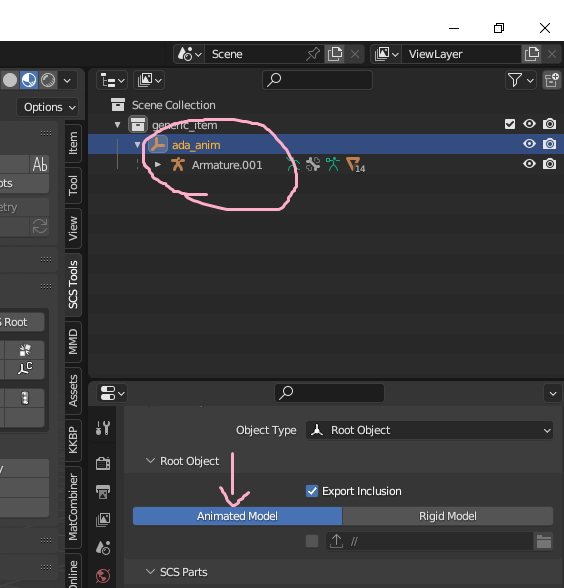
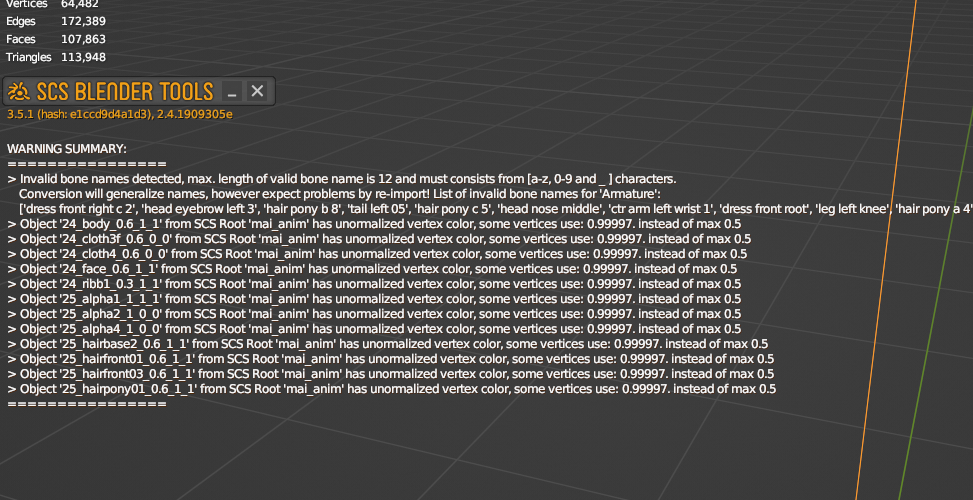
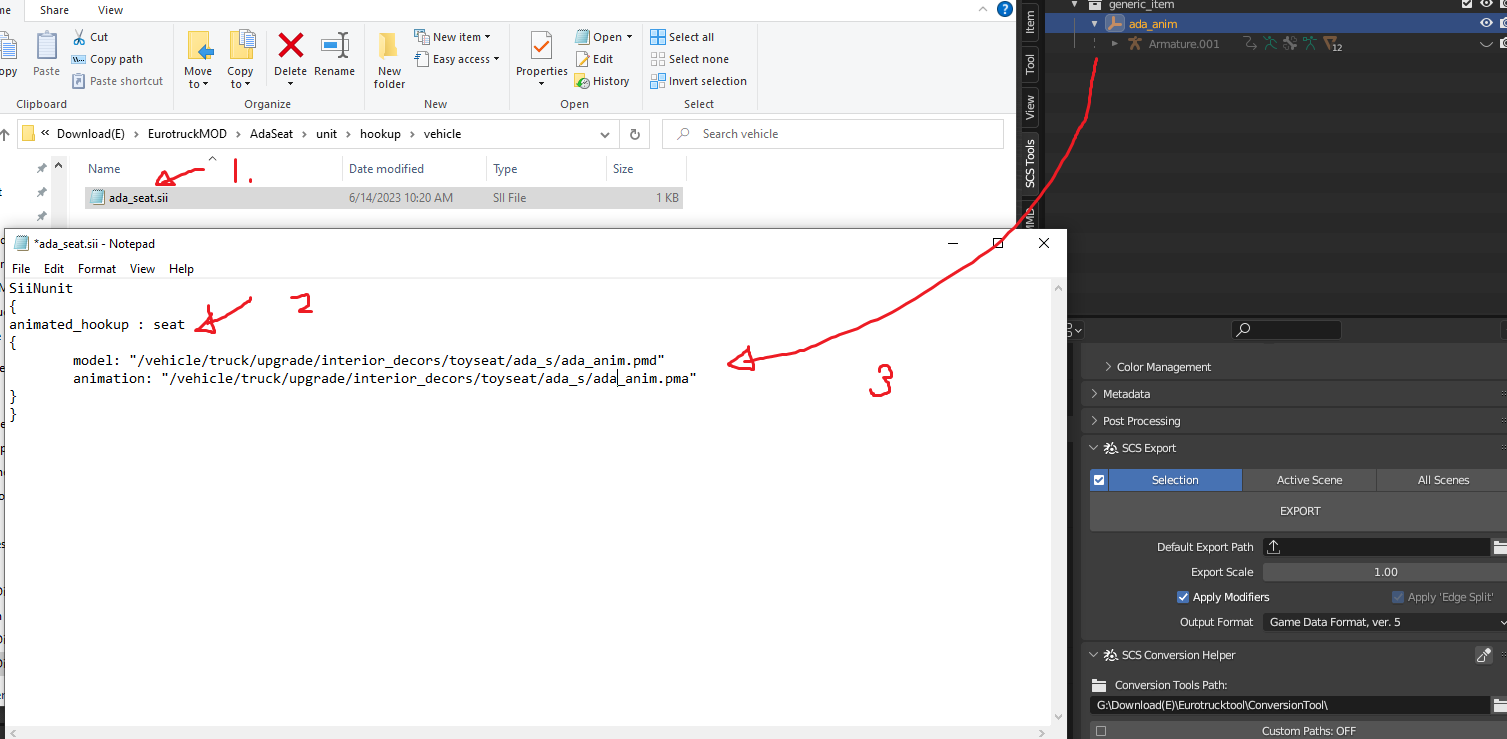
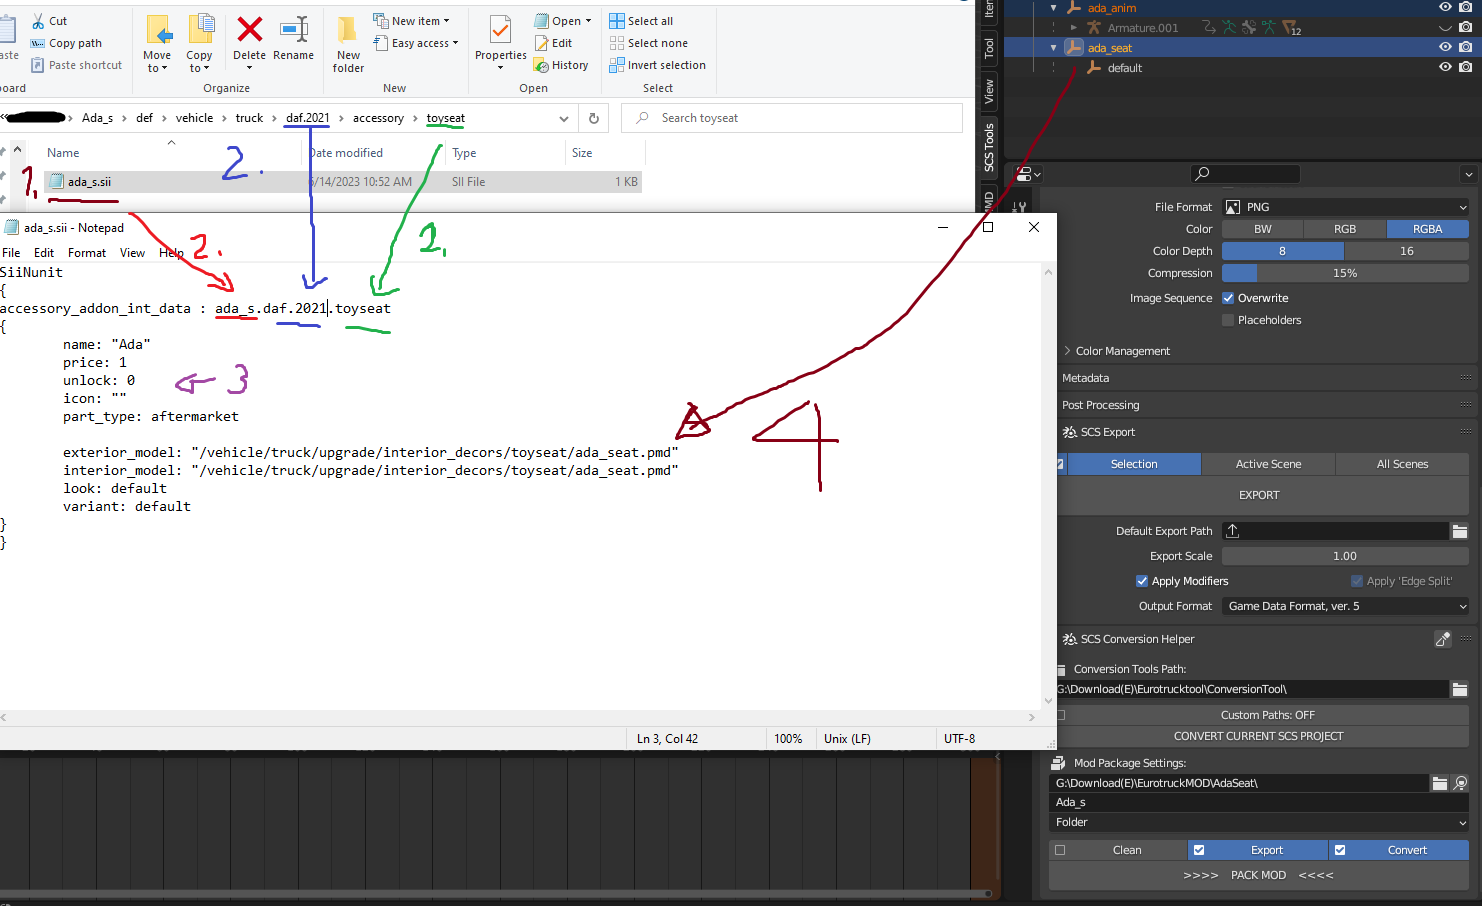
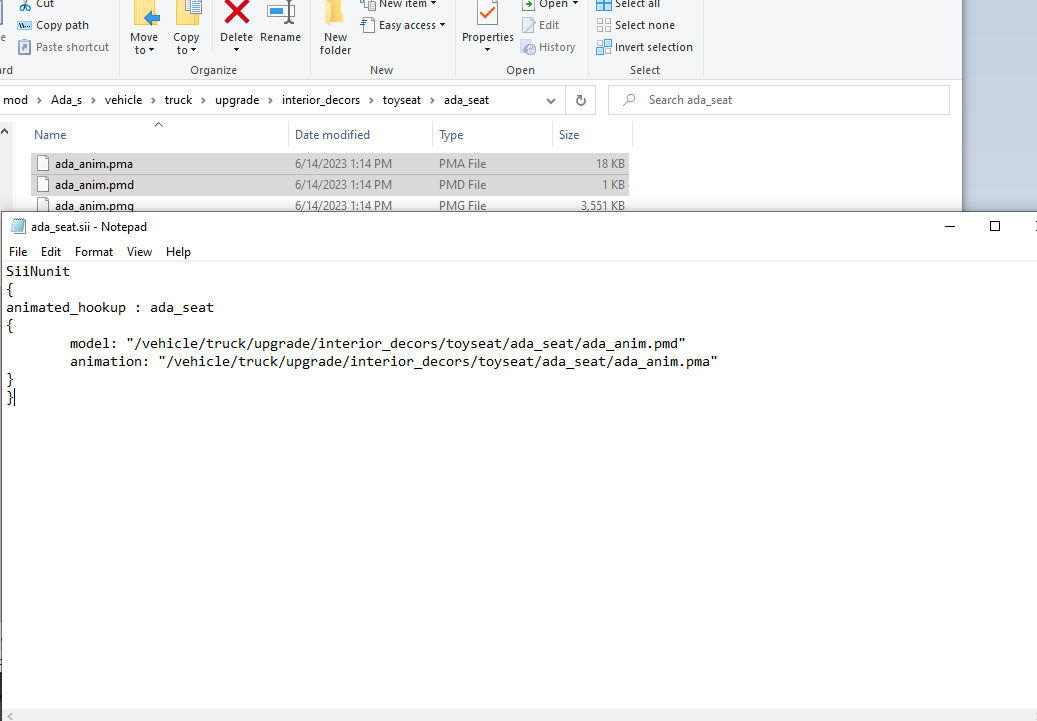
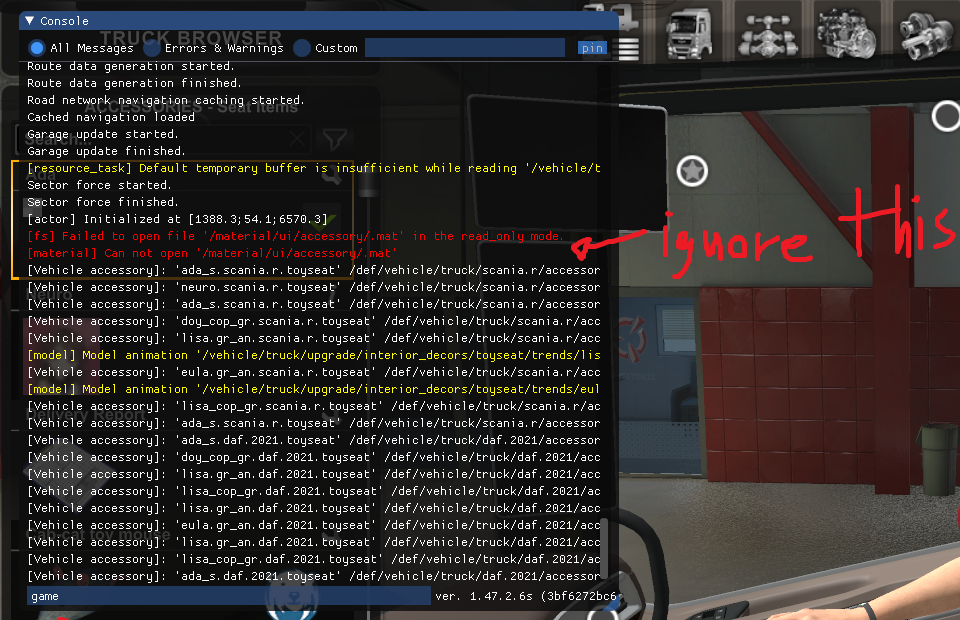
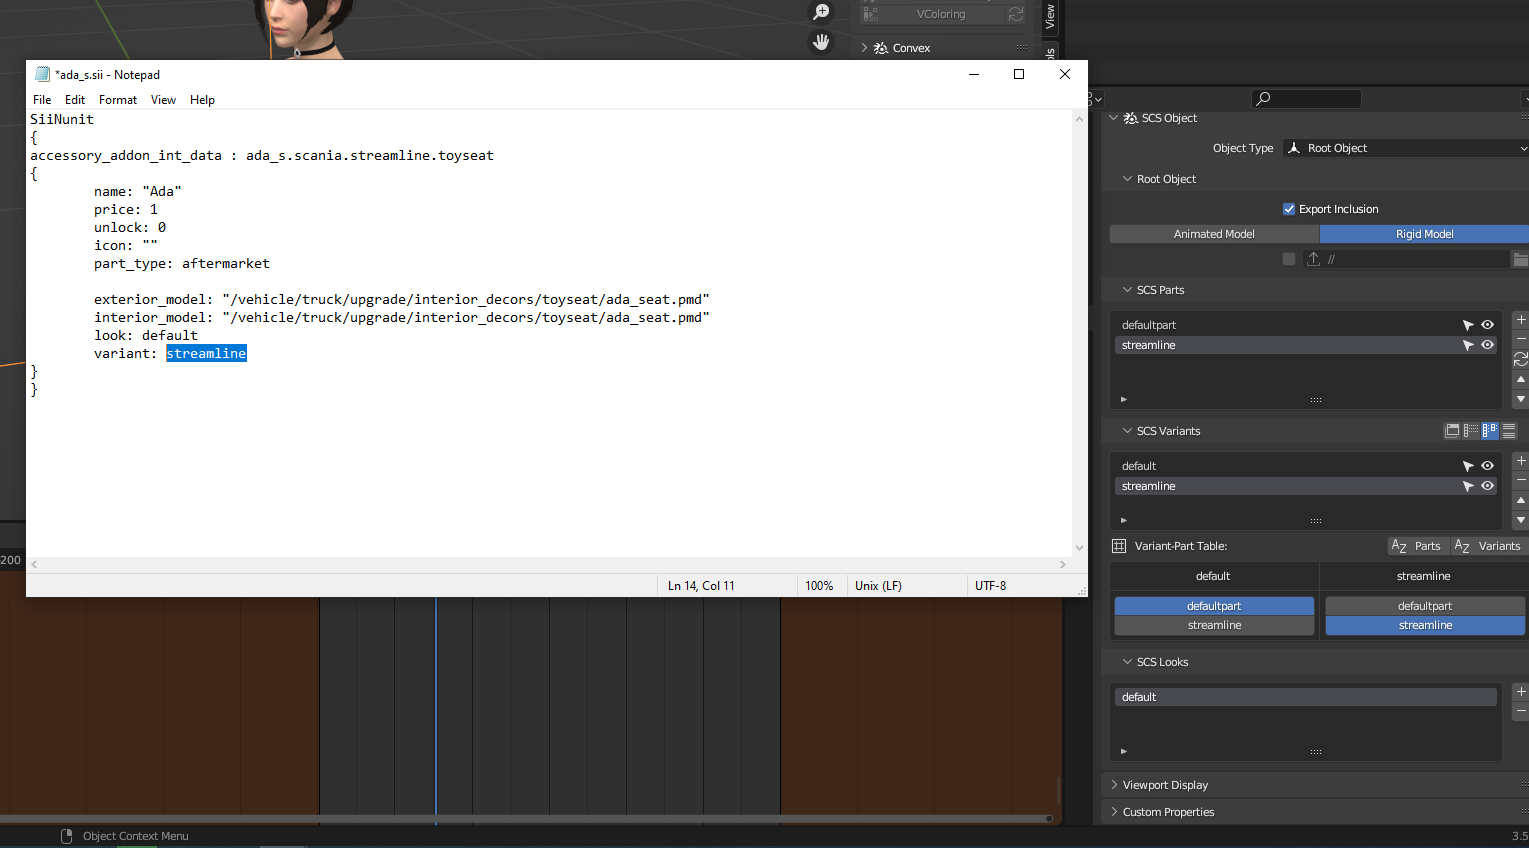
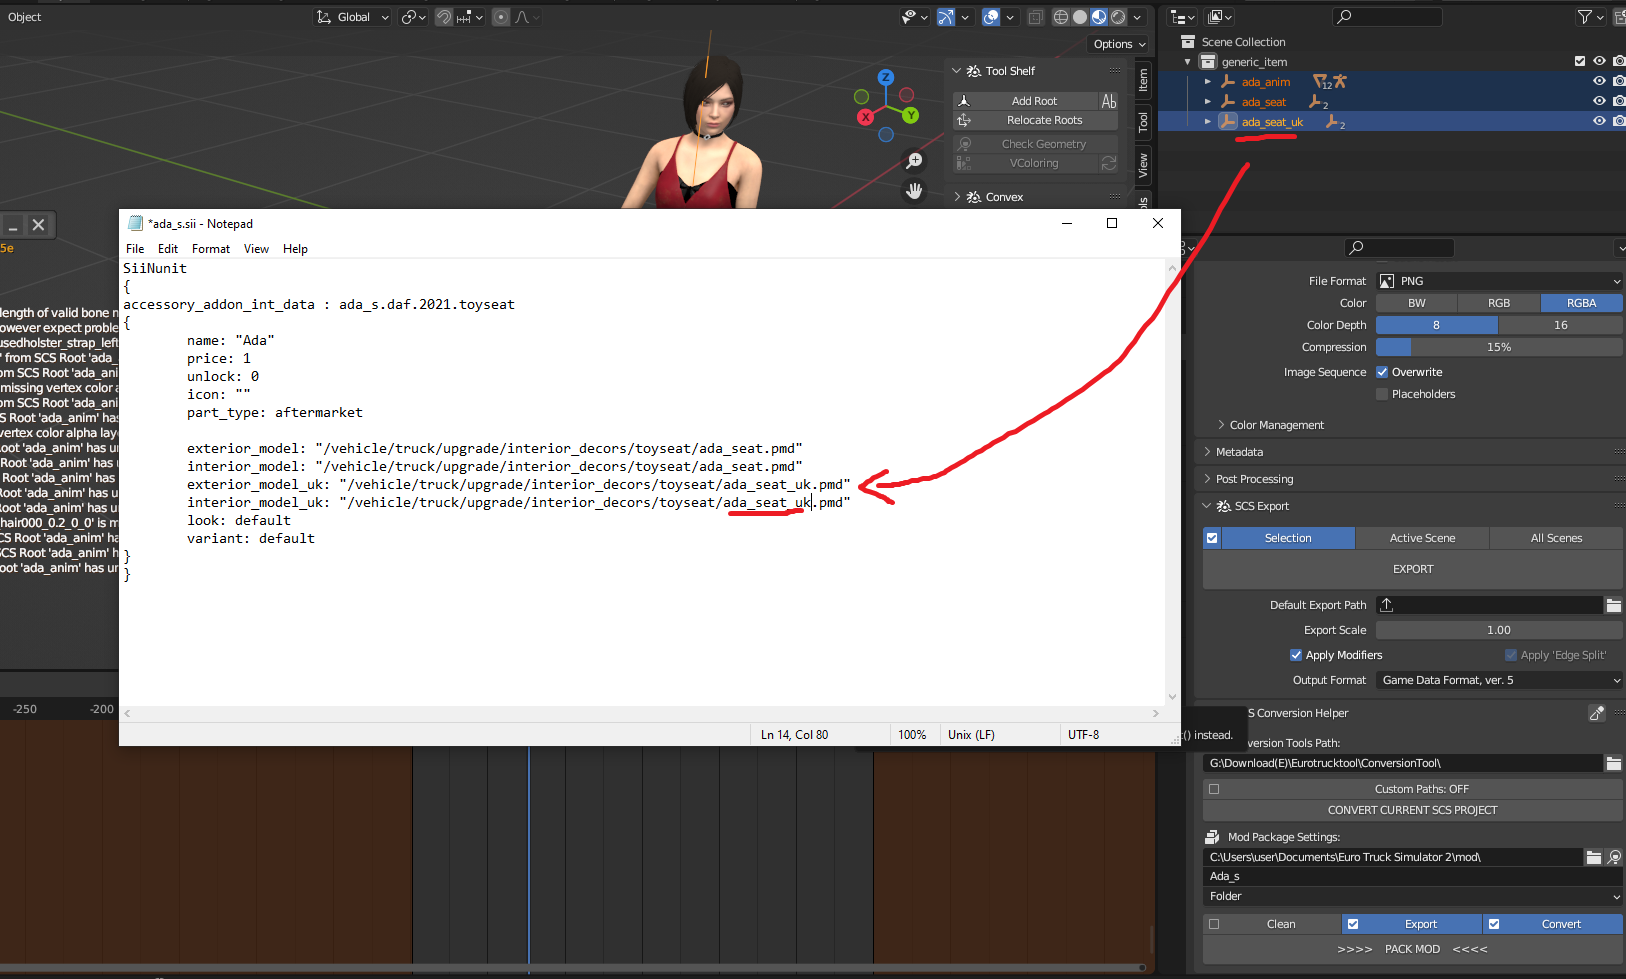
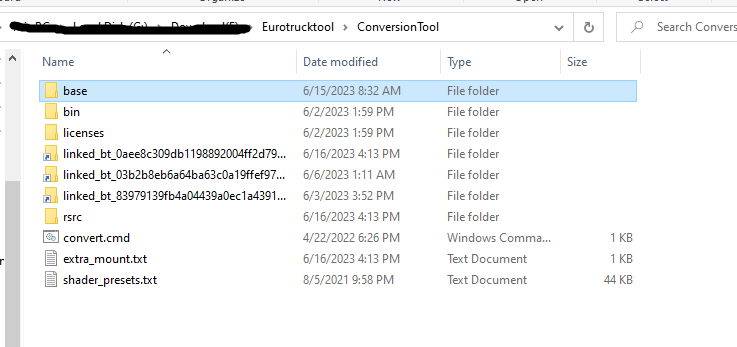
If you encounter a problem when exporting mod in step 9
/<your locator file name>. pit: 21: missing AutoMat or Material paragraphs [token '}']
Such an error
Go here
https://forum.scssoft.com/viewtopic.php?p=1849628#p1849628
#357 has a solution
sky uwu Aug 14, 2023 @ 11:43pm 
maybe one day ill have the patience to follow this guide and make one of my own passanger XD
Hitozichi Aug 5, 2023 @ 3:34am 
Thank you! It's really useful tutorial.
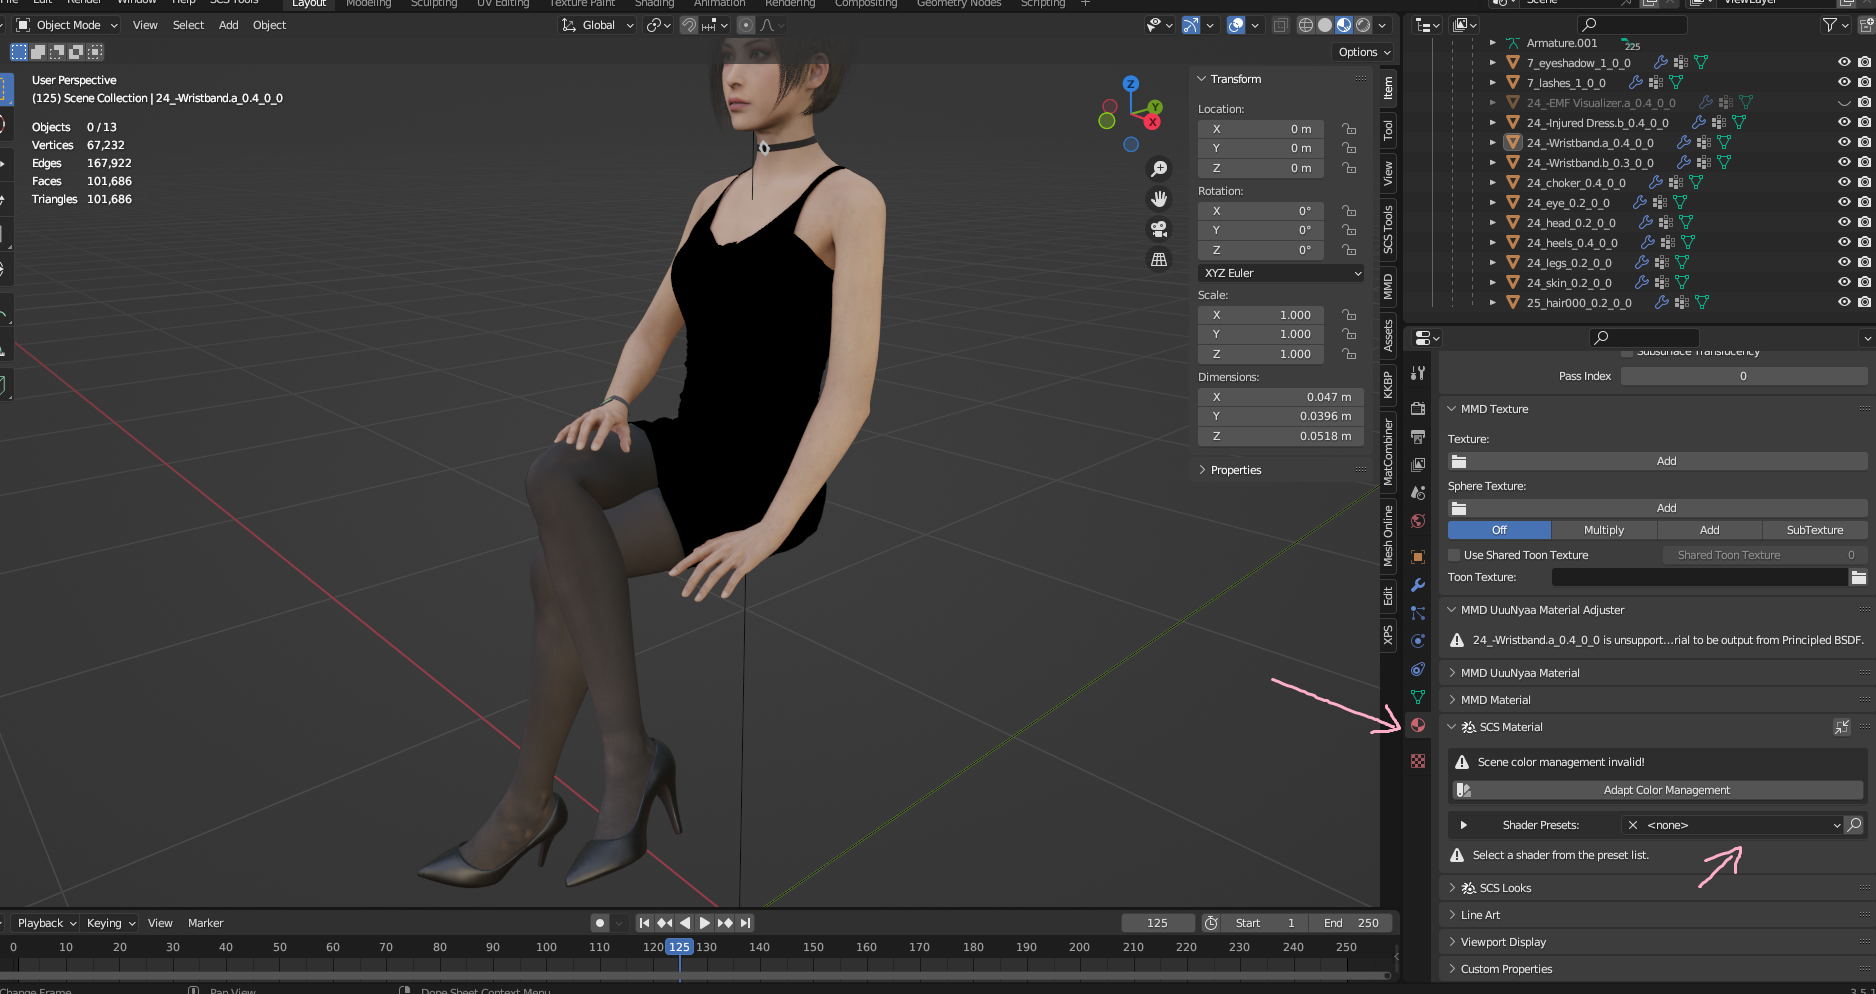
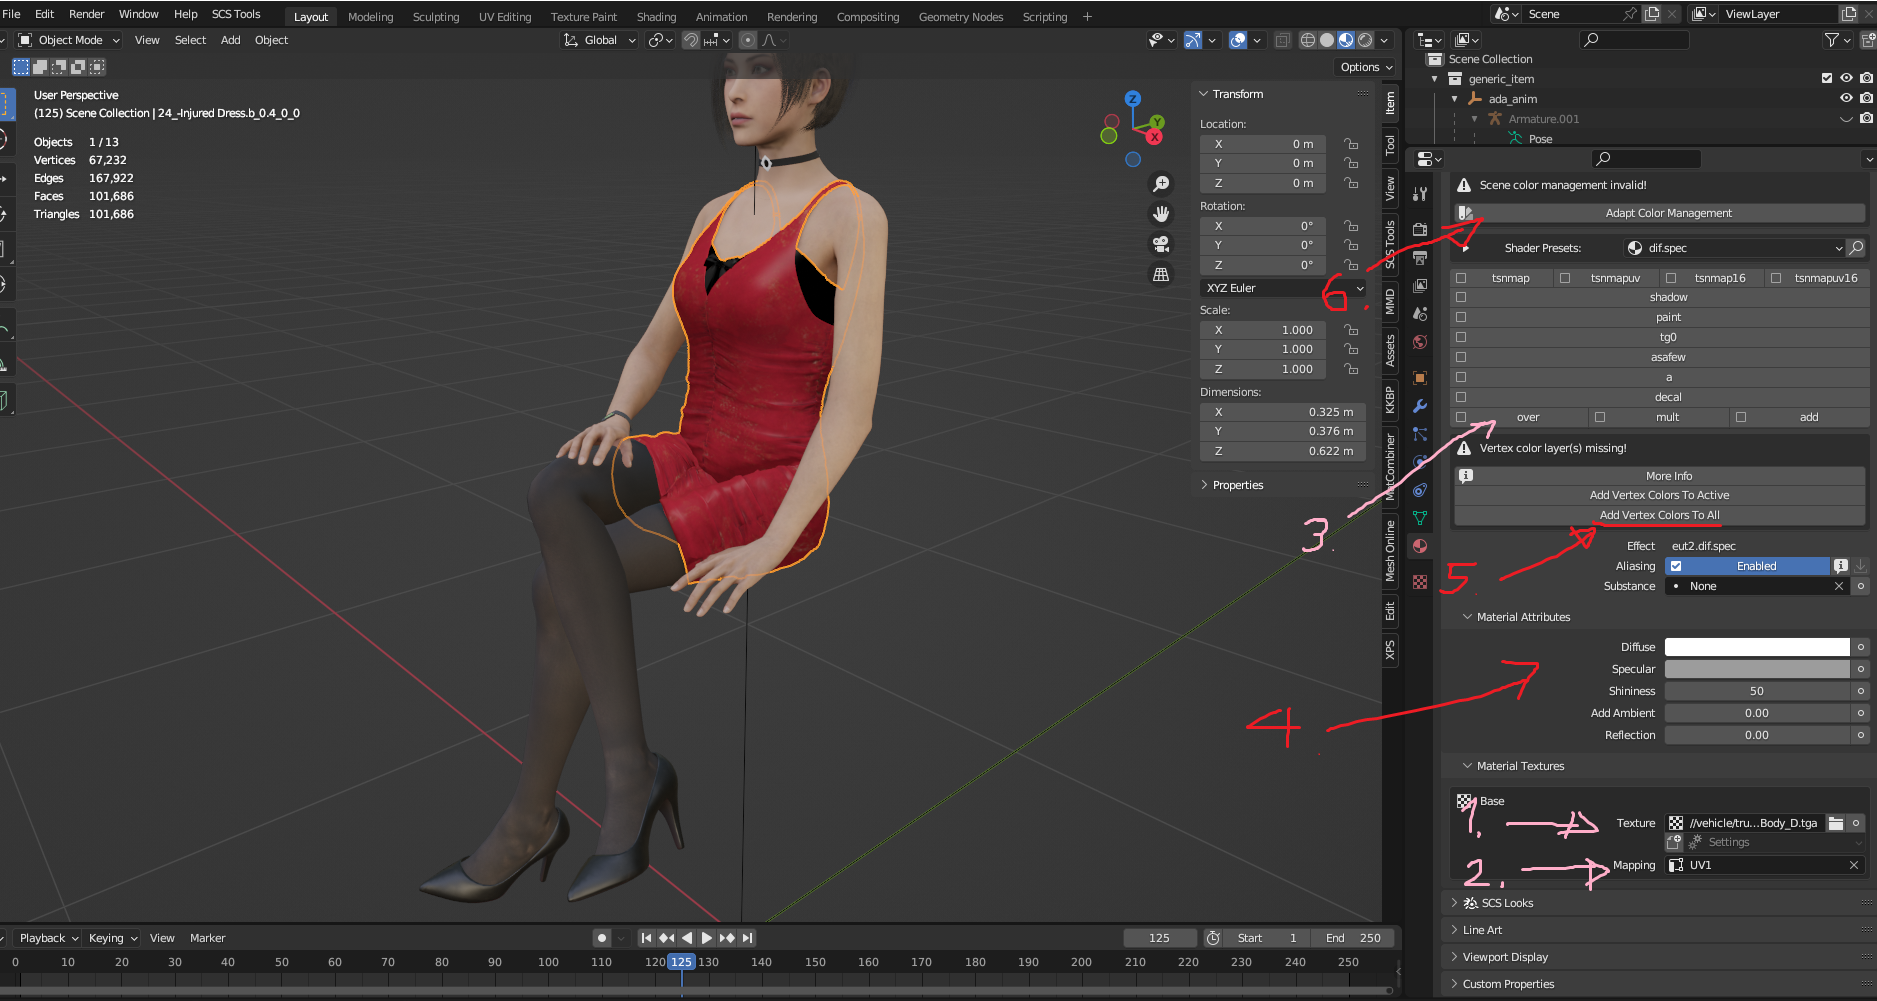
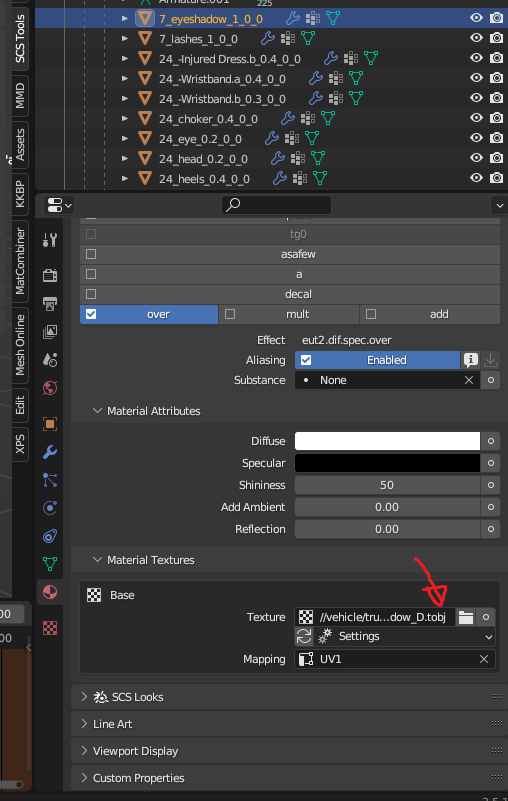
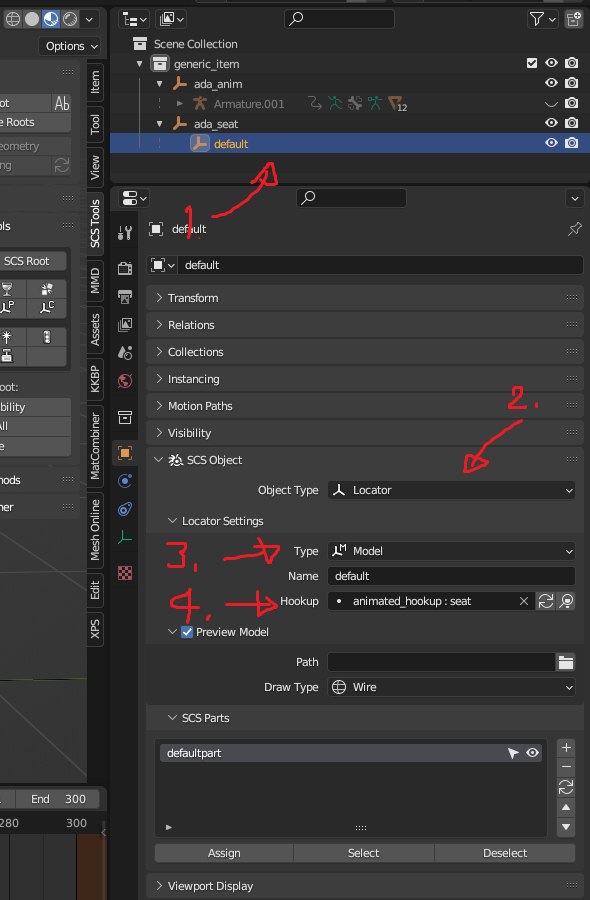
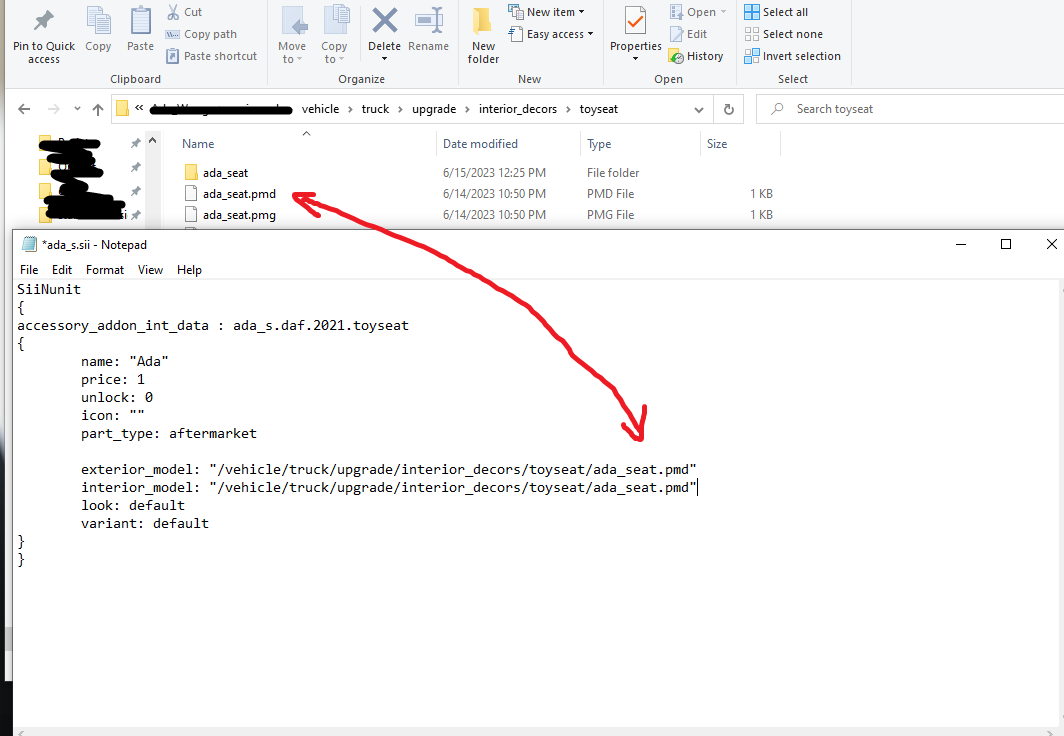
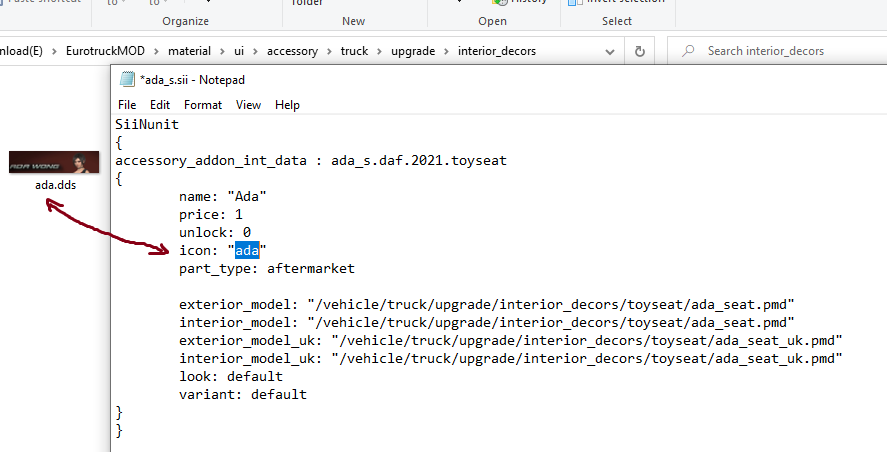
I finally noticed it must use "dif.spec" shader for animated models.

I'd wanted to use "dif +flat" shader, but it is NOT compatible for animated... ive been stucked this problem for some years.;-(