Fallout 4

Fallout 4

866 betyg
100% Achievement Guide: Fallout 4
Av Cynic 0055
This is a comprehensive 100% Achievement guide detailing a step-by-step walkthrough to take you from 0 all the way to 100%. If you are looking for a particular Achievement or Collectible, use Ctrl+F & type it into the search bar for more direct help.

I run support & debug help on all my guides. If you have any questions, problems, or find errors in the guide itself, do not hesitate to leave me a comment & I will get back to you as soon as I am able to. Happy Hunting!
42
14
36
4
9
7
3
4
2
5
2
3
3
3
2
   
Utmärkelse
Favorit
Favoritmarkerad
Avfavoritmarkerad
Introduction:


Achievement Breakdown: (50)
Story Related: (16)
Factions & Side Quests: (12)
Character: (6)
Collectibles: (2)
Slay: (4)
Miscellaneous: (10)

DLC – Automatron: (5)
Story Related: (3)
Collectibles: (1)
Miscellaneous: (1)

DLC – Vault-Tec Workshop: (3)
Secondary Objective: (2)
Miscellaneous: (1)

DLC – Contraptions Workshop: (3)
Miscellaneous: (3)

DLC – Wasteland Workshop: (3)
Collectibles: (2)
Miscellaneous: (1)

*Note that this guide is structured as if you bought the Game of the Year Edition; all 6 DLC Expansions are required for 100%.


Fallout 4 is a very fun & straightforward 100%. The Base Game has 50 Achievements we must unlock with an extra 6 DLCs that all add their own Achievements. We can unlock all Achievements & both game Endings in a single playthrough if we use strategic Saves & by playing nice with all four of the main Factions right up until we have to start choosing one over another.

There are no Achievements associated with Difficulty; so feel free to play on whichever you prefer. The major differences in Difficulty, outside of enemies dealing more damage, is the difference between your Xp multipliers & the frequency of Legendary Enemies spawning. The easier the Difficulty, the more Xp you will earn, but the frequency of Legendary Enemies spawning will be low. On harder Difficulties, these variables are reversed; less Xp for more Legendary Enemies/Legendary Weapons.

There is no Level Cap for your Character so build them however you like. The only things you will have to remember is that we will have to Pick 50 Locks, & Hack 50 Terminals. These will require a decent Science & Lockpicking Skills. Speech is also very useful for unique dialogue situation. Other than those, everything else is fair game. There are some mandatory Perks we need to unlock for Achievements however, & these are: Local Leader Level 2, Pickpocket Level 2, Animal Friend 1, & Wasteland Whisperer 1. Some recommended Perks to make things easier for us are: Armorer (Level 1-4), Blacksmith (Level 1-3), Gun Nut (Level 1-4), Locksmith (Level 1-3), & Hacker (Level 1-3). These will unlock higher level instances of certain activities, giving us more opportunities to work towards Achievements.

Settlement building is huge in Fallout 4. To be effective at building & Crafting, loot EVERYTHING. This is not an exaggeration. Loot every single thing you can pick up & store it in your Settlement’s Workshop. Items can be broken down into Crafting Materials like Copper, Steel, Rubber, Plastic, etc. We will be using a lot of these Crafting Materials for Settlement building or Crafting/Upgrading Weapons or Armor. This adds a lot of tedium to the game having to Fast Travel back home all the time, but I assure you, it is well worth the investment. Building things in your Settlements also gives you Xp making it an insanely cheap way to Level Up.

There are a few Collectibles in this game as well as in the Nuka-World & Far Harbor DLCs. Outside of the Nuka-World DLC, there are no glitches involved regarding any of the Collectibles. While I do include the locations of all Collectibles in the game, if you want a more independent approach, the IGN Interactive Map is incredibly useful for locating Bobbleheads, Settlements, Power Armor, Unique Weapons, & more. You can query your searches so the map only shows what you want to look for.
https://www.ign.com/maps/fallout-4/commonwealth

As for DLCS, The Vault-Tec Workshop, Contraptions Workshop, & Wasteland Workshop are very short DLCs that contribute towards Settlement building. They each add 3 Achievements & can be completed in the Base Game area, The Commonwealth.

The Automatron DLC takes part in The Commonwealth as well & is a short series of Quests that adds 5 Achievements; it revolves around building Robots.

Nuka-World & Far Harbor are DLC expansions that include their own separate areas to explore. Far Harbor is not too difficult to 100% but Nuka-World has a lot going on & takes a bit of time to complete. I will go into more details when we are ready to start this DLC. Both Nuka-World & Far Harbor add 10 Achievements each.

For those interested, here is an organized list of all the Achievements/Secret Achievements. This is how I derive my Achievement Breakdowns & the first reference I create before I begin my 100% journeys.
https://steamcommunity.com/sharedfiles/filedetails/?id=2934820382

Before You Play!: Unlike in Fallout New Vegas, you are able to safely use the Developer Console & it will not disable Achievements. However, using any mods installed through the Creation Club will still disable your Achievements. If you want Achievements re-enabled, you have to turn off all Mods & reload your Save to an earlier state before they were activated.

Sometimes textures (mainly concrete) will not render properly & will appear blurry & you will clip through them potentially falling out of the map. To fix this, simply stand in the unrendered texture, Save your game, quit, then reload your game, & everything will be restored as easy as that. Shout out to fears_escalators of Reddit for this straightforward debug!

*Guide contains major spoilers.
Sequence 1: A Broken Family
1. Main Quests: Out of Time, When Freedom Calls
2. Minutemen Quests: The First Step
3. Companions: 2/5
4. Bobbleheads: 2/20
5. Achievements: 7/84
-----------------------------------------------------------------------------------------------------

There are plenty of cumulative Achievements like: Picking 50 Locks, Hacking 50 Terminals, Crafting 50 Weapon Mods, Discover 100 Locations, etc. Keep these in mind as we play, but note that none of these are missable unless you break every Lock or Terminal in the game. That would be highly unlikely as there are well over 50 instances of each throughout the Base Game & DLCs.

Sanctuary Hills:
Choose your Special Stats & game Difficulty at your own preference; for reference, I set all of mine to 4 & played the game on Normal…

Vault 111:

Main Quest #1 – Out of Time 1: We will receive this Main Quest upon waking up from our crypod after the Prologue in Vault 111.


Achievement #1 – Future Retro: Play a Holotape Game.
Navigate through the corridors of the Vault until we reach our first Radroach. From here, enter into the cafeteria room straight ahead of us & we can find a Recreation Terminal on a desk behind the central seating. Access the Terminal, & we can find the Red Menace game inserted into it giving us the option of playing it; Play Tape to unlock the Achievement.

This Achievement can be unlocked by playing any Holotape Game we might find throughout the world.


Achievement #2 – War Never Changes: Enter The Wasteland.
Story Related. Escape Vault 111 & take the elevator back up to the surface & witness the new world order of the Commonwealth in 2287 to unlock the Achievement.

Sanctuary:
When we arrive in Sanctuary again after the fallout, speak with Codsworth to progress the Main Questline. Before we leave for Concord however, take some time to loot Sanctuary & locate the Workshop to convert it into a Settlement. This will most likely become our primary base of operations. With the Workshop unlocked, enter into Build Mode & quickly go around & Scrap objects in Sanctuary into raw materials that we can then use going forward to build things. Build yourself a small outpost to store some things & sleep, & we will carry onwards.

Red Rocket Truck Stop:

Companion #1 – Dogmeat: As we make our way down to Concord, our first Location along the way will be the Red Rocket Truck Stop. When we approach it, a friendly dog will come & greet us. Respond to the dog in anyway except to beat it, & it will join our party becoming our first Companion.

Museum of Freedom:

Main Quest #1 – Out of Time 2: Get to Concord & defeat the Raiders outside the Museum of Freedom to complete this Main Quest.

Main Quest #2 – When Freedom Calls 1: We will receive this Main Quest after completing the previous one…

Bobblehead #1 – Perception: Make your way into the Museum of Freedom for Main Quest – When Freedom Calls & fight your way up to where a future Companion, Preston Garvey, is. In the same room we find him & the other survivors, we can find our first Bobblehead on the desk where Jun Long is freaking out on the ground…

Main Quest #3 – Jewel of the Commonwealth 1: Assist Preston & the survivors, progressing When Freedom Calls to where we need to escort the group to Sanctuary. Before we do this, we will speak with Mama Murphy who will give us our next lead & Main Quest.

Sanctuary:

Main Quest #2 – When Freedom Calls 2: Wait for Preston & the others to get to Sanctuary & speak with him when they arrive. Agree to help the Settlers at Tenpines Bluff to complete this Main Quest.


Achievement #3 – When Freedom Calls: Complete When Freedom Calls.
Story Related. We will unlock this Achievement after linking up with Preston in Sanctuary.

Minutemen Quest #1 – The First Step: Agree to assist the Settlers at Tenpines Bluff for Preston to unlock this Faction Quest.


Achievement #4 – Born Survivor: Reach Level 5.
If you have built a few things around Sanctuary, completing our first few Quests will most likely put you into Level 5. If it has not yet, the Achievement is bound to unlock for you imminently.

Companion #2 – Codsworth: Codsworth can become a Companion at any point after we have completed Main Quest – Out of Time. Track him down in Sanctuary & speak with him to unlock him as one…

Side Quest – Sanctuary: Speak with Sturges in Sanctuary to receive Side Quest – Sanctuary. Progress this Side Quest as far as you can until you need to go collect outside resources; it will most likely be when we have to provide Food for the Settlers.

Tenpines Bluff:

Minutemen Quest #1 – The First Step 2: Travel to Tenpines Bluff, exploring as you go, & speak with the Settler to progress this Quest to where we need to clear the Raiders out of Corvega Assembly Plant which will mark it on our World Map.

Before we leave, be sure to loot some of the many Tato plants that are growing here…

Sanctuary:


Achievement #5 – Sanctuary: Complete Sanctuary.
Now that we have some extra Food to plant, there is nothing stopping us from fulfilling Sturges requirements & completing this Side Quest for our Achievement.

Corvega Assembly Plant:


Achievement #6 – Touchdown!: Get a touchdown.
Head down through Concord & reach the ruins of Lexington. In the center of the area close to a Red Rocket Truck Stop, we can find an old renaissance statue. Make a Save here, & begin making your way down the street to the South East. Above us, shortly, will be a walkway with a Slocum Joe’s billboard on it; hiding behind the billboard is a Raider in Power Armor with a Fat Man. To unlock this Achievement… we need him to kill us with the Fatman; specifically, we need any enemy to kill us with a fired Mini-Nuke which includes Suicidal Super Mutants.

Bobblehead #2 – Repair: Reload our Save now & go to the Corvega Assembly Plant at the far South end of the town. Fight through the host of Raiders outside Corvega & make your way up the scaffolding to the highest point of the facility exterior. At the very top, head around the large blue dome along the walkways & we can find this Bobblehead at a dead end on top of a wooden crate.

Minutemen Quest #1 – The First Step 3: Enter into Corvega now & kill off all the Raiders inside, most importantly their leader, Jared. This will consume a lot of our collected ammunition & resources so be sure to come prepared for a fight!


Achievement #7 – Commonwealth Citizen: Reach Level 10.
This will come naturally as we play through the game…
Sequence 2: Back In A Minute
1. Main Quests: No Progression
2. Minutemen Quests: The First Step, Radiant Quests (2)
3. Brotherhood of Steel Quests: Fire Support, Call to Arms,
4. Automatron DLC Quests: Mechanical Menace 1
5. Companions: 3/5
6. Bobbleheads: 2/20
7. Achievements: 13/84
-----------------------------------------------------------------------------------------------------

Tenpines Bluff:

Minutemen Quest #1 – The First Step 4: Return to the Settlers of Tenpines Bluff & report our success to them to progress the Quest.

Doing this will now unlock Tenpines Bluff as an Allied Settlement; we can access the nearby Workbench to Scrap & develop it.


Achievement #8 – Scavver: Gather 1000 resources used for Crafting.
Between Sanctuary, Red Rocket Truck Stop, & Tenpines Bluff, there should be more than enough resources we can Scrap to accumulate 1000 resources. Note that you do not need to Scrap 1000 objects, as certain objects break down into multiple resources.

Be sure to access the Workshop & “Take All Junk” for it to count as gathered after you finish Scrapping…

Sanctuary:

Minutemen Quest #1 – The First Step 5: Report back to Preston & turn in the Quest now.


Achievement #9 – The First Step: Join the Minutemen.
Complete the first Minutemen Quest – The First Step & agree to help Preston to start rebuilding the Minutemen as the new General.

Companion #3 – Preston Garvey: Agreeing to rebuild the Minutemen after completing The First Step will unlock Preston as our next Companion.

Unlike our first two Companions for obvious reasons, Preston is a Romance option that can earn us the Loveable Achievement if you choose it…


Achievement #10 – Fix-Er-Upper: Build 100 Workshop Items.
Take some time to develop our base at Sanctuary a bit more; if you just want to speed level the Achievement, just build something easy that only takes Wood & or Steel until it unlocks.

Minutemen Quest – Radiant Quest (2): To progress the Minutemen Questline, we will need to complete at least two Radiant Quests. These are randomly generated Quests that involve assisting a potential Settlement in various ways. Keep speaking with Preston, & we can receive up to 5 of these Radiant Quests to do.

If they are located within the range of Sanctuary, Concord, or Lexington then it is a good idea to complete it; if it is outside of our explored region then save it until we travel there through other Quests/when we are stronger…

Cambridge Police Station:

Brotherhood of Steel Quest #1 – Fire Support 1: When you are ready to continue, leave Lexington to the South & start heading towards Diamond City. Shortly at the town exit, we will receive the Radio Channel Military Frequency AF95 & unlock this Faction Quest.

Get to Cambridge & assist some Brotherhood of Steel members being assaulted by a horde of Ghouls. Speak with Paladin Danse & agree to help them further to complete the Quest.

ArcJet Systems:

Brotherhood of Steel Quest #2 – Call to Arms 1: Speak with Paladin Danse inside the Cambridge Police Station. Accompany him to ArcJet Systems to locate the Deep Range Transmitter.

When you reach the surface after finding it, agree to join the Brotherhood of Steel to continue this Questline.

Cambridge Police Station:

Brotherhood of Steel Quest #3 – Semper Invicta 1: We will receive this Faction Quest after completing the previous one. Return to Danse at the Police Station & accept the conditions for joining the Brotherhood. To progress this Faction’s Questline, we need to do a Radiant Quest for both Scribe Haylen & Knight Rhys.


Achievement #11 – Semper Invicta: Join the Brotherhood of Steel.
Progress the Faction Quest – Semper Invicta & join the Brotherhood of Steel to unlock this Achievement.

We will now be able to receive Radiant Quests from Scribe Haylen & Knight Rhys; these are not required to progress Brotherhood Questline. Completing some of these will give us some unique Side Quests from Paladin Danse; these Quests are optional as well & not required for any Achievements or progression.

Cambridge:

Automatron Quest #1 – Mechanical Menace 1: When we reach Level 15 & have the Automatron DLC installed, we will receive the Caravan Distress Frequency & this DLC Quest. Listen to the distress call & it will give us a Waypoint that we can track down close to Cambridge.

When we arrive at the scene, we will find friendly group of Robots being attacked by a horde of hostile ones. You may want to make a Quick Save prior; this is a difficult fight! Try luring the Robots away & pick them off one by one while the friendly guys distract the rest. Speak with the friendly Robot, Ada, & she will become a unique Companion to us to progress the DLC Questline; she does not count towards the Never Go It Alone Achievement.


Achievement #12 – Mechanical Menace: Complete Mechanical Menace.
Complete the Automatron Quest – Mechanical Menace to unlock this Achievement; we must be at least Level 15 to unlock it via a Radio broadcast.

After Ada is unlocked, we can now be attacked by hostile Robots as a random encounter. Though they can be very difficult, this is technically a good thing as we need to collect different Robot Mods for the Robot Hunter & The Most Toys Achievements.

Automatron Quest #2 – A New Threat 1: After partying up with Ada, we will unlock the next DLC Quest to complete. The General Atomics Factory is a long ways away; we will not be going here until much later, after we have arrived at Diamond City…

Sanctuary:


Achievement #13 – The Most Toys: Build 10 Robot Mods.
At Sanctuary, or wherever your primary Settlement is, construct the Robot Workbench. Here we can Mod Ada, Codsworth, & even construct our own Robot Companions. Simply construct 10 brand new Robot Mods to upgrade them to unlock this Achievement.

If you do not have the materials, just keep looting as we go along & be sure to store them in our Settlements Workshop; Adhesive, Aluminum, Ceramic, Circuitry, Rubber, Steel are the major Materials we will need for crafting.

Minutemen Quest #2 – Taking Independence 1: Complete any two Radiant Quests for the Minutemen; I completed Taking Point – Starlight Drive-In & Ghoul Problem At Greentop Nursery.

With two completed, return to Preston & we will receive this next Minutemen Quest for us to progress this Faction. Like our Automatron Quest, the Castle is located far to the South; we will save this Quest for later…
Sequence 3: A Soul Out of Time
1. Main Quests: Jewel of the City, Unlikely Valentine
2. Minutemen Quests: No Progression
3. Brotherhood of Steel Quests: No Progression
4. Companions: 4/5
5. Bobbleheads: 6/20
6. Achievements: 17/84
-----------------------------------------------------------------------------------------------------


Malden Middle School (Vault 75):

Bobblehead #3 – Science: Consult the Map above, & to the Malden Middle School; beware the Deathclaw hiding in the Old Gullet Sinkhole nearby!

Enter the middle school & navigate down to its basement where we can find the entrance to Vault 75 inside. Taking the elevator inside the Vault’s entrance will initiate the Side Quest – Vault 75. Locate the Gunner Commander in a Combat Simulator room & find the Vault 75 Lab Access Card to gain access to the Laboratory. Head through the lab until we reach a room that overlooks the Combat Simulator & we can find the Vault 75 Admin Access Card here; the Bobblehead will be in this room on top of a desk.


Achievement #14 – What’s Yours Is Mine: Pick 50 Locks.
This will come naturally as you play through the game. Loot everything & explore all you can; & when you come to a Safe or Door that is locked by a Lock & a Terminal, always pick the Lock first to double down on Xp. Having at least two Ability Points in Locksmith will greatly increase available Locks we can pick…

The Commonwealth:

Vault 88 Quest #1 – Vault-Tec Calling 1: When you reach Level 20, & have the Vault-Tec Workshop DLC installed, we will receive the Vault 88 Radio Beacon Radio Station. Listen to it, & it will place a marker for Vault 88 on our Map near the far South end of Boston. We will investigate this location much later…

Saugus Ironworks:

Bobblehead #4 – Explosives: Head East now from Malden Middle School towards the Saugus Ironworks building. Fight through the Forged inhabitants & enter the Saugus Blast Furnace room; be warned that there is a difficult boss fight ahead of us!

Kill the Forged leader, Slag, & we can find this Bobblehead behind where he stood on the catwalk above us on top of a console near the red Steamer Trunk.

Finch Farm:


Achievement #15 – Community Organizer: Ally with 3 Settlements.
If you decide to help Jake Finch in Saugus Ironworks, we will unlock Finch Farm as a new Settlement. This plus any other Settlements you may have unlocked through Minutemen Radiant Quests or just via exploring & finding them counts towards the Achievement. This will come naturally as we befriend & unlock more Settlements.

Dunwich Borers:

Bobblehead #5 – Sneak: Head North East from Saugus Ironworks & we can find the Dunwich Borers; another difficult battle with Raiders await us here! When they are defeated, get to the bottom of the quarry & head around the back side of one of the walls to enter into the Dunwich Borers mine. Fight through the mine interior & reach the very bottom where we can find the Raider boss, Bedlam. Kill her & pass into the quarantine zone of Dunwich Borers that is infested by Ghouls.

When we witness the flashback, the corridor ahead of us will become filled by Ghouls. Kill them & follow it down, taking a right into a more open section of the quarantined mine. Past a wooden platform, we can find this Bobblehead on a table beside the Station 4 Terminal.

Longneck Lukowski’s Cannery:

Bobblehead #6 – Barter: Reach the Cannery now & enter inside. Make your way up to the top floor above the meat assembly line & we can enter the control room. At the back of the control room, past a Weapons Workbench, we can find the Bobblehead at the dead end on top of a broken Terminal near a red Steamer Trunk.

Diamond City:

Main Quest #3 – Jewel of the City 2: At long last we can finally begin making our way down towards Diamond City to continue our search for Shaun. When we arrive, we will meet Piper, & have to get inside the city. Do so to progress the Main Questline.

Companion #4 – Piper Wright: After we gain access to Diamond City, speak with Piper again to unlock the Side Quest – Story of the Century. Go to the Publick Occurrences office & speak with Piper there to conduct our candid interview. Complete it, & she will join our party just like that.

Piper is another Companion we are able to pursue as a Romance option.

Main Quest #3 – Jewel of the City 3: Speak with Ellie Perkins in the Valentine Detective Agency to complete this Quest.

Main Quest #4 – Unlikely Valentine 1: We must go & locate Nick Valentine at the Park Street Station; conveniently within the Combat Zone…

Miscellaneous Quest – Explore the Combat Zone 1: As we explore Diamond City, it is highly likely we will overhear some residents speaking about the Combat Zone which will automatically unlock this Miscellaneous Quest. We need to complete this to locate another potential Companion…

Railroad Quest #1 – Road to Freedom 1: Like the previous Miscellaneous Quest, we can unlock the first Faction Quest for the Railroad by overhearing Residents speak of them in Diamond City…


Achievement #16 – Unstoppable Wanderer: Reach Level 25.
This will come to us naturally as we play through the game…


Achievement #17 – Homerun!: Get a homerun.
This is a really random Achievement we can unlock in Diamond City. To do so, we need to run & touch all of the baseball bases around the old world stadium to get an arbitrary homerun.
Home plate can be found just outside the Publick Occurrences office, in the middle of the wooden walkway. It looks something like this.


First base can be found down the walkway to the right, past Polly’s House & the Dugout Inn.

Second base can be found further down the walkway, to the left now, past Doc Crocker’s House where the walkway gets a bit flooded.

Third base can be found to the West of us, past the Valentine Detective Agency, down at the next junction.

From here, run back to where home plate is in front of Publick Occurrences to unlock this Achievement. It does need to all be done relatively quickly, or the Achievement will not unlock.
Sequence 4: Shipping Up to Boston
1. Main Quests: Unlikely Valentine, Getting A Clue
2. Minutemen Quests: No Progress
3. Brotherhood of Steel Quests: No Progress
4. Companions: 5/5
5. Giant Creatures: 2/5
6. Bobbleheads: 11/20
7. Achievements: 23/84
-----------------------------------------------------------------------------------------------------


This area of Boston is jam packed with Locations so the Screenshots of my Map at the time made the places I needed to highlight eligible. I had to manually add the Locations in for this Collectibles Map & it is a little haggard, so, sorry for that. *

Boston Public Library:

Bobblehead #7 – Intelligence: When you are ready, leave Diamond City & begin making your way West to the Boston Public Library. Either Pick the Advanced Lock to get in through the front doors or navigate through Copley Station to get inside it. Regardless of how you get in, make your way to the far North West wing of the library on the upper floor, past all of the Super Mutants. Enter into the room where Curator Givens & Dalen were holding out & we can find the Bobblehead down a small set of stairs on top of a console.

Trinity Tower:

Side Quest – Curtain Call: If you have not already done so, listen to the Trinity Tower Radio Station to not only unlock this Side Quest, but to mark Trinity Tower on your Map.

Bobblehead #8 – Melee: Take the two elevators up Trinity Tower fighting through Super Mutants as we go & defeat the boss Fist. Get to the cell on the rooftop where Rex is located & we can also find the friendly Super Mutant, Strong. Free them to progress Side Quest – Curtain Call & we can find this Bobblehead on a table in their cell.


Achievement #18 – Animal Control: Kill 300 Creatures.
Yet another Achievement that will come naturally as we play through the game; we will probably kill four times this number by the end of our 100%...

Companion #5 – Strong: Complete Side Quest – Curtain Call & speak with Strong afterwards to ask him to become a Companion. He will; he is not a Romance option.


Achievement #19 – Never Go It Alone: Recruit 5 separate Companions.
Strong will be our fifth Companion unlocked, unlocking this Achievement. Due to possible Romance options & personal preference, I will include the locations of the remaining eight Companions.

We need to max out the Affinity with at least one of them for the Loveable Achievement.

Combat Zone:

Companion – Cait: If you have meandered around Diamond City, you will most likely have overheard some gossip & received the Miscellaneous Objective to investigate the Combat Zone. Go there, clear out the Raiders, & accept to take over Cait’s contract from Tommy to unlock her as a Companion.

Cait is a potential Romance option…


Achievement #20 – Masshole: Kill 300 People.
This Achievement will also come naturally through our progression, though it may come later on then the Animal Control Achievement depending on how much optional exploration you have been doing up to this point.

Park Street Station (Vault 114):

Main Quest #4 – Unlikely Valentine 2: From the Combat Zone, we will be very close to Nick’s last known location. Follow the Waypoint to Park Street Station & enter into the subway; passing by here will also progress Railroad Quest #1 – Road to Freedom as well… ignore that for now.

Fight down the tunnels through the Triggermen, & we will reach the entrance to Vault 114. Link up with Nick in the Overseer’s office & he will go to lead us out of Vault 114…

Bobblehead #9 – Speech: Before we leave the Overseer’s office & escape Vault 114, be sure to collect this Bobblehead off of the Overseer’s desk!


Achievement #21 – Print’s Not Dead: Read 20 Magazines.
In 3/4 of every Location in the game, especially in ones pertaining to Quests, you will most likely find a Magazine or two. There are well over 100 Magazines in the game; keep your eyes open, & always be a thorough looter!

Main Quest #4 – Unlikely Valentine 3: Exit out of the secret entrance to Vault 114 & tell Nick you will meet him back at his office in Diamond City to complete this Main Quest.


Achievement #22 – Unlikely Valentine: Complete Unlikely Valentine.
Story Related. Complete Main Quest – Unlikely Valentine to unlock this Achievement.

Main Quest #5 – Getting A Clue 1: We will unlock this Main Quest after completing the previous one…

Swan’s Pond:

Giant Creature #1 – Swan: Just East, around the building we exited Vault 114 near, we can find… Swan’s Pond. If you have the Stimpaks & bullets to spare, feel free to give this unique Super Mutant Behemoth a go. If not, remember him for later… we need to kill five Super Mutant Behemoths or Mirelurk Queens for the …Harder They Fall Achievement.

Massachusetts State House:

Giant Creature #2 – Mirelurk Queen: Just North of Swan’s Pond, we can find yet another Giant Creature in the flooded basement of the Massachusetts State House. Use the Terminal & activate the emergency override to escape the basement where the Mirelurk Queen will burst from the ground & ambush us. Once again, only attempt to slay this beast if you have the Stimpaks & bullets to spare, otherwise discover the Location but leave the Queen be until you are stronger…

Mass Fusion Building:

Bobblehead #10 – Strength: We have two more Bobbleheads we can scoop up before we carry on with things. When you are ready, continue North East through Boston up to the Mass Fusion Building. Enter inside, & make your way up to the highest floor you can where the second reception desk & two doors leading out to the Mass Fusion Balcony are. From where this upper floor reception desk is, look over the edge past a green Couch down to the lower floors & we can spot this Bobblehead resting on the head of a hanging statue.


Achievement #23 – They’re Not Dolls…: Collect 10 Vault-Tec Bobbleheads.
If you have been following along with the guide, we will unlock this Achievement after collecting 10/20 Bobbleheads.

Pickman Gallery:

Bobblehead #11 – Lock Picking: Our next Bobblehead can be find in the visceral, Pickman Gallery. Fight your way up to the third floor, & we can pass through a hole in one of the walls to find a series of drops that will take us down into the basement. Head through the tunnels until you reach the room with Pickman himself being confronted by the Raider Leader, Slab. We can find our Bobblehead in this room on the ground next to a burning barrel fire in the rooms center.
Sequence 5: Working On the Railroad
1. Main Quests: No Progress
2. Minutemen Quests: No Progress
3. Brotherhood of Steel Quests: No Progress
4. Railroad Quests: Road to Freedom, Tradecraft, Boston After Dark
5. Automatron DLC Quests: No Progress
6. Vault 88 DLC Quest: No Progress
7. Giant Creatures: 2/5
8. Bobbleheads: 12/20
9. Achievements: 26/84
-----------------------------------------------------------------------------------------------------

Diamond City:

Side Quest – Special Delivery 1: Return to Diamond City, but hold off on returning to Nick as we will not want to get side tracked once we proceed with the Main Questline. In Diamond City, track down the Dugout Inn & head inside. Spend some time here, speak with Vadim, & a Ghoul in military attire will arrive to speak with us of the name Edward Deegan. Accept his proposal, & we will receive this Side Quest; this Side Quest chain is tied to us collecting the Charisma Bobblehead.

Cabot House:

Side Quest – Special Delivery 2: Head West from the Pickman Gallery over to the pristine Cabot House. Use the intercom outside the front door & ask to speak with Jack Cabot to be let inside. Speak with Jack & Edward, & we will progress the Side Quest, but more importantly receive the location & access to it where our Bobblehead is located.

Parsons State Insane Asylum:

Side Quest – Special Delivery 3: Travel to the Parsons State Insane Asylum to speak with Maria, then collect the Package at Parsons Creamery. Return to Edward back at the Cabot House to complete the Side Quest.

Cabot House:

Side Quest – Emogene Takes A Lover 1: Our next rando Side Quest we need to complete is to locate Emogene Cabot.

Goodneighbor:

Side Quest – Emogene Takes A Lover 2: Our lead from Edward will take us to Goodneighbor. Go to The Third Rail bar & speak with Whitechapel Charlie, Magnolia, then Ham to find our next lead.

Companion – Robert MacCready: Before we leave The Third Rail, enter into the VIP room & we can find the old mayor of Little Lamp Light, Rob MacCready. Simply pay him 250 Caps or perform an Easy Persuasion check to lower it to 200 & he will become a permanent Companion just like that. MacCready is a Romance option.

Charles View Amphitheatre:

Side Quest – Emogene Takes A Lover 3: Carry on to the next location where Emogene could be & speak with Brother Thomas. Convince him, one way or another, to see Emogene & she will return back to Cabot House where we can turn in the Side Quest.


Achievement #24 – Ranger Corps: Discover 100 Locations.
Explore. Explore. Explore. Go out of your way to explore as we need Caps, Junk for building, Magazines, & lots of enemies to kill. Only good things will come with exploration.

We are not even 1/4 through our 100% playthrough so this will come naturally even if you do not.

Parsons State Insane Asylum:

Side Quest – The Secret of Cabot House: At long last, we will receive the necessary Side Quest we need to enter the asylum where we can collect our Bobblehead.

Bobblehead #12 – Charisma: Follow Jack through the Parsons State Administration area until you link up with a wounded Edward Deegan. We can find our Bobblehead on a desk in the room we find him in next to the elevator control Terminal.


Achievement #25 – Gun-For-Hire: Complete 10 Side Quests.
Complete any 10 unique Side Quests to unlock this Achievement; Miscellaneous Objectives & Radiant Quests do not count.

Boston Commons:

Railroad Quest #1 – Road to Freedom 2: Return to the Boston Commons & we will quickly go & link up with a new Faction to befriend. Go to where the patrolling Tour Bot Protectron is & we can find a red line on the ground leading up past the entrance to Park Street Station. As we go, we can find Freedom Trail Markers that give us this code: 7A, 4L, 2A, 6O, 3I, 5R, 8D. The path will take us past Park Street Station, Old Granary Burying Ground, Goodneighbor, Old Corner Bookstore, Faneuil Hall, & into the Old North Church.

Head through the Ghoul infested church in through the catacombs until you reach the spinning dial puzzle. To complete it, turn the dial & press the center button at R-A-I-L-R-O-A-D to open the secret door.

Meet with Desdemona, & be polite as this is one of the three Factions we need to be allied with until the final Main Quests of the game.

Old North Church:

Railroad Quest #2 – Tradecraft 1: Speak with Deacon to receive our first Quest to prove ourselves to the Railroad. Meet him along the old highway just South of the Drumlin Dinner.

Lexington:

Railroad Quest #2 – Tradecraft 2: Link up with Deacon, & speak with the Tourist Ricky Dalton to get some intel on the old Railroad HQ. Enter in through the Sewers & locate the missing Prototype with Deacon. Grab the Prototype & return back to the Railroad HQ to complete the Quest.

Note that if Deacon gets glitched & does not move (i.e., when he needs to use the Terminal to open the Inaccessible Security Door) just make a Save & reload it to unstick him.

Old North Church:


Achievement #26 – Tradecraft: Join the Railroad.
Turn in Carrington’s Prototype to Desdemona & complete Railroad Quest – Tradecraft. When asked, accept to join the Railroad to unlock the Achievement.

Companion – Deacon: We will unlock Deacon as a permanent Companion after completing the Railroad Quest – Trade Craft; he is not a Romance option.

Railroad HQ:

Railroad #3 – Boston After Dark 1: Take the Prototype to Dr. Carrington now & we will receive our next Railroad Quest. Collect the Dead Drop & speak with Old Man Stockton in Bunker Hill to progress the Quest. Clear out the rendezvous point & escort the Synth H2-22 on route to Highrise’s home. When finished, return to Dr. Carrington & turn in the Quest.

This is all we need to do for the Railroad for now, any other Quests we receive from them will be the repeatable Radiant Quests.
Sequence 6: Shadow of Steel
1. Main Quests: Getting A Clue, Reunion
2. Minutemen Quests: No Progress
3. Brotherhood of Steel Quests: Shadow of Steel, Tour of Duty, Show No Mercy
4. Railroad Quests: No Progress
5. Automatron DLC Quests: No Progress
6. Vault 88 DLC Quest: No Progress
7. Giant Creatures: 3/5
8. Bobbleheads: 14/20
9. Achievements: 27/84
-----------------------------------------------------------------------------------------------------

Vault 81:

Side Quest – Vault 81: We have a few more errands to run before we will finally return to Mr. Valentine & progress the Main Questline. Our next Bobblehead can be found in Vault 81; you may have collected a Miscellaneous Objective to investigate it. Before we can enter the Vault, the Overseer demands we offer up 3 Fusion Cores; by now you should have a decent supply saved up. If not, then hold off on Vault 81 until we complete the upcoming Main Quest – Getting A Clue as we can find 4 Fusion Cores in a house we will be tasked with investigating… Offer up the Fusion Cores to complete the Side Quest & gain access to the Vault.

Side Quest – Hole In the Wall: Inside Vault 81, take the elevator down to the lower level. Head down the stairs in the common room, down the halls of Residential, down another set of stairs & enter the Clinic. Here, agree to donate some blood to Dr. Forsythe as a Miscellaneous Objective then sit in a Chair & Wait for 24 hours.

When we come to, there will be a medical emergency involving the child Austin & a virus he got from a Mole Rat… the real source of Covid. Agree to help them & enter into the Secret Vault.

Bobblehead #13 – Medicine: Navigate through the Secret Vault until you are under 20m away from our Waypoint in the Mole Rat caging room. Either hack the Expert Terminal or find the Passcode for it at the end of the hall in a side room. Speak with the robot, Curie, & she will let us in to her lab & give us the cure we need for Austin. We can find our Bobblehead on the desk behind her next to a Terminal.

Companion – Curie: If we complete the Side Quest – Hole In the Wall, we will unlock Curie as a permanent Companion. She is also a Romance option & my personal favourite choice… you will be less weirded out by that if you complete her Companion Quest after maxing out half her Affinity.

Nuka-World Quest #1 – All Aboard 1: When you reach Level 30 & have the Nuka-World DLC installed, we will receive this Quest & the Nuka-Cola Family Radio. Listen to the irritating radio message to get the location of the Nuka-World Transit Center in the far West corner of the map; we will be going to this DLC in Post Game after we finish the main campaign first…

Diamond City:

Main Quest #5 – Getting A Clue 2: Return to Nick in Diamond City now & speak with him about our case. Follow him to a cereal brand’s house & look for your son there.

Companion – Nick Valentine: When we complete the Main Quest – Getting A Clue, we will unlock Nick as a permanent Companion; he is not a Romance option.

Main Quest #6 – Reunion 1: When we leave Kellogg’s House, Dogmeat will magically be waiting for us to assist in finding Shaun. What a good boy. Show him the San Francisco Sunlight Cigars & he will begin leading us to where Kellogg is… because no one else in the entire world smokes these things apparently.

Fort Hagen:

Main Quest #6 – Reunion 2: Follow Dogmeat through the wasteland as you track Kellog, & we will reach Fort Hagen.

Bobblehead #14 – Energy Weapons: Fight through Fort Hagen & take the elevator down to the basement where we can enter into the Fort Hagen Command Center. Head down the corridors until you reach the kitchen area found across the hall from the medical ward. Enter into the kitchen & head to the back room where we can find this Bobblehead on a table in between two fridges.

Main Quest #6 – Reunion 3: Confront Kellogg & deal with him after learning what has happened to Shaun.

Brotherhood of Steel Quest #4 – Shadow of Steel 1: When we exit Fort Hagen through the elevator, we will see a massive Brotherhood of Steel airship fly over us. Wait for the intercom to stop speaking & we will receive this new Quest.

Listen to the Military Frequency AF95 to hear Paladin Danse’s repeating message to report back to the Cambridge Police Station.

Diamond City:


Achievement #27 – Reunions: Complete Reunions.
Story Related. Before we check in with Danse, return to Diamond City & tell Nick Valentine what we discovered at Fort Hagen.

Main Quest #7 – Dangerous Minds 1: We will now be tasked with going to the Memory Den in Goodneighbor to speak with Doctor Amari about entering into Kellog’s memories to find the location of the Institute. Or at least how to get there…

Cambridge Police Station:

Brotherhood of Steel Quest #4 – Shadow of Steel 2: Go to the Cambridge Police Station & link up with Paladin Danse.

Travel with him to the Prydwen, & we will meet the leader of the Brotherhood, Elder Maxson.

Companion – Paladin Danse: We will unlock Paladin Danse as a permanent Companion after we complete Shadows of Steel; he is a Romance Option, though his character arc is a little contested as you will later find out.

Prydwen:

Brotherhood of Steel Quest #5 – Tour of Duty 1: Return to Paladin Danse after being promoted to Knight, & ask him to accompany us on our tour of the ship to unlock this Quest.

Go around & meet the main crew members on board the ship.

Brotherhood of Steel Quest #6 – Show No Mercy 1: After meeting the final crew member on the Prydwen, we will receive this next Quest. Speak with Elder Maxson, & board the Vertibird outside to head to Fort Strong.

Fort Strong:

Giant Creature #3 – Super Mutant Behemoth: When we arrive at Fort Strong in the Vertibird, we will need to use the attached Mini-Gun to kill a Super Mutant Behemoth.

Brotherhood of Steel Quest #7 – Show No Mercy 2: Clear out all of the Super Mutants at Fort Strong & report back to Elder Maxson on the Prydwen.

This is as far as we can go with the Brotherhood until we discover the location of the Institute…
Sequence 7: Vault 88
1. Main Quests: No Progress
2. Minutemen Quests: No Progress
3. Brotherhood of Steel Quests: No Progress
4. Railroad Quests: No Progress
5. Automatron DLC Quests: No Progress
6. Vault 88 DLC Quest: Vault Tech Calling, Better Living Underground, A Model Citizen, Power to the People
7. Giant Creatures: 4/5
8. Bobbleheads: 19/20
9. Achievements: 28/84
-----------------------------------------------------------------------------------------------------

Before we carry on with the next section of the main storyline, let us travel South & find our final Bobbleheads as well as finishing some DLC Questlines.


Gunners Plaza:

Bobblehead #15 – Small Guns: Make your way down South to the highly defended Gunners Plaza & enter inside the building. Make your way over to the far West end of the building on the first floor to the On-Air newsroom, where Captain Wes is; the Bobblehead can be found on the news anchor’s desk.

Atom Cats Garage:

Bobblehead #16 – Unarmed: Cut Eastward across The Commonwealth towards the ocean from here & we can reach the Atom Cats Garage. Enter into the main clubhouse for the Cats, & we can find this Bobblehead on the hood of a rusted car at its barn door entrance.

Poseidon Energy:

Bobblehead #17 – Endurance: Head down South now to the Poseidon Energy building. Enter inside the building & navigate to the large warehouse full of Raiders as well as the unique Raider Boss, Cutty. Get to the upper levels of the rooms in this area along the stairs/walkways to find where Cutty’s cushioned throne is; we can find the Bobblehead on a desk close by it.

If you are able to, I recommend picking the Master Lock on the roof of the building to enter inside as it will give you direct access to the Bobblehead & Cutty.

Wrecked of the FMS Northern Star:

Bobblehead #18 – Agility: Head Eastwards now towards the edge of the continent, to the ocean again. Here we can find the wreck of an old warship. Navigate through the heavily irradiated hull of the ship & get up to the top deck. Fight your way through more Raiders to where the boss, Rags, is hiding out. Exit his room past a Chemistry Station out towards the life raft escape route; we can find the Bobblehead on the platform just past the life raft overlooking the ocean.

Spectacle Island:

Bobblehead #19 – Luck: Spectacle Island is pretty easy to find; it is the lone island East of our current position. Swim over to it, & get to the stranded boat at the South end of the island. Enter the boat & get to the upper deck where we can find the Bobblehead inside a shelf close to a green Steamer Trunk.

We will not grab our final Bobblehead until we progress into the Main Questline & enter the Glowing Sea…

Giant Creature #4 – Mirelurk Queen: In the bottom floor of the boat we are in, we can flip a Circuit Breaker to restore power to a Workshop we can use to make a Settlement in the center of the island. Do this, & a Mirelurk Queen will emerge from the ocean & we will have to slay it…

Vault 88:
While we are in the neighborhood, it is time to finally pop in to Vault 88 & complete the Vault Tec Workshop DLC.

Vault 88 Quest #1 – Vault Tech Calling 2: Make your way over to the marked Vault 88 in the Southern Commonwealth. Dispatch the Raiders outside, & enter in through the caved in entrance to the Vault. Open the sealed Vault 88 to complete the Quest.

Vault 88 Quest #2 – Better Living Underground 1: Enter in through the Vault doors & lift the security lockdown using a nearby Terminal. Kill the irradiated Security Chief Anderson to collect the Vault Tec Control Board & place it into the Vault Tech Workshop to activate Workshop Mode; scrap the caved in area to progress further into Vault 88.

Once we clear our way to the other side, we can speak to Overseer Barstow & complete this Quest.

Vault 88 Quest #3 – A Model Citizen 1: The Overseer will then task us with killing the remaining Vault residents who have become Feral Ghouls. Return to her after they are dealt with & be sure to agree to help her to restore the Vault back to its prime… or close to it.

Go into your Workshop now & build Barstow the Vault 88 Overseer’s Desk.

Speak with the Overseer, & we will then be tasked with turning on the Vault 88 Radio Beacon to draw in Settlers to the Vault.

Build a Bed, & Sleep for a few hours, & we will be able to assist the Overseer in interviewing some Settlers who have responded to the Beacon.

Vault Quest #4 – Power to the People 1: Once you & the Overseer have selected a candidate, go to the nearby Vault Trunk & equip them with a Vault 88 Jumpsuit; give them a Pip Boy as well & we can unlock an Achievement.


Achievement #28 – Vault Dweller: Equip Vault 88 Suit & Pip-Boy on a Settler.
Equip any Settler with a Vault 88 Suit & Pip Boy; these items are restocked in the Vault Trunk found at the entrance.

Vault Quest #4 – Power to the People 2: Go into your Workshop now after speaking with the Settler & the Overseer & construct the Power Cycle 1000 Prototype. Next, go into the Power – Miscellaneous tab & construct a Terminal so that we can select our Experiment Parameters; you may need to attach a Small Generator to it at first to give it some power.

Vault Quest #5 – The Watering Hole 1: After we finish with the Power Cycle experiment, the Overseer will give us a new task; getting some sketchy Chemical Research from Hallucigen Inc.
Sequence 8: United We Stand
1. Main Quests: No Progress
2. Minutemen Quests: Taking Independence, Old Guns
3. Brotherhood of Steel Quests: No Progress
4. Railroad Quests: No Progress
5. Automatron DLC Quests: No Progress
6. Vault 88 DLC Quest: The Watering Hole, Explore Vault 88, Vision of the Future, Lady Luck
7. Giant Creatures: 5/5
8. Bobbleheads: 19/20
9. Achievements: 34/84
-----------------------------------------------------------------------------------------------------

Vault 88:

Vault 88 Quest #6 – Explore Vault 88 1: With the Radio Beacon turned on, we will have received this Quest to start exploring Vault 88; there are three Workshops we will need to turn on. To do so, we need to find a Control Board for each Workshop; click on the Workshop to then get a Waypoint to find each Control Board.

Some Workshops are hidden behind Limestone or Rockslides so you will need search around & Scrap them in Build Mode if it is available.

Giant Creature #5 – Mirelurk Queen: We can find a Mirelurk Queen guarding the East Sector Workshop (we need to Scrap a Rockslide blocking one of the train tunnels in the main Vault chamber).


Achievement #29 – …the Harder They Fall: Kill 5 Giant Creatures.
If you have been following along with the guide, we will unlock this Achievement after killing our final Mirelurk Queen (Super Mutant Behemoth kills also contribute). If it does not unlock for you, that is alright as this Achievement can be buggy. It also only counts if you perform the killing blow yourself. We will need to kill another Mirelurk Queen shortly anyways during the upcoming Minutemen Quest #2 – Taking Independence.

If it still does not unlock for you, here is a good video guide by Zasta 360GameTV showing the location of 10 possible Giant Creatures. While we did already kill some of the ones he shows, most will actually respawn after a long amount of time if they weren’t Quest Related.
https://youtu.be/Hq6PaDoCCx0

Achievement #30 – Better Living Underground: Unlock all 3 Vault 88 build areas.
Complete Vault 88 Quest #6 – Explore Vault 88 & activate all 3 Workshops to unlock the Achievement.

HalluciGen Inc:

Vault 88 Quest #5 – The Watering Hole 1: Get to HalluciGen Inc & navigate through the halls filled with crazed Gunners until you reach the blast doors locking up the chemical shipment. If you cannot Hack the Expert Lab Access Terminal, go into the side room & Hack the Novice Mainframe Access Terminal & reset the Password.

Collect the Vault 88 Chemical Research.

Vault 88:

Vault 88 Quest #5 – The Watering Hole 2: Return to the Overseer with the Chemical Research & construct the Soda Fountain Prototype; it will need Power. Connect it to a Terminal & choose whichever Experiment Parameters you want.

Vault 88 Quest #7 – Visions of the Future 1: After the experiment is finished, return to the Overseer again again to learn of the next prototype to test, the Phoropter Prototype. It will require 25 Nuclear Material which may be a lot if you are not an avid Junk collector; we can Scrap Uranium Deposits found throughout the caves in Vault 88, there is an obscene amount of it here.

Build the Phoropter Prototype, & connect it to a Terminal to select the Experiment Parameters for it.

Vault 88 Quest #8 – Lady Luck 1: We have one final experimental prototype to test after the previous one, the Slot Machine, Overseer Barstow’s personal design. Once again, hook it up to a Terminal & set your experiment parameters.


Achievement #31 – Oversight: Become Overseer.
After we finish with the final prototype, speak with Overseer Barstow & she will tell us she will be leaving Vault 88 to go & bring her schematics to share with other Vaults. When she goes, we will be bestowed the duty of being the new Overseer.

Do not Persuade her to Stay Here As Overseer or she will do just that, completing the Quest but voiding our Achievement!

Sanctuary (Or Anywhere):


Achievement #32 – Armed & Dangerous: Create 50 Weapon Mods.
As you progressively get new Weapons, make a point of Modding them to the best of their ability; spending Ability Points in Gun Nut, Blacksmith, & Science are very useful & strongly recommended.

An easy way to farm this Achievement is simply Crafting a Muzzle Mod for any Gun, then equip & unequip the Muzzle Mod over & over again. By selecting “No Muzzle” the game actually thinks you are Crafting something new.

The Castle:

Minutemen Quest #2 – Taking Independence 2: It is now time, at long last, to reunite with Preston Garvey outside of The Castle to finish off the Minutemen Questline. After the Mirelurks & the Mirelurk Queen are dispatched, we can access the nearby Workshop & begin developing the Castle as a Settlement; to make things easier, go to one of your other Settlements & send a Supply Line to sync over all Junk & building materials.


Achievement #33 – Taking Independence: Complete Taking Independence.
Restore power to the Radio Transmitter & speak with Preston Garvey to complete Minutemen Quest #2 – Taking Independence.

Minutemen Quest #3 – Old Guns 1: There is one final Quest we need to do for the Minutemen; we need to wait for around 3 days or so after retaking the Castle. To receive the Quest, speak with Preston; if he is not at the Castle, he will be it the last known Settlement you have sent him to like Sanctuary. Speak with Preston, & he will tell us that the Castle has been trying to reach us on the radio & we will receive this Quest. Make a Save before carrying forwards as this Achievement has been known to bug out & not unlock after completing the Quest!

When we reach the Castle, we will link up with Ronnie Shaw, an old Minuteman… Minutewoman? Accompany her into the Castle Tunnels & come out the other side inside the Bastion to collect the Artillery Schematic. Construct an Artillery Piece & assign one of the Settlers or Minutemen living here to it. Follow Ronnie’s instructions & do a test bombardment.


Achievement #34 – Old Guns: Complete Old Guns.
With that done, return to Preston, & turn in the Quest to unlock the Achievement. If it does not unlock, you will unfortunately have to reload your Save(s) & try again.

As of now, we are officially done with the Minutemen; any remaining Quests we receive from Preston will all be Radiant Quests for assisting & obtaining Settlements.
Sequence 9: Wasteland Savant
1. Main Quests: No Progress
2. Brotherhood of Steel Quests: No Progress
3. Railroad Quests: No Progress
4. Automatron DLC Quests: No Progress
5. Bobbleheads: 19/20
6. Achievements: 39/84
-----------------------------------------------------------------------------------------------------

Contraptions Workshop (Any Settlement):
If you have the Contraptions Workshop DLC installed, now is as good a time as any to polish off its associated Achievements.


Achievement #35 – Time Out: Assign a Settler to a Pillory.
To construct a Pillory, go to Resources – Miscellaneous to find it; all we need is Wood x4 & Concrete x1 to build it. With it constructed, select any Settler & assign them to the Pillory to unlock the Achievement; be sure to return them to their original task… or they will just stay there… forever.


Achievement #36 – Show Off: Display a Weapon on a Weapon Rack, Armor on an Armor Rack, & Power Armor in a Power Armor Display.

Our next manner of business is to build Displays for a Weapon, some Armor, & Power Armor. Go to Decoration – Display to find… Displays.

An Armor Rack will take Wood x4 & Cloth x1; add an Outfit or piece of Armor to its Inventory & equip it. Weapons Racks come in various sizes & forms depending on which Weapon you want to display; build any of them & place the proper Weapon in its Inventory to display.

Lastly is our Power Armor Display which takes Gears x6, Oil x4, Screws x4, Plastic x4, Aluminum x12, Fiberglass x6, & Circuitry x3; it also requires Power x1 so we will need a Generator attached to it. When it is ready, enter any Power Armor (by this point you should most likely have 1 or 2 sets kicking around your primary base) & walk over to the display, getting as close as you can to it before exiting the Power Armor. Once outside of the Armor, & near to the Display, select the Power Armor Display & Activate it to set the Armor on… display.

With all the laid out conditions met, we will unlock the Achievement after all three Items are set out on display… & I will never say “display” again for the entire guide.


Achievement #37 – Mass Production: Produce 100 objects from your Builders.
This Achievement is actually really straightforward & will only cost you a lot of Steel. To start, go to Power – Manufacturing – Machinery & construct a Builder; they take Circuitry x2, Gears x3, Rubber x4, & Steel x10. It will require a whopping Power x8, so we will need to build or repurpose some Generators to it.

The next step is to build a Terminal & connect it to the Builder; it will also require Power. With the Terminal built, select Vault Tec Lunchboxes as the desired build Item; the default build Item is Steel Balls. Now approach the Builder & place Steel x300 (or objects that add up to Steel x300) inside its Inventory; if you need Steel, go & Scrap objects in Vault 88, there is well over 1000 Steel in objects/buildings there… With this done, the Builder will commence building the Lunchboxes & begin dumping them on the ground; if you don’t want your game to bug out due to 100 Lunchboxes on the ground, I recommend constructing a Conveyor Storage & attaching it to the Builder.

Unfortunately, passing time by Sleeping or Waiting will not work & we have to essentially idle our game or bumble around in the Settlement until 100 Vault Tech Lunchboxes have been built. Periodically pop in & check on the Builder to make sure you didn’t underestimate the amount of Steel you put into it & that it is still plunking away; once the 100 are built, we will unlock our Achievement.


Achievement #38 – Wasteland D.I.Y.: Craft 100 Items.
As another random Achievement we can mop up, we need to create at least 100 Items using a Cooking Station or Chemistry Station. The easiest Item to Craft, is some good ol Jet. Jet only takes Fertilizer x2, & Plastic x1; everything the body needs. This amounts to a total of Fertilizer x200 & Plastic x100. You can also cook different Meats, Purify Water, make Cutting Fluid, etc. If you do not want to waste materials, just make a Save before this Achievement & reload after it is unlocked.

Any Settlement (With 1 Settler In It):


Achievement #39 – Benevolent Leader: Reach maximum Happiness in a large Settlement.
As you can probably gather, this is a complicated Achievement, but I will make it as easy to follow as possible. The easiest method for unlocking this Achievement is using the “single Settler method”. To do this, we will need to start with a Settlement that has 0 Settlers; if you have no good candidates, speak with Preston & he will give you Radiant Quests that will end in obtaining a Settlement. Once you have one, if there are Settlers present, relocate them to other Settlements for now; do not build a Recruitment Radio Beacon.

First, you will want to place at least 20 Mutfruits & 20 Purified Water into the Storage of the Settlement; this allots to 20 days worth of Food & Water. Choose Mutfruit as all other Foods count only as 0.5 days worth of Food, if you use other Foods than double the amount in Storage. With that done craft at least one Machinegun Turret to provide +5 Defense as well as at least 1 Bed.

Lastly, we will need to build a Rank 2 Bar, to do this, we will need to have the Local Leader Perk maxed out to Level 2. Bars can be found in the Stores – Food & Drink tab.

Baseline Settlement Happiness is set to 50. If you have all the required steps completed, go to any of your other Settlements & Move a Settler to your Achievement Settlement. Once there, assign them to the Rank 2 Bar to generate a bonus +20 Happiness.

It may take a few hours/days for the Happiness to slowly reach 100. When it does, our Achievement should unlock. If it doesn’t unlock, even at 100 Happiness (it didn’t actually for me), Fast Travel to the opposite end & back to the Settlement until the Achievement unlocks. If it still doesn’t, then just carry on with the game & leave the Settlement be; if all the requirements were met, it will not drop below 100 Happiness. I tried so many different things, Sleeping, Save/Quit/Reloading, but nothing worked. I just left & started doing other Side Quests & it randomly unlocked for me during one of them.
Sequence 10: The Superhuman Gambit
1. Main Quests: Dangerous Minds
2. Brotherhood of Steel Quests: No Progress
3. Railroad Quests: No Progress
4. Automatron DLC Quests: A New Threat, Headhunting, Restoring Order
5. Bobbleheads: 19/20
6. Achievements: 45/84
-----------------------------------------------------------------------------------------------------

If you have not already done so, make sure to allocate 2 Ability Points into the Pickpocket Perk so we can unlock the Prankster’s Return Achievement

General Atomics Factory:

Automatron Quest #2 – A New Threat 2: Since we went & dealt with the Minutemen’s Castle, we are now in the same area of The Commonwealth to progress the Automatron Questline. Enter into the General Atomics Factory & destroy the Robobrain to collect the Mechanist Device.
Speak with Ada after acquiring this Item, & install it to her using a Robot Workbench.

Fort Hagen Satellite Array:

Automatron Quest #3 – Headhunting 1: With the Device installed on Ada, we now need to track down & destroy two more Robobrains to retrieve their Radar Beacons.

The second Robobrain can be found North of Fort Hagen.

The third Robobrain can be found West of Fort Hagen in the Fort Hagen Satellite Array.


Achievement #40 – Robot Hunter: Unlock 10 Robot Mods.
While we do have a baseline amount of Robot Mods we can craft as part of the DLC, to unlock anymore, we need to loot them off of defeated Servomechs. By completing the DLC Missions as well as encountering random Servomech or Rust Devil patrols, we will eventually accumulate 10 new Robot Mods.

These enemies will sometimes attack our Settlements as well as part of the random “Defend Settlement X” Miscellaneous Objectives.


Achievement #41 – Headhunting: Complete Headhunting.
Story Related. To acquire the third Radar Beacon, you will need to deal with Jezebel. Of the decisions, take your pick, & receive the Radar Beacon from her one way or another.

RobCo Sales & Service Center:

Automatron Quest #4 – Restoring Order 1: When you figure out how to continue, install the M-SAT device on any Robot (ideally Ada). Once it is hooked up to a Robot Companion, we can now travel to the RobCo Sales & Service Center.

When we find the Mechanist, we will enter the hardest battle we have faced yet, facing waves upon waves of his Robots before we can either talk him down or kill him… her.

After you deal with the Mechanist, shut down the Master Control Terminal & put an end to the madness.


Achievement #42 – Restoring Order: Complete Restoring Order.
Story Related. Speak with Ada after settling the score with the Mechanist for a final concluding conversation, & we will complete the Automatron Quest – Restoring Order, complete this DLC, & unlock our Achievement.

Any Settlement (Or Anywhere):


Achievement #43 – Prankster’s Return: Placed a Grenade or Mine while Pickpocketing.
After you have placed two Ability Points into the Pickpocket Perk, we can now place live Grenades into characters Inventories. To easily unlock this Achievement, make a Save, & go to any Settlement. With a Frag Grenade (or any Grenade/Mine technically) sneak up behind a Settler & place it inside their Inventory where it will then explode, unlocking our Achievement.

Goodneighbor:

Companion – John Hancock: If you wanted to collect the final Companion, Hancock, we first need to obtain the Miscellaneous Objective – Talk to Bobbi. To be honest, I can’t actually figure out how to get this Miscellaneous Objective; I couldn’t get it when I tried to, but then somehow just got it randomly. If you don’t have it, don’t worry about this & just carry on.

When you eventually do get it, speak with Bobbi, & accept her job to receive the Side Quest – The Big Dig. Progress through the Quest until you enter into the storeroom where Fahrenheit confronts us. Do not side with Bobbi & betray or convince her to leave. With that done, & the Side Quest completed, go see Hancock where we can ask him to join us as a Companion; he is a Romance option.

Main Quest #7 – Dangerous Minds 2: While in Goodneighbor, make your way to The Memory Den. Speak with Nick & Doctor Amari, & begin some Inception on Kellogg’s old memories. After viewing all the memories, interact with the TV in Kellogg’s home to leave the dream.


Achievement #44 – Dangerous Minds: Complete Dangerous Minds.
Story Related. Complete the dream sequence in Kellogg’s memories & speak with Doctor Amari afterwards to finish the Main Quest & unlock our Achievement.

Main Quest #8 – The Glowing Sea 1: We will find our new lead in the case to finding our son in The Glowing Sea, with a rogue Institute Scientist named Virgil.

Any Settlement (Anywhere):


Achievement #45 – Lovable: Reach Maximum Relationship Level with a Companion.
This can be done with any Companion, ideally your favorite or preferred travelling Companion. Piper is the easiest Companion to earn maximum Affinity with as she basically likes anything you do that is good or neutral by a lot. As well she likes when you Picklocks, which is pretty easy to rack up favour with her. Reaching maximum Affinity also unlocks the option for Romance if they are applicable Companions.

An easy… & horrific way to earn favour with over half our Companions is healing Dogmeat with Stimpaks. The best way to farm this, is to have all your Companions in one Settlement, have Dogmeat as your current Companion… & shoot him. Shoot him until he is down, & heal him with a Stimpak for a good boost to people’s Affinity who are in the Settlement. Wait for 48 hours, rinse & repeat. It is pretty sick… but very effective.

To see more on Companions & how to earn favour with them, check out Carl’s Fallout 4 Guide where he breaks down all Companions & how to max out your Affinity with them.

https://www.carls-fallout-4-guide.com/companions/perks-likes-dislikes.php
Sequence 11: Infiltrating the Institute
1. Main Quests: The Glowing Sea, Hunter/Hunted, The Molecular Level
2. Brotherhood of Steel Quests: No Progress
3. Railroad Quests: The Molecular Level
4. Bobbleheads: 20/20
5. Achievements: 49/84
-----------------------------------------------------------------------------------------------------

If you have not already been doing so, make sure you are accumulating all the required materials for Crafting the 15 Cages from the Wasteland Workshop DLC & storing them in your Settlements. It is best to do this as we play, rather than scrambling to hunt all the Items down after the fact; you can see the cumulative materials list in my Achievement Checklist linked in the Introduction of this guide…

We will also need the Animal Friend & the Wasteland Whisperer Perks to build a Beta Wave Emitter which we will need for the Docile Achievement.

Vault 95:

Bobblehead #20 – Big Guns: When we reach our first Quest Waypoint for Main Quest – The Glowing Sea at the Edge of the Glowing Sea location, we can spot a Vault symbol on our compass South from our position. Get to it, & it will be Vault 95.

Take the elevator down into the Vault, & we will have to fight off a massive Gunner blockade in the central lobby. From here, enter through the Residential wing, & head down the stairs into it. At the bottom of the stairs, pass through a wrecked wall & take a right where a Machine Gun Turret will fire at us. Past the Turret will be a large suite with the Gunner Lieutenant in it; our Bobblehead will be in the center of the room on top of a playing radio.


Achievement #46 – …They’re Action Figures: Collect 20 Vault-Tec Bobbleheads.
If you have been following along with the guide, we will unlock this Achievement after collecting our final Bobblehead.


Achievement #47 – RobCo’s Worst Nightmare: Hack 50 Terminals.
This Achievement takes much longer than Picking 50 Locks. Be sure to put at least 3 Ability Points into the Hacker Perk; 4 Ability Points will make it so you will never fail a Terminal which is also very handy. With this Perk, its just a matter of locating & Hacking the Terminals; you can check your progress in the Data – Stats – Crime tab of your Pip-Boy.

Keep in mind we do still have two large DLCs as well as the remainder of the Base Game to go through so there is plenty of time to keep chipping away at this Achievement.

Rocky Cave:

Main Quest #8 – The Glowing Sea 2: When you are prepared, begin making your way through The Glowing Sea. You will want an ample supple of Rad Away & Rad X as well as either a Hazmat Suit, or Upgraded Rad resistant Power Armor. Note that the highest the Radiation will typically reach is only a +3, so it can easily be remedied with a good store of Rad X alone…

After we reach the Crater of Atom, the residents will point us the way to the Rocky Cave where we can find Virgil. Speak with him & we will get our next lead on finding the Institute.

Greentech Genetics:

Main Quest #9 – Hunter/Hunted 1: Travel to the C.I.T. Ruins now & tune your Pip-Boy Radio to the Courser Signal to track them. Follow the signal East to the large green building, Greentech Genetics. Track down the Courser, & kill them, to acquire the Courser Chip.


Achievement #48 – Hunter/Hunted: Complete Hunter/Hunted.
Story Related. We will unlock this Achievement after completing Main Quest – Hunter/Hunted when we acquire the Courser Chip.

Railroad HQ:

Main Quest #10 – The Molecular Level 1: Since we have already met them, our Mission objective will be to go & take the Courser Chip to the Railroad & get them to decode it.

Bring the decoded information back to Virgil in the Glowing Sea, & we will receive the schematics to build our Signal Interceptor device. Be warned, we are starting to venture into the latter end of the Main Questline. Some decisions we make will affect our ability to earn all Achievements & lock us into a certain Ending. Keep this in mind & pay attention. With Virgil’s schematic, we will have Optional Objectives to speak with either the Minutemen, Railroad, or Brotherhood of Steel to help us build the Signal Interceptor; choose the Railroad & speak to no one else! Choosing the Railroad will keep them in the race & carry on their Questline; choosing the other two will amount to the same, but we will not get to finish the last Quests for the Railroad which voids some Achievements.

Where we end up building the Signal Interceptor does not matter; it can be built in any Settlement. When we build the Stabilized Reflector Platform, return to Tinker Tom at Railroad HQ & we will receive a massive list of Materials we need. Fortunately, we get Waypoints for locating any specialty Materials; if you have been diligent in your looting, you may already have everything we need. Build the Control Console, Molecular Beam Emitter, & Relay Dish wherever you built the S.R.P; the whole set up will also require a whopping 28 Power.

When you are ready to continue & take a massive leap into the Main Questline; step onto the S.R.P.

Railroad Quest #4 – Underground Undercover 1: Since we used the Railroad to enter the Institute, we will receive this Quest & progress their Questline; there is an Achievement attached to this Quest that would have been voided if we chose a different Faction’s help.


Achievement #49 – The Molecular Level: Complete The Molecular Level.
Story Related. We will unlock this Achievement after completing Main Quest – The Molecular Level after we enter the Institute.
Sequence 12: Like Father... Like Son
1. Main Quests: Mass Fusion (Progressing)
2. Brotherhood of Steel Quests: No Progress
3. Railroad Quests: Undercover Underground (Progressing)
4. Institute Quests: Institutionalized, Synth Retention, Battle of Bunker Hill, Mankind Redefined
5. Achievements: 51/84
-----------------------------------------------------------------------------------------------------

The Institute:

Railroad Quest #4 – Underground Undercover 2: When we arrive in the Institute, exit the teleporter & we can find a Computer Terminal in the next room. Load the Network Scanner Holotape given to us by Desdemona & select “copy encrypted message” to initiate conversation with Patriot.

When they respond, be sure to read the urgent message sent, & a meeting place will be set for the two of you.

Be sure to also initiate the Network Scanner to download valuable Institute information to take back with us…

Institute Quest #1 – Institutionalized 1: Leave this room & approach the nearby elevator to hear from the Father, & we will receive this Quest. Play nice! The Institute is one of the two Factions we will side with for an Ending of the game when we reach our playthrough’s crossroads!

When we meet the Father, refrain from gunning him down, & hear him out to discover a big ol’ Morty mind blaster. Plot twist.

Again, play nice in the dialogue, & play the double agent (or believe the situation too, because that is also valid if you want the Institute Ending to be cannon for your run; it is compelling).
You are now the new Kellogg; dog of the Institute.


Achievement #50 – Institutionalized: Complete Institutionalized.
Story Related. When we are done speaking with the Father, go around & speak with all of the different leaders of the Institute. After doing so we will unlock Fast Travel to the Institute & unlock our Achievement.

This is both a Story Related Achievement & technically missable; there was nothing stopping you from gunning down the Father upon first encountering him…

Railroad Quest #4 – Underground Undercover 3: If you have set up our meet with Patriot, follow the Quest Waypoint & we can find him in a storeroom. Speak with Patriot, & we will begin hashing out a plan to rescue some synths; we will need to speak with Desdemona when we return to the surface…

Institute Quest #2 – Synth Retention 1: When all the “shaking of the hands” has been done, return to the Father, & we will receive our first assignment; some good old fashioned busy work.

It is important that we do not report back to the Brotherhood of Steel yet! Doing so, will start progressing their Questline, which is fine however there is a point of no return with them that sets us down their Ending, vilifying us with the Institute. For now, ignore them, & we will report back after we have finished progressing our business with the Institute…

Railroad HQ:

Railroad Quest #4 – Underground Undercover 4: Now that we are finished in the Institute for now, it is time for us to leave. Report back to Railroad HQ & we will be directed to the Cambridge Polymer Labs to locate the password for the Institute Code Defender.

Break into the Isotope Lab & we can locate the password on a Terminal inside room C3 on the second floor; we need to enter in through the broken ceiling of room C1 & navigate through the vents to reach it. With the password, we can override security & escape the lockdown.

Return to the Railroad HQ & speak with Desdemona to progress the Quest.

Nahant Wharf:

Institute Quest #2 – Synth Retention 2: Head to the Nahant Wharf & link up with the Courser as requested by the Father. Speak with X6-88, & assist him in reclaiming an escaped Synth from the clutches of some Raiders on the Libertalia.

When you reach the crows nest of the main flotilla, we will find our Synth. Use the recall code that X6-88 just passed us, kill the other Raiders, & X6 will take the Synth back to the Institute.

The Institute:

Railroad Quest #4 – Underground Undercover 5: Return to the Institute & speak with Patriot & Z1-14. Z1-14 will then task us with acquiring some mining equipment him & the other synths can use to build weapons with; it will require us to kill some specific guards but won’t damage our reputation with the Institute.

Once we have them, speak with Z1-14 again & he will tell us to continue working with the Father. This is the end point for this Quest as following it through will make enemies of the Institute; we will save this for when it is Endgame time & we have chosen our anti-Institute Ending.

Institute Quest #2 – Synth Retention 3: Tell the Father that the job has been finished. Check out your new digs in the Institute, & we will complete the Quest.

Institute Quest #3 – The Battle For Bunker Hill 1: For our next Quest, we will be tasked with attacking the Railroad outpost of Bunker Hill & reclaiming some “lost” Synths. We will get two optional objectives to notify the Brotherhood of Steel & the Railroad; do not speak with the Brotherhood, but definitely 100% go & tip the Railroad off to the attack!

After we have warned the Railroad, travel to Bunker Hill & link up with X4-18. Immediately after we speak with the Courser; kill him, & our objective will change to having to speak with the Father in the C.I.T. Ruins. Pass through the Rotunda to get up to the rooftop, & we will have a potentially heartfelt conversation with the Father… son… our son… who wants to be the father we call Father. Shaun, we will just call him Shaun.

After we talk to Shaun, be sure to tell him that we were ambushed & that the Railroad was already waiting for us.

Institute Quest #4 – Mankind Redefined 1: When Shaun teleports back to the Institute, follow him, & participate in the Institute directors board meeting.


Achievement #51 – Mankind-Redefined: Complete Mankind-Redefined.
Story Related. Finish our meeting with the director’s council in the Institute to unlock the Achievement.

Main Quest #11 – Mass Fusion 1: When we are given are next task, ignore it. This is the Main Quest of “point of no return” & following through with it will send us down an Ending. We must now branch out from the Institute & work with the Railroad & Brotherhood of Steel to bring them up to speed…

Do not speak Allie Filmore; it is time we speak with Elder Maxson instead…
Sequence 13: Calm Before the Storm
1. Main Quests: (No Progress)
2. Brotherhood of Steel Quests: Outside the Wire, From Within, Liberty Reprimed, Blind Betrayal
3. Railroad Quests: Operation Ticonderoga
4. Institute Quests: (No Progress)
5. Achievements: 56/84
-----------------------------------------------------------------------------------------------------

Prydwen:

Brotherhood of Steel Quest #7 – Outside the Wire 1: Return to Elder Maxson after all we have done for the Institute… & in locating them, & spill the beans. He will then give us two tasks, the first being to give that same report of data we gave to the Railroad on the Institute to Proctor Ingram.

Go down to the Boston Airport & we can find her helping to set up the field base for the Brotherhood of Steel; give her the Network Scanner.

Brotherhood of Steel Quest #8 – From Within 1: The second task we are given is to convert Madison Li (yes from Fallout 3) back into the favour of the Brotherhood; you potentially have already conversed with her while hanging around in the Institute.

Travel to the Institute, & locate Madison Li, most likely in Advanced Systems. If you have high Charisma & perhaps the Lady Killer Perk, we can convince Li to come back to the Brotherhood simply through dialogue. If you don’t, we will need to break into Virgil’s old FEV lab to find evidence of his disappearance to convince her.

Regardless of how you do it, report back to Elder Maxson once Li has agreed to come back.

Brotherhood of Steel Quest #9 – Liberty Reprimed 1: Our next task will be to help the Brotherhood rebuild Optimus Prime. Speak to Proctor Ingram, reconvince Madison Li to do her job, & return to the Boston Airport to see them have worked triple time to build a rig to set up Prime. We will then be tasked with building the Electromagnetic Actuators for each of his four limbs. To do this, we first need to collect a High Powered Magnet from any hospital; we get a Quest Waypoint for it.

Once you have the magnet, return & build the Actuators. They are a bit complicated & will require: Circuitry x20, Screws x4, Steel x40, Fiber Optics x12, Rubber x20, & of course High Powered Magnets x4. The Institute is a good source for collecting Fiber Optics if you need them as we can strip them from Microscopes.

The next phase will be to locate a supply of Mark 28 Nuclear Bombs for Liberty Prime’s arsenal. Go to Scribe Haylen at Waypoint Echo at the edge of the Glowing Sea. Once we have the Distress Pulser, travel to our next Quest Waypoint at the Sentinel Site & locate the bomb storage. With that done, return to Proctor Ingram to complete the Quest after Liberty Prime has been… primed.

Brotherhood of Steel Quest #10 – Blind Betrayal 1: Speak with Elder Maxson & we will discover that Paladin Danse is an escaped Synth. After speaking with Scribe Haylen about the situation, we will learn Danse is hiding out at Listening Post Bravo. Whether we decide to let Danse live or kill him, we will acquire his Holotags that we must show to Elder Maxson as proof.

If you let Danse live however, Maxson himself will confront us at the Listening Post. We cannot become enemies with the Brotherhood, if you have a high Charisma, we can convince Maxson to let Danse go & everything will be fine. If you can’t, we have to execute him; there is no other way.

Return to Elder Maxson on the Prydwen to complete the Quest & earn a promotion.


Achievement #52 – Blind Betrayal: Complete Blind Betrayal.
Either spare or execute Paladin Danse, & earn the new promotion of Paladin rank with the Brotherhood of Steel.

Brotherhood of Steel Quest #11 – Tactical Thinking 1: Do not go & speak with Lancer Captain Kells; this Brotherhood Quest is where we go & destroy the Railroad, which we cannot do yet.

Railroad HQ:

Railroad Quest #5 – Operation Ticonderoga 1: Before we continue with the Brotherhood of Steel, it is time we check in with the Railroad. When we arrive, Desdemona will give us new emergency assignment.

When we arrive at the Railroad safehouse in question, we will find out that the Institute has already made it & killed everyone. Dispatch the Synths, making sure none escape to keep our cover intact.


Wasteland Workshop DLC (Any Settlement):
Before we carry on with anymore Factions, we may as well finish off our final Settlement related DLC for some extra Xp.


Achievement #53 – Instigator: Start a spectated Arena Fight in a Settlement.
Go to any Settlement with at least two Settlers in it & go to the Cages – Arena tab. Build the Arena Contestant Blue & Red Team stages. The next step is to build a Quitting Time Siren & give it some Power. When you are ready, make a Save in case things go wrong, & activate the Siren to lure everyone over to our stages. Then assign a Settler to the Blue & Red stages, & they will begin fighting; with all the Settlers gathered around to witness the fight on a “break”, we will unlock the Achievement.

It will not unlock unless we have Settlers nearby as spectators due to the Quitting Time Siren.


Achievement #54 – Trapper: Build all 15 Cage types.
Still in the Cages tab, we can build 4 Small Cages, 5 Medium Cages, & 6 Large Cages; they do not all have to be built in the same Settlement. For a full list of materials needed to build these, check out my Achievement Checklist in the Introduction.


Achievement #55 – Docile: Have 5 Tamed Creatures in a Settlement.
For this Achievement, we will have needed to get the Animal Friend Perk & Wasteland Whisperer Perk to Level 1 so we can build a Beta Wave Emitter.

Wherever you built your Cages, be sure to Power them up so we can begin potentially trapping things in them. Sleep in a nearby Bed to pass the time, & eventually they will begin filling up; we need to catch something in 5/15 of our Cages which is pretty easy. This process can take 1-3 days to happen. Certain enemies like Raiders, Gunners, Mutant Hounds, & Super Mutants cannot be tamed.

Once we have a good stockpile of captured creatures, build the Beta Wave Emitter & turn it on to Tame them. Having 5 Tamed creatures alive in the same Settlement will unlock our Achievement.


Achievement #56 – Mercenary: Complete 50 Miscellaneous Objectives.
As an aside Achievement, this may or may not come naturally for you depending on how much you explore/speak with people. Typically, though, you will have more Miscellaneous Objectives than you will ever want to complete. Chip away at your running list & the Achievement should unlock for you eventually; you can check your progress in the Data – Stats – Quest tab of your Pip-Boy.

Remember that we also have two large DLCs to complete with Miscellaneous Objectives in it as well…
Sequence 14: Bittersweet
1. Main Quests: Nuclear Family
2. Brotherhood of Steel Quests: (No Progress)
3. Railroad Quests: Precipice of War, Rocket’s Red Glare
4. Institute Quests: Mass Fusion, Pinned, Powering Up, End of the Line
5. Achievements: 62/84
-----------------------------------------------------------------------------------------------------

As of now, this is it, & no matter what we do we will be working towards the Endings. Make a Hard Save, & do not lose track of it. As well, be sure you choose the Ending you want to Save as “cannon” last. I started with the Institute first so the Brotherhood would become cannon; if you prefer the reverse, then jump down to Sequence 15 & do that before playing this one…

The Institute:

Main Quest #11A – Mass Fusion 2: After we speak with Allie Filmore, we will have our ultimatum: to side with the Institute or warn the Brotherhood of Steel; we will first start with the Institute’s Ending & go straight to the Relay. Again, make sure you have made a Hard Save as proceeding will make us an enemy of the Brotherhood of Steel…

When we arrive at Mass Fusion, we will need to fight our way through the Brotherhood to reach the Beryllium Agitator. When we get to the basement where it is located, we will enter its highly irradiated storage room; we will be hit with 50+ Radiation per second so have a good supply of Radaway or a Hazmat Suit on before doing this.

Fight your way out of Mass Fusion & return to Allie Filmore at the Institute to complete the Quest.

Institute Quest #6 – Pinned 1: Speak with the Father, & we will learn that there is a situation developing with the Minutemen. We cannot allow the Minutemen to prevail, either talk them down… or kill them.

When that is done, enter the nearby house & speak with our Institute contact. We then have to convince T.S. Wallace to accompany us back to the Institute for his role in Phase 3.

Institute Quest #7 – Powering Up 1: Return to the Institute once again & Shaun will task us with announcing to the Commonwealth not to (Censored by Steam) with the Institute. Maybe make a Quick Save before doing so just in case something goes wrong, as we have some freedom in how we choose to say the speech.

Now take our recorded speech to Diamond City Radio & install the three Radio Parts into the system to boost the signal.

With that done, return to Shaun, start up the nuclear reactor, & start the Institute’s broadcast.


Achievement #57 – Powering Up: Complete Powering Up.
Story Related. Attend the Institute board of Directors meeting & make your decisions on where to focus the Institute’s attention. Finish the meeting, & we will complete the Quest & unlock the Achievement.

Railroad Quest #4 – Underground Undercover 6: After we finish our meeting, a Synth will approach us & tell us that Z1-14 needs to speak with us immediately. The time is now to spring our Railroad trap. We are now caught at another crossroads; the Institute & the Railroad.

It is imperative that we make a new Hard Save at this moment so we can reload back & carry on with the Institute.

Railroad HQ:


Achievement #58 – Undercover Undercover: Complete Underground Undercover.
Story Related. Return to the Railroad & warn them of the impending Brotherhood of Steel assault to complete the Quest & unlock the Achievement.

Railroad Quest #6 – Precipice of War 1: Defend the Railroad HQ from the Brotherhood assault then carry out the next phase of the plan; stealing a Vertibird.

Cambridge Police Station:

Railroad Quest #6 – Precipice of War 2: Meet Tinker Tom outside the Cambridge Police Station & prepare to counterattack it. Eliminate all the Brotherhood forces & defend Tinker Tom while he preps the Vertibird hijack.

The Prydwen:

Railroad Quest #7 – Rocket’s Red Glare 1: Sneak aboard the Prydwen & place the three explosives in the Gas Bag controllers. Escape back to the Vertiboard & watch the Prydwen explode in a blaze of Glory.

Railroad HQ:


Achievement #59 – Rockets’ Red Glare: Complete Rockets' Red Glare.
Story Related. Report back to Desdemona & tell her of the success of project Red Glare to unlock the Achievement.

Do not continue speaking with Desdemona after we unlock this Achievement!

If you prefer siding with the Railroad as your cannon Ending, make a new Hard Save here & reload back to it after completing the Institute & Brotherhood Quests; the Railroad has the same Ending Achievement as the Brotherhood of Steel.


Achievement #60 – Legend of the Wastes: Reach Level 50.
This will come naturally as we play; if you build a lot in Settlement development, you may earn this sooner or later in the game. There is no Level cap & we will most likely be around Level 60-65 after we have fully 100% the game & beaten the final DLCs…

The Institute:

Institute Quest #8 – End of the Line 1: Once we are done with the Railroad, return back to the Institute & speak with the Father. Unsurprisingly, we will now be tasked with eliminating the Railroad. There is no other way.

Be careful as we have conflicting tasks with Desdemona at the moment; do not speak with her… kill her, & everyone else at Railroad HQ. We will also have to go & track down Deacon wherever we currently have him.

Main Quest #12A – Nuclear Family 1: This is it, the final Main Quest before we unlock the Institute’s Ending. Speak with the Father… with Shaun.


Achievement #61 – Nuclear Family: Complete Nuclear Family.
Story Related. We will unlock this Achievement after becoming the new Director of the Institute & completing the Main Questline of Fallout 4.


Achievement #62 – Prepared For the Future: Decide the Fate of the Commonwealth.
Story Related. We will unlock this Achievement after completing any of the four Endings of the game. The Institute is the only Faction with its own unique Ending; the Minutemen, Railroad, & Brotherhood of Steel all share The Nuclear Option Achievement for their respective Endings.
Sequence 15: War... War Never Changes
1. Main Quests: Nuclear Family
2. Brotherhood of Steel Quests: (No Progress)
3. Achievements: 61/84
-----------------------------------------------------------------------------------------------------

When you are finished, reload the Hard Save we made awhile back before all of this, before we made a decision during Main Quest – Mass Fusion.

Railroad HQ:

Brotherhood of Steel Quest #11 – Tactical Thinking 2: Speak with Lancer Captain Kells & he will task with… eliminating the Railroad.

Go to the Old Church & link up with the Brotherhood strike team to begin your assault on the Railroad HQ.

Mass Fusion:

Brotherhood of Steel Quest #12 – Spoils of War 1: Speak with Proctor Ingram, & we will be performing the reverse of our Mass Fusion Quest for the Institute. Board the Vertibird, piss off the Institute, & fly to Mass Fusion.

Brotherhood of Steel Quest #13 – Ad Victoriam 1: Plug in the Beryllium Agitator to Liberty Prime & start the killing.

Ignore the Minutemen Quest – Form Ranks unless you want to side with the Minutemen for the final Ending. If you do, make a Hard Save here, but still ignore it until we complete this last Brotherhood of Steel Quest.

If you remember Fallout 3… & even the Broken Steel DLC… then you will remember the amazing joy of following Liberty Prime along a nice, slow stretch of linear scripting. Having 100%ed Fallout 3 a few times now, I get why they did this… I just wish they didn’t. Follow the tin man along… all the way to C.I.T. where the Institute is; yep, we can track our progress in real time on our Pip Boy Map.


Achievement #63 – Ad Victoriam: Complete Ad Victoriam.
Story Related. Escort Liberty Prime to the C.I.T. Ruins & let him excavate a hole to the Institute; enter inside to complete the Quest & unlock the Achievement.

As of now, we are technically done with the Brotherhood of Steel. If you wish to side with the Minutemen or the Railroad, reload your prior Saves; if you wish to stay true to the Brotherhood, then proceed into the Institute. All Factions besides the Institute will unlock our final Achievement upon completion…

The Institute:

Brotherhood of Steel/Railroad/Minutemen Quest – The Nuclear Option: No matter who you side with, you need to eviscerate the Institute.


Achievement #64 – The Nuclear Option: Complete The Nuclear Option.
Story Related. Fight your way to the Institute Reactor & place the Fusion Pulse Charge inside it. Vacate the Institute, decide what you want to do with your Synth replica of Shaun, & teleport back to the wasteland to watch the fireworks.

76% Complete
Sequence 16: Nuka-World
1. Nuka-World Quests: All Aboard, Taken For A Ride, An Ambitious Plan
2. Nuka-Cola Recipes: 0/15
3. Nuka-Cola Crafted: 5/20
4. Scav! Magazines: 0/5
5. Achievements: 66/84
-----------------------------------------------------------------------------------------------------
DLC – Nuka-World: (10)
Story Related: (4)
Side Quests: (2)
Collectibles: (3)
Slay: (1)


There are quite a few Collectibles to search for during this DLC such as the Scav! Magazines & Nuka-Cola Recipes. As well, we need to loot & redeem 100,000 Nuka-Cade Tickets; search/loot everywhere. Lastly, we need to kill 40 enemies while under the effects of unique DLC Nuka-Cola’s we craft or find; always drink one before/during combat until we get the All Sugared Up Achievement. Only creatures unique to this DLC will count; regular base game enemies like Raiders, Mirelurks, Molerats etc. will not count.

Note that to collect one if the Scav! Magazines, we will need to have 3 Ranks in the Locksmith Perk to be able to Pick Master Locks.

As another thing to note, be sure to stockpile on some Pre-War Cash we find & hold onto it for the end of the DLC. For the Eyes On the Prize Achievement we need to use Pre-War Cash to exchange for Nuka-Cade Tokens that we use to earn the needed Nuka-Cade Tickets; Nuka-Cade Tokens can also be found throughout the DLC as well.

For the Beverageer Achievement, we will need to Craft all 20 new Nuka-Cola Recipes. To see the cumulative ingredients list of all we will need once we acquire the associated Recipes, check out my Achievement Checklist linked in the Introduction.

Nuka-World Transit Center:

Nuka-World Quest #1 – All Aboard 2: After you have finished with your remaining business in The Commonwealth, it is time to begin the Nuka-World DLC; we will have received this Quest automatically after becoming Level 30…

Make your way to the Nuka-World Transit Center in the West corner of the map. Defeat the Gunners outside & enter into the Transit Center to find the injured Trader, Harvey. Restore power back to the Nuka-Express, & we can take the monorail to Nuka-World…

Before we leave, make a separate Hard Save here in the wasteland just in case something bugs out or happens; back when I played this on PS4 years ago, I had one of the Nuka-Cola Recipes glitch through the floor somehow & I couldn’t get it essentially voiding my entire 100% playthrough since I never made a Save to reload back to before starting the DLC.

Nuka-Station:

Nuka-World Quest #2 – Taken For A Ride 1: When we arrive in Nuka-World, a Raider of the name Porter Gage will warn us of an impending death trap. Make your way through the Gauntlet, until you reach the Cola-Cars Arena. With Gage’s help, use the Thirst Zapper to take down Overboss Colter’s defenses & kill him.


Achievement #65 – Taken For A Ride: Complete Taken for a Ride.
Story Related. After we defeat Overboss Colter, speak with Porter Gage, & we will be put in charge of Nuka-World. Just like that.

Nuka-Town USA:

Nuka-World #3 – An Ambitious Plan 1: After we speak with Gage at the Fizztop Grille, we must go around & introduce ourselves to each of the three Raider Gang Leaders. Take stock of them & their gangs; at the end of the DLC, we will be siding against one of them & taking the other two to the top with us. Report back to Gage when it is done to complete the Quest.

Nuka-World Quest #4 – The Grand Tour 1: This is going to be the longest running Quest in Nuka-World; we will be tasked with reclaiming five large territories to expand the Raider’s influence. In each of these territories will be lots of our needed Collectibles, this is what will be slowing us down. As of now, we will be entering into our exploratory grind for this DLC…

The Commonwealth:


Achievement #66 – Raiding For A Living: Complete 12 Side Quests for any Nuka-World Raider Gangs.
As of now, we can receive repeatable Radiant Quests from each of the Gang Leaders. We need to complete 12 of these Quests total to unlock the Achievement; it does not have to be from one Leader & we can mix & match Quests. Unfortunately, they all take place back in the Commonwealth meaning we will be doing a lot of Fast Travelling back & forth.

To speed this process up, accept a Quest from each of the three Leaders at a time so we only need to make four trips to the Commonwealth. This is still a tedious Achievement regardless…

Nuka-Town Market:

Shelbie Chase: If you need specific Nuka-Cola types for a Recipe such as Nuka-Cola Wild, visit Shelbie Chase in the Nuka-Town Market. She has them all for sale; to restock them, simply sit on any Chair or Bench in the Market & Wait for 24 hours.

The Commonwealth (Or anywhere with a Nuka-Mixer Station):

Nuka-Cola Crafted #1 – Newka-Cola: For the Beverageer Achievement, we need to craft all 20 unique Nuka-Cola flavours. We need to find 15 of Recipes ourselves in Nuka-World, but the first 5 are given to us free when we build a Nuka-Mixer Station in one of our Settlements.

To craft Newka-Cola, we need: Nuka-Cherry x1 & Nuka-Cola x1.

Nuka-Cola Crafted #2 – Nuka-Buzz: This Recipe requires: Nuka-Cola Wild x2 to make; we can purchase the Nuka-Cola types from Shelbie Chase or find them as loot throughout Nuka-World.

Nuka-Cola Crafted #3 – Nuka-Fancy: This Recipe requires: Nuka-Cherry x1 & Nuka-Cola Wild x1 to make; we can purchase the Nuka-Cola types from Shelbie Chase or find them as loot throughout Nuka-World.

Nuka-Cola Crafted #4 – Nuka-Free: This Recipe requires: Dirty Water x1 & Nuka-Cola x1 to make; we can purchase the Nuka-Cola types from Shelbie Chase or find them as loot throughout Nuka-World.

Nuka-Cola Crafted #5 – Nuka-Twin: This Recipe requires: Nuka-Cola x1 & Nuka-Cola Wild x1 to make; we can purchase the Nuka-Cola types from Shelbie Chase or find them as loot throughout Nuka-World.
Sequence 17: Play Time's Over
1. Nuka-World Quests: A Magical Kingdom
2. Nuka-Cola Recipes: 7/15
3. Nuka-Cola Crafted: 12/20
4. Scav! Magazines: 3/5
5. Achievements: 66/84
-----------------------------------------------------------------------------------------------------

Nuka-Town USA – Cappy’s Café:

Nuka-Cola Recipe #1 – Nuka-Cide: Our first Nuka-Cola Recipe will actually be found in Nuka-Town. Fast Travel to the Operator’s base, The Parlor, & head South West across the street ahead of us to find Cappy’s Café. Head inside, behind the front counter into the kitchen, & we can find this Recipe on a counter near a Lantern.


Evan’s Home:

Nuka-Cola Recipe #2 – Nuka-Love: It is now time for us to venture beyond the Nuka-Town walls. Head South West from Nuka-Town to Evan’s Home & we can find… well, Evan. Speak with him & he will offer us some supplies; ask him what he has, & he will give us this Recipe for free.

Hubologist’s Camp:

Nuka-Cola Recipe #3 – Nuka-Frutti: Travel North West now up to the Hubologist’s Camp. Enter into the main diner base & take a left underneath the stairwell to enter the kitchen area; we can find the Recipe on a booth table nearby.

Grandchester Mystery Mansion:

Nuka-Cola Recipe #4 – Nuka-Punch: Head due West now until you reach the Grandchester Mystery Mansion. Enter into the Mansion & “go on the tour” until you reach the very end where we will enter a room with the rogue Raider, Zachariah. We can find this Recipe nearby on top of a dresser close to the bed in this room.

Scav! Magazine Issue #4: In this same room, we can find a red door that is locked by a Master Lock. Pick the Lock, & head up the stairs into the secret side room where we can find this Magazine on a crate immediately to our right when we enter the room.

Nuka-World Junkyard:

Scav! Magazine Issue #2: Head up North now towards the Nuka-World Junkyard. This part is a bit confusing as this is a large area, but from where the Nuka-World Junkyard icon is on our Map, head just up to the North East of it. Here, we can find a metal warehouse on the junkyard outskirts.

Enter inside it & head up to the second floor where we can find this Scav! Magazine on a desk next to a Star Core…


Nuka-World Power Plant:

Nuka-Cola Recipe #5 – Nuka-Power: Carry on North West now until you reach the Nuka-Cola Power Plant. Enter inside the building & navigate to the manager’s office. This is actually harder than it sounds, there is technically only one linear path through this building, but it is a bit of a maze & hard to navigate. When you reach the end of the building at its uppermost floor, enter into the central room with a pool table, desk with a Terminal, couch, & Expert Locked Safe in the corner. Here we can find the Nuka-Cola Recipe on the desk beside the Terminal.

Kiddie Kingdom:

Nuka-World Quest #5 – A Magical Kingdom 1: Make your way to the Kiddie Kingdom now, our first of ffive territories we need to claim for our Raiders… Kiddie Kingdom makes Chernobyl look like a walk in the park so you will want a (Censored by Steam) ton of Rad-X, or even better, a Hazmat Suit.

Kiddie Kingdom – Fun House:

Scav! Magazine Issue #3: Navigate your way through the heavily irradiated Kiddie Kingdom until you reach the entrance to the Fun House. Fight through the Fun House, past the Hall of Mirrors, sped up conveyor belt, & the Bottle Jumps. Enter into the Hypno Halls next & head down the green tunnel down to our right. Head down the next green tunnel straight ahead of us, & we can find this Scav! Magazine at a dead end next to a… dead Raider.

Nuka-Cola Recipe #6 – Nuka-Lixir: Pass through the last of the Fun House until you reach the control room where Oswald used to be, we can find this Recipe on one of the consoles beside a Terminal.

Kiddie Kingdom – King Cola’s Court:

Nuka-Cola Recipe #7 – Nuka-Berry: Exit back into Kiddie Kingdom now & navigate to King Cola’s Castle. Enter inside & we will have our first encounter with the Ghoul, Oswald, who we have been hearing this entire time over the intercom. When he is driven off, head in behind the central stage & we can enter into some dressing rooms. Enter into the dressing room off our right to find this Nuka-Cola Recipe on one of the desks.

Nuka-World Quest #5 – A Magical Kingdom 2: After we have investigated all three areas of Kiddie Kingdom, Oswald will tell us to meet him on the Castle’s rooftop. Take the elevator up & deal with Oswald.

When that is done, we can place one of the three Gangs Flags on Signal Flagpole; whoever you pick will piss of the other Gangs. There are five territories total we will reclaim; if you alternate between all the Gangs, all Gangs can have two territories except one. At the end of the day, whichever Gang gets the least amount of territories will betray us no matter what; keep that in mind & take your favourite two to the top.

The Commonwealth (Or anywhere with a Nuka-Mixer Station):

Nuka-Cola Crafted #6 – Nuka-Cide: This Recipe requires: Nuka-Cherry x1, Nuka-Cola x1, Nuka-Cola Dark x1, Nuka-Cola Orange x1, Nuka-Cola Quantum x1, Nuka-Cola Quartz x1, Nuka-Cola Victory x1, Nuka-Cola Wild x1, & Nuka-Cola Grape x1 to make; we can purchase the Nuka-Cola types from Shelbie Chase or find them as loot throughout Nuka-World.

Nuka-Cola Crafted #7 – Nuka-Love: This Recipe requires: Nuka-Cola x1 & Nuka-Cola Wild x1 to make.

Nuka-Cola Crafted #8 – Nuka-Frutti: This Recipe requires: Nuka-Cherry x1, Nuka-Cola x1, Nuka-Cola Orange x1, Nuka-Grape x1.

Nuka-Cola Crafted #9 – Nuka-Punch: This Recipe requires: Nuka-Cherry x1, Nuka-Cola Orange x1, Nuka-Cola Quartz x1, Nuka-Grape x1.

Nuka-Cola Crafted #10 – Nuka-Power: This Recipe requires: Nuka-Cola x1 & Nuka-Cola Dark x2.

Nuka-Cola Crafted #11 – Nuka-Berry: This Recipe requires: Nuka-Cherry x1, Nuka-Cola x1, & Nuka-Grape x1.

Nuka-Cola Crafted #12 – Nuka-Lixir: This Recipe requires: Med-X x1, Nuka-Cola x1, & Nuka-Cola Orange x1.
Sequence 18: Five Flags Amusements
1. Nuka-World Quests: A World of Refreshment, Safari Adventure, High Noon At the Gulch
2. Nuka-Cola Recipes: 12/15
3. Nuka-Cola Crafted: 17/20
4. Scav! Magazines: 4/5
5. Achievements: 67/84
-----------------------------------------------------------------------------------------------------

Nuka-Cola Bottling Plant:

Nuka-World Quest #6 – A World of Refreshment 1: Our next stop will be the Nuka-Cola Bottling Plant. There are no Nuka-Cola Recipes or Scav! Magazines here, so we can safely breeze through this & claim the territory for one of our Raider Gangs.

Be sure to kill Nuka-Lurks under the effects of a Craftable Nuka-Cola for the All Sugared Up Achievement.

Safari Adventure:

Nuka-World Quest #7 – Safari Adventure 1: Carry on North now to Safari Adventure. When we arrive, we will be attacked by a Gatorclaw. Kill it, & Tarzan will appear & speak with us. We will be tasked with eliminating the Gatorclaw infestation, regardless of whether you let Tarzan live or not…

Be sure to kill Gatorclaws under the effects of a Craftable Nuka-Cola for the All Sugared Up Achievement.

Nuka-Cola Recipe #8 – Nuka-Hearty: Get over to the far West end of Safari Adventure & we can find The Jungle Journey Theater. Get in behind the main stage of the theater & we can find a small scrap metal hut. Enter inside & we can find the Recipe on a shelf.

Safari Adventure – Welcome Center:

Nuka-Cola Recipe #9 – Nuka-Rush: Navigate to the Welcome Center now which can be found directly across from the main entrance to Safari Adventure. Drop down to the lower floor where the circular reception desks are & we can find this Recipe next to one of the broken Terminals.

Safari Adventure:

Nuka-World Quest #7 – Safari Adventure 2: Shutdown the Gatorclaw Replicator & we will be tasked with hunting down the remaining survivors. With that done, deal with Cito however you like, if you have not already done so & we can choose a Gang to assign to this territory.

Dry Rock Gulch:

Nuka-World Quest #8 – High Noon At the Gulch 1: Make your way over to the Dry Rock Gulch now. Similar to at the Safari Adventure, we will need to figure out a way to get rid of another creature infestation.

Be sure to kill Bloodworms & Rad-Ants under the effects of a Craftable Nuka-Cola for the All Sugared Up Achievement.


Achievement #67 – All Sugared Up: Defeat 40 Nuka-World Creatures while under the effect of any Nuka-Mix flavor.
There are a few perquisites for this Achievement. The first is we need to drink any of our Craftable Nuka-Colas & second is we need to kill enemies unique to Nuka-World. These enemies are: Gazelles, Nuka-Lurks, Gatorclaws, Bloodworms, Rad-Ants, etc. Whenever you find these enemies, drink a Nuka-Cola type & kill them; they do not last long, so be sure to check if it is still active by looking at the Stat-Status tab of your Pip-Boy & check the active Effects.

Newka-Cola is the easiest to craft, but barely lasts 10 seconds; Nuka-Cola Power is a bit more costly, but lasts for around a minute which is very handy.

This is best done while clearing out the five territories due to the high amounts of Nuka-World enemies found within them; it is more tedious & harder to do afterwards since we have to manually track enemies down.

Dry Rock Gulch – Dry Rock Gulch Theater:

Nuka-Cola Recipe #10 – Nuka-Sunrise: We can find the Dry Rock Gulch Theater at the far South end of the territory. Near the back of the theater, we can find an employees only door that has an Expert Lock on it. Pick it, & we can find this Recipe inside on a table.

Nuka-Cola Recipe #11 – Nuka-Xtreme: While still at the theater, head up the stands & we can walk up a small ladder on top of the employees only building where we can find another Recipe beside a skeleton.

Nuka-Cola Recipe #12 – Nuka-Bombdrop: Navigate over to where Mad Mulligan’s Minecart Coaster is & head left from the entrance over to where the Bandit Roundup stand is. To its right, we can find this Recipe on top of a hotdog stand.

Dry Rock Gulch – Mad Mulligan’s Minecart Coaster:

Nuka-World Quest #8 – High Noon At the Gulch 2: Either destroy the Protectron Sheriffs or complete their tasks to receive the Safe Combination to get the Key to Mad Mulligan’s. Enter inside & defeat the Bloodworm Queen, to stop the infestation.

Dry Rock Gulch – Dry Rock Gulch Employee Area:

Scav! Magazine Issue #5: This Scav! Magazine is technically only accessible after we have restored power to Nuka-World when we complete the DLC. We can however do some parkour & get there early. Alternatively, if you have a Jet Pack Mod for a suit of Power Armor, it makes getting to the Magazine trivial.

First, go to the Dry Gulch Theater & stand on the… stands. From here looking East, jump onto the hedges boxing in the theater & run along them towards one of the buildings in the corner. Jump onto the low stone wall in front of us, then use it to get onto the buildings roof.

From here, jump onto a higher set of hedges & follow them East over towards the massive boundary walls of Dry Rock Gulch. Leap off of them onto the brown rock formation & follow in behind them along the boundary wall until it gradually brings us up to their level. Get onto the boundary walls & follow them over to an isolated area of Dry Rock Gulch.

Drop down into this secret area & using some wooden planks on a few red containers, get on top of the rooftops. Get over to the rooftop of the building in the center of the area & we can find this Scav! Magazine on a table beside a pile of Frag Mines.

The Commonwealth (Or anywhere with a Nuka-Mixer Station):

Nuka-Cola Crafted #13 – Nuka-Hearty: This Recipe requires: Carrot Flower x1, Nuka-Cola x1, Nuka-Cola Dark x1, & Tato x1 to make.

Nuka-Cola Crafted #14 – Nuka-Rush: This Recipe requires: Nuka-Cola Victory x1 & Nuka-Wild x1 to make.

Nuka-Cola Crafted #15 – Nuka-Sunrise: This Recipe requires: Nuka-Cherry x1 & Nuka-Cola Orange x1 to make.

Nuka-Cola Crafted #16 – Nuka-Extreme: This Recipe requires: Nuka-Cola x1, Nuka-Cola Quantum x1, & Nuka-Grape x1 to make.

Nuka-Cola Crafted #17 – Nuka-Bombdrop: This Recipe requires: Bourbon x1, Nuka-Cola x1, Nuka-Cola Dark x1, Rum x1, & Vodka x1 to make.

We can buy Bourbon & Vodka from White Chapel Charlie at the Third Rail in Good Neighbor. A bottle of Rum can be found inside one of the fridges of the Cabot House beside just off the kitchen.
Sequence 19: Reverse Robinhood
1. Nuka-World Quests: Star Control, The Grand Tour, Home Sweet Home, Power Play
2. Nuka-Cola Recipes: 15/15
3. Nuka-Cola Crafted: 20/20
4. Scav! Magazines: 5/5
5. Achievements: 74/84
-----------------------------------------------------------------------------------------------------

Galactic Zone:

Nuka-World Quest #9 – Star Control 1: Get to the final territory, the Galactic Zone. To complete this Quest… we need to locate 20/32 Star Cores found within the Galactic Zone to repair the core. While we can opt to kill all the Robots in the territory instead, as you will discover, that is quite the task; keep your eyes peeled for both as you go through the area & whatever comes first to completing the Quest.

Nuka-Cola Recipe #13 – Nuka-Cooler: When we reach Starport Nuka, turn around from its entrance & look back into the Galactic Zone. Take a right, into the Star Market, & we can find this Recipe on a shelf in the first vender stall off our left.

Scav! Magazine Issue #1: Back at Starport Nuka, head around the right side of the building & we can pass through an open gate. Head through the security building with the Protectron Guardians & we can spot a wrecked bus ahead of us; we can find this final Scav! Magazine on some wooden crates beside it.


Achievement #68 – Diebrarian: Collect all 5 issues of Scav! Magazine.
If you have been following along with the guide, we will unlock this Achievement after collecting the final copy of Scav! Magazine.

Galactic Zone – Starlight Interstellar Theater:

Nuka-Cola Recipe #14 – Nuka-Void: We can find the Starlight Interstellar Theater at the far South end of the Galactic Zone. Get to the center of the building, where the Startender is, & go to where the concession stand is to find this Recipe on the floor inside it.

Galactic Zone – RobCo Battlezone:

Nuka-Cola Recipe #15 – Nuka-Ray: Our final Recipe can be found in the RobCo Battlezone. Head to the lower level below the stadium stairs & we can find a gift shop; the Recipe will be on one of the shelves across from the checkout counter.

As of now we have all of the Nuka-Cola Recipes.

Galactic Zone – Starport Nuka:

Nuka-World Quest #9 – Star Control 2: Whether you were able to destroy every single Robot in the Galactic Zone or find 20/32 Star Cores to repair the system to deactivate defensive mode. With that done, we can head upstairs & assign a Gang to this territory.


Achievement #69 – The Grand Tour: Complete The Grand Tour.
Story Related. After you have claimed all five territories for our Raider Gangs, speak with Gage to complete our Quest & unlock this Achievement.

The Commonwealth (Or anywhere with a Nuka-Mixer Station):

Nuka-Cola Crafted #18 – Nuka-Cooler: This Recipe requires: Nuka-Cola Quantum x1, Nuka-Cola Quartz x1, & Nuka-Cola Victory x1 to make.

Nuka-Cola Crafted #19 – Nuka-Void: This Recipe requires: Nuka-Cola Dark x1 & Nuka-Cola Quantum x1 to make.

Nuka-Cola Crafted #20 – Nuka-Ray: This Recipe requires: Nuka-Cola Orange x1 & Nuka-Cola Victory x1 to make.


Achievement #70 – Beverageer: Create all 20 different flavors of Nuka-Cola.
If you have been following along with the guide, we will unlock this Achievement after crafting our final Nuka-Cola Recipe.

Nuka-Town USA:

Nuka-World Quest #10 – Home Sweet Home 1: Speak with Shank & we will begin the next phase of the DLC; taking over Settlements in the Commonwealth for our Raider Gangs. Choose any Settlement from Shank’s list to get the Radiant Quest to take it; if possible, pick a Settlement you don’t already control so you don’t lose one. Follow all of Shank’s tasks, going back & forth to Nuka-World.

When it is an option, send Shank to one of your Outposts in the Commonwealth to save all the loading screens going back to Nuka-World.

The Commonwealth:


Achievement #71 – Home Sweet Home: Complete Home Sweet Home.
Story Related. Our next task in Home Sweet Home will be to claim two more Raider Outposts. With Shank readily available, just keep asking him for jobs to establish new Raider Outposts.

Do not confuse converting a Settlement into a Supplier as making a Raider Outpost…

Nuka-World Quest #11 – Power Play 1: When we return to Shank, he will tell us that one of the three Raider Gangs have turned against us; (whichever one got the least amount of territories) we will be attacked if we return to Nuka-World by them.

If Shank is in Nuka-World, we will be attacked immediately.


Achievement #72 – Hostile Takeover: Establish 8 Raider Camps in the Commonwealth.
For this Achievement we will need to claim an extra five more Raider Outposts. If Shank is in the Commonwealth, just carry on claiming. If he is in Nuka-World & we were attacked, speak with him afterwards to carry on.

This is 100% going to mess up our Settlements & ruin a lot of Supply Lines. If you want to undo all of this & only keep the three Raider Outposts needed for the Nuka-World Quest, make a Save beforehand to reload to when we have the Achievement.

Nuka-World Power Plant:


Achievement #73 – Power Play: Complete Power Play.
Story Related. Return to Nuka-World & travel outside the Power Plant to link up with the Gang Leaders. Hunt down whichever of the Leaders went rogue & kill them. Switch on the power & speak with Gage to complete the DLC & unlock our Achievement.

Commonwealth (Any Settlement):


Achievement #74 – Eyes on the Prize: Redeem 100,000 tickets at the Nuka-Cade.
We now have one final grind for this DLC, obtaining & redeeming 100,000 Nuka-Cade Tickets. First, don’t bother grinding Tickets at the Nuka-Cade; we can speed things up by a lot building our own games in a Settlement. We can find games in the Decorations – Nuka-World – Nuka-Cade tab. Hoop Shot is our fastest method to earn Tickets.

There is a clipping method called the Mat Method that uses Rubber Mats to interfere with the collision of the Hoop Shot, allowing us to stack them on top of each other if done correctly. This way, we can activate & play multiple Hoop Shots at once & when dunking the ball into one machine its actually three or four machines instead. It takes a bit of practice to get this process right, for some help, here is the video guide I used created by Genghis Ares.
https://youtu.be/SvJcwZO5MxY
Once your mega machine has been made, insert Tokens into all of them & grab a Basketball. Stand in the middle of the machine & position yourself above the basket & repeatedly press Crouch to dunk the ball through the hoops. You may want to assign Crouch to a different button. I had three Hoop Shots in my mega machine & this took me around 1 hour straight to get my Tickets.

Once you have your 100,000 Tickets, go to the Nuka-Cade across from The Parlour in Nuka-Town. Make a Save before doing so, just in case, & use the Nuka-Cade Prize Terminal to redeem all our Tickets for the Achievement.

88% Complete
Sequence 20: Far Harbor
1. Far Harbor Quests: Far From Home, Walk In the Park, Where You Belong
2. Far Harbor Workshops: 2/3
3. Islander’s Almanacs: 5/5
4. Achievements: 77/84
-----------------------------------------------------------------------------------------------------
DLC – Far Harbor: (10)
Story Related: (5)
Collectibles: (1)
Slay: (1)
Miscellaneous: (3)


Throughout this Questline, as it pertains to Synths, we will have the option of keeping the Brotherhood of Steel or Institute up to date on the situation. Never do this, as it culminates in them biasing the Quests & even ending the DLC a Quest early if we continue to update them. Keep them in the dark, & stay on Far Harbor to see the Questline through on your own for all of the Achievements.

Diamond City:

Far Harbor Quest #1 – Far From Home 1: After we completed Main Quest – Getting A Clue, we will be able to receive Quest from the Detective Agency. Most are all meaningless Radiant Quests, except this one. Speak with Ellie if you have not already done so previously to receive this Quest if you own the Far Harbor DLC.

Nakano Residence:

Far Harbor Quest #1 – Far From Home 2: Travel to the Nakano Residence in the far North East corner of the Commonwealth & speak with Kenji Nakano to learn about his missing daughter.
Do not notify the Brotherhood/Institute & set sail for Far Harbor after we complete our preliminary investigation.

Far Harbor:


Achievement #75 – Far From Home: Complete the Quest Far From Home.
Story Related. We will complete this Quest & unlock the Achievement when our boat arrives at Far Harbor.

Far Harbor Quest #2 – Walk In the Park 1: Assist the Far Harbor residents in defending the Hull from the creatures coming out of the Fog; we need to kill 30 of these enemies specifically for the Hooked Achievement.

Islander’s Almanac #1: We will now need to find a guide to take us to the Synth sanctuary, Acadia. We can find this man at The Last Plank bar, where we will also find our first Collectible of the DLC, an Islander’s Almanac. We can find it beside our guide, Old Longfellow, on the table.

Acadia:

Far Harbor Quest #2 – Walk In the Park 2: Speak with Longfellow at The Last Plank & get him to lead us through the Fog to Acadia.

Far Harbor Workshop #1 – Longfellow’s Camp: After we finish speaking with Longfellow at Acadia, we will automatically unlock a Workshop at his camp; we need to locate & access two more Workshops for the Push Back the Fog Achievement.

Islander’s Almanac #2: After we speak with Acadia’s leader, DiMA, we are able to go & locate Kasumi. Head down the stairwell to the first sub level (Kasumi will be one floor lower) & enter into the common area. As soon as we enter, there will be a long shop counter run by a man named Dejen; we can find this next Almanac on this counter beside some candles.

Far Harbor Quest #3 – Where You Belong 1: Speak with Kasumi & she will task us with uncovering DiMA’s secrets. The easiest way is to actually speak with DiMA himself & learn what exactly is at stake for them.


Achievement #76 – Where You Belong: Complete the Quest Where You Belong.
Story Related. Report back to Kasumi after uncovering DiMA’s plan to complete the Quest & unlock the Achievement.

Far Harbor:

Side Quest – Blood Tide 1: Before we continue with Far Harbor Quest – Best Left Forgotten, lets explore around Far Harbor & nab some of the random Achievements we have. As we travel around, make a point of uncovering as many Locations as you can for the New England Vacationer Achievement.

Return to Far Harbor & we can speak with Cassie Dalton at a table just outside The Last Plank. Accept her Side Quest to avenge her cousin & kill all the Feral Ghouls at the National Park Campground.

National Park Visitor’s Center:


Islander’s Almanac #3: From the National Park Campground, head up North West towards the Visitor’s Center. Go to the main building & enter the gift shop where we can find this Almanac on the front counter.

While there is a Workshop here we can potentially obtain, it won’t become available to us until we beat further into the Far Harbor Questline.

Dalton Farm:

Side Quest – Blood Tide 2: Return to Cassie to receive the next part of the Quest; liberating the Dalton Farm. When we arrive, kill the Fog Crawler which is reminiscent of a Mirelurk Queen.

Far Harbor Workshop #2 – Dalton Farm: With the Fog Crawler dead, return to Cassie & we will unlock the Dalton Farm as a new Settlement.

Brooke’s Head Lighthouse:

Side Quest – Blood Tide 3: For the final phase of this Side Quest, we need to go to the Brooke’s Head Lighthouse & kill the Trapper leader there.

Islander’s Almanac #4: After we kill the Trapper leader at the top of the Brooke’s Head Lighthouse, search around his quarters here & we can find this Almanac on a table beside a Cookstove.

Northwood Ridge Quarry:

Islander’s Almanac #5: Immediately North of the Brooke’s Head Lighthouse, we can find the Northwood Ridge Quarry. Enter into the actual quarry interior itself, & navigate up through the main Trapper hideout to the top floor where we can find the final Almanac on a table near the main Steamer Trunk loot box.


Achievement #77 – The Islander’s Almanac: Collect all 5 issues of The Islander's Almanac Magazine.
If you have been following along with the guide, we will unlock this Achievement after collecting the final Almanac.
Sequence 21: Keeping the Peace
1. Far Harbor Quests: Best Left Forgotten, The Way Life Should Be, Cleansing the Land, Close to Home
2. Far Harbor Workshops: 3/3
3. Achievements: 84/84
-----------------------------------------------------------------------------------------------------

Far Harbor:

Side Quest – Rite of Passage: To get our final Workshop we need to complete this Side Quest & help out the people of Far Harbor.

To unlock it, we need to complete Side Quest – Living On the Edge & speak with Teddy Wright. We must then defeat a Mirelurk Queen at the given location; drop any kind of Meat into the water here to lure them out. Return to Teddy Wright to complete the Quest.

Side Quest – The Changing Tide: After completing the previous one, we will unlock this Side Quest. Helping either Mitch &/or Small Bertha will give us two different Settlements with Workshops we can unlock. Complete their given Side Quests to unlock a final Workshop; helping Mitch is pretty quick.

National Park Visitors Center:


Achievement #78 – Push Back the Fog: Unlock 3 Far Harbor Workshop Locations.
There are only four Workshops we can unlock in total in Far Harbor not giving us too many options.


Achievement #79 – Just Add Saltwater: Cook one of the new Far Harbor Recipes.
The new Recipes are very simple to make but will require Meat from the three different enemies found in the DLC. The easiest to make is Poached Angler which only requires a single Angler Meat to craft. Another easy one is Fried Fog Crawler which takes Oil x1 & Raw Fog Crawler Meat x1.

The Nucleus:

Far Harbor Quest #4 – Best Left Forgotten 1: It is time to carry on with the Questline now & travel to the Pre-War submarine dubbed The Nucleus. Speak with Grand Zealot Richter, & we will be given a new Quest to perform their cultist ritual… if you have not already figured it out, this DLC is just a (Censored by Steam) version of Fallout 3’s Point Lookout DLC.

Travel to Atom’s Spring & drink from the irradiated waters to go on our spirit quest. Follow the Ghoul to the Children of Atom Shrine; the password to the Terminal can be found scrawled on the lockers to the left of the Periodic Table pinned to one of the walls. With the Icon secured, report back to the Grand Zealot.

Once we have the loyalty of the Children of Atom, navigate to the Nucleus Command Center. Fight your way to the Memory Bank Terminal & flip on the auxiliary power nearby. With that done, we will need to complete a series of building/escort mini-games to complete all five of the Memory Banks. These are not too hard but can be pretty tedious, especially the last one.

With this done we will now have to complete three other objectives in various locations scattered around Far Harbor. To start, first go to the very far North West end of the map to collect the Wind Farm Kill Switch Code from DiMA’s Cache. We will have the option of confronting DiMA with these codes; don’t return to him until we complete the other two objectives as there are Achievements involved!

Vim! Pop Factory:

Far Harbor Quest #5 – The Way Life Should Be 1: Travel now to the Vim! Pop Factory & break into DiMA’s secret basement room. Dig up the old grave & loot what remains of the real Captain Avery.

Once again, do not confront DiMA yet…

Harbor Grand Hotel/Fringe Cove Docks:

Far Harbor Quest #6 – Cleansing the Land 1: For our final objective, go to the Harbor Grand Hotel & break into the safe house to obtain the location for the Nuclear Launch Key.

Head to the new location at the Fringe Cove Docks in the far South West corner of the map across the water & open the safe in the sunken ship to retrieve the Launch Key.

Acadia:

We now have quite a few choices to make that will determine the fates of The Children of Atom, Acadia, & Far Harbor. Since we have both Far Harbor Quest – Cleansing the Land & Far Harbor Quest – The Way Life Should Be active, we can decide how to end this DLC however we like & not void anything.

Whatever we choose, do not destroy Acadia & by proxy, kill Kasumi or we will void the final Far Harbor Quest – Close to Home & void another Achievement.


Achievement #80 – The Way Life Should Be: Complete the Quest The Way Life Should Be.
Story Related. Decide which faction you want to side with & agree to their plan to complete this Quest & unlock the Achievement.


Achievement #81 – Cleansing the Land: Complete the Quest Cleansing the Land.
We will unlock this Achievement by destroying either Far Harbor &/or the Nucleus. We can also unlock it by completing Far Harbor Quest – Reformation which is the peaceful route given to us by DiMA but only if we have this Quest active as well. If you do not, & finish Reformation, it will actually void the Cleansing the Land Achievement since we never “completed” it.


Achievement #82 – Close to Home: Complete the Quest Close to Home.
Story Related. With our Ending finished, return to Kasumi in Acadia & we can help her decide what to do next. Whether you tell her to stay or return to her parents, we will unlock this Achievement upon completing the Quest.

Far Harbor:


Achievement #83 – New England Vacationer: Discover 20 Far Harbor Locations.
It is now time for our final mop up. If you have not already done so, travel around Far Harbor & discover the final Locations you need for this Achievement.


Achievement #84 – Hooked: Defeat 30 Far Harbor Sea Creatures.
Unless you were diligent in exploration, it is unlikely that you unlocked this Achievement naturally. The best place to find Anglers, Fog Crawlers, & Gulpers is in the ocean area between the Fringe Cove Docks & the Children of Atom Shrine. Travel from one Location to the next on foot, then wait 24 to respawn the enemies to do it again. Search around wherever you see Lureweed for a good chance of spawning Anglers.
Conclusion:
In my opinion… this is actually a bad Fallout game. But it is not a bad RPG, & I find the story quite compelling. It’s just when I think Fallout, I think freedom to play a character however I like in the wasteland, whereas for this game we are stuck in the developer’s narrative. Also, the downside of a voiced character as well… at least for the male character’s inflection; being even a little bit aggressive in your dialogue options sounded goofy. But again, I do enjoy this game a lot. Like I said similarly in New Vegas, I apologise if the guide was heavy handed with rail roading your playthrough as there is just so much to do & explore. This game took me 127 hours to 100%, with a lot of time wasted just exploring & writing my guide. As a whole, it is a pretty straightforward & easy game to complete.

If this guide helped you achieve 100%, rate the guide or let me know in the comments. Helps me know if I am doing things right!


100% Complete
Thank you for choosing Cynical Guides, & I will see you in the next one!

If you are interested in a little bit of patronage, support my projects & consider buying me a coffee. If not, no worries; my guides are, & will always be free content. Achievement Hunting is my passion, & writing these guides is a way for me to give meaning to a life long hobby!
https://www.buymeacoffee.com/cynic0055

Other Cynical Guides:
If you enjoy this game & my style of writing guides, be sure to check out my:
https://steamcommunity.com/sharedfiles/filedetails/?id=2523574006
Check out my profile for a full list of my works.
https://steamcommunity.com/sharedfiles/filedetails/?id=2992727030

37 kommentarer
Vorec Seend 12 apr @ 6:13 
just wanted to say thank you fort this guide. Your hard work on this guide and your Skyrim guide got me across the 100% line. Thanks so much!
Tenpenny 6 jan @ 16:38 
Hey Cynic - King of all Guides! I wanted to point out that I just ran into the Nuka-Cooler recipe floor glitch on the PC - probably the same one you had on the PS4. It's the one on a magazine shelf in Galaxy Zone.

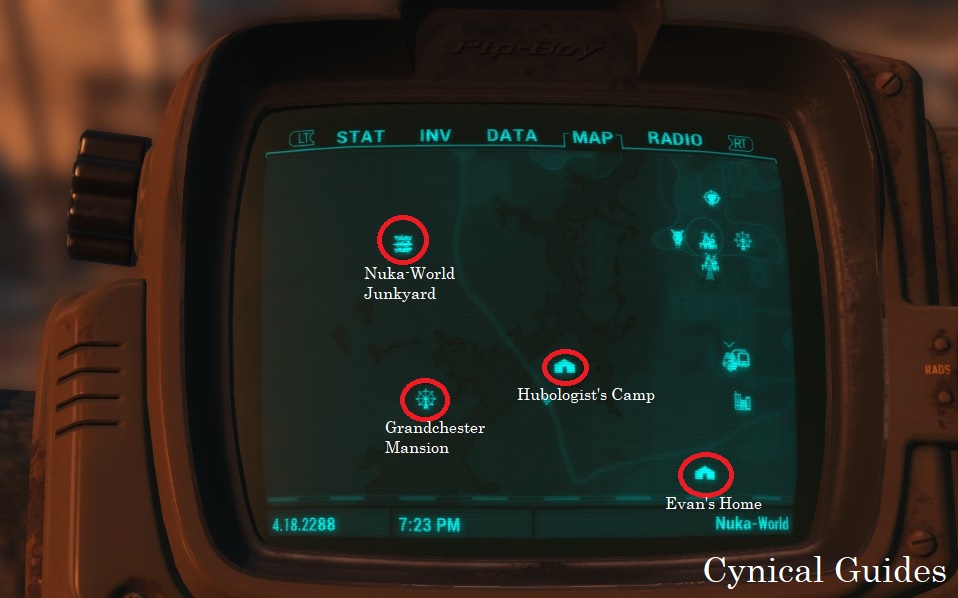
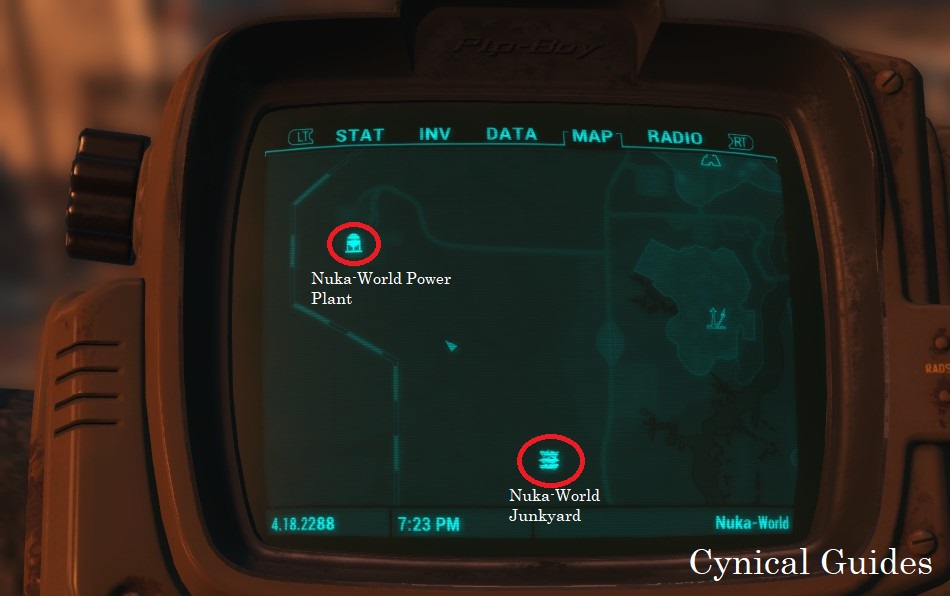
I didn't want to lose progress, so I found a YouTube how-to for glitching yourself through the wall using Exit Power Armor. That let me pick it up, but you can also use the console to unlock the recipe so you can just mix the drink for the achievement. :RogueMoneybags:
AaronSonOfNel 27 nov, 2024 @ 10:49 
i loved this guide, many thanks!
Özire 2 nov, 2024 @ 5:50 
Thanks so much this outstanding guide!
Longstone 18 okt, 2024 @ 5:35 
Nice!
TF2heavy 16 okt, 2024 @ 15:00 
any tf2 players hare?
TF2heavy 16 okt, 2024 @ 15:00 
ain't no way im gonna read all of that
Cynic 0055  [skapare] 3 okt, 2024 @ 9:13 
Hey Modius, thanks for bringing this up. It turns out that only mods installed using the Creation Club will disable Achievements; it's in New Vegas where using the console disables them. I will update my Introduction.
Modius 3 okt, 2024 @ 3:43 
Using the console does not lock you out of the achievements. I tested this just now. I added a minuteman through the console and made it so I could move him to other settlements and then later got the achievement to lvl to 25.
WiseMonster 30 jul, 2024 @ 3:25 
Hey Cynic 0055 thank you, today I solved it. I had to complete the quest "Boston after Dark" and then I did another radiant quest for the Railroad and when I got back I finally got Drummer Boy to tell me to go speak with Desdemona