Euro Truck Simulator 2
Оцінок: 59
Most Complete Controller Settings/Guide
Автор: AJ
After going through this guide you will be able to steer at both low and high speed turns without having to slow down too much. Every function you need can be binded to the controller, so no need to touch the keyboard.
This guide/setting will transform the way you enjoy ETS with a controller :)
2
   
Нагородити
До улюбленого
В улюблених
Прибрати
Why this guide?
  • ETS 2 was released in 2012 but still we still we only have 2 basic options for driving. Steering sensitivity and non-linearity. The game has an in-built speed sensitivity setting (uneditable) which limits your steering angle based on the speed you're driving and this value is too high. Hence, we have to slow down to 5kph to make 90° tight turns or even at roundabouts.

  • This guide aims to get rid of all those issues while still maintaining the smooth inputs of steering at high speeds in highways. Also, using the steam controller configuration settings, you can bind almost anything you want to the controller itself. Hence, no need to buy a wheel to drive fast into corners anymore and also no need to reach out to the keyboard to press "enter" at tollbooths or uncouple the trailer etc.

  • Pros: You control the steering of the truck, the game doesn't restrict it, no matter the speed.
  • Cons: You control the steering of the truck, the game doesn't restrict it, no matter the speed.

  • I've provided a link to youtube clips under each section which do exactly what that section says. So, if you're confused about something, you can refer to the videos as well.


  • I'd recommend to at least go through to part III for the steering settings, which are the most important imo.
I. Save your current settings
  • Before you open the game and apply any changes to your controls or keybinds I recommend to backup your control settings.
    To do this, copy and paste you controls.sii file somewhere else.
    The file is located here (make sure to select the correct profile folder if you have multiple)


Click for the Video
II. Steam settings
Before we start the game, we must enable xbox controller support for steam. (important for later steps)
  • Open steam app and click on steam top left.

  • Click on settings


  • Click on the controller and then select General Controller Settings


  • If you use xbox 360 or xbox one controller, make sure you enable Xbox configuration support .

    For xbox one elite controller, you also need to enable Xbox entended feature support so that you can use the paddles
    For playstation controller, enable Playstation configuration support.

click for the video
III. Steering settings
Now, start the game.
  1. Go to settings ~> GAMEPLAY
    Scroll down to Truck Settings and put the Steering Animation Range = 360°
    why?: because it's extremely difficult to control a wheel which rotates 1080° using a gamepad.
  2. The truck will still steer the same amount, it's just that the wheel animation is limited to 360°. So, instead of waiting for the wheel to turn 1080° or more to do a full lock, the wheel only need to turn 180° each way. This makes it way easier to give precise inputs in tight hairpins etc.
  3. Go to CONTROLS menu
    - controller subtype = wheel
    - steering sensitivity = 1st of all put it at zero using your mouse (all the way to the left)
    Then keep the mouse cursor on the slider so that it remains selected and then using your keyboard, press the right arrow 15 times. (This is done to get the exact value which is difficult using mouse.)
    - steering non-linearity = zero

    - Try the 15 clicks for now, if you feel like increasing or reducing it. Use to keyboard to do it, so that you know how much you're changing and use what you feel at ease with.

    Now, to make the steering feel smooth even though we've selected wheel subtype we need the help of steam. Let's see how to do that in the next step.

    click for the video
IV. Steam Controller Configuration - (For steering)
To maximise the use of limited buttons and ease of handling with the controller, we need the help of steam.
  • While you're in the game, press shift + tab to open the steam overlay
  • Click on controller configuration at the top right
  • You will most likely come across the recommended settings like this
  • Do NOT use those settings, instead click on the templates (left side) and select gamepad.
  • We will refer to this page as gamepad settings.
  • Now click on the bottom left rectangle representing the left stick

  • Go to Additional Settings (bottom right)
  • At the top left, you'll see Stick Response Curve which should be at linear by default.
    (This is responsible for how the truck turns based on our inputs.)
    - click on Linear, scroll down and select Custom Curve
    - reduce the slider such that the value is approximately 0.07.
    ~ why 0.07? Since, we're using wheel subtype in-game, the steering will be very responsive even if you only move the LS a little bit but we want to be able to drive smoothly on highways with 10% input and also turn quickly at hairpins with 100% inputs.
    - Looking at the graph above, we have dampened the initlal 50% input from the controller so that truck doesn't turn too much, but as you turn a bit more, the graph picks up resulting in high inputs.
    Congratulations if you've made it this far. Now, you can now turn smoothly on the highways with low inputs and also turn sharply in tight-slow corners with full left stick movement:)

    click for the video
V. Assigning button to the necesary functions
-If you're happy with 7 or 8 controls which you've binded to your controller, you can leave this guide. The main aspect of driving is over
- But if you're the one who wants to maximise the effectiveness of controller and avoid the keyboard for functions such as cruise control +/-, spotify (background music) prev/next track, retarder +/-, trailer coupling, handbrake, beacon, etc. you name it. Then welcome to the nerd fest.
- This will be a long section, so make sure you're hydrated and have patience.
It'll be worth it in the end.

Let's begin.
1. Close the steam overlay and go back in-game. Click on options, then select Keys & Buttons.
Press Reset to defaults
2. After this, scroll through the menu and bind those functions which are empty (only using keyboard)
(we do not want to bind to anything to the controller in-game)
For example: This is additionally what I've binded after I reset the controls to default
Function
Primary
Engine Brake Toggle
B
Front Suspension Up
W
Front Suspension Down
S
Rear Suspension Up
D
Rear Suspension Down
A
Suspension Reset
\
Cruise Control Speed Increase
Num +
Cruise Control Speed Decrease
Num -
Cruise Control Resume
Num Enter
Dashboard Display Mode
Z
Dashboard Map Mode
/
Open Right Window
,
Close Right Window
.
Open Left Window
U
Close Left Window
I
Route Advisor Next Page
Num 0
Quick Save
=
Audio Player Volume Up
Right Shift
Audio Player Volume Down
Right Control

~ If you don't have a numpad on your keyboard, use the arrow keys or other buttons instead. The main thing is that you have a button on keyboard for every function that you want to use.

click for the video
VI. Binding everything to the controller
  • Now, just like before, press shift + tab and open the controller configuration.
  • Once the configuration window is open, press alt + tab to go back to the game window and close the steam overlay. Then make sure you're in the Keys & Buttons menu of the game.
  • This step is necessary because we will be assigning keys to the controller based on keyboard buttons we've assigned in-game. So now, you can press alt+tab to go back and forth between the game and controller menu to see which keys you want to bind.

How to assign buttons to the controller
  • 1st of all, we won't touch LT and RT, they are brake and throttle pedals, which are already assigned in the game controls menu.
  • Click on the D-pad. You'll see this
  • Now, click on all the four buttons and assign whatever functions you want.
    For example: I want d-pad up to enable the function "chasing camera". I will press alt + tab to go back to game and search through the keys which keyboard button corresponds to chasing camera. I found the button is "2"

  • Now, go back to the controller menu by pressing alt + tab , click on d-pad up button. You'll see this
  • click on "2" on the keyboard.
  • Similarly, click on the rest of the buttons in the controller menu and assign what button on keyboard you want it to correspond to.
  • The following table shows what I personally have done.

    Controller Button
    Assigned button
    Function in-game
    d-pad up
    2
    Chasing camera
    d-pad down
    L
    Light modes
    d-pad left
    {
    Left indicator
    d-pad right
    }
    Right indicator
    select
    space-bar
    handbrake
    start
    F
    hazard indicator
    A
    left-shift
    upshift
    X
    left-control
    downshift
    B
    N
    Air horn
    Y
    J
    Light horn
    holding Y
    K
    high-beam headlights
    LS click
    Esc
    Escape
    Note: '{' & '}' in the table actually mean '['& ']' but I couldn't use them as they messed up the table formatting.

    ~ If you were following the guide till now, you might've notice there are 2 functions assigned to "Y" key of the controller in the table above. This is how it works.
    • Click on the "Y" key in the menu, you'll see the picture of keyboard and other buttons. At the bottom right, you'll see SHOW ACTIVATORS. Click on it. This will open.
    • Under the regular press, click on the binding and select 'J' key on the keyboard.
      This means that when we u simply click the Y button, 'J' on keyboard will be activated for that moment, which is the light horn/flasher.
    • Now, click on ADD ACTIVATOR and under Activation type select long press.
      Click on the binding and select 'K' key on keyboard.
    • What this does is that if you simply click the Y button on controller, you'll flash the headlights, but if u hold them for 0.150s (you can change this value in the slider) the high-beam will turn on. To turn off high beam, again hold the Y button for same duration.
    • But now, if u go back in-game and click the Y button to use flasher, you'll notice a problem. You'll barely see the headlights flash because they only turn on for a split second and turn off before they even the chance to fully light up. So, we need to increase the duration the flasher stays on. To do this, go back to the controller settings of Y button and again go to the regular press activator.
      - In the middle, you'll see 2 sliders 'fire start delay' and 'fire end delay'. Since, we want to delay the end, so that the headlights actually turn on. Move the slider of 'fire end delay' slightly to the right, I use 0.05.

      click for the video
VII. Fun Stuff begins (LB)
  • We didn't use Left and Right Bumper buttons in last section because we need to make the LB & RB buttons act like the 'Shift' key in keyboard.
    What I mean by that is. When you hold those keys and press another button, the function of that button will change just like the Shift button in keyboard.
    For example: If you press 1 in keyboard, it types 1. But if you hold Shift then press 1, it becomes !, 2 becomes @, 3 becomes # etc.
    Holding Shift changes the function of that button.
    Similarly, for the controller we are making the LB and RB buttons act like Shift 1 and Shift 2. So that, by holding them we can change the function of buttons we press next.
  • In gamepad settings, at the top, there's ADD ACTION LAYER and ADD ACTION SET.
    For now, we only need the layer option.
    click on them and read their description for info
    Note: This is additional info. Difference between ADD ACTION SET and ADD ACTION LAYER
    In section VI, we assigned many functions to different buttons.
    - If you add action set, a new set will be created which will not have any functions you assigned before unless you select the option to import them. Basically, a completely new set which you have to map completely differently.
    - If you add action layer, all the functions you assigned before will still be there unless you change them.


  • Now, let the magic begin.
    LB
  • Click on add action layer and name it as LB.
  • Click on DEFAULT at the top, then click on LEFT BUMPER.
  • Just above F12, you'll see this button.


  • select Hold Action Layer in the drop down menu
  • select LB (the layer which we just created), click OK.
    So from now on, you'll enable LB action layer when you hold the Left Bumper in-game. And now we are going to assign controls to this layer :)
  • Now, click on LB(layer) in the gamepad settings page, so that's it selected. You'll see same buttons assigned as before but faded. It just means unless you change them, they'll still act as the old buttons even if you hold LB.
  • Just like last section, we'll be assigning keyboard keys to the controller buttons for the functions we want. I'm sharing below what I did for myself.
    Controller Button
    Assigned button
    Function in-game
    d-pad up
    =
    quicksave
    d-pad down
    Num 0
    Route advisor next
    d-pad left
    F5
    Route advisor nav
    d-pad right
    P
    wiper
    select
    E
    engine on/off
    start
    T
    trailer couple/uncouple
    A
    ;
    retarder +
    X
    '
    retarder -
    B
    B
    toggle engine brake
    Y
    C
    apply cruise control

  • By default, the RS (right stick) is used as a look around camera. But while holding LB, we can use it to act like 4 sets of buttons, when moved in the 4 directions.
  • To do this, make sure you're still in the LB settings and not default.
  • Click on the RS (joystick move), now under style of input select Directional Pad and for Layout Cross Gate.
  • Increase the deadzone, similar to the pic above, so that you don't accidentally press 2 buttons while moving the joystick.
  • Now, just like previously, assign controls to these four buttons.
  • This is what I did
    Controller Button
    Assigned button
    Function in-game
    RS up
    right shift
    Radio volume +
    RS down
    right ctrl
    Radio volume -
    RS right
    page down
    next station
    RS left
    page up
    prev station
    RS click
    I
    left window closes
    LS click
    U
    left window opens

    click for the video
VIII. RB
  • Repeat exactly what we did for LB before.
  • Click ADD ACTION LAYER and name it as RB.
  • Click on DEFAULT at the top, click on RIGHT BUMPER.
  • Click on the symbol above F12 ~> hold action layer ~> RB.
  • Now, click on RB at the top so that it's selected and let's get back to work.
  • Do the same thing to RS, that we did before in the LB action layer.
  • These are my settings for RB
    Controller Button
    Assigned button
    Function in-game
    d-pad up
    Num +
    cruise control +
    d-pad down
    Num -
    cruise control -
    d-pad left
    z
    dashboard display
    d-pad right
    /
    dashboard map
    select
    O
    beacon
    start
    Enter
    Enter/Activate
    A
    Play
    play/pause music
    X
    Mute
    Mute
    B
    F2
    virtual mirror
    Y
    Delete
    resume cruise control
    RS up
    volume up
    pc volume +
    RS down
    volume down
    pc volume -
    RS right
    next track
    next song
    RS left
    prev track
    prev song
    RS click
    .
    right window closes
    LS left
    ,
    right window opens

    click for the video
IX. LB+RB
What we've done so far is already more that enough to enjoy the game. But if you also want to adjust the suspension of the truck using controller, we can do it.
  • Add another ACTION LAYER and rename it to LB+RB.
    It's important to put LB first because for this to work in-game, you have to hold LB 1st, then RB and then click on the buttons.
  • In the gamepad settings, click on LB.
  • Now, click on the rectangle of right bumper button, it should say Hold Action Layer RB in a faded way.
  • Again, select the symbol above F12 ~> hold action layer ~> LB+RB.
  • Now, click on LB+RB at the top and assign the controls you want.
    These are my settings.
    Controller Button
    Assigned button
    Function in-game
    d-pad up
    W
    front suspension up
    d-pad down
    S
    front suspension down
    d-pad left
    A
    rear suspension down
    RS click
    \
    suspension reset

    Y
    M
    map
    X
    tab
    tab
    - Note: The only issue with LB+RB while playing is that you must release LB & RB in opposite order, you must release RB before you release LB button. If you release LB first, the action layer will remain active even if you're not holding anything.
    If you did this mistake already, to fix it, hold LB then press RB. Release RB, then release LB.
My Settings
If you've read and followed the entire guide, you truly have enormous patience and my respect.
  • I doubt many would've done it.

    Finally, here's my steam control settings.

    Version 1
    steam://controllerconfig/227300/2829409404

    Version 2
    Latest Settings
    steam://controllerconfig/227300/2881968283

  • You need to play at least 30mins to get used to the wheel subtype steering. After that, you'll never go back :)

  • Make sure to leave a comment whether you liked it or not.
UPDATES
Version 2
  1. Shifted (escape) button
    - Instead of 'LS', now you need to hold the 'SELECT' button.
  2. Clicking 'LS" enables a new layer called High Speed

    - This layer limits the horizontal input of 'LS' to only 40%. So, if you are driving fast >100kph, it's preferable to use this mode as the chances of you of tipping over is greatly reduced.

  3. To go back to normal mode, where moving 'LS' gives 100% turning inputs. Click on "START" button.
  4. To help you know which mode you're in. Pressing 'B' in High Speed mode turns on Air Horn, whereas in the normal driving mode you'll hear normal truck horn.
Коментарів: 19
FreeGen 10 груд. 2023 о 12:43 
will you update guide? Mainly with old screenshots (steam input UI) it was so hard to understand all staff
AJ  [автор] 14 лют. 2023 о 20:42 
@Parrow go to your library>right click ETS>properties>controller>select "Enable Steam Input"
That should work, I don't know much else honestly.
Parrow 14 лют. 2023 о 16:36 
Facing the same issue as Tinpot, is there a known fix to that?
Tinpot 22 листоп. 2022 о 13:04 
for some reason the game doesn't detect my controller, every button works but i cant select wheel subtype so the steering wheel doesn't work
SkullCrusher 20 листоп. 2022 о 7:30 
I wanna drive manual shift with clutch and wanna make lb as clutch. How can i do that?
AJ  [автор] 2 листоп. 2022 о 22:01 
@Mucy make sure the style of input for the left stick is "joystick move". If you still don't see the curve option, then I'm afraid I'm out of ideas for that issue.
Probably just try out my settings (version 2) in the "updates" section above, maybe that should work.
Mucy 2 листоп. 2022 о 7:19 
Solid guide but I'm already struggling in the Configurator trying to change the Stick Response Curve.

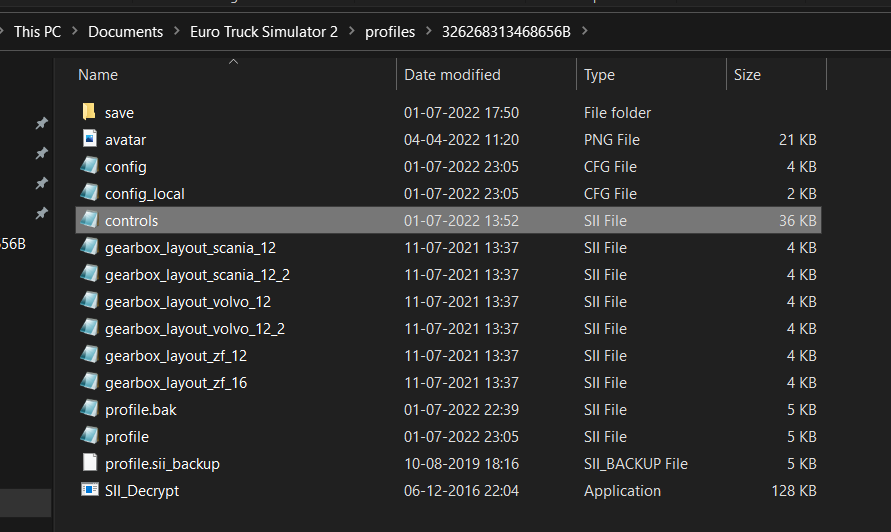
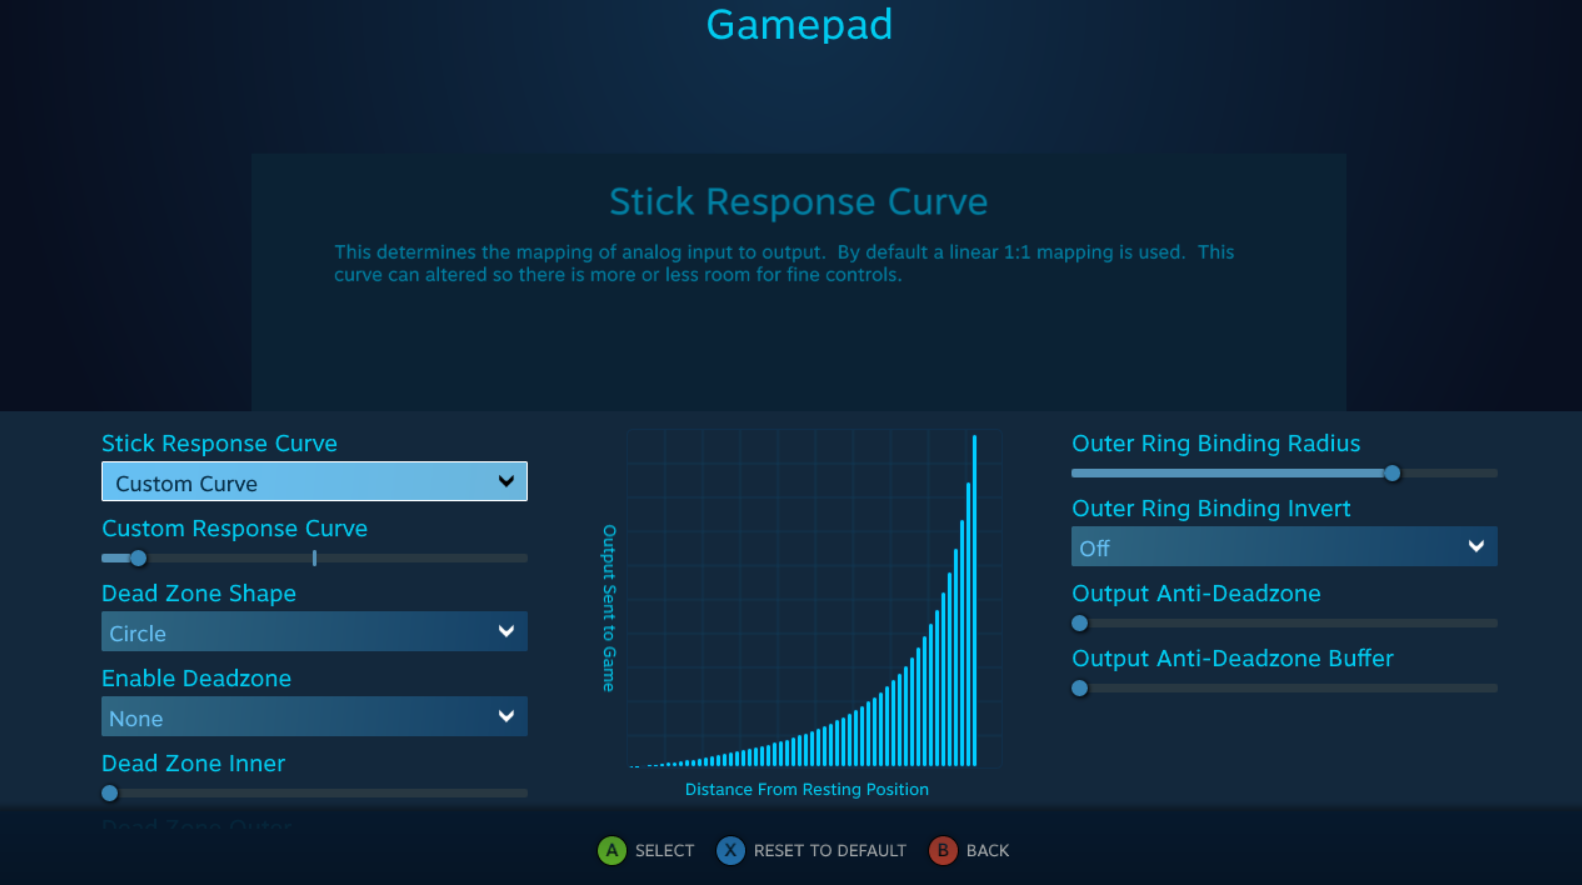
It fact, when I go into Additional Settings on the Joystick Move subsection, I am unable to change any settings regardless of using a mouse or a controller so I'm stuck on Linear Response Curves.

Any idea what I can do about that?
𝔾𝕒𝕝𝕖𝕘𝕠 20 верес. 2022 о 10:25 
You're most likely right. I only played for half an hour after finishing the setup and I'm still getting used to the asign buttons and combinations haha
AJ  [автор] 19 верес. 2022 о 21:20 
@galego give it some time. You need to drive at least for an hour to get used to it. Use the values in the guide for now, then adjust them later if you want. The reason people struggle to deal with it at first is because the normal settings are really slow and smooth but these settings are super responsive. The truck turns exactly the same amount at 20kph and 200kph, there's no help from the game. So, you need to keep driving and eventually it'll become normal.
𝔾𝕒𝕝𝕖𝕘𝕠 19 верес. 2022 о 17:52 
Hey man, awesome guide!

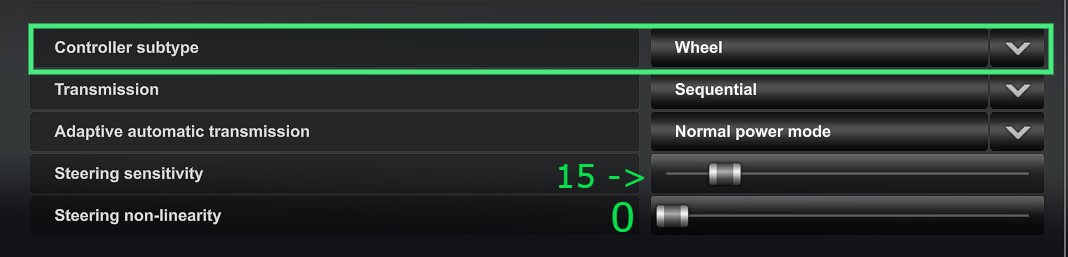
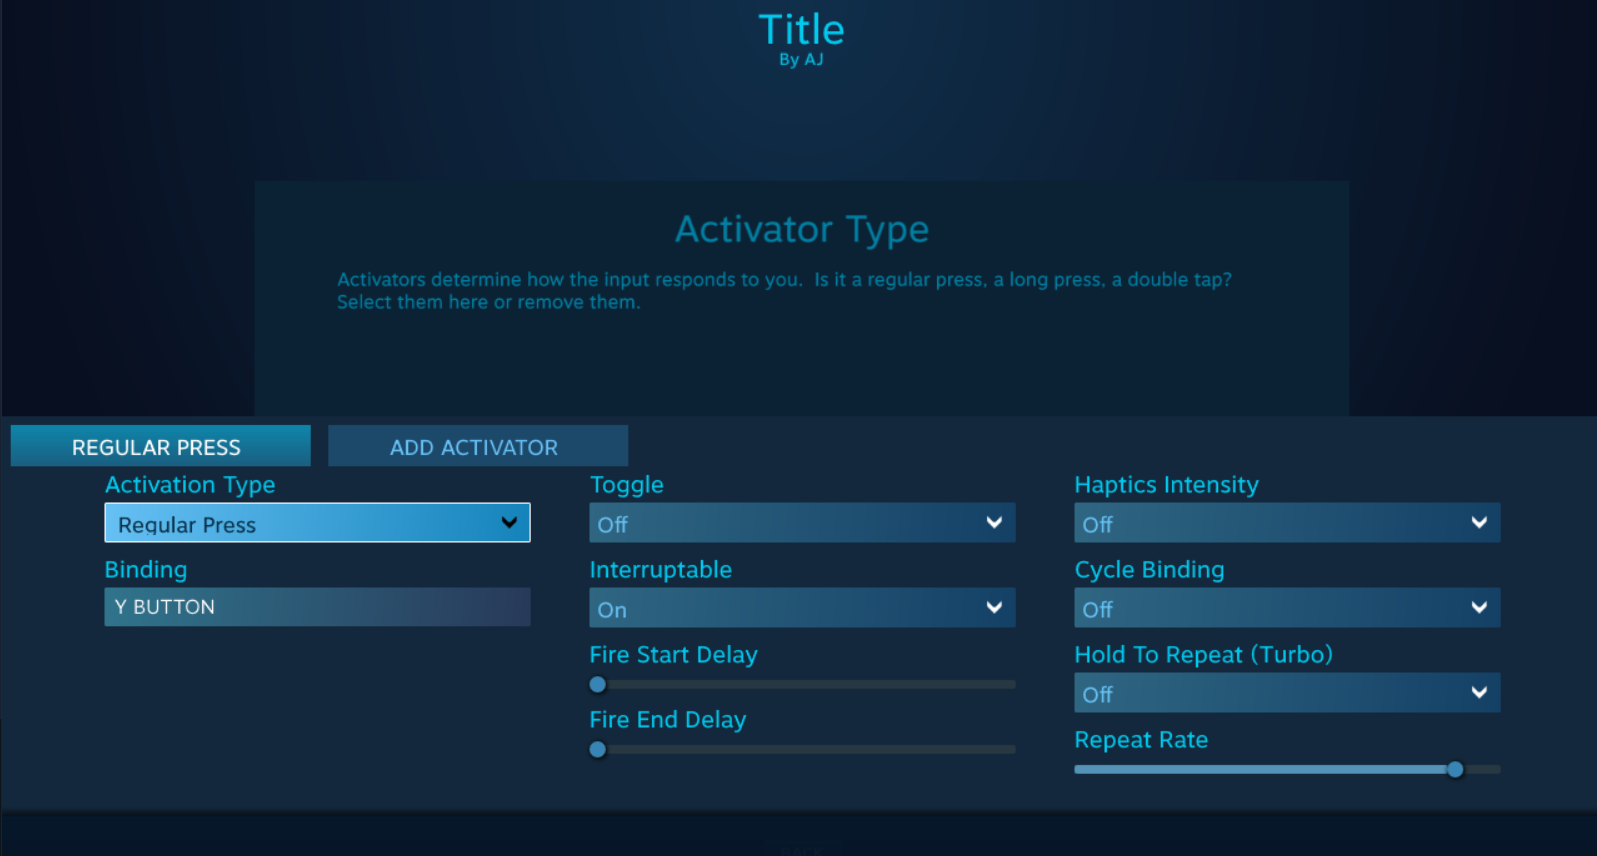
Just one question, after finishing your guide, my steering feels kinda giglish, you know what I mean?

I tried messing around with the Steering sensitivity and the Steering Non-linearity but it still feels weird.

Do you have any suggestion on how to smooth the steering?