Euro Truck Simulator 2

Euro Truck Simulator 2

1,657 ratings
ETS2 Fast Track Playguide
By Perylous and 1 collaborators
This is a guide on leveling quickly. That is, following the guide will take the player from a new game to end-game (or at least what I consider end-game) in a short time (only approx. 22 deliveries needed).

This guide is mainly written for the beginner, though more experienced players may wish to look over the guide to get information on leveling quickly.

End-game here is considered to be having a trucking business that is self-sufficient and brings in enough money to cover any expenses, leaving the player free to roam the game world.

End-game can be reached by level 14 in just over 15 hours of play time and completing only 22 deliveries.
5
4
20
2
4
3
2
2
2
   
Award
Favorite
Favorited
Unfavorite
Guide Translations
Version Française par Gleamie
Using the Guide
I recommend reading through the guide at least once before trying things out in-game as this will give the reader a better understanding of what is involved and what the goals are in each part of the guide.

Though this guide is aimed at beginners, it will not go over gameplay basics and will instead rely on the game itself to teach the player these things. There is however a tips section as well as one for learning to park the trailer.

The guide assumes that no gameplay mods are active and so only deals with standard equipment and maps. The Going East DLC can be present though not a requirement. The guide also assumes that fatigue simulation and the speed limiter are turned on (this is the default).
Creating a Profile
Profile Info

Start a new game by creating a new profile. Most of the things here has no real effect except for the Preferred Truck Design. While playing, you will receive an in-game email from the closest main dealer for the truck brand selected here. I recommend selecting either a Volvo design (one of the last two) or a Renault as I recommend purchasing one of these as your first truck. This will just make it easy to find a dealer for your truck purchase. (The Renault can be had for cheaper than the Volvo, but the Volvo comes with a more powerful engine).

Control Configuration

The game then will ask you to configure your controls. The startup config here is quite basic so you may need to press ESC once you are placed in the truck for the first time in order to access the options menu and finish configuring things.

I use an Xbox360 controller for playing ETS2, though you may need to configure it to your liking as I find the default setup less than ideal.

Sometimes, especially if multiple controllers are plugged in, the controller buttons don't seem to take in the keyboard mapping window. Try un-plugging the extra controllers and just keep mashing the button until it is accepted and/or cancel (by pressing ESC) and try again. It is an annoying problem, but it will eventually accept the buttons.

Start Location

Your start location doesn't really matter, though as France, Poland and Italy have a lot of toll booths and the UK has you driving on the left, it is more convenient to select a location that is much more central.

As you will receive an in-game email that will unlock a main truck dealer for the preffered truck brand you selected in your profile, it is a good idea to select a city where there is a truck dealer for the brand you will use for your company AI drivers.

I recommend starting in Frankfurt as it has a main Iveco dealer. We'll see why this is in the Expanding the Business section.

New to v1.11, you can relocate your HQ into a new garage merely by relocating your avatar driver. So the start location selected here is more for convenience than anything.

In-Game Tutorial

Now go through the in-game tutorial. I recommend doing this as it will quickly go over the game interface. If you have played the game before, you may skip this part.
Skill Point Assignment
While playing, you will gain levels. At each level up, you will gain a skill point. These can be assigned to different skill sets that will help you or unlock new jobs. Here is a list of the different skills.

  • ADR
    The only skill where each class can be individually selected instead of simply increasing ranks. Each ADR class unlocks new job types. Which ADR class you select first isn't overly important but the explosives (class 1) and flammable liquids (class 3) seem to be more common.

    ADR classes give an XP bonus but no cash bonus, however as the ADR jobs will give a higher return, this isn't a drawback. Further, ADR class jobs often work in conjuntion with the High Value Cargo and Fragile Cargo skills making this an important skill set to increase.

    As of v1.11 of the game, the fragile cargo icon is no longer hidden for ADR jobs.

  • Long Distance
    This skill opens longer distance jobs. This is probably the most important skill as it gives both a 25% XP bonus for deliveries longer than 250 km and a 5% cash bonus per skill rank for deliveries that fall within that rank's distance.

    More importantly, since the base reward for deliveries is based on distance, this skill also effectively increases the base reward of both money received (your driver charges a flat rate + a rate per km) and XP (you gain 1 XP per km driven on the job) making this skill your first priority.

  • High Value Cargo
    This skill opens new and better paying jobs, as well as giving an 18% XP bonus for high value cargo and a 5% cash reward bonus per skill rank. Many ADR jobs are also considered high value cargo making this an important skill.

  • Fragile Cargo
    This skill opens new and better paying jobs, as well as giving a 22% XP bonus for fragile cargo and a 5% cash reward bonus per skill rank. Many ADR jobs are also considered fragile cargo making this an important skill.

  • Just-In-Time Delivery
    This skill opens important deliveries at rank 1 and urgent deliveries at rank 2. Important deliveries give a 3% higher reward per skill rank and a 20% XP bonus. Urgent deliveries give a 5% cash reward bonus per skill rank and a 30% XP bonus.

    Though at first this seems a very nice skill, there is a drawback. Important and urgent deliveries have a much smaller delivery time frame. Since the penalty for a late delivery is very high, this skill should be taken later when you have a truck that can do the deliveries required.

  • Ecodriving
    The least useful of the skills. This skill reduces the amount of fuel consumed while driving (reduced by 5% + an aditional 5% per skill rank). As the cost of fuel isn't all that high and easily covered by the rewards recieved by deliveries, this skill can be ignored until the end.

Here's an example of a delivery with both ADR (class 2) and fragile cargo bonuses. The job was marked only as an ADR class 2 job. (Note that as of v1.11, the fragile cargo icon is no longer hidden on ADR jobs in the freight market.)


In order to help increase the cash and XP rewards, here is my recommendations for skill point assignment while leveling up, presented in the order they should be taken (move to the next step only when the previous is complete).
  1. First four ranks of Long Distance
    Jobs of up to rank four can usually be done with only one rest stop.
  2. First rank of Fragile Cargo
    We take one rank here to open this job type and have at least one rank when we start on the ADR jobs.
  3. First rank of High Value cargo
    Again we are opening the High Value jobs as well as having at least one rank for when we start taking ADR classes.
  4. Three classes of ADR
    Make Explosives (Class 1) and Flammable Liquids (class 3) a priority.
  5. Second rank of Fragile Cargo
  6. Second rank of High Value Cargo
  7. First rank of Just-In-Time
    We finally open the important deliveries.
  8. Last three classes of ADR
    Finish off the ADR classes.
  9. Last two ranks of Long Distance
    Finish off the Long Distance Jobs. Be aware that you will start seeing jobs that will require multiple rest stops.
  10. Third rank of Fragile Cargo
  11. Third rank of High Value Cargo
  12. Second rank of Just-In-Time
    Open up the urgent deliveries. We could have taken this a little earlier, but I prefer it here.
  13. Last three ranks of both Fragile Cargo and High Value Cargo
    Alternate between the two until both are complete.
  14. Last four ranks of Just-In-Time
  15. Six ranks of Ecodriving

The order given above isn't set in stone of course, and you may find that a somewhat different order works better for you. However, the order shown is what I use and gives excellent results.
Starting Off
As this is the very start of the game, the first goal is to get your own truck. Having a bit of cash on hand won't exactly hurt either.

As you don't yet have a truck, you can only do Quick Jobs. Try to pick jobs that start and/or stop at cities you haven't been to before, though largest cash reward is still priority.

When visiting cities, drive in front of areas that have a question mark (?) on the map/GPS. This will allow you to discover recruiting agencies and other truck dealers.

When you level up, assign skill points according to the recommended order shown above.

Perform quick jobs until you receive an in-game email from both the bank and from the truck dealer for your Preffered Truck Design (selected during profile creation). You'll likely be level 1 or 2 at most when this happens. Also make sure that you have enough money to cover the cost of the truck and a bit left over to cover fuel costs (you'll need about 10,000 euros in the bank if you want the Volvo, 4000 euros if you are purchasing the Renault).


Your First Truck

Though you could purchase any truck you want, this is a quick leveling guide so you want to make your life as easy as possible. This means getting a truck that isn't too expensive, and can be used for as long as possible without wasting money upgrading it into usefulness.

Unfortunately, recent changes to the game have made things a little harder in this respect. Though I still recommend the Volvo FH16 Classic Sleeper, however the starter Renault truck can now be had for cheaper.

With the above in mind, I recommend the Volvo FH16 Classic Sleeper or the Renault. If you strip off a few extras on these trucks, the price can be reduced to 108,665 euros for the Volvo or 99,025 for the Renault. The Volvo comes with a 420 hp engine while the Renault is 380 hp. This is almost enough to haul the heaviest loads of 25 tons in an unmodified game (though the Renault may start having difficulties on steeper inclines) .

First, go to the bank (via the menus or the bank's email) and take out the 100,000 euro loan. Now go to the Volvo/Renault dealer via the truck dealer's email and select the cheapest truck there (typically this is the first truck, and likely the only one you are allowed to buy right now anyway). Now customize this truck so that you remove any extraneous items on the truck and check for cheaper paint jobs and transmissions. The Volvo can be reduced to a price tag of 108,665 euros while the Renault can be had for as little as 99,025 euros. Buy the truck.

This should then leave you with a little bit of money to help cover loan installements, fuel costs and possible repairs at the start of the next phase.


Delivering Freight

Now that you have a truck, you can pick up jobs from the Freight Market instead of quick jobs. Select the city you are in (select the city where the blue arrow on the map is) and select the job that gives the best rewards. However, also look at the distance the job requires (this is shown in the top right of the map when you select a job). At the start this isn't very important, but later the distance you'll need to travel will also dictate the number of rest stops you must do along the way. Also check the time the job offer is for. If the offer is only valid for a few minutes, then you may not be able to get to the job pickup point before the offer expires. Lastly, avoid jobs that start and end in the same city as they aren't really worth the bother.

Set the GPS destination to this job and drive over to the pick-up point. You don't yet have the job, just where to go get it. Once at the pickup point, drive over and stop on the floating green icon and press the activate key. Verify that the job is still there (it'll be the one with the [GPS] icon on it. Select it and click Take Job.

Drive up to the trailer and back your truck nice and slow until you can attach the trailer (the GPS display will indicate when you are in the right spot). You can press the [5] key or move your view out the driver side window to look behind you (for an extra challenge, try only using the mirrors).

Attach the trailer, then follow the GPS to your destination just like you did for the quick jobs. Parking the trailer at the destination only gives a flat 45 XP, so whether or not you want to park the trailer is your choice (see the Parking the Trailer section for details on doing this). I normally do park the trailer myself, and have gotten used to doing it only using the mirrors, however in the profile used for testing this guide, I purposefully didn't park the trailer.

After each job, head to the closest repair shop and fix you truck (even if you didn't have any accidents along the way). Your truck, especially the tires, will wear down a bit just from normal use so maintaining your truck is important.

All repair shops and gas stations also have a parking spot where you can stop and rest. Though at the start of the game you likely don't really need to rest much, when you do, it is a good idea to stop and rest at these locations.

Once repaired and rested, pick up another job at this new city. Don't forget to drive around the place to discover truck dealers and recruiting agencies.

Continue doing jobs until you receive an email from the bank saying they can help expand your business and that you are consistently getting jobs that pay 10,000 euros or more (this will take you to about level 3).

The job amount of 10,000 euros is really just an estimate. What you really want is enough money coming in to pay for the bank loan, fuel costs, any maintenance on the truck and have a little left over. At level 3 with three Long Distance skills, you should be easily reaching this goal.
Expanding the Business
Welcome to mid-game. The goal here is to expand the business and make it both profitable and self-sufficient.

This is done by purchasing new garages. You do not want to expand your tiny starter garage (at least not yet) as the cost to do so is the same as that of a new garage (180,000 euros) but will only give you two extra driver slots (your own truck takes up the third slot). A new garage on the other hand will give you all three slots since your truck is still in the starter garage.

To purchase a new garage, drive up to the garage in the city of your choice (yes you must physically go there) and drive over the green icon. As you don't yet have the money, get the 400,000 euro loan from the bank before actually purchasing the new garage (though only get the loan when you are in front of the garage you want to buy or you may end up paying installments before you end up using the money). It doesn't really matter what city this new garage is in, you just want another one somewhere. Once purchased, you need to start filling it with trucks and drivers.

To buy trucks for the new garage, visit the truck dealer via the main menu. You will need to visit the dealer as you must possess at least five trucks before using the "online" purchases ("online" here is merely an in-game convenience thing and isn't going to take you to a real website for DLC content).

Company drivers are only ever simulated. Though the trucks they use has an effect on their driving, in tests I've found that this can be ignored until the business is self-sufficient. So we can give them the cheapest trucks available and they'll be fine. For this reason, I recommend purchasing the Iveco Stralis Active Space (the cheapest one with 310 HP). Before buying, change the paint to white, remove the front mirror and sunvisor (at about level 6 you can also change the steps to something cheaper, but at first the cheaper steps aren't unlocked) and change the side mirror to the "Stock I" style. This makes the Iveco only 92,085 euros, so buy at least two and send them to the new garage (don't drive them yourself).

Hire at least two drivers from the recruitment agency (again go through the main menu). Try selecting drivers that have skills that match up closest to the recommended skill point assignment. Do not hire a driver unless you can provide them with a truck or they may quit on you after a few days. Don't worry about the driver rating. It will go up as they level up. Assign the new drivers to the trucks you just purchased.

Go to the driver manager and set the training policy of your new hires to Long Distance. Use the same skill leveling process described above for the drivers. While playing, you will receive messages as to what your drivers are doing. When they level up, check the driver management and change their training as appropriate. You can do this even while driving yourself as you can always access the company manager from the main menu.

Your company drivers will likely actually lose you a bit of money at first, but they will quickly start making a profit once they level up a bit. For this reason, you want a bit of extra cash hanging around so that you can cover the slight loss.

Do jobs until you can buy a third Iveco truck, hire a third driver and pay off the 100,000 euro loan (this should take you up to about level 8).


Second Expansion
Now that the smaller loan is paid off and your drivers should be bringing in enough to cover the payments on the 400,000 euro loan, it is time to consider opening another garage.

As the garage is already paying for the 400,000 euro loan, we could consider this to be end-game. I don't merely because to do more in a reasonable time requires another bank loan which the current garage can't yet cover for.

To help maximize profits, choose a city near the edges of the world map including over in the UK. For example, Glasgow or Plymouth in the UK, Bratislava in Slovakia, Debrecen in Hungary (requires Going East DLC). This will allow drivers at this garage to pickup longer distance jobs giving you higher income possibilities.

Do jobs until you have 180,000 euros to get another garage. You can get a second 100,000 loan to get this a bit earlier (I did this for the test profile). When you are at or near the amount needed, try to pick jobs that take you to or near your chosen location. Then drive over to the garage you want and buy it.

Perform more jobs until you can afford a new Iveco Truck and hire a driver for it (92,085 + 1,500 = 93,585 euros for a truck plus driver). Don't forget that you will still need some money to cover expenses and the new driver will likely lose money until they level up a bit. You may consider taking out another 100,000 euro loan to get a truck and driver quickly (if you didn't take it for the garage itself).

Repeat until all three garage slots are filled with drivers and trucks (this should bring you up to level 14 or so).
End-Game Already!
Yup, you are pretty much at the end-game. It may not be immediately obvious, but the first garage should be bringing in enough money to cover all bank loans plus a bit of profit, and the second, though barely started and may lose a tad until the drivers level up, will eventually turn a tidy profit. In short, the business is successfull and you can start thinking of other things such as expanding your tiny garage, buying and/or upgrading trucks, or just driving around.

Here's the progress history for my test profile that I used in creating and testing this guide.


As can be seen, at level 14, and only 15 hours of playtime, I had the two garages started. The most impressive stat here is the number of deliveries. Only 22 deliveries and it's essentially end-game.

Here's the state of the two garages immediately after buying the last truck and hiring a driver for it


Note how the last driver hasn't started any jobs, yet the average daily profit is over 40,000 euros (about 14,000 of which is coming from the company drivers). Also note that I was in the middle of a delivery as can be seen by the "On Duty" state of my driver.


Enjoy the sights

Notes on Changes for v1.11 of ETS2
Here are a few notes about some of the changes/additions that are now present in v1.11 of ETS2.

Speed Limit Display on GPS
The game now displays the current speed limit on the GPS.

You can choose between truck and car speed limit displays. The car speed limit is what is typically posted while the truck limit is typically lower (truck display is the default). Be aware that if you use the car speed limit display, you may still get speeding fines.

The display only updates at the next posted speed sign or when turning onto a different road. So if changing the display while driving down the highway, you may not immediately see the new speed limit display.

The speed limit displayed in the GPS is in your selected mode even when driving where the posted speed limits are not. That is, if your speedometer is in km/h, then so will the displayed speed limit on the GPS even while driving in the UK.


Cruise Control Adjustment
The new cruise control speed adjustment helps when entering cities and areas with lower/higher speed limits. The keys/buttons aren't bound by default so you will need to configure them.

The speed change is by 5 km/h.

The resume feature is handy to have since it puts the cruise control back on at the speed last set.


New Cities
The new cities are all along the coast (Venice in North-East Italy, Graz and Klagenfurt in Southern Austria). This makes them good locations for garages though Venice, being in Italy, is still plagued by toll booths.


Relocating Your HQ
You can now relocate your HQ by relocating your avatar driver to a different garage. In effect, whichever garage your avatar driver is in is considered to be your HQ. This can be done in the driver manager.


Selling Garages
To sell a garage, first you will need to empty it of any trucks and drivers (you can only sell an empty garage). Relocate and/or dismiss any drivers and trucks then, in the garage manager, select the garage and the picture icon in the top left will now have a button allowing you so sell the garage.


Fragile Cargo Icon and ADR Jobs
ADR jobs that also have fragile cargo now no longer hide the fragile cargo icon in the freight market. It is not yet known if high value cargo icons remain hidden, nor if the job is both fragile and high value cargo as well as ADR.
Driving and Playing Tips
Here are a few driving and playing tips.

Obey Traffic Laws
Though this seems obvious, because this is a game, players do tend to try to go as quickly as possible. This is a mistake.

You aren't in a race, you want to get to the destination within the delivery window. The game provides ample time to reach your goal without breaking traffic laws so why bother. Pay attention to the posted speed limits and stay within them.

Also, the AI drivers around you will react to your turn signal. Often slowing down on the highway to allow you a lane change or even stopping and allowing you to make your turn at crossroads. So signal your turns and lane changes.

The one area where this is less than ideal is when dealing with roundabouts. The AI drivers don't always react well to roundabouts so though you should try to obey the rules on negotiating these, be careful.

Though v1.11 of the game has added AI improvements, they can still act like jerks at times and they still can't properly negotiate roundabouts.


Stay in Your Lane
Many beginners, especially those who don't drive in real life, tend to forget that you aren't sitting in the middle of the truck but on one side of it. This means that if you try to align yourself with the center of the lane, one side of the truck will actually be outside the lane. Instead, aim for about 1/4 of the lane on the driver's side.

Also, while driving from the inside of the cab, use the various things on the dashboard as a kind of quick alignment guide. Lastly, use the mirrors to check the position of your truck in the lane.

Here's an example:

Note the alignment of the truck with respect to the lane itself. The mirrors show that both sides of the truck and trailer are in the lane (with a bit of space).

For quick alignment checks, I use the top of the parking brake knob to align with the right side line on the road while for the left, I use the side of the tachometer (RPM display) to align with the center line.

Aside: I was coming down a hill at the time I took that screenshot and not really paying attention the my speed, hence the 95 km/h shown on the GPS display.


Keep Your Lights On
A tip from real life truckers is to always keep your lights on. Many tunnels require you to have your lights on when entering them and it is too easy to forget to do so. By keeping them on at all times, you never have to worry about it.

As a side note, the game doesn't penalize you for using your high beams. The only reaction that the AI drivers will have is that they will flash their high beams at you. This means that at night on a dark, unlit road, you can turn your high beams on for visibility and not worry too much about the AI drivers. The only other drawback to this, and the reason I don't keep high beams on, is that if you have the HDR lighting turned on, the added glow effect off the signs makes them harder to see at a distance.


Driving in the UK vs Europe
When crossing over to/from the UK, keep in mind that you will need to start driving on the other side of the road. This is especially important when turning corners since you will have a tendency to turn into the wrong lane so be extra careful at corners. Roundabouts aren't so bad since everything is the same, you just circle in the opposite direction.

The UK also has a lot of speed traps along the highways. Often the posted speed limits change from 60 mph to 50 mph for no apparent reason other than to catch you in a speed trap. So be on the lookout for this while driving in the UK.

I find that the biggest problem with driving in the UK vs the rest of Europe is the speed limits themselves. In the UK, the speed limits are in Miles per Hour (mph) while the rest of Europe uses Kilometers per Hour (kph). Keep this in mind and use the following table as a quick guide to speed limits

v1.11 introduced a speed limit indicator on the GPS. Not only will it help you identify the current speed limit, but it is displayed in the units set in the game configuration. So the following tables aren't really needed anymore

Mph to kph quick convertion table
Posted mph
Use kph
30
45
50
80
60
90

Kph to mph quick convertion table
Posted Kph
Use mph
50
30
80
49
90
55
100
60
110
65
The values shown have a little bit of leaway in them to help avoid speeding tickets.


Using the Cruise Control
Cruise control is a nice feature to have on those long highways, but you can also use it at other times to your advantage.

When entering cities, or crossing some bridges and tunnels, the posted speed limit changes to something slower. If you don't brake too hard, then you can watch your speed and when it reaches the posted speed limit, turn your cruise control on. This will make your truck travel at that speed helping you maintain the speed limit without much effort.

V1.11 has added adjustable cruise control. That is, you can increase or decrease the current cruise control speed (in 5 km/h increments). They also added a resume feature which turns cruise control back on at the speed last set. You will need to go into the keyboard settings to set bindings for this feature as there are no keys associated with them by default.

Ferries as Rest Stops
When crossing to/from the UK, you will need to use one of the ferries. Either the Chunnel train (Eurotunnel), or one of the boat ferries at Calais/Dover , Rotterdam (Europoort/Harwich/Hull) or Amsterdam (IJmuiden/Tyne).

The ferries to/from Rotterdam and Amsterdam are long enough that you will gain a full rest period. This means that if you plan your route keeping in mind that you will be resting during the ferry ride, you can save yourself a rest stop during your trip.

The Chunnel train and the Calais-Dover ferry are too short in duration so you will only gain about 30 minutes of rest. However, this can be enough to get you to a gas station, or even your destination if it is close enough.


Getting Rid of Traffic Jams
Sometimes, the game throws too many AI drivers at some intersections (especially when comming off highways) and everything comes to a standstill. Nothing moves and you are stuck.

One way to deal with this situation is to save then reload the game. When you reload, all the AI drivers will be gone from your immediate vacinity.

Note that this is somewhat of a cheat and should really only be used when things jam up to the point where noone can mvoe forward. This typically doesn't happen at traffic lights since the lights help control traffic flow.
Achievement Tips
Now that ETS2 has added Steam Achievements, here are a few tips on getting them.

Most of the achievements in ETS2 are rather simple and so you will get them merely through normal play (for example, the "Zzzzz" achievement merely requires you to rest somewhere). Others are not difficult but require a fair bit of time investment to achieve (some examples of this are the "Pathfinder" achievement which requires you to discover 100% of the map and "Head hunter" which requires you to discover all recruitment agencies).

However, there are a few that require a bit more driving skill. Examples of these are the "Job is only worth it if it's done well!" achievement requires that you complete a delivery of at least 1000km without taking any cargo damage or getting any fines of any kind as well as being in-time. The "Carrerist" achievement requires you to complete five consecutive deliveries without taking any cargo damage as well as being in-time.

Note the wording of those last two achievements. It's in-time not on-time. What is meant here is that you must make the delivery within the delivery time window. In other words, not only can you not be late, you also can't be early.

So we'll concentrate on those achievements since the others are almost automatic.


In-Time Deliveries
The game uses a speed of 62 km/h as its average speed for calculating the delivery time window. Driving above this speed will reduce your delivery ETA, while driving at lower speeds will increase it. Note that if you are driving on back roads (non-highway), you often have a speed limit of 60 km/h so you may need to lower your speed even more in those cases.

Therefore the easiest way I've found to get your deliveries in-time is to start by driving at the speed limit (use the Truck Speed Limit for this) and watch your ETA time, comparing it to the delivery time frame (as shown when you press F6 on the GPS). If you find that your ETA is early, use the cruise control to slow your speed down to 60 km/h. Doing this will start to slowly increase the ETA of your delivery.


Oddity with "Careerist"
As of this writing, there appears to be a bug with the "Careerist" achievement. You must perform all five deliveries within the same game session. If you save and quit the game then restart, the previous deliveries will not be counted.

For this reason, I recommend using short distance deliveries when attempting this achievement.

According to apollyon
Originally posted by apollyon:
an update to the careerist achievment, you no longer have to do it in one go, as long as between the start of the first job and the finish of the last job, no damage has been obtained you should recieve it.
furthermore saving before you take damage and then returning to that save after obtaining damage doesn't seem to reset it, as if the part between the save and the reload has never happened


Parking the Trailer
This section is all about parking the trailer, by far the most complex maneuver in ETS2. I highly suggest using a controller or steering wheel for doing this since the keyboard just doesn't have the fine control of the other steering devices.


Understanding the Physics

Before taking a look at parking itself, lets take a look at what is actually going on. If you have access to a toy truck, you may want to try the following to get a better understanding of what it going on. If not, you can try pushing a pencil around from the eraser end.

When reversing a truck with a trailer, you are effectively pushing a long stick from one end of it. However, because the cab has steering on one end and the attachment point acts as a pivot, things get a little more complex.

Obviously, if the cab and trailer are both aligned straight then reversing is a simple matter since everything goes in a straight line. It is when the cab and trailer are at angles to each other that things get complicated.

So first lets look at what happens when there is an angle between the cab and trailer, and the steering is straight.

In the following images, the blue lines show the position of the non-turning wheels, green lines are the turning wheels, the red dot is the cab-to-trailer attachmnt point (in other words, the pivot) and the purple arrows show the direction things will move in.

Since the streering is straight, the entire cab will move straight back which forces the pivot back as well. Because of the angle between the cab and trailer, the front of the trailer will be forced to one side which makes the far end of the trailer move in the opposite direction. If you continue to reverse, the angle will get more extreme, eventually causing the cab to hit the side of trailer in what is known as a jack-knife.


Now lets see what happens when steering to the right (that is you would turn to the right if you where moving forward) while reversing.

If steering to the right, the front of the cab will swing to the left. This makes the rear of the cab and the pivot point also swing to the right and forcing the rear of the trailer to swing to the left. In short, this cause the angle to become more extreme even more quickly.


So what about steering to the left (again, the steering would take you left if you where moving forward).

Here, the front of the cab will swing out to the right making the rear of the cab and the pivot point swing to the left. This causes the rear of the trailer to swing back to the right. The net effect is that the angle between the cab and trailer will get smaller and eventually straighten out.


Parking Notes

  • Since you are reversing, the steering is essentially backwards. That is, to swing the cab to the right, you must steer left.
  • The far end of the trailer will tend to swing in the same direction as the front of the cab, which will be the opposite direction of the near end of the trailer.
  • Because two of the steering maneuvers causes the angle between the cab and trailer to become more extreme, you will need to compensate for this by using the third steering maneuver. So you kind of snake your way left and right in order to get the trailer where you want it.
  • Due to the fact that you are pushing the trailer from one end, there is a kind of delayed reaction at the far end of the trailer. So always start your steering maneuvers early.


Parking in Action

Now that we've seen what is going on, lets actually park the trailer. I recommend looking back through the driver side window. Press the '5' key to quickly switch the camera to this view (press '1' to look forward again).

First we want to get the truck and trailer past the parking area, preferably at not too extreme an angle. Obviously, if you can line it up so that it is straight back that would be ideal but that is rarely the case. Here's an example of a good placement.


Start reversing slowly (1 to 2 km/h) while steering so that the trailer starts turning into the parking area


Continue adjusting your angle so that the trailer is almost straight with the parking area.

PIC: park a 3.jpg

Start swinging the cab to reduce the angle, allowing the trailer to back straight in.

PIC: park a 4.jpg

If needed, slightly bring the cab in the opposite direction to help adjust the trailer.

PIC: park a 5.jpg

and done.

PIC park a 6.jpg


Parking from the Other Direction

Trying to park when the parking area is on the opposite side of the driver is much the same procedure but as you are mostly blind on one side, this means that you will effectively be parking using the passenger side mirror.

Again, the first step is to try to get a good angle between the trailer and the parking area.

PIC: park b 1.jpg

We again reverse slowly while steering the trailer into the parking area. Though it is a little harder since we can only rely on the mirror.

PIC: park b 2.jpg

Continue snaking your way into the parking area

PIC: park b 3.jpgPIC: park b 4.jpg

If you find that you've overshot the parking area a little, stop reversing.

PIC: park b 5.jpg

Move the truck forward while straightening out.

PIC: park b 6.jpg

Now it should be an easy matter to reverse into the area.

PIC: park b 7.jpg


Parting Advice

There really isn't much more I can say other than to practice. It may be frustrating at first, but eventually you'll get it.

Since you do need to use the mirror at least some of the time, you can eventually start to only use the mirrors and not bother ever switching the camera view.
Change Log
Here is the list of changes I've made to this guide.

  • v 1.7.1
    Added a Translations section as Gleamie has started work on a French version of this guide. Will link to the full version once it is completed.

  • v 1.7
    Changed the recommended starter truck to include the Renault and changed appropriate sections to reflect this as well as the new costs of the trucks.
    Changes the text about employee drivers now affected by their truck specs (though this can be ignored until end-game).

  • v 1.6.1
    Added apollyon's comment updating info on the Carreerist achievement.

  • v 1.6
    Added Achievement Tips section.

  • v 1.5
    • Added a few notes to the text about some of the changes added with v1.11 of ETS2.
    • Added a v1.11 Notes section for more details on some of these changes.
      (not all changes mentioned, just a few that affect the guide)

  • v 1.4
    Minor tweaks and notes added to the guide.

  • v 1.3
    • Added Parking the Trailer section.
    • Added Change Log.

  • v 1.2
    • Added Driving and Playing Tips section.
    • More fixes to typos.

  • v 1.1
    Fixes to various typos.

  • v 1.0
    Original release.
242 Comments
lenard.barbosa.garcia Apr 13 @ 8:17pm 
joguei. vinculei a conta mais esqueci a senha ou o login para entrar no perfil do jogo e agora? alguém pode me ajudar por favor. não estou entendendo esse suport esta tudo em ingles.
Zekk Distor Jan 5 @ 1:17am 
Just started and unfortunately the Iveco Stralis Active Space cannot be purchased from dealers anymore. So I just ended up buying 2nd hand trucks for my first business.
Other than that great advice for starting out, cheers.
Elemento Junior Dec 25, 2023 @ 9:29am 
Oh yeah and I should also say, thanks for the guide in general!
Elemento Junior Dec 25, 2023 @ 8:49am 
The newest update adds buying used trucks, as well as parts/truck wear, meaning in the long run you'll have to replace parts/possibly the entire truck.
This means a player's starting truck might be cheaper now, but getting one with way too much permanent damage may be detrimental in the long run.
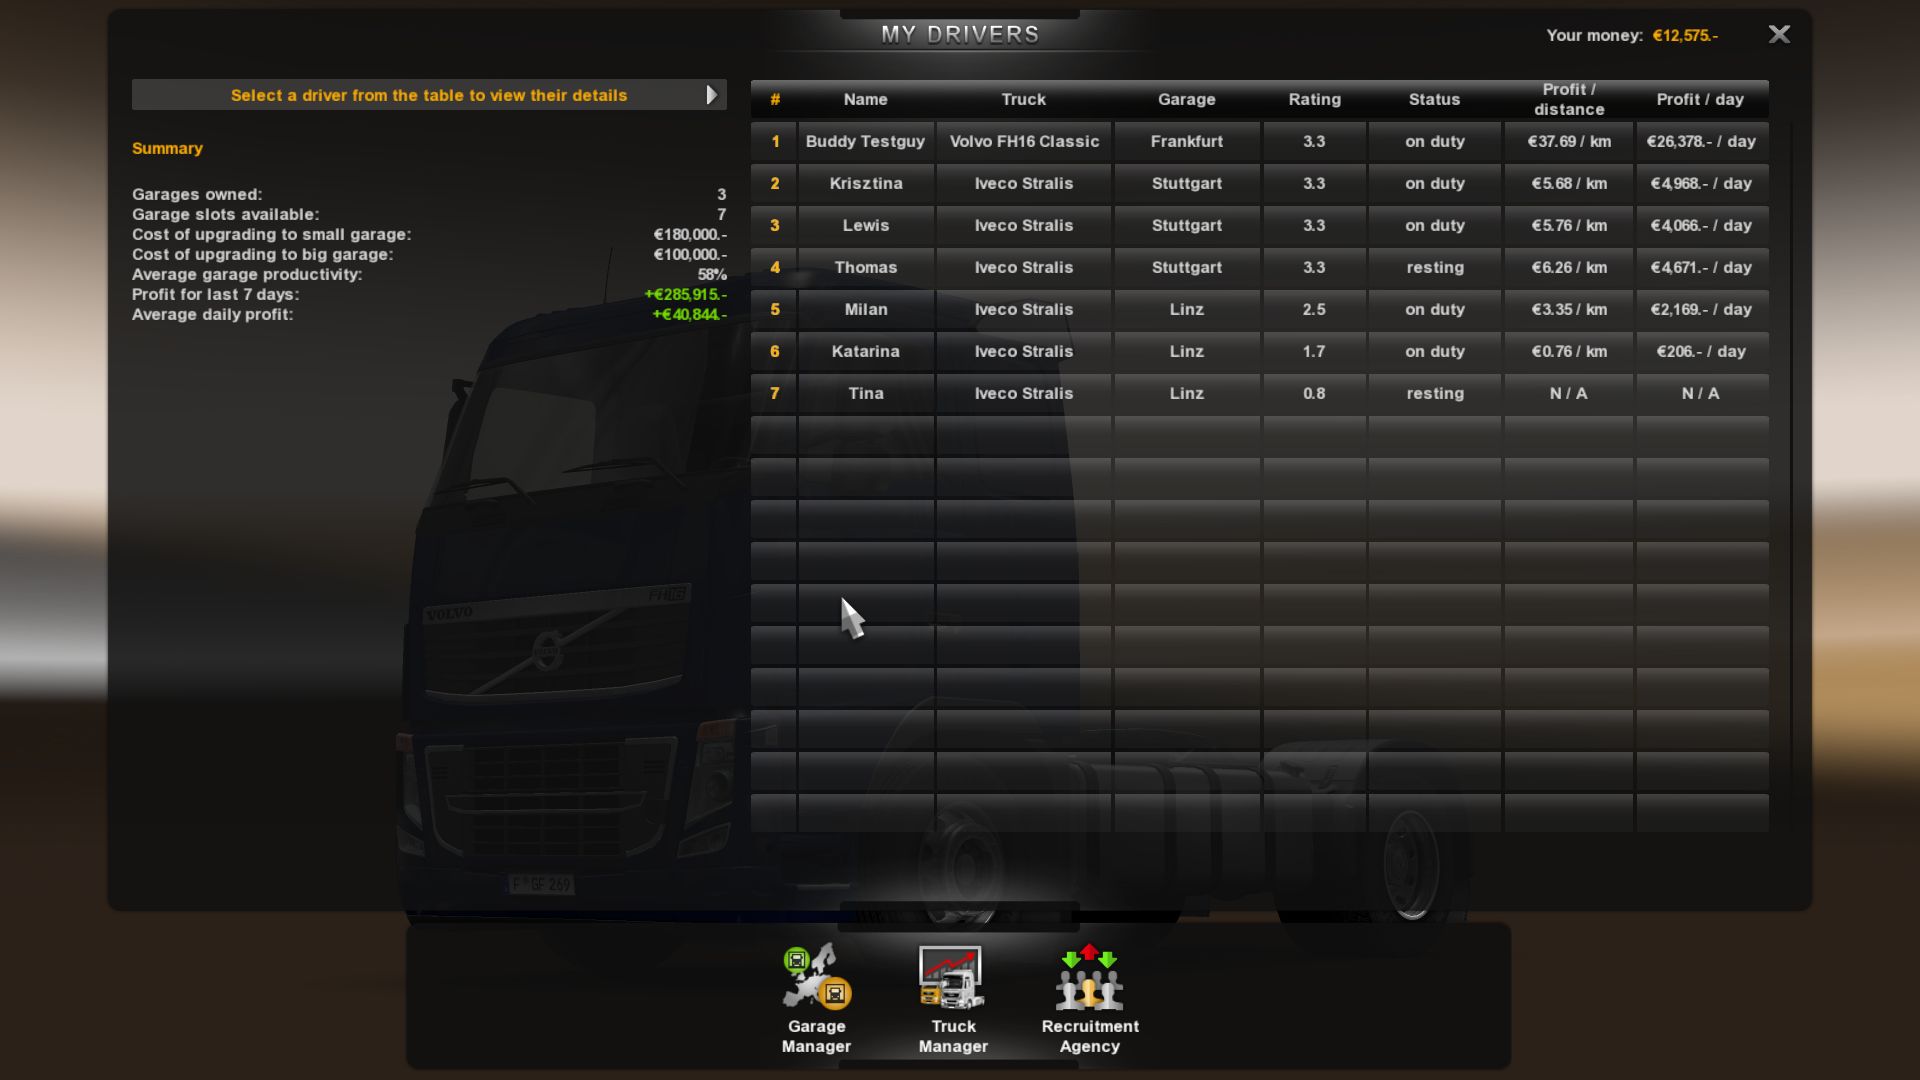
I still don't know if trucks used by company drivers build up wear over time. If they don't, a good strategy may be to find the cheapest used truck for them. As an example, I got a $24.5k Iveco Stralis with 14% permanent damage for one of my drivers, but still haven't played the game enough to know whether that'll increase with time or not.
I haven't really tested anything myself (yet) but might be worth revisiting these aspects of the guide in the future.
kaki_gamet Aug 17, 2023 @ 6:38am 
If you don't mind using External Contracts with all their "differences", then there you can sleep up to three times in a row (27 in-game hours) every time you need to rest. But never leave one of those jobs running as timer ticks always (server side).

That change is somewhat recent, actually I don't know since it is a feature, maybe since they added Convoy and made some changes to Quick Travels too. Years ago it was doable but even at "best", one real time hour would turns into 19 in-game hours (plus there was a better way to quickly advance in-game time back then, Quick Travels before it changed).

It may be possible to setup a private Convoy session, where time ticks fast even if on main menu, but I think that there is an idle timeout that will terminate it after few minutes. Give it a try if willing to test it, but I would leave PC turned off while no one is actively using it ; )
TheArtilleryman Aug 17, 2023 @ 4:24am 
OK so I tested out the AFK money farming idea and it doesn’t work. If you drive along a road out of town, the minutes tick over once every couple of seconds. However, as soon as you pull over on the hard shoulder, even with the engine running, time slows down again. So it isn’t really viable to passively earn income. Sure, if you left it for hours, maybe, but it wouldn’t work the way I was thinking. Was hoping to run the game while I was working and have extra cash when I came back to it … sigh :)
TheArtilleryman Aug 8, 2023 @ 11:35pm 
Oh ofc the game is so old now and I’m sure everything I could post will have already been discovered. But if other noobs like me come here and see it then it might help. The xp bit is fine, good thing the cash is the same :)
kaki_gamet Aug 8, 2023 @ 5:53pm 
It is a know "exploit" as game counts ferry time twice when calculating the total time allowed for a delivery (thus making ferry routes less likely to be selected as they would take too long). But you will get less XP instead as it is calculated on driven distance only (not a big problem actually).
TheArtilleryman Aug 8, 2023 @ 10:08am 
Another quick tip I’ve discovered for making fast money: sometimes jobs can be done faster if you take a different route than the one the sat Nav gives you.

For example, I had a delivery from Strasbourg to Glasgow. Sat Nav wanted to take me to Calais, then the tunnel, then drive all the way up the UK. Instead, I went to Amsterdam and took the ferry to Newcastle. HOURS less driving and the same reward, plus the ferry ride took care of the rest stop.
kaki_gamet Aug 5, 2023 @ 5:03am 
Just don't use it for hired drivers. Player has the luxury to be able to choose between hundreds of jobs, hired drivers not, they get a single job or nothing, and with that setup they will do "worse".

The second skill point into Just-in-Time should be their fourth skill if going to micromanage them, not 20th. And to micromanage them will quickly go out of hand when you will have tens or hundreds of hired drivers.

For them Balanced is the better way and will do better than focusing on a single skill line without the added bonuses of other skills. Four points in Long Distance are too many, one is enough them move forward.

Good luck everyone, and as you already know, don't destroy your truck and anything will do.