Source Filmmaker

Source Filmmaker

250 ratings
editing stuff that's hard to explain
By Rev
Here's some stuff i do for SFM, ranging from technical stuff in-engine to post-production editing. I'm an awful teacher and wanted to write this down so i can direct people this way. THIS IS A WORK IN PROGRESS! please dont yell at me if things are missing, I'll likely add more info later.
3
2
15
2
   
Award
Favorite
Favorited
Unfavorite
How to use this guide
here's some things you can do with this guide right off the bat if you think its helpful

READ IT!

FAVORITE IT! i'd really appreciate it

SHARE IT! with people who you think need it

SUBSCRIBE TO THE COMMENTS! below i'll post additions and revisions, tick the Subscribe to Thread button to get notified when i post a thing down there.

ok buckle up

ENGINE 1 - assets
So, first things first: be sure to UPDATE YOUR STUFF! every time people ask me where the hot new meme item is, i tell em to update their stuff manually cause god knows if valve wants to do it. heres what you need --


if above link is broken lemme know

Download gcfscape and look for your content files

what you'll want to do is open your tf2 game folder
C:\Program Files (x86)\Steam\steamapps\common\Team Fortress 2\tf
and find the vpks labeled tf2_misc_dir, and tf2_textures_dir.
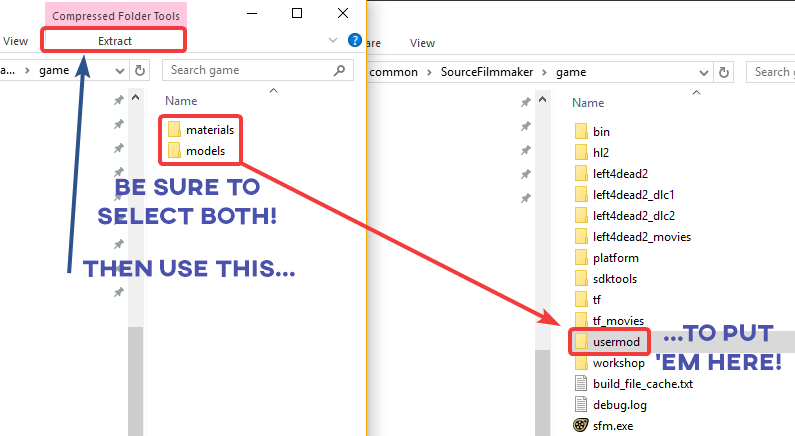
you'll need to open them with GCFscape and extract the "materials" folder from tf2_textures_dir and both the "materials" and "models" folders from tf2_misc_dir to your SFM's "tf2" folder
common\SourceFilmmaker\game\tf

this will take a while, grab yourself some nice cold brew and sit for a bit. also be aware that certain items will NOT have the same names as their in game names. Graybanns are called Sweet_Shades in the model files, and the Homewrecker is called c_sledgehammer.*** also be aware im writing this at like 50 mph cause i really wanna get this done


***SEE SECTION 1.3 FOR MORE INFO ON TRACKING THESE ITEMS DOWN!
ENGINE 1.2 assets pt. 2
But what if you're installing custom stuff?

Same as before! whatever you're looking to install should have a "materials" and "models" folder at the root of it (or at least near the root of its compressed file)

Extract those two folders to your usermod folder for the sake of organization.


QUICK FOLDER GUIDE FOR ORGANIZATION:

usermod: for manually added custom things like OCs or memes

tf: for official TF2 assets like hats and props

workshop: where your subscribed workshop addons go!
ENGINE 1.3 Assets pt. 3
Not all hats will retain their names from in game. Let's take the Slo-Poke for example.

It's model file is called soldier_marshal_hat.mdl, but how would we deduce that? Research!

1. Go to the Team Fortress 2 Wiki

2. search up the item you're looking for.

LOOK AT ITS WORKSHOP SUBMISSION NAME! IT MAY GIVE YOU A HINT ON ITS FILENAME!

3. scroll down to Update History

4. Click on its oldest update entry

5. click on Files Changed and expand it, if possible.

6. press CTRL + F on your keyboard to open the text finder and try searching for terms you believe will help you find it.

For example: Slo-Poke's workshop name is "US Marshal Hat" so if we search for "marshal" on the file changes...


Voila!

Write down the filenames so you don't forget!
ENGINE 2 - attachments, bone merging
here's the layman's terms on attaching hats for those items not worthy of having a big shiny "add team fortress item" button

drag n drop bones thats it. you can also drag the name of the PERSON over the cosmetic and the cosmetic will try its damnest to fit, hopefully it will (DEFAULT MODEL RIGS ONLY, REMOVE BIPED RIGS BEFORE DOING THIS)

IMPORTANT: ONLY USE THE ZERO SLIDER ON LOCKED BONES

press CTRL and click on only the bones you want to zero


also please dont cry about the boobs i know youre better than that son
ENGINE 3 - focus
now its time for DOF (Depth of Field)

First off if you havent, make an animation set for your camera, you'll ALWAYS need one for posters, seriously. then what you wanna do is drag the FocalDistance slider around, you'll see a BIG FAT PURPLE WALL when you do it.

drag it so its clipping with your subject. Now what I mean by that is have half of the model be in front of the wall and the other half be behind it. you're gonna want this "vertical slice" to be on the thing you want to focus on the MOST, because everything else behind AND in front will be BLURRED when we apply aperture, which we're gonna do RIGHT NOW!
drag the aperture slider to whatever value you want between 0 and 1 (i like to use 0.3 - 0.6, double click to set a custom value)

now go back to the blue timeline and right click the viewport to bring up the refinement settings. use these.


For some more high quality DOF try using 512 - 1024 samples. it may cause SFM to chug really hard on weaker PCs, but it can be worth it for final renders.

once that's done wait a bit and you should be able to see the blur be rendered. CONGRATS you did it
ENGINE 4 - performance & lag
SFM can run slower than molasses swimming in glue, let's fix that

TIMELINE STUFF

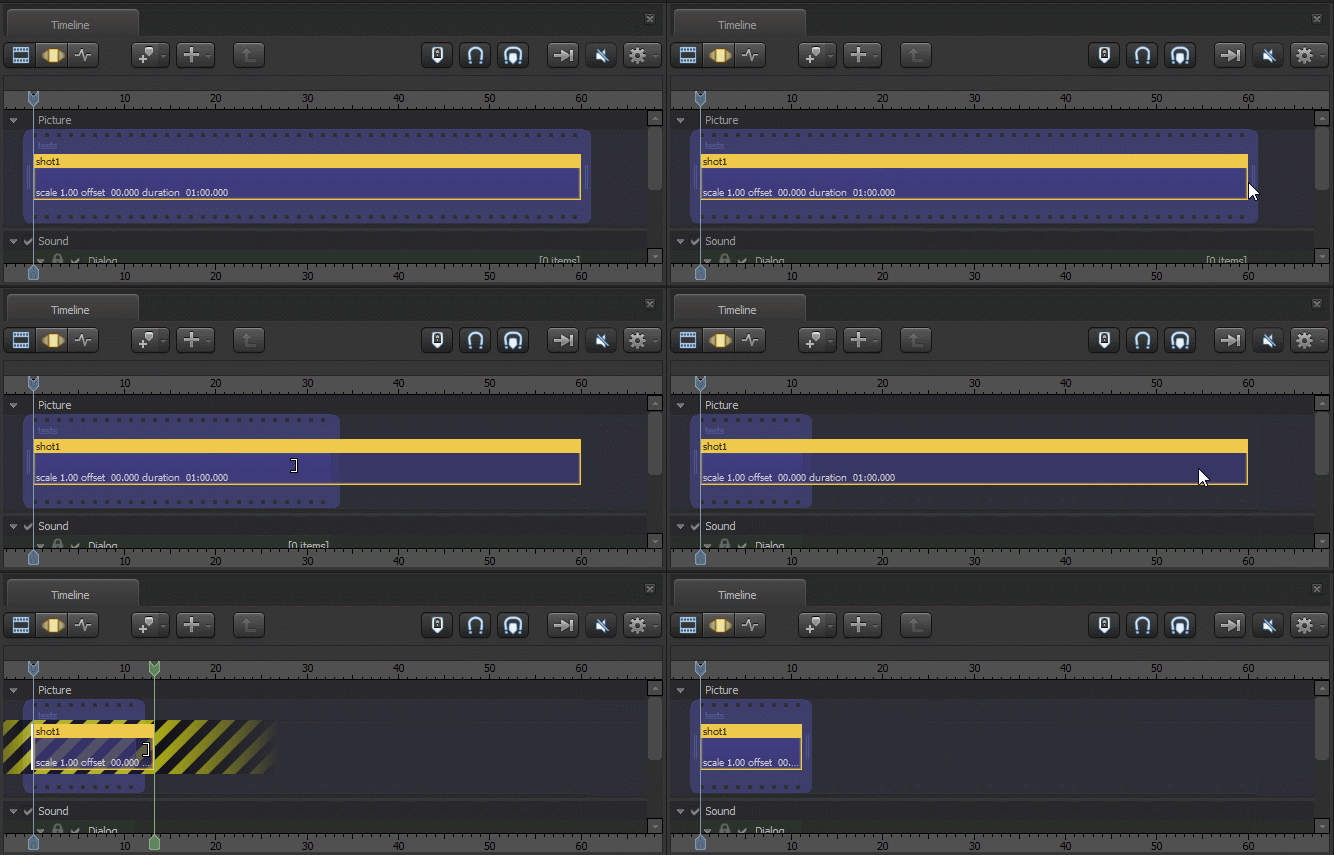
You can remove that excess lag that comes up when fingerposing by shrinking the timeline length to like 5 - 10 seconds. its a gatdang poster, they aint goin anywhere!


SETTINGS:

Progressive refinement, turn it off when you're working. you'll only need it when you're READY TO EXPORT AND RENDER

Disable lighting! right click on the viewport and untick it to make everything fullbright, just be aware some map props may still be fullbright when you turn it back on. this is a glitch and its unwelcome in this house. restart SFM if this is the case.

OTHER THINGS

Still getting lag when fingerposing? Remove any RIGS you may have, rigs mess up fingerposing for god knows why, so ONLY USE RIGS FOR BLOCKING OUT POSES. Use the default rigging for the details -- including fingers.

REMOVE THE SECONDARY VIEWPORT

Having only one viewport surprisingly makes things 10x smoother. Probably because it only has to worry about rendering one screen. You can bring it back and attach it to wherever you like by selecting View > Secondary viewport.
ENGINE 5 - covering up
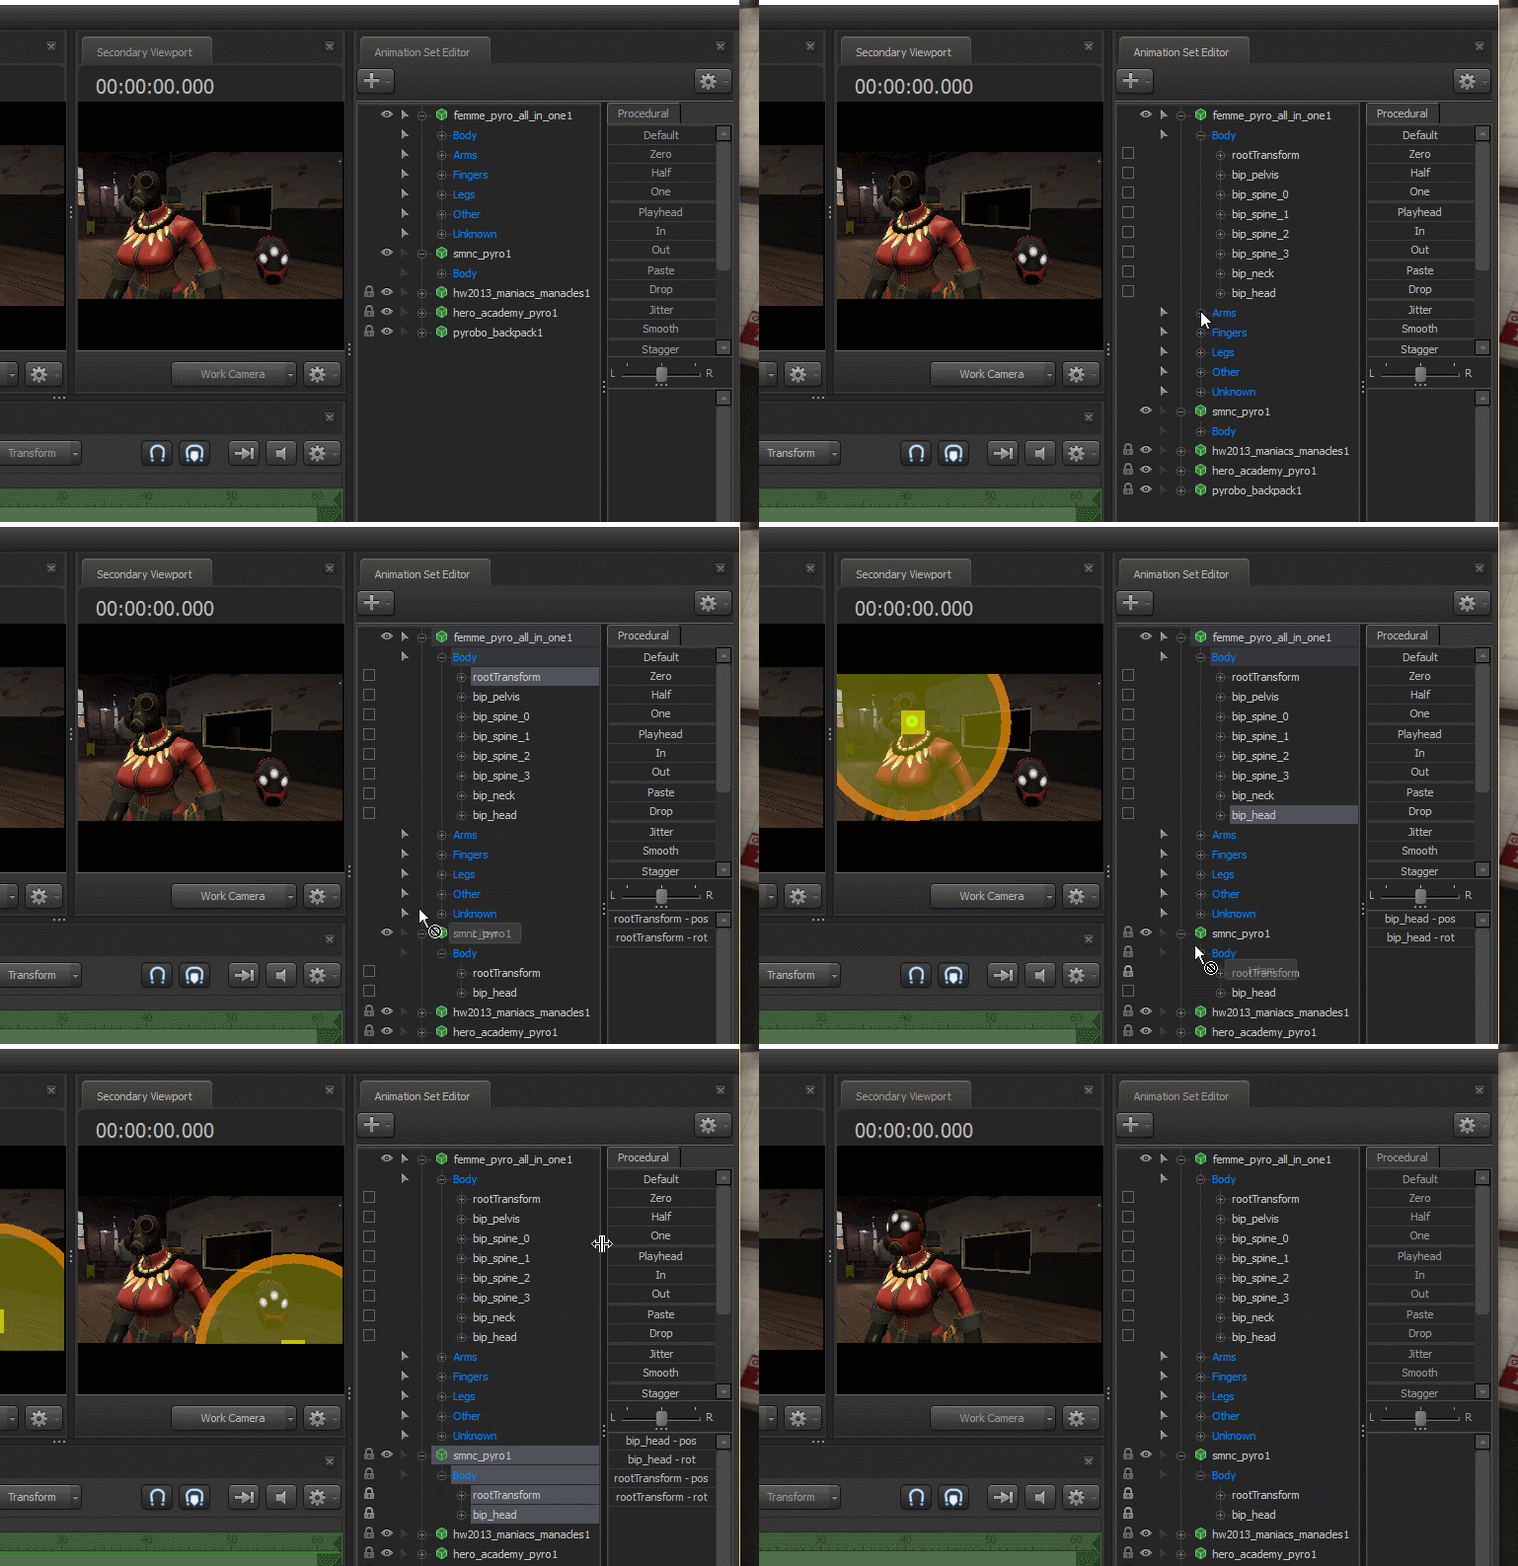
depending on what assets you're working with, you can be cheeky and hide certain clipping areas by dragging bones around like this (see below)

get creative! the only things that matter are the things visible on your camera.


ENGINE 6 - dealing with lights
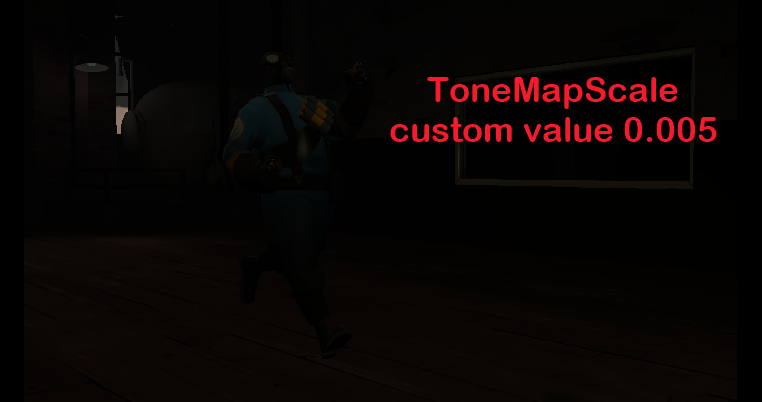
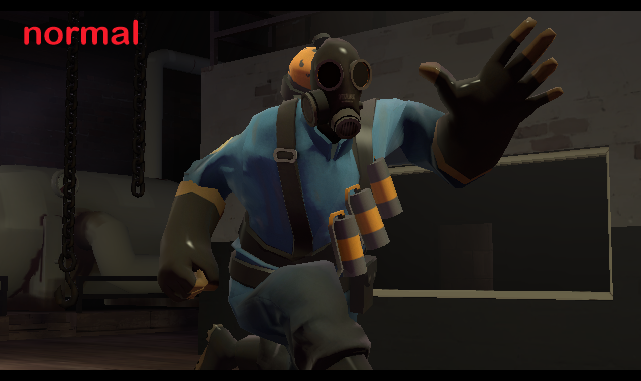
valve lighting is bright and useful for gameplay, but gets in the way when making posters. a quick and dirty way of dealing with it is dragging the ToneMapScale slider down a bit or setting a custom variable number. this will darken the camera's vision and make it legally blind in 37 states. you can then add your OWN lights and stuff!

take note that this is darkening EVERYTHING, and you'll need to intensify your lights if you want to compensate for the darkness.


--------------------------------------------------------------------
If you're lazy like me you can just opt to search the SFM workshop for a dark version of the map you're using. try search terms like "dark", "nolight" or maybe even "night"


if you're on mobile right now I'm so so sorry
ENGINE 6.2 - Precision Lighting
Here's how i control my lightwork
basically what I do is

  • 1. drag a light into the secondary viewport, its view will change to first person of said light
  • 2. use WASD and mouse to move around. its basically like camera movement
  • 3. hold SHIFT to pan the light around quickly, hold CTRL to pan slowly
thats how i make sure my lights are precise and wherever i want

You can also make lights ORBIT around a subject:

  • 1. select your orbit point using left click (characters pelvis bone for example)
  • 2. hold CTRL and click on your desired light to rotate
  • 3. use the orbit hotkeys (ALT + HOLD MOUSE1) in the light's viewport and make it orbit

pretty ballin if u ask me
ENGINE ??? - Where did i park?
So, if you lost track of where you put your models or lights in a scene, just select em and press V and your gaze will SNAP to where it is.

that's about it
ENGINE 7 - posing can be fun
posing can be fun

You using a preset animation? good for you, no qualms about that. using existing anims can help be a base foundation or a canvas for posing more unique things. if people yell at you for using default stuff and not posing from scratch like a caveman learning how to use fire they are simply

incorrect

Here's how to make your presets stay still so you dont lose your pose by accidentally hitting space (which i have done when starting out)


--------------------------------------------------------------------
in case you cant tell, you select a model and drag the slider named Playhead ALL the way to the right to flatten out the motion curves, rendering your model completely frozen in time. you can press enter and do this multiple times to ensure its flatter than a month old soda

BUT WAIT, THERE'S MORE!

Here's how to "reset" a body parts position if you wanna start fresh on just moving fingers or a leg maybe: first, REMOVE ANY APPLIED RIGS! now, while holding CTRL (idk what the mac equivalent is sorry) drag your mouse around the bones you want to reset. DONT LET GO OF CTRL YET and right click the model name and select Import, then Sequence. It'll auto-default to the model's "ref" pose (i think) and you can just click OK to reset the selected bones only.

amazing isnt it


BUT I'M NOT DONE YET!

Finger posing doesnt have to be a pain in the fanny as i've established earlier, right click the viewport while you have a bone selected (preferrably one in view) and choose Rotation Mode, set this to LOCAL and when you select multiple bones (by holding down CTRL and clicking on a bone) you'll be able to turn multiple bones at once! it's like you have multiple mouses being held by multiple hands!!! This is also very helpful if you're using a segmented model like a chain or a really looooooong noodle

/// IMPORTANT! ///
Be sure to set this back to WORLD when your done finger posing! could cause some goofy shenanigans if you select a whole model and rotate it. (it is pretty funny though)

ENGINE 8 - perspective
With the massive amounts of Freedom(tm) that SFM provides, you can use it to make things more exciting, more bold, and overall more visually appealing to the eye.

FORCED PERSPECTIVE is something where you take certain parts of a subject and exaggerate their proportions. in SFM's case its taking models and making them str e e e tch


You can make things go from wow to WOWEE with moving certain bits forward to the cam or back away from it. it adds more depth if you're looking for that.

ENGINE 9 - particles doing weird stuff
A good friend was asking me about particles disappearing from their scene and I was helping them out, but i have trouble communicating to new people when i talk SFM. it usually starts with the person going "hey how can i fix this" and then i end up saying some ridiculous confusing nonsense that no normal person would understand like:


and then my brain just has a National Bruh Moment Alert trying to explain, i end up feeling really stupid. thats why i'm making this guide. so i never have to feel stupid again.

That said, let's walkthrough the situation that went down. if your particles are missing, try these methods:

1. did you set a proper lifetime for the particle? you do so when you make a new particle -- make sure its between zero and a reasonable number. Try 0 -30, your peeps arent going anywhere, its a poster.

2. did you attach the particles root to the thing you want? like a hat? be sure to drag it into view, and also you can hold SHIFT while moving it and it'll SNAP ITSELF OVER onto whatever surface your cursor is over, like a hat.

3. you can REFRESH the scene by dragging the Playhead (the little marker indicating where you are on the timeline) back BEFORE the scene and then back in. (thats right, negative seconds)


These methods should work tried and true to get your particles back in gear.
ENGINE 10 - Glossiness
If something comes off as too shiny and makes your eyes melt while looking at it you can simply use your Overrides to get the job done.

1. Right click model, hit Add Override materials

2. right click again and hit Show In Element Viewer > Model

3. navigate down to the Materials section and open it

4. Find the material you want to dull down (You may want to do your research beforehand)

5. Right click the name of it (in green) and select Add Attribute > Float

6. in the dialogue box, type $phongboost then hit enter

7. if done correctly, the texture will be matte.

Play around with the $phongboost value (usually between 0 and 1) and see what you think looks best.

Another Float attribute you can try is $phongexponent.
This will adjust the radius of an items glossiness. with 1 being the widest. higher values will shrink the shine radius, which is useful for making a model look wet, like it's been out in the rain.

ENGINE MISC. - Troubleshooting
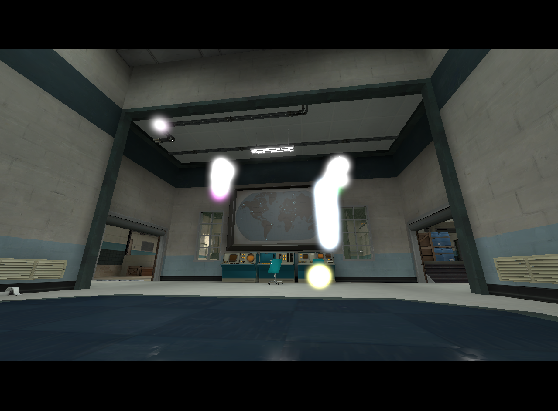
BLOOM OF DEATH

Has this ever happened to YOU???


There's got to be a better way, and there is!

1. Open the console via Windows -> Console.

2. Set mat_fastspecular and/or mat_specular to 0

3. type in buildcubemaps (The viewport(s) will be stuck white after processing, this is normal)

4. restart SFM after it's done

If the issue returns after restarting SFM, just set mat_specular to 0 or consider using a different map

WARBLE WOBBLE

Do your models look like they're made of Jell-O™ when you zoom in close to them?


This is due to your subjects being way too far from the map's origin coordinates. (0, 0, 0)
Move your setup closer to that origin point, or consider using a different map if that point is out of bounds. (the PASS Time map District is a prime example of this.)
--POST PRODUCTION MASTERCLASS--
WELCOME!

This has been a SUPER long time coming for this guide but here's my """""mastery""""" of post production tips right here for you! I will be adding more and more to this guide if it KILLS ME but not literally i like being alive if i can be honest

This section is UNDER CONSTRUCTION as ironic as it sounds, but i decided to get off my ass and put what i've already written on the table. its about damn time!

Table of Contents:
0. Preamble: equipment & software
1. Basic Smoothing edits (Airbrush & Trim)
2. fixing things
3. Intermediate Fixes (Rebuilding broken parts and smoothing rough edges)
4. fixing BIG things
5. Advanced Reconstruction (transforming existing parts)
6. Layer types and when to use them (overlay, glow, shade/shine, various burns and dodges)
7. DIY rimlighting
8. Inconspicuous Materials and Other Effects (smoke, goo, water droplets)
------------------[SECTIONS COMING SOON!]------------------
9. Using Render passes in your works (Alpha channels / magic wand)
10. Utilizing masks
11. Typography and how to make it fancy

And more! (When I can come up with what can be taught)


alright strap in
PREAMBLE: Equipment & Software
So, I want to share what I have in my toolkit but bear in mind that these aren’t EXACTLY what you need, and there’s much better tools out there that could easily get the job done.

MY HARDWARE:
Wacom bamboo Create tablet

“Is a drawing tablet required?”
No, I’ve seen folks absolutely slay with just a mouse. That stuff is practically wizardry and it kinda freaks me out tbh. but if they can do it, you can too

“Do you recommend using a tablet?”
Yeah, if you’re up for it! it’s a system everyone can relate to – a stylus and pad are the modern day equivalent of pen and paper. It doesnt have to be fancy or expensive; this old boy of mine is over 10 years old and is built like a tank. Get yourself something that never quits


MY SOFTWARE:
  • Paint Tool SAI 2
  • Photoshop CS6
I use these two programs in tandem but SAI takes up the bulk of my edits. PS is mainly for alpha channels (which we’ll discuss later) as well as typography and filters that SAI may not have. This Masterclass is written with SAI in mind, so there may be discrepancy in the tools I use and whatever you may choose to use instead.

Recommendations?
Do your best to acquire the programs you want yourself. I'm not advocating software piracy but just so you know, Adobe's kind of a POS (that means pack of screwballs!!)

A license for SAI 2 is a one time purchase so none of that monthly/yearly subscription bullcrap. Once you buy it, you own it. Simple as. Other recommendations from friends are:

Krita (Free)
GIMP (Free)
Paint(dot)net (Free)

All of these support usage of alpha channels which is INCREDIBLY helpful with poster making. If you already have a capable software you’re happy with, you can stick with it. I think anyone can make good edits with the tools theyre given.
PPM: Basic Smoothing Edits
To start this off, I’m going to show you how to make a simple edit to an image with one tool. Our good friend the airbrush is a recurring MVP in many of my posters, so get familiar with it and refer back to it in times of need. It’d probably make you some cocoa and do your taxes for you if it could, its such a bro


With some light to moderate pressured strokes of an airbrush, you can make some significant touch-ups to rough spots. With a hard edged eraser, you can even use this to create a new shape from scratch and utilize it in repairing a jagged edge or similar. I like to call this “sculpting”.


The benefits of “Brush and Trim” are fixing a broken part while having it look seamless. It’s a tried and true method that i’m surprised isnt like patented or anything, that’d be messed up tbh
PPM: fixing things
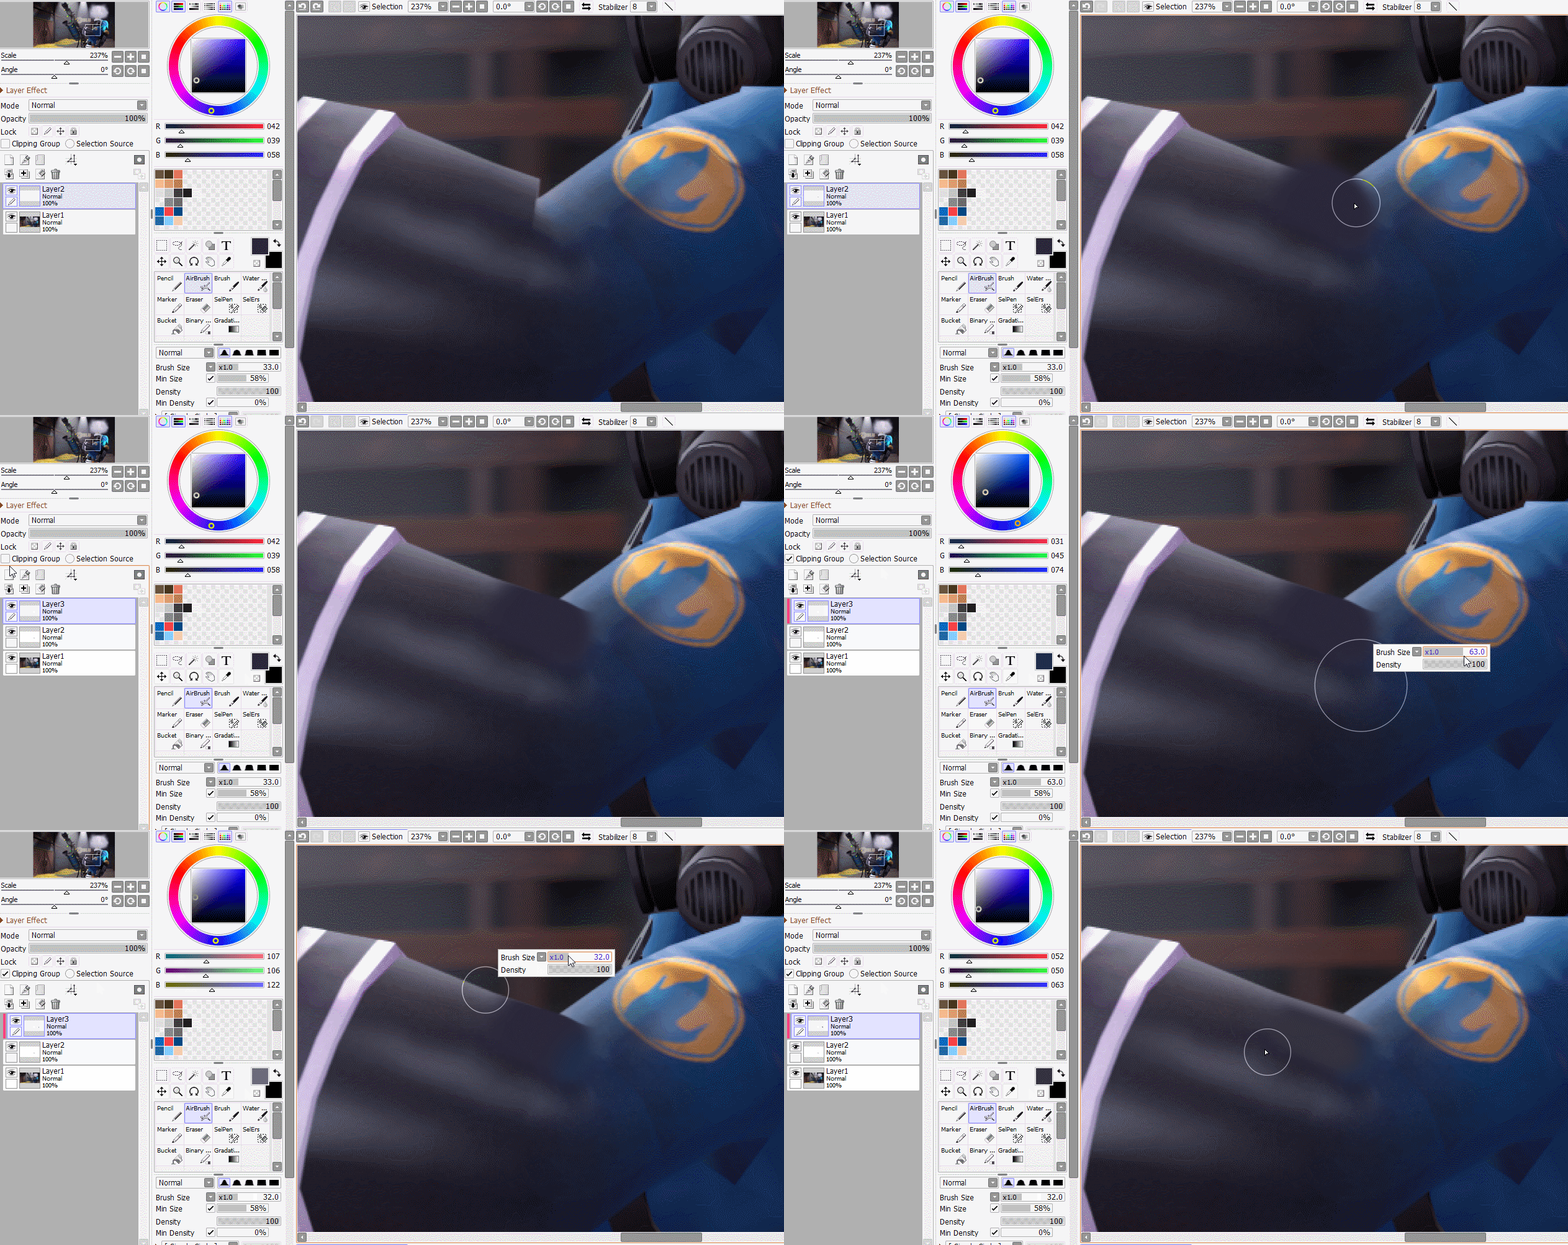
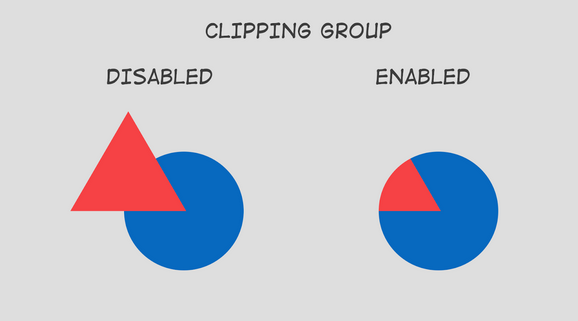
what you wanna do for post production edits is use big brushstrokes and trim to fit. then just add a new layer on top with clipping group enabled to add more colors. PICK ONE BASE COLOR then just add on top of it. its like painting on a canvas or an ogre, you need layers

here's gifs of simple fixes

be sure to add more and more and more layers if you wanna be safe. you can merge em together if you feel safe and confident with your fixes
PPM: Intermediate Fixes
If you're wondering what the hell is a "clipping group" from the previous section, dont worry lemme explain

We're gonna take this simple method of editing and add on to it – for this part, we’re going to be using something called Clipping Groups which essentially works as a “stay within the lines” button and is an overall safety net for editing aside from just making new layers.


In SAI, ticking this box on a selected layer will make it become a clipping group. This means parts of it will be hidden; its contents will only be visible based on where the contents of the layer beneath it are located. You can do this with multiple layers on top of each other, just be aware of their hierarchy. Ok so how we actually USE these is to add shading and depth to our sculpting. It’s a lot like actual sculpting where you carve out the details after establishing the basic desired shape.
PPM: fixing BIG things
allan please add details

here comes something really juicy, dont tell your friends: you can RECONSTRUCT things in post if theyre clipping or otherwise broken when rendering.

ok this is important, listen up:

You dont have to settle for busted crap if you dont want to.

simply use a hard brushtroke or two to get the basic shape, add an extra layer on top, and make it a clipping group, thats where you define said shape with more brushstrokes and maybe even add cool details like shine or gloss.

the possibilities are probably not endless but very VERY high!

PPM: Advanced Reconstruction
Alrighty, put the hardhats on – we’re getting into the heavy lifting section. What i’m about to describe here can be difficult to pull off at first but with enough careful-mindedness and a little practice, it can be gamechanging for certain posters.

DEFORMING AND SMOOTHING

This is gonna sound gross but you can distort and deform parts of your base render and utilize them for your reconstructions.

What you wanna do here is pick up our SAI-exclusive** friend here the Selection Brush and draw it over whatever we want to deform.

**i’m pretty sure other softwares have this tool but i’m too lazy to look up their names, sorry

Once that’s done, copy and paste that sample onto a new layer and hit CTRL-T to activate transform mode. You can hold CTRL and drag on the corners of the transform to stretch and morph the sample into however you desire! Keep in mind that in SAI the end result will be very slightly more blurry than before – its SAIs blending method to make transforming things smooth and less jagged.

Much like with brush and trim, you can use a hard or soft eraser to get rid of any undesirable pieces. A steady hand can even smooth out the rough edges!

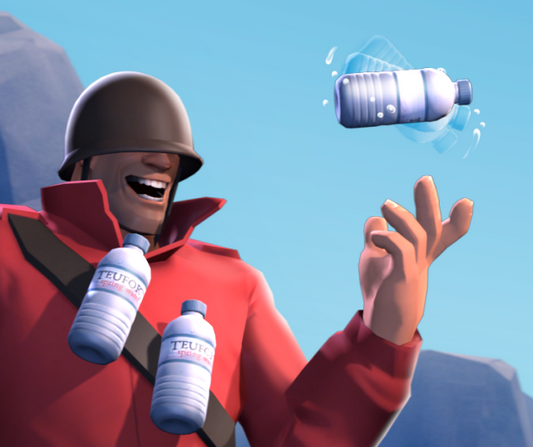
This method can also be used to “clone” stuff more than once to demonstrate movement, such as this epic water bottle item that you can GO VOTE FOR HERE!

PPM: Layer Types and when to use them
So there’s many different flavors of layer blending in image editors. They change the way the layer renders itself which can be useful for creating neat effects like shine on an object or realistically painted text on a prop. I can’t go over them all here because i’m not completely insane in the membrane but i’ll cover the most common layer types i use in this Very Helpful Diagram(TM) below.

Note: Layer name discrepancies will occur through different software!


This is about as basic as I can put it, so results may vary.


Here’s some visual examples of what to use them for:

PPM: DIY rimlighting
Same as with basic patches, you can make your own rimlighting if doing so in engine didnt go exactly to plan. Brush and trim, as before.


Wanna make em brighter? add a clipping group layer above and sample a brighter color! then merge if you're feeling good.
PPM: Inconspicuous Materials (WIP)
Now’s where we quite literally get into the juices. Create a new linework layer by clicking the Page with the Pen icon next to it. This is where we're introduced to:


This is the (SAI exclusive) pen tool. But this is no ordinary pen, my friend.
This pen allows you to CHANGE ITS PATH AT WILL.
This allows you to refine whatever curves and strokes you make and even use it to sculpt any highly specific shapes you need!

Here’s how you do it:

1. You gotta draw the line somewhere!
2. Hold down CTRL (or the Mac equivalent of CTRL)
3. You’ll see your line broken up into several control points marked as dots.
4. While holding CTRL, click and drag that control point and move it around
5. Release the mouse button when you got it in a spot you want
6. Rinse and repeat steps 2 - 5 with whatever points on the line you wanna move

aaaaand thats about it really. You can also hold CTRL and click anywhere on the line between two points and create a NEW point. Holding ALT while clicking an existing point will remove it.

BIG LARGE McHUGE NOTE:

In order to KEEP your pens control points intact in SAI, you must save it as a .sai or .sai2 file. The line will be rasterized (turned into raw pixels) if saved in any other format. Same goes for text boxes but we’ll get onto that laterrrrr.
Closing remarks and more guides
EVERYONE STARTS OFF AWFUL AT THESE THINGS!
you just gotta keep at it and always find ways to improve, don't give up!

Ask for help if you need it!
there's no shame in needing help, dont believe the haters

I wanted to close this off by saying that i wrote this as fast as i could but the high wore off before I could wrap this up. I'd love to go back and rewrite this so it sounds like a not crazy person wrote it but tbh i think you're smart enough to get what i'm saying, i mean you got this far

if people complain enough i'll rewrite it i guess but this is mainly meant for like 3 people i know. i figured more people could probably use this if they need it

Feedback is appreciated on this guide, I'm hoping to turn this wood shed into a livable house, in a way.

Also!
Read these really cool guides by these really cool people if you're looking to dive deep cuz they're way better written than this slop

THIS FIRST ONE IS REALLY GOOD! I highly recommend poster makers read this. my friend made this and he's epic
https://steamcommunity.com/sharedfiles/filedetails/?id=1684499173

If you're still struggling to navigate SFM (i sure do sometimes) i suggest giving this a read
https://steamcommunity.com/sharedfiles/filedetails/?id=1826909237

this one is sweeeeeeet, it uses a way cool technique called render passes which i do a LOT with tricky backgrounds
https://steamcommunity.com/sharedfiles/filedetails/?id=821085748

oh shoot oh golly all my beans are on the floor!! now everyone will know about SFM's little known features such as Uberlights, Negative Intensity, and even special types of bloom effects!!
https://steamcommunity.com/sharedfiles/filedetails/?id=1716880745

material overrides can make you king (or queen)
https://steamcommunity.com/sharedfiles/filedetails/?id=291500222

heres how to get your fav map confirmed for smash
https://steamcommunity.com/sharedfiles/filedetails/?id=480267373

this quick guide gives info on how to fix grainy Ambient Occlusion (AO)
https://steamcommunity.com/sharedfiles/filedetails/?id=149692868

i havent used this much but my friend who slays at SFM has it favorited so i think its useful
https://steamcommunity.com/sharedfiles/filedetails/?id=182880961

once you've got the hang of things i recommend trying out different Visual Styles so you can get rank SSS and the vocals for Devil Trigger kick in
https://steamcommunity.com/sharedfiles/filedetails/?id=2116664621

okay bye i love you, call me back later. if you get tired while driving, pull over
41 Comments
Rev  [author] Jul 14, 2023 @ 2:11pm 
UPDATE!

Happy summer folks, hope you're enjoying the buff australians and goofy ahh seals

I added a brief section on why certain models appear to warp and wobble when you zoom in on them. Check it out in Engine Misc - Troubleshooting.
Joose_2005 Dec 13, 2022 @ 9:04am 
I've found $alpha useful sometimes when headhacking. Just putting that out there.
Rev  [author] Dec 12, 2022 @ 1:34pm 
Yep, paint dot net is listed in the recommended software for the Preamble :ss13ok:

I've also linked a guide about using material overrides at the Closing, but i think i want to make a dedicated section to certain override commands that have lots of utility, since it goes far beyond replacing one texture with another. I'll try drafting something about it soon :happy_creep:
Joose_2005 Dec 10, 2022 @ 12:12pm 
Also, feel free to mess with materials. It can be helpful from time to time.
Joose_2005 Dec 10, 2022 @ 12:07pm 
Paint dot net is small and works well. Just saying. Also, turning of AO helps with lag. It does for me at least.
Rev  [author] Aug 22, 2022 @ 12:17am 
ATTENTION:

https://twitter.com/clipstudiopaint/status/1561577703261835265

As of 2023, Clip Studio Paint will be moving to a subscription based model for updates, with the base software still being a one-time-purchase.

This change has been shown to be controversial among artists. As such, I'll be removing CSP from the list of recommended software from the PPM Preamble, for the time being at least.

While I personally disapprove of the company's decision, whether or not you choose to use it is up to you.
Rev  [author] Aug 22, 2022 @ 12:13am 
I've added GIMP to the recommended software section :ss13ok:
Big Glock Aug 21, 2022 @ 11:49pm 
Gimp is a good alternative
Rev  [author] Jul 15, 2022 @ 5:09am 
bros!!!!! bros holy moly POST PRODUCTION MASTERCLASS IS HERE-ish!!!

This collection of ramblings from an Insane Man will cover how I do my usual post-render edits. It took a damn long time but i finally said screw it and put this wannabe college course into Early Access(TM)

Thank you all so much for sharing this guide and helping others be creative! Be on the lookout for more!! love u all :happy_creep: :pizzaslice:
NightBread Apr 12, 2022 @ 5:01am 
Thanks!