Euro Truck Simulator 2

Euro Truck Simulator 2

187 ratings
Guide to Manual Transmissions in ATS and ETS2
By Outlaw Trucker
This is a guide to help those wanting to use manual transmissions in American Truck Simulator and Euro Truck Simulator. It contains videos and descriptions of all current manual transmission layouts. I hope this helps some people out, I spent quite a few hours compiling this so I hope it isn't too bad, lol. This is my first guide and I'm not the greatest writer but I hope it explains things well.
2
13
2
   
Award
Favorite
Favorited
Unfavorite
How Many Gears Can this Crazy Thing Have?!?
I think the first thing people notice when they first start looking at manual semi transmissions is the number of gears there are. You might look at an Eaton Fuller 18 speed and say to yourself, "I have 6 gear positions and there are 18 gears!". In fact, there are even some trucks in real life that have up to 24 gears. So how is this possible? How can we get 18 gears out of only 6 positions?
This comes from the way a truck transmission is set up. Let's continue our example of the Eaton Fuller 18 speed. In actual fact there aren't 18 gears in an Eaton Fuller 18 speed for one. It's actually 5 forward gears which are then split in half with what's called a splitter. Then there is a high range and a low range that when switched gives you another 4 forward gears which are then, again, split into high and low.
So how do we then magicly split these gears in half and put them into low and high range? This is where are our control settings within the game come in. In our control settings (see images below) there are two very important hot keys that we have to set up. One is labeled "Shifter Toggle: 1" and the other is labeled "shifter toggle: 2". These buttons are going to be used to get all those lovely gears that a gearhead like myself loves. In the next section I will explain using these keys.

Control Settings Within The Game:
Using Splitter and Range Buttons
So I've shown you in the last section what allows us to get all these gears on our truck. Now it's time to explain how to use them. The first thing I would like to say is on where to map these gears. You basically want to put these buttons somewhere that you can reach easily with one hand on the wheel and one hand on the shifter. "Why", you may ask? Well, there are times when cornering or maneuvering that you are going to need to press those buttons with one hand on the shifter and one hand on the wheel.So let's jump right into how we shift a manual gearbox in a semi. It's worth noting that I'm describing this in general terms with no specific transmission in mind. I will explain specific transmissions further in this guide.

Step 1: The first time you load into the game every time the gearbox is going to be set to low range and the splitter will be in low. So if you put it into whatever gear position is gear 1 it will be gear 1L (depending on transmission of course).

Step 2: Press your clutch in and put your shifter where first gear is.

Step 3: As you press in the on your accelerator slowly as you slowly let out on the clutch to start the truck moving.

Step 4: When your RPMs reach between 1500 and 1800ish press in on the clutch as you hit your "Shifter Toggle: 2" known as your splitter and then let out on the clutch. This will split the gear into high.

Step 5: Again, as your RPMs reach the magic numbers you want to depress the clutch, hit your splitter again and shift into where gear 2 is which will put you into 2L.

Step 6: As your RPMs reach the magic numbers you again press in on the clutch and hit your splitter button putting you into 2H.

Step 7: For brevity sake we are going to say that you continue this pattern until you run through all your gears in the bottom range (don't worry I will explain this further in individual transmissions)

Step 8: After you have run through the entire bottom range you would then depress your clutch, put your splitter into low, hit you "Shifter Toggle: 2" also known as your range and shift into where your gear 1L was. This will put you into your first low gear of the high range.

Step 9: You then just go through steps 1 - 6 again until you reach your final gear. What could be any easier? =P.
How to Figure Out a Specific Shift Pattern
So I've gone through the basics of how a semi shifts and how we get all those gears. Now I thought I would cover how to figure out a specific gear pattern. There's a couple of different ways you can go about this depending on whether you are adept at reading a shift schematic or not. If you can't read a shift schematic, fear not, I'll go into that as well. If you can't or don't want to mess with a schematic or can't find one for your specific transmission you can always just play with the truck and figure out the pattern.

How to read a gear schematic
So I thought I would begin with how to read a gear schematic. In the later sections on each transmission I will include a schematic that you can peruse to your hearts content. However, it helps if you can read the darn things right? For an example I will start by showing you the Eaton Fuller 18 speed schematic and then explain it's contents.


Ok so let's have a closer look at what's being displayed here. First off, each box shows the position on the H-shifter so the upper-left box is the upper-left shifter position. Everything that you see displayed in purple will be a gear that's in the low range. Everything that is shown in white will be what's in the high range. The letters you see displayed next to the numbers or the "R" in the case of reverse is denoting whether there is a high or low split for that gear.
So let's look at our upper-left box and see what information we can glean from it. First we notice that there are 4 reverse gears on it. We have a "R" in both our low and high range and then beside each of those "R"s we can then see nomenclature for R1L and R1H in the purple box and then for R2L and R2H in the white box. We can then look at the other gear positions and see, in the same manner, what gears are in that position.

Stick It In A Slot and See What Happens!

So let's say I don't really like this whole schematic thing. Who wants to have to look at a bunch of boxes and numbers? I just want to drive the darn truck! Well, my friend, there is another way to figure out a gear pattern. You can just sit in your dealership with the clutch in and start throwing that stick in holes. After a few times of flipping your range and hitting your splitter you'll eventually (let's hope anyway) figure out what goes where. It's kinda like your first time, well ...... we'll just leave that one alone.
Shifter Layout Behavior & Fast Split Options
Shifter Layout Behavior & Fast Split Option
You may have noticed there are a couple of options below your “Shifter Layout” option. I thought I would go through what these options allow you to do since a lot of people are unsure what they do. The first option right below “Shifter Layout” is “Shifter Layout Behavior”. There are 3 different options you can set this to: “Simple”, “Simple + Warning Sound” and “Advanced”.

Simple: The simple setting does pretty much what you expect it to do. It simplifies the shifting of the truck. You won't grind gears shifting at all and can pretty much shift as fast as you want and whenever you want.
Simple + Warning Sound: The Simple + Warning Sound option is sort of a step up in the complication of shifting a truck. If you try to initiate a shift too fast, like you would a car, the gears will grind on you. You can still initiate a shift at whatever RPM you choose unlike a real truck, but you will grind gears if you try to just slam through gears very fast.
Advanced: The Advanced setting does a couple of different things. The first thing is that, just like with simple + warning sound, your gears will grind if you try to initiate shifts too fast. It's still unlike a real truck in that you don't have to RPM match but if you try to go through gears too fast you will grind them. The second thing this allows us to do is set our “Shifter Fast Split Option (Advanced Only)”.

Shifter Fast Split Option (Advanced Only): If you set your setting to advanced you'll see this option right below your “Shifter Layout Behavior” option. This option allows you to set four different advanced options to split your gears, “Never”, “Clutch Press”, “Throttle Release” and “Clutch or Throttle”. Depending on how you set this up you can do what's called fast splitting your gears. A fast split is where you can select your gear splits ahead of time and then do one of the previously mentioned options to split your gears from low to high or high to low. European trucks use a different setup then U.S. Trucks which I'll explain below.

Never: The name says it all. You will never be able to do a shift fast split. Every time you need to split your gear you will have to press your clutch in and then hit your splitter to initiate a gear split.
Clutch Press: This is the system that European trucks use. Let's say I'm in 4th gear and I'm close to ready to splitting my gear into 4 high. I can go ahead and hit my splitter beforehand and it won't split the gear until I clutch in to split the gear.
Throttle Release: This is sort of the system that U.S. Trucks use although the last option is more accurate to U.S. Trucks. With the Throttle Release option you can select your gear splits ahead of time, just like as in clutch press, but it won't initiate the shift until you let up off the gas. You don't have to use the clutch at all to split your gears.
Clutch or Throttle: This is pretty much the system that U.S. Trucks use. You can select your splits ahead of time and it won't split the gear until you either clutch in or let out on the throttle.
Speed Matching with a Manual Transmission
So what do I mean within the confines of the game as to what speed matching is? Speed matching, as I'm explaining here, in it's basic essence is knowing what gear I need to have my truck at, at a certain speed to either achieve slowing of the truck or to be able to find the right gear when making a sudden stop or something to get back going again. There are, of course, all these rules that you have to follow when speed matching. Just be thankful that you don't have to do the math on gear ratios to figure it out like you do in real life.
The first thing about speed matching is to know your RPM range. We know that a truck get's it's best power to torque ratio between 1,000 and 1,800 RPMs for most trucks with the exception being the DAF and Scania trucks which go up to about 2,000 RPM at the high range. So what does the best power to torque ratio mean? Boiled down to it's very essence it's when the truck's engine is most efficiently transferring power to the transmission which is then most efficiently transferring that power to the wheels. This means that the truck is getting the most power to the wheels with the least amount of effort. It couldn't be much more simple.
In the video below I explain how to do this but I'll also describe it here if you don't want to watch another video.

1. Start out in your first gear and accelerate to 1,000 RPM and make a mental or physical note of what MPH/KPH you are at. This is your low end of the power range.
2. Accelerate to 1,800 RPM and make note, again, of what MPH/KPH you are at. This is the high end of your power range.
3. Shift into your next gear and slow down until you are at 1,000 RPM and make a note of your speed again.
4.You continue this pattern until you have a mental or physical note of where every gear in your transmission has been gone through.

You'll notice a lot of these gear ranges overlap and that's normal. Especially with half gears there is a very small change in your RPM to Speed. This means you don't have to worry about grabbing the exact gear if you are making a down shift from having to do a sudden stop or something. For instance I know that I can have my Volvo 12+2 with the 750 engine in it in 5L-5H-6L or 6H to be right around 45 to 55 KPH. Just as long as you know the approximate gear range you need to be in you should be able to find your gears pretty easily. After a while it becomes something you don't even really have to think about.
Eaton fuller 10 Speed Transmission
First off we can see that there are no gear splits at all, every gear is in either low range or high range. We can see that we have a Reverse in our low range and a reverse in our high range. Gears 1 - 5 are all in the low range. Gear 1 is in the lower left position on the H-shifter, gear 2 is in the upper middle, gear 3 the lower middle, gear 4 upper right and then gear 5 being in our lower right.
Going into high range we can then access gears 6 - 10. Gear 6 being in the lower left slot, gear 7 being in the upper middle, gear 8 lower middle, gear 9 upper right and then gear 10 in lower right. The Eaton Fuller 10 speed is one of the easier transmissions to drive in the game.

http://steamcommunity.com/sharedfiles/filedetails/?id=1214793792
Eaton Fuller 13 Speed Transmission
We can see by the schematic that, again, like the Eaton Fuller 10 speed our Reverse gears aren't split. They are a high range and a low range. We can also see that the gears L - 4 in the low aren't split, low gear starts in the lower left position, gear 1 is in the upper middle, gear 2 is in the lower middle, gear 3 is in the upper right and gear 4 is in the lower right.
Going into the high range we can see our gears are now going to start being split into high and low. 5L/5H being in the upper middle, 6L/6H being in the lower middle, 7L/7H being in the upper right and 8L/8H then being in the lower right.


https://youtu.be/S2hduF8RLfA
Eaton Fuller 18 Speed Transmission
The Eaton Fuller 18 speed we can see is chock full of gears. We first off see in the upper left position we have a R1L and R1H in the low range and then a R2L and R2H in the high range. The lower left corner is where the Low, or granny as we call them in the US, gears are located. We have a LL and a LH. We then see that every gear in the other 4 shift positions are all split.
Gear 1L/1H starts in the upper middle, 2L/2H in the lower middle, 3L/3H in the upper right and then 4L/4H in the lower right.
Gear 5L/5H starts in the upper middle, 6L/6H in the lower middle, 7L/7H in the upper right, then finishing with 8L/8H being in the lower right position.


https://youtu.be/fSdOwUeSo4o
Volvo 12 Speed and 12+2 Speed
With the Volvo 12+2 we can start to see how most European shift patterns are set up. Most European shift patterns use only 5 of the 6 positions on an H-shifter. Although the positions they don't use differ most only use 5 of 6 positions.
Starting off in the top right in low range we can see gears C1 and C2, these are crawler gears. They are a very low gear ratio for either starting with massive weight or slick conditions and the like. We can also see in the lower left that we have 4 reverse gears. In the low range we have RLL and RLH, in the high range we have RHL and RHH.
For our low range gears we start with 1L/1H in the upper middle, 2L/2H in the middle, 3L/3H in the upper right and then we can see there is no gear in the lower right.
For our high range we start with 4L/4H in the upper middle, 5L/5H in the lower middle, 6L/6H in the upper right and once again no gear in the lower right.

The Volvo 12 speed transmission I'm not going to make an entire new section for or schematic. The changes are minor enough that I can just explain them. For one you only have 2 reverse gears and the other difference is there are no crawler gears in a Volvo 12 speed.


https://youtu.be/OHYzUfkbb_E
Scania 12 Speed and 12+2 Speed Transmissions
Starting off in the upper right of the Scania 12+2 we can see we have 2 reverse gears in the low range RL/RH, there is no high range reverse gears. In the lower right in low range we can see, like the Volvo, we have crawler gears C1/C2, there is no high range gear in the lower left.
Starting off in our low range we can see there is no gear in the upper middle position, 1L/1H is in the lower middle, 2L/2H is in the upper right and 3L/3H then in the lower right position.
In our high range we can see, once again, there is no gear in the upper middle, 4L/4H is in the lower middle, 5L/5H in the upper right and then 6L/6H finishing off in the lower right.

Like the Volvo I'm not going to make an entire new schematic or explanation on it's layout, the differences are minor. The only difference in a Scania 12 speed verses a Scania 12+2 is that there are no crawlers gears.


https://youtu.be/d1JbpszFyl4
ZF 12 Speed Transmission
In the ZF 12 speed transmission we can see that we have no gear in the upper left position. We also see that in the lower left position we have one lonely, little reverse gear. It's not split and there is no high range.
In the low range we start in the upper middle with 1L/1H, lower middle position has no gear, 2L/2H are in the upper right position and then 3L/3H are in the lower right position.
In the high range we start with 4L/4H in the upper middle, again there is no gear in the lower middle position, 5L/5H are in the upper right position and 6L/6H finish it off in the lower right position.


https://youtu.be/oOHLga-VwyY
ZF 16 Speed Transmission
The Zf 16 speed looks much the same as the ZF 12 with the addition of another gear slot to add 4 more gears. Starting off at the upper left we can see, once again, there is no gear here. There is only one reverse again in the low range and no high range.
Starting off our low range forward gears we have 1L/1H in the upper middle position, 2L/2H in the lower middle position, 3L/3H in the upper right position and then 4L/4H in the lower right position.
In our high range we have 5L/5H in the upper middle position, 6L/6H in the lower middle position, 7L/7H in the upper right position and 8L/8H finishing it off in the lower right position.


https://youtu.be/Z1NEMKA72rA
31 Comments
Mushu Nov 7, 2023 @ 7:26am 
Hey Outlaw,

Loved your guide! I'd like to translate it into Spanish and Russian for more gamers to enjoy. I'll make sure to credit you as the original author. Cool with you?

Cheers,
Quartet
tesTTrucker Apr 16, 2022 @ 5:23am 
Hello there. I have a different kind of problem. It would be more useful if we can see which of transsmisions are automated/automatic, and which of them are manual. So far I know (or at least I think that I know) that ZF's can be both of them. And for example, I'm currently using Volvo FH classic with an I-shift ATO3512F R and found out that ATO stands for Automatic or automated (this is not the same, but in both cases there's no clutch pedal. So, in vanilla game only Iveco, Man, some of DAFs and Renault supports ZF's. It seems like a Volvo using only Alison and I shift.
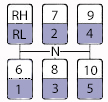
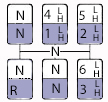
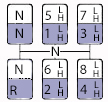
Ok... I would sto here, but I'm a bit confused. I know that, no matter what transmission you bought you can use thesse explained patterns, but it's not realistic IMO. Cheers guys, and happy trucking. I hope someone will explain this to us.
Blash the Goon King Jan 30, 2022 @ 8:06am 
Also, ZF 12 speed with 16 gear ratio does offer high and low range on the reverse. 12TX2421TD, aviable for DAF XF106. Dunno yeat about the new DAF XF/XG shifters tho.
Blash the Goon King Jan 30, 2022 @ 7:22am 
Here is a pic you can use to export the specific layouts: https://i.imgur.com/OsZpKKf.jpeg
Blash the Goon King Jan 30, 2022 @ 7:21am 
You could update gears layouts tho, to not show empty gears.
Blash the Goon King Jan 30, 2022 @ 7:20am 
I am very gratefull for your guide. Great job! At first it all seemed complicated, but in reality when i got it, it was easy as a cake.
Yakuzashi Oct 25, 2021 @ 6:45pm 
I play with ps3 controller and my top speed is aroun 50-60 km/h. It feels like truck is rolling down on neutral and highly depends on terrain. Did sb have same problem?
Joxson Oct 13, 2021 @ 7:38am 
This guide is amazing!!! All i want to using my new shifter logitech, thanks u so much dude !:steamhappy:
bUrnIt Oct 2, 2021 @ 3:13pm 
hi love you guide :steamthumbsup:, just a note: in "Using Splitter and Range Buttons" section : Step 8: you say "Shifter Toggle: 2" for Range shift. little mistake. :steamfacepalm:
Truckyluv Mar 2, 2021 @ 5:36pm 
Cheers buddy you have helped me sort out a coupla silly little mistakes I was making. It is now allowing me to REALLY ENJOY sitting behind the wheel. :104::steamhappy: