The Sims™ 3

The Sims™ 3

Not enough ratings
Move Game Saves to Another Location & Improve Performance
By † ßâd•£üç]< Îñç™
If you are experiencing computer and Sims 3 performance issues, learn how to speed it up by moving your save games to another drive and purge bloated cache files with this handy script. (Updated to include Sims 4!)
   
Award
Favorite
Favorited
Unfavorite
Introduction
Most modern computers have operating systems installed on solid-state drives, referred to as SSD's. SSD's speeds up OS and most application loading times, however, they can be very costly depending on its storage capacity. In addition, constantly writing too much data to an SSD can significantly shorten the drive's lifespan. While The Sims 3 can benefit from increased SSD loading times, file sizes for game saves can be absurdly large… especially when expansion packs, mods, and all kinds of other content are used to customize the game, reading and – especially writing saved game data will eventually degrade load times and overall speed performance of the drive itself. (This can also be problematic for mechanical hard drives (HDD) as well, since they are slower to access large amounts of data. It is advised to purge cached save game files and will touch upon this topic in the Sims Cache Cleaning Script section(s) of this guide.)

It is assumed that Sims 3 and/or Sims 4 is being run from either Windows Vista, 7, 8/8.1 or 10 – but will also work with XP, with slight modifications. Works with Steam, Origin, and DVD installation discs for Sims 3; or with Origin and installation discs for Sims 4.

Disclaimer: This tutorial utilizes advanced knowledge of the Windows OS. Anyone attempting to follow this guide does so at his or her own risk and agrees not to hold me liable for any damages caused as the result of user error.
Moving Game Saves to Another Location
For whatever reason, the developer decided to hard code Sims 3 saved games to the defaulted Documents folder in Windows (or in My Documents if running XP), making it difficult for the user to choose an alternate saved games location. This tutorial attempts to provide step-by-step instructions to anyone wanting to create a directory symbolic (or soft link) from the defaulted save game location in the Documents folder to the target directory where the actual game saves are stored.

For best performance, it is suggested to have the game installed on an SSD (if possible) and keep game saves on a mechanical drive.

Readers attempting to follow this guide must have proficient working knowledge of Windows operating systems. A high comfort level is necessary when working at the command-line, as well as having familiarity of running an elevated command prompt. Administrative privileges to the operating system is also required.

Step-by-Step Instructions
  1. Make sure The Sims 3 game is installed and run it at least once.
  2. Check your Documents folder to verify the saved game location under Electronic Arts/The Sims folder.
    • For some Windows 8.1 users, game saves may be hidden by default. If this is the case, you will need to open the Change the folder and search options under the View tab in Windows Explorer and select Show hidden files, folders, and drives; click the Apply to Folders button, then click OK.
  3. Move all existing files inside The Sims folder – including the Sims 3 folder itself and all of its sub-folders to an alternate internal/external drive and folder location.

    Note: If moving to a different drive, delete all moved content from the Documents/Electronic Arts folder. (Be sure to create a backup in case anything goes wrong!)
  4. Open a command prompt as an Administrator.
  5. In the command prompt, type the following then press Enter:
    mklink /J "C:\Users\$USER$\Documents\Electronic Arts\The Sims 3" "G:\Sims3 Game Saves"
    IMPORTANT: $USER$ and G:\Sims3 Game Saves is a Windows username placeholder and suggested drive letter\folder used to demonstrate. Replace with the actual Windows username assigned to the Documents folder, and the drive and folder location you moved your Sims 3 folder and content before running the command.

    Note: If running XP, change the Documents location to "C:\Documents and Settings\$USER$\My Documents\Electronic Arts\The Sims 3".
  6. If done correctly, a command prompt message should look similar to:
    Junction created for C:\Users\$USER$\Documents\Electronic Arts\The Sims 3 <<===>> G:\Sims3 Game Saves

    Note: If you get an error message saying, "Cannot create a file when that file already exists." check that there are no files or folders inside Documents\Electronic Arts and repeat Step 5.
  7. Run The Sims 3 again to verify saved games are working correctly.
    Additionally, the Sims 3 folder icon will also show a shortcut arrow from inside the Documents\Electronic Arts folder using Windows Explorer.

Moving The Sims 4 Game Saves to Another Location
Creating a directory junction works exactly as outlined for Sims 3. To create a junction for Sims 4, simply change 3 to 4 in the command prompt as seen in the screenshot below.

Sims 3 Cache Cleaning Script
If you have lots of custom content loaded into Sims 3 as I do, you will notice that game performance will still degrade – even after having moved the entire saved games folder to a new drive. This is why I have written a couple of batch scripts for Sims 3 that will delete cached save game files and other junk, and will launch the game automatically after the cleaning process… so you won’t have to.

Originally, I included an ultra-condensed (albeit sloppily written) script for Sims 3 in this guide. As I continued to improve automated functionality within the scripts and make them more Origin/physical disc or Steam specific friendly, my primary motivation was to get them working with the Steam overlay no matter which Sims 3 installation type you are running. In doing so, I ended up writing additional guides for each script and have decided to remove the script from this guide to avoid redundancy. (If a simple cache cleaning script without the bells and whistles is preferred, simply copy and paste everything from the first line to the end of the cleaning section in the script for Origin instead.)

📌 If you are running a physical disc and/or Origin installation of Sims 3, then this script can be added to the Origin client. Not only will this script delete saved game cache files, it will launch the Origin client for you (if it’s not already running), followed by the Sims 3 Launcher. In other words, the only tasks you have to do is to run it from the non-Steam game shortcut you made to get the Steam overlay working, load Sims 3 from the Launcher, and manually exit Origin after you close out your game. (Includes a similar script for The Sims 4.)

Note: Includes a stand-alone cache cleaning script option for Sims 3 if it is preferred. The script's comments will explain what is needed to get it working.
https://steamcommunity.com/sharedfiles/filedetails/?id=1543030089
📌 Steam players of Sims 3 now has a script specifically made just for it. Since the Steam client resists running batch files, this script can easily be made into a desktop shortcut to bypass the hassle and still automate the same tasks. Like the script for Origin, it automatically cleans the cache for saved games, and will run the Sims 3 Launcher from Steam (it will even start Steam for you if it’s not running already) … and the Steam overlay will still function like normal. In addition, the script also takes care of the launcher bug that occurs in Steam’s version of Sims 3.
https://steamcommunity.com/sharedfiles/filedetails/?id=1853224297
It should be noted that if you have more than one installation of Sims 3, there appears to be no significant conflicts – despite Origin and Steam using different versions. Be aware, however, that custom content created by 3rd party creators might not be compatible and display erroneously. (Don’t worry, this is not harmful to the game.) If this is the case and the appearance should bother you, it is recommended to swap out the content with something that displays correctly, and to check which version of Sims 3 that 3rd-party custom content support before adding them to your game.
Sims 4 Cache Cleaning Script
Like Sims 3, Sims 4 players may also experience performance degradation if the cache isn't cleaned periodically.

Below is a stand-alone cache cleaning script that will work on DVD disc installations as well as Origin. Also runs on Windows versions supporting the Documents folder. (XP users will need to modify this script for My Documents.) This script is not compatible with Mac.

📌 If you prefer having a cache cleaning script that adds the Steam overlay when run through Origin, grab the script here.

Simply run the script before launching Sims 4 or whenever noticing system performance starting to degrade.

Step-by-Step Instructions
  • Create a new text file and rename it. (I have named mine Sims4 Cache Cleaner.)
  • Copy and paste the following into the text file:
    @echo off title Sims 4 Cache Cleaner del /Q "%USERPROFILE%\Documents\Electronic Arts\The Sims 4\localthumbcache.package" del /Q "%USERPROFILE%\Documents\Electronic Arts\The Sims 4\cache\*.cache" del /Q "%USERPROFILE%\Documents\Electronic Arts\The Sims 4\cache\*.dat" del /Q "%USERPROFILE%\Documents\Electronic Arts\The Sims 4\cache\*.jpg" del /Q "%USERPROFILE%\Documents\Electronic Arts\The Sims 4\cachestr\*" if exist "%USERPROFILE%\Documents\Electronic Arts\The Sims 4\onlinethumbnailcache" ( rd /S "%USERPROFILE%\Documents\Electronic Arts\The Sims 4\onlinethumbnailcache" ) else ( echo onlinethumbnailcache folder does not exist. ) echo Cached files deleted. pause exit
    Note:
    For this script, I am using the Windows %USERPROFILE% variable for the game saves Documents folder junction. It will not be necessary to alter this unless you are running Windows XP.
  • Save and exit the text file.
  • Change the file extension from .txt to .bat

    Note: You will get a warning about changing the file name extension and ask if you want to change it – click Yes.
  • Double click the file to run.
Optional – for older Sims 4 installs, the cachewebkit and lotcachedata folders are no longer needed. If you feel you may still have these folders, but don't want to delete them manually, copy and paste the following code directly above the echo Cached files deleted. line:
if exist "%USERPROFILE%\Documents\Electronic Arts\The Sims 4\cachewebkit" ( rd /S /Q "%USERPROFILE%\Documents\Electronic Arts\The Sims 4\cachewebkit" ) else ( echo cachewebkit folder does not exist. ) if exist "%USERPROFILE%\Documents\Electronic Arts\The Sims 4\lotcachedata" ( rd /S /Q "%USERPROFILE%\Documents\Electronic Arts\The Sims 4\lotcachedata" ) else ( echo lotcachedata folder does not exist. )

Note: If you are experiencing problems with Sims 4 on Origin and this script does not help improve game performance, clearing the cache for Origin may also help.
Fix for 0x065d0274 Error in Sims 3
Although this has nothing to do with improving computer and Sims 3 performance, I wanted to share this with anyone else experiencing the "Unable to start game. Service Installization failed (0x065d0274)" error in Sims 3.

To fix it, go into the Documents > Electronic Arts folder and rename The Sims 3 folder to The Sims 3 Backup. Afterward, run the game so it will repopulate your game save folders. (If you wish to keep the old game saves in the new folders, copy the backup save files into the corresponding folders... otherwise, delete the repopulated The Sims 3 folder, and rename The Sims 3 Backup folder back to The Sims 3.)

For more information on the topic, view this thread.

Similar links:
Additional Notes
When I originally moved my Sims 3 save games location to another drive, it never occurred to me to take screenshots of the process as I never thought I'd be writing a tutorial for it. Hopefully, I have written this guide well enough that screenshots should not be necessary. As someone who enjoys playing Sims 3, I caved in and bought The Sims 4 during the early Black Friday sale on Origin. After doing some research and some tinkering, I whipped up a quick script and remembered to get a screenshot when I made a directory junction for Sims 4 just to share it with you all.

If you enjoy playing The Sims 4 – and especially Sims 3, as I do, I hope you will find this guide useful.

Rate this guide!
Please rate this guide with a thumbs up if you found it helpful; or a thumbs down if you didn't. Be sure to reserve questions, concerns, suggestions for improvement, or anything else regarding this guide in the comments section below
Changelog
10/28/2022 – Added new guide link.
07/08/2020 – Added new guide link.
03/03/2020 – Pinned note to script for Sims 4.
01/23/2020 – Fixed typo in link.
01/14/2020 – Added new guide link.
11/02/2019 – Embedded new image.
11/01/2019 – Added new guide link.
10/02/2019 – Added information note to Sims 3 script for users wanting a stand-alone cache cleaning version of the script.
09/17/2019 – Added switches and fixed typo to Sims 4 script.
09/16/2019 – Added title to Sims 4 script.
09/15/2019 – Removed script from Sims 3 Cache Cleaning Script section to minimize redundancy, and added guide links to separate scripts for Steam and for Origin clients; added Step-by-Step Instructions section to Sims 4 Cache Cleaning Script to avoid confusion, and removed optional automatic game start functionality from Sims 4 script.
09/03/2019 – Added new guide link.
05/22/2019 – Fixed typo.
12/09/2018 – Fixed continuity error.
11/28/2018 – Added new section for players experiencing the 0x065d0274 error in Sims 3.
11/24/2018 – Fixed typo, changed heading for Sims 4 junction, and added optional lines of code for older Sims 4 installs.
11/21/2018 – Updated guide to include directory junction and cache cleaning script for Sims 4; changed Improving Performance section to Sims 3 Cache Cleaning Script; added Sims 4 Cache Cleaning Script section; changed text for continuity.
11/08/2018 – Added text for clarity regarding the Sims 3 Cache Cleaner script under the Improving Performance section.
10/19/2018 – Added new guide link.
10/15/2018 – Added new guide link.
05/02/2018 – Added new guide link.
12/24/2017 – Fixed typo.
11/25/2017 – Fixed typo.
11/09/2017 – Added Other Guides section.
10/31/2017 – Suggested drive types for game installation and saved games location for performance.
10/27/2017 – Added optional functionality lines to script.
10/27/2017 – Provideded clarity to the types of Sims 3 installs this guide will work on.
10/26/2017 – Corrected commented line numbers for cached cleaner script notes.
10/25/2017 – Fixed typo and removed space between drive letter and folder in the command line.
10/25/2017 – Initial version.
33 Comments
† ßâd•£üç]< Îñç™  [author] Apr 11 @ 2:58pm 
@Noveria: Sorry to hear that you're having trouble with TS3, but it sounds like you may have a corrupted file not related to game saves.

Do you own the game on Steam? If so, you can run a file integrity check. If you don't know how to do that, this Steam Support page can walk you through the steps: https://help.steampowered.com/en/faqs/view/0C48-FCBD-DA71-93EB

Good luck and please let me know if it worked for you.
Noveria Apr 11 @ 10:12am 
I did this for TS3 and it caused error - 0x039e8474, every single recommendation suggests re-install, making it all pointless. Anyone got an idea?
† ßâd•£üç]< Îñç™  [author] Aug 19, 2022 @ 7:50pm 
@erric_usa: That is fantastic news! I am happy to hear that I was able to help and that your game saves are working again. 😄

Have fun and enjoy!
erric_usa Aug 19, 2022 @ 7:35pm 
@ ßâd•£üç]< Îñç , The Backup Tab in OneDrive Fixed it! Now all local Documents STAY local. None of the files in the Documents folder is uploaded to the OneDrive. I have lots of hard-drive space and my OneDrive was getting full. Now the problem is fixed. The OneDrive now only syncs folders I want to sync. Thank you!
† ßâd•£üç]< Îñç™  [author] Aug 17, 2022 @ 12:15pm 
@erric_usa: For now, right click the Documents folder inside OneDrive and go to Properties. Under the Location tab, click the Restore Default button and then Apply. Click YES to the pop-up windows to confirm the change, then click OK. Next, open up OneDrive and go to Help & Settings > Settings, then click on the Backup tab when the OneDrive window pops up. Click the Manage Backup button and uncheck the Documents folder. Unchecking Desktop and Pictures is optional.

Let me know if this helps you.
† ßâd•£üç]< Îñç™  [author] Aug 17, 2022 @ 12:15pm 
@erric_usa: Apologies for not addressing my last comment to you. I thought I had... sorry about that! It also looks like I may have to update these guides for a OneDrive fix. Sadly, Microsoft should have thought things through before implementing a device-to-cloud-sync because there are countless programs that have the Documents folder hardcoded to store saves and it just breaks things for no reason. It also eats up drive space on the C:\. If you're limited on space, the best option is to disable it or move it to another drive. (See: https://youtu.be/EM1h9MMm39I)
erric_usa Aug 17, 2022 @ 6:55am 
@† ßâd•£üç]< Îñç Sorry, I tried everything and all inside the "Documents\Electronic Arts" folder always gets uploaded to OneDrive - after moving the "Electronic Arts" folder to another location. The mklink command works, but my hard-drive space is not a problem, just the OneDrive space is low. I don't want Electronic Arts files going to the cloud unless I specifically want to share content to the world.
† ßâd•£üç]< Îñç™  [author] Aug 8, 2022 @ 1:55pm 
Another person was having similar issues with One Drive where it would hijack everything in Documents. (See Comments section of my Sims 3 cache cleaning guide .)

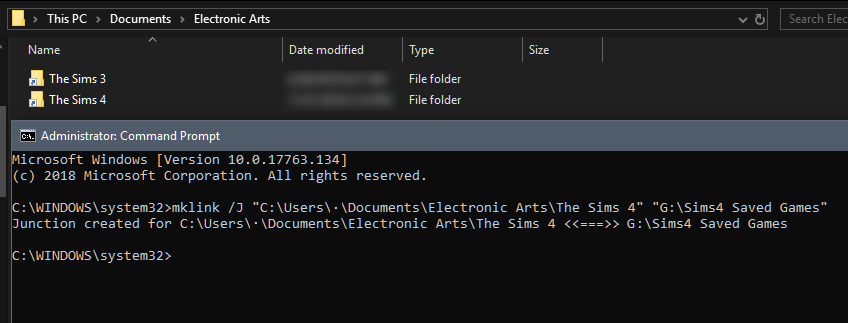
Try going into your One Drive settings and uncheck the following: Documents, Downloads, and Pictures . This should change it back to their original file paths.

Good luck and please keep me posted!
erric_usa Aug 8, 2022 @ 12:53am 
For me the mklink command worked at moving the Sims4 file location. The bad news is the link is still in the Documents folder and for some dumb reason. OneDrive forces the computer to sync all files, including large mods to the cloud. I see no way to make keep SIms4 files off the cloud without disconnecting the network. Any ideas? Thanks!
† ßâd•£üç]< Îñç™  [author] Dec 2, 2020 @ 8:42pm 
@sharishari006: You are very welcome! I am happy this guide was able to help. :steamhappy: