
Everlasting Summer

Everlasting Summer

Not enough ratings
How to upload mods to workshop correctly (ESCU v2)
By 🔰 Лена 🔰 and 1 collaborators
This guide explains how to correctly upload a mod to the Workshop using the new v2 uploader, covers typical mistakes mod creators make, and describes the uploader's capabilities.

25.03.2025 - added a question about adding tags without updating a mod.
   
Award
Favorite
Favorited
Unfavorite
Getting Started with the v2 Uploader
So, you've created your mod and decided to upload it to the Workshop. To do this, you'll need the mod uploader program, located at the path Steam\steamapps\common\Everlasting Summer\game\mods, where "Steam" is the folder where you installed Steam, or the game library folder on another drive if you have multiple libraries.

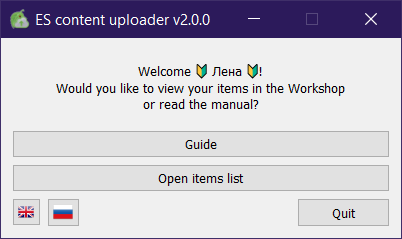
After launching the program, you'll see a warning explaining the intended use of this program and highlighting purposes it isn't suited for. However, if you're reading this guide, you probably already know what you need, right?


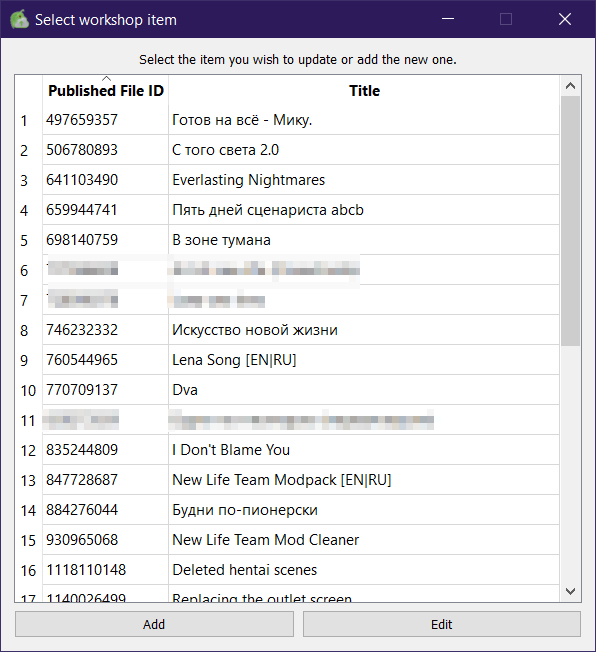
Next, you need to choose a mod to update or create a new one. Here's where a pleasant surprise awaits (compared to version one): you no longer need to know the mod ID you want to update. The list will show all mods you have in the Workshop, including those where you're listed as a co-author. You can sort the mods by ID or name. The ID sorting state is preserved even after restarting the program. You can navigate to editing a mod by clicking the corresponding button or double-clicking the mod.

Creating or modifying a mod in the Workshop
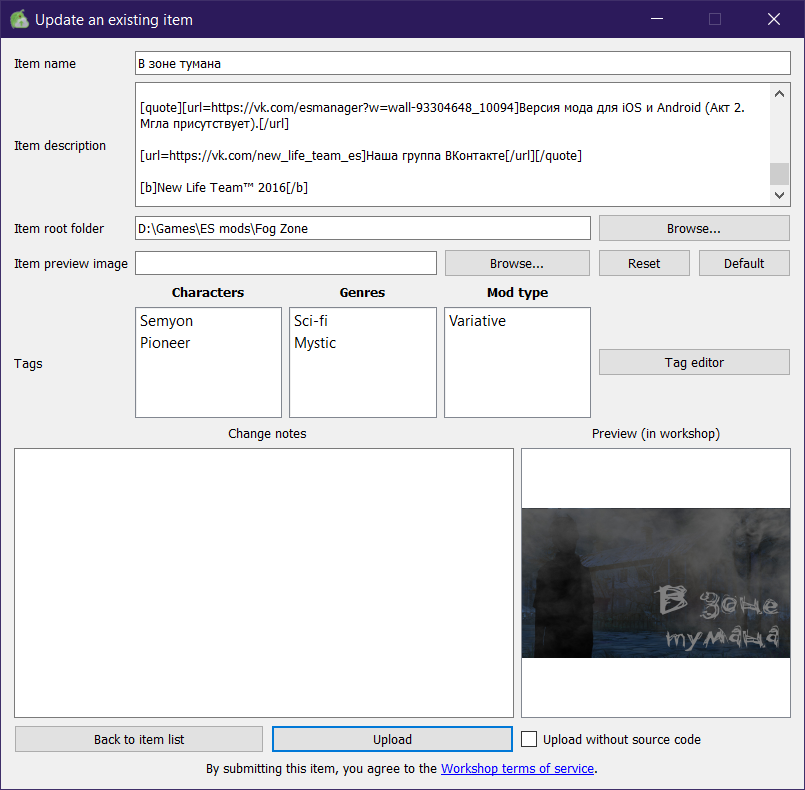
After creating a new mod or selecting an existing one to update, a window with mod settings will open, which we will examine in this section.

If you mistakenly selected the wrong mod to update or created a new one by accident, you can always return to the mod list by clicking the appropriate button. Newly created mods are automatically deleted if you go back, so you won't have to worry about empty mods appearing in the workshop.


  • Item Name
    Here, you should specify your mod's name, which will appear in the workshop. However, if you're updating an existing mod, this field will be locked from editing, but you can change the title directly on the workshop page.

  • Item Description
    This field displays your mod's description from the workshop. When creating a new mod, you can't set the description here; instead, you'll be able to add it later on the mod's page. The reason for this will be explained below.

  • Main Folder
    Specify the folder containing your mod files. This field is crucial, and incorrectly setting the folder often leads to errors for mod users. How to determine the main mod folder will be discussed in the next section.

  • Item Cover Image
    Provide the path to the image that will serve as your mod's cover in the workshop. Any image size in pixels is acceptable, but a square image is recommended. Supported formats include JPG, PNG, GIF, and WebP, and the file size must not exceed 1 MB. The "Reset" button allows you to revert to the previously set image if updating an existing mod, while the "Default" button applies a standard image, though it's better to create a unique and attractive cover yourself!

    The uploader also includes an automatic cover detection feature. If a file named preview is present in the mod's root folder in a supported format, it will automatically select this as the cover upon choosing the main folder. If a different preview file already exists, the uploader will prompt you to replace the current cover.

  • Tags
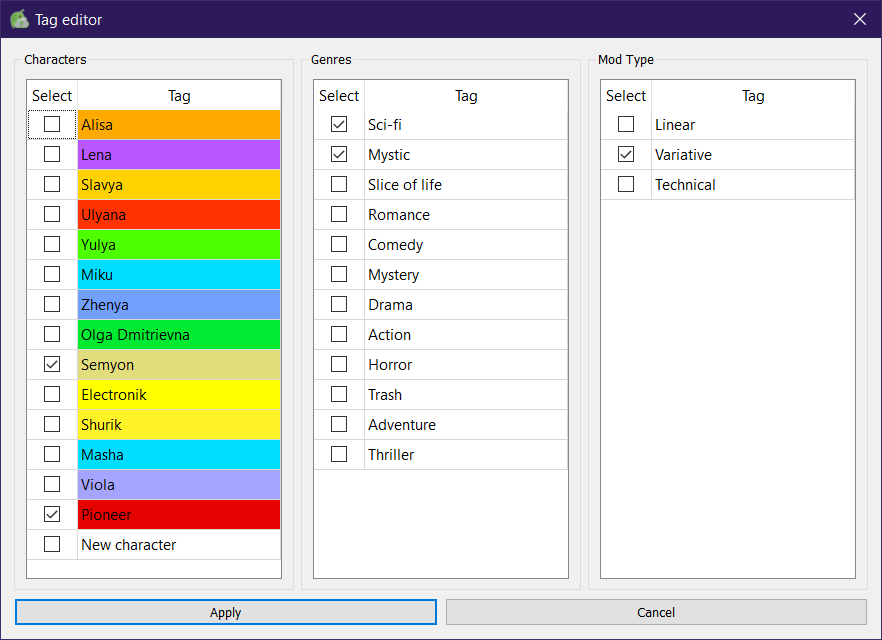
    Now we arrive at one of the uploader's key new features—the tag editor.


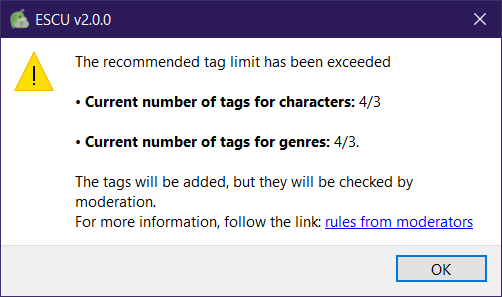
    Tags can be selected by double-clicking or checking them. You can set as many tags as you wish, but moderation guidelines for the Everlasting Summer Workshop recommend no more than 3 tags for genre and 3 for characters. Exceeding these recommendations won't stop you from uploading, but your mod will receive the tag "Pending Review".


    This tag can be removed either by adjusting the tag quantity yourself or by moderator review. Note that the uploader doesn't affect tags in the "Likes/Dislikes" category.

  • Change Log
    Here, you can describe updates made to your mod. If this is your first upload, a default message "First mod version" will automatically be added.

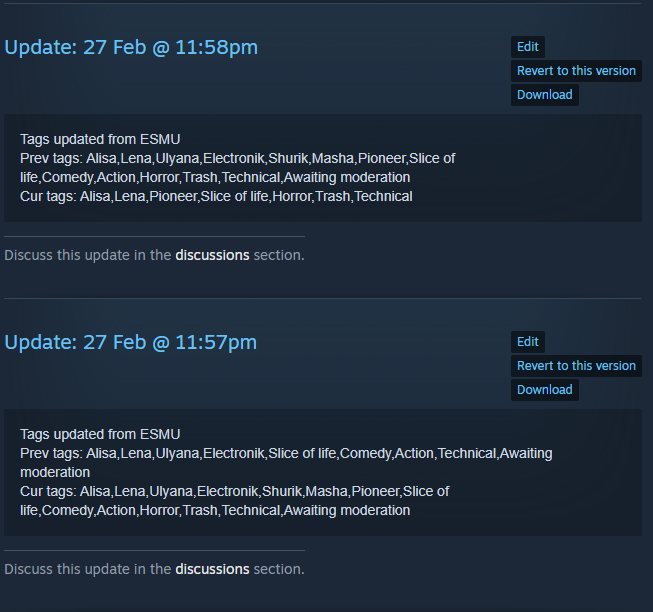
    P.S. Note from the developer: When changing tags, the uploader automatically appends tag-change history to the change log. Don't be alarmed.


  • "Upload Without Source Files" Option
    This option allows uploading the mod without .rpy files, useful if you want to hide your code from curious eyes. It doesn't delete source code immediately; instead, it creates a temporary copy without .rpy files (ensure sufficient disk space). Always keep backups, as future retrieval of source files from your own mod might be challenging.
Selecting the mod's main folder
And here we come to the most important moment in the process of loading a mod because most often, it is due to an incorrectly chosen folder that modders later cannot understand why their mod works, but not for readers. And for this, you need to understand the correct folder structure in the game, where exactly files are searched for, and what exactly needs to be specified in the mod code so that your images, sounds, and music work correctly for all players.

Base game folder

When you open the game folder, you will see the following folders: Everlasting summer.app, game, lib, and renpy. We are interested in the game folder, while the other folders are components of the game engine, and Everlasting summer.app is the MacOS version of the game (essentially, folders with the .app extension in MacOS are considered executable files, so for Windows and Linux users, the contents of this folder do not matter, while Mac users see this as an executable file, just as we run .exe files on Windows or .sh files on Linux).
And the contents of the game folder are processed by the game as all the content in the game, whether it is mods or the main novel files. Therefore, our starting point will always be the game folder when writing mods.

What about the mods folder inside the game folder?

Here things get interesting. The fact is that the Ren'py engine was not originally designed for creating modifications for games written on this engine. Therefore, the game processes all files located in the game folder. Yes, all modding guides state that the mod should be placed in the mods folder, but it is not an error if your mod is located in a separate folder inside the game folder instead of mods. For example, my mod "Art of New Life" is in the folder game\art_of_new_life, "Pioneer Daily Life" - game\budni, and so on. This does not mean that you need to rewrite your mod and place it in the game folder, but understanding the base game folder is very important when we discuss how mods are loaded into the workshop.

Where are the mods downloaded from the workshop stored?

This is a perfectly reasonable question because if you carefully examine the contents of the game folder, no new files appear in the game folder, let alone in mods. All mods are stored in the folder Steam\steamapps\workshop\content\331470\, and inside this folder, there are many numbered folders, where each separate folder is a specific mod. And here is where things get even more interesting. Each numbered folder is perceived by the game engine as another game folder, but not as a mods folder! Therefore, the folder structure and paths in the code must be the same as in your game folder. If your mod is in the folder game\my_awesome_mod, then when you upload the mod to the workshop, there should be a folder my_awesome_mod inside the numbered mod folder, and inside it, the files and folders present in your mod.
If your mod is in the folder game\mods\my_awesome_mod, then in the workshop mod folder, there should be a mods folder, and inside it a folder my_awesome_mod with all the mod's contents.

For example, let’s take one of my mods - In the Fog Zone. The ID of this mod is 698140759, so the full path to the mod will be: Steam\steamapps\workshop\content\331470\698140759
If you open this folder, you will see only the folder fog_zone, and in the mod’s code file, there will be the following code for declaring images:
image bg fz_houses_night = "fog_zone/bg/ext_houses_night.jpg"

Based on what was written above, the full path to this image after downloading the mod from the workshop will be: Steam\steamapps\workshop\content\331470\698140759\fog_zone\bg\ext_houses_night.jpg

Let’s look at another example. The mod Four Horizons, its ID is 3075325899, so after downloading, the mod folder will be: Steam\steamapps\workshop\content\331470\3075325899
Here, inside the numbered folder, there is a mods folder, inside it a four_horizons folder, and inside it the mod’s contents. In the code, the image declaration looks like this:
image bg FH_ext_aidpost_sunset = "mods/four_horizons/images/bg/ext_aidpost_sunset.png"

The full path to the file is: Steam\steamapps\workshop\content\331470\3075325899\mods\four_horizons\images\bg\ext_aidpost_sunset.png

There are also more complex cases when the mod author placed all files in the root folder. An example of such a mod is Return to Sovyonok with mod ID 354136207. I won’t provide code examples and file paths, but if you’re interested, you can study the structure of that mod yourself. However, this is definitely not the way to do it.

So which folder should I specify in the uploader?


Since your mod is in the game folder (you do test your mod before uploading it, right?), based on the above, you cannot simply specify the following path:
C:\Program Files (x86)\Steam\steamapps\common\Everlasting Summer\game\mods\my_awesome_mod

In this case, only the contents of the folder my_awesome_mod will be uploaded to the workshop, but the game will not be able to find the folder itself in any of the workshop folders.

So what should I do?
It’s simple. You need to create a folder somewhere, then create a mods folder inside it and copy your mod’s folder into it. If you originally created your mod outside of the mods folder, then it’s even simpler - just copy your mod folder from the game folder into a new folder and specify the path to it.

Let’s consider the example from the path above.
Your mod is in the folder
C:\Program Files (x86)\Steam\steamapps\common\Everlasting Summer\game\mods\my_awesome_mod

In the uploader, you specify the folder
C:\My Awesome mod\

And the files themselves will be located at
C:\My Awesome mod\mods\my_awesome_mod

If your mod is in a separate folder inside the game folder, then it’s even easier because you only need to copy the mod folder to the new location without creating a mods folder.
Only in this way will users avoid errors related to missing images, music, and other files in your mod.
Selecting the mod's main folder, part 2
Is there an easier way?

Yes, there is, but it comes with its own nuances. You can create a folder with any name inside Steam\steamapps\workshop\content\331470\ and work with this folder as a separate game folder. In the uploader, you simply specify this folder without needing to copy it anywhere, and in this way, you can check that the game correctly recognizes your workshop folder without actually uploading your mod there. After all, instead of numbers representing the mod ID, you can use any other name.

However, in this case, there is a temptation not to create a folder with the mod’s name but to dump everything into a single directory, following the approach of the mod "Return to Sovyonok", which I mentioned earlier. But why is this a bad idea? If the game folder contains, for example, a folder named bg, and inside it a file ext_house_of_un_night.jpg, there is a chance that another mod will also have a file with the same name in the same folder. And which of the two files from different game folders will the game load? This is uncertain, so the reader might see an image from another mod instead of yours. And while this might not be critical for backgrounds, as in the example above with Lena's nighttime house, what if a crucial CG illustration has the same name? A mismatched illustration could give the wrong impression of your mod.

Mod compatibility is always an important issue because, as I mentioned earlier, the game does not have a built-in mechanism for loading separate mods. That is why it is crucial for each mod to be in its own folder inside the game folder. Whether there is an intermediate mods folder is less important, but keeping the mod in its own folder, whether it's art_of_new_life, budni, fog_zone, or any other name, is very important.

Yes, there is a mod manager that allows you to load only selected mods into the game, but not all users may have this program. Therefore, it is better to ensure mod compatibility in advance by placing all of its files in a separate folder and adding a prefix or suffix to all variables. Yes, this makes mod creation a bit more complicated, as you will need to consistently apply this prefix/suffix everywhere, but it’s better to take care of this early rather than later trying to figure out why the wrong image is displayed for players or why errors occur in the code.

Once again, here are examples from mods I’ve created:
  • Pioneer Daily Life, mod folder - budni, prefix - bpp_
  • In the Fog Zone, mod folder - fog_zone, prefix - fz_
  • Four Horizons, mod folder - mods/four_horizons, prefix - FH_


It is worth noting that the engine is case-sensitive, so if you have variables with the same name but different capitalization, they will be treated as separate variables.

In conclusion, it’s up to you to decide whether to place your mod in a separate folder inside 331470 or copy it to a separate folder before uploading. However, I have warned you about potential issues and even provided some tips on mod creation, even though this guide was not originally intended for that.
Tips and Common Mistakes
This section is dedicated to common mistakes and some useful tips when working on your mod.

Missing .rpyc Files on Upload

Some mods in the Workshop have only the source code files with the `.rpy` extension but lack corresponding `.rpyc` files. The `.rpyc` files are generated automatically by the game to speed up loading, so you should not remove them from your mod.

I am not sure where the practice of excluding these files originated, but there are two possible explanations:

  1. The mod author did not test their mod and simply uploaded it as-is. This is very bad practice because errors in the mod will be discovered by players rather than the author. There might even be a critical error in the code that prevents the game from launching.
  2. Some modding guides might recommend deleting `.rpyc` files. I don’t know where this idea came from, but I suspect it was done in the past to ensure mods could run on different engine versions. Precompiled `.rpyc` files might not be readable on older versions of the game. However, this is no longer relevant since almost everyone uses the Steam version. If you are developing for mobile, where `.rpyc` files are typically not included, you can create a separate folder for the mobile version and remove the files there.


Why is deleting .rpyc files a bad idea?
This is due to how Steam handles file deletions. When you subscribe to a mod and later unsubscribe, Steam only deletes the files that were originally uploaded by the author. Any files generated by the game or third-party programs remain.

In this case, the `.rpyc` files created by the game will stay behind. This can cause several issues:
- In the best case, the mod remains in the mod list but produces missing file errors when launched.
- In the worst case, if the author included a custom font for the mod’s title or a cover image for the mod list, the game might crash when opening the mod menu.

Yes, this issue can be resolved by installing Mod Cleaner or a mod manager, but it’s best to design your mod for maximum compatibility from the start to avoid frustrating users.


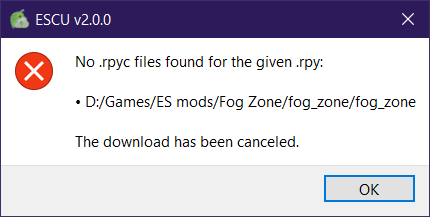
The mod uploader automatically checks for all `.rpyc` files, and if any are missing, it will display a warning with a list of missing files and cancel the upload.

The game won’t start after subscribing to my own mod!

This error occurs when the game detects duplicate files in different folders. If you carefully read the section about choosing the correct upload folder, you should already know how to properly upload a mod. However, if you are unsure, check the files inside your mod’s ID folder.

You can find the mod ID in the uploader’s mod list or from the mod’s page URL:
https://steamcommunity.com/sharedfiles/filedetails/?id=XXXXXXXX
where `XXXXXXXX` is your mod’s ID.

If the folder with your mod’s ID contains a `mods` folder or a properly named mod folder rather than a scattered set of files, then you likely did everything correctly.

However, if you originally placed your mod in `mods` and mistakenly specified `mods` again when selecting the upload folder, then the mod will need to be reuploaded with the correct folder structure.

If you want to test your mod by subscribing to it, **make sure to move your mod’s folder out of the `game` directory** before subscribing to avoid conflicts.

The mod gets stuck while uploading or another error occurs

Most often, mod uploads are blocked by an active VPN. Disable any VPNs or other network bypass tools and try uploading again.

If the issue persists, check the `log.txt` file generated in the uploader’s directory. This log can be large, so instead of posting it in comments, contact me via VK[vk.me] or Telegram[t.me] and send the file there.

P.S. A note from the coder: The likelihood of an uploader error is minimal because the program itself does not upload or process anything—it simply "communicates" with the Steam client. Most issues are caused by network problems or Steam itself. Be thorough and try different solutions before messaging.


What is the .tagsHistory file in my mod’s folder after uploading to the Workshop?

This file stores data about the tags assigned to your mod. It allows changes in tags to be recorded in the update history even if the mod itself was not modified.

This file does not affect gameplay, so you don’t need to worry about it. It ensures that tag changes are properly reflected in the mod’s history since, normally, Steam does not log updates if only tags are changed.

Because of Steam Workshop moderation rules, silent tag changes are no longer possible. If we hadn’t implemented this feature, we would have been forced to restrict mods to just three characters and three genres. Since I disagree with these limitations, I found a compromise.

P.S. A note from the coder: This file does not directly influence tags, so do not attempt to edit it—it will be regenerated each time. Tags can only be added/removed through the uploader or via Workshop moderation.

Is it possible to add tags without updating the mod itself?

Yes, it is possible, but you need to specify the mod’s folder in the loader. If you don’t have the mod files on your computer (for example, if you just want to add tags to your old work), then simply subscribe to your mod and then indicate the mod folder within the 331470 folder. I have already written about this folder and the mod ID before. Unfortunately, you can’t just open the mod in the loader and add tags without specifying the mod folder – this is a quirk of Steam when working with Workshop items.

I would also like to note that the mod’s update date will be changed due to the tags file that will be added to the mod (see the previous question). Therefore, if you want to keep the mod’s update date intact, it won’t be possible to add tags inconspicuously. In that case, you should contact Workshop moderation, but there is a chance that they may refuse to add some tags.