Conan Exiles
468 evaluări
Conan Exiles: The Exile's Journey steps
De către Stormknight și colaboratorii 1
In Conan: Exiles you gain a large amount of experience points towards levelling up from completing Journey Steps.
This guide catalogs what the journey steps are and how you can achieve them to best gain xp and level up!
2
   
Premiază
Adaugă la preferate
Preferat
Elimină din preferate
Introduction
Since the pre-release patch on 18th April 2018, completing journey steps in Conan: Exiles grants significant amounts of experience. This means that completing those Journey steps is an important part of levelling up efficiently.

Looking at the Journey page in game shows you all of the steps in your current chapter (current chapter is the highest level chapter that still has some incomplete steps). It doesn't show you what the steps are in later chapters, however, it is still possible to complete steps from later chapters and get credit for them.

As an example, right at the start of the game, someone could give you an iron bar and you would complete the chapter III step, "Obtain an iron bar" whilst still working on chapter I.

This guide lists all of the steps in each chapter to help you plan and complete them.

If you have found any journey steps that I haven't, or experienced any issues with what I've described in this guide, please let me know, so I can update!

Thank you to Cryptomancerx & Lufialunar for letting me know some of the steps I didn't have.
CHAPTER I
1. Climb
Climb up any surface, like a nearby rockface, by jumping at the rock and pressing space again.

2. Drink
Near to where you start there is a waterskin. Pick it up and use it from your action bar to drink.

3. Eat
Use your action button on a bush a few times and you'll collect some insects. They're edible.

4. Use a bed or bedroll
Make a Fiber Bedroll[conanexiles.gamepedia.com] or Rawhide Bedroll[conanexiles.gamepedia.com] then place it on the ground.

5. Clothe yourself
Use your action button on a bunch of bushes to harvest Plant Fiber. You can craft this in your inventory to make a Coarse Tunic[conanexiles.gamepedia.com], Handwraps, Leggings & Footwraps.

6. Slay!
This one is simple - kill something! There are some fairly easy creatures as you leave the desert near the river that you can kill with something as simple as a stone pick. Equipping yourself with a Stone Sword[conanexiles.gamepedia.com] is preferable though.

7. Craft a tool
Grab a few branches and small rocks off the floor and you can craft a Stone Pick[conanexiles.gamepedia.com].

8. Find signs of intelligent life
There are various places you can complete this - usually by interacting with a written message or strange runed obelisk. The easiest is the note near where you spawn.

9. Kick
Press the Ctrl key on your keyboard. You don't even have to be in combat at the time.

10. Dodge
Press the left-Alt key on your keyboard.
CHAPTER II
1. Spend Knowledge Points
Press "O" to access the Feats page - you just need to select a feat and unlock it.

2. Get a dedicated weapon
Craft yourself a Stone Sword[conanexiles.gamepedia.com] from branches, stone and twine.

3. Eat a filling meal
To start with you're probably surviving by eating insects and berries. To gain this journey step you need to eat some food that has been cooked. The easiest way to do this is with a Campfire[conanexiles.gamepedia.com] - put some wood and raw meat on it.

4. Find shelter
You gain this by creating a building with walls & roof, but it can sometimes trigger from naturally occuring shelter, such as caves.
Purchase the Apprentice Mason[conanexiles.gamepedia.com] feat from the Construction page, enabling you to craft Sandstone building parts in your inventory.

5. Perform a Heavy Finisher with a weapon
As soon as you have an actual weapon, such as the Stone Sword you made above, you can use the heavy attack four times in a row to activate the finisher. You don't need to be attacking anything.

6. Use a Torch
Make an Improvised Torch[conanexiles.gamepedia.com] from 5 branches and 10 plant fiber. Add it to your quickbar and use it.

7. Scout an Exile Camp
Look for one of the camps of npc exiles, usually a large bonfire with them sitting around it. Just get close enough to one and you'll unlock this step.


8. Store goods
Place something from your inventory into a Wooden Box[conanexiles.gamepedia.com], or other type of box. These can be made by taking the Boxmaker feat from the survival page.

9. Create a home
You'll likely trigger this when you're halfway to making yourself a building. Just unlock the Apprentice Mason feat and build a house/hut, starting with Sandstone Foundation[conanexiles.gamepedia.com].

10. Block an attack
This journey step actually requires you to be fighting an opponent. You need a shield first. Both Wooden Shield[conanexiles.gamepedia.com] and Bone Shield[conanexiles.gamepedia.com] are easy to make early on. Take the Defender feat from the weapons page.
CHAPTER III
We're getting a bit advanced now and there is an assumption that you have a base of some sort where you can build crafting tables.

1. Equip a piece of light armor
The easiest way to get this is for someone else to make the armor for you.
To do this yourself, you'll need to take the Armorer[conanexiles.gamepedia.com] feat from the Armor page, then build an Armorer's Bench[conanexiles.gamepedia.com] where you can make the light armor you need. Note that crafting armor is a little odd in that you need to craft the padding first, then you can craft the actual armor from the padding.

2. Use a skinning dagger to skin an animal
To get a skinning knife, you need to unlock the Journeyman Butcher feat, then craft an Iron Skinning Knife on a Blacksmith's Bench[conanexiles.gamepedia.com].

3. Scout a Darfari camp
As for the exile camp in Chapter II, but Darfari are a different tribe found further North in the desert areas. The map image here shows one of these camps.


4. Obtain an iron bar
You may get lucky and loot an Iron Bar[conanexiles.gamepedia.com] from an NPC you killed or a chest. If you're playing with others, you can all unlock this journey step from a single bar.
Most likely you'll need to make the iron bar yourself. To do this you'll need to unlock the Blacksmith[conanexiles.gamepedia.com] feat from the survival page, then build and place a Furnace[conanexiles.gamepedia.com]. Place some Iron Ore and fuel (wood or coal) into the furnace and start it up to make the iron bar(s).
Note that you'll need to travel North of the starting river to find ore nodes to mine and will need a pick to hit them with.

5. Find somebody to talk to
Other players don't count for this! There are a number of neutral npcs on the map that you can talk to, to unlock this journey step. The first one available to you is wandering around a campfire at the Sentinels (the big statues on the river in the starting area).

6. Shoot an enemy
There's two ways to approach this - bow and some arrows, or you can throw something like a spear at a target. The Archer feat can be taken from level 5 onwards and both bow and arrows can be created in your inventory.

7. Venerate the gods
You remember when you selected a God to follow in character creation? This is the point where you hope that you didn't select Crom. To unlock this journey step, you need to build and place a shrine to a God. If you did choose Crom, don't worry, it's possible to find neutral npcs that will teach you additional religions.

8. Get a Head
Chop up bodies with a hatchet. :)
It's not guaranteed, it's a chance for each corpse.

9. Throw an Orb
Loot enough npcs and chests and you'll find a Gaseous Orb, Grease Orb, or possibly Demonfire Orb. Equip it on your quick bar, select it like a weapon and then right-click to throw it. Done! These orbs can also be crafted at a Firebowl Cauldron.

10. Use a pick to gather bark from trees
You've almost certainly made a Stone Pick by now to gather rock. You probably have a Stone Hatchet to chop trees with for Wood. However, if you hit a tree with your pick, you'll occasionally get Bark as well. It's mostly useful for fuelling the Tanner and Drying Rack.
CHAPTER IV
1. Put an Enemy in the Wheel of Pain
Time to learn how to capture NPCs and turn them into your thralls (make them work for you).
You'll need to unlock the Thrall Taker[conanexiles.gamepedia.com] feat. Now build a Lesser Wheel of Pain[conanexiles.gamepedia.com] at your base and craft yourself a Truncheon and Fiber Bindings - place these on your quickbar for easy access.
Find yourself an npc exile - they can be found at various camps across the map - attack them with the Truncheon and, instead of killing them, you will knock them unconscious. Now activate the Fiber Bindings as your active weapon and press the E key while looking at the unconscious npc - you'll attach them to the rope and you can now drag them back to your base. Beware that the rope has fairly low durability, but you can repair it (or carry more than one). Once you get back to your Wheel of Pain, look at the wheel and press the E key again to place the unconscious npc onto the wheel. This should unlock this journey step!
Note - to successfully en-thrall the npc, you need to power the wheel of pain with some sort of food and activate it. People often use Gruel[conanexiles.gamepedia.com] for this.

2. Sleep in a bed
This one is real simple - you just need to bind yourself to a bed, like you did with the bedroll earlier. You don't even need to be the one who made or placed the bed, if the person who placed it is in your tribe.
If you need to make your own bed, you'll want the Bedshaper[conanexiles.gamepedia.com] feat on the Survival page.

3. Craft an iron tool
Requires you to unlock the Iron Tools feat on the Survival page and then craft either an Iron Pick or Iron Hatchet. Both of these require a Blacksmith's Bench[conanexiles.gamepedia.com] to craft.

4. Obtain a potion
There are many potions in the game and many ways to acquire them (crafting, looting, trading).
If you want to craft a potion, the easiest choice is to unlock the Firebowl Cauldron[conanexiles.gamepedia.com] feat on the Survival page. You can use this to craft Aloe Extract[conanexiles.gamepedia.com] which is a really useful healing potion that can be used whilst in combat and only requires 10 Aloe Leaves[conanexiles.gamepedia.com] to craft.
Don't forget that, like many crafting stations, the cauldron requires fuel.

5. Show your religious zeal
That shrine that you built in Chapter III - you'll unlock this journey step very soon after by crafting the gathering item on that shrine and generating a point of zeal for your God.
These gathering weapons should be used on dead exiles to harvest an item of religious significance from them.

6. Mine all the iron in a node
If you've got to Chapter IV, you've most likely already done this, but if not - find an iron node and hit it with your pick until it explodes (you have harvested all of the Ironstone[conanexiles.gamepedia.com] from it and the journey step will unlock.

7. Dye an item
You can obtain different colors of Dye[conanexiles.gamepedia.com] by looting npcs or chests, or by crafting Dye in a Firebowl Cauldron.
To use Dye on a location of armor, select the armor and you'll see a button for Dye.

8. Catch a fish
Place a Fish Trap[conanexiles.gamepedia.com] into water and wait for a bit until there is a fish in there!

9. Plant seeds
There's a couple of things you need to do to successfully plant seeds:
- Place a Compost Heap[conanexiles.gamepedia.com] and then add Putrid Meat, Plant Fiber, and Bone Powder. Over time it will create Compost.
- Place a Crude Planter[conanexiles.gamepedia.com] and then add Compost plus any type of seeds. Seeds can be gathered from most bushes.

10. Earn a perk
Perks are earned every 10 points of each attribute. As an example, when your Vitality reaches 10, you gain the perk, "Deep Breath"
CHAPTER V
1. Craft an exceptional or flawless item
When you have added a tier 3 & 4 thrall to a blacksmith or armorer station, it may allow you to craft exceptional or flawless versions of some armor types. To unlock this journey step, just craft a weapon or armor piece.

2. Destroy the Abyssal Remnant
This monster can be found at the end of "The Dregs" - a dungeon located at the very Western end of the starting river.
- To enter, you need to shed the blood of another human on the patterned stonework. Lure an enemy exile into the room and kill them on the stonework to open the dungeon.
- Make sure to take a bow and plenty of arrows with you, to shoot the puzzle gongs in this dungeon.


3. Upgrade a building piece
Craft a Stonebrick Foundation[conanexiles.gamepedia.com] (tier 2 building) and use it to replace a Sandstone Foundation you already placed.

4. Obtain the head of a boss creature
Some boss creatures will yield a head, others won't. Typically, the ones that drop skeleton keys don't have a head. Some fairly easy boss creatures that you can get a head from are:
  • Shaleback King, located at the South-East of the map.
  • - Elk King, located North of The Shattered Basin.

5. Ride an elevator
Fairly self explanatory. You can learn to build an elevator by taking the relevant feat.

6. Scout a Black Hand camp
Black Hand camps are mostly found in the North-East of the desert area, especially around The Black Galleon.


7. Decorate yourself with warpaint
You can learn to craft decorative warpaint as a feat. The warpaint itself is crafted in the Firebowl Cauldron.

8. Fire a trebuchet
Another fairly self-explanatory step. The trebuchet can be learned as a Feat and is crafted and assembled in 4 steps.

9. Combine orb effects
Equip and throw a Grease Orb[conanexiles.gamepedia.com] at some scenery, then equip and throw a Demon-fire Orb[conanexiles.gamepedia.com], to hit the patch of grease that you can see.
Note that you should use right-click to throw these, so they smash on impact.

10. Climb the Tower of Bats
This can be a fairly tricky climb, so make sure you're only wearing Light Armor. The tower is found South-East of the Unnamed City, across the river. It's pretty tall and easy to spot if you're in the right area.
CHAPTER VI
1. Use an explosive
Place an Explosive Jar[conanexiles.gamepedia.com] on the ground, then interact with it to activate the timer fuse. You probably want to run away as soon as you have done this!
Note that if you detonate the explosive by shooting a fire arrow at it, you won't unlock this journey step.

2. Modify a weapon
Unlock the Apprentice Weaponsmith feat from the weapons page.
This allows you to make several weapon modifications at the Blacksmith's Bench, such as Simple Reinforcement Kit or Simple Weapon Damage Kit.
Make one of these and then drag it onto a weapon to modify that weapon. Note that the weapon must be fully repaired to do this.

3. Scout a Dogs of the Desert camp
The Dogs of the Desert camps are situated at, and around, The Den.


4. Lure an enemy into a trap
This is accomplished using an Exploding Trap[conanexiles.gamepedia.com] and getting an opponent (either player or npc) caught in the explosion. It works like a land mine after it is placed.
Something to be aware of is that the explosion has a delay of a few seconds from when it is triggered, so the player/npc that triggered it may have moved out of the area of effect. I found the best way to guarantee this journey step triggering is to stand next to the trap, so you get hit by it as well.

5. Modify a piece of armor
Unlock the Apprentice Armorsmith feat from the armor page.
This allows you to make several armor modifications at the Armorer's Bench, such as Thin Armor Plating.
Make one of these and then drag it onto a piece of armor to modify that armor piece.

6. Squish something in a fluid press
There are a number of things you can squish in a Fluid Press[conanexiles.gamepedia.com] to trigger this journey step, such as berries or the head of an animal.

7. Drink water from a well
If your base isn't near water, then building a Water Well[conanexiles.gamepedia.com] is a worthwhile investment.

8. Cripple an enemy
The Cripple status effect is typically inflicted with Heavy Attacks from a sword.

9. Sunder an enemy
The Sunder status effect is typically inflicted with Heavy Attacks from Maces, Hammers and Axes.

10. Make an enemy bleed
The Bleeding status effect is typically inflicted with Heavy Attacks from paired daggers.
CHAPTER VII
1. Survive a sandstorm outside of a shelter
To trigger this it seems that you need to be standing outside when a Sandstorm starts and take at least one tick of damage from it.
The safest way to trigger this journey step is to have a Sandstorm Mask[conanexiles.gamepedia.com] and equip it as soon as you have taken one tick of damage. You can also try to survive by using Aloe potions to heal yourself.

2. Explore the Unnamed City
The Unnamed City[conanexiles.gamepedia.com] is a darker orange color than the rest of the desert and easily spotted by the massive, black walls. You don't need to go very far inside the walls to trigger this and, in some places, can trigger it from outside of the walls.


3. Survive a Purge
Be present, in a clan, when a Purge occurs that targets that clan.
I believe that you actually need to get involved in fighting the attackers for this to work, but as long as you don't die and the attackers are all killed, then this journey step will unlock.

4. Destroy a Dragon
Find a Dragon[conanexiles.gamepedia.com] and kill it! The easiest dragons are found in the Unnamed city, with smaller ones in the Breeding Pools to the West of the city.

5. Visit Sepermaru
Also known as The Relic Hunter City[conanexiles.gamepedia.com], Sepermaru can be found in the far West of the desert area of the map.
It is a largely neutral city where you can trade.


6. Attune an Obelisk
There are many Obelisks[conanexiles.gamepedia.com] situated around the map - they are easily spotted as they are large, black rock and have a purple cloud effect around them that causes you to gain corruption when near it.
To attune to one, run up to it and interact with it.
You can now use a Map Room to teleport to that Obelisk.


7. Create a map-room
It's important to note that this journey step triggers from placing the Map Room[conanexiles.gamepedia.com] rather than crafting it. The Map Room can also be picked up to your inventory and re-placed, allowing everyone in a tribe to gain this journey step from crafting a single Map Room.
Note that you need a flat area that is at least 8x8 foundations.


8. Recruit a unique thrall
Hopefully you have a fair few Thralls by now, enhancing your workshop and guarding your base.
To trigger this journey step, you need to capture and convert a named npc on the Wheel of Pain.

9. Equip a Raider Armor Piece
Raider armor feat (Level 30 armors) - either find/borrow a location, or make some at the Armorer's Bench.

10. Cleanse corruption by watching an entertainer
Three steps required:
- Capture an Entertainer[conanexiles.gamepedia.com] Thrall and place in your base.
- Gain Corruption[conanexiles.gamepedia.com] from being near an Obelisk or in the Unnamed City.
- Stand near the Entertainer in your base to remove the Corruption.
CHAPTER VIII
1. Visit New Asgard
New Asgard is a large, circular Nordheim settlement in the green area of the map.

2. Defeat the Kinscourge
The Kinscourge is located in The Black Keep, in the Frozen Northlands (see map). It's a huge, maze-like structure with many undead warriors to fight before you reach the Kinscourge. Wear good heavy armour for this fight, though many of his attacks are avoidable.

3. Get extremely drunk
You need to drink FIVE alcoholic drinks to get drunk enough to trigger this journey step. This is also enough to give you alcohol poisoning and a fairly lengthy buff of +3 Strength and +3 Vitality (the alcohol poisoning debuff can be cleared using a potion from the Set shrine).
There are many alcoholic drinks in Conan: Exiles and you can loot them from various opponents or chests, as well as make them using a Fermentation Barrel[conanexiles.gamepedia.com].

4. Enter the Palace of the Witch Queen
Situated in the Eastern side of the Jungle zone - this is a reasonably obvious entrance to an instanced dungeon. Once inside, it's a brief walk forward before you encounter the Witch Queen herself. You do NOT need to fight her to complete this journey step.
If you do decide to fight her, watch out for the pew pew lazer beams!


5. Drink the Yellow Lotus Potion
When you drink a Yellow Lotus Potion[conanexiles.gamepedia.com] it will instantly refund all of your attribute points and feats.
You can make this potion at the Firebowl Cauldron and Yellow Lotus flowers are found across much of the map.

6. Harvest the Black Lotus Blossom
Black Lotus flowers can be found in a place called "The Black Garden" in the Eastern part of the Jungle zone, amidst broken temples populated by gorillas.

7. Discover all of the Lemurian Lorestones

8. Harvest a fallen star for ore
First off it's important to note that this unlocks from adding Star Metal Ore[conanexiles.gamepedia.com] to your inventory.
This means that you can earn this by looting the ore off fallen monsters or by taking it from a box in your base. You may need to do this the hard way and find a node of Star Metal and harvest it - this requires explosives.

9. Build or Upgrade your building to the highest tier
Learn the Master Mason feat from the Construction page, then craft either a Reinforced Stone or Black Ice-Reinforced building part and place it.
Note that to unlock this journey step you don't need to be the one making the building part, just place it, so someone else can craft the building part for you.

10. Discover what haunts the Sanctuary Ruins
Sanctuary Ruins are at the top of an island in a large lake at the East side of the green zone. This is an easy one to get, as there is little peril there and you just need to get to the top.
There is also a lot of the backstory for the game here!
CHAPTER IX
1. Visit the Mounds of the Dead
The Mounds of the Dead are in the Western half of the Brown zone.


2. Defeat the Barrow King
The Barrow King's lair is located to the West of the brown area (see the map), behind a large, round, locked door.
To open the door, you need to have at least 1 Demon's Blood in your inventory. Once you kill the Barrow King, there is a stone tablet where you can learn how to make a special polearm.

3. Obtain a Black Ice Weapon
Black Ice Weapons can be crafted at the Frost Temple Smithy within The Temple of Frost.
You don't need to make one to unlock this journey stage, just move one to your inventory, so you can borrow one from someone else.

Another method is to upgrade a shrine of Ymir to tier 3 and forge one of the weapons there, such as Glacier Crack.

4. Buff yourself with Warpaint
Learn the feat Functional Warpaints from the Armor page, then craft and use one of them in the Firebowl Cauldron.

5. Summon Witchfire
This one is pretty easy compared to most of this chapter. You need to add either a Witchfire Wall Torch or a Witchfire Standing Torch to your inventory to unlock this journey step - it doesn't matter who made it.
These torches are crafted at the Artisan's Worktable[conanexiles.gamepedia.com] and require Witchfire Powder[conanexiles.gamepedia.com] which is made at the Firebowl Cauldron, from Glowing Essence and Brimstone.

6. Pour Boiling Oil from a Siege Cauldron
This took more figuring than it should. The Siege Cauldron[conanexiles.gamepedia.com] can be learned from the Master Construction area of feats. To place it, you need to first place a crenelation along the edge of a ceiling. The Siege Cauldron will then snap to the crenelation.
You then need to access the inventory of the placed Siege Cauldron and add TAR (not oil).
Lastly, interact with the handle and it will tip 1 of that oil over the edge, slightly damaging any foes below.

7. Maintain normal temperature in the most Extreme Cold
The easiest way I found to unlock this is to find an area of Extreme Cold that is next to an area that isn't very cold at all. You then simply run into the Extremely Cold zone.
I found that The Bridge of the Betrayer worked well for this (see map below). I also wore armour with cold resistance and ate some spiced food to get my warmth up before running across the bridge.


8. Defeat Hrugnir of the Frost
Hrugnir can be found guarding the Frost Temple Smithy within The Temple of Frost.


9. Equip a Nordheimer Armor Set
Simply unlock the armour feat to allow you to craft the Nordheim armour sets.

10. Discover all of the Giant-king obelisks
CHAPTER X
1. Find a Legendary weapon
To unlock this you need to add a Legendary Weapon to your inventory. It can be one that belongs to someone else. To gain a Legendary Weapon, you should defeat one of the many huge-sized beasts that can be found around the map (Giant Crocodiles, Spiders, Rhino etc) and loot a Skeleton Key from them. Near to the huge beast will be a chest that can only be opened with a Skeleton Key - inside each chest you will discover a Legendary Weapon.
An alternative method is to craft a legendary weapon! The Kingslayer Polearm and Kingslayer Dagger both count as legendary weapons and the recipes can be learned from The Barrow King.

2. Destroy whatever dwells at the heart of the Volcano
Completion text:
The Degenerate, ancient enemy of mankind, lies dead in the ruins of his city. Such a creature knew nothing but deceit and contempt for other living things. The Giant-kings were fools to trust it, the Lemurians were fools to believe that it revealed itself to them willingly.Now, you wipe the ichor of its passing from your blade and stride forth from the ruins. It will never attempt to rule from the shadows again.

3. Obtain an Obsidian Weapon
This journey step is unlocked when you move an Obsidian Weapon into your inventory. To craft Obsidian Weapons you need to learn the recipe.

4. Create a Master Workstation
The top tier of workstations are all named "Improved <name>" rather than master.
As of 30th April 2018, the only workstation that you can craft to unlock this journey step is the Improved Oven.

5. Summon the Avatar of a God
Description:
You have tried to find time to make devotions to the gods. You've visited their altars and even made sacrifices to them. But to call upon the power of the gods requires earning a lot of favor and a lot of favor requires a lot of sacrifice.You decide to renew your efforts on behalf of your chosen deity. Or deities.
That way lies true power.
Craft a True Name token at a tier 3 altar and summon the avatar of your god. Just don't do it in your house.

6. Survive the heat of the volcano
Description:
The volcano is the hottest place in the Exiled Lands – so hot that it can burn a person to death just walking on the stones there.
You will not allow it to beat you. You will stroll through the Volcano and you will not sweat and you will not quiver.You need to prepare, of course.
Visit the hottest area of the Exiled Lands while maintaining a normal body temperature. You will need to combine food effects, special clothing and armor to achieve this.

7. Equip an Epic Armor Set
At this time, there is no minimum level for wearing epic armour, so borrow from a friend if you can and get the XP for completing this step. To make your own epic armour:
- Place an Improved Armorer's Bench.
- Craft the epic armor (purple corners on the icon) from that bench.

8. Explore the entire Exiled Lands
Description:
You have explored much of the Exiled Lands, but to truly dominate you know that you need to understand the land intimately.
Every chokepoint that can turn the tide of battle, every cave where an enemy might be hiding, every location where a rare resource might be found - you must learn them all.\n\nTime to get cracking.
Explore your map to find every point of interest in the Exiled Lands.

9. Defeat the Mummy of the Ring
Description:
So it comes to this - Thoth Amon, lord of the Black Ring, is the one who imprisoned you in the Exiled Lands. He seeks the artefacts that you have gathered and he is sending his black servant to collect them.
Destroy the Servant of the Ring, by any means necessary.
When you placed the artefacts in the vessel, the Servant of the Ring was summoned to take them. You must defeat it!

10. Escape the Exiled Lands
Description:
You have gathered the artefacts of the Giant-kings, their enemies and their allies. You have defeated the Servant of the Ring and earned your right to freedom. Now, you need only complete the ritual to free you of the bracelet and escape the Exiled Lands forever.Or, you can choose to stay and dominate.
You must make a choice.
Use the keystone to remove the bracelet and escape the Exiled Lands. Be aware that this will delete your character and end the game.
54 comentarii
General Scorpion 29 iun. 2023 la 11:31 
For some reason I'm unable to post a guide myself But if anyone is looking for a way to get the following achievements: The Road of Kings, O Sleeper Awake, The God in the bowl, What do i know of Cultured ways?

The achievements seem to be bugged and most likely because of the rework done to "Journey" missions.

No matter how many altars,wheels of pain, beds u make it will not matter. The achievements for me only triggered when I was completing the Journey missions with corresponding objective like: "place or access bed,altar,wheel of pain..."

And for the Road of Kings it triggered for me when i finished all of the Journeys, even though the achievement description said "finish first journey"
Another way to get it could be if you follow the steps of the old "chapter 1" missions.
M 20 iul. 2022 la 20:25 
X.9 still not in the game?? However THANK for list!
Augustyn 20 nov. 2021 la 6:53 
If anyone is too lazy to capture an entertainer, there's 3 where you meet Conan in Sepemeru that give you the journey step by standing near them
naugolnovs16 10 iul. 2021 la 8:34 
почему так пишет Соединение разорвано. Для игры по сети необходимо подключение к интернету.
Smaller_Abyss 28 iun. 2019 la 5:51 
@freault I just use the generic seeds. Not sure if other seed types work.
Smaller_Abyss 28 iun. 2019 la 5:50 
I just found out that you can get the journey step "Combine Orb Effects" by throwing a gas orb into an NPC bonfire.
ADAMBOMB 16 nov. 2018 la 10:08 
Discover all of the Lemurian Lorestones is super annoying.
Stormknight  [autor] 21 iun. 2018 la 15:19 
"non" is South-West of the map, well past the Soul Wall and can only be reached by teleporting.
Aki-San 21 iun. 2018 la 13:21 
i downloaded the "all map markers" mod and got X-8 with the only missing location being "non". wherever that is. maybe the modauther could help with the necessary locations (list) for this mod.

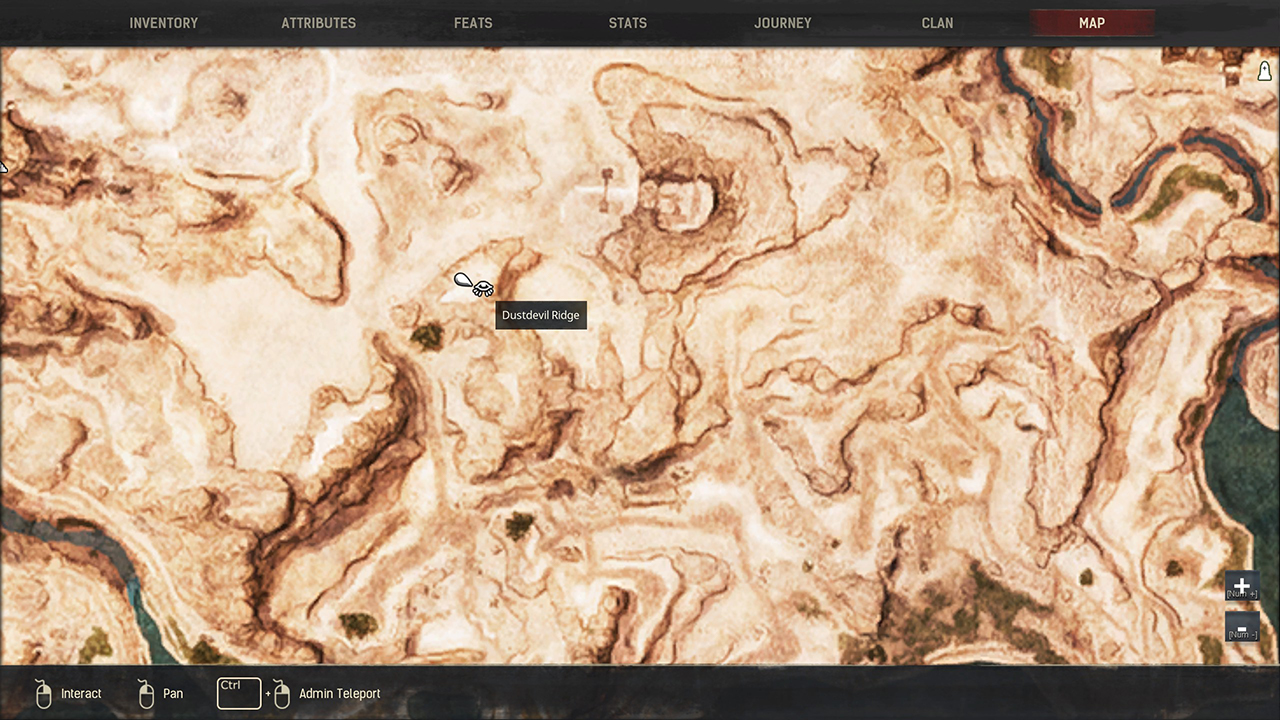
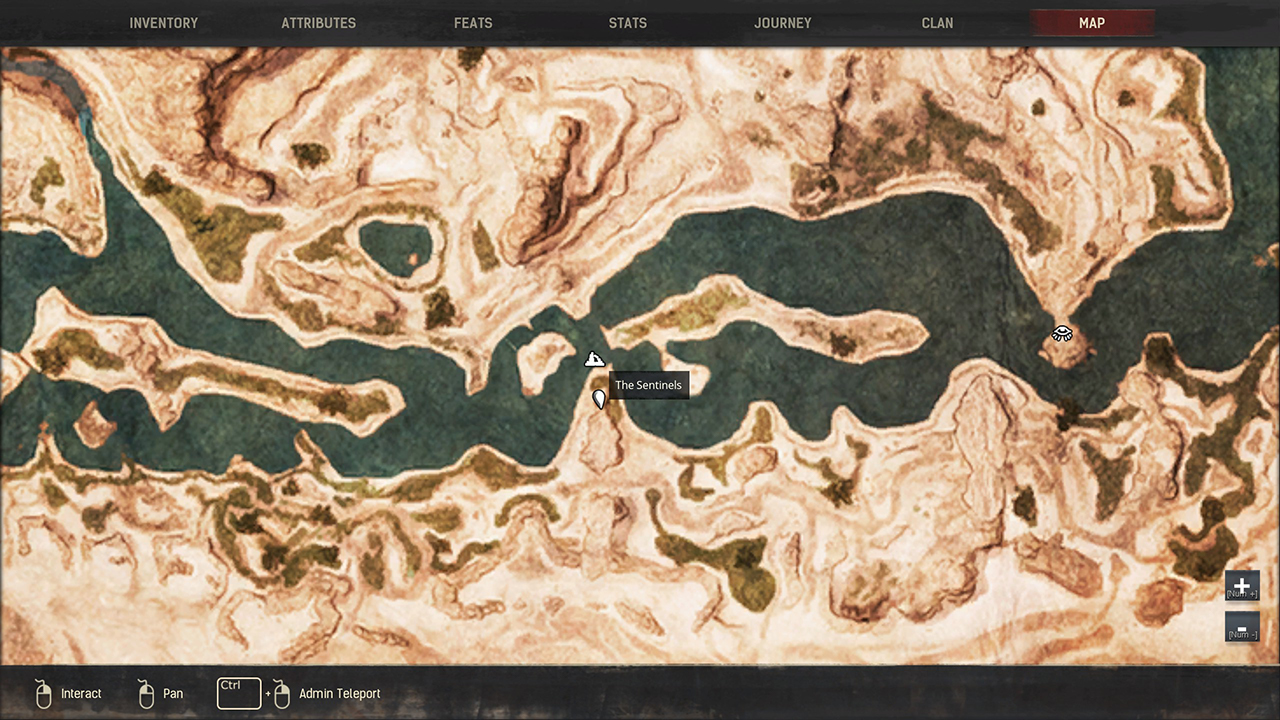
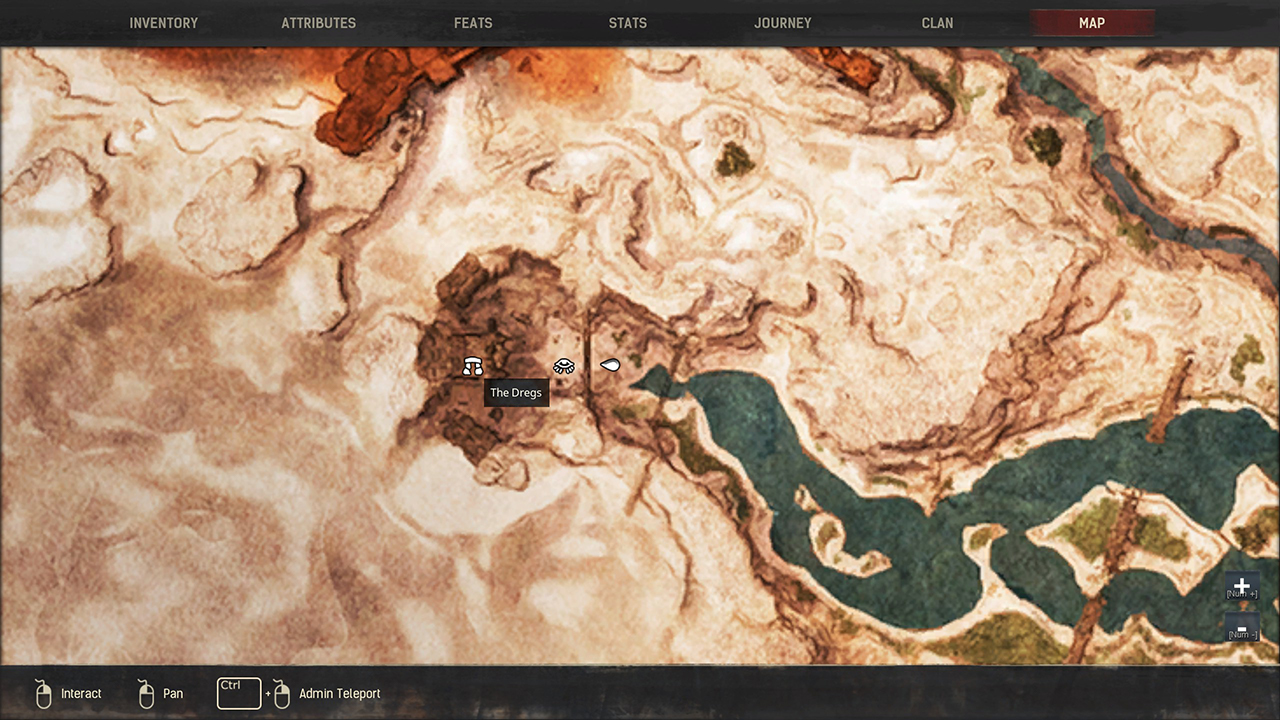
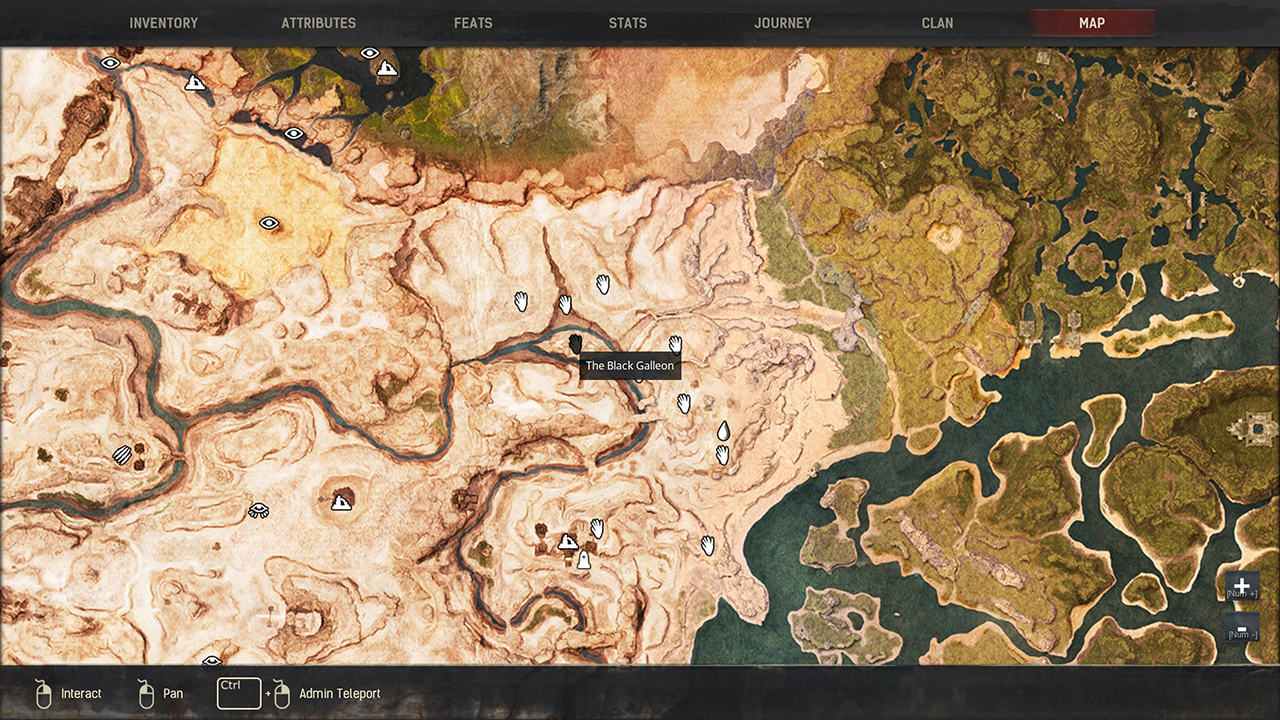
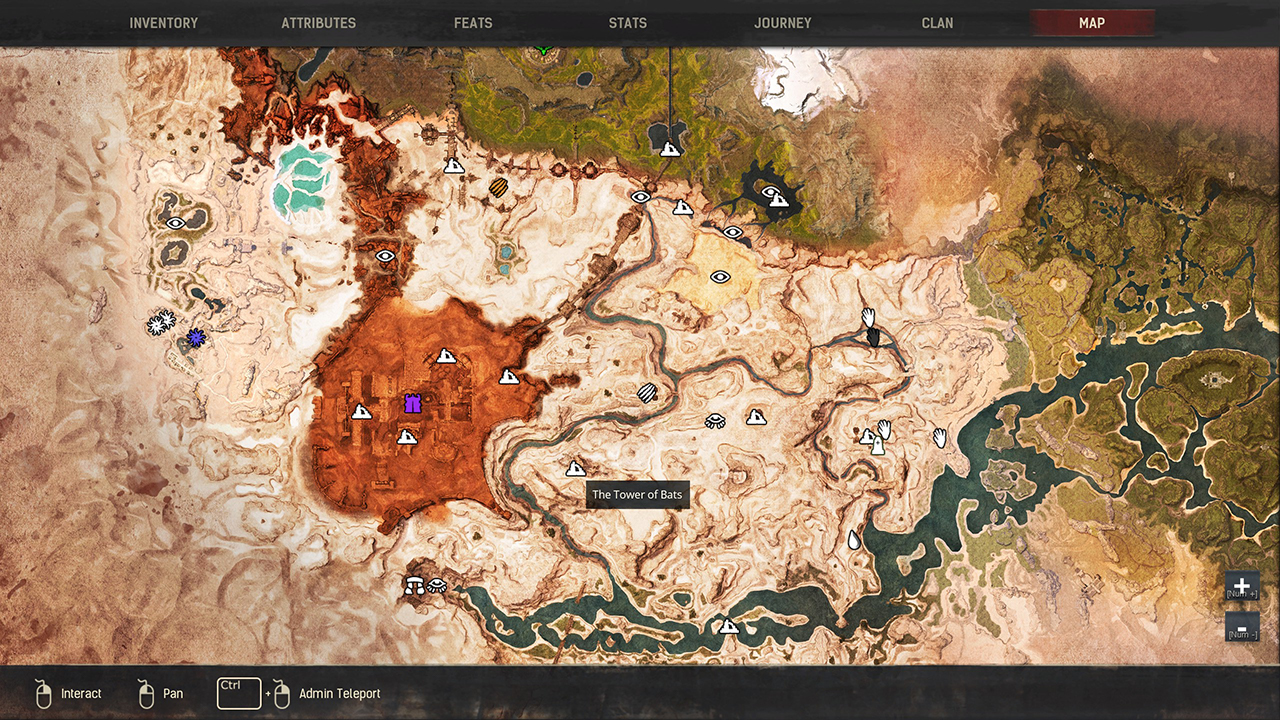
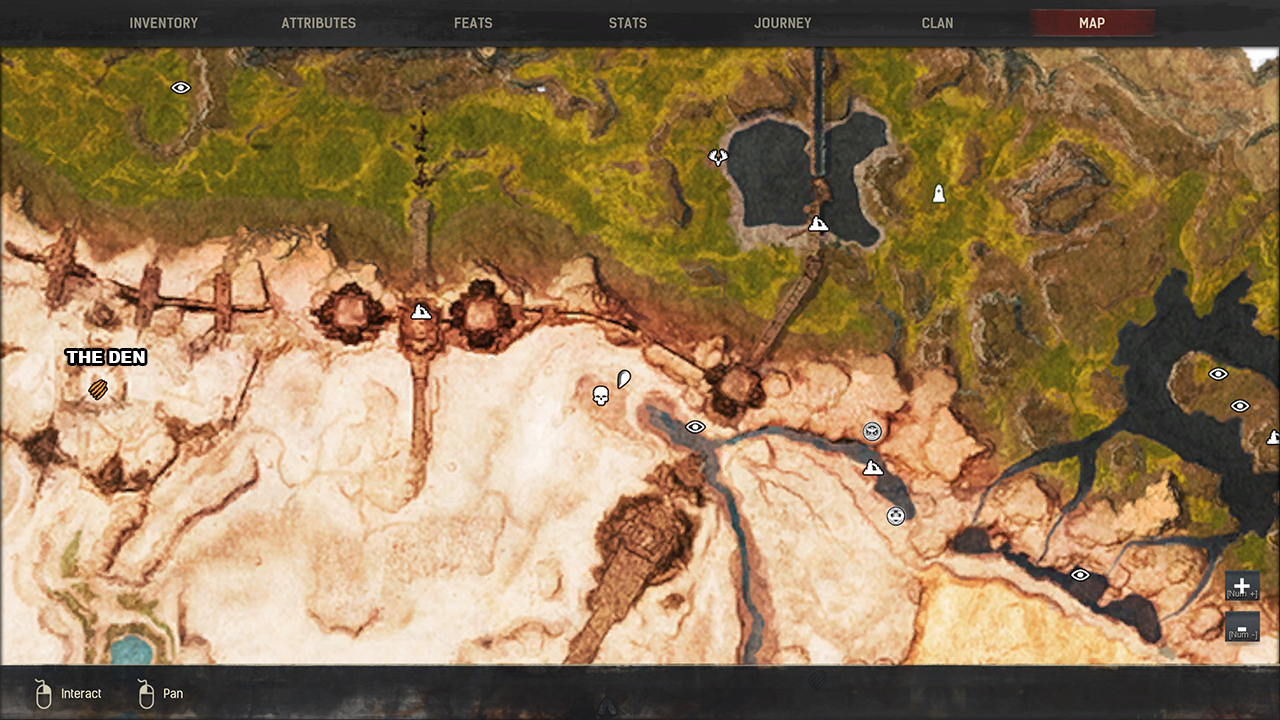
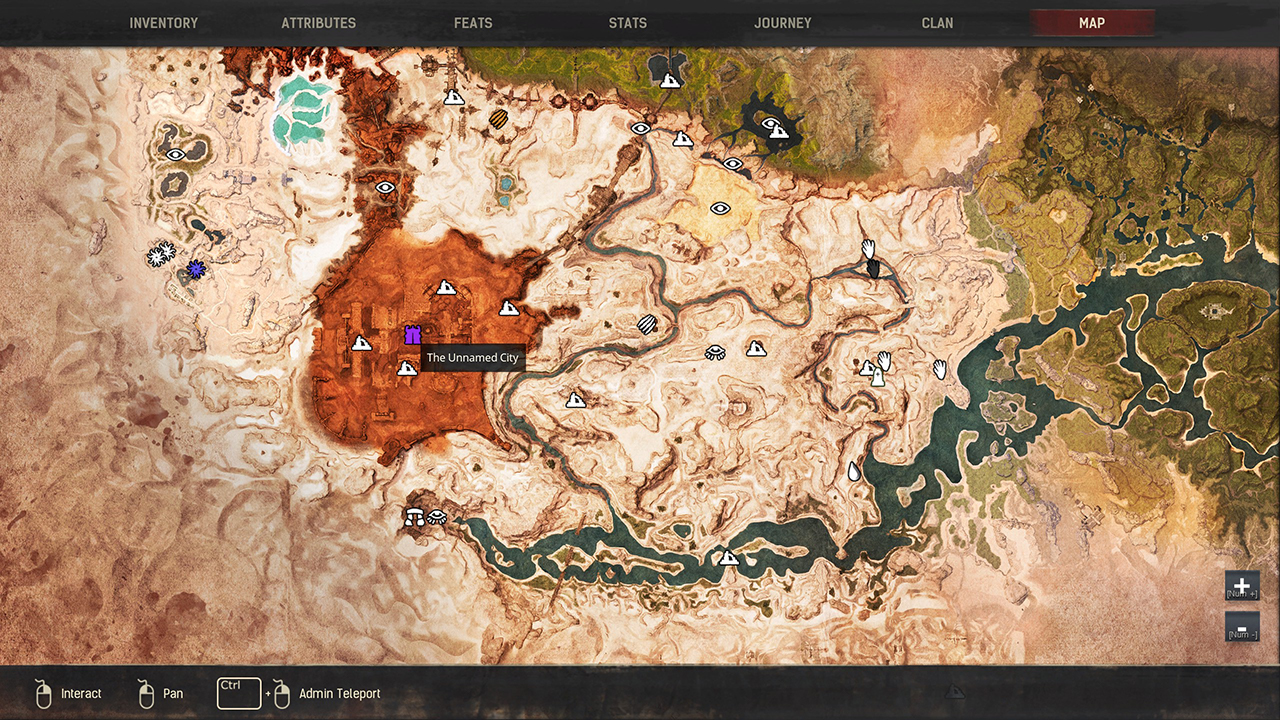
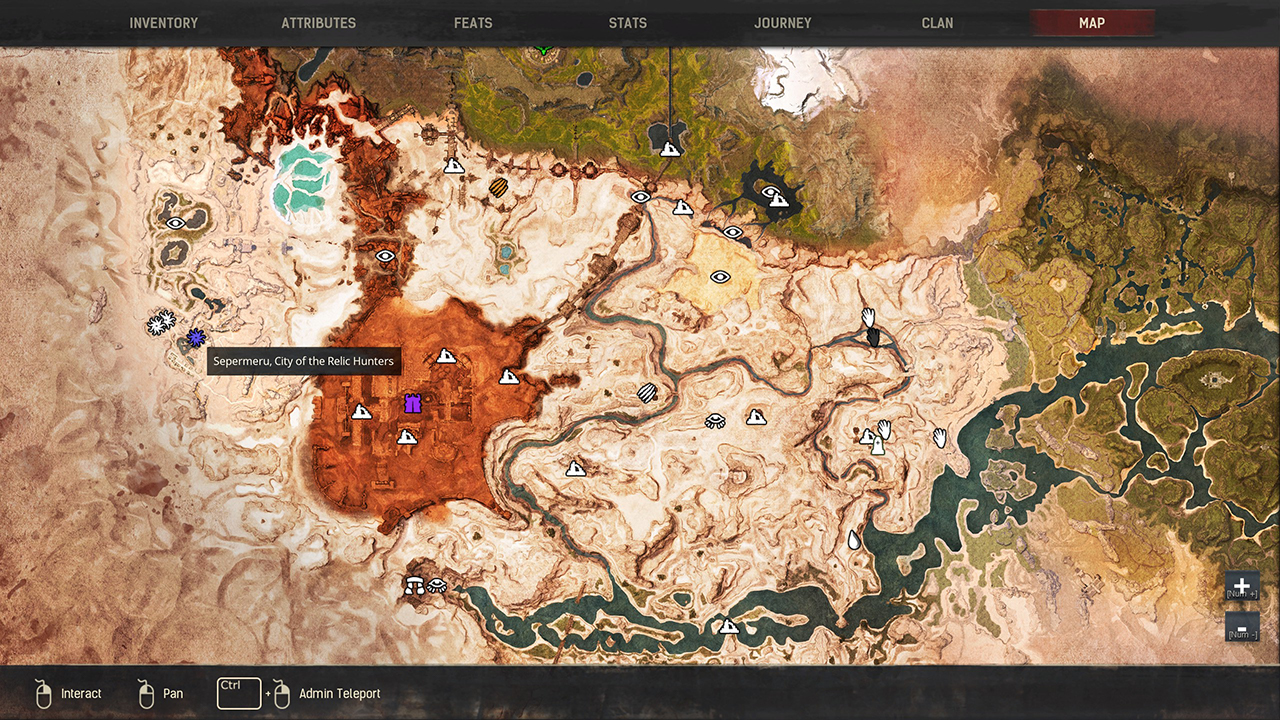
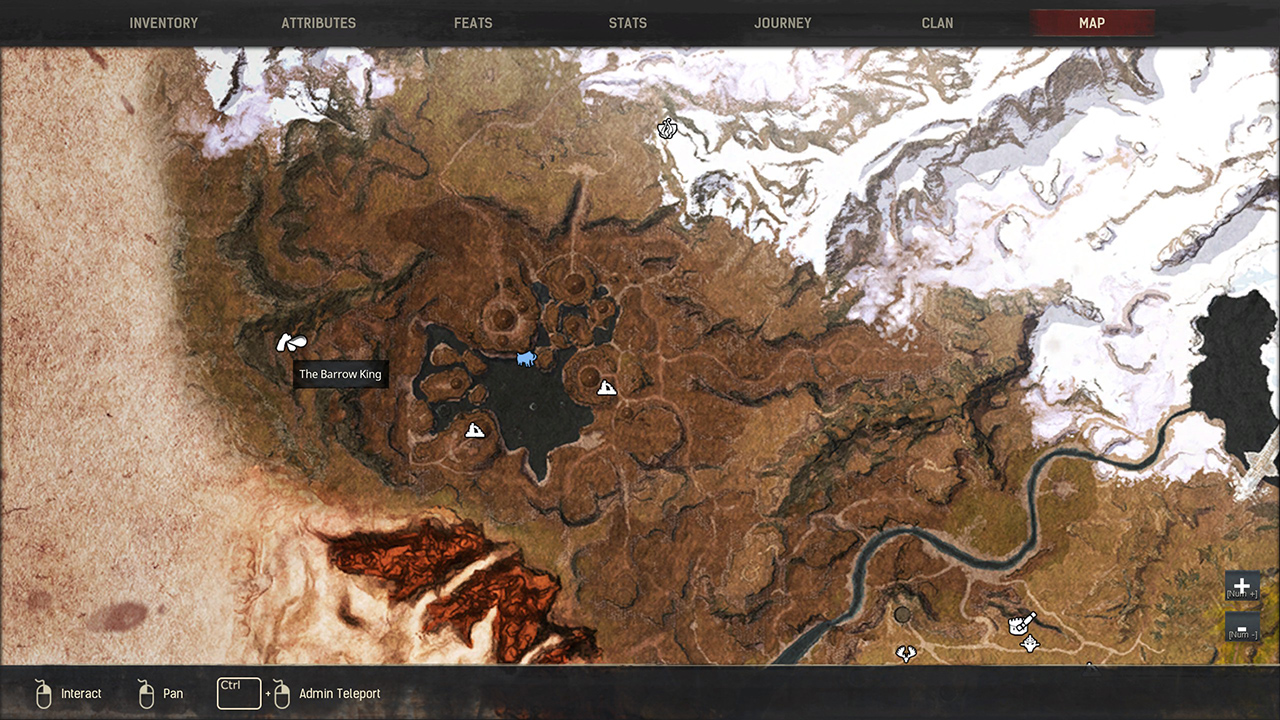
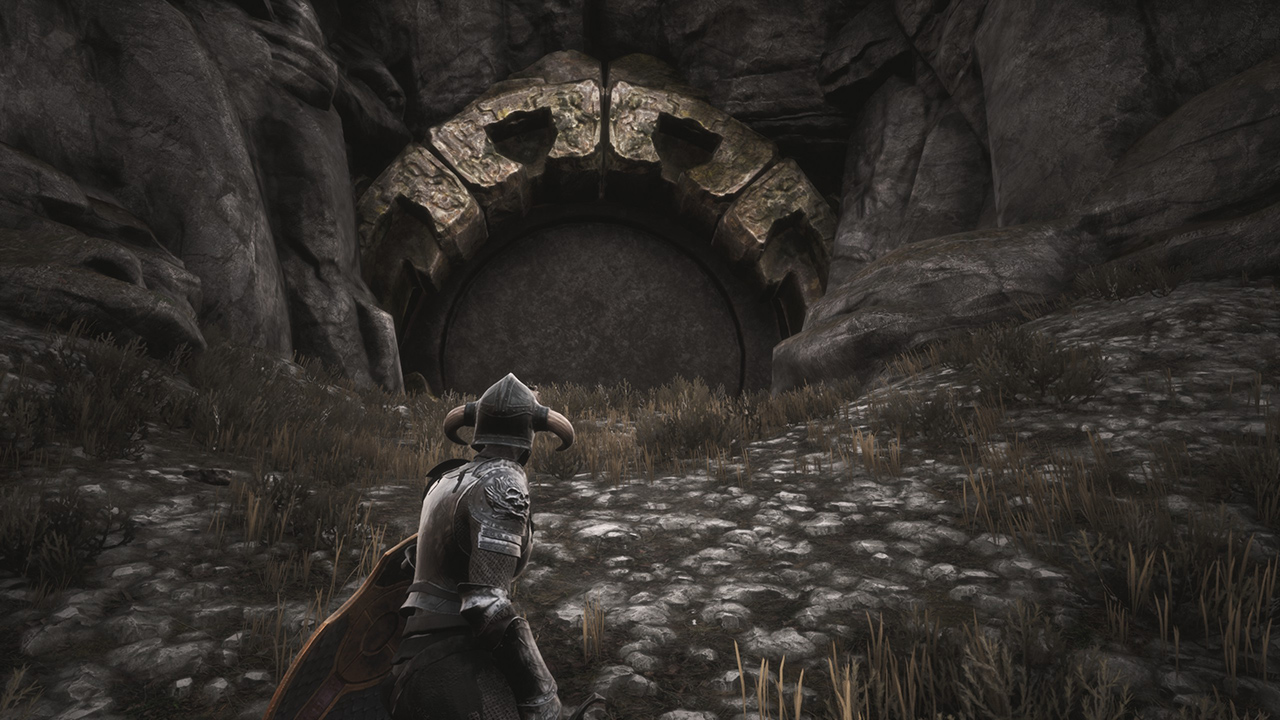
The "lemurian lorestone fix" mod has the locations for VIII-7 and IX-10 (lemurian lorestones and giant king lorestones)

Link to the discussion
https://steamcommunity.com/workshop/filedetails/discussion/1391893072/1692669912407489997/
Eternie 11 iun. 2018 la 23:13 
Thanks for this guide it is well written and very helpful!
I still cannot get a lot of them as they have bugged out, (the icon has disappeared and for simple items like "Throw an Orb" or pick a perk when I have reached L140 with mod and redone the feats several times.)
They may pop if or when I totally restart game