Borderlands 2

Borderlands 2

698 ratings
The Ultimate Badass Build Guide
By Dr RIPATTACK
I've played a lot of Borderlands 2. The more I experimented with character skill trees, the more I appreciated and enjoyed the game. I've created this guide to share some of these builds. Enjoy :)
11
6
6
2
2
3
2
   
Award
Favorite
Favorited
Unfavorite
Intro
Welcome
Borderlands 2 has been one of my all time favourite games, and I definitely played the crap out of it. This guide contains all of the successful builds I've tried (there are others that didn't make it). Each build will include: ratings, a skill tree, tips for playing them, recommended equipment, and a gameplay video. Overall, this guide is about showing how versatile builds can be and discovering other ways to play the game with proven builds I've levelled myself from 1 to 72 +op levels without using mods, altered files, or exploits. These builds were retested at level 80 OP 10 to ensure they still work after the Commander Lilith and the Fight for Santuary update.

This guide is pretty big. Please use the scroll bar or the contents menu to navigate to sections you want to see.

I hope you find something you like or find useful.

Have fun Vault Hunters!

Please note:
I used the Borderlands 2 Skill Calculator - http://bl2skills.com, to show how i specced my characters.
How to Make a Build
What beginners need to know about skill trees:
  • Skill trees use a tier system, where every 5 points invested into a tree unlocks the next tier.
  • The last skill of each skill tree is a game changer. Their are other skills within skill trees that max with 1 skill point which also provide special benefits.
  • The skills with a hexagon boarder are "kill skills" -they activate for a period of time (about 8 seconds) when you kill something
  • It's generally better to fully invest into a skill than spreading them thin to unlock everything.
  • You can reach the bottom of your first skill tree at level 31. You will be able to access two of these skills at level 57 but you won't be able to reach a third by the maximum level 80.
  • You can "Respec" your skill points at any time at Customization Station by clicking the "Refund Skill Points" option. You can do this as many times as you want, and it won't cost much of your in-game cash.
  • If you're overwhelmed by choices and want a simple approach to choosing skills, start by looking at the last skill in each skill tree and choose the one you like the most. Next, dedicate your points to that skill tree; you will only need to decide between two skills at a time as you progress through the tier system towards the last skill.

How to make a build:
  • Builds start with an idea, then determination to make it work.
  • Look for skills that compliment each other.
  • Base it on an item type or preferred play style. For example: you may want to use Shotguns or Booster Shields, you may like get up close to kill enemies, or use range, support others, or be the main source of damage.
  • Base it around the class mods you find. Class mods in Borderlands 2 are themed. You can always find a new class mod if your current build is not a good fit for you. A list of the Borderlands 2 class mods can be found here: https://borderlands.fandom.com/wiki/Class_Mod_(Borderlands_2)
  • You may even find a build by accident.

One more thing... You can make builds that cater to multiple class mods, this will allow you to shift you strengths by swapping between eligible class mods as needed. For example: A siren that has a mod for support abilities but can then go offensive by swapping to a mod with damaging abilities (without reallocating any skill points). This will only work if you have unlocked all of the skills needed for both class mods.
Axton - Legendary Soldier (Best for Damage)
"Ten years of DAHL military experience at your service"

This build uses Axton's skills, class mod, relic and shield to increase his damage as much as possible. This build is easier to play than other 'glass cannon' builds as Axton's turrets can be used to distract enemies and apply slag.

Damage: 9 (Can solo Haderax the Invincible)
Toughness: 4
Difficulty: 2
Fun: 7

Here's the skill tree:

https://youtu.be/IEaOIRYq77A

Tips:
  • If you prefer to use non-elemental weapons, consider moving points from Overload to Duty Calls. However, Overload is required to solo Haderax the Invincible to burst damage without losing too much time reloading.
  • To avoid taking hits:
    • stay in cover and try to only peak one enemy at a time.
    • keep your distance as enemies become less accurate over range.
    • try to focus enemies with higher fire rates first - the more shots they have, the more likely one will hit you (enemies with rocket launchers or snipers will be an exception to this rule).
  • Willing is a good skill to have when using the Bee shield as it reduces shield recharge delay.
  • This build does not offer much health recovery as it's about avoiding damage. The health regeneration from Preperation will be enough if you play safe enough. Transfusion grenades can offer faster recovery when needed.
  • Your turrets can be used to slag, distract enemies, deal damage, and provide temporary cover. When deploying your turrets, spread them out so they can cover different angles and not get blown up at the same time. Also keep them in front of you so they take most of the damage.
  • Carry a tougher shield (ie. Blockade, Evolution, Antagonist) or adaptive shield) for running through enemies to reach locations faster and surviving bosses that use unavoidable attacks.
  • Let your turrets pick your targets so you and your turrets are working together and so you don't have to swap weapons to slag enemies.
  • Scoring critical hits will be vital for damage output. Skill comes from practice and will become easier as you learn enemy movement patterns.
  • keep a gun that can get kills without a Bee shield that you can use to recover from Fight for Your Life if needed.


Suggested items
  • Weapons: Any high damage output weapon. The Toothpick, Unkempt Harold, B|tch SMG, and Skull Smasher are good options. Weapons that get +critical hit damage receive better bonuses from the Bee shield.
  • Shield: Bee shield for additional damage.
  • Grenade: Any you prefer. I use a Magic Missile to slag enemies. Transfusion grenades can be used to recover from damage faster.
  • Class Mod: Legendary Soldier Class Mod - this will offer additional gun damage, fire rate and action skill cooldown.
  • Relic: + damage bonuses to your preferred weapon, manufacturer, or element.


Problem's with this build:
  • This is a solid build, but does struggle for health recovery
  • You are more vulnerable while you don't have turret support. There may be times when you need to take shelter until they're ready to use again and the build may fail in longer fights (i.e. boss fights).

Gameplay Videos:
https://youtu.be/_K_-jPB3MFQ

Solo Farm Haderax the Invincible on Level 80 OP10
https://youtu.be/e4RgYvOcDt0
Axton - Gritty Pointman (Tank)
"Like I was gonna die"

This build is about beefing up Axton's shields and health. If that's not enough, it also gives him a 40% chance not to die. But wait there's more.... If he does go down he'll gain a 115% damage and 140% movement speed boosts to regain his feet. Finally, this build includes skills to give him some extra damage so fights don't last too long.

Damage: 4 (7 with bee shield equipped)
Toughness: 8
Difficulty: 3
Fun: 8

Here's the skill tree:

https://youtu.be/OH6RXgJWN1Q

Tips:
  • This build's toughness comes from regenerating health and shields simultaneously. Your shields will want to recharge sooner as your health gets lower, triggering a situation where your shields and health will be regenerating at the same time. Your shields will charge first and give your hit points some time to catch up.
  • Grit has a 40% chance to ignore death. When Grit triggers it will restore 50% of your hit points (HP) and can chain as long as you are constantly taking damage. Careful though, the Grit effect wears off quickly (see timer above the exp bar) and you'll be rolling the dice again if it does. Lowering your max health may make it easier to keep Grit active, but don't rely on it. Grit is like a 'get out of jail free' card... you keep it in your pocket and try to avoid ending up in jail.
  • Your turrets will be useful for slagging enemies, boosting your gun damage, and providing cover. Phalanx Shield doesn't last very long under fire but you can position your turrets one behind the other, so you can shelter behind both shields at the same time. The moment of peace will give you time to recharge your shields, regen some health, and return to fight 'willing and able'.
  • Do not give up your shields for a Rough Rider -it will not be as good at keeping you alive compared to a shield that will keep charging while you're low health. Shields provide resistances to fire and corrosive damage, whereas you will take additional fire damage without your shield.
  • You can run this build with a Bee shield if you want more to speed up your gameplay. While the Bee shield does have less capacity it won't impact on the build's toughness too much.


Suggested items
  • Weapons: This build will require high-damage weapons, such as the Unkempt Harold, Peak Opener, Skull Masher, or a Ravager (Purple Torgue) shotgun
  • Shield: A Neogenator or Evolution will compliment the health regeneration abilities. Otherwise an adaptive shield if you don't have these yet.
  • Grenade: A Magic Missile grenade mod will give you a faster option to slag enemies than swapping between weapons.
  • Class Mod: Legendary Pointman Class Mod. Mods that give +6 skill points to Grit are also good options. The Ranger class mod can offer +fire rate and +crit damage.
  • Relic: a +health relic or +shield capacity relic will help keep you alive; the Blood of the Seraphs is a good option as it provides +health and health regeneration.


Problem's with this build:
  • Borderlands 2 is a damage hungry game as late-game-enemies have ridiculous amounts of HP. Tanks in late BL2 gameplay can be downed in a few consecutive hits. Make your character tough enough to stay alive but don't neglect your damage; you need to be able to score kills without wasting too much time and ammo in the process. I eventually fell into the habbit of running this build with a Bee shield for damage.
  • Borderlands 1 has a stronger role for tanks, as they can keep boss fights rolling while team mates return to the fight; but Borderlands 2 uses lock-out mechanics that prevent players from returning to the fight after they've been killed.
  • Despite this, Grit is a very enjoyable skill to run with - and the Pointman Class Mods compliment it nicely.

    Gameplay Videos:
    https://youtu.be/yLRBxFX20nY

    https://youtu.be/9I-s1sQrHxM

    https://youtu.be/SleTESdnwQg
Axton - Popcorn Turrets - Engineer (Easy to play)
Chew 'em up honey

Beef up your turrets and stack cooldown reduction with this build, so you can deploy your powerfull turrets as often as needed. Your turrets will draw enemy fire, slag, and provide additional damage. There's also some damage increases included for Axton.

Damage: 8
Toughness: 5 when turrets are deployed (almost always)
Difficulty: 2
Fun: 5

Here's the skill tree:

https://youtu.be/nz2hUL6p5p0


    Tips:
  • Cooldown rate can be increased above 100%. This does not mean that your skill will instantly be recharged though as it's based on the rate of recharge not the total duration (+100% recharge rate will halve the wait time). For Axton's Action Skill, 10% recharge rate = roughly 1 seconds faster recharge.
  • Axton's turrets are "like having an extra player on the field" and recieve team benefits from class mods.
  • Enemies have a slightly harder time hitting Axton's turrets if they are stuck to walls.
  • You can pick up your turrets to refund some of the Action Skill cooldown. Do this whenever your turrets aren't needed anymore, they're badly positioned, or you want to push forward.
  • When deploying your turrets, think about them as being like security cameras with guns - you want them to be able to see as much of the battleground as possible. This will make it difficult for enemies to hide behind cover, and you will be less likely to engage an enemy without their support.

    Suggested Items:
  • Weapons: This build is not weapon specific.
  • Shield: A Bee shield works well as it's easy to maintain full shields while your turrets tank damage. If any enemy targets you, just take cover until they target your turrets instead. Willing is a good skill to have when using the Bee shield as it reduces shield recharge delay. Weapons with +crit damage will receive a greater benefit from the amplified damage.
  • Grenade: A high damage grenade such as a Fast Ball or Bonus Package
  • Class Mod: Legendary Engineer Class Mod. There are blue and purple versions of the Engineer class mod if you don't have this yet.
  • Relic: +Action Skill Cooldown Rate

    Problems with this build:
  • Axton's turrets scale with overpower levels but the turret damage started becoming less effective with each OP level. Despite this, your turrets can still get kills and serve other functions, such as slagging and absorbing damage.


    Video Guide:
    https://youtu.be/UDeS4joj2Pg

Axton - Demolitions Expert (Viable)
Nukes, sentry turrets, and rocket launchers... Hell of a day.

This build is based around increasing rocket launcher, grenade, and gun damage. It also provides significant boosts to shield strength, but can be built for damage (depending on what shield is equipped)

Damage: 7
Toughness: 6
Difficulty: 3
Fun: 6

Here's the skill tree:

https://youtu.be/rxafIvp3yN0

    Tips:
  • If you want to base this build around using rocket launchers you will need a Sham or a Big Boom Blaster shield to replenish your rockets as they're not easily found and are expensive to purchase from venders.
  • If you opt to use a Big Boom Blaster, avoid putting points into Forbearance (3rd tier Survival skill) as the damage over time effects will be the main source of shield boosters. Each point of status effect damage has a chance to launch a booster shield. Status effects will also grant more shields from boosters than the damage received from the status effect.
  • Rocket launchers will benefit from all bonus 'gun damage'.
  • Your turrets serve three main purposes: to deploy nukes that can damage and displace enemies, increase your gun damage while they're deployed, and distract enemies.
  • Your Grenades will receive a 65% damage boost when your turrets are out (35% without turrets).
  • Carry a Bee shield for when you need to need to increase your gun damage.

    Suggested Items:
  • High damage weapons to reap the most of the damage boosts granted by the skill tree.
  • a high damage rocket launcher such as a Nukem, Badaboom, or Norfleet.
  • high damage grenades such as singularity, Fast Ball, Bonus Package or Fire Storm
  • Look for class mods that increase gun damage. Boosts to gun damage will be more beneficial than Grenadier class or Veteran class mods with points in Steady.
  • Sham shields are easier to farm but the Big Boom Blaster is more likely to keep you alive in fights. The Big Boom Blaster will also generate grenades, if you can get your hands on one.

Problems with this build
  • The build is well balanced -it doesn't have many weaknesses but it also doesn't have any particular strengths.
  • Nuke skill damage becomes less effective at higher levels, but you can still use Nuke to displace enemies; this gives you time to kill them while they were recovering from the blast.


    Gameplay Video:
    https://youtu.be/YuBM9goGqI8

    https://youtu.be/VwQaP9bSXUQ
Axton - Ranger (Team Player)
"Voted 'quickest charge' in the DAHL military."

The Ranger class is based around shield strength and chaining quick kills together. Each kill charges your shields (10% per a second), boosts your movement speed, your damage, and fire-rate. This build can be played as a shield tank or full damage.

Damage: 6 (Tank) or 10 (DPS)
Toughness: 7 (Tank) or 4 (DPS)
Difficulty: 2 (Tank) or 4 (DPS)
Fun: 5 (Tank) or 5 (DPS)

Here's the skill tree:

https://youtu.be/xDuhbfRO0yw

Tips:
  • You can use this build to either tank with high capacity shields or shred enemies with the Bee shield's amp damage.
  • A lot of this build's power is tied to kill skills that are boosted further by class mods. This means that damage is important to keep killing things to maintain power.
  • One kill skill boosted by the Ranger class mods is Quick Charge which is often overridden by Willing. Quick Charge will enable you charge your shields (10% per a second for 8 seconds = worth 80% shield) without waiting for the shield recharge delay. However, Willing will come into effect after 1-4 seconds and will recharge your shields faster (giving 100% shields). It is better to seek a break from taking damage to recharge your shields than use Quick Charge. Quick Charge has still been selected as it does come in handy where it is hard to avoid damage (i.e. Son of Crawmerax) and the 5 points are needed in the Survival tree if you want to unlock Gemini.
  • This build is about shield strength and shield recovery, not health. Avoid taking health damage as much as possible. Consider sacrificing health for more shields if you want to increase your toughness.
  • Your turrets can be used to knock enemies off balance on deployment, draw enemy fire, increase Axton's gun damage, and deploy Phalanx Shields which will give you long enough for your shields to regen if needed. Your turrets won't deal much damage with their bullets with this build. Points have been placed in Sentry just to extend turret duration so you can get a longer benefit from the +30% to Axton's gun damage provided by Battlefront.
  • Try to slag multiple enemies each time you swap to your slag weapon, so you can knock them down like dominoes when your kill skills activate. You don't want to be swapping to and from your slag weapon while your kill skills are active as you're losing valuable time. Expertise will help to prevent time loss if this is unavoidable.
  • This build pairs really well with a Psycho running a build using a Reaper class mod, as he can double the active time of your kill skills.


Suggested items
  • Weapons: Unkempt Harold if playing as a tank. Otherwise, look for guns that have high damage scores on their card but still have decent fire rate to back it. Weapons made by Torgue will generally be reliable. If you're using the Bee, look for guns that fire more bullets per a minute or +crit damage. The Lady Fist pistol and B!tch SMG are good options. Your slagging weapon needs to have a high chance so you don't waste valuable seconds of your kill skills trying to slag something. The Slagga SMG is preferred.
  • Shield: You will reach higher power with the Bee shield as a lot of points are tied to kill skills. However the build is also good for tanking. Some of the best options include the Blockade, Antagonist, or any high capacity purple Turtle shield.
  • Grenade: Singularity grenades will help to pull enemies out from behind cover and turn enemies like 'shield nomads' and 'spiderants' around so you can hit their crit zones.
  • Class mod: This build is using the Legendary Ranger Class Mod, but is viable with the Shock Trooper or Rifleman class mods for lower levels.
  • Relic: +Shield Capacity and Resistances to 3 damage types for tanking (look for +shock resistance as one of these), otherwise you can use +damage to your preferred weapon.


Problem's with this build:
  • The game really slows down when you run tanky builds, and the game is fairly punishing in terms of dishing out damage late game, especially when you confront enemies that reflect your own bullets back at you (you will 1-2 shot yourself regardless of how tanky you are due to the damage you deal vs how tough you can make your character).
  • Electricity will destroy your shields, even with extra resistance.
  • The build is based around kill skills and therefore lacks power until you can kill something. You also lose your kill skills when you enter Fight for your Life which can make it harder to get back up.


Gameplay Videos:
https://youtu.be/TWuM7V00AjI

https://youtu.be/WtTu6fvZ3Kk
Gaige - Speedy Anarchist (Reccomended)
When she hits them, it will hurt!

This build is based around the anarchy skill, being able to maintain strong shields and move quickly between kills. This was my most powerful Mechromancer build

Damage: 8
Toughness: 7
Difficulty: 3
Fun: 6

Here's the skill tree:

https://youtu.be/zlFfZLhRigI

    Tips:
  • Slagging enemies will be vital to killing them when you are starting to accumulate Anarchy stacks. Don't stop slagging enemies though, it will continue to help melt enemies, even with full Anarchy (and help you to reserve ammo).
  • Take it easy until you can get your first kill, this kill will activate Unstoppable Force which will increase your movement speed allowing you to close in on another enemy. Getting in close will increase your chances of getting direct hits to make the most of your anarchy. At maximum Anarchy (400 stacks) your guns will be dealing +700% bullet damage, plus the gun damage on your class mod and any other source, but only if you land direct hits. Ricocheted bullets will only deal 50% of your total damage.
  • Blood Soaked Shields will restore 80% of your shields after a kill at the cost of 4% of your health. This skill will work together with Unstoppable Force to keep topping up your shields after getting kills to keep you alive.
  • Keep an eye on your health and use With Claws to top your health up when it falls below 50%. There is a mechanic in the game that prevents you from dying to a massive blow when your health is above 50%. Instead of going into Fight for Your Life you will be left with critical health with a brief moment of invulnerability (about 2 seconds) before the next hit downs you.
  • Summon Deathtrap for additional cover when you spot tougher enemies or you expect a long fight. He'll help distract enemies and soak up some of the damage.
  • Avoid using Discord and accumulate those anarchy stacks as quickly as you can; more anarchy means more power. You could avoid unlocking Discord all together but you risk losing all of your anarchy if you accidentally reload without emptying your guns magazine first. Consider it a worthwhile safety net.
  • Use the highest capacity shield you can find, but don't use a Hopolite or Fabled Tortoise. These shields will slow your movement, preventing you from getting in close and landing direct hits.
  • If you're in Fight for Your Life and you're able to get yourself back up, you will be granted full shield and a movement speed buff which will reduce your chances being knocked down again.

    Suggested Items:
  • Weapons: an Unkempt Harold -preferably the Double Penetrating variety. Otherwise a high damage burst weapon, and a high fire rate slag weapon with a decent chance to slag (~22-24% on SMGs).
  • Shield: Any high capacity shield. A purple Turtle shield will be sufficient.
  • Grenades: A Singularity grenade to group enemies together, and/or a Fast Ball to take out aerial units.
  • Class Mod: Legendary Anarchist Class Mod. For lower quality class mods, use a Technophile Class Mod for toughness (but avoid points in Interspearsed Outbusrt), or a Roboteer Class Mod to better utilise Deathtrap. The lower quality Anarchist Class mod does not provide ideal skill points but will give +gun damage -accuracy.
  • Relic:: + shield capacity with resistances (prioritise shock resistance). +pistol damage or +explosive damage relics are also viable, but you will be downed into Fight for Your Life more often at higher levels.

    Problems with this build:
  • It racks up anarchy stacks quick enough, so dying after some time playing wasn't a huge set back. I found the Unkempt Harold maintained it's accuracy fairly well, even with 400 anarchy stacks because the shots continued to fire in a set wide spreading pattern. But shooting aerial units can still be challenging when you have over 250 Anarchy.

Gameplay Videos:
https://youtu.be/zorSsHZYEFg

https://youtu.be/T_Zo5BBD-Bk
Gaige - Roboteer (Easy to play)
I'm the greatest engineer alive!

This build is based around maxing Deathtrap's (useful) abilities, but also branches into anarchy so you can hold enemies off by yourself. The build uses a lot of cooldown reduction so that you can pop Deathtrap out as often as possible.

Damage: 8
Toughness: 3
Difficulty: 2
Fun: 7

Here's the skill tree:

https://youtu.be/Hva7by5qsmg


    Tips:
  • Deathtrap will use Robot Rampage as his first attack after he is summoned. This attack will deal double damage if he is charged with an element - Make it Sparkle.
  • Keep Deathtrap charged with an element to double his damage. His elemental damage is equal to his physical damage. Increases to his physical damage will increase his elemental damage.
  • This build requires the player uses a roid shield so Deathtrap can use his Sharing is Caring to receive a copy and deal crazy damage. Deathtrap will just be a bullet sponge without it and you'd be weaker than you would be with a different build. The good thing about this build is that Deathtrap gives you instant power; he doesn't need Anarchy to deal damage. Just run support for him while you're starting to accrue Anarchy so Gaige can deal damage.
  • Dying is a real set-back when using Anarchy as you'll lose all of your stacks and have to start accumulating them again. The only 'sound advice' I can give here, is 'die less'. Nah, Just kidding; try to avoid tough fights without Deathtrap backing you up. Enemies are more likely to target Deathtrap, so you can hide behind him while he soaks up the damage for you.
  • Deathtrap counts as an extra player, so team boosts also have an effect on him. You will need to get these boosts (like +attack speed) from other players as Gaige doesn't have much to offer herself (other than +team max health or +team elemental effect damage).
  • Cooldown rate can be increased above 100%. 100% recharge will halve the wait time for your Action Skill. For Gaige, 6% cooldown rate is about 1 second faster.
  • Deathtrap can activate your kill skills but he doesn't benefit from them (or any of your stats).
  • Increasing Gaige's melee damage by any source DOES NOT increase Deathtrap's damage.
  • Don't use a Hoplite shield when Sharing is Caring is unlocked as Deathtrap's copy will slow you down.
  • Deathtrap can be healed by transfusion grenades but this will be quite minimal, Maya's Restoration, and Maya's Elated skill are more effective.
  • Explosive Clap is an early game skill that is ineffective late game.
  • Avoid unlocking The Stare and One Two Boom. Deathtrap is not intelligent when using The Stare and will target enemies resistant to fire and sometimes players. Deathtrap takes too long to charge and shoot One Two Boom and you will have difficulty shooting the orb to trigger the explosion due to your negative accuracy. Both are ineffective damage dealers compared to Deathtrap's melee attacks.
  • Accuracy on guns doesn't matter much as your Anarchy will erode it. Guns with higher base damage will receive a greater damage increase from Anarchy. You won't be using a Bee shield with this build, so fire rate becomes less vital for damage output, but consider how many shots will be needed to hit your target. Getting in close to an enemy will slightly reduce your chances missing, and is worth the chance of scoring a direct hit for maximum damage. Ricocheted bullets will deal 50% less damage.
  • Deathtrap sucks in boss fights as he will use his lightning bolt attack instead of meleeing them. Swap your roid shield out in boss fights for something that can keep Gaige alive or a Bee shield for extra damage.

    Suggested Items:
  • Weapons: There will be times when Deathtrap is being a dumbass, so you will need a powerful weapon like an Unkempt Herald to carry him when he's not being useful. The predictable spread of the Unkempt Harold will also make it easier to hit enemies.
  • Shield: The Hide of Terramorphous will give the largest boost to Deathtrap's melee damage, but a good purple Maylay shield will work fine if you can't farm Terramorphius yet.
  • Grenade: Grenades don't really matter but they can be used to accurately kill enemies as they are not affected by Anarchy's negative accuracy stat.
  • Class Mod: Legendary Roboteer Class Mod is the best option as it provides cooldown reduction, melee damage, toughness and movement speed for Deathtrap. The Legendary Mechromancer Class Mod can also be used but it will only provide cooldown reduction and melee damage. A regular Roboteer Class Mod is also viable.
  • Relic: Use an Action Skill Cooldown relic to help Deathtrap recharge quicker.

    Problems with this build:
  • Deathtrap is only effective while he is meleeing things. He's useless against flying enemies and most bosses as he will use his lightning bolt attack instead, which doesn't deal damage late game (seriously, he can't even kill a surveyor bot with this skill). You can't tell him who to target or recall him to reset him, So if he attacks something he can't kill (like a Stinging Cactus), he'll stay locked onto it until he expires or you move a great distance away from him. If possible, kill the target he's electrocuting so he can pick a new target.
  • There's no way to return Deathrap when he's no longer needed (unless you change zones or jump into a vehicle) and his cooldown only begins after he dies or despawns. This means there will be times when you'll be on your own and you won't be benefitting from all of the points you've invested into him. I've managed to reduce the cooldown time to 23 seconds, which isn't bad. You can always use your Anarchy to kill things without him if you need to do something while you wait!
  • You will have difficulty hitting flying units due to your negative accuracy. Try to avoid fighting flying things. If you have to fight them, use grenades or shoot at them (or the ground to richochet bullets) when they're flying low.
  • The Mechromancer is a class that really doesn't have skills to increase her damage output other than Anarchy. This means all Mechromancer builds will play the same way and suffer from 'no accuracy'. You simply won't deal enough damage without Anarchy, but you can balance it around 250 stacks if you can't stand not hitting things.
  • You can't run a Bee shield with this build, as Deathtrap newds the roid damage.

Gameplay Videos:
https://youtu.be/ztbfujyWHGU
Gaige - Catalyst (Not Reccomended)
Ugh, got some brain on my shoes. *Sniff* I like it

This build is based around Gaige's 'Little Big Trouble' skill tree for electrical burn. I've respecced this character more than a few times and this is what i ended up with using to deal the most damage:

Damage: 9
Toughness: 8 against bullets/rockets, 2 against everything else while Sham shield is equipped.
Difficulty: 2
Fun: 5

The Skill Tree:

https://youtu.be/q6hYtzd8X3k

    Tips:
  • Grenades deal higher status effect damage than guns. Try to use this to your advantage, especially when Evil Enchantress activates after getting a kill.
  • It will be harder to aim as you get more accuracy, but direct hits will deal up to 700% more damage. This can be increased more by slag effects and +Electric damage. Use opportunities to get up close to enemies to land those shots.
  • Be careful not to take too much damage though as your shields will need a break from damage to recharge and you don't have great health recovery. Consider moving points from Unstoppable Force to Blood Soaked Shields to instantly recharge shields at the cost of health. However Blood Soaked Shields is not a good option when using the Norfleet or otherwise killing multiple enemies at the same, as it will chunk your own health too quickly.
  • Use small clip and fast reloading weapons like a quad shotgun can be used to build anarchy stacks quickly, but powerful weapons that can achieve kills will do it quicker and more reliably.
  • Deathtrap has a long cooldown, so you'll either have to save him for tougher enemies, or get as much Action skill cooldown reduction as possible. Obtaining at least 70% Action skill cooldown will mean Deathtrap you will have to wait 30 seconds before you can summon him again, so he will always be nearby to soak up bullets when you need him.
  • Cooldown rate can be increased above 100% (100% will half the cooldown wait time). For Gaige's Action Skill, 6% = roughly 1 second.
  • you can use the Close Enough skill (top left of the Best Friends Forever skill tree) to bounce bullets off surfaces. You can this your advantage to shoot bullets around corners so you can get kills and heal up (with Moxxi Weapons) from cover in stressful situations.

    Suggested Items:
  • Weapons: Shock element weapons with high elemental effect chance and status damage. Faster fire-rate guns will help you to burn multiple enemies at a time. You will need weapons that have higher base damage to chunk health better as enemy health regeneration will negate most of your status effect damage. Having a corrosive weapon like a Hornet or an explosive weapon like the Unkempt Harold will help take down those tough armoured units and Buzzards.
  • Shield: Hoplite or purple Turtle shield are good options for survival, but the Hopolite will slow your movement if Deathtrap and other players have it equiped. There are two end-game damage options for Gaige, you can either use the Sham with eridium rocket launchers such as the Norfleet, or the Bee shield with high fire-rate weapons.
  • Grenade: An electric type grenade, focusing on it's status effect damage. The Chain Lightning will be your best option, but the Electric Chair and Quasar are also good options.
  • Class Mod: Legendary Catalyst class mod or Zapper class mod
  • Relic: + Electric damage relic (increasing your electric damage will also increase the ignite damage from your Electrical Burn skill).

Problems with this build:
  • This build is not as good as others in end game content. The elemental burn effect damage doesn't kill things, you will rely on gun damage instead. This is managed with the bee shield or the Sham-Rocket Launcher combo.
  • It takes awhile to warm the character up (build anarchy stacks) and dying is a real set-back as you'll lose all of your anarchy and have to start again. However, as there's usually no consequence to dying this aspect makes the game a bit more involving. This is issue can be managed by constantly boosting your damage output and putting points into Typecast Inoclast which will healp you reach maximum stacks 30% quicker.
  • You will struggle to hit aerial units at maximum stacks. Try to avoid aerial units as they're not worth the trouble. Learning the enemy movement patterns, and waiting for them to fly low to the ground will make it easier to hit them.

    Gameplay Videos:
    Farming loot midgets, starting with 0 anarachy
    https://youtu.be/3ATkhVa-ICw

    Farming Anarchy 0-400(Max)
    https://youtu.be/jOh14q90VoI

    Clearing Heroes Pass and the Warrior with 400 Anarchy
    https://youtu.be/8t9cb9D29rA
Gaige - Jill of all Classes (End Game Build)
"Break the game"

This is an end game build that uses the Slayer of Terramorphous Class Mod. It combines Gaige's other three builds (Roboteer, Catalyst, and Anarchist) into a single build. The class mod also allows you to reach 600 Anarchy (+1050% gun damage).

Damage: 8
Toughness: 5
Difficulty: 2
Fun: 6

Here's the skill tree:

https://youtu.be/l4zcPdJtGY0

    Tips:
  • Accuracy on guns won't matter much as Anarchy will make erode it. Guns with higher base damage will receive a greater damage increase from Anarchy. You won't be using a Bee shield with this build, so fire rate becomes less vital for damage output, but consider how many shots will be needed to hit your target. Closing in on enemies is not going to make it much easier to land direct hits either, unless you're close enough to kiss the Goliath you're shooting.
  • Status effect damage is dealt with grenades, not guns; guns will only deal a fraction of status effect damage that grenades are capable of. Evil Enchantress will increase your status effect damage for a short time after you kill an enemy.
  • Electrical Burn's damage scales with your electric damage (even though it is displayed as fire damage).
  • Slagging enemies will be vital to killing them when you are starting to accumulate Anarchy stacks. Don't stop slagging enemies though, it will continue to help melt enemies, even with full Anarchy (and help you to reserve ammo).
  • This build requires the player uses a Maylay/Roid shield so Deathtrap can use his Sharing is Caring to receive a copy and deal crazy damage. Deathtrap will just be a bullet sponge without it. The good thing about this build is that Deathtrap gives you instant power; he doesn't need Anarchy to deal damage. Just run support for him while you're starting to accrue Anarchy.
  • Deathtrap will use Robot Rampage as his first attack after he is summoned. This attack will deal double damage if he is charged with an element - Make it Sparkle.
  • Keep Deathtrap charged with an element to double his damage. His elemental damage is equal to his physical damage. Increases to his physical damage will increase his elemental damage.
  • Deathtrap counts as an extra player, so team boosts also have an effect on him. You will need to get these boosts (like +attack speed) from other players as Gaige doesn't have much to offer herself (other than +team max health or +team elemental effect damage).
  • Deathtrap can activate your kill skills but he doesn't benefit from them (or any of your stats).
  • Increasing Gaige's melee damage by any source DOES NOT increase Deathtrap's damage.
  • Deathtrap can be healed by transfusion grenades but this will be quite minimal, Maya's Restoration, and Elated skills are more effective.

    Suggested Items:
  • Weapons: Toothpick, Redundant Fibber, Norfleet, Seeker
  • Shield: Maylay/Roid shield. The Hide of Terramorphous will provided the most roid damage. The spike and nova damage is also handy, even late game. You could also use the Sham but you will eventually blow yourself up.
  • Grenade: Lightning-type grenade. The Chain Lightning is a good option. The Electric Chair is another option.
  • Class Mod: Slayer of Terramorphous (Mechromancer) Class Mod
  • Relic: Skin of the Ancients with +Shock Damage and Action Skill Cooldown Rate.

    Some problems with this build:
  • Having 0 accuracy sucks. Sometimes it feels like the character is just playing itself and you're waiting for your shots to land. There are also times when shooting skywards makes landing shots virtually impossible.
  • It can take awhile to accumulate 600 Anarchy, so dying is a real set back. Getting your hands on a Norfleet and Sham will help you to farm anarchy quicker in Pyro Pete's Bar, but it will still take ~10 minutes (including travel time).
  • Deathtrap sucks in most boss fights as he tends to use his lightning bolt attack instead of meleeing them.


Gameplay Videos:
https://youtu.be/9jaE0flLoUA

https://youtu.be/pD71ZtqK4v4

https://youtu.be/oH1ywr-0Jec

Krieg - Hellborn/Torch (BBQ Master)
HE'S ON FIRE!!!

This build focuses on maximising Krieg's elemental damage and offers big boosts to his toughness, fire rate, accuracy, and a large but temporary boost to his gun damage.

Damage: 8
Toughness: 9
Difficulty: 2
Fun: 6

Here's the skill tree:

https://youtu.be/tc3u6H794H8

    Tips:

  • Focus on slagging things. your Raving Retribution will take care of the rest.
  • Burn Baby Burn and your class mod will give you a big increase to your burn status effects (status effect damage refers to damage over time effects and slag). Your other elements will not receive any bonus damage but may still be beneficial against enemies resistant to fire. Otherwise you could just use an explosive weapon to dispose of them quickly.
    Pay attention to if enemies have shields equipped. Shields provide resistance to fire and corrosive damage and will need to be broken if you want your burns to hurt them.
  • Grenades deal much higher status effect damage than weapons, but weapons can stack status effect damage faster.
  • Elemental Empathy is a powerful skill, but only converts status effect damage to health. This skill will keep you alive of you can keep multiple enemies slagged and under status effect damage at the same time. This ability may fail if you only have 1 person ignited, or targets are resistant to the status effect applied.
  • Avoid shields that have immunity to burn damage. They will stop you from being able to immolate yourself so you won't be able to get the bonus "on fire" stats.
  • killing an enemy with a grenade or explosion will activate Bloodbath, giving you a massive boost (up to %500) to gun damage for a short time. The initial impact damage of Raving Retribution counts as explosive damage. Kills from status effect damage applied by grenades and explosions will not activate Bloodbath.
  • Don't worry about the clips size of your weapons, Blood-Filled Guns and Elemental Elation will give huge boosts to magazine size. This also means you can better utilise weapons that are normally designed to deal massive damage but need to be reloaded often.
  • It's much easier to apply status effects when you are on fire.
  • Loot ammo and health vials after battles where you are missing health, so you're ready for the next fight. You're vulnerable at the start of fights while you're applying status effects, starting a fight with low health won't help.
  • Increase your health as much as you can. This will help keep you alive when you don't have many active status effects, and surviving being on fire after fights.
  • Your experience bar can only show up to 5 skills active at a time, but the other skills will still be active in the background (Blood Bath, Elemental Elation, Blood Twitch, Nervous Blood, Fuel the Fire, and Salt the Wound can all be active at the same time, but the game will only display some of their icons on the exp bar).

    Suggested items:
  • Weapons: Moxxi weapons will provide additional healing. The Good Touch, Slow Hand, Grog Nozzle, and Ruby are good options. I use the Slow Hand to slag enemies. An Unkempt Harold is also useful for enemies that won't burn, especially when it's receiving bonus damage from Bloodbath. A rocket launcher such as a Nukem, World Burn or Norfleet can also be used to recover from Fight for Your Life.
  • Shield: Rough Rider as it provides additional health and damage reduction. The Flame of the Firehawk will work for lower levels.
  • Grenade: Firestorm or Antifection to apply status effect damage. The Fast Ball also works well to get grenade kills for bigger Bloodsplosions and to activate Bloodbath for increased blood damage.
  • Class Mod: Legendary Torch Class Mod (best option), or Legendary Psycho Class Mod as it provides similar damage boost to ignite damage and more max health, but burns on yourself and enemies will not last as long.
  • Relic: +Max Health (best), or +Fire Damage.

    Problems with this build:
  • Occasionally you will die from self-immolation (after combat finishes) and there's nothing you can do about it but bite your nails and hope you live it. You can increase your chances of survival by: A) Maxing out Numbed Nerves for damage reduction, B) equip a fire damage resistance relic, C) use a damage reduction shield, and D) Avoid killing the last enemy too quickly so you can steal some last minute heals from Elemental Empathy before they die.
  • The build is not as good against enemies that are resistant to fire. Don't over invest into fire damage and keep some other elemental weapons handy.
  • Hellborn Psychos struggle even more against enemies that cannot receive status effects as you will not be able to receive any 'On Fire' benefits and Elemental Empathy won't work (no heals). These enemies are usually close to others that can receive status effects; try to keep these alive to maintain on fire effects and heal yourself.


Gameplay Videos
https://youtu.be/r-Uhzmma_QA
Krieg - Hellborn Grenade Psycho
I COOKED THE LITTLE RED ROCK AND THREW IT AT YOUR DEATH!

With this build you can use grenades as your primary weapon. With this build you'll be running through mobs lobbing grenade after grenade with each kill giving you more grenades to throw until you're heart is content. You can do this 2 different ways -based around explosive or elemental grenades. This build uses the left tree for grenade skills, then the right tree for elemental damage.

Damage: 8(solo) 5(co-op)
Toughness: 4-8 (increases when on fire)
Difficulty: 4
Fun: 9

Here's the skill tree:

https://youtu.be/_qUNg-zpMbk

    Tips:
  • Your power scales with Bloodlust stacks. Bloodlust stacks can be accumulated by dealing constant damage to enemies but start to decay quickly when you stop dealing damage. Applying status effects and using high fire rate weapons can help you to accumulate bloodlust stacks quickly.
  • Killing an enemy with a melee attack activates Fuel the Blood, which will greatly increase your grenade damage for a short period of time, but you would have to invest most of your skill points into melee damage skills to make this skill viable, so it has not been selected.
  • Killing an enemy with a grenade or explosion will activate Blood Bath which will cause enemies to drop grenades and significantly increase your gun damage for a period of time. Killing enemies with Bloodsplosion and the initial impact of Raving Retribution's homing fire balls count as killing enemies with explosions and will also activate Blood Bath.
  • Using a class mod that extends your kill skill duration will help you to better utilise kill skills such as Blood Bath.
  • You can run this character with all 5 elements if the elements on your guns are different to your grenade; so you can always play to your opponents weaknesses; but only your fire damage will be receiving bonus damage.
  • Use shields that give +health as shield capacity won't last long and will not recharge as you will be receiving burn damage from being 'on fire'. Also avoid shields that have immunity to burn damage, as they will stop you from being able to light yourself on fire and get the "on fire" bonuses from your Hellborn skill tree - this would also prevent you from using your best skill - Raving Retribution.
  • Grenades aim off-centre to the left of your cross-hair with most guns equiped. This is important when using the Fast Ball grenade mod. Grenades aim at the centre of your cross-hair when a rocket launcher is equiped.
  • Lightning type Chemical Sprayer grenades are safer to use as they will not hit you when you're running inside their area of effect. Careful when using the Quasar or Electric Chair grenades though, as the explosions caused by these grenades will hurt you, even if their chemical sprayer component does not.
  • Avoid using Bouncing Betty grenades as they deal damage by 'spraying bullets'. Kills achieved with bouncing betties will not count as killing an enemy with a grenade or an explosion, because you're actually killing enemies with bullets.
  • Damage reduction sources start to lose their effectiveness when multiple sources are applied. Numbed Nerves and a Rough Rider shield will provide enough damage reduction to stay alive with this build, additional sources will reduce damage further but not by much more. Krieg's abilities allow him to exceed 100% damage reduction, but he will still take damage because the game calculates damage reduction by carrying incoming damage through all sources of damage reduction in turn, instead of cumulatively (You won't have 145% damage reduction, you will have incoming damage-75%=value-50%=value-20%=total damage reduction). This simply means you cannot be invulnerable unless you receive 100% damage reduction from a single source.

    Suggested Items:
  • Weapons: The Good Touch, Slow Hand, Rubie and Grog Nozzle are ideal weapons as they can apply fire and slag elements, and convert a percentage of damage dealt to healing. Slag is preferred to amplify damage. Other elements can be used to heal when enemies are resistant to fire. An Unkempt Harold can come in handy for enemies that are immune to damage over time effects (i.e Constructors). The Logan's Gun or the Thunderball Fist are useful (but not effective late game), as the explosions caused by these guns will cause enemies to drop grenades.
  • Shield: the Flame of the Firehawk will work at lower levels but loses its effectiveness late game. The Rough Rider will increase your health and provide damage reduction that will keep you alive late game.
  • Grenade: Chemical sprayer grenades are easy to find and fire types will deal significantly more damage but electricity will let you enter it's radius unharmed which makes it easier to draw enemies into it. It also kills enemy shields so you can better deal damage with your fire and corrosive weapons. Sprayer grenades will be effective up until ~level 55. After that, you'll need something that hits harder such as an elemental Fast Ball. The Fast Ball will 1 or 2 hit most slagged enemies and trigger greater Bloodsplosions damage. Bloodsplosion will deal additional damage to slagged enemies, and can chain further from the enemies it kills.
  • Class Mod: Legendary ReaperMod or Blister Class Mod. These class mods will extend the duration of killskills, so you can reap the bonus gun damage granted by Blood Bath after getting a kill with grenades or explosions.
  • Relic: +elemental damage relic, +health can also be beneficial but less preferable.

    Problems with this build
  • The build works best when playing solo as enemy health will increase as more players join, this will mean you will need more grenades to kill things and your pool of grenades will dry up quicker. Also, other players will become excited when they see how many grenades are being dropped and start burning through grenades themselves, so there will be fewer to go around. This problem can be managed by focusing more on using your elemental weapons and saving grenades for weaker enemies or to finish off enemies to activate your Blood Bath skill for more gun damage.
  • Sprayer grenade damage dropped off around level 52-55. After that, swap to a Fast Ball for additional damage.
  • You will occasionally die from self-immolation. Fortunately, Borderlands 2 is a game where dying doesn't really matter. I've learnt to enjoy the psycho's self destructive behaviours but if it does annoy you, you could swap the +elemental damage relic with one that gives you +health or +fire resistance.
  • Krieg's Elemental Empathy is not very effective against slag resistant/immune enemies -so be more cautious around these enemies.
  • It goes without saying but Krieg's damage is significantly lower against fire resistant enemies. Keep another high damage weapon handy to deal with these enemies and don't over invest into fire damage weapons/grenades.
  • If you come up against a red dragon, you're going to have a bad day - don't fight them unless you have to; and you better be well equipped.


Gameplay video:
https://youtu.be/-3h0LrCOuyY
Krieg - Hellborn Melee Psycho (Tougher)
YOU'LL NEVER KILL MEEEEEE!!!

This is a melee build for Krieg that focuses on his tankiness. He'll still have decent power behind him, not as much as he could but he'll benefit from a lot more damage reduction. He won't mind hitting himself in the face and will surely outlast his opponent

Damage: 5
Toughness: 8
Difficulty: 6
Fun: 4

Here's the skill tree:

Skill tree video


    Tips:
  • Your power scales with Bloodlust and Salt the Wound stacks. Your first melee kill will give you a heap of bloodlust stacks (increasing your damage reduction), and you will have started to accumulate some Salt the Wound stacks (increasing your melee damage). You will gain momentum quickly after that first kill.
  • I've avoided putting points into Blood Trance as I want to keep my Buzzaxe Rampage duration short. Having a shorter duration can be helpful in boss fights, as re-activating Release the Beast will refill your health and keep you alive in situations where you cannot heal from getting a melee kill.
  • Be careful with receiving healing from Elemental Empathy and Moxxi weapons outside of your Buzzaxe Rampage as fluctuating heals can make it harder to time Release the Beast. You can fully heal from activating Release the Beast and getting kills with Krieg's action skill. But miss-timing Release the Beast will leave your health dangerously low, and probably not high enough to kill anything to recover before being knocked into Fight for You Life.
  • How damage reduction is calculated in BL2 is complicated - and honestly, I still don't understand how it works as I'm very bad at maths. What I do understand is that 100% damage reduction will only equal 'immune' if it comes from a single source (i.e. Kinetic Reflection boosted to at least 10 points by a class mod), and you will receive diminishing returns when you apply multiple sources of damage reduction. Without understanding the maths, I used to think damage reduction capped around 70-80%, but I now understand damage reduction stats lose their effectiveness when there are multiple sources of damage reduction applied, resulting in a plateau effect.

    Suggested items:
  • Weapons: Maliwan/Elemental weapons that can pack a punch - Caster SMGs are Tediore weapons are good as you can afford to burn your ammo between rampages.
  • Shield: Use a Rough Rider for the extra 20% damage reduction and health.
  • Grenade: any grenade but be careful with transfusion grenades as they may heal you when you want to activate release the beast.
  • Class Mods: Legendary Sickle (damage reduction and + melee damage), Legendary Torch (damage reduction and fire damage) or Legendary Psycho (+ health and burn damage). The blue or purple Sickle mod will be the best option for lower quality mods, there are other options though that will give extra points to Taste of Blood.
  • Relic a + max health will be your best option. A +resistances relic is an okay substitute.

    Problems with this build:
  • You'll be more vulnerable while your Buzz Axe Rampage is on cooldown.
  • Your damage will not be as good as it could be so fights will last much longer (safer, but longer).
  • You better get good at throwing your axe, because you're going to using it a lot, especially if you use the Legendary Torch Class Mod. You can't melee flying enemies, so it will take some practice to hit things like buzzards with your thrown buzz axes.
  • Tank builds still get annihilated in certain circumstances (ie. versing enemies with rocket launchers or snipers.
  • Enemies that don't take status effect damage and have large health pools such as constructors are extremely challenging to beat with build.


Video Guide:
https://youtu.be/fffZnVNORwY
Krieg - Explosive Grenade / Reaper (Highly Reccomended)
Boom, bang, BOOM! EXPLOSIONS!!!

This has been one of my most enjoyable builds. It allows you to use grenades as a primary weapon, but also offers massive damage boosts to melee damage and gun damage if you play him right (up to 500% for each). It also used Bloodsplosion so you can nuke an enemy and watch everything around it explode.

Damage: 8
Toughness: 3-7 (Toughness increased when using Buzzaxe Rampage)
Difficulty: 4
Fun: 8

Here's the skill tree:

https://youtu.be/flu1ICZsz9M

Tips:
  • A lot of this build's power is tied to kill skills that scale with Bloodlust Stacks. Learning how to gain and maintain bloodlust stacks will help to reach the full power of this build. for starters, bloodlust stacks are gained by dealing damage to enemies and are quickly lost when you stop dealing damage.
  • This build uses melee damage to accumulate bloodlust stacks quickly through Taste of Blood and Fuel the Blood which will give bonus bloodlust stacks for getting kills during Buzz Axe Rampage and getting melee kills. 2 quick kills using these skills will have you at full bloodlust stacks in no time.
  • killing an enemy by shooting them with a gun will increase your melee damage, Killing an enemy with a melee attack will increase your grenade damage, killing an enemy with a grenade (or explosion) will increase your gun damage, and the cycle continues. Remember: SMG (Shoot, Melee, Grenade) - although it might be easier to start this cycle with a melee kill.
  • Your thrown axe receives bonus melee damage and counts as a grenade when dynamite is strapped to it with Buzz Axe Bombardier. Your thrown Buzz Axes will deal crazy damage when Blood Overdrive and Fuel the Blood are both active as they will receive up to +500% melee damage and +100% grenade damage from these skills.
    You don't need many points in Thrill of the Kill as the damage you dish out is much higher than your max health. So any proportion of damage is likely to heal you back to full, or close to full. The important thing is that this skill should be healing you to above half health after each kill, this will activate the health gate that prevents you from being one shot by a massive damage source. You will need to be utilising your kill skills so that you can kill enemies quickly so you can keep receiving healing from this skill to keep you alive outside of Buzz Axe Rampage. This will also allow you to stay in combat and maintain those bloodlust stacks.
  • 'Blood Filled Magazines' will further boost the damage of Tediore weapons that are thrown when reloaded. Tediore weapons are also classified as grenades when they are reloaded, and can receive bonus damage from Fuel the Blood and can activate Blood Bath if they kill an enemy.
  • You can put fewer points into Blood Bath (to reach grenade drop chance of 100%) if you have a class mod that boosting the skill level. A percentage higher than 100% gives you a chance of dropping 2 grenades instead of 1.
  • When using homing type grenades, they tend to lock onto the first thing you're aiming at (if not the closest enemy). If you're using homing grenades you should throw them in different directions (left and right) so that they can home into the hordes from different sides and hit different targets.
  • The 2.5 second delay before you start using bloodlust stacks might not seem like much, but it will give you enough time to target the next baddie after kills and keep your stack count high during fights.
  • Blood Twitch and Fuel the Fire work really well together as you can quickly swap to a slag weapon that is pretty much guarantied to slag on the first shot or two, then swap back to your damaging weapon to keep on reaping lives. Additionally, Fuel the Fire does not need you to be 'On Fire' to receive the full benefit of the skill.
  • Avoid using fire-type weapons, you will receive no benefit from lighting yourself on fire when igniting enemies.
  • Using a class mod that extends the duration of your kill skills will make them less situational and more useful.
  • Explosive weapons will be able to active Blood Bath so they can sustain their own bonus damage. They can also active Blood Overdrive so you're ready to melee enemies for massive damage if you need to activate Buzz Axe Rampage.
  • Use Buzz Axe Rampage to save yourself when you are at critical health and unable to score a quick kill for heal yourself. Release the Beast will activate if your health is low enough (indicated by a red exclamation mark icon flashing next to your health bar) and will heal you back to full with some damage reduction to keep you alive. You will lose your bonus damage reduction immediately when Buzz Axe Rampage and it takes awhile for Krieg to return to his weapons, you will take massive damage during this time. You may want to take cover as Buzz Axe Rampage ends so you don't get trapped in an endless cycle of activating Release the Beast over and over to stay alive.

    Suggested items:
  • Weapons: The Unkempt Harold will hit the hardest. Any explosive weapon will do while levelling, Tediore guns with large clips that reload like a grenades are great. Any fast firing slag weapon will do, preferably with a larger clip so you don't have to reload it. And rocket launchers such as the Nukem are good for recovering your feet in tricky situations.
  • Shield: Use a Rough Rider for the extra 20% damage reduction and health.
  • Grenade: the Fast Ball will be your best option as it will score higher 'Overkill' damage than other grenade mods, which is then applied to Bloodsplosion - dealing massive damage to others around the dying enemy. The Fast Ball is easy to farm, but if you're still levelling, any other higher damage grenade will do, just avoid bouncing betties - they kill enemies with bullets, not the grenade itself and won't trigger Blood Bath. Status effect grenades are also less reliable.
  • Class Mods: Legendary Reaper Class Mod is the best option as it provides boosts to the most important kill skills and extends their duration. Levelling up you could use a blue or purple Crunch (+explosive damage) or Reaper (Kill skills) class mod.
  • Relic a + max health will be your best option. A +explosive damage relic is also a good option but carries more risk.


Problems with this build:
  • The build works best when playing solo as enemy health starts increasing when more players join -which will then cost you more grenades to kill things. Also, other players will become excited when they see how many grenades are on the ground and start throwing them themselves which will reduces your ability to keep throwing them. But don't threat too much, this build still gives you some good boosts to melee and weapon damage. Kills with explosive weapons will also help replenish your grenade count (unlike the elemental version of the grenade psycho which relies on Raving Retribution to do this).
  • A lot of the builds power is tied to kill skills and will be much weaker in boss fights where there are no minions to kill to activate it's power. The damage reduction Krieg receives will keep him alive but it will be a slow fight without the bonus damage his kill skills provide.

Gameplay Video:
https://youtu.be/vIt5cxfprzg
Krieg - Bloodlust Melee Psycho (More Damage)
meat... meat... MEAT! CARVE THE MEAT! WHERE'S MY SALT!?

Hack, slash and explode your enemies into tiny chunks with this build that makes the most of Krieg's devastating melee damage. You will be able to kill enemies in 1-4 hits (except bosses) and kills will trigger blodsplosion to explode or weaken nearby enemies.

Damage: 10 prior to OP levels and 6 after OP levels
Toughness: 6
Difficulty: 6
Fun: 10 prior to OP levels and 4 after OP levels

Here's the skill tree:

https://youtu.be/9gy9Rr6SrBE

    Tips:
  • Practice your axe throwing skills, you're going to need to master your axe throwing skills to take down flying enemies like buzzards and get kills to stay upright. Some enemies like to run away, hitting them with a flying axe will make them stumble so you can catch them.
  • Your Buzz Axe Rampage damage isn't boosted by your guns melee damage (if it has a blade attached) but it is by other items (i.e. relic, class mods, roid shields). Your melee damage can be boosted by guns when you're not rampaging.
  • Don't discount your weapons, you will still need them to get yourself back up when you go down.
  • There are 3 ways to tell if Release the Beast is ready: listen for Krieg to tell you when it's ready, there should be a red exclamation mark on the right-hand side of the health bar and the health icon on the left-hand side of the bar should be shaking like crazy. If you are badly wounded, but not low enough for Release the Beast, take cover and try to hit yourself in the head - then you'll be good to go.
  • Borderlands 2 has a mechanic that stops you from getting knocked in one hit. This only occurs when you suffer a killing blow while your health is stable (HP is above 50%, and is indicated by the health icon not shaking). This 'health gate' will knock you down to critical health and give you 2 seconds of invulnerability, but the next will down you. This happens fairly reliably at higher levels and provides the perfect opportunity to use Release the Beast. Beware though, if your health was already below 50% before you take a hit, the health gate will not trigger and the next hit may down you without giving any opportunity to trigger Release the Beast.
  • You can still swing your axe to deal damage while you have a 3rd person view of your character entering Fight For Your Life. So keep swinging!
  • Your power scales with Bloodlust and Salt the Wound stacks. Your first melee kill will give you a heap of bloodlust stacks (increasing your damage reduction), and you will have started to accumulate some salt the wound stacks (increasing your melee damage). You will gain momentum very quickly after that first kill.
  • I've avoided putting points into Blood Trance as I want to keep my Buzzaxe Rampage duration short. Having a shorter duration can be helpful in boss fights, as re-activating Release the Beast will refill your health and keep you alive in situations where you cannot heal from getting a melee kill.
  • Avoid healing skills like Elemental Empathy, Thrill of the Kill, and Moxxi weapons as unexpected heals can make it harder to time Release the Beast. You can heal from activating Release the Beast and getting a kill with Krieg's action skill will heal him to full.
  • How damage reduction is calculated in BL2 is complicated - and honestly, I still don't understand how it works as I'm very bad at maths. What I do understand is that 100% damage reduction will only equal 'immune' if it comes from a single source (i.e. Kinetic Reflection boosted to at least 10 points by a class mod), and you will receive diminishing returns when you apply multiple sources of damage reduction. Without understanding the maths, I used to think damage reduction capped around 70-80%, but I now understand damage reduction stats lose their effectiveness when there are multiple sources of damage reduction applied, resulting in a plateau effect - see 'other notes / Krieg' for more info.

    Suggested items:
  • Weapons: The Unkempt Harold works well with this build (tired of recommending it but it is a good gun). If you're tired of the Unkempt Harold and want to use something else, look for explosive weapons with good enough damage to get a quick kill when fighting for your life - but finding an alternative to the Unkempt Harold will be difficult. Tediore guns are also good as you can afford to burn ammo as you spend soo much time in Buzz Axe Rampage that you barely get to use your gun. They also receive bonus grenade damage on reloads, and are thrown like your axe - it's good practice! Keep a weapon handy to slag enemies before you enter your buzz axe rampage to score a couple of quick kills.
  • Shield: I was using a roid shield will devastate enemies up until you start to complete overpower levels. A good purple roid shield can give you just as much damage as a the Seraph Pun-chee but thw Hide of Terramorphous will give the largest damage boost. You will need to use a Rough Rider late game to increase your toughness to stay alive long enough to deal damage. Don't use a Love Thumper as it is not effective higher levels and the blasts can hurt your teammates, unless that's what you want.
  • Grenade: Use a high damage grenade like the Fast Ball, or something to light yourself on fire before you activate rampage, such as a Fire Storm or Antifection.
  • Class Mod: Legendary Sickle Class Mod or a blue and purple Sickle mod.

    Problems with this build:
  • This build is a lot of fun up until level 80 as it loses it's effectiveness as you overpower. Enemy health will scale too quickly for you to get the fast 'high damage' kills that grant huge Bloodsplosions. You will need to trade some of your damage for additional hitpoints so you can stay alive long enough to get a kill.
  • Krieg's biggest threat is himself. His self harming behaviour (negative impact of silence the voices), causes him to bash himself and leaves him open to enemy attacks. It also may prevent you from getting a kill that would heal you and keep you going. However, the damage bonus from Silence the Voices is just too good to pass up. There's no skill called Counselling, so you're just going to have to accept Krieg the way he is if you want the massive damage this skill offers... mental health issues and all.
  • Missing your timing on Release the Beast will place you in a very vulnerable position - it will place your Buzz Axe Rampage on cooldown, so you can't tap into your main strength, and it'll likely put you into fight for your life as you will be starting a rampage with low health. Getting the timing right becomes increasingly harder as your health pool gets larger. Taking health damage will reduce the cooldown faster.
  • Some enemies won't let you get close enough to melee them, you will need to throw your axe instead but this will deal noticeably less damage.
  • Not good against most bosses. You'll have to use your guns instead.

Gameplay Video:
https://youtu.be/fffZnVNORwY

Maya - Legendary Siren (Easy to play)
"Pick 'em up and shoot 'em down. I love my powers!"

This is a really easy build to play that focuses on accelerating Maya's action skill - Phaselock as much as possible. You won't need to be a good aim when you can use Phaselock every few seconds to hold enemies still while you shoot them through. On top of this, the build offers improvements to shield functionality and provides 3 sources of healing to keep you alive.


Damage: 7
Toughness: 7
Difficulty: 2
Fun: 4

Here's the skill tree:

https://youtu.be/doXqpMKFthg

    Tips:
  • Increase your action skill cooldown rate as much as possible using a class mod, relic, and Quicken.
  • Avoid selecting Thoughtlock as this will increase the cooldown duration by 4 seconds.
  • Use a shield that will increase your toughness so you can position yourself wherever you need to be in order to critically hit the phaselocked enemy without worrying about wearing damage yourself.
  • Once you phaselock an enemy, nuke it. So your ability can quickly recharge and you can use it again to pick up the next target.
  • Don't worry about missing when trying to activate Phaselock, you will be able to try again immediately after.
  • Avoid using weapons with small clips. When you phaselock an enemy you want to pump it with damage without needing to reload more than once.
  • Don't worry about unlocking Life Tap and Scorn until later levels. Your damage and action skill utility are more important.
  • when you have Life Tap, keep dealing damage after you kill your phaselocked enemy to maintain your health until your action ability is ready to use again.
  • You will lose 30% of your gun damage when versing enemies who cannot be phaselocked as you will be unable to activate Wreck. Be more careful around these enemies.
  • Phaselock can be used at very long ranges. You could use a Bee shield on this and snipe with accurate weapons (other than snipers) if you want to deal more damage with this build.

    Suggested Items:
  • Weapons: Miss Moxxi's Good Touch as it has a good magazine size, extra crtical hit damage, and provides additional healing. You can get Miss Mozzi's Good Touch from Mozzi in Sanctuary by dumping cash in her tip jar until she offers you the weapon. You can do this as many times as you want, but the second time you do it she'll give you Miss Moxxi's Bad Touch instead which has a corrosive element instead of fire. A character will only see one Miss Moxxi Bad Touch offered in their lifetime, (regardless of play-through or who put money in the tip jar), and will receive Miss Moxxi's Good Touch every other time. Of course, the Unkempt Harold also works.
  • Shield: The Antagonist and Blockade are good options as they offer flat damage reduction, but purple Turtle and Adaptive shields will also work.
  • Grenade: Use an electric-type grenade mod to break shields
  • Class Mod: Legendary Siren Class Mod or Binder class mod if still levelling
  • Relic: +Action Skill Cooldown Rate. A Bone of the Ancients will also provide bonus damage to your preferred element.

    Some problems with this build:
  • It's an easy build to play, but with the loss of challenge it can get boring quickly.
  • it's weaker against enemies that cannot be phaselocked.
  • It feels slower to play than other builds characters
  • It doesn't really teach you howto predict movement when trying to shoot enemies.


Gameplay Videos:
https://youtu.be/JO8FVkoi3Kg
Maya - Fierce Cat (Best for Damage)
"Oh my god, she's armed with an SMG. She's a siren warrior" - Krieg


This build uses the Cat class mod which increase your sub-machine gun damage, and provides boosts +damage skills. Add a bee shield and a +damage relic and you will be melting faces. Just like a Siren should.

Damage: 9 (Can solo Haderax the Invincible)
Toughness: 3
Difficulty: 3
Fun: 7

Here's the skill tree:

https://youtu.be/f16kI2pZsCk

Tips:
  • Submachine Guns(SMG) will deal significantly more damage than your other weapons with the Cat class mod equipped.
  • The Sandhawk is the best high damage option for this build, but the Good Touch and Bad Touch SMG's provide healing and can help keep you alive. The goal is to not take damage, so you shouldn't need much healing.
  • When using the Bee shield, it adds amplified damage to projectiles fired from your gun as long as your shields are fully charged; and the amplified damage will be significantly higher than the gun's base damage. To maximise damage provided by the bee shield, prioritise fire rate or guns that shoot multiple projectiles. For example: The B!tch SMG boasts high fire rate, whereas the Sandhawk shoots 7 projectiles per a burst.
  • Wreck provides a big boost to damage because of the combined +fire rate and +gun damage and Chain Reaction causes a percentage of bullets to richochet; but these skills are only active while you have an enemy Phaselocked. Avoid killing your Phaselocked enemy to make these boosts last longer.
  • Thoughtlock will make you phaselock ability last longer and will give baddies something else to shoot. Enemies will prioritise whoever is thoughtlocked, which will make it easier for you to maintain your Bee shield.
  • Converge will group enemies and Ruin will slag them. Then you just need to mow them down.
  • There may be a learning curve when using the Bee shield, as you need to become good at avoiding all sources of damage. Keeping some distance from enemies (so they lose their accuracy) and staying behind cover will help. Also prioritise enemies with explodive projectiles, snipers, and high fire rate (in this order). You will have enough damage in your kit to not need a Bee shield, but you're better off with it.
  • When collecting your Sandhawk (mission reward from 'Whoops' in 'Captain Scarlet and her Pirate's Booty') look for a Sandhawk with the 'Flying' prefix. The Flying Sandhawk's projectiles fly faster, making it easier to use. If you do not like the Sandhawk you were rewarded, you can force the application to close without saving, reload the game, and try turning in the mission again.


Suggested items
  • The build is based around SMG's. I levelled up using the Emperor SMG. It felt nice and clean to play with (like a tactical breach), but it's damage does not compete with the Sandhawk is a stronger pick when using the bee shield because it fires 4 bursts of 7 projectiles per a burst (28 bullets) and the Bee shield's amp damage applies to each one.
  • as this is a DPS build, the Bee shield is the best choice.
  • Choice of grenade doesn't matter. I'm using a Magic Missile to slag things.
  • Use a +SMG damage relic
  • the build is based around Cat class mods. look for a Legendary Cat Class mod for end game content.


Problem's with this build:
  • This is a a fairly good all round build but is less effective in situations where you can't channel Phaselock.
  • The Sandhawk will chew through ammo a bit quicker than other SMG varieties. Loot containers to top up your ammo and carry a spare weapon.


Gameplay Videos:
https://youtu.be/7NFwVOl_S8c

https://youtu.be/HauLvvrgcHQ

https://youtu.be/6BAumUoF4KY
Maya - Binder (Team Player - Balanced)
Should we band together, we'll survive this. Our enemies will not.

This is a balanced build that can do it all. It can spam Phaselock, accelerate action skill cooldown for your team, heal team members, and dish out damage. It is designed to work with other players but is still good for solo play for when your team is unavailable or you want to farm loot between sessions.

Damage: 8
Toughness: 5
Difficulty: 3
Fun: 6

Here's the skill tree

https://youtu.be/kXdiAeqD6eU


    Tips:
  • when using Phaselock, don't kill the trapped enemy too quickly so you can continue to benefit from Wreck and Chain Reaction. Instead, shoot at other enemies then finish off the Thoughtlocked enemy just before it's released.
  • Sub-Sequence can be a good skill with this build due to the 10-11 points you can get in Sweet Release. If you have Sub-Sequence unlocked, you will want to focus damage on the Phaselocked target each time it jumps to keep releasing healing orbs with each kill. However, the focus was on being able to hold a target for as long as possible, so Sub-Sequence was not selected for this build as there is a game mechanic that shortens the Phaselocked duration each time it targets the same enemy, and Sub-Sequence jumps can initiate this.
  • Weapons with larger magazine sizes tend to take longer to reload but you can reload them while your Phaselock ability is cooling down so your guns are prepped for the next time you use your ability.
  • Res is only useful if you're playing co-op.
  • Helios is a good early game skill but it's a rubbish end game skill. Ignore the 5 points the Legendary Binder Class Mod gives to this skill when you're above level 72.
  • It's easier to shoot players to heal them with guns that have bullet spread, deal AoE damage, and/or have higher fire rates. Be mindful of the weapon's reload speed; players will be downed while you're reloading if you're trying to heal them while they're still taking damage.

    Suggested items:
  • Weapons with larger clips work better with this build as you don't loose damage output reloading while Phaselock is active. Avoid using snipers as this build consumes ammo like a badass midget consumes drinks at a bar.
  • I pretty much used Miss Moxi's Good Touch the whole way through -I've settled with one that has an extended magazine.
  • Weapons that deal AoE damage or a bit of bullet spread are effective after Converge bunches enemies up.
  • This build is based on the Legendary Binder Class Mod, but is highly flexible other mods depending on which aspect you want to focus on.
  • The Bee shield work well with this build. There are plenty of options for tanking if you want to focus on playing the support role.
  • Your choice: Magic Missile to slag, Singularity Grenade to better group enemies and deal AoE damage (Quasar is a good option), or Transfusion type grenade to heal (look for 'sticky homing' types as these will release healing orbs immediately on explosion).

    Problems with this build
  • The build will consume a lot of ammo but as long as you have a slag weapon and 3 offensive guns, you should be fine.
  • Your Phaselock can't pick up larger enemies so you won't be able to gain the large increase to damage and fire rate bonus when versing larger units like constructors or buzzards unless there are smaller enemies around.
  • You will do better with a different build if you plan on playing solo most of the time.

Gameplay Videos
https://youtu.be/iaoZgIUaeuo
Maya - Nurse (Co-Op - Full Support)*
Oops, this build is outdated and is being reviewed. check back soon! 17/05/2022

If looks could heal

How the build works
Your friends will be happy to have you in their team looking after them with this build. The build is all about support, your ults will mind control things that then taunt and tank enemy damage, you and your team will regenerate %10 of your max health per a second while you have an enemy Phaselocked, you can shoot team mates to heal them, you focus on slagging things so they don't have to, and you can revive from distances with your action ability.

Here's the skill tree:


    Tips:
  • Weapons with a fast fire rate, a little bit of spread, or cause area effect damage will make it easier to hit your team mates to heal them when they're running around erratically.
  • Enemies will focus their attention on targets under the influence of Thoughtlock (bottom skill in the left/Motion tree).
  • This build is good for players who want to support inexperienced players, or for inexperienced players to feel like they are contributing (you are!).

    Recommended items:
  • a couple of items to slag with -doesn't matter what as long as it has a good chance to slag and you can sustain the ammo
  • The build is not weapon specific but probably works better with larger clips and/or higher fire rate weapons.
  • I found the Invader with +crit damage was handy for dealing damage when i was playing on my own. I've also used the The Hellfire and Hornet which were effective enough.
  • The Legendary Nurse Mod will give you the best stats. If you don't have this you could use a Matriarch, Cleric or Nurse(basic) Class Mod. If levelling up solo, you may even want to consider using a Cat class mod to increase your damage.
  • Transfusion or slag grenades will give you more support utility. I'm using the Magic Missile.
  • Your shield doesn't matter but you could use a Bee Shield to boost your damage if you're good at staying out of the combat, any form of the adaptive shield to increase your survivability (i.e. Evolution), or Antagonist to compliment your Kinetic Reflection ability.

    Problems with this build:
  • The builds damage was good enough to solo level to 72 and pull your weight in multiplayer but this build's damage was not fantastic.
  • It can be annoying when a mind controlled enemies reset because there's nothing for them to fight.
  • It's harder to drill damage into a mind controlled enemy that's moving around than one that's being held still
  • If this is your only character and you can't be bothered levelling another up, you could find yourself quitting Borderlands 2 when your friends do (or you could simply respec it to try something else you can do on your own).


Video Guide:
Maya - Fleet/Banshee (Speed Runner)
"No time to waste. Let's get moving!"

Maya can increase her movement speed by up to 110%, which is is good for speed running and farming loot. You only need a blue Banshee class mod, a Rough Rider shield, and points in her Fleet skill. The 'dedicated' build is for players that want to have the Banshee class mod equipped 100% of the time, but an 'interchangeable' build is a better option as you can swap between your main build and movement speed whenever it's convenient.

Damage: 6
Toughness: 5
Difficulty: 5
Fun: 7

Here's the skill tree:
Note: This build only need points in Fleet.
https://youtu.be/F7ss1DajQXQ

Tips:
  • Consider including Fleet in another Siren build so you can swap between your Banshee class mod and Rough Rider shield when you want to gain the Fleet Siren's speed boost, and swap to your main class mod and shield when you want to deal more damage.
  • Sweet Release provides good healing when you're below 50% health, but the health orbs move too slowly to catch you when you're using Fleet. You will need to wait for the health orbs to reach you on run towards them if you want to use Sweet Release with your build.
  • Suspension and Thoughtlock work well together as you will be able to hold a target 19.5 seconds. You will also heal 5% of your health each second while an enemy is Phaselocked if you have unlocked Elation.
  • Thoughtlock can be used to distract other enemies, as they tend to prioritised attacking Thoughtlocked targets over players. Using Thoughtlock to distract enemies can be handy for running through crowded areas when you're trying to skip content. Also consider increasing your Action-Skill Cooldown Rate so it's ready to use before you run through the next area.
  • It's worth investing into abilities that heal Maya to keep her alive while she is using the Rough Rider and has no shields. Life Tap is a useful healing ability and it pairs well with Recompense and Kinetic Reflection as you will heal a percentage of damage these skills reflect back at attackers. These skills are more useful if reflected damage is hitting slagged enemies. Life Tap only needs to keep you alive until Thoughtlock is ready to use again.
  • Be careful when using Skorn, as it moves slower than you can run with Fleet. Avoid casting Skorn while running forwards as you will run through the projectile, causing it to explode and slag yourself. Skorn has a moderate cooldown and isn't always reliable, so bring a slag weapon just in case. Ruin is a good substitute as it is reliable for slagging, but you will need to give up Life Tap for Flicker. Recompense will be less useful without Life Tap, so consider moving points from Recompense to Sweet Release for an alternative source of healing.
  • Blue level 50 Banshee Class Mods are the highest quality mods you can find for this build as they can give +6 skill points to Fleet and don't decrease your health as much as higher level mods. You also will not benefit from the +shield recharge rate and -shield recharge delay stats that higher level class mods offer.


Suggested items
  • Weapons: Moxxi weapons will provide some additional healing - Miss Moxxi's Good Touch has been a reliable weapon. The Unkempt Harold also packs a punch. Bring a slag weapon as Skorn isn't always reliable.
  • Shield: Rough Rider
  • Grenade: Firestorm grenade for some additional status damage and almost instant healing while Life Tap is active and to AoE nuke enemies after they have been grouped with Converge and slagged with Skorn.
  • Class Mod: Blue Level 50 Banshee Class Mod with +6 to Fleet. The Breakneck version provides the better secondary skill.
  • Relic: Skin of the Ancients will give you +Action Skill Cooldown Rate and +Elemental Damage (Best Option), otherwise look for +Action Skill Cooldown Rate (preferred), +Damage to preferred weapon (2nd pref), or +Max HP(3rd pref).


Problem's with this build:
  • This build works for guerrilla tactic fights and isn't good for boss fights.
  • The build also struggles against enemies that cannot be Phaselocked as you cannot receive healing from Elation.
  • Fire elemental damage is good against flesh - that's you without shield protection. Prioritise eliminating enemies dishing out fire damage.
  • This build only heals through combat (and Dr Zed Vendors). It's risky trying to recover health when you're already low. I was initially using Sustenance to counter this but then got rid of it because it wasn't have a big impact.
  • The build sacrifices damage and toughness for speed. Using an interchangeable build will reduce power loss for your character.


Video Guide:
https://youtu.be/vE56yvQ7L_M
https://youtu.be/0clPHaKy0m4
https://youtu.be/eCZwlhMGQKE
Maya - Vampire*
Oops, this build is outdated and is being reviewed. check back soon! 17/05/2022

"While others wither, I grow stronger"


There's some seemingly useless skills in Borderlands 2, but even those skills can become useful when paired with another. Recompense and Blight Pheonix are pretty bad skills on their own, but when you pair them with Life Tap you get a Vampiric Siren. Just kill something to activate Life Tap and then hurt your enemies to heal.


Here's the skill tree:


Tips:
  • You should use class modsthat increase Life Tap to get the most out of this build.
  • Alternate between Phaselock and Skorn to slag without needing to switch to slag weapon or use grenades.
  • Avoid weapons with long reload times or that need to be reloaded too frequently as this is when you're most vulnerable of getting knocked down.
  • Blight Pheonix will be useless if you're not getting up close to your target. Some points in Fleet will help with this.
  • Be very careful when recovering from Fight for your Life as you will revive with no shields and low health. You will recover with your kill skills active so you can be aggressive to steal health or seek cover until you have a plan/opportunity to engage.
  • If you're not able to chain a kill before your kill skills deactivate, you may need to consider upgrading your weapons or using something to sustain your health until you can get your next kill (i.e. Elated or transfusion grenades).
  • The pulsing noise Life Tap emits was annoying at first, but you get used to it. It's far less annoying when you consider it a useful audial way to tell when your kill skills end (when it stops emitting noise). You're safer when it's pulsing.
  • Trickster class mods can increase your Life Tap and Kinetic Reflection. If you can boost your Kinetic Reflection to 10 points you will gain 100% damage reduction and bullet reflection -making you bullet proof until the kill skill wears off.


Suggested items
  • This build even works well with less popular guns like Sledges Shotgun and the Infinity Pistol. You can use just about anything, however I've found the Moxxi weapons don't add much to the already decent life steal.
  • A Rough Rider Shield for the damage reduction and extra health.
  • a transfusion type grenade (to top up health when Life Tap isn't active (i.e. start of a fight, against constructors or something else you can't kill within 7 seconds)
  • A +max health relic as this gives more room for your health to fluctuate. You may find you're going down too often without this.
  • A class mod that increases your Life Tap skill. I preferred the Trickster variant but a matriarch or cleric(Tiny Tina DLC) can also work.


Problem's with this build:
  • Not good against bosses (that don't have minions)
  • No other serious concerns.


Video Guide:
To be added soon
Salvador - Rampage (My Main)
NEED MORE BULLETS!

This build can solo Digistruct Peak on OP10 and is based around using hyperion weapons to shoot accurately from the hip while endlessly gunzerkering. The build you will see here was refined to use pistols such as duel wielding Lady Fists (non elemental and slag), or an Unkempt Harold with a Grog Nozzle, to reap major damage benefits from No Kill Like Overkill

Damage: 10
Toughness: 3 (with Lady Fist pistols) 10 (with Grog Nozzle pistol])
Difficulty: 3
Fun: 5

Here's the skill tree:

    Tips
  • When using the Lady Fist:
  • Hyperion weapons are good for Gunzerking as they increase accuracy while holding down the trigger. This makes them accurate when shooting from the hip.
  • The Lady Fist works well if you use a Bee shield and can consistently score critical hits.
  • Kill a weak enemy first to activate No Kill Like Overkill to apply additional 'overkill' damage to each shot. Each kill will re-apply No Kill Like Overkill based on the new value 'overkill' value, meaning the 'overkill damage can stack on top of itself and continue to climb with each consecutive kill while the ability is active.
  • The Lady Fist gun damage, Bee shield's amp shots and 'overkill damage' will all receive the +800 critical hit damage the Lady Fist provides; this is what causes your damage to sky rocket after the first kill or two, and will continue to climb until you reach maximum damage as long as you keep getting kills with critical hits. Killing an enemy with a body shot may cause your damage to topple and you will have to build it back up.
  • The Lady Fist does not work with the Grog Nozzle as it does not deal enough damage without the Bee shield's amp shots and the drunk effect the Grog Nozzle applies will cause it to become too inaccurate to use until you sober up.
  • The Unkempt Harold and Grog Nozzle option requires far less skill to deal massive damage and increase survivability, but you will need to ditch the Bee shield for something tougher to get closer to enemies. Just hold the trigger down and spray high damaging explosive bullets (which are fantastic against most enemies) and the [Grog Nozzle[/i] will convert a percentage of damage dealt to heal yourself.
  • You will only be able to get a permanent one through mods (literally the only thing i used the community mod for). Otherwise you may get one from other players or leaving 'The Beard Makes the Man' mission is incomplete. If you opt for leaving 'The Beard makes the Man' mission incomplete, you risk losing access to your Grog Nozzle while you're in a game where the party leader has finished the mission, but you will regain access when you leave their party.
  • When playing in groups you will need I'm Ready Already as other players will be killing enemies preventing you from extending your gunzerking duration.
  • You can combine skills such as Inconceivable, Filled to the Brim, and 5 Shots or 6 (kill skill) to shoot free bullets non-stop without reloading for a short time after getting a kill. If you a couple of Topneaa rocket launchers equipped (preferably one slag and one for damage) - you can hold your trigger down and spray enemies with free rockets. This will deal less damage than just using your pistols though, but it looks impressive - like a Super Saiyan slamming enemies with 'Continuous Kikōha'.

    Suggested Items:
  • Weapons: Guns like the Unkempt Harold, Grog Nozzle (for healing), Lady Fist are good. I've also tried duel wielding B|tches SMG (i didn't name this gun), it works OK but it's not nearly as powerful and drains more ammo. I stuck to Hyperion weapons when levelling up as they are accurate when fired from the hip when duel wielding.
  • Shield: Blockade, Antagonist, Rough Rider, or at the very least an Adaptive shield will give you more survivability. A Bee shield will give your more damage and compliment the Lady Fist, but you will need to play more cautiously.
  • Grenade: Singularity grenades are good for grouping and nuking enemies, especially when using an Unkempt Harold.
  • Class Mod: Legendary Hoarder Class Mod, or a Tiny Tina Monk Class Mod.
  • Relic: +pistol damage, +explosive damage (for Unkempt Harold), or +health

Problems with this Build
  • The Lady Fist only works well against enemies with crit zones; so use the Unkempt Harold against creatures without crit zones. Also, getting the right Lady Fists can be annoying. Here's how you can do it, but it's an exploit - so if you don't want to do this then i suggest you finish reading this section here. Here's how it works: if you don't like the reward you've received you can force the application to close without saving, reload your game and turn the mission in again, and repeat until you get the gun parts and/or element you want. You can also have a second account join with a freshly made character to earn a second reward simultaneously.

    Gameplay Videos:
    https://youtu.be/ANqccZv2CRM

    https://youtu.be/WQ0-TB0mQqw
Salvador - Zippy Beserker (Speed Runner)
NOW LET'S HAVE SOME FUN!

This build was based around the gunzerker's ability to move quickly. It's quite satisfying leaving your friends in the dust with Salvador's athletic ability -watch his little legs go! but wait, there's more! The build also hypes up his attack speed, reload speed, and boasts some damage, which allows you to melt enemies with an almost endless barrage of bullets.

Damage: 7
Toughness: 10
Difficulty: 2
Fun: 8

Here's the skill tree:

https://youtu.be/40t3cyszPU4

    Tips:
  • The movement speed of this build makes it really easy to position yourself at the optimal distance to maximise damage with the Unkempt Harold - where the bullets just start to duplicate and spread out and prevent enemies from getting too close.
  • This build works well with the Grog Nozzle as you will receive constant healing from the fast-fire rate of your weapons, and short reloads. You will only be able to get a permanent one through mods (literally the only thing i used the community mod for). Otherwise you may get one from other players or leaving 'The Beard Makes the Man' mission is incomplete. If you opt for leaving 'The Beard makes the Man' mission incomplete, you risk losing access to your Grog Nozzle while you're in a game where the party leader has finished the mission, but you will regain access when you leave their party.
  • You won't loose the attack speed bonus from Keep Firing if you choose to manually reload your guns as long as you keep holding the trigger down while you push your reload key.
  • You will burn through ammo, so you will another weapon set you can alternate between resupplies.
  • You will deal 15% more damage if you are using pistols, and 30% more damage if duel wielding two guns of the same type.
  • You won't want to tickle enemies to death with fire-rate alone, increase your gun damage where practical to make your bullets punch.
  • This is a good build for solo farming Master Gee the Invincible as you can punch him onto the pools of poison.

    Suggested items:
  • Weapons: Best with the Unkempt Harold and Grog Nozzle, otherwise look for weapons that can sustain damage through fire rate and reload speed and a Moxxi weapon for additional healing.
  • Shield: Rough Rider Shield -this keeps All Out of Bubblegum active and will keep you alive when storming enemies.
  • Grenade:
  • Singularity type grenades are good for grouping enemies so you can hit more with your Unkempt Harold. Chain Lightning can be used for breaking shields and fast source of healing while a Moxxi weapon is equipped. A chemical sprayer grande may also be helpful as these will stay in effect for longer.
  • Class Mod: Legendary Berserker Class Mod. A Beast Class Mod or Renegade Class Mod can be used if needed.
  • Relic: use a +health relic to increase survivability

    Problem's with this build:
  • I have not had problems with this build, other than finding the weapons to support it. It works better with explosive weapons, and the Unkempt Harold is easy enough to get, getting a Grog Nozzle without the Community Mod will be a challenge, the other Moxxi weapons are easy enough to get but will take time and their heals won't be as beneficial. I have struggled to deal good 'bullet' damage with any gun other than the Lyuda. The Lyuda works well because of it's large base damage and crit damage; but it's the large ammo clip that makes the gun work for this build. The Lyuda has a very low chance to drop from Gettle in the Dust, but you'll find a bunch of Tubby Spiderants while attempting to farm him.


Gameplay Videos:
https://youtu.be/b_if9eErLL0
Zero - Sniper (One Shot Kills)
I have destroyed you / A deadly shot from nowhere / From my best sniper

This build is about using sniper rifles to explode enemies from a distance, but he can also rely on other guns in situations where snipers are impractical. He'saglass cannon, but you like cannons right?

Damage: 9 (can score max damage occasionally with Deception)
Toughness: 2
Difficulty: 6
Fun: 5

Here's the skill tree:

https://youtu.be/Q2mS_xDgwNo

    Tips:
  • Snipers with +crit damage generally deal more damage.
  • This guy still won't deal much damage if you body shot, but critical hits will be devastating.
  • There are a few skills that you will need to utilise to deal damage:
    • Ambush will increase your damage when shooting something in the back or when the target is attacking something other than yourself,
    • Death Mark will increase all damage the marked enemy takes from all sources by 80% (this can be applied with Death Bl0ss0m while using Decepti0n,
    • Decepti0n will deal massive damage if you wait until the skill is about to expire (+200% gun damage and +250% crit damage),
    • 0ne Sh0t 0ne Kill will cause the first bullet fired from a fully loaded magazine to deal bonus damage. Reload your sniper before shooting.
    • Killer will increase your critical hit damage for a short time after killing something.
    • Slag your enemies to increase damage they take by 300%

    Suggested Items:
  • a good Jakobs sniper rifle with +crit will be good enough.
  • The Lyuda (automatic snimper) is good for killing bosses and tougher units like constructors but will burn your ammo reserves.
  • The Skullmasher's pellet spread can help you hit your target consistently if you find you're always a little bit off your target.
  • The Hawkeye has amazing +crit damage but lower base damage so it's only good against enemies with crit spots
  • I'd highly recommend keeping a corrosive weapon handy to kill tougher/non crit enemies like Ultimate Badass Loaders. A Hornet is good for this.
  • The build works with other weapons like the Striker shotgun, Maggie pistol and B|tch SMG (yes, that's what's it's called). I would use these weapons when i became tired of sniping or was versing enemies that close in too quickly.
  • As this build has no healing abilities, i used transfusion grenades to sustain health. A Leech is a good choice as it has a longer lasting effect.
  • I'm using a Legendary Killer Class Mod on this guy but you could use a Sniper Class Mod if you don't have one.
  • A Bee shield and a +sniper damage relic will further increase your damage

    Some problems with this build:
  • I gave up on this character as i felt his health was too weak and it was frustrating versing enemies that didn't have crit spots or had crit spots that glitched out so you couldn't hit them anymore (like the Badass Bikers). I managed the enemies without crit spots well enough by using weapons like the Hornet to take down some of the tougher enemies. There are some enemies that have crit spots but you can't hit them when the enemy is facing you (which is nearly all of the time when playing solo). This build is easier to use in Co-op play where you have a team mate that can turn the enemies away from you so you can pick them off.
  • This build does not have any health recovery abilities and he does not have a lot of toughness so you end up going down a lot. To manage this i used transfusion grenades to heal. Also, don't panic when you go down, take your time and use 'Fight for Your Life' to your advantage.
  • This build struggled in Tiny Tina's DLC because there are a large number of enemies that close in on you quickly like charging orcs and flying skulls. You can deal with these enemies better by sniping from the hip or using other weapons like a SMG or shotgun.


Gameplay Videos:
https://youtu.be/a85MykIuNys

https://youtu.be/tNnXyi_BCic

https://youtu.be/TuoF-RMIpaY


Zero - Ninja (Melee)
"My sword is sharpened / I remain invisible / A true assassin"

This build was based around the assassin's melee attack. I found it challenging levelling this guy up but it all became so much easier after you reach level 62 and can put points in both Death BL0ss0m (bottom mid/Cunning tree) and Many Must Fall (bottom right/Bloodshed tree). It's a good build to try as it offers a very unique play style.

Damage: 7
Toughness: 2-6 (small health pool, but can heal to full with each melee strike with Law and Order)
Difficulty: 7
Fun: 6

Here's the skill tree:

https://youtu.be/3--ZDJM0hDg

    Tips:
  • To play this build effectively, you need to know where your damage comes from:
    • Killing Bl0w will activate when an enemy's health drops below 30%
    • Be Like Water will increase your next melee attack's damage after you shoot something. A melee attack will increase the damage of your next shot fired.
    • Backstab will increase your melee damage when attacking an enemy from behind.
    • Ambush will also increase damage you deal when you attack an enemy from behind or it's attacking something other than you. This boost also effects gun damage.
    • F0ll0wthr0ugh will increase your melee damage and movement speed after you get a kill. It also increases gun damage.
    • Like The Wind will increase melee damage when moving.
    • Rising Sh0t will increase your melee damage when melee attacks are dealt in quick succession. Also effects gun damage.
    • Death Mark will increase all damage the marked target takes by 80%
    • Slag will increase damage by 300%
    • Decepti0n will deal up to 650% melee damage. To score maximum damage, you need to attack an enemy at the end of it's duration (notice the scaling bar displayed on screen while Decepti0n is active. Maximum damage is achieved when the loading bar reaches the explosion icon)
    • C0unter Strike has a chance to activate when you take damage, granting increased damage on your next melee attack if executed quickly.
    • Aim for critical hits
    • You can further increase your melee damage by equipping class mods, roid shields, and +melee damage relics.
    To maximise damage you need to meet the requirements of as many of these points as practical when striking your opponent.

  • Many Must Fall will extend the duration of Decepti0n after each melee kill while Decepti0n is active. It doesn't add much time though, so you'll need to attack your next target quickly. You will have enough time to use Death Bl0ss0m to Death Mark a new target and either strike before the kunai explodes or wait until after it explodes. Alternatively, you can try to Death Mark multiple targets, and stay 2 steps ahead with marks so you won't be charging into exploding kunai.
  • You can use Death Bl0ss0m to weaken enemies, apply Death Mark and try to slag your targets to make it easier to kill them with your next melee attack. If you successfully kill a target with a melee attack while Decepti0n is active you'll be able to use Death B0ss0m again. Try to use kunai as much as possible as it's a good damage dealer, but try not to kill your targets with kunai as this won't activate Many Must Fall. Careful not to hurt yourself with Death Bl0ss0m's explosions, as you don't have a lot of health and they will down you quickly.
  • Throwing grenades does not break Decepti0n so you can use grenades to slag enemies snd/or break your shields to activate roid damage while Decepti0n is active.

    Suggested items
  • Use Captain Blades Rapier when you activate Decepti0n as it gives a massive +200% but it's gun damage is horrible. You can swap to a different weapon after Decepti0n to deal gun damage.
  • The Law (pistol) and Order (shield) are a good combination, as melee attacks will heal you when both are equiped. These items are obtained as mission rewards from Santuary missions Won't Get Fooled Again for Law, and BFFs for Order.
  • The Grog Nozzle is a good alternative as it provideshealing as well, but hard to get with the +melee damage variant. You may want to ask the Borderlands community to give you one for this build (only way to acquire it as it cannot be farmed).
  • you could use either a Legendary Ninja Class Mod (preferred) or a Legendary Hunter Class Mod would work if you altered the spec. If you don't have one of these, you could use a blue or purple Ninja Class Mod or an Infiltrator Class Mod.
  • I'm using a relic that boosts my melee damage. A reduce cooldown relic would also work.
  • A slag grenade is handy. Transfusion for additional healing, Bouncing betties as they last longer in combat, or Magic Missile.
  • You may want to keep a weapon handy to manage things you don't want to get too close to (like constructors). a sniper, Maliwan Caster or a thrown-like-a-grenade Tediore will do the trick. This weapon should be reliable enough to use to recover from Fight For Your Life.

    Problem's with this build:
  • Levelling the character up wasn't a fun experience but it was worth it in the end.
  • Sometimes it was difficult to melee flying enemies -but my friends thought it was funny watching an assassin using Dashing Strike to fly through the air yo chase them. You will become better at timing your attacks against aerial units with practice.
  • The build does not have much toughness and will fall quickly to enemies you can't melee.


    Gameplay Videos:
    https://youtu.be/2zfJ3W8NN84

    https://youtu.be/8P2tpqyCD-g


Zero - Contract Killer (Team Player)*
Oops, this build is outdated and is being reviewed. check back soon! 17/05/2022

" I'm on a mission / With automatic weapons / It's kill or be killed."


This build uses the Cunning skill tree and the Sniping skill tree, but not for sniping -which makes things a lot easier.


Here's the skill tree:


Tips:
  • Rising Sh0t is considered useless by the wider community but it's not with this build. Rising Sh0t is very effective with automatic weapons when you're holding the trigger and consistently hitting your enemy.
  • Use Decepti0n often, while active use Death Bl0ss0m to apply Death Mark to multiple enemies, recharge your shields, regen health and reload your gun.
  • Ambush is not as useful when playing solo, you will get an increase in damage while Decepti0n is active but that boost will end as soon as you're revealed. It's more useful in co-operative play when enemies are attacking other players.
  • Zero is a hero that's based on skill. His damage comes from consistently getting critical hits.
  • Use Death Mark on things you can't slag
  • In co-op games, use Decepti0n to trick enemies into targeting another player.
  • Look for opportunities to use B0re. If you can get a kill just before you use Decepti0n you will gain movement speed from F0ll0w Thr0ugh (kill skill) and Innervate (augmentation for Decepti0n) which can help you reposition to line a couple of baddies up.


Suggested items
  • Automatic Weapons. The B|tch SMG and Lady Fist work well because of their bonus critical hit damage.
  • A Bee shield to maximise damage -will also compliment weapons like the B|tch and Lady Fist.
  • A slag grenade can be handy to slag things while using Decepti0n or so you don't have to swap weapons to slag -the Magic Missile is a good option for this. A transfusion grenade can also be helpful to replenish your health when needed -I'm using a Slag O-Negative.
  • This build uses a Legendary Killer class mod. a Blue stalker class mod that has Rising Shot and Follow through is also a good option. I levelled up using 'Spy' class mods. I wasn't fussed about the non-legendary killer class mods.
  • A Cooldown reduction relic or a +gun damage relic. I'm using a Cooldown Reduction Relic.


Problem's with this build:
  • This is a strong build for Zero, the only weakness is Zero himself -his character is designed to dish out damage but not take it. Part of this, is Zero's inability to heal himself if he takes damage.
P.S. I know a lot of you reading this will argue that zero can heal himself with a Grog Nozzle and tank just fine when using a melee build with Law and Order. I'd argue that's the gun healing, not Zero


Video Guide:
To be added later
Zero - Hunter (Guns and Melee - Balanced)
Whether you're at range / Or you want melee combat / I'm prepared for you

If you're unsure if you want to be sniper or melee zero, just go both. Many of the skills selected for this build boost your gun and melee damage well enough that you will be able to use Decepti0n to one shot enemies with a well placed Sniper bullet, or by stabbing them in the back.

Damage: 8
Toughness: 4
Difficulty: 5
Fun: 6

Here's the skill tree:

https://youtu.be/YSd0NPrA2pQ

    Tips:
  • Knowing where your damage comes from will help you kill enemies more easily, and one-hit-kill things with Decepti0n.
    The following increases both your melee and gun damage:
    • Like The Wind will increase gun and melee damage when moving.
    • Rising Sh0t will increase your gun and melee damage when quickly hitting the enemy multiple times. Stacks decline quickly when there is a pause between dealing damage.
    • Death Mark will increase all damage the marked target takes by 80%, this can be applied with Death Bl0ss0m kunai while using Decepti0n
    • Decepti0n will deal up to 650% melee damage. To score maximum damage, you need to attack an enemy at the end of it's duration (notice the scaling bar displayed on screen while Decepti0n is active. Maximum damage is achieved when the loading bar reaches the explosion icon at the end of the bar)
    • Ambush will also increase damage you deal when you attack an enemy from behind, or when it's attacking something other than you.
    • Be Like Water will increase your next melee attack's damage after you shoot something. A melee attack will increase the damage of your next shot fired.
    • Zero's skills boost his critical hit damage. Critical hits will be devastating, shooting enemies without scoring critical hits will just tickle them.
    • F0ll0wthr0ugh will increase your gun damage, melee damage and movement speed after you get a kill.
    • Killer will increase your critical hit damage for a short time after killing something.
    • Slag will increase damage by 300%

    The following will increase your melee damage:
    • Killing Bl0w will activate when an enemy's health drops below 30%
    • Backstab will increase your melee damage when attacking an enemy from behind. Movement speed provided by Innervate and F0ll0w Thr0ugh will help you to get behind enemies to Ambush and Backstab them.
    • C0unter Strike has a chance to activate when you take damage, granting increased damage on your next melee attack if executed quickly.
    • Roid/Maylay shields are essential for dealing melee damage. Swap from guns to melee when your shields break, or break your own shields with shock damage when you want to amp your melee damage. Many players use a Lightning bolt grenade mod to do this, and grenades can be used while Decepti0n is active without ending it. A slightly lower level Lightning bolt will help you to avoid self-inflicting unnecessary damage.

    The Following will increase your gun damage:
    • 0ne Sh0t 0ne Kill will cause the first bullet fired from a fully loaded magazine to deal bonus damage. Reload your sniper before shooting, especially when using Decepti0n.
    • Vel0city increases your gun damage by 10% and your critical hit damage by 15%
      Innervate will increase your gun damage by 10% while moving in Decepti0n
    Suggested Items:
  • Weapons: A good sniper, the Amigo is the best option. A Law pistol (for Law and Order combo), something to slag with, and something hard hitting like an Unkempt Harold for enemies without crit zones.
  • Shield: Order shield. The Law and Order combo makes melee attacks heal you, which will keep you alive when you're stuck in melee range with an enemy like Rabbid Stalkers
  • Grenade: Chain Lightning or Lightning Bolt to break your melee shields when wanted, or a grenade that can slag while Decepti0n is active. Slag grenades need 0 fuse time due to Decepti0n's short duration. Magic Missile grenade mods are reliable when wanting to slag enemies, but be careful of their explosions though.
  • Class Mod: Legendary Hunter Class Mod
  • Relic: +melee damage, or +sniper damage, or +action skill cooldown rate.

    Some problems with this build:
  • Your snipers don't punch as hard as they would as a dedicated sniper build, and your power does not scale without Critical Ascenti0n. You also lose a bit of melee damage but not much.
  • The build feels a bit equipment based; without the Law and Order combo, Zero doesn't have enough healing to tank enough damage to really utilise his C0unter Strike ability. Zero continues to toughness and the ability to recover health in situations where he cannot melee enemies.

Gameplay Videos:
https://youtu.be/k8mba1oIy7M
Need Loot?
Here's a list of farming locations to help you find equipment (non boss specific):

  • Want more golden keys?: This is the website I use to find codes for golden keys for Borderlands 2 and Borderlands: The Pre-Sequel - http://orcz.com/Borderlands_2:_Golden_Key

  • Loot midget farming in the Wildlife Exploitation Preserve: You have a gaurentted chance to find 4 loot midgets as long as you do not pick up a single echo recording when you have accepted the Doctor's Orders mission (each echo recroding you pick up will reduce how many midgets you find by 1). You'll find the midgets at the third echo location when you start to open some boxes in a small room (where they were keeping bloodwing captive before they moved her). Farming the loot midgets works better if you have the Natural Selection Annex DLC as you can enter this area and leave it again to create a save checkpoint further into the Wildlife Exploitation Preserve (so you don't have to run the whole thing). Also, you can keep the Animal Rights mission active to reduce the number of enemies you fight on the way to the midgets.

  • Tubby farming: there is a small chance to find tubby creatures. Tubbies appear fatter and have a good chance to drop valuable items - mostly class mods at higher levels of the game, they are also the only source of some pearlescent weapons in the game. To farm tubby creatures you want to go somewhere where lots of beasts spawn and there is a good chance that some off these will be badasses (i.e. varkids, skags, spiderants, stalkers, and skeletons). There are other tubby creatures (i.e. rakks, psycho's, nomads, and goliaths) but these are much harder to find. When farming varkids, there is a chance that a varkid will evolve into a tubby version but i didn't see this happen very often when i was trying to spawn Vermivorous the invincible.

  • Marcus Mercenary Day -Loot Train [Requires DLC]: You can kill Mr Tinder Snowflake then head back to town, where a train will stop. You can then pull the lever on the second carriage to open the presents sent by Marcus. You'll get lots of random loot this way and some eridium, some purples and hopefully an orange. This can be repeated as many times as you want and is a good option for farming class mods.

  • BNK3R: The BNK3R is a good early game farm when you don't have many orange items or you need a Sham shield. When you kill the bunker it will drop several purple items - most of these will be trash but some good quality purple items are worth looking for (i.e. Maylay/Roid shield, Turtle Shield, Sniper Rifle, Grenades, Caster SMGs, etc.). There's also a red chest under the waterfall which will have a low chance of giving orange items. The BNK3R is an easy boss to farm with any character but Zero will down him the fastest with B0re when you shoot BNK3R in the right spot. The following is an exploit: There are two round dishes underneath the BNK3R, you will want to shoot the top part of the dish on BNK3R's right-hand-side. It works better when shooting it from underneath towards the turret dish on top of the BNK3R. Using a gun with a little bit of bullet spread will help.

  • Farming the Treasure of the Sands [Requires DLC] (Exploit): The final mission of Captain Scarlet and her Pirate Booty DLC, you will be able to kill a boss called the Leviathan and enter a vault with lots of treasure chests (and some of these have an increased chance to give high quality stuff). After you loot the treasure room, you'll be able to accept another mission to repeat the last boss to loot the treasure room again. Here's the kicker: if you don't hand in the Treasure of the Sands mission, you'll be able to keep accessing the Lair of the Leviathan, where you can do some shifty stuff to glitch your way back into the room so you can keep looting the chests inside. Here's a video by BroCo Gaming showing you how to use this exploit:

  • Farming the Rough Rider shield/Bulwark [Requires DLC]: a lot of builds are based around the Rough Rider shield. you can get this in Sir Hammerlock's Big Game Hunt DLC in Hunter's Grotto. As you play the DLC you'll get a quest to hunt the Bulwark. You don't need the quest to kill it again. You can find it here:

  • Farming the Unkempt Harold/Savage Lee: Savage Lee can be found in several locations within Three Horns Divide. He has a chance to spawn around bullymongs. once killed he has a decent chance to drop an Unkempt Harold -a pistol with great damage.
    this video by Aindo will show you how to speed farm it:

    Here's an alternative method I use to reliably obtain the Double Penetrating variant of the Unkempt Harold which I think is faster if you can beat any one of the obtainable missions to earn coins quickly. With Gaige, I can earn the coins needed in about 15 minutes, then it will take another 20 to find the gun in a Torgue vender. 35 minutes to get a Double Penetrating Unkempt Harold will be quicker than killing Savage Lee over and over.
    https://youtu.be/fpkYXMs4rEQ

  • Farming a Bee Shield: Hunter Hellquist in Arid Nexus - Boneyard and Treants in Tiny Tina's Assault on Dragon Keep have a higher chance to drop the Bee shield. I prefer killing Treants as there is a bunch of them clustered in The Forest and their drop rate is very good.

    https://youtu.be/FOHwuD5gqc4

Builds I Haven't Finished Yet
other builds i'd like to try -but I may never finish these.

Character
Theme of build + (actual level of character)

    Kreig
  • elemental assault rifles as a primary weapon (reached Level 72 op2)
  • Based on elemental shotguns

    Salvador
  • Tediore weapons using the Legendary Hoarder class mod (level 61)
  • build without gunzerking - I expect it to be crap but I will try it anyway (level 12)

    Zero
  • based on Unf0rseen and Ambush (level 25)
Other Notes
Commando:
Duty Calls give damage benefits to Cannon Assault Rifles but not Tediore reloads
Grenade Damage bonuses affect Cannon Assault Rifles and Tediore reloads

Gunzerker:
Even with the gunzerker's firing rate, Hyperion snipers did not do enough damage past level 60 (started to struggle to deal damage at level 50).

Mechromancer:
Electrical Burn scales with bonuses to +shock damage
Interspersed Outburst is glitched and will cause your game to crash if used on certain enemies such as the Warrior. It also does not scale damage from investing additional points into the skill, only increased chance to slag.

Krieg:
Damage reduction: Incoming damage is reduced through a series of calculations that apply one source of damage reduction at a time. For instance, if you have 75% damage reduction from Taste of Blood(ToB), 50% from Number Nerves(NN), 20% from the Rough Rider(RR), and each of these were calculated indvidually:

100% incoming damage -75%(ToB) = 25% incoming damage,
25% reduced further by -50%(NN) = 12.5%,
12.5% reduced further by -20%(RR) = 10% TOTAL damage taken.


Even if this is accurate though, I still don't know how the game calculates the order damage reduction sources

85 Comments
Ethany3k Feb 8 @ 4:43am 
this guide is really good and informational, are you going to work on the outdated builds?
deathblade Mar 31, 2024 @ 1:44pm 
What does easy mode mean does it mean it only works on easy or makes the game east
AAAAAAAAHHHHHHHHHHHHHHHHHHHHHHHH May 25, 2023 @ 10:25pm 
awesome
LadyGrelka Feb 26, 2023 @ 5:30am 
So first thanks for taking the time to put this together!

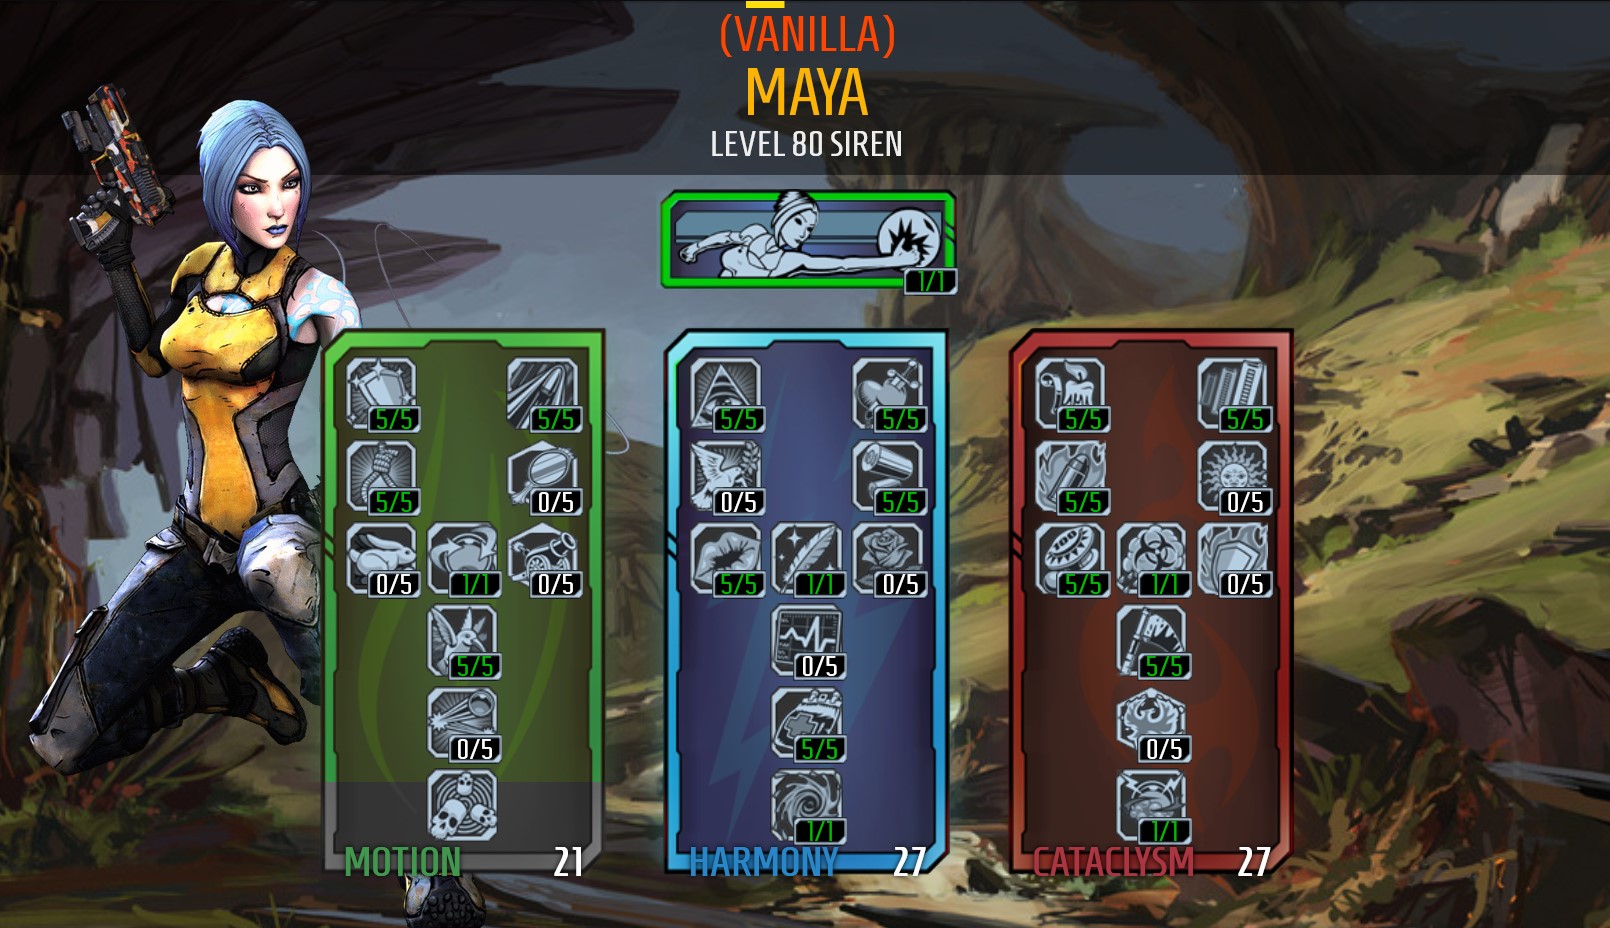
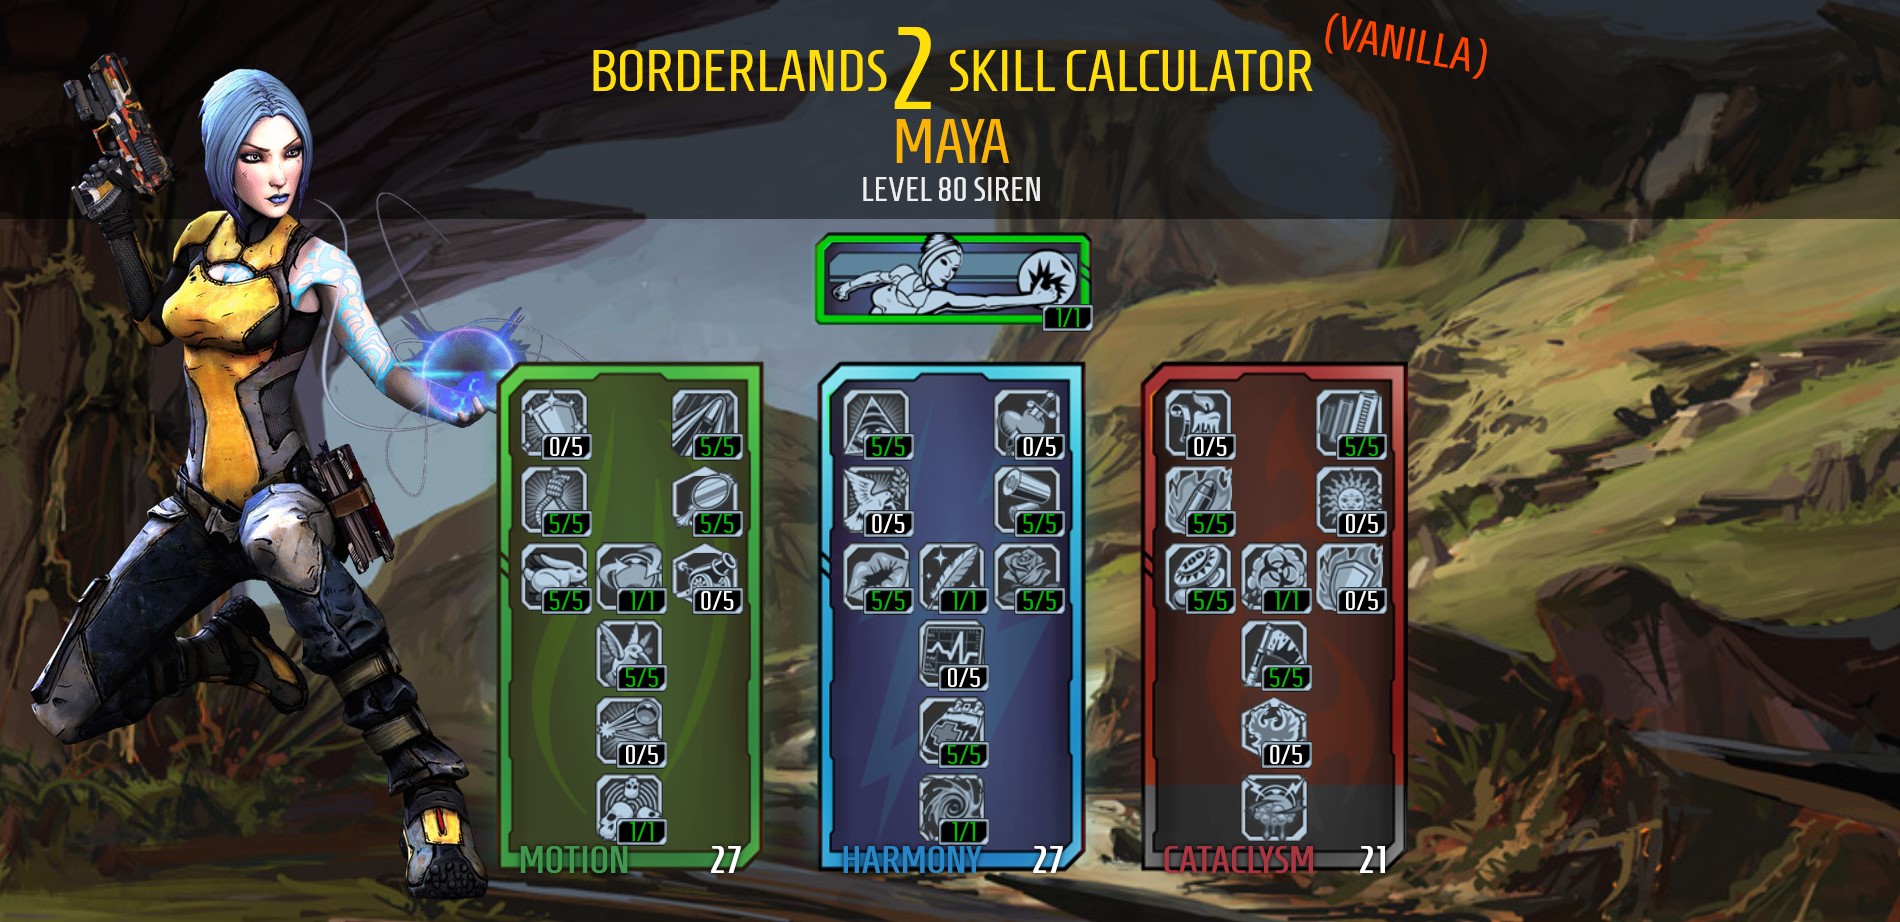
I was wondering if you plan or would consider creating a build that is a mix of Maya Legendary Siren and Fierce Cat for those of us (or maybe it is just me with this problem) who don't do so well with not taking damage and have eyes that don't focus well on moving targets as fast as maybe they should. I really like the look of the Legendary Siren but I would love more damage, Also about how much in tips does it take to get the Miss Moxxi's Good Touch?

Again thanks for putting this together!
Dr RIPATTACK  [author] Jan 16, 2023 @ 1:34am 
You're right Stotin, I've deleted the incorrect note. not sure about the second part of your comment.
Stotin Oct 10, 2022 @ 1:56pm 
@PatDart , I might be misunderstanding something but at the end in the other notes, would 40% reduced by 75% be 10%? Alternatively if your taking it as 75% of the 40% then wouldn't the first reduction be 20% of 100% making the first modifier make you only take 20% damage?
Dr RIPATTACK  [author] Sep 7, 2022 @ 8:42pm 
hi Myta, this is covered in the Bloodlust Melee Psycho using the Reaper class mod but i will add it as a TIP to the other builds. thanks for the feedback.
myta Aug 9, 2022 @ 7:32am 
I feel like the Krieg guide can be better, the buzz axe bombardier skill is not used even though it changes the damage type of the buzz axes to grenade, making it benefit from all of Kriegs explosive and grenade damage bonuses. Definitely necessary and makes him god tier for op levels
Luznis! Jul 3, 2022 @ 3:43am 
where deputy sal
Aphotic Apr 26, 2022 @ 1:22am 
wow someone still playing and keeping BL2 alive!
super hot! :revolutionmolotov:
welldone on updates brother! :tup: