War Thunder

War Thunder

Ocen: 31
How To Fly | Messerschmitt Me 262 A-1a "Swallow"
Autorstwa: sekachsiF
A guide which aims to give players of all skill levels a greater knowledge of their aircraft, and how to use it. In this specific guide, FishcakesSquared tells of how he flies his Me 262 A-1a in air realistic battles.
   
Przyznaj nagrodę
Ulubione
Ulubione
Usuń z ulubionych
Introduction | The First Operational Jet Fighter
G'day, and welcome to my first guide I've produced for Gaijiin Entertainment's War Thunder combat simulator. Within the said guide, I aim to tell of how I personally fly my Me-262 A-1a within the game with great success.
First of all, I will get you aqquainted with the bird which I shall refer to:
The Messerschmitt Me 262 "Schwalbe" was a early turbojet-propelled fighter aircraft, which held the title of the first combat-operational jet fighting, with it first seeing service in mid-1944 within the German Luftwaffe.
For the A-1a - the one we'll be talking about in game and the primary production model - two Junkers Flugzeug Jumo 004B turbojets were mounted with one on each wing, each of which being capable of producing up to 8.8 kilo-newtons (1 980 foot-pounds) of thrust. This allowed the A-1a to be significantly faster than any of the Allied aircraft which fought it during the Second World War.

The A-1a example were able to be used as both fighters and bombers, with it being mounted with an astoundingly powerful set of 4 x Rheinmetall-Borsig MK 108 30 millimeter (1.18 inch) autocannons within the nose of the craft. With four of these beauties firing Minengeschoß rounds at once - which contain up to 72 grams of the highly-explosive compound called pentaerythritol tetranitrate each - these guns were extremely dangerous for Allied aircraft in history, which is reflected within the game.

For the Messerschmitt A-1a, the specifications are as follows:
Crew: 1 (Pilot); other variants had capacity for more.
Weight: 3 795 kilograms (8 336 pounds) empty; 7 130 kilograms (15 720 pounds) maximum takeoff.
Powerplant(s): 4 x Junkers Jumo 004 B-1 @8.8 kilo-newtons (1 980 foot-pounds) each.
Speed: 900 kilometers/hour (559 miles/hour) maximum.
Climb Rate: 1 200 meters/minute (3 900 feet/minute) at 7 130 kilograms (15 720 pounds)
Range: Up to 1 050 kilometers (652 miles)
Guns: 4 x Rheinmetall-Borsig Maschinenkanone MK 108 30 millimeter (1.18 inch) autocannons mounted in nose.
Additional Armament: Up to 24 x R4M anti-aircraft rockets; 2 x 250 kilogram (550 pound) bombs held underwing.

Image 1: A cutaway diagram of the A-1a; www.asisbiz.com
Image 2: A Me-262 A-1a circa 1944; Bundesarchiv.

Disclaimer: The content within this guide is intended for use only within the Realistic game mode, but parts of the information will be valid for use in all game modes. All tactics within the following guide are based solely off of my personal experience, being tactics I find to be the most successfull. Additionally, parts of this article may contain my personal opinion, which may contradict that of others within the wider community, as we all have differring playstyles within the game itself. Apologies in advance for any; gramatical, statistical or crediting errors throughout this article - every effort is used to accredit the correct authors of any images or screenshots shown throughout the peice. If an error is seen, let me know in the comments.
The A-1a in War Thunder
In War Thunder, the A-1a resides as the battle rating of 7.0, which places it with all other earlier turbojets such as the American P-80A-5 and F-84B-25; British Meteor F Mk. 3 and Attacker FB.1; Soviet MiG-9s and Japanese R2Ys.

When the aircraft is stock, it's performance is as follows:*
Speed: 798 kilometers/hour (221 meters/second; 495 miles/hour) maximum at 6 000 meters (19 685 feet) above sea level.
Max Altitude: 12 500 meters (41 010 feet) above sea level.
Turn Time: 30.0 seconds.
Rate of climb: 15 meters/second.
Takeoff run: ~750 meters (0.75 kilometers; 0.47 miles).
Like all airborne vehicles within War Thunder, there are no cosmetic changes between stock and fully upgraded vehicles, excluding the addition of items such as externally mounted weaponary or
bombs. Above is my personal A-1a, which usually sports a user-made custom camoflague.


When it's fully upgraded, the performance is:*
Speed: 865 kilometers/hour (240 meters/second; 537.5 miles/hour) at 6 000 meters (19 685 feet) above sea level.
Max Altitude: 12 500 meters (41 010 feet) above sea level.
Turn time: 28.0 seconds.
Rate of climb: 20 meters/second.
Takeoff run: ~750 meters (0.75 kilometers; 0.47 miles).

At first, the differences between stock and fully upgraded may appear little, but you will really notice a change, especially in the acceleration of your aircraft. Additionally, I rarely refer to the stat cards within War Thunder, as I find they appear to have largely differing characteristics in game to what's on the cards.

* All performance statistics throughout this guide are based off of those for the Air Realistic Battles mode, which differ significantly to that of Air Arcade Battles modes.
Notable Foes You'll Encounter
As stated previously, whilst flying the A-1a you'll be fighting primarilly against other earlier turbojets which - to the untrained player - will make your aircraft seem greatly disadvantaged and potentially useless. This is often due to the fact that the player themselves likely is either unfamiliar with their own aircraft or unfamiliar with the ways to counter common foes.

Below I shall list several notable enemies that you will likely encounter whilst flying the Me-262 A-1a, with several tips on how to avoid them and (hopefully) land a few fatal blows upon their aircraft.
The Supermarine Spitfire Mk. 22/24: A common foe you will face, which if left unattended will barely hesitate to eliminate you with ease. These late Griffon-powered Spitfires are often found killing anti-aircraft artillery on the deck or seven kilometers up trying to start the British Space Program. They have 4 x 20 millimeter Hispano Mark. V cannons, which are well and truly capable of hitting you up to 1 200 meters out, so be careful.
I'd recommend never going head-first into them, as their high-velocity cannons will easily hit you before you can range in your significantly slower cannons. In my experience, you're best when you deliver a quick spray from either behind or the side when they are too fixated on, for example, an Arado or AAA. More often than not, ten or so rounds is enough to destroy the craft completely.
Hawker Tempest II: Yet another British so-called super-prop aircraft, which is often first encountered at the boundaries of space alongside the Spitfires. If you're not careful, and leave these unaccounted for, they will often 'jump' you when you're at lowest energy in a climb, or if you've mistakenly began a turnfight with another jet.
Once again, these are armed with a brutal four Hispanos, which will riddle your aircraft with hole at first contact. Similarly to the Spitfires, these will - like all props at the 6.3 - 7.0 BR bracket - accelerate alot faster than you, meaning at lower speeds you are significantly more likely to be critically damaged. It's best you keep a wide berth around them when at low energy states, and avoid performing headon passes along with turnfighting. Remember, if you're at altitude and one begins to dive on you, dive yourself. The 262 has the best dive rates, meaning they will never catch you.
Next up is likely what will either be killing you the most, or you killing the most. The American Grumman F8F-1 Bearcat. This little 'doozy' is by far the most common prop you'll be facing, with most American teams consisting of these. As is the story for the other props, they will accelerate faster than you, so the same rules apply. Just like the previous aircraft, it's not advisable to go headon unless you're desperate as the F8F is armed with four wing-mounted AN/M3 20 millimeter cannons.
I find that quite a few pilots of the F8Fs will attempt to follow you into a dive - obviously not realizing that they will rip their wings before catching you - which, as they have significantly lower energy retention (as is the same with all props) in comparison to you as a jet, they will bleed their altitude, whereas you will be able to 'zoom-climb' back up to around where you initiated the dive from. Once again, it's best you attack the Bearcat from the rear or side, which is quite often the way you'll encounter them as they often are found AFK-climbing to space.
Next up is the Soviet Mikoyan-Gurevich MiG-9 and MiG-9/Late jet fighters, which - if flown right - will be your greatest challenge even in a fully upgraded '262. Armed with 2 x Nudelmann NS-23K 23 millimeter cannons (which recently recieved a nerf, meaning they are significantly weaker in game now) and a single, very dangerous 37 millimeter Nudelmann N-37D cannon. Both of these guns are low velocity, but they are still faster than that of your MK 108s, once again meaning headon passes are not advisable unless desperate.
As stated previously, the MiG-9s will likely be your most challenging foe, due to their substantially decent turn radius, fast acceleration and powerful armament. They will often be encountered up to 1 000 meters above you, and will (if they are fully upgraded) likely catch up to you even in a dive. Thankfully, the biggest threat is the MiG-9 Late version, with the early version being somewhat lesser threatening. The Late differs from the early by the addition of wingtip mounted fuel tanks, as pictured in the above photograph.
I find engaging them after they've been dragged to lower altitudes due to other teammates and performing high-speed passes on them works best, but beware as they can sustain quite an amount of damage.
Now, what I class as the British P-80, being the Supermarine Attacker FB.1. Thankfully, this aircraft isn't often encountered within the War Thunder community. I have little experience in fighting them as a direct result, but they are often found at medium-to-low altitudes, often being on the deck at super speeds attempting to 'rush' your team when they are climbing at low energy. From my experience, they are very, very fast. They have a fairly high acceleration, but do not appear to be able to turn as well as the '262s, meaning if you have one on your tail, it's a valid tactic.
These have 4 x 20 millimeter Hispanos mounted on the wings, each of which have very high rates of fire, meaning if you're infront of one it's likely lights out for your pilot, providing you allow them to hit you. Remember, an Attacker at low speed is a fairly easy kill for you, providing you're at higher speed and/or are diving on them.
Now, possibly the most annoying enemy you'll encounter is the Japanese Yokosuka R2Y series. You will encounter these powerful foes at extremely high altitudes, albeit very rarely as they will only appear in 'realcade', or 'mixed-battles'. They get a 6 000 meter 'airspawn' as they are classed as bombers. They often jettison their bomb immediately after spawning, and initiate their bomber-hunter mode, where they will use their high altitude to eliminate friendly bombers, as they have four truly devastating 30 millimeter autocannons.
All I can say is, get infront of this thing and you're likely dead - they have a great range, and from memory have similar ballistics to the MK 103 30 millimeter cannon found on the Horten Ho 229. Don't do a headon pass unless you're certain they're out of ammunition.
Once they're down from space, or at low energy, they're relatively easy to fight. Mind you, they are very good turnfighters so it's best to keep your speed up and Boom 'n Zoom them from altitude. More often than not - simply due to the fact they are several kilometers above you upon you contacting them - you'll be unable to counter their moves before their cannons hit you. Diving is often your only hope when you've got a 'UFO' like this above you.

This concludes my listing of the most threatening foes you'll encounter whilst flying the '262. Next up, we'll take a look into what else we'll face, being things of significantly lower threat to your aircraft's integrity.
Lesser-dangerous Foes You'll Encounter
Now I'll tell of the other foes you'll likely face, being slighty less dangerous than the previous aircraft.


First off, we'll begin with a fairly common plane that you'll find yourself fighting - the Boeing B-29 Superfortress. Yes, it's not a fighter aircraft, but you will definetly encounter up to four of these in a single match. They are often found around the 6 500 meter mark, as they have a high-altitude airspawn and often go into a steep climb.
If attacked incorrectly, the 12.7 millimeter machine-guns will be able to damage your aircaft with ease as if you're climbing up to their altitude, you will likely be at a slow airspeed. I'd advise leaving B-29s for the other aircraft on your team such as the Horten Ho 229s or Arado C-3s - as the Hortens are able to 'snipe' them with their high-velocity cannons and the Arados tend to either ram or 'harrass' them.
If you are faced with having to engage one, if it's below your current altitude it's pretty self explanitory of what to do - keep your speed up (preferably greater than 500 kilometers/hour), attack from an angle and try not to strafe in a straight line. As the B-29 is a very large aircraft with weak aileron control surfaces, firing a few rounds into the wing itself is often enough to down a B-29. It won't die instantly, but it will slowly 'roll' over and initiate a dive it cannot pull up from, where it will rip it's wings.
If it's above you, once again - keep your speed (this time, above 600 kilometers/hour) and if you can, headon it as a few stray shells to the cockpit will kill both pilots, giving you the kill. The .50 calibre turrets will rarely kill you in one spray, but will often severely damage your engines and/or snipe your pilot, so it's best to avoid fire.


Next up is the Republic F-84B, which is likely the most dangerous of this list, purely due to it having an airspawn, meaning it spawns in the air a few hundred meters above the runway with quite a bit of speed behind it. This means it is able to reach it's maximum velocity before most other jets, hence why it's often first encountered at altitudes between 500 meters and 1 500 meters. It's armed with several M3 Browning 12.7s, meaning it's more than capable of turning your Swallow into Swiss cheese.
From my experience whilst fighting the F-84 and flying it myself that it performs best at altitudes below 2 500 meters, hence why it's often found below there. Some pilots, although, take the F-84 well above these altiudes where you will likely outperform them.
Additionally, they will bleed energy very easily in a tight turn, meaning if you must turn, it's a valid option. I personally find that you'll often be able to 'swoop' in as such and easilly hit the F-84 when it's near stalled out after booming and zooming a friendly player which is at a lower altitude.


Now, the next one on the list is the Lockheed P-80A. Back in the day, before the recent battle-rating changes, the P-80 would have been on the previous list as it was the biggest threat to you as a Me-262. Now? It's somewhat of a lesser-challenging foe, with most pilots using it incorrectly which gives you the advantages if you yourself know your plane.
These are often encountered at similar altitudes that you will primarilly operate at, being anywhere from 2 500 meters to 4 000 meters. They have six nose-mounted M2 Browning 12.7 millimeter guns, which will still do damage, but significantly less in comparison to other aircraft you'll be fighting.
The P-80 will accelerate faster than you, and it will be able to sustain a higher velocity in a horizontal flight, but it will not dive faster than you meaning it's advised that you use your altitude advantage and high dive rate to your advantage. The P-80s will often initiate turnfights with you, and if you are unable to escape them - meaning you have moderately low energy - you can turn with them. The roll rate of the P-80 is very fast, whereas yours is fast but lesser so, meaning you can use that to your advantage too by making them roll too much, if they are on your tail.
Quite often with a stock aircraft, you'll find these very difficult to intercept and/or eliminate, but with time you will learn their playstyles and counter them succesfully.
Just remember, keep your speed (preferably) above 650 kilometers/hour whilst engaging a P-80, unless you're above them. I've noticed quite a few pilots in the P-80 fail to use their aircraft properly, further guarenteeing a kill for you.


Now, moving onto a fairly uncommon - due to it's pricing - prop: the Yakolev Yak 3 VK-107 Soviet 'superprop'. These are often encountered at higher altitudes than yourself, given their powerful engine and very decent climbrate. They have three nose-mounted autocannons which will not hesitate to knock out your pilot, or set your engines on fire, meaning it's best to avoid these.
Being a prop, the VK-107 will accelerate faster than you, meaning it's advised that you maintain a steady high speed pace whilst fighting such an aircraft. At speeds above 600 kilometers/hour the VK-107s control surfaces will lock up considerably, meaning that they will not be able to turn as sharply compared to you, but I don't recommend turning with them.
These are - as mentioned previously - fairly rare aircraft to encounter due to their premium status, costing around 7 000 'Golden Eagles', and their lower battle rating, meaning they sometimes are up-tiered to your battle rating. Nontheless, they are a force to be reckoned with - as are all other Yakolev fighters.
In my experience though, as it's a premium fighter aircraft, nearly all of the players I've faced whilst they're in this plane appear to have little knowledge of how their plane is flown correctly, which is often the case for players whom purchase premium aircraft. This allows you to eliminate them easier, in most cases, as they often put themselves at the disadvantage when, for example, going into a vertical chase and stalling out, allowing a fighter to 'swoop' in a shoot them.


Then, we've got the British Gloster Meteor, with the only one we'll be fighting at this battle rating being the F Mark. 3. It's a fairly devastating aircraft if you let it within firing range, due to it's assortment of four Hispano Mark. V autocannons mounted within the nose. This allows a good pilot to hit you over 1 kilometer away, meaning headons - like against all aircaft with Hispanos - are not advisable.
The Meteor is able to accelerate reasonably well, but it's maximum speed before the ripping of the wings is significantly lower in comparison to that of yours. Most Meteors will not be able to surpass 700 kilometers/hour from my experience, meaning they are easilly avoided by either; maintaining a higher speed, turning sharply at speed or diving away if they are above you.
There isn't much more to it really for the Meteor, it's able to be turned with if you're able to manage the flaps and such, but I wouldn't recommend doing so. Try to keep your speeds higher than theirs whilst engaging Meteors, and make sure they don't get shots on you.
In addition, they are often found at fairly high altitudes, meaning you can dive away if faced with one you cannot beat.

I've reached the world limit for this section. It is continued in 'Part II' of 'Lesser Dangerous Foes You'll Encounter.


Lesser-dangerous Foes You'll Encounter | Part II
As continued from the previous section:

Finally, we have the Grumman F7F-1 Tigercat, which is armed with several M2 Browning machineguns and a few more AN/M2 autocannons. Obviously, it's not too much of an idea to go headon with such a vehicle, but if you are deperate, you'll manage.
The F7F is able to maintain a fairly decent speed, and will often follow you into dives, but they rarely will catch you, unless you do not know of their presence and commit to a turn or zoom back up to gain altitude.
A few short burts with their cannons is all that's needed to bring you down, meaning avoiding fire is highly recommended. They will often try to turnfight with you, but this is where you need to maintain speed and zoom away, or dive if needed. They will bleed large amounts of energy whilst in sharp turns, which will make them more vulnerable to elimination.
They are not normally a challenge to kill, but some will climb to around 7.5 kilometers altitude and 'run' from your team, which will be unable to catch them at the said altitude.

This concludes this section. If in error I have left out any other vehicles you'll face, be sure to let me know and I'll promptly add them. Next up, we'll get you aqquainted with the guns you'll be using.
How to Fly | What Altitude?
In this section of my guide, I aim to tell how I fly my A-1a, being the method which I find able to replicate good end-of-match results regularly.

Takeoff:
For those not familiar with the basic characteristics of the earlier turbojet aircraft within War Thunder, turbojets do not climb like your conventional propeller-driven aircraft - being what you've mostly flown - meaning they are not suited to initiating a 20 degree climb as soon as you leave the bitumen or tarmac.
You'll need to learn how to climb in a more suited way, with the most common way of gaining altitude being zoom-climbing. Firstly, what is it to zoom climb?
It's where the rate of climb is greater than that of what it would be providing you were in a sustained climb, as you are within propeller-driven aircraft most of the time. It's where the pilot will fly along a very shallow angle, or even horizontal angle - and gain a large amount of speed. After gaining enough speed, the aircraft is placed into a somewhat steep ascent.

A United States Lockheed NF-104 "Starfighter" shown in a steep zoom-climb with a rocket engine mounted on the back. Source: Edwards AFB Photo Gallery.
When iniating zoom-climbs within the A-1a, you will need to reach around 500 kilometers/hour (310 miles/hour; or 269 knots) IAS (Indicated air speed) before initiating the climb. Depending on if you've spawned in to the battle late, or will be targeting enemy high-altitude bombers, you may wish to alter the angle of climb once you initiate the climb. I, personally, climb at either 10 degrees or 15 degrees, but if I am in need of altitude, I will go at up to 20 - 30 degrees.

My Me-262 shown at altitude with a squadron member in chase.
I would highly recommend that you do not go lower than 390 kilometers/hour (242 miles/hour; 210 knots) IAS when stock, or inexperienced with the aircraft due to it's marginally slowed reaction times, as when you're below the speed of 400 kilometers/hour (215 knots; 248 miles/hour), you're more likely to be killed by an enemy that has more airspeed than you.

Additionally, I highly recommend you side-climb - meaning you should not climb into the enemy's initial flight-path from their airfeild, as it will often leave you with insufficient altitude to engage them, as more often than not you'll be below the enemy if you are not careful. I will always climb until I'm at around 3000 meters (9842 feet), but will often climb until I reach around 5000 meters (16 404 feet) altitude, as it will often give me the upper hand.

This concludes this section. Next up, I shall discuss how you should be selecting your targets, providing you have the ability to do so.
How To | Enemy Selection
Once you've reached your desired altitude, you'll soon be faced with multiple enemies entering your area of operation. You will need to select an appropriate target that you will be able to get guns on, but first you'll need to make sure the target is right for you.

Target Selection:
"First of all, why do I need to select my target? Why can't I go with guns blazing and fire upon all who come within firing range?", you ask.
To your suprise, I answer.
You need to make sure you are attacking the target that you have the most advantages over, for example, would you attack A) the pilot 1500 meters above you; or B) 1500 meters below? It's about making sure you're guarenteed an easy pass on the target, without risk of them being able to fight back immediately.

As is stated in the Notable Foes and Lesser Notable Foes sections of this guide, some aircraft that you will fight will perform better at certain things that you may be not as good at, for example, how the Tempest II or Spitfire Mk 24 will accelerate significantly faster than you, due to their propeller-driven propulsion.
1) Altitude of Said Aircraft:
This sub-section is more based off of common sense, but it will still be written anyhow.
Whilst flying, you should be making sure you are not engaging aircraft which are holding more gravitational potential energy (GPE; in form of altitude) than you, providing you do not have sufficient airspeed to counter them providing they initiate a dive toward you.
Additionally, you should be using your GPE providing you are above the enemy, and - as previously stated - the 262 is very, very good at gaining speed within a dive. It also has very decent energy retention, which can help when being chased by aircraft with lower maximum speeds such as the Yokosuka R2Y and Gloster Meteor.

2) Type of Said Aircraft:
So, you'll also need to make sure you know the aircraft you are engaging, as in, you need to know if you can outperform a said enemy when engaging them to give yourself the upper hand providing you need to do so. For example, the Me-262 can dive faster than nearly every other 7.0BR jet, being a valid way to escape enemies which are diving onto your tail, or perhaps how you can turn better (even just slightly better) than the enemy of which you are engaging. Yes, you can turnfight with the 262, it's just not something I'd recommend unless you are entirely sure you can outturn the enemy, and there are no others which may swoop down and end your match abruptly.
Additionally, remember how your guns are slow-velocity, but hard hitting? This can be used to your advantage, providing the enemy you are shooting at does not have high-velocity rounds, or you are unable to avoid their rounds. Keep in mind that they may be using stealth 'belts', which means their rounds will not have any tracers, leaving the rounds invisible to both you and them.

My 262 in Simulator Battles.
Are they damaged? Unable to fight back, but able to make it back to base to repair?
More often than not, you'll come across another enemy that has had around fifty others shoot at it, but still it refuses to go down? It may be combat incapable, but it will likely go back to base and repair whilst you are busy attempting to eliminate other aircraft on the battlefield. I highly recommend you check on these said aircraft, with their damage being apparent as they may be trailing huge amounts of fuel vapour, or they have smoke pouring from their engines.
Also, enemies might be returning to base due to the lacking of ammunition, which is often the best time to pounce as they often will go to the 'deck' - meaning around 50 meters above the treeline - and speed toward their airfeild in attempt to rearm. If you've got sufficient altitude, I'd highly recommend you dive upon them and put them out of their misery, as they may return later when you're out of fuel, ammunition or are damaged, leaving you nearly helpless in fending them off.

Are they pro?
I myself do not do this, but sometimes you may wish to check the enemy and their statistics within the said aircraft they are flying, as it may shed light into whether they are new to the aircraft - likely meaning they themselves do not know how to fly it, and they are stock - or if they're a well renowned player with an astonishing kill-to-death ratio within the aircraft.
Also, some players will always stick to one playstyle, meaning they will do the same thing for example - always bank right when avoiding your shots in a headon. This can allow you to combat their actions before it happens, providing you come across the same target multiple times in multiple matches.

This concludes this section of my guide. Next up, we'll wrap up the guide and share any additional information in relation to it.


Credits, Acknowledgements and Links
More content will likely be added, so please do return to check for updates.

If you've managed to get this far with my guide, my job is complete - providing you didn't just scroll to the bottom to post a copy-paste meme in the comments. Either way, the guide may seem somewhat short or rushed, likely because it was just a tad. Thank you for reading, and I do hope you gained some insight into how to fly the A-1a, or if you're trying to combat it, how to fight it.

You may or may not know that I am a regular poster on War Thunder Live, where I post historical photographs with the stories behind them, biographies on vehicles such as aircraft, ships and tanks, and soon, alternate history aircraft skins. I can be found by clicking the link below:
http://live.warthunder.com/user/FishcakesSquared/

Additionally, I would also like to link you to my YouTube channel, which is full of somewhat mediocre videos which showcase how terrible I am at the game War Thunder. Either way, pop by and have a look.
https://www.youtube.com/channel/UC5M885RXYdUKV_3lWUzSBYQ

Also, I wish to thank all members of the Six squadron within War Thunder; specifically KommandantFranz and Kalux, both of which taught me nearly everything I know about the 262.
Also #2: I'd like to thank my mother, father, three-legged dog, (currently deceased) goldfish Jerry and myself.

Coming Soon(TM): More "How To" guides by myself. Post below which ones you wish to see first - I have most aircraft within War Thunder at the moment.
Komentarzy: 20
Callsign_RABBIT™ 19 stycznia 2018 o 4:25 
The Yakolev Yak 3 VK-107 has two cannons, not three mate :)
Pebble 17 stycznia 2018 o 23:11 
I appreciate this.
Sharkow 30 października 2016 o 10:37 
Great guide!
Jager 14 października 2016 o 18:08 
Great Tutorial mate, we should fly out together more often in this beast! (btw i used to go by the name of Churchill) :sniperelite:
combatsmithen 13 października 2016 o 12:30 
This guide must have taken forever to make lol
Team_oooo 13 października 2016 o 8:33 
goodgood
B. Lamp 13 października 2016 o 7:14 
@FishcakesSquared apologies if I sounded disrespectful I was just surprised how you didn't find the Meteor F.3 dangerous. I also noticed there's only one 8.0 plane in the enemies section.
sekachsiF  [autor] 12 października 2016 o 22:30 
@T. Samuelsen, of course it's grossly innacurate.
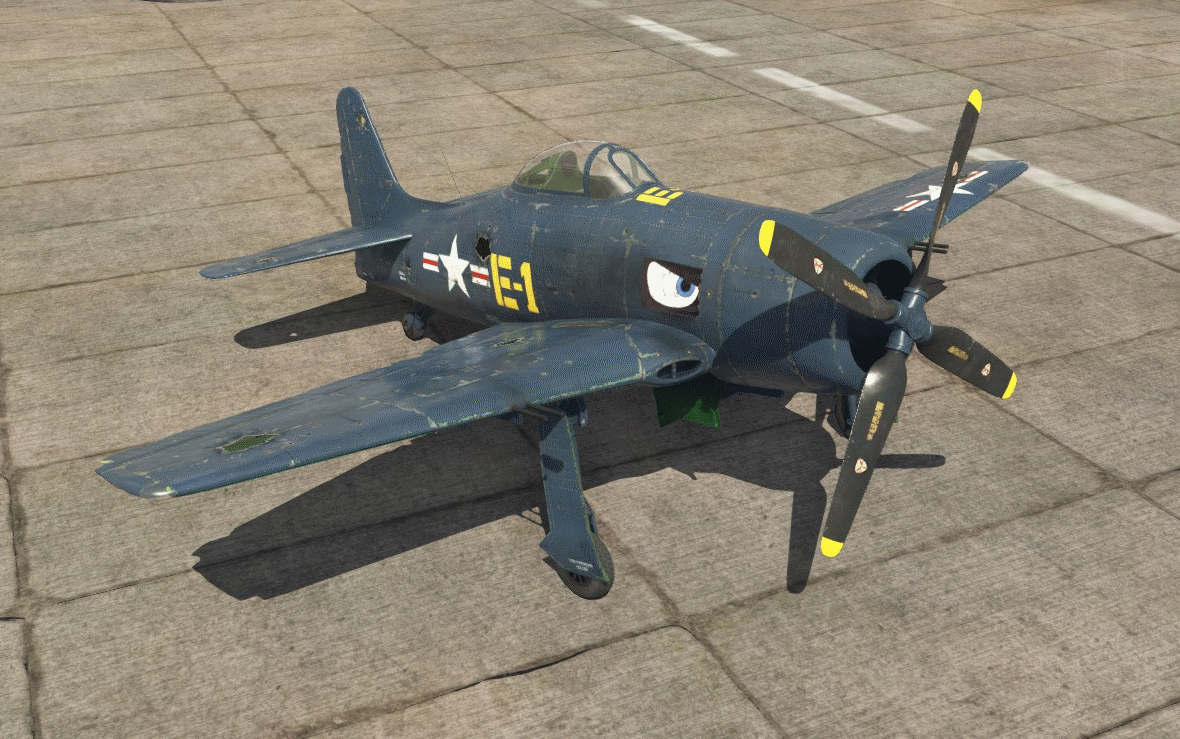
I stated this guide is solely based off of my own, personal views whilst flying this aircraft. If you think other aircraft are more dangerous, so be it.
Thank you for voicing your opinion.
B. Lamp 11 października 2016 o 16:06 
Guide is grossly inaccurate when it comes to the foes, First the Meteor F.3 is THE MOST dangerous plane you'll face as long as the pilot has half a brain, the Attacker Fb. 1 and the F8F-1/1B are useless fighting the 262 if you fly it correctly, the F-84 is a very dangerous oponent as well considering the sheer speed, the MiG-9 is only dangerous when you're in front of it. Other than that you can generally out perform it in a few ways, you can carry 48 R4M rockets and 0 bombs, the F7F is dangerously decent versing the 262 as well.
SticcestBoi 11 października 2016 o 13:54 
Great guide man