Arma 3
25 ratings
ArmA 3: Multiple Versions Installation & Maintenance Guide
By NZPorterDJ
Since its official release in September, 2013, the ArmA III platform has seen roughly twenty-nine stable builds. There have been only slightly fewer Release Candidate builds set free since then and of course there have been almost daily builds released out into the Development branch.

While for the average player it is simply enough to install and use the current Stable branch through the Steam client, there are times when it may be necessary to temporarily downgrade a version to be able to continue to access a particular server, or Game Mode / Mission / MOD developers may need to access the other development and preview versions for testing their offerings against the upcoming changes, or for the curious to get a sneak peek at some of the upcoming features and assets before the rest of the player base.

This guide is written in the hope that it can make the installation and maintenance of multiple versions of the ArmA III engine as easy as possible.
   
Award
Favorite
Favorited
Unfavorite
A Note on Updates and Version Compatibility
The update path of 'features' and bug fixes in the different builds of ArmA III follows this pattern from the Internal builds to a Stable release:

INTERNAL > Profiling (Performance) > Development > Release Candidate > Stable

Where:

INTERNAL:
  • INTERNAL builds are not released to the community
Profiling (Performance):
  • These builds are experimental and are built and released when needed
  • These builds ARE MP compatible with the current Stable builds
Development:
  • These builds are experimental and are built and released when needed
  • These builds may include features that are not expected to be finalised and included in the next Release Candidate or Stable build
  • These builds usually recieve daily updates
  • These builds are NOT MP compatible with the current Stable builds
Release Candidate:
  • These builds are built and released 1~3 weeks before a new Stable release, usually recieving daily updates within this period
  • These builds are NOT MP compatible with the current Stable builds


Build Version Numbering
Stable builds will always use an even number for the major build (i.e: 1.62 > 1.64 ... X.YZ)
Development builds will always use an odd number for the major build (i.e: 1.63 > 1.65 ... X.YZ+1)

Available Releases
LAST UPDATED: 16th July, 2017

At any time there can be from three to five builds of the ArmA III platform available for download: NOTE: Size on Disk is listed for installations that include all three DLC and the APEX Expanson. Actual size on disk may be up to ~10 GB smaller.

Builds in the Development Pathway:
  • INTERNAL (Not released to the public)
  • Development
  • Release Candidate
  • Stable / Profiling (Performance)
Other Builds available:
  • Legacy
  • Legacy Ports (Linux/MacOS)
NOTE: Currently Legacy and Legacy Ports are the same version and interchangeable.

As an average user, you would probably only be looking at having the current Stable build installed. This would give you the maximum compatibility with the available MP servers and with the MODs that are usuable. If this is the case you need do nothing more than install the game through Steam and leave it alone.

You may also sometimes have a need to run the previous version to maintain GameMode or MOD compatibility during the brief period after a version update while third-party developers make the necessary changes to make their offerings compatible. The Legacy build is there for this purpose.

If you are a slightly above average player, you may also require compatibility with your Linux or MacOS using friends, so you may want to look at installing the current Legacy Port that is compatible with their non-native wrapped builds. You lose a lot of compatibility with the MP servers and finding MODs to use with thess builds can also be problematic if you haven't planned ahead.

Lastly, if you are interested in the ArmA III development side of things, you may want to look at the Development builds and the Release Candidate builds to give your feedback to the Bohemia programmers. Again, you lose a lot of compatibility with the MP servers and finding MODs to use with these builds can also be problematic as changes are constantly being made and most third-party GameMode and MOD developers can find it difficult to keep up, at least until things hit the Release Candidate stage.

While most users won't want to be installing every version of the ArmA III engine, it is possible to do so, or to just pick and choose which you want from the menu of those available.
Development
Current Version: 1.77.142.807
Size on Disk: 29.2 GB
Update Cycle: Updates to new sub-version most week days.

NOTE: Do not use this branch unless you would like to actively participate in testing. For regular players, we recommend staying on the Stable branch.

The Development branch is the furthest away from the Stable branch and closest in character to the initial Alpha / Beta cycle the platform had before it's official release, although there are less game breaking bugs introduced these days. Also note that this branch is NOT compatible with the current Stable builds.

This branch will see the rollout of new content and assets first, but if a change is going to break a game mode / mission / MOD, it will also be broken here first also.

Development is also continuing to see almost daily updates and so you should be prepared for the bandwidth required to keep up with these. These updates can range from as little as a few MB to upwards of a few GB depending on where we are in the development process and what content is being rolled out.
Release Candidate
Access Code: Arma3Update176RC
Current Version: 1.76.142.775
Size on Disk: 28.8 GB
Update Cycle: Updates to new sub-version frequently for testing purposes before a new Stable build is released.

NOTE: Do not use this branch unless you would like to actively participate in testing. For regular players, we recommend staying on the Stable branch.

A Release Candidate build will usually appear ahead of main branch updates, usually 4~6 weeks. These are released for the express purpose of finding and documenting any issues and bugs that may have passed through the other QA processes.

A release Candidate can be used by game mode / mission / MOD developers to get a head start on compatibility testing, updating and bug fixing in their own offerings before a release is scheduled to be released to the Stable branch.


Stable
Stable
Current Version: 1.74.142.559
Size on Disk: 27.3 GB
Update Cycle: Updates to new sub-version irregularly.

The Stable branch is by default installed by Steam. You don't need to do anything beside hitting the Install button. For most players this will be the only version they need to consider.
Profiling (Performance)
Access Code: CautionSpecialProfilingAndTestingBranchArma3
Current Version: 1.72.142.342
Size on Disk: 24.4 GB
Update Cycle: Updates to new sub-version irregularly as new optimisations are needing testing.

NOTE: Do not use this branch unless you would like to actively participate in testing. For regular players, we recommend staying on the Stable branch.

This is a modified Stable branch with modified Client/Server executables, specifically the arma3.exe file. You will need to replace this file in your installation with the one contained in the .7z file available from this link[forums.bistudio.com], or alternatively you can use the betas tab with the code provided from within the Steam Client.

NOTE: The Profiling (Performance) branch is only accessible through seperate download of the executables in a .7z archive or through the Steam client. It is not accessible through the Game Updater tool. As a work around, you can download it through Steam and then copy it to another location and use it in the same way as the other branches through Game Updater.
Legacy
Access Code: Arma3Legacy166
Current Version: 1.70.141.838
Size on Disk: 24.4 GB
Update Cycle: Updates to new version only when new Stable build is released.

NOTE: Do not use this branch unless you require compatibility with the previous Stable build. For regular players, we recommend staying on the Stable branch.

The Legacy branch release allows you to, for whatever reason, continue to use the previous build of the ArmA III platform. You may need to do this to keep compatibility with a particular game mode / mission / MOD either temporarily while it is being updated to the new Stable release, or to use old content that will not be updated.

Legacy branch will NOT update. It will remain frozen at the point immediately before a new Stable build is released so you will never have to worry about running any maintenance on the install. It can, however, be deprecated over time.
Legacy Ports (Linux/MacOS)
Access Code: Arma3LegacyPorts
Current Version: 1.64.138.732
Size on Disk: 24.4 GB
Update Cycle: Updates to new version irregularly

NOTE: Do not use this branch unless you require compatibility with the Experimental Ports for MacOS / Linux. For regular players, we recommend staying on the Stable branch.

The Legacy Ports branch allows Windows users to install the ArmA III platform that is compatible with the current MacOS / Linux Ports.

Information on the ports themselves can be found on the Dev Hub: Experimental Ports[dev.arma3.com] page, noting the significant limitations of these. Some of these limitations are not found in the Windows build but you may need to be aware of these if you are wanting to support these other platforms fully.

NOTE: The Legacy Ports branch is only accessible through the Steam client. It is not accessible through the Game Updater tool. As a work around, you can download it through Steam and then copy it to another location and use it in the same way as the other branches through Game Updater.
Using the Steam Client to Switch Builds
The Steam client is able to install and maintain any single branch of the ArmA III platform. You can currently opt into the Legacy Ports, Legacy, Stable, Release Candidate or Development builds through the Steam client by right clicking on the entry for ArmA III in your Library, selecting the Properties option and selecting the Betas tab in the dialog.

Legacy Ports, Legacy and Release Candidate builds require an access code to enable their download. These codes can be entered into the access code field on the ArmA 3 -> Properties -> Betas tab and after clicking the Check Code button, should appear in the Available Betas drop down list..

To opt into the Ports Branch in your Steam client
Opting into or out of this branch currently requires a ~4 GB download from Steam
  • Right-click on Arma 3.
  • Select Properties.
  • Access the BETAS tab.
  • Enter the access code (CODE: Arma3LegacyPorts).
  • Press CHECK CODE.
  • Select 'legacyports - Legacy Build (1.64 - ports)' from the drop-down list.
  • Let the game update itself to the Ports build.
    • To ensure a valid build, consider verifying the integrity of the local game cache using the Steam client.

To opt into the Legacy Branch in your Steam client
  • Right-click on Arma 3.
  • Select Properties.
  • Access the BETAS tab.
  • Enter the access code (CODE: Arma3Legacy166).
  • Press CHECK CODE.
  • Select 'legacy - Legacy Build (1.66)' from the drop-down list.
  • Let the game update itself to the Legacy build.
    • To ensure a valid build, consider verifying the integrity of the local game cache using the Steam client.

To opt into the Release Candidate Branch in your Steam client
  • Right-click on Arma 3.
  • Select Properties.
  • Access the BETAS tab.
  • Enter the access code (CODE: Arma3Update176RC)
  • Press CHECK CODE.
  • Select rc - Release Candidate Build from the drop-down list.
  • Let the game update itself to the RC build.
    • To ensure a valid build, consider verifying the integrity of the local game cache using the Steam client.

To opt into the Development Branch in your Steam client
  • Right-click on Arma 3.
  • Select Properties.
  • Access the BETAS tab.
  • Select 'development - Development Build' from the drop-down list.
  • Let the game update itself to the Development build.
    • To ensure a valid build, consider verifying the integrity of the local game cache using the Steam client.

To revert back the Stable Branch in your Steam client
  • Right-click on Arma 3.
  • Select Properties.
  • Access the BETAS tab.
  • Select 'None - Opt out of all beta programs' from the drop-down list.
  • Let the game update itself to the Stable build.
    • To ensure a valid build, consider verifying the integrity of the local game cache using the Steam client.
Pre-Planning for Multiple Versions
Instalation & Profile Paths
By default ArmA III is installed in the selected Steam Library location, i.e. ~\Steam\steamapps\common\ArmA 3 and uses the Profile path of ~\Users\<UserName>\Documents\ArmA 3. This is great when you only have a single version installed and running but there are issues with this whan dealing with the installation and management of multiple versions.

I would strongly suggest that you decide beforehand on a suitable location for all of your ArmA III installations away from the Steam install location and that you plan to have a seperate Profile location for each version installed.

For the following discussion I am going to use a top level simply called 'Games'. This can be a directory or a physical HDD/SDD, but the details are not important.

Under 'Games' I have created an 'ArmA' directory to contain all of my seperate installs. Under this I have directories labeled as 'ArmA 3 <version>' as below:
Games -> ArmA -> ArmA 1.58 -> ArmA 1.60 -> ArmA 1.62 -> ArmA 1.64 -> ArmA 1.65
Under the default Profiles directory of '~\Users\<User>\Documents\ArmA 3' I create a 'Profiles' directory and it follows a similar pattern:
ArmA 3 -> Profiles -> 1.58 -> MODs -> 1.60 -> MODs -> 1.62 -> 1.64 -> 1.65
OFC you don't have to create the direstories for any version you are not going to be installing.

Things to Consider
Each version of ArmA 3 that you install will require ~20+ GB of storage on your HDD/SSD. You'll also need to allow around twice that while you are performing the installation due to the way that Steam stages these. It is always a good idea to have 20~50 GB free on any device anyway for the system to use, but YMMV.

You can seed an installation from a lower version to a higher version by copying the lower versions files into the directory before commencing the installation. This may allow the installation to avoid having to download those files that have not changed between the updates but it isn't guaranteed to do so. Expect to have to download the full amount and be happily surprised when you don't.
Preparing & Installing GameUpdater
Prerequisites
  • Preferably don't have BI Tools installed as it conflicts somehow (on Windows registry entries level) with the Arma 3 Tools from Steam
  • Own a valid Steam account
  • Internet connection
  • At least 1.1 GB free space on your Hard Drive

Preparation
  1. Open your Steam library (switch the filter to "Tools") and look for the "Arma 3 Tools" entry
  2. Configure which branch you want to use
    1. Right click, then click on "Properties"
    2. go into "BETAS" tab
    3. Select the appropriate "beta"
    4. Set up the Automatic updates behavior to suit your perposes
      1. Go into "UPDATES" tab and select the appropriate value
        To help you, there is a label under the list box that describes the selected option
      2. You may Enable Steam Cloud synchronization for Arma 3 Tools if you wish to use this feature with the ArmA 3 Tools

How to Install
  1. Run Arma 3 Tools from Steam
  2. Find Game Updater on the main form
Then, from Game Updater itself, on the first startup, click ok in the message box telling you GU is not installed and:
  1. Type your Steam credentials (leave Steam Guard Code empty) and click "Ok"

  2. A console window appears, to check your Steam account

    1. If your account is protected by Steam Guard, it will ask you the code that you will find in your emails (sent automatically)
    2. Type the given code and hit ENTER
  3. After a few seconds, the time to check your Steam license, the console window will close itself and the main form of GameUpdater should appears
  4. Congratulations, GameUpdater is installed and ready to work

NOTE: In case of mistake on the Steam logging info, you will need to run "Delete user data.bat", located in the directory "Arma 3 Tools\Game Updater"
Installing ArmA III Builds with GameUpdater
How to Use Game Updater
Once it's installed, there are two forms in which you should have a look.

Options
  • From the main form of GameUpdater, click on "options"

    • "Selected Branch" allows you to select what branch you want to use to install or update
      • In case you want to install, either legacy or RC branch, a access code will be asked. If it is incorrect, the update process will fail
      • The text-box of the access code is disabled when the branch is password free
    • Play sound when update is done
    • Handle Steam Client
      • If enabled the updater will log you out of your Steam automatically instead of asking you what to do when you hit "update".
    • Check local content
      • If checked, It will check for errors or corrupted files in the existing data. The update process will be a bit longer but it's the safer method.
      • Otherwise, it will just download the modified data from your version to the newer, without any check on existing files.

In the main form, the only available option is the path to the installation to add or update. By default, this is "...\YourSteamPath\steamapps\common\Arma 3 [development]", change it if needed.

NOTE: Be careful on your installation path when you change the branch. The main form give you some information about the version found in the selected directory (based on the executable).

The Install/Update Process
  1. Run Game Updater
  2. Double check the branch and the installation path
  3. Click on Update
    1. If Steam client is running live (started and on online mode), it will ask you to continue or not
    2. A message box is displayed, click yes to proceed (by clicking "No", the main form will be displayed)
    3. Other questions may be asked
  4. Here you are, just wait until the end of the update process

    • If you are using the mobile authenticator, its code will be asked
  5. Once the update done, you can open the installation directory or just exit Game Updater.

Notes
  • Game Updater has some child processes, ran in asynchronous mode, to get better stability and performances. This is why the information displayed are not in real time. The delay can be from seconds to minutes.
  • If for some reason the update fails, check out the output and the step
  • You can send Game Updater to the notification zone during the update. A balloon tool tip will be displayed as soon as the update process is completed
  • You can cancel the update at any time, "Resume update" is handled.
  • Update steps are:
    1. Preparing: Prepare account info and game data
    2. Starting: Check parameters and run child processes
    3. Validating: Validate the local data if option is set to "Yes"
    4. Preallocating: Reservation of the disk space needed
    5. Downloading: Download of the new files
    6. Success: Self explained
Logs
There are two log files, stored in "Arma 3 Tools\Logs":
  1. GameUpdaterYYYY-MM-DD.rpt: Main log of Game Updater
  2. GameUpdaterChildYYYY-MM-DD.rpt: For child processes
Additional logs from Steam can be find in "Arma 3 Tools\Game Updater\logs", the most relevant is "stderr.txt", filled in case of error.
Maintenance Using Game Updater
The Legacy Ports and the Legacy builds will never require an update as these are frozen at the point that they changed status from Stable. Once these are installed they can be left as they are.

If you have installed the Stable build with Game Updater, it will require to be updated whenever there is an update or hotfix to be applied to keep it current.

The Release candidates, when they are available, will require more reqular updates as patches and hotfixes are applied. These will usually occur more frequently than on the Stable build.

The Development branch recieves almost daily updates, so you should be updating this branch each day to match this release schedule.

To update an installation:
  • Run ArmA 3 Tools
  • Select the Game Updater Tool
  • Click the 'Options' button
  • Set the options for the branch you wish to update
    • Set branch in the drop down list
    • Enter the Access Code if required
    • Click the 'Save' button
  • Set the installation path to the correct location
  • Click the 'Update' button
  • When update completes, click the 'Exit' button
  • Exit out of Game Updater and ArmA 3 Tools
Profiles
One concern with multiple installs is that there can be changes in the way that profiles are used between the different builds of the ArmA III engine. I would strongly recommend that you get in the habit of using seperate profiles for each build you choose to install.

By default, ArmA III places your default profile in the directory ~\Documents\ArmA 3 and any other profiles you create in the directory ~\Documents\ArmA 3 Other Profiles. The default location can be overridden with the command line option -profiles=.

How you wish to structure your profiles directories is up to you. I like to keep all my profiles under a single root: ~\Documents\ArmA 3\Profiles. From there I branch out into folders based on the version number of the build.

The easiest way to accomplish this is to add the profile path via the Launcher for the build you have installed. With the Launcher on screen, go to Parameters > Advanced tab. Expand the Advanced section and you will find the last entry Profile Path. Click the '...' button and select the folder you have selected for the profile.

Push the Play button and the game will create all the required files in the chosen directory.
MOD Management
ArmA III is an actively evolving platform and it is common that any version update will break MODs that you are using. Couple that with the knowledge that most MOD development teams are only actively targeting the current Stable build and that they are not routinely archiving versions compatible with previous versions and you will come to understand the difficulty of finding MODs compatible with these versions after the fact.

It is therefore necessary to actively plan for future needs by finding those MODs while they are current, which means when they are working with the current Stable builds of ArmA. This also means that you may not find versions of MODs compatible with the Legacy Ports builds unless you had a lot of foresight.

For those new to ArmA, the main repositories for MODs are Armaholic and Steam. Some MODs are only found on one of these, or you may get to choose where you wish to download them. IMO Steam is the easier place to access these as their download servers are well provisioned and reliable and functionality is not limited for any user in any way. All of the most important MODs are available on Steam.

I'm not going to go into the details of using the Steam Workshop except to say that using a MOD from there is as simple as finding it, hitting the Subscribe button and then letting Steam and the ArmA III Launcher handle the rest.

Once a Steam Workshop MOD is downloaded and installed, you can convert it into a locally stored MOD by using the ArmA III Launcher: On the MODs tab of the Launcher, select the Steam MOD you want to store locally and highlight it. Select '...' > 'Copy MOD to folder ...' option and point the save dialog at the folder you want to store it in. I suggest that the version specific local MODs be stored in the version specific Profile folder created earlier. If you are not using version specific Profile folders, then you are on your own with that.

Once you have the MODs stored locally you will need to maintain them as you would any other manually installed MOD.

With MODs that are coming from another source like Armaholic, then these will be installed and maintained manually, so you will only need to install them to the required directory and tell the ArmA III Launcher where they are.

Suggested MODs

Caveats
Due to the way that the ArmA III Launcher operates, when you copy a MOD into a local folder and point the Launcher to this folder to be able to access them from their, there will be two listings for the MOD shown; one for the Steam Workshop and one for the local copy. There is no way at present to disable the listing for the Steam Workshop version without unsubscribing from it. This will, however, make it unavailable to the current Stable version and the local version may not remain compatible with this version and it definately won't have any bugs fixed, etc.

It is suggested that you get in the habbit of saving MOD profiles as these can be set up once for the Legacy builds and you can simply reload these to ensure that you get the correct MODs loaded in the Legacy builds.

If you were paying attantion then you may have noticed that only the Legacy builds in the Pre-Planning discussion have specified MOD folders under the Profiles. This is because they are the only builds that will benefit from locally stored MODs.

The builds will not change so therefore the MODs that work with them can also be frozen and will not need to be changed. You may be able to use updated versions targetting newer build, but this is usually an exception rather than the rule, being reliant on what has or hasn't changed between versions.

MODs for the current Stable build are better managed via the standard means, either the Steam Workshop functionality or manually as necessary with Armaholic.

MODs for the Release Candidate and Development builds are left as an exercise for the player. A particular MOD may or may not work with these builds and finding which do and don't is simply a matter of trial and error. Until a version has been moved into the Stable build it is almost worthless to set a particular MOD in stone as most changes will not be ready for release until that time, therefore local storage is simply a waste of space and your time.

[2016.09.13] As there is a pending update from 1.62->1.64 looming over us, now is the opportune time to be making provision for grabbing those MODs for the 1.62 build and storing them safely away against future needs. Same goes for GameMode or Mission files that you just can't live without.
Linux & MacOS
If you are using Linux or MacOS clients for ArmA 3, then I'm going to assume an higher level of technical competence and not have to explain to you here why there is no ability to use the Development or other branches on those platforms.

Just say thank you for the non-native 1.58 ports and move on.

And if you're still here looking for how to run the other branches, then my only suggestion is Wine / Bootcamp as appropriate or dual boot your hardware with that other OS. You choose...

References:
ArmA 3: Experimental Ports[dev.arma3.com]
Available Releases of other ArmA III Tools
Dedicated Server
Multiple versions of the Dedicated Server installation are available through the Steam Client > Library > Tools > ArmA 3 Server > Properties > Betas tab. These use the same Access Codes as for the complimentary Client builds:
  • Legacy Ports (Access Code: Arma3LegacyPorts)
  • Legacy (Access Code: Arma3Legacy164)
  • Stable
  • Profiling (Performance) (Access Code: Arma3LegacyPorts)
  • Release Candidate (Access Code: Not Currently Available)

Note: There is no seperate install for the Development build of the Dedicated Server available. You'll need to install the full Development Client build and use the arma3server.exe contained in that release.


ArmA III Tools
Multiple versions of the ArmA III Tools installation are available through the Steam Client > Library > Tools > ArmA 3 Tools > Properties > Betas tab. These require no Access Codes:
  • Stable
  • Development


ArmA III Samples
Multiple versions of the ArmA III Samples installation are available through the Steam Client > Library > Tools > ArmA 3 Samples > Properties > Betas tab. These require no Access Codes:
  • Stable
  • Development
FAQs
  1. Do I need to own ArmA 3 to run the other builds?
    Yes.

  2. Do I need to own ArmA 3 DLC and Expansions to access them in the other builds?
    Yes. DLC and Expansion restrictions apply the same across all builds.

  3. Do I need Steam to be running to run the other builds?
    Yes. Steam must be running to access all builds.

  4. My MODs aren't working on some builds!
    MOD developers target the current main Stable build of ArmA III and it is not guaranteed that any particular MOD will work on previous or future versions and builds. If a particular MOD isn't working then you may need to either find a version compatible with a previous version of ArmA III or wait for the MOD developer to upgrade it to the new version.

  5. All builds are using the same Profile!
    Yes. All branches will use the Profile and settings from the folder 'Documents\Arma 3' or 'Documents\Arma 3 Other Profiles', whichever was last used. You can use the ArmA III Launcher to point to an alternative location. Go to the Parameters->All Parameters->Advanced section of the settings and set the 'Profile folder' to where you want the profile to be stored.

    It is recommended that you use seperate Profiles for each version to avoid any implementation problems with changes between builds. See the Pre-Planning section for my recommendations.

  6. I can't see any <Insert Favourite MP Game Mode> servers on the other builds!
    The non-Stable branches are usually not supported directly be modders and MP Game Mode developers have enough trouble getting their code to work on the Stable build. It is recommended that you play MP on the Stable build.

  7. I can't see ANY servers on the other builds!
    The non-Stable builds are not usually supported by server admins due to the increased update frequency or because they are not where the players are at. It is recommended that you play MP on the Stable build.

  8. All of the servers are red when I'm on another branch!
    Stable servers are not compatible with the other branches and vice versa. You'll need to match the version and build with that used by the server.
Known Issues
Known issues with the installation process or with maintaining and running multiple ArmA 3 Client installations on a single computer.
  1. Steam only supports the installation of a single instance of a game. This includes adding the second copy as a non-Steam game in some instances. It is better to create and use desktop shortcuts for any additional branches installed.

  2. You cannot currently access the Legacy Ports build through the Game Updater Tool. You will need to switch branches in the Steam Client and copy the install directory elsewhere to have a seperate install for this version. This isn't an issue in itself as the LegacyPorts version won't be recieving any updates AFAIK.

    This is not usually an issue as if you have planned ahead you will already have the Legacy Ports version downloaded and installed before it becomes the Legacy Ports build.
Links
ArmA 3: Development Hub[dev.arma3.com]
ArmA 3: Development Branch Changelog[forums.bistudio.com]
ArmA 3: Development Branch Captain's AI Log[forums.bistudio.com]

ArmA 3: Experimental Ports[dev.arma3.com]

Game Updater Wiki Entry[community.bistudio.com]
Game Updater Manual[community.bistudio.com]
Changelog
16th July, 2017
  • Updated build version numbers

4th December, 2016
  • Added Profiling (Performance) build information
  • Added section on Available Releases of Other ArmA III Tools
    • ArmA 3 Dedicated Server
    • ArmA 3 Tools
    • ArmA 3 Samples
  • Added section on feature Update Path and note on Version Numbering

2nd December, 2016
  • Removed Release Candidate 1.66
  • Updated Stable build 1.64 > 1.66
  • Updated Legacy build 1.62 > 1.64 (CODE: Arma3Legacy164)
  • Updated build sub-versions
  • Added Update Cycle notes for builds

13th November, 2016
  • Added Release Candidate 1.66 (CODE: Arma3Update166RC)
  • Updated Dev build 1.65 -> 1.67
  • Updated build sub-versions

5th November, 2016
  • Updated build sub-versions

25th September, 2016
  • Removed Release Candidate 1.64
  • Updated Stable build 1.62 > 1.64
  • Updated build sub-versions

13th September, 2016
  • Updated Release Candidate 1.62 > 1.64
  • Updated Legacy Ports build 1.54 > 1.58 (CODE: Arma3LegacyPorts)
  • Updated Development build version 1.63 > 1.65
  • Added first draft of Pre-Planning section
  • Added first draft of MOD Management section

11th July, 2016
  • Removed APEX Preview information
  • Updated Stable build 1.60 > 1.62
  • Updated Legacy build 1.58 > 1.60 (CODE: Arma3Legacy160)
  • Updated other build version numbers

16th June, 2016
  • Added APEX Preview information
  • Updated Development build 1.61 > 1.63
  • Updated other build version numbers

31st May, 2016
  • Stable branch incremented 1.58 > 1.60
  • Legacy branch incremented 1.56 > 1.58 (CODE: Arma3Legacy158)
  • Legacy branch 1.56 removed
  • FAQ updated
  • Known Issues updated

<date>
  • <item>
26 Comments
NZPorterDJ  [author] Feb 17, 2017 @ 5:16pm 
Good to hear you got this sorted.
ski2060 Feb 17, 2017 @ 4:21pm 
I think I discovered what was happening. I deleted the install off my HDD and did a fresh DEV install to my SSD with Arma 3 on it.
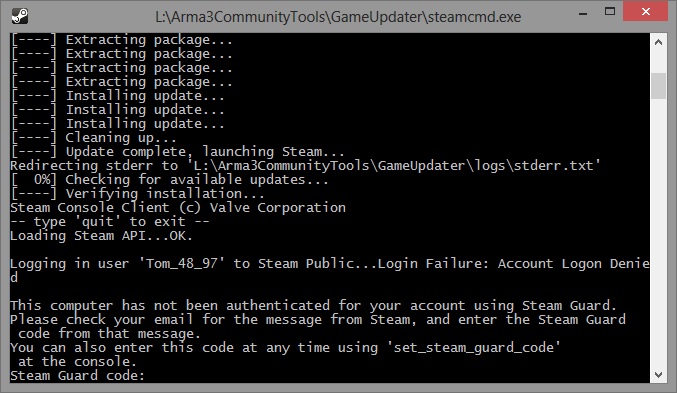
When I did that I noticed that evn though I wsa getting a completion ding from my notification center, I was NOT getting an actual complete install from Game Updater. It was running into download or install issues and failing out.
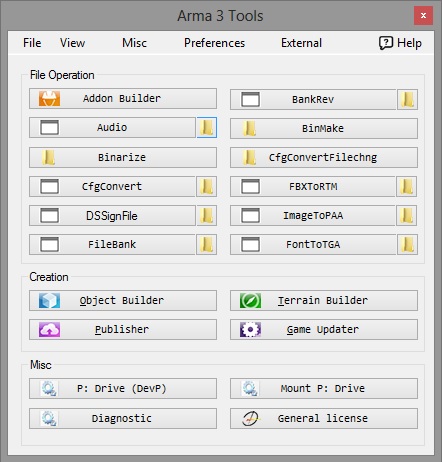
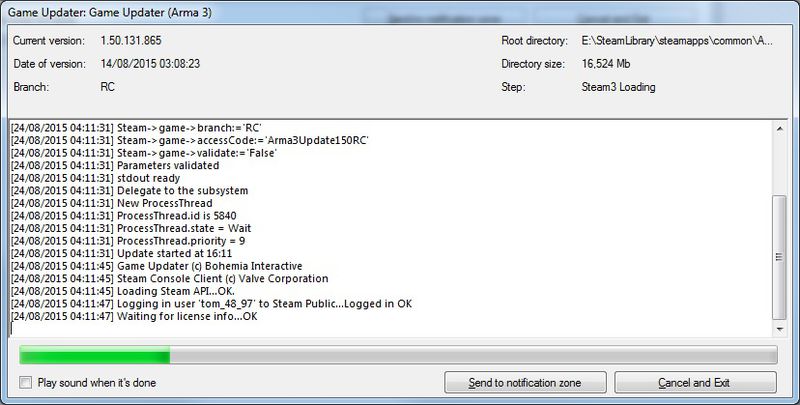
So I kept running GU until I got a full download and install showing everything OK on the GU tool.
Seems like I have it working properly now.
NZPorterDJ  [author] Feb 17, 2017 @ 12:06pm 
@ski2060: Check the options in Game Updater and make sure you've updated the directory location it is installing into. That error can pop if GU is trying to write to a directory that has been removed. I'll investigate further when I'm back in front of my PC in a few hours...
ski2060 Feb 17, 2017 @ 11:19am 
So, I have been having a weird issue with Game Updater to install the current DEV build. I initially installed the DEV build to a different drive than my current Steam/Arma 3 install. I just made a new Steam DIR on my HDD instead of the SSD Arma 3 is on.
When the Game Updater gets to the end of the install, it has an error screen informing me that there was not enough space (500 GB left on drive) and several other issues.
I read that this was common, and just to ignore it.

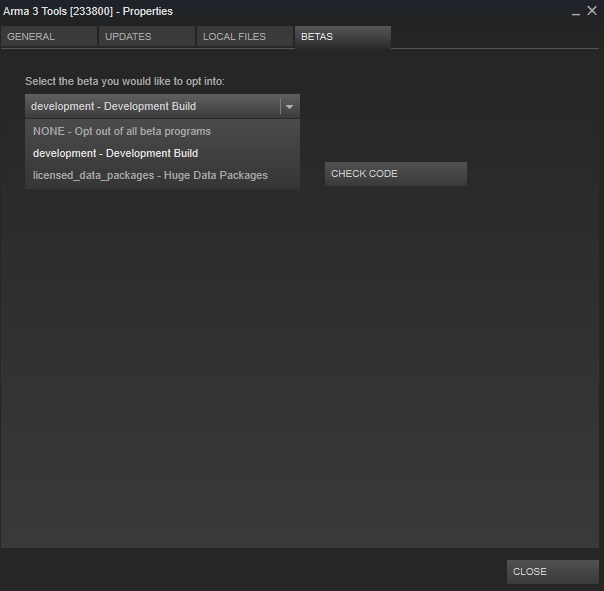
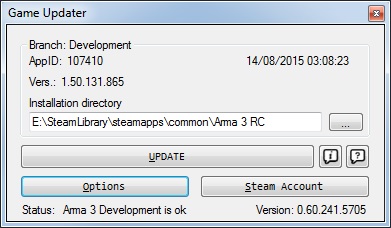
The main issue I have is that the DEV build is not going into my Steam>SteamApps>Common>Arma 3 DEV folder.
It is going into an install that looks like this: F:\Steam_DIR\steamapps\common\Arma 3 Dev\steamapps\downloading\107410

It will not move from that temp updating folder to the actual Arma 3 DEV folder.
Anyone else having this issue?
NZPorterDJ  [author] Dec 3, 2016 @ 11:04am 
Added info on the Profiling and Performance build that is MP compatible with the cureent Stable releases, plus did a little editing here and there.
NZPorterDJ  [author] Nov 4, 2016 @ 3:41pm 
Updated sub-versions to reflect current status. Working a new job ATM and hours are long and in-game and extra time is limited. Will keep this updated as I am able.
NZPorterDJ  [author] Sep 12, 2016 @ 9:45pm 
Added a few new sections on Profile and MOD management for multiple installs. They make sense to me but may be too wordy...
NZPorterDJ  [author] Sep 12, 2016 @ 9:44pm 
Some major rewriting has happened due to my short term lack of employment. Text of the new sections is semi copy-pasta from the GameUpdater Wiki as it made more sense than my attempt. Still needs more work but hopefully will get most people up to speed with GU and ArmA.
.............. Sep 12, 2016 @ 12:40pm 
Very useful and detailed guide! Well done
NZPorterDJ  [author] Jun 9, 2016 @ 3:20pm 
@Reforger2: Yes. Game Updater will update the Dev install the same way as if it was managed by Steam, so it will verify the existing files and only download those that have changed. The Game Updater tool is just a wrapper around the SteamCMD tool from Valve and uses the same tech as that and the Steam client.

I.e: Todays update only needed to download ~840 MB as opposed to the ~21 GB for a full install. You just have to remember to run Game Updater to do the actual download and patch.