Space Engineers

Space Engineers

34 Bewertungen
How to create a new skybox using Space Engine
Von Camulorix
This guide describes how to create a completely new skybox for Space Engineers. The source images are taken from space engine. Space Engine is a free program which allows the user to explore our universe. And it comes with a skybox export function :)
This guide also describes how to test and publish your newly created skybox.
   
Preis verleihen
Favorisieren
Favorisiert
Entfernen
Space Engine
Important notice

It seems that custom skyboxes currently work only in DX9.

Ursprünglich geschrieben von spaceengine.org:
Q: May I make a video with SpaceEngine or use screenshots or skyboxes made with SE for my own use?
A: Yes, you may use SpaceEngine products for non-commercial use as long as you cite SpaceEngine as the source for those assets. Please see the license page for full details.
Space Engine FAQ[en.spaceengine.org]

Where to get
Download and install Space Engine[en.spaceengine.org] and apply the patch to 0.973. There are also some addons[en.spaceengine.org] which can be installed as well. The addons provide nicer textures for our solar system and are completely optional. This guide doesn't cover the installation of Space Engine or its addons. Neither does it cover the handling of Space Engine. Please refer to their website for help.

Preparations
Once Space Engine is installed and running, go into the Planetarium. To get to a specific place, search for it (click on the magnifying glass on the left hand side) and click on go to. It is also possible to change the time to allow for better planet/moon positions.
Be aware that if sun rotation is turned on in Space Engineers, it is possible to get odd looking skyboxes. Just create the skybox from space between stars. The following pictures are from an older version of this guide. They still work if sun rotation is turned off.

When near a planet, I recommend to set the auto exposure to off. Otherwise stars aren't visible because too much light comes into the virtual camera lens.

Export the skybox
To export the current scene as skybox, press escape and go to editor and then click export skybox. Set the resolution to 2048 and press export. Depending on your computer, it can take a few seconds to export the skybox. Space Engine saves 6 images in the export directory of its installation. Each export overwrites old files. Save them first if you want to keep them.
If you can't find the sun, export with a lower resolution first and remember where it is when exporting with a higher resolution. Higher resolution means that all stars will appear smaller, including the sun.

There's also a post about skyboxes in their forums[en.spaceengine.org]
Create the skybox
Necessary Software
It is essential to save the skybox as dds file in the end. As stated in the official modding guide[www.spaceengineersgame.com] there is a Photoshop plugin which can do the job. Download it from Nvidia[developer.nvidia.com].
If you don't have Photoshop, you can search for a plugin for Gimp or Paint.Net. Both programs are completely free.

Folders for the Mod
Navigate to %AppData%\SpaceEngineers\Mods. To get there, type it into the address bar of your windows explorer, in the search bar of your start menu (Windows 7) or by pressing the windows key and R simultaneously. Create a new folder. The name will be the mod's name.
Open it and create a few new folders: Data and Textures\BackgroundCube\Final.

Navigate to the Space Engineers installation folder. It is possible to get there through steam. Right click in Space Engineers in your library and open the properties. Navigate to the local files tab and click on browse local files. Open the folder Content\Data and copy the file Environment.sbc into the newly created mod's data folder.

Reference Skybox (Optional Step)
There is a nice skybox on the workshop which helps a lot:
http://steamcommunity.com/sharedfiles/filedetails/?id=348446748
Subscribe to it and add it in the game to ensure that it is downloaded. All mods are downloaded to %AppData%\SpaceEngineers\Mods. Find the sbm file with the mod id, which is 348446748.sbm and open it with a zip program (7-Zip, WinRAR). Renaming it to .zip works too :)
Find reference.dds in a sub-folder of Textures and load it into Photoshop.

Image Positioning
If you skipped the step with the reference skybox, create a new image which has a width of 12288 pixels and a height of 2048 pixels or download my pattern[dl.dropboxusercontent.com].

Two of the exported images need to be rotated before they are positioned for the skybox:
  • sky_neg_y.tga 90° counter clockwise
  • sky_pos_y.tga 90° clockwise

Position all images next to each other as shown below.


I'm using 50% opacity until the sun is in the right spot to help me rotate the skybox in the game.

When all images are in place, save as D3D/DDS. It is important to set it to DXT5 and cube map. I also marked all other options I changed or I think are important. I included a dds profile of my settings and a profile of the default settings in the pattern.zip (see above). Navigate to the mod's Textures\BackgroundCube\Final folder and save the image as BackgroundCube.dds. Saving the DDS can take a while.


Don't forget to save the Photoshop file as psd. This makes it easier to change it in the future.

Test and Positioning
Start Space Engineers and create a new custom empty world in creative mode (no death). Also add the newly created mod. It appears in the list with an icon of a folder instead of steam.
The game should load the new skybox. To change the orientation of the skybox open the Environment.sbc with a text editor of your choice. I prefer Notepad++ because it has syntax highlighting (set language to XML). There is also a way to automatically enable syntax highlighting as soon as a sbc file is opened in Notepad++. Go to Settings -> Style Configurator and choose XML as language and type sbc in the user extension field (thanks to Stone Cold Jane Austen for this advice).
Tune it by changinging the attributes yaw, pitch and roll of the element EnvironmentOrientation. I recommend, setting all values to 0 and to start from there. All values are in degrees.
<EnvironmentOrientation Yaw="0" Pitch="0" Roll="0" />
Only change one value at a time, save the file and press F5 in the game (quick load). At this point it pays off to be able see the reference skybox combined with the newly created skybox. Always remember around which axis you are rotating. One example:
To move the sun upwards when you look directly at the upright "front" text, the right axis is pitch in a negative direction. Not the sun changes its position, the skybox changes its orientation!

The Environment.sbc contains a lot of other values. Some of them are for the lighting or the ship speed. I found a forum post explaining a few settings Semantics of entries in the Environment.sbc file[forum.keenswh.com]. Tweak the Environment.sbc until you are happy with the results. Just remember that all values for the colors are from 0 to 1.
Upload to the Workshop
Publish

Publishing a mod is really easy. But there is still a thumbnail missing. Create an image or use a screenshot and put it in the mod folder (where the data and texture folders are). The name has to be thumb.jpg.

To publish the mod go into the main menu of the game and prepare to start a new custom game or prepare to load an existing one. Before starting/loading go into the mod options for the game an click on the folder which contains the new skybox and click on publish. Updating a mod works the same way. Once the mod is published, there is a new file called modinfo.sbmi in the directory. It contains the mod ID and the owner ID. Just leave it there :)

I usually change the visibility of my newly published mod to hidden. Then I take a few screenshots and add a nice description. When I'm done, I change it to public.

Congratulations, you created a new skybox from scratch and published it in the workshop.
If you have a few ideas how to improve this guide, let me know. And also write a comment with a link to your own new beautiful skybox ;)

The skybox I created while writing this guide can be found here:
http://steamcommunity.com/sharedfiles/filedetails/?id=447496715
32 Kommentare
kota 19. Juli 2023 um 0:59 
my skybox is all black? dont see any way to fix it in environment.sbc
Nucklead 6. Feb. 2021 um 14:28 
Thanks a lot for the guide. Although, a bit dated, it still works. I used space skybox generator created by Rye Terrell (known as wwwtyro). After a few manipulations in photoshop (with dds plugin installed) the work was done and I now have beautiful new skybox. So, thanks again.
Malkrie 10. Nov. 2020 um 23:27 
Ok, I have discovered something really really weird: In order for changes to be applied to the skybox, you must create a new mod. Just copy-paste your mod folder, rename it, then update the .dds file and you will see the changes. Even if you create an entirely different skybox cubemap it will still show the first one you put in there unless you have nothing in the folder "final".

I have no clue how that works since the mod shouldn't have the ability to load something that doesn't exist, but that is the only fix I've found so far. This also invalidates my previous question; visual settings are applied, just make sure you update the skybox.
Malkrie 10. Nov. 2020 um 23:00 
I know this guide is ancient but I have one thing to add and one question to ask:

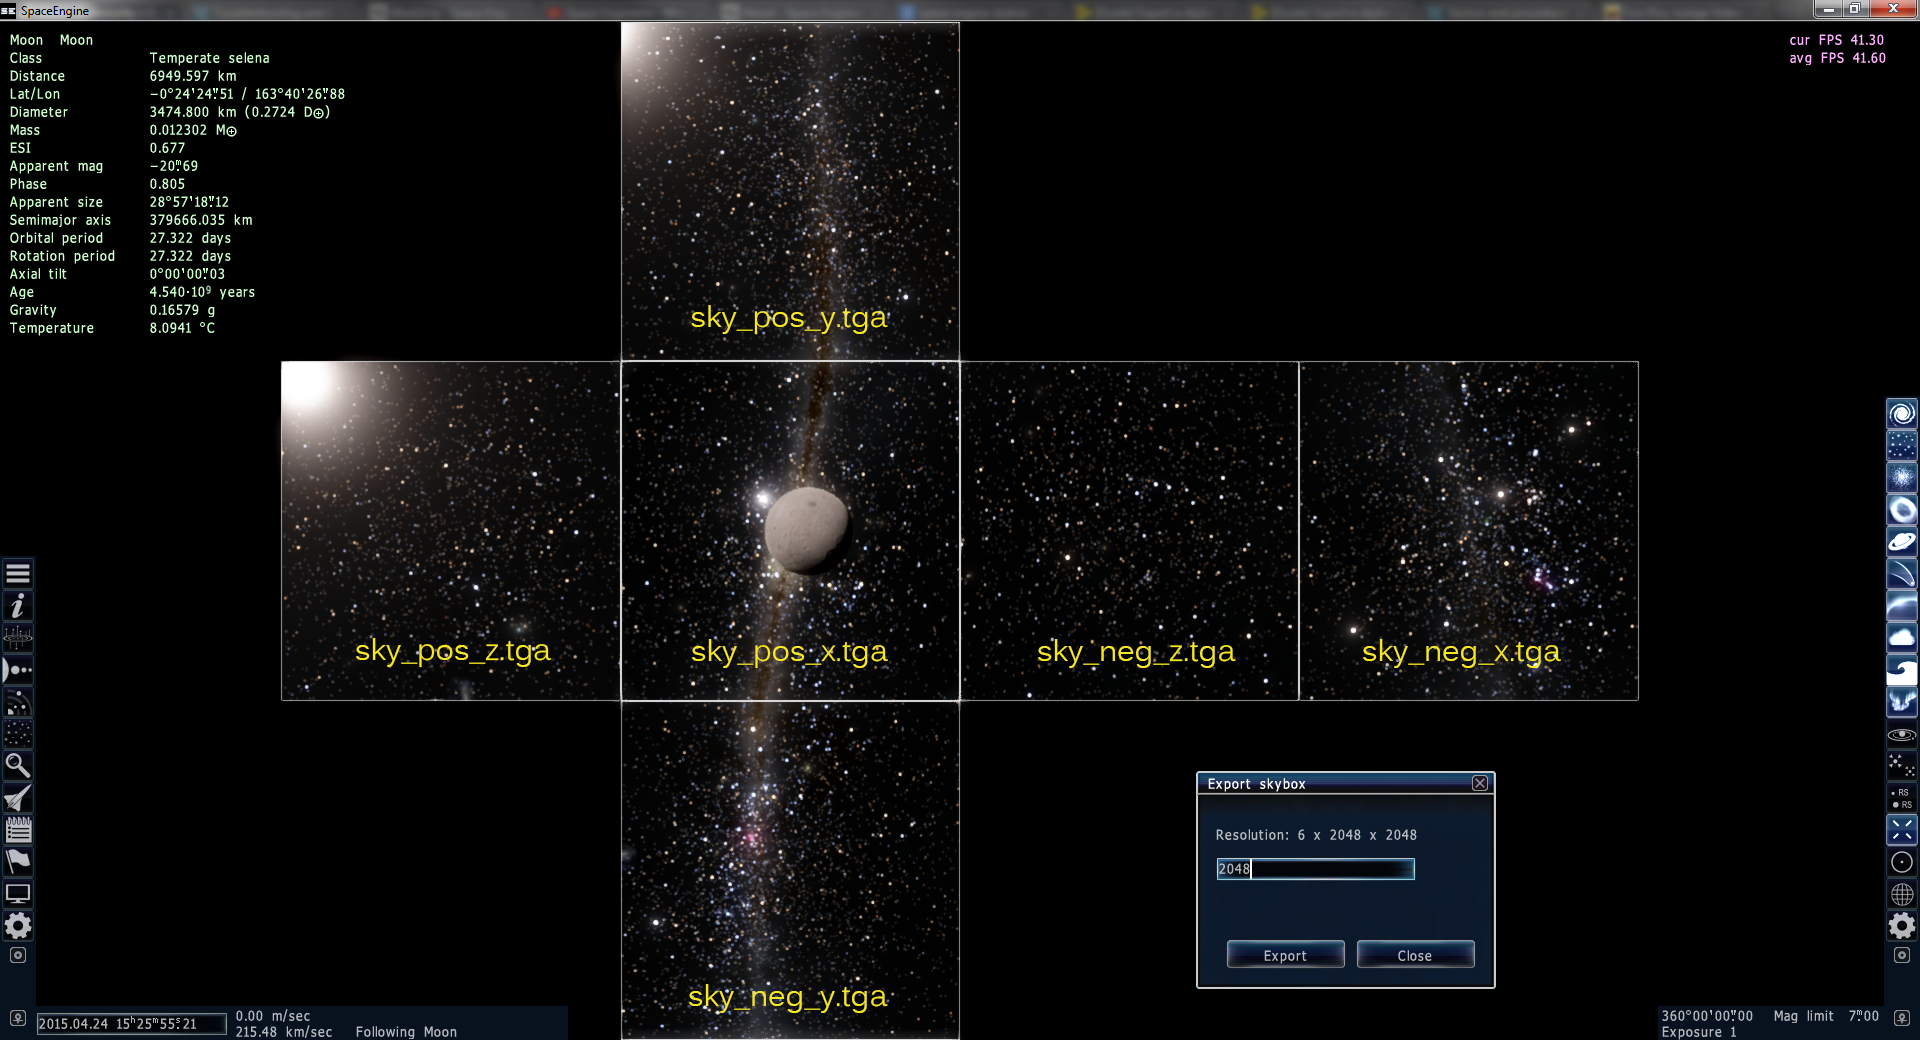
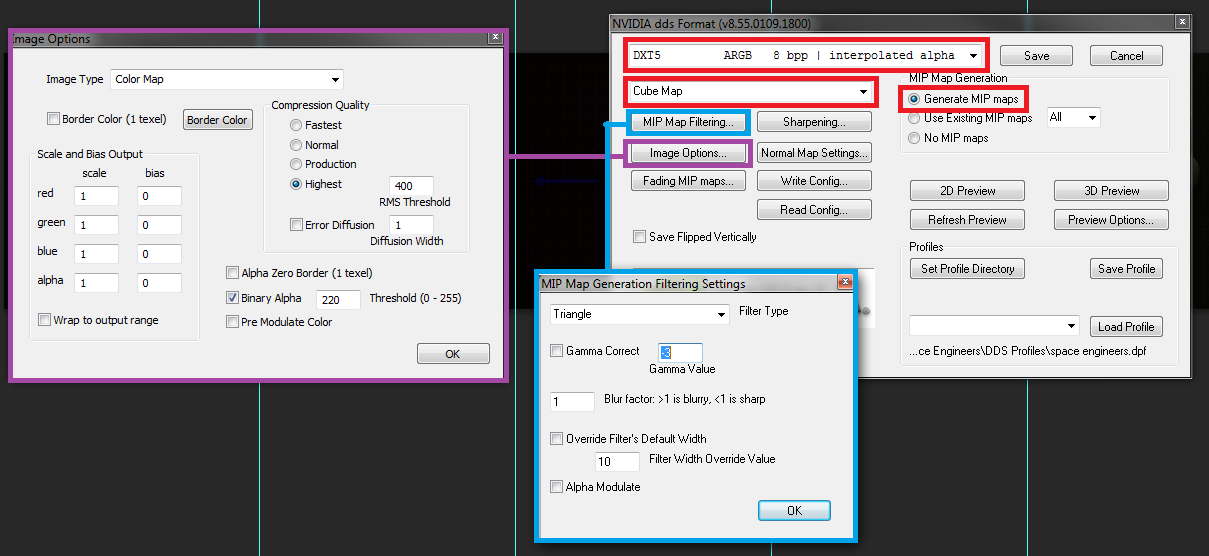
With the professional version of SEngine you can export a .dds cubemap directly from SEngine with no in-between work absolutely necessary unless you want to do it.

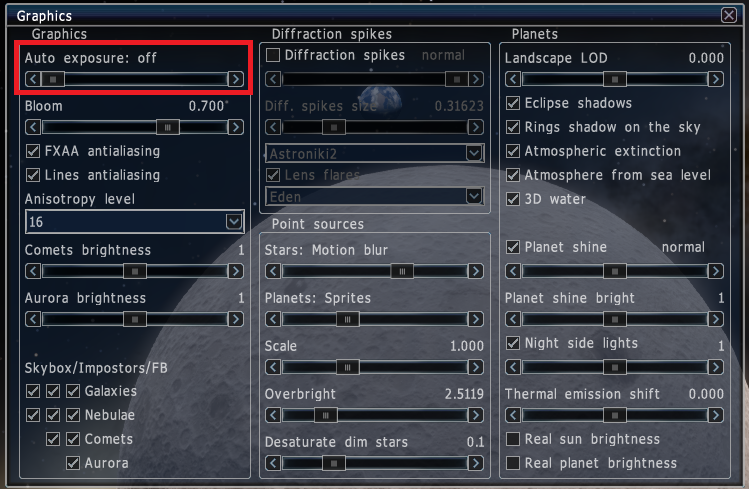
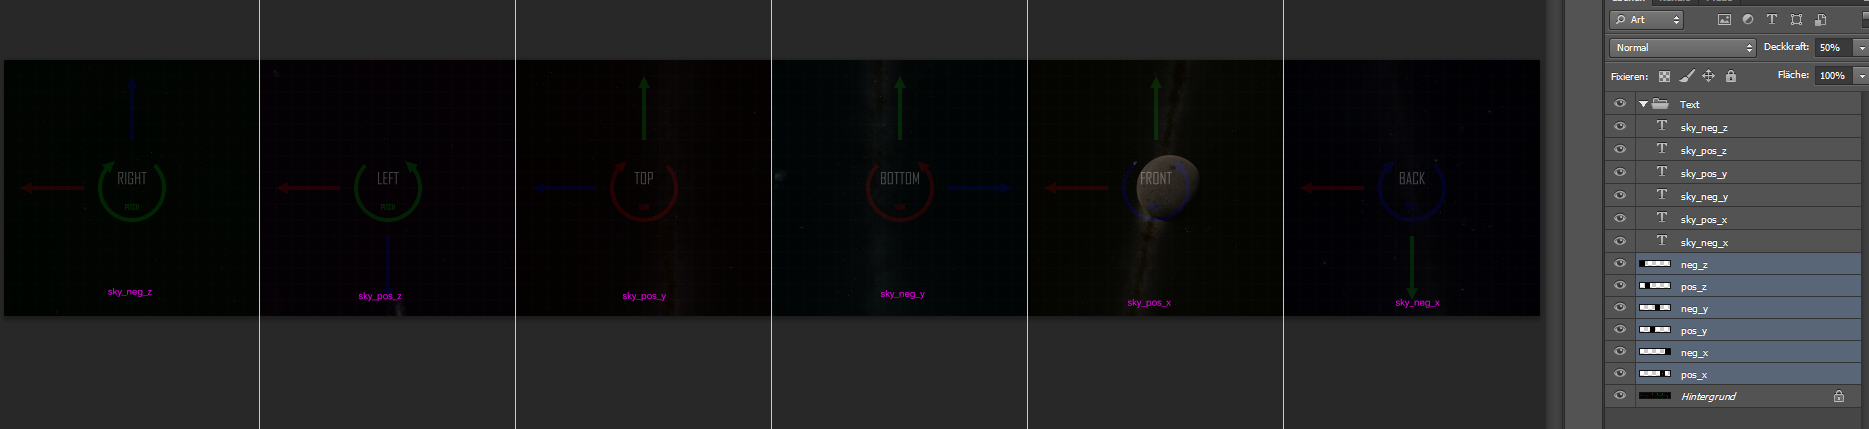
Is there any way to reduce the size or number of the stars the skybox exports? The skybox doesn't seem to pay attention to any visual settings set in SEngine, and I typically like to have my stars set to the smallest scale possible but it sure as hell doesn't export it that way...
Zeon 21. Jan. 2020 um 22:42 
This is awesome!
Camulorix  [Autor] 31. Mai 2018 um 22:39 
It's been a while but if I remember correctly, there should be some settings for lighting in the file.
NexeL 31. Mai 2018 um 21:00 
Ok, so I would like to make a dark skybox. I've made a pitch black skybox which is on the workshop right now, but I want to make a skybox that has very low direct light and little to no ambient light or glow. My pitch black skybox only works with space. I would like a little help in understanding the environment sbc settings so I can modify the lighting settings for both the skybox and planets. I would very much like for this next skybox I want to make compatible with planets.
XandreBlues 23. Mai 2016 um 1:17 
Just what I needed. Thank you for this.:steamhappy:
CaptPatrick01 25. Feb. 2016 um 21:36 
Try making it using this: http://registry.gimp.org/node/25532
Vitória, Bruxa Lésbica 25. Feb. 2016 um 15:12 
Did not work for me. When I try to load the world with the skybox on it, it just freezes during loading.