Dying Light

Dying Light

485 beoordelingen
100% Achievement Guide: Dying Light
Door Cynic 0055
This is a comprehensive 100% Achievement guide detailing a step-by-step walkthrough to take you from 0 all the way to 100%. If you are looking for a particular Achievement or Collectible, use Ctrl+F & type it into the search bar for more direct help.

I run support & debug help on all my guides. If you have any questions, problems, or find errors in the guide itself, do not hesitate to leave me a comment & I will get back to you as soon as I am able to. Happy Hunting!
9
16
2
3
2
3
2
2
   
Prijs
Toevoegen aan favorieten
Toegevoegd aan favorieten
Verwijderen uit favorieten
Introduction:


Achievement Breakdown: (50)
Story Related: (11)
Secondary Objectives: (7)
Character: (4)
Collectibles: (1)
Slay: (16)
Miscellaneous: (7)
Online: (4)

DLC Breakdown – Parkour Fever: (3)
Secondary Objectives: (2)
Miscellaneous: (1)


To earn 100% completion in Dying Light, we will need to complete a single full playthrough of the Base Game along with a full playthrough of each of the three main DLC expansions. There are no missable Achievements in the Base Game & all can also be unlocked during Post-Game after the Main Story is completed. There are no Achievements associated with game Difficulty.

For the most part, the bulk of the Achievements just revolve around completing 100% Game Completion which is nice. Complete all Main Quests, Side Quests, finding all 67 Collectibles, & killing Zombies in a bunch of different ways. For the Now It’s Safe Achievement, only Safe Zones that we manually clear & activate count towards the Achievement. There are only 17/44 Safe Zones we need to do this for; the others are all unlocked through the Main Story or Side Quests.

Similar to Safe Zones, we also do not need to complete “every Side Quest” for The Whole Story Achievement but only 44/51. Fortunately, we can actually exactly which Side Quests we need: go into the Extras tab of the Main Menu, & Professional Statistics. Scroll to the bottom of our stats to see a Checklist of every Side Quest that is needed & what you have already completed.

We will need a LOT of Craft Parts for making healing items, throwing weapons, & upgrading Weapons. There are many hidden Blueprints & Weapons scattered around that are not covered in the guide so take your time exploring Harran! On top of that, we also we need a massive amount of Xp from killing Infected & doing Parkour. Since there are no missable Achievements or Collectibles, loot & kill anything & everything.

There is an Online Coop aspect to the game that will involve us having to complete Quests & Challenges with a partner. The only Achievement that may give you some tedium is The Polyamory Achievement which will require us having to complete 5 Quests cooperatively with the same 3 players. Which if you are like me, that is way more friends than I have… Keep this in mind as you play & feel free to ask for a boosting partner in the Comments section down below.

Dying Light has four different DLC expansion that add in an additional 28 Achievements for us to complete. On top of these DLC expansions there are also 26 Weapon/Skin DLC packages you can collect as well. None of them will add any Achievements, though they may give you an easier time playing as you will get a lot of gear. 7 of them are completely free to access while the other 19 of them are paid; if you purchased the Enhanced Edition all DLCs will be available to you for download.

Parkour Fever DLC is a free title update that adds in 10 Parkour Challenges we can complete.

For those interested, here is an organized list of all the Achievements/Secret Achievements. This is how I derive my Achievement Breakdowns & the first reference I create before I begin my 100% journeys.
https://steamcommunity.com/sharedfiles/filedetails/?id=2882392664&searchtext=achievement+checklist
For unknown reasons to me, we have the option in our Pause Menu to login to an Epic account. This is completely optional & unnecessary unless you have a pre-existening Epic account that you want to track your in-game Stats with. But seeing as though we are here on Steam, this is kind of useless. I write Steam Guides, not Epic Guides… … though that title does sound way better, doesn’t it? Sorry, Gabe…

Before You Play!: For some reason, there is a chance that the Side Quest – Hell From Above will automatically complete itself when we begin a New Game. This is a good thing technically, not a bad thing, as it does count as being complete for The Whole Story Achievement.

Auto Aim: In my opinion, this game is much easier when you turn off the Auto Aim setting. Auto Aim does exactly that, & makes it easier for your melee attacks to register… but harder for Headshots. Without Auto Aim, you have more control where your attacks land, & every Headshot will be that instead of it potentially registering as a body shot which typically happens. While high damage does not really matter for the Base Game, it will for the Bozak Horde & Hellraid DLCs where speed will be of the essence. I highly recommend disabling Auto Aim at the start of the game to give you time to get used to it while the game is easy.

*Guide contains major spoilers.
Sequence 1: First Assignment
1. Slums: The Tower, District D
2. Side Quests: 0/44
3. Text Collectibles: 5/67
4. Captured Safe Zones: 3/17
5. Achievements: 4/78
-----------------------------------------------------------------------------------------------------

There are no Achievements associated with Difficulty for the Base Game; feel free to play on whichever you prefer.

Slums – The Tower:


Achievement #1 – Is It Really Necessary: Kill your first Infected.
Story Related. After a long portion of the story & receiving the Main Quest – Awakening from Rahim, head up to floor 13 where we can find our first Infected that we are able to kill as a part of the story.


Achievement #2 – Little Craftsman: Craft your first item.
Story Related. Shortly after we kill our first Infected, we will be tasked with crafting a Medkit after finding some Alcohol & Gauze; craft it to unlock the Achievement.


Achievement #3 – Flight of the Crane: Jump from the Crane.
Story Related. Keep progressing our first Main Quest until we link up with Rahim on the crane across from the Tower; perform a “leap of faith” to unlock the Achievement.

Text Collectible #1 – Note #5: When we are tasked with going to meet with the Quartermaster, take the elevator down to the ground floor of the Tower. Once we arrive, head over to the blue notice board off our right to find our first Note tacked to it.

Text Collectible #2 – Battle Journal #0: After we speak with the Quartermaster & collect our daily Requisition, look on top of the shelf to the left of his reception desk to find our first Battle Journal.

Slums – District D:


Text Collectible #3 – Note #4: Head down the stairs leaving the Tower towards the West & we can see a memorial wall at the back of the parking lot. Look for a teddy bear on the ground by the memorial wall to find a Note leaning against it.

Text Collectible #4 – Battle Journal #1: After arming the Car Trap during Main Quest – First Assignment, Jade will task us with rescuing a trapped Survivor at an inactive Safe Zone to the North of the Tower. Turn on the lights here to activate the Safe Zone; this one does not count towards the Now It’s Safe Achievement.

After we turn on the lights in the new Safe Zone, turn around & look over to where our Stash is to find a Battle Journal beside it.


Achievement #4 – BBQ: Stick a burning Zombie on spikes.
For this Achievement we need to find a Spike Trap, a group of Infected, a Molotov (or a Weapon dealing Fire damage) & ideally have a Firecracker as well. If you have crafted a Molotov, then we can find a Spike Trap just South of the Safe Zone we just unlocked. Throw a Firecracker at the Spike Trap to lure Infected near it, throw a Molotov at the group, then quickly swoop in & kick a flaming Infected into the Spike Trap to kill it & unlock our Achievement.

If you do not plan for it, this Achievement will definitely come through natural progression with how improvisational & chaotic this game is… there are many Spike Traps found around Harran.

Unlocking DLC Outfits: Activate all of the Traps for Spike & sleep through the night at the Safe Zone. When we wake up, if you own the Enhanced Edition or any other aesthetic DLC expansions, we can now access all of the Outfits from our Stashes.

Along with our Outfits, we will unlock any other DLC Blueprints & Quests. Ignore the Quests (not the Blueprints) & carry on with Main Quest – First Assignment for now. Do not do anything regarding Hellraid or The Bozak Horde yet… Do not interact with the Hellraid Arcade or the Bozak Poster on the first floor of the Tower.

Slums – The Tower:
Side Quest #1 – Mother’s Day 1: After we complete Main Quest – First Assignment, we will unlock a slew of Side Quests at the Tower. We will receive Mother’s Day after speaking with Brecken at the meeting, Dr. Lena will automatically give us this Side Quest.

Side Quest #2 – Goodnight Mr. Bahir 1: Head up to floor 20, & make your way to room 202 where we can find a group of Survivors outside it. Speak with one of them to unlock this Side Quest. Pick the lock to suite 202, speak with Bahir, then Yusuf to progress the Side Quest out of the Tower.

Side Quest #3 – Gunslinger 1: On floor 20, we can find Dawud. Speak with him & he will ask us for a Pistol in exchange for the key to his fully stocked pawn shop.

Slums – District D:
When we leave the Tower & speak with our GRE contact during Main Quest – Airdrop, we can see eleven new Inactive Safe Zones appear on our map. Ignore the Mission Waypoint at the Cauldron, & we will go rogue for a bit looting & activating the other Safe Zones. If we do not progress the Main Story, the time of day will not change, locking us into a perpetual dusk; this is perfect as when time does start moving again, we will have plenty of Safe Zones scattered around to keep us… safe.

As we explore, we may come across Random Events that have Survivors being attacked by Infected. Quickly rescue them for a reward & some Survivor Xp; complete 15 of these Events to unlock the We’re All In This Together Achievement. As well, loot & kill as much as you possible can for Xp & money; go out of your way to locate Police vehicles we can pick lock as we have a chance to find Guns in them if you are lucky!

Captured Safe Zone #1: From the Tower, head over to the Inactive Safe Zone due East. Get onto the building’s roof & enter inside; clear the Infected inside & turn on the power to unlock the Safe Zone.

Captured Safe Zone #2: Head North from our position up to the next Inactive Safe Zone. Switch on the power using the control panel on the ground floor & climb to the top of the large radio tower to the next control panel to activate the Safe Zone.

Text Collectible #5 – Battle Journal #3: From the Safe Zone, carry on East over to the Fisherman’s Village area. After entering the front gates, climb up to the roof of the building immediately off our right to find this Battle Journal on a chair underneath a tarped cover.
Sequence 2: Making Harran Safe Again
1. Slums: District D, District B, District A, District C
2. Side Quests: 0/44
3. Text Collectibles: 10/67
4. Captured Safe Zones: 8/17
5. Achievements: 6/78
-----------------------------------------------------------------------------------------------------


Slums – District D:


Achievement #5 – Can’t Touch This: Kill 20 enemies in a row without taking damage.
This Achievement is not as difficult as it sounds; depending on how hard of a Difficulty you are playing on of course. If you have looted enough, you can craft a bunch of Firecrackers & Molotovs… & that is basically all you will need. Move around on the rooftops to find groups of Infected, throw a Firecracker to group them together then throw a Molotov to kill them.

From the radio tower Safe Zone, we can see the Infamy Bridge just Northeast of our position where we can find hundreds (almost) of Infected for us to kill.

Oil Spills can be lit on fire for maximum effect, so long as there are no Propane Tanks near them; Spike Traps are pretty useful as well. If you find isolated Infected, run up behind them & kick them to the ground where you can then safely pulp them. If you accidentally attract Virals, get to a high point then repeatedly kick them off of it until they die; if you fight them fairly in the streets you will most likely take damage.

Text Collectible #6 – Battle Journal #5: If you are not already there, make your way over to the Infamy Bridge & head to the very far end of it; take your time exploring this bridge & looting open buses, vans, & the trunks of cars for a lot of loot!

When you reach the broken end of the road, leap down into the ocean below, & swim all the way over to the concrete support column across from us towards the edge of the map. Climb up to the landing, then enter into the left column & begin climbing up the yellow piping back up to the bridge roadway.

Drop down into the Garbage Pile below, & enter into the quarantine tents off our right. Pass through the first analysis partition, two partitions full of dead bodies…, & enter another analysis partition; we can find this Battle Journal on a stool under a desk off our right.


Achievement #6 – Open Sesame: Perform 10 successful Lockpicks.
This will come naturally as we play through the game. Lockpicks are very easy to craft only taking 1 Metal Part to make 3; Metal Parts can be found through looting or be made anytime your weak melee Weapon breaks & is Dismantled. We will find ten times the Chests/doors we need to Lockpick over the course of our playthrough…

Slums – District B:
Captured Safe Zone #3: Return back to the mainland from the Infamy Bridge & head towards this Safe Zone. Drop into the storefront from the roof & clear out the Infected; restore power to unlock the Safe Zone.

Captured Safe Zone #4: Make your way up to the North most Inactive Safe Zone now & crawl under a gap in the perimeter fence or leap across the broken overpass to get inside. Head up to/across the broken roadway to a tunnel entrance in the upper cliffside to find our Safe Zone & we will have to clear out a large group of Infected. Turn on the power after they are killed to unlock the Safe Zone.

Slums – District A:
Captured Safe Zone #5: Head West from the Safe Zone now over to the next inactive one available to us on the map. Navigate your way over to it & leap up into the apartment complex

Text Collectible #7 – Battle Journal #9: Ignore the inactive Cauldron Safe Zone for now, & continue onwards to the West of the Slums until we reach a large bus depot. Enter into the main reception building & we can find this Battle Journal on a bench underneath a blue notice board.

Captured Safe Zone #6: Carry on to the next Inactive Safe Zone to the West across from the bus depot, to find an isolated playground court. Run inside & close the front gates; we will need to defeat the Infected & Heavy Rebar wielding Goon. Switch on the power after they are all dead to unlock this Safe Zone.

Captured Safe Zone #7: Head down South now to the next Inactive Safe Zone, & similar to the last Safe Zone we will have to close the front gates, defeat the Infected inside, & restore power to unlock it.

Captured Safe Zone #8: Keep heading South down to the next Safe Zone & make your way up to the rooftop of the apartment complex. Clear out the Infected & turn on the power to activate Safe Zone.

Slums – District C:
Text Collectible #8 – Battle Journal #10: From the previous Safe Zone, head South across the street to the Waste Land or dump area. Here, we can find this Battle Journal on the porch of the… office building? on top of an armchair.

Text Collectible #9 – Note #26: Make your way East now & enter into the quarantine entrance of Harran Public School. Take a left into the green C-can structures, & we can find this Note inside one of the blue lockers in the first room.

Side Quest #1 – Mother’s Day 2: Continue this Side Quest now, & follow our Waypoint to Gazi’s House. Speak with him & hear neat rhyme about our name… & locate the chocolate & Charly VHS for him. Once they are delivered, break into his house through the roof uninvited by crossing over using the underside of the overpass above us. Enter into the room past Gazi & his “mom” to find the Tranquilizers we need.

Text Collectible #10 – Note #21: We can find this Note in the same room as the Tranquilizers on the computer desk.
Sequence 3: The Greater Good
1. Slums: District C, District D, The Tower, District A
2. Side Quests: 3/44
3. Text Collectibles: 15/67
4. Captured Safe Zones: 11/17
5. Achievements: 8/78
-----------------------------------------------------------------------------------------------------

As we begin leveling up our Agility Tree, make a point of purchasing the Grapple & Vault Skills. For the Power Tree, purchase your way down to the Drop Attack Skill. We need all of these Skills to unlock some Achievements…

Stay vigilant for Police vehicles as well so we can find a Pistol for the Side Quest – Gunslinger!


Slums – District C:
Captured Safe Zone #9: Leave Gazi’s House & start heading East towards the next Inactive Safe Zone. Close the front gates, kill the Infected, & restore power to activate the Safe Zone.

Text Collectible #11 – Note #3: In the Bazaar, head to the North end of the market & we can find this Note on a table underneath a wooden overhang outside.

Captured Safe Zone #10: From the Bazaar, head to the second last Inactive Safe Zone left available to us just due East. You know the drill; close the gates, kill the zeds’, & turn on the power to unlock the Safe Zone.

Side Quest #2 – Goodnight Mr. Bahir 2: With all that done, continue this Side Quest, & follow the Waypoint over to Bento’s Drugstore. Speak with Bento, & as I am sure you can guess by what all his men are holding… we have to fight & kill them all. When they are dealt with, we will contact Lena over radio & complete the Side Quest.

Text Collectible #12 – Note #1: We can find this Note inside Bento’s Drugstore, on the pharmacy counter beside our Stash.

Slums – District D:
Side Quest #3 – Gunslinger 2: Before we continue on with the Main Questline, head over to District D & look at the map added above. Go to the location marked “Pistol” across a small inflow, & we can enter into a cabin with a man who seems to have shot himself in the head. Look at the floor beside them to collect a guaranteed German 9mm Pistol; we can give this to Dawud to progress his Side Quest.

If you looted a Pistol already from a Police vehicle, then just keep this one for yourself…

Slums – The Tower:
Side Quest #1 – Mother’s Day 3: Return to Lena at the Tower on Floor 18 & turn in this Side Quest.

Side Quest #3 – Gunslinger 3: With a Pistol collected, bring it to Dawud on Floor 20 to progress this Side Quest.

Slums – District D:
Text Collectible #13 – Note #7: Make your way over to Dawud’s pawnshop now & lift open the bay door to get inside. Look in a drawer to the right of the cash register to find this Note.

Text Collectible #14 – Note #6: Use Dawud’s Key to enter into the back room of the pawn shop & close the door behind you to see a cork board on the wall to our right. Look on the board & we can find a Note tacked to it.

Side Quest #3 – Gunslinger 4: Now that we are in the back room, grab the action figure of John Marston. As we return to the Tower, Breckon will give us a disturbing update over the radio.

Slums – The Tower:
Side Quest #3 – Gunslinger 5: Return to the Tower & speak with Salma to hear what happened to complete the Side Quest.

Slums – District C:
Captured Safe Zone #11: At long last, continue Main Quest – Airdrop & follow the Waypoint to the Cauldron. Before approaching the airdrop, locate the Inactive Safe Zone here first. Climb up into the building & clear the Infected out of it; turn on the power to unlock the Safe Zone.

This is the last Safe Zone we need to capture in the Slums, the rest we need for the Achievement are located in the second area, Old Town, much later in the game…

Slums – District A:
Text Collectible #15 – Battle Journal #2: From the Safe Zone, head North over to the building that has our Quest Waypoint on it, with the fallen parachute on its roof. When we find who the parachute belongs to, roll them over, & we can find this Battle Journal underneath them.


Achievement #7 – Prom Night: Survive night pursuit of level two or higher.
After we come across the Antizin Drop during Main Quest – Airdrop, nightfall will finally trigger. When it does, we will get chased by Volatiles. This is a very easy Achievement to unlock during this section.

As we make our way to the Tower while being chased, run away & hide from the Volatiles so that they start searching for you. Get noticed a second time & we will trigger a level 2 pursuit which will unlock our Achievement once we reach the Tower or Evade the Pursuit. You may get this without even trying as you head to the Tower, the only reason you will not is if you receive the message “Pursuit Evaded” & you hide from the Volatiles long enough to stop being chased. If this happens, you need to get discovered, hide, then get discovered again again.

Slums – The Tower:
Side Quest #4 – Voltage 1: Speak with Brecken to receive our next Main Quest – Pact With Rais & we will enter into the next Chapter of the game. Take the Elevator to Floor 1 of The Tower & go to find Alfie in his workshop to receive this Side Quest.


Achievement #8 – Master Crafter: Use Blueprints at least 100 times.
This will come naturally as you play through the game as we will constantly be crafting Medkits, Firecrackers, Molotovs, & so much more. If you are like me & go through Firecrackers like a madman, you will most likely earn this Achievement sooner rather than later.
Sequence 4: Courting With the Devil
1. Slums: District D, District C, District A, The Tower
2. Side Quests: 5/44
3. Text Collectibles: 19/67
4. Captured Safe Zones: 11/17
5. Achievements: 12/78
-----------------------------------------------------------------------------------------------------

As of now, the day/night cycle will begin & time starts passing in the game. Pay attention to what time it is & how close you are to a Safe Zone; unless you are bold, do not get caught out night after 21:00! We will also start receiving Relief Packages from airdrops as well throughout the day randomly; whenever they appear, get to them as fast as you can before they are raided. We need to find 15 of them for the Disaster Recovery Achievement.


Slums – District D:
Side Quest #4 – Voltage 2: Head to the North & East substations & turn on the power. Once they are powered up, head down to the central substation. Before getting there, we must first wait until night; we can rest at the Dr. Zere’s lab Safe Zone for close access. I do recommend heading down to the substation & scouting things out during the day first. The building we will need to enter is at the South most end in the chain link enclosure.

When it is night, carefully/quickly get down to the central substation; note the Light Traps in the area in case you are being chased by Volatiles. Leap across the transformers & drop into the chain link enclosure. Restore power to complete the Side Quest.

Text Collectible #16 – Note #11: We can find this Note in the newly unlocked Safe Zone on the table next to our Bedroll.


Achievement #9 – Judo Master: Throw 50 enemies with Grapple.
This is a very easy Achievement to unlock, & the Grapple Skill is available early on. Once you acquire it, make a point of throwing around Infected when you see them. If you really wanted you could stand there & Grapple the same zombie over & over again, but that is not necessary. There are PLENTY of Infected in Harran…

Slums – District C:


Achievement #10 – My Left Or Your Left?: Meet with Rais.
Story Related. When you are ready, begin the Main Quest – Pact With Rais, & meet the man himself at his lair to unlock this Achievement.


Achievement #11 – Trade Company: Sell items worth $10,000.
This Achievement will also come naturally as you play through the game. If have been looting everything that is not nailed down, then there is a good chance you will have collected enough Valuables to sell by now. Only sell Weapons if you have a surplus of Metal Parts; for early game it is better breaking down broken ones than selling them.

Slums – District A:
Text Collectible #17 – Battle Journal #6: After speaking with Karim at Rais’s lair, we will receive our next step in the Main Quest. Head to the first telecommunication antenna & enter into the main power building; we can find this Battle Journal to the right of the power controls.


Achievement #12 – Pheidippides: Run (move or sprint) at least 42.195m.
Yet another Achievement that is bound to unlock for us without any effort; you most likely accrued more than half of this distance in our first bout of Collectible hunting when we first began the game…

Text Collectible #18 – Battle Journal #4: After we finish at the first telecommunication antenna, we will be tasked with heading to a second one which we will then automatically unlock as a Safe Zone.

As we head towards Alexei’s Tower, we can see a Taurus Gas Station just below it to the West. Enter inside it, & we can find this Battle Journal on the ground near a mattress.

Text Collectible #19 – Note #23: Before (or after) you interact with the second telecommunication antenna, climb down to the bottom of the Safe Zone & enter into the main building down here. We can find a Note on table beside the Stash.

Slums – The Tower:
After we turn on communications during Main Quest – Pact With Rais, return to the boss-man & we will receive our second task from Karim. Before we report to the GRE, we can unlock some new Side Quests back at the Tower, head there now…

Side Quest #5 – Tunnel Vision 1: When we enter the Tower, we will pop up to see one of the security guards on duty that we can speak to named Blake. Speak with him, to get a lead on this Side Quest; note that it does not unlock for us yet until we go to the house with the smoke down in District C.

Side Quest #6 – Incense Herbs 1: Head over to the Bounty Board in the Tower & we can find this Side Quest posted to the blue notice board beside it.

Side Quest #7 – Spare Glasses 1: We can find this on the board beside the Bounty Board as well. Speak with Khaliq, to progress the Quest to not only find him his spare glasses, but also his gardening book for dumb dumbs…

Leave the Tower now & head to Khaliq’s apartment. Collect his glasses & the book & return them to him to complete the Side Quest.

Slums – District C:
Side Quest #5 – Tunnel Vision 2: Make your way over to the Waypoint now in District C marking “The house with red smoke poring out of it”. Climb into a scrapyard & speak with Ryan inside the house here to fully receive this Side Quest. Crane… we need to COOK!

Go to the Black Serpent Bazaar Safe Zone & speak with Aziz. He will then tell us to locate the courier’s abandoned car inside one of two tunnels; the car will be in the longest of the two tunnels. Head inside & we can find the white SUV guarded by a Goon zombie near the middle of the tunnel. Collect the Phenyl-Nitrate & return it to Aman at the Tower.
Sequence 5: One Hand Gives.. The Other
1. Slums: District C, District B, District D
2. Side Quests: 9/44
3. Text Collectibles: 24/67
4. Captured Safe Zones: 11/17
5. Achievements: 15/78
-----------------------------------------------------------------------------------------------------

If you have not already been doing so, be sure to work your way through the Power Skill Tree down to Drop Attack so we can unlock some more Achievements! Also make a point of unlocking the Electric Fences Skill in the Survivor Tree so we can chip away at the Electrified! Achievement.


Slums – District C:
Side Quest #5 – Tunnel Vision 3: Aman will swap out the packages & we must take it to Ryan now all the way back to the scrapyard. When we arrive, Bandits will be trying to break into the drug den. When they are killed, give Ryan the false package to complete the Side Quest.

Text Collectible #20 – Note #14: When we complete Side Quest – Tunnel Vision, we will unlock Ryan’s Scrapyard as a Safe Zone. Enter inside it, & we can find this Note on a crate right beside the Bedroll.

Text Collectible #21 – Note #13: Exit out of the drug den garage now, & head around the building to the right. Look beside a green garbage can against the building wall to find this Note on top of a small white seat; a Bandit was sitting on it previously.

Slums – District B:
Side Quest #6 – Incense Herbs 2: The Lavender Herbs we need for this Side Quest are located at the far North East corner of the Slums. Scour around the four Lavender symbols marked on our map to find them; there are two around the first Northmost symbol, two around the second symbol, one around the third, & one more near the last symbol.

Once they are collected, take them to Toygar at the Tower to complete the Side Quest.

Slums – District C:


Achievement #13 – Everybody Dance Now: Simultaneously shock 5 monsters with electricity.
This can be done a few different ways & at any time during the game. As you explore around, you may come across Water Pool Traps that can be electrified. Not to be confused with Electric Fence Traps which are something else. Water Pool Traps can be found all over the place, but the marked “Pool” on the map this is the one I exploited.

When you reach the Trap, use Firecrackers & lure in a whole host of Infected; more than five is ideal in case you mess up. After you have collected a large enough group to stand on the water pool, engage the Trap & electrocute at least 5 to unlock this Achievement.


Achievement #14 – Strong: Reach Power Prof. Level 10.
This will come naturally as you play through the game; this is only Level 10/23 so it is very easy to achieve. If you have been massacring Infected as you travel around, you will most likely unlock this Achievement during this Sequence. If not, just keep killing…

Slums – District D:
When you are ready, proceed with Main Quest – Pact With Rais, & contact the GRE.

Text Collectible #22 – Note #10: After we receive Rais’s payment from Gursel at the Fishermen’s Village, we will unlock at as a Safe Zone. Head over to the Golden Hammer Workshops & enter the bedroom to find this Note on the mattress of a lower bunk bed.

Side Quest #8 – Gas Mask Man 1: Before we go to the next Safe Zone to collect Rais’s payment, head up to the main entrance of the Fishermen’s Village to find Musa. Speak with him, to learn of the infamous Gas Mask Man.

Slums – District B:
Side Quest #8 – Gas Mask Man 2: Locate Gas Mask Man… or Shakur… & retrieve his treasure bag near the center of the marked lake in its deepest section. Return the bag to Shakur to get a new lead in the case.

Text Collectible #23 – Battle Journal #7: Before we leave Shakur’s Base, look around the backside of the house to see a wrecked green car. Look inside its open trunk to find this Battle Journal in it.


Achievement #15 – Disaster Recovery: Get 15 Relief Packages.
There are a few ways to find Disaster Relief Packages. Some can be stumbled upon randomly in exposed Air Drop Crates in the streets, in Quarantine Zones, or in some of Rais’s abandoned vehicles. The main way, is to collect them is through Air Drops. A supply plane will drop a shipment of two Relief Packages at 10:00am & at 16:00pm. When they drop, you need to get there quickly before Rais’s men raid it. If they do, there may be only one Disaster Relief Package left or none.

As we play, keep your ears & eyes out for these Air Drops. The Achievement will unlock after grabbing your fifteenth Package; they do not need to be delivered to a Quartermaster to count. This is guaranteed to unlock for us when we go raiding all the Quarantine Zones in the game later on…

Slums – District D:
Side Quest #8 – Gas Mask Man 3: Return to the Fishermen’s Village now, & speak with the gate guard. Search the possible suspects homes for evidence to find Shakur’s impersonator. Confront the impersonator & return to Musa to complete the Side Quest.

Text Collectible #24 – Note #9: We can find this Note in Gursel’s home above the Fish Market store, on a shelf to the left of where we first enter it. It only becomes available during the Side Quest – Gas Mask Man.

Side Quest #9 – Poisonous Herbs 1: Head to the center of the Fishermen’s Village to find the notice board, & we can find this Side Quest stapled to it. Similar to Incense Herbs, go to the Poisonous Herb symbols in the South ends of District C & D to find them.

This is much easier than finding Lavender, simply start at the very beginning of the rocky gully & follow it down to find well over 10 Wolfs Bane herbs. Return them to Musa to complete this Side Quest.

Side Quest #10 – Midnight Bride 1: After turning in the previous Side Quest, go back to the notice board in the Fishermen’s Village to collect this new one.

Hold onto this Side Quest for now; we will get to it a bit later…
Sequence 6: The Talk of Harran
1. Slums: District B, District D, District A, District C
2. Side Quests: 11/44
3. Text Collectibles: 26/67
4. Captured Safe Zones: 12/17
5. Achievements: 19/78
-----------------------------------------------------------------------------------------------------


Slums – District B:
Side Quest #11 – A Survivor’s Guide to Zombieland 1: When we take the final extortion payment for Rais at the Ferry Station, we will unlock it as a Safe Zone. Head over to where the Bounty Board is here to find Neil. Speak with him to receive this Side Quest.

Slums – District D:
Side Quest #12 – Where’s My Mother 1: Before continuing, return back to the Fishermen’s Village Safe Zone & we can find another Side Quest here to collect. Speak with Meliha who is banging on a door of a house near the waterfront. Speak with her, Yasmina, & Harun to progress the Side Quest.

Go to the Red Flower Café to find Jamil & learn the location of where we can find his mom, Aida.

Text Collectible #25 – Note #8: After rescuing Jamil, head to the third floor of the Red Flower Café, & we can find this Note on a desk beside the bed up here.


Achievement #16 – Electrified!: Catch 25 enemies in the Electric Fence Trap.
If you have purchased the Electric Fences Skill in the Survivor Tree, you can begin activating Electric Fence Traps. These are scattered all over Harran & are not too difficult to find. As we run around the Slums completing Side Quests & finding Collectibles, keep your eye out for these.

When you find one, throw down some Firecrackers to lure over as many Infected as you can before activating the Electric Fence Trap. If you can get at least 5+ Infected kills with one, you will only need to find 5 Fence Traps.


Achievement #17 – Agile: Reach Agility Prof. Level 10.
This will come naturally as we play, though will take longer than the Strong Achievement. Doing Parkour as well as killing Infected with Agility specific attacks will boost your Xp towards it. Killing enemies with the Electric Fence Traps will also grant you a large chunk of Agility Xp as well…

Side Quest #11 – A Survivor’s Guide to Zombieland 2: Switch our active Side Quest now & make your way over to then Hyper House Internet Café. Pick the lock to get inside & try your best not to get blown up by the Bomber zombie. Look under one of the computer stations to find Fallon’s satchel of notes.

Text Collectible #26 – Note #22: We can find this Collectible in the Hyper House Internet Café on the desk Fallon was using to work from where his satchel was stashed.


Achievement #18 – We’re All In This Together: Save 15 Survivors from Zombies.
As you rip around through Harran, you may see a flashing blue circle appear on your mini-map denoting a Random Event. These can mean a few things, but the most common is either a Merchant or a Survivor being attacked by Infected. Whenever these blue symbols appear, always go & check them out.

These Random Events appear far more frequently in the Slums than in the second area of the game, Old Town. I highly recommend getting this Achievement before we leave the Slums for the first time (we are not there yet though so do not worry).

The Random Events can also be Survivor’s being captured by Rais’s men; we need to complete 15 of these Events as well for the H0mo Homini Lupus Est Achievement. These are a very rare Random Event type to get; go out of your way to complete these if you find them!

Slums – District B:
Side Quest #12 – Where Is My Mother? 2: Head North up to where Salim’s creepy dungeon house is, at Salim’s Workshop. Deal with Salim, perhaps through dismemberment… & free poor Aida to complete the Side Quest.


Achievement #19 – Italian Plumber: Kill an enemy with a Wrench, using Vault followed by Drop Attack.
For this Achievement we need to purchase the Vault Skill in the Agility Tree & the Drop Attack Skill in the Power Tree. Then we need to find & hold onto any kind of Wrench Weapon; they can be found in Chests, car trunks, being held by Infected, or for sale by a Merchant or in a Requisition… they are very common.

A Wrench can always be found around the Harran Public School at the top Northeastern end of District C.

After you have all you need, find any Infected & Vault off them then kill them with Drop Attack while wielding a Wrench to unlock the Achievement.

Slums – District D:
Side Quest #11 – A Survivor’s Guide to Zombieland 3: Now it is time to locate Fallon’s ditched camera. Head over to the Infamy Bridge, & get to the center of the marked area to find Fallon’s black car crashed through the barricades on the left side of the bridge. When we interact with the trunk, the car will fall off the bridge into the ocean below. Jump after it as soon as it drops so you don’t lose its location & grab the camera.

Take it & the previously collected satchel back to Fallon to complete the Side Quest.

Slums – District A:
Captured Safe Zone #12: Go to return back to Rai’s Garrison for Main Quest – Pact With Rais. As we cross over into District A, Karim will call us on the radio asking us to look for his men.

When we arrive at the location, we will need to take out a Bandit Gunman on the rooftop of a Taurus Gas Station. Do so by any means, then drop into the building he was on to unlock the Safe Zone.

Side Quest #13 – The Prodigal Son 1: After we deal with the Bandit & collect the blueprint for Karim, Alexei will call down to us from his antenna tower. Go up to him, & he will task us with finding his lost son.

With access blocked to the upper floors of the Tower due to the rampant Infected, we cannot continue this Quest until later…
Sequence 7: Good Samaritan
1. Slums: District C, District A, District B
2. Side Quests: 14/44
3. Text Collectibles: 30/67
4. Captured Safe Zones: 12/17
5. Quarantine Zones: 1/8
6. Achievements: 20/78
-----------------------------------------------------------------------------------------------------

When we reach Survivor Level 9, Bows will begin randomly appearing in the inventories of some Merchants (any crafted Bow or Crossbow from DLC expansions also count). Be sure to pick one up to chip away at the Robin Hood Achievement from the Bozak Horde DLC (if you own it).


Slums – District C:
Return the blueprint to Rais to progress Main Quest – Pact With Rais & we will unlock a bunch more Side Quests that we can go & complete… Ignore our objective of contacting the GRE again, & let’s get to it!

Side Quest #14 – Gassed Up 1: As we leave Rais’s Garrison to track down some Side Quests, Alfie will call us on the radio to say that the Tower is out of gas & needs someone to track down the mechanic Jeff.

Go to Jeff’s “fortress” & speak with the Commander to figure out how to turn it back on. To start, open the Gas Valves under the overpass & near the train bridge.

Text Collectible #27 – Note #18: During Side Quest – Gassed Up, head over to the Gas Valve in the small fenced in enclosure just South of the Fort Jefferson; we can find this Note on a cardboard box here.

Text Collectible #28 – Note #19: When we enter the side area inside the tunnel where the Gas Valve is in the underground area, we can find a room off our left full of Infected. Clear them out & on top of a desk at the back to find this Note.

Text Collectible #29 – Note #20: During the Side Quest – Gassed Up, we will need to go to the main distribution gate after the three Gas Valves are opened. Go there, & we will need to break into a lone building in the distribution plant; it is a Hard Lock, so you will probably have to clear out all the Infected in the area.

Once the door is opened, we can find this Note posted to the wall near a Medical Cabinet.

Side Quest #14 – Gassed Up 2: Swim through the drainage pipe across the street from the distribution plant to enter into the flooded chamber below with the Goon in it. Deal with the Goon, turn the final Valve, & return to the Commander to witness the fiery eruption of his Apocalypse Wall to complete the Side Quest.

Note that there are a whole (Censored by Steam) of Infected grouped around Fort Jefferson after the Side Quest finishes making it a prime time to unlock the Can’t Touch This Achievement if you have spare Molotovs, Throwing Weapons, a Bow, & or a Gun.

Side Quest #15 – Steal From A Thief 1: Head over to Jaffar’s Wheelhouse now & speak with Jaffar himself in the main store front office to receive this Side Quest.

Side Quest #16 – Firebug 1: Before we leave Jaffar’s Wheelhouse, speak with Zaid in the garage to receive this Side Quest as well, bro.

Slums – District A:
Side Quest #16 – Firebug 2: Before heading up to the railyard hangar, you may want to pack a Gun or Bow with you; there will be some of Rais’s men at the hangar, one wielding a Rifle. Reach the marked hangar & get up to the roof. Lure Rais’s men out one by one to deal with or take them out with your ranged Weapon. Clear out the men, & probably the Infected, & search through all the train cars to collect the components we need. Return them to Zaid to complete the Side Quest.

Side Quest #17 – O Brother Where Art Thou? 1: Make your way to the “!” in the top North end of District A. Enter into the dark tunnel here & we can find an open side passage that we can head through. Follow the eerie halls along & we can find a man named Osman who we met previously at Rais’s Garrison. Speak with him, & he will task us with finding his brother Nazim.

Slums – District B:
Side Quest #15 – Steal From A Thief 2: While we are up here, switch to this Side Quest & head over to the construction site. When we get to it, there will be a large group of Rais’s men that we will have to deal with either melee or ideally ranged Weaponry. Defeat them & locate a blue c-can at the Northmost end of the site that we need to Lockpick open; the Dynamite for Jafar is inside.


Achievement #20 – High Flyer: Kill 25 enemies using Ground Pound or Drop Attack.
With both these Skills unlocked in the Power Tree, we can chip away at this Achievement as we play. It is very easy to obtain, as we run around Harran, just focus on leaping off things or using Vault on Infected & finishing them off with Drop Attack.

Slums – District A:
Side Quest #17 – O Brother Where Art Thou? 2: Make your way over to the Stuffed Turtle grocery store where we can find Nazim. When we arrive, it will become marked as a Quarantine Zone on our map; there 8 Quarantine Zones we need to raid to unlock the Trespassing Achievement.

Text Collectible #30 – Note #2: With Side Quest – O Brother Where Art Thou? unlocked, we can find this Note stuck in between the entrance doors to the Stuffed Turtle Quarantine Zone.

Quarantine Zone #1 – Stuffed Turtle: Enter into the Stuffed Turtle now & we will be tasked with locating 5 Disaster Relief On-Site Packages. Scour around the electrified store & find them to complete our first Quarantine Zone.

Keep an eye out for rare GRE Chests to loot for the Parkour Fever DLC Pearl In the Mud Achievement.

Side Quest #17 – O Brother Where Art Thou? 3: After completing the Stuffed Turtle Quarantine Zone, leave this entrance & head around to the back of the store to enter a different one where Nazim went exploring. Climb through the vents into the warehouse, kill the Virals, & find Nazim.

Return back to Osman in the tunnel & dispatch Rais’s men that have come after him to complete the Side Quest.
Sequence 8: Breaking Quarantine
1. Slums: District A, District C, District D, District B
2. Side Quests: 20/44
3. Text Collectibles: 32/67
4. Captured Safe Zones: 12/17
5. Quarantine Zones: 3/8
6. Achievements: 21/78
-----------------------------------------------------------------------------------------------------


Slums – District A:
Quarantine Zone #2 – Sunny Apartments: As we head around to loot the two Osman Stashes here in District A, go to the back of the Sunny Apartments & we can find an entrance to a Quarantine Zone. To complete this one, we need to go through the building & kill off all 23 Infected. The catch is, is that the building is full of smoke & we will occasionally (more often than not) take damage. Be sure to pack lots of Medkits. Do not let the smoke scare you though, take your time to loot & keep your eyes open for GRE Chests!


Achievement #21 – Pearls In the Mud: Open 5 GRE Chests in Dead Zones.
GRE Chests are unique blue Chests found in Quarantine Zones that are Hard Locks. If you looted the two GRE Chests in the Stuffed Turtle Quarantine Zone, then you will definitely unlock this Achievement while raiding Sunny Apartments; there are four in this Quarantine Zone alone!

Side Quest #10 – Midnight Bride 2: Go to the far North Eastern Safe Zone & wait for nightfall. Before leaving to search for Midnight Bride, be sure you are well stocked on good Weapons, Medkits, & have some Flares handy. Avoid Volatiles at all costs & be as stealthy as possible. Night Vision Boosters are also handy to have as well, if you have the plants to make them.

Stick to the outskirts of the map as Volatiles don’t seem to spawn near it or where we find the Midnight Bride. Quickly track down five samples of it & get back to the Safe Zone to wait until morning.

Slums – District C:
Side Quest #15 – Steal From A Thief 3: Return to Jaffar & give him the Dynamite we collected from the construction site to complete this Side Quest.

Quarantine Zone #3 – Chemical Storage: Make your way over to the far West of District C to find the Chemical Storage building. Enter the building through a taped off sliding door… which looks a lot like the regular walls so it can be a bit difficult to spot. Once inside, find the five Disaster Relief Packages to complete the Quarantine Zone.

The last two Quarantine Zones here in the Slums are extremely difficult & we will leave them until later on in the game when we are stronger…

Slums – District D:
Side Quest #10 – Midnight Bride 3: Ignore returning to the Tower for now & head over to the Fishermen’s Village. Find Gursel & deliver him the plants to complete the Side Quest.

Side Quest #18 – Dulse 1: While we are at the Fishermen’s Village, check out the notice board to collect this Side Quest.

Side Quest #19 – Binoculars 1: We can find this Side Quest on the notice board as well. There is no Waypoint to find the Binoculars & they must be found randomly throughout the world which would prove tedious… if you didn’t have me. Head up the hill to the Radio Tower Safe Zone & go to where the Stash is; a guaranteed Binocular spawn will be on a cardboard box near a mattress. Run the Binoculars back to Santiago at the Village to complete the Quest.

Slums – District B:
Side Quest #18 – Dulse 2: Head up North to the marked locations of Dulse at the Lake of the Drowned. Be sure to use your Survivor Sense as often as possible to help you locate the Dulse & spend as little time underwater. Most of the Dulse we need can actually be found in shallow water; there is way more than five bushels of it in the lake. Once we have what we need, take it to Sophia back at the Village to complete the Side Quest.

Slums – District C:
Side Quest #20 – The Big Bang Thesis 1: After enough time has passed since we completed Side Quest – Steal From A Thief, Jaffar will call us on the radio telling us to return to him & we will receive this Side Quest. Return to the Wheelhouse & speak with Jaffar then to Kurt to progress it.

Give Kurt the collected Truck Battery, 6 Metal Parts, 6 Household Supplies, & 6 Power Cables. We can find the Craft Parts around Harran as random loot, in Quartermaster requisitions, or for sale by Merchants. Deliver everything he needs, & we will need to wait a little bit so the Side Quest can continue.

Side Quest #21 – Total Security 1: While we wait for Kurt to finish the bomb, speak with Jaffar again & we can receive this Side Quest.

Slums – District A:
Side Quest #21 – Total Security 2: Head up to the building where Hanson’s group was holding out for Side Quest – Total Security. Shut off the three power generators & climb up to the rooftop. At the top, we will find everyone dead; check on top of a chair beside a locked door to find a Recorder we can listen to. We will radio back to Jaffar shortly after & complete the Side Quest.

Text Collectible #31 – Note #25: Before we leave the rooftop, head over to the center area of the roof, & we can find this Note on a bamboo bedroll next to a clothesline.

Text Collectible #32 – Note #24: Climb up to where the radio is repeating Seref’s SOS message & we can find this Note on the blue crate beside it.

Slums – District C:
Side Quest #20 – The Big Bang Thesis 2: Almost immediately after we left the Wheelhouse, Kurt will have radioed to us that the bomb is ready. Return back to him now & collect it. We will then be tasked with testing out the bomb inside one of the dark tunnels… at night.

Stay at the closest Safe Zone until night, bring some Flares, & sneak your way over to the tunnel entrance. Plant the bomb, leave the tunnel… return to the bomb & manually detonate it, then sprint back to the Safe Zone to wait until morning. Return to Kurt to complete the Side Quest.
Sequence 9: Journey Into Night
1. Slums: The Tower, District C, District A
2. Side Quests: 24/44
3. Text Collectibles: 35/67
4. Captured Safe Zones: 12/17
5. Quarantine Zones: 3/8
6. Achievements: 25/78
-----------------------------------------------------------------------------------------------------


Slums – The Tower:


Achievement #22 – Everybody Knows Kyle: Reach Survivor Rank Level 12.
We should be getting around Survivor Level 10 or 11 as we complete all these available Side Quests. Dropping off all of the Disaster Relief Packages we have been raiding from the Quarantine Zones to a Quartermaster will net us a massive amount of Survivor Xp as well.

Side Quest #22 – Searchlights 1: While at the Tower, track down Alfie in the ground floor workshop & speak with him to receive this Side Quest. We will need to steal some powerful UV lightbulbs off the Infamy Bridge… at night. Conveniently, we can actually net ourselves the A Long Way Down Achievement while we are out there as well, so it is worth it.

Side Quest #23 – On the Hooks 1: Near the notice board in the Tower, we can find a Messenger who will give as an unmarked Side Quest working for two engineers of a petrol mogul. Speaking with him will activate the Side Quest, but we will not be able to track or view it until we are contacted by the engineers.

Side Quest #13 – The Prodigal Son 2: With access to the Tower elevator now, take it up to the upper floors. Track down Ayo to get a lead on Kristov’s location.

Slums – District C:
Side Quest #23 – On the Hooks 2: Shortly after we leave the Tower, we will be contacted by Tolga… & Fatin. Link up with them at Jaffar’s Wheelhouse & listen to them condescend us to progress the Side Quest. Head up to the warehouses to the North where we had to go to find Zaid’s Flare materials.

Enter into the blocked off portion of the hangar & kick apart some wooden crates to find the box of hooks we need.

Slums – District A:
Side Quest #13 – The Prodigal Son 3: As we neared the original Waypoint for the Side Quest, Kristov will call to us on the radio that he has found Survivors elsewhere but needs help up close to where we are at the trainyard. When we reach his location, we will need to clear out the Infected that are trapping him & the Survivors. Secure the Bites Motel Safe Zone & speak with Kristov to progress the Side Quest.

Text Collectible #33 – Battle Journal #8: Before we leave the Bites Motel, enter into the lower floor of the motel to the reception area where we can find this Battle Journal on the front desk.

Side Quest #13 – The Prodigal Son 4: Make your way over to Alexei’s Tower & speak with him to try to change his mind about working for Rais… & then Rais’s men will show up. Kill Rais’s men & defend Alexei to complete the Side Quest.


Achievement #23 – Robin Hood Theory: Score 10 Headshots on Rais's men with a Bow.
Bows will begin appearing for sale in Merchant’s after reaching Survivor Rank 9 & Arrows can also be restocked or Crafted as well. Always carry a Bow (or DLC Crossbow) with you, for lots of good reasons, but when you find Rai’s men take them out with Headshots. After 10, we will unlock this Achievement.

Not that this is an Achievement for The Bozak Horde DLC but can be unlocked in the Main Story.

While we are out here, contact the GRE for Main Quest – Pact With Rais to progress the Main Story.

Slums – District C:
Side Quest #23 – On the Hooks 3: Return to Jaffar’s Wheelhouse & bring the hooks to Fatin & Tolga to complete the Side Quest.

Slums – The Tower:
Text Collectible #34 – Battle Journal #12: Return to the Tower & deliver the Antizin to Jade for Main Quest – Pact With Rais. Take the elevator to the upper floors & locate suite 191 on floor 19. Enter inside it & we can see it has been repurposed into the new hospital for the Tower. When we walk into the triage room, look off our right to find this Battle Journal on an end table beside a patient.

Follow Main Quest – Pact With Rais through to unlock the next one, Main Quest – Siblings.

Slums – District D:
Side Quest #22 – Searchlights 2: Before we link up with Jade, make your way over to the Fishermen’s Village & wait until night. Pack some Flares, & swim under the Infamy Bridge to the concrete supports underneath where we can climb up. Navigate your way up to the very top of the bridge structure where the UV lights are & collect the ones that work off the two levels they can be found on.

Text Collectible #35 – Note #12: After grabbing all the UV lights at the very top of the Infamy Bridge, proceed forwards & we can unlock a Safe Zone up here. Look just up past the Bedroll to find a Note on the floor.


Achievement #24 – A Long Way Down: Jump to the water from the Infamy Bridge (Slums) at night.
Sleep at the Safe Zone here to make it night again (or don’t if it is still night) & make your way down to the end of the roadway on the Infamy Bridge. Sprint/leap across the vehicles to the broken dead end & be sure to jump off from that point to unlock the Achievement; leaping off of the sides may not count.

If you have Flares to spare, aggro some Volatiles & blind them with the Flares to start chipping away at the Blinded By the Lights Achievement.


Achievement #25 – Mouths Wide Open: Kill a Volatile.
If you have not already earned this naturally, then now is as good of a time as any to unlock this. To easily kill a Volatile… just shoot it down with a Gun. By now you may have collected or crafted some Pistols, Rifles, or Shotguns; simply grab any of them, with some ammo, & find a Volatile to shoot to its death to unlock the Achievement. Be sure to do this near a Safe Zone so you can get away safely once it is dead.

Side Quest #24 – A Baby Is Born 1: As we make our way back to the Tower, head over to some buildings just North West of the Red Flower Café Safe Zone & we will hear a woman scream. Get on top of the building where a Waypoint will be created & enter into it through a trap door. Get to the second floor & we can speak with a man named Macary whose wife is giving birth. Give him 3 Alcohol, 3 more Alcohol, & 3 MORE alcohol… I imagine he is just grabbing the bottles & pouring them over his wife at this point…

Crane gets mad, & so will you; pick open the door & “drink away, drink away” … to complete the Side Quest. No baby here… just alcoholism.

Slums – The Tower:
Side Quest #22 – Searchlights 3: Take the UV lights back to Alfie at the Tower to complete the Side Quest.
Sequence 10: Scourge of Harran
1. Slums: District C, The Tower, District A
2. Side Quests: 27/44
3. Text Collectibles: 37/67
4. Captured Safe Zones: 12/17
5. Quarantine Zones: 3/8
6. Achievements: 27/78
-----------------------------------------------------------------------------------------------------

As we near the end of our campaign in the Slums, really focus on locating Survivors being harassed by Rais’s Bandits for the H0mo Homini Lupus Est Achievement. Unless you own The Following DLC, we need at least more than half our progress towards this Achievement progress before carrying on to Old Town as not only are these encounters few & fair between there, but their rarity also increases here in the Slums making it very difficult to unlock later on. Take your time with things, & stay out in the streets to try to get these encounters to appear.

The next few Side Quests we receive from Tolga & Fatin, Hardware as well as Assault & Batteries do not contribute to The Whole Story Achievement. They are still worth completing for loot/Xp though…


Slums – District C:
Find Jade & enter into Harran Public School together during Main Quest – Siblings.


Achievement #26 – Harran Shooting Club: Kill 50 enemies with shooting Weapons.
Pistols, Rifles, Shotguns, Bows, & Crossbows count as shooting Weapons. If you are a Bow heavy user, this will probably unlock sooner rather than later for you. After you have a stockpile of Guns to use (especially if you own some/all of the extra DLC Expansions) make a point of using them to kill enemies; these Weapons are very useful for fighting Rais’s men.

Slums – The Tower:
Progress Main Quest – Siblings until Dr. Zere tells us to speak with the Quartermaster about the Bolter Zombies; after we do this, a new arc will open up & more Side Quests will become available to us.

Side Quest #25 – Witch Queen 1: Go to room 193 on Floor 19 of the Tower to where the Merchant is located & we can speak with Jared to receive this Side Quest. Once again, this only initiates this Side Quest; we can also speak with a man at the Fishermen’s Village for the same lead.

Side Quest #26 – Cease & Desist 1: Before taking the elevator down to the ground floor, we can speak with Mesut to get a lead on some strange activity going on at Harran Public School. Again, this will only initiate this Side Quest, not activate it.

We can also speak to the guard, Blake, before exiting the Tower to get the same lead as well.

Side Quest #27 – Electronic Parts 1: Take the elevator down now & look on the notice board to find this Side Quest. Simply bring Toygar 2 Electronics to complete the Side Quest.

Side Quest #28 – Crayons For the Kids 1: We can receive this Side Quest from the notice board as well. We can find the Crayons over at Harran Public School where we will need to go to anyways…

Slums – District C:
Side Quest #26 – Cease & Desist 2: Get to the Public School & speak with Edward to enter inside where we can speak with Erol to fully activate this Side Quest. Erol wants us to go to the Slabs & wipe out a group of Rais’s men who are looking for him.

Side Quest #28 – Crayons For the Kids 2: While at the Public School, search around & collect the 5 boxes of Crayons scattered around the room.

Text Collectible #36 – Note #17: Still at the Public School, look on a table behind Erol to find this Note beside a laptop & radio transceiver.

Text Collectible #37 – Note #16: Enter into the side room of the school now across from Erol & we can find this Note on a table beside some CDs.

Slums – District A:
Side Quest #26 – Cease & Desist 3: Go to the Slabs & search the dead men here to find Karim’s Walkie-Talkie. Head to the West end of Gabriel Estate building 5, & enter into the basement below. Fight your way to the upper levels & confront Karim.


Achievement #27 – A Game of Catch: Kill 50 enemies with Throwing Weapons.
This may come sooner than the Harran Shooting Club Achievement, but the premise is the same. Whenever you have Throwing Stars or Knives, use them. I always like using these to take out Goons to save myself the hassle of constantly dodging them. We can also craft Throwing Stars indefinitely if you have the Elemental Throwing Stars Skill in the Survivor Tree & the required Crafting Parts.

Slums – District C:
Side Quest #26 – Cease & Desist 4: Speak with Erol again & talk to him about Karim to receive our next task in the Side Quest, collecting Paint Cans. Head over to the construction site nearby to find it; the Paint will be scattered around the building on the scaffolding.

Return to the Public School & use the Paint on the roof to mark the helicopter landing then go to recover Erol’s hefty multimillion dollar duffle bag. Once it is… not found, get up to the rooftop again to find a reward from Erol to complete the Side Quest.

Side Quest #25 – Witch Queen 2: Head to the Black Serpent Bazaar now & track down Dahlia & she will give us a difficult task that we must complete at night.

Text Collectible #38 – Note #15: We can find this Note inside Dahlia’s home at the Black Serpent Bazaar.

Side Quest #25 – Witch Queen 3: Wait until night & bring along some Flares & a good Gun for emergencies in case we get caught by Volatiles. Head to the caves South of the Bazaar & collect the 10 bunches of Mushrooms. Return them to Dahlia to complete the Side Quest.
Sequence 11: A False Shepard
1. Slums: The Tower, District B, District D, District C
2. Side Quests: 31/44
3. Text Collectibles: 37/67
4. Captured Safe Zones: 12/17
5. Quarantine Zones: 3/8
6. Achievements: 32/78
-----------------------------------------------------------------------------------------------------


Slums – The Tower:
Side Quest #28 – Crayons For the Kids 3: Take our bundle of Crayons back to the Tower & turn them in to Kate to complete the Side Quest.

Slums – District B:


Achievement #28 – Bolter Hunting: Catch 5 Bolters.
Now that we have them unlocked, we can begin hunting Bolters at their Feeding Grounds at night. To quickly/easily obtain this Achievement, go to the “Bolter” location marked on the map & use the nearby Safe Zone as our base of operations: there is a Bolter Feeding Ground right outside it. Wait until night, kill the Bolter, return to the Safe Zone & rest until night again. Rinse & repeat.


Achievement #29 – Blinded By the Lights: Blind 25 Volatiles with Flares or a Flashlight.
While farming Bolters, this is a good a time as any to net this Achievement as well since we will be drawing some attention to ourselves. After killing our Bolter, hang around outside the Safe Zone & draw some aggro to summon some Volatiles to us. When they arrive, lob a Flare at them & get them to stagger away from it shielding their eyes; note that Virals (regular fast running Infected) do not count. You can also chase them around with our UV Flashlight & be a nuisance turning it on & off in their face for the same effect.

The tracker for this Achievement is a bit finicky & your progress may not appear correctly in your Steam Achievements menu. You also cannot blind the same Volatile over & over again; they need to be 25 individual ones. You can also farm this Achievement will earning the next one below as well…

Slums – District D:


Achievement #30 – Enlightened!: Blind 25 enemies in the Light Trap.
This Achievement is not as difficult as it sounds, in fact it is quite simple though you may die a few times. Go to Dr. Zere’s Lab Safe Zone & wait until night. At either end of it on the roadway just above it, we can find a Light Trap; see the Light Trap locations marked in Green above.

Simply aggro some Volatiles or Virals (both count towards this Achievement) & lead them back & forth between the two Light Traps. By the time you reach one, the other will be recharged to use again. As you go, kill off some of the Virals so new ones arrive to be blinded. This is very dangerous & the Volatiles will most likely kill you every so often, which is actually good as it hard resets the area with new enemies to blind.

You can also farm Blinded By the Lights Achievement as well while doing this.

Slums – The Tower:
Complete Main Quest – Siblings, & we will collect the next one Main Quest – The Pit. Before we go to Rais’s Garrison, pop into the Tower first.

Side Quest #29 – Bandages & Meds 1: With Main Quest – Siblings complete, we can find three new Side Quests available on the Tower notice board. Collect this one, & we will have to deliver 3 Gauze, 3 Syringes, & 3 Painkillers.

The Gauze is easy, but for the Syringes & Painkillers, we will need to locate pharmacies to raid or Medical Cabinets.

Side Quest #30 – Coffee 1: As it sounds, for this Side Quest we need to deliver Coffee to Toygar… 20 packs of it. To find Coffee in bulk, we will need to of course raid coffee shops or in any Fridge until the Quest is complete.

Side Quest #31 – Lighter Gas 1: For this Side Quest we need to find 5 Lighter Gas for Toygar. I had never seen Lighter Gas before accepting this Side Quest; it is a random loot we can find in Wardrobes until the Quest is complete. Keep an eye out for them as we complete the first two Side Quests.

Slums – District D:
Pharmacy #1: We can find the first pharmacy immediately to the East of the old Dr. Zere’s Lab Safe Zone; the Fridges inside may also contain Coffee.

Pharmacy locations are marked on the map at the top in pink…

Pharmacy #2: On your map, look for the Bolter Feeding Ground symbol North of a nearby Safe Zone & head to the building just West of it to find another pharmacy.

Slums – District C:
Pharmacy #3: We can find another pharmacy just South East down the street from the Black Serpent Bazaar Safe Zone.

There are A LOT of stores in this area that we can loot for Coffee or Lighter Gas…

Slums – The Tower:
Side Quest #31 – Lighter Gas 2: Return to the Tower & turn in the 5 Lighter Gas needed for the Side Quest; this is most likely the first one of the three you will complete.

Side Quest #29 – Bandages & Meds 2: After scouring the three pharmacies as well as any random Medical Cabinets you find along the way, you will most likely have the supplies you need to complete this Side Quest.

Side Quest #30 – Coffee 2: Similar to the Side Quest – Lighter Gas, Coffee will be increased to a much higher drop rate. As we navigate to the pharmacies, loot any building you come across & search through Wardrobes & Fridges to find Coffee.


Achievement #31 – Gabriel’s Sword: Add a Fire elemental effect to a Sword or a Khopesh.
By this point, there should be a few types of Sword class Weapons available either to purchase or loot. The most common currently would be the Sipahi Saber with Khopeshes & Sacrificial Short Swords being rarer. Collect one of these Swords & apply the Standard-Issue Hellfire or other Fire exclusive Blueprints to it to unlock the Achievement.

Slums – District C:


Achievement 32 – Snake In the Grass: Escape the arena.
Story Related. When you are ready, continue on & chase after Dr. Zere to complete Main Quest – The Pit to unlock this Achievement.
Sequence 12: The Jogging Dead
1. Slums: The Tower, District B, District D, District C, Sewers
2. Old Town: District C, District D, District B
3. Side Quests: 31/44
4. Text Collectibles: 43/67
5. Captured Safe Zones: 14/17
6. Quarantine Zones: 5/8
7. Achievements: 36/78
-----------------------------------------------------------------------------------------------------


The Slums:


Achievement #33 – I’m A Runner & A Fighter: Complete 15 Agility or Power Challenges.
Before we leave to Old Town, we can complete the available Agility & Power Challenges that are in the Slums, there are only 6 here; two Agility & four Power Challenges. Each Challenge has multiple parts however, getting more & more difficult. The bulk of these Challenges can be found in Old Town however if you complete at least 4-5/6 of these Challenges fully you will unlock the Achievement here in the Slums.

Do not confuse Parkour Challenges for Agility Challenges, these are a part of the Parkour Fever DLC & have their own Achievements… we will get into these during Post-Game after we have maxed out our Agility Tree.


Achievement #34 – The Legend of Harran: Reach Survivor Rank Level 18.
This will come naturally as we play, if not here at the tail end of the Slums, then definitely at some point once you enter Old Town.


Achievement #35 – Mount Everest: Climb at least 8848 meters on various objects.
Another Achievement that will come naturally along our 100% journey that won’t need grinding. You can’t really do much in the game without climbing after all…

Slums – District C:
Quarantine Zone #4 – Bright Mountain Tunnel: This is a very difficult Quarantine Zone. Though we only have to find the five Disaster Relief Packages like in other Zones… there will be a high concentration of Virals that will harass us in the tunnels. Bring your best melee Weapons & Shotgun as well ALL the Medkits for this one…

Slums – District A:
Quarantine Zone #5 – Underground Parking: Be forewarned that there are Volatiles in this Quarantine Zone. Find the five Disaster Relief Packages to complete the Quarantine Zone. While there are a lot of them the Infected/Volatiles are not unlimited & you can kill all enemies before continuing to each new room if you choose.

When you are ready to leave The Slums to Old Town, speak with Cenk for the Main Quest – The Saviours, & we will be told to go to the entrance of the sewers. Get across the overpass, through the tunnel to the right, & we can enter into the Sewers.

Slums – Sewers:
Link up with Hazan & follow him through the sewer tunnels. When you reach the group of Survivors in limbo, & you completed Side Quest – Gunslinger, then we can find Dawud & his son waiting with them. Speaking with him will later initiate the Side Quest – Lost In Space; this Quest does not count towards The Whole Story Achievement

Text Collectible #39 – Battle Journal #11: Follow the sewer along until we reach a canal outside of the tunnels full of Infected. Enter into the next section of tunnel & we will reach a room with more Infected in it & a yellow pipe directly ahead/above us. Before climbing up the pipe to carry on, head into the tunnel straight ahead of us where the Infected came from to find a side room. Not only can we find a lot of loot in here, but we can find a Battle Journal on a chair in the far left corner of it as well.

This is our final Text Collectible for The Slums…

Old Town – District C:


Achievement #36 – Sightseeing: Reach the Old Town.
Story Related. Fight through the rest of the Sewers & exit outside into Old Town to unlock this Achievement.

Old Town – District D:
Reach the “Loft” & complete Main Quest – Find the Embers. True to form, hold off speaking with Jade at Harran University & let us do a quick run around the city to snag any loose Text Collectibles or rogue Side Quests.


Side Quest #32 – Outposts 1: Before we leave Ember’s Tower, speak with Savvy to receive this Side Quest… or both of them. Side Quests Radio Station & Office Outpost count as the same Side Quest for The Whole Story Achievement; both needed to be completed to check off Side Quest – Outposts.

Text Collectible #40 – Voicemail #3: From Ember’s Tower, head South East through the streets down to a Luck Medicine on the ground floor. Enter inside & we can find a new type of Text Collectible on a landline phone behind the reception counter.

If you locate a Quarantine Zone called Three Moons Restaurant; this is DLC & does not contribute towards the Trespassing Achievement.

Old Town – District B:
Captured Safe Zone #13: Head North from Ember’s Tower over to an Inactive Safe Zone Waypoint. Drop in through the roof & clear out the Infected before restoring power.

Text Collectible #41 – Battle Journal Epilogue (16): We can find this Battle Journal inside the Safe Zone near a corpse immediately from where we drop through the roof.

Text Collectible #42 – Voicemail #4: Head East across Old Town over to an apartment building at the end of the city. Get to the upper level of it at the North end & we can enter into a top floor suite. We can find a Voicemail on the landline in the apartment’s entry way, across from the shoe rack.

Captured Safe Zone #14: Head North from the apartments we were in to find another Inactive Safe Zone in a lone tower. Climb in through a window with a rescue banner hanging below it. Clear the Infected & the Goon on the roof, restore power to activate the Safe Zone.

Text Collectible #43 – Voicemail #16: Carry on North to another apartment building & reach the upper North Eastern end of it to find a suite we can enter. There is only a single room available to loot in this suite, the Voicemail will be on top of a drawer.
Sequence 13: The Concrete Jungle
1. Old Town: District B, District A, District C
2. Side Quests: 33/44
3. Text Collectibles: 55/67
4. Captured Safe Zones: 16/17
5. Quarantine Zones: 7/8
6. Achievements: 37/78
-----------------------------------------------------------------------------------------------------


Old Town – District B:
Captured Safe Zone #15: Head over to the Djinn In the Jar Hotel & we can find an Inactive Safe Zone that we will need to capture. Clear out the Infected & restore power to activate the Safe Zone.

Text Collectible #44 – Voicemail #5: We can find this next Voicemail inside a lone Lorem restaurant building across from an apartment complex; the Voicemail is inside near the fridges.

Text Collectible #45 – Voicemail #15: Head across the street to the West from the restaurant & we can climb up into an apartment suite on the second floor through an open window. We can find the Voicemail near the bed on a nightstand in the bedroom.

Side Quest #33 – The Bunker 1: As we head West over towards District A, we can spot a “!” Waypoint on our map called Ihsan. When we reach the Waypoint, we will unlock a new Safe Zone. Speak with Ihsan here to receive & activate this Side Quest.

Old Town – District A:
Captured Safe Zone #16: Head into District A now over to the Northern Inactive Safe Zone. Enter in through the roof, clear the Infected & turn on the power.

Text Collectible #46 – Voicemail #10: In the newly activated Safe Zone, head over to the kitchen area & we can find this Voicemail on the counter close to a window here.

Text Collectible #47 – Voicemail #9: Make your way across the street to the West from the Safe Zone & head inside the Luck Medicine pharmacy here; we can find a Voicemail on a cabinet shelf behind the reception desk.

Text Collectible #48 – Battle Journal #13: Head to the very far North West end of Old Town, over the walls & across the water moat to find an entrance to a sewer tunnel. The entrance is barred, but we can find a Battle Journal on the ground in front of the locked door.

Quarantine Zone #6 – Striped Dragon Hotel: We can find another Quarantine Zone at this location. Find all 5 Disaster Relief Packages to complete it.


Achievement #37 – Hush, Hush Now: Quiet a Screamer.
Screamers are essentially Infected children that… scream at you, summoning other Infected while also damaging you. We can find them in the Quarantine Zones in Old Town & will unlock them regularly when we progress further into the Main Quests.

Text Collectible #49 – Voicemail #14: Head South across the street from the Striped Dragon Hotel & get up to the top floor of this building where we can enter a 24 hour Bar & Grill… why can’t we have these in Canada? We can find this Voicemail inside the pub behind the bar counter on a shelf against the wall.

Side Quest #33 – The Bunker 2: Locate Thabit & speak with him to progress the Side Quest; he will only tell us about the bunker when we collect the Mayor’s Seal for him…

Text Collectible #50 – Voicemail #1: Drop down to the streets below Thabit’s hideout, & enter inside a bar on the ground floor of the same building. Head around the bar counter to find a Voicemail on it.

Quarantine Zone #7 – Parking Lot: Directly West of this building, we can find a new Quarantine Zone inside an underground parking lot. We need to kill all 45 Infected, Virals, Goons, & Bombers to complete the Quarantine Zone.

Old Town – District C:
Side Quest #33 – The Bunker 3: Reach the Avryk Hotel & enter in through its roof. Navigate through the floors until you reach the reception computer which will tell us what room the mayor stayed in. Get inside his suite & loot the Seal of the Mayor.

Text Collectible #51 – Voicemail #12: When we leave the Avryk Hotel, head down the street South & down an alley to find a Luck Medicine pharmacy at the other block. Hop over the front counter & we can find a Voicemail resting on it.

Side Quest #33 – The Bunker 4: Return to Thabit & hand him the Seal of the Mayor to learn the location of where the Bunker is. Once we enter inside, we will need to pop out again to find the actual Key to the Bunker. Find it, return, deal with Thabit, & enter the Bunker to complete the Side Quest.

Text Collectible #52 – Voicemail #6: Keep on ignoring Jade at the University & carry on to this location in Old Town. Get to the upper floor of the apartment building & enter into the top floor suite; go to the bedroom & we can find the Voicemail on the floor beside the bed.

Text Collectible #53 – Battle Journal #15: Go to the building South East of our location & we can find a large outdoor square (there is a high chance there will be a Random Event here with some Survivors fighting a Demolisher). Head over to the building with the Workshop sign over it & open the garage door to enter inside it; we can find the Battle Journal at the back of the room on a worktable.

Text Collectible #54 – Voicemail #8: Immediately across the square from the Workshop will be a Luck Medicine pharmacy. Enter into the main reception room & we can find this Voicemail on a shelf behind the counter.

Side Quest #32 – Outposts 2: East of our location will be the marker for the Office Outpost. Sneak or kill your way inside & clear out all of Rais’s men that are occupying it; there are a lot of them in here, most with Guns, so be careful.

Text Collectible #55 – Battle Journal #14: Leave the Office Safe Zone & head across the street to the North to find another apartment complex. Enter the suite on the top floor & go to the bedroom where we can find a Battle Journal on the windowsill.

Side Quest #32 – Outposts 3: Go to the Radio Station Outpost & clear out all of Rais’s men as well. This one is scripted to not be stealthy, so definitely pack along your best Rifle & maybe Shotgun… it’s gonna get messy.

Completing both the Radio Station & Office Outpost Side Quests… count towards the one “Outposts” Side Quest needed for The Whole Story Achievement. Not sure why they both wouldn’t count or why they needed to be two separate Side Quests then. Oh well.
Sequence 14: Fixing Zombieland
1. Old Town: District C, District A, District B
2. Side Quests: 39/44
3. Text Collectibles: 62/67
4. Captured Safe Zones: 17/17
5. Quarantine Zones: 8/8
6. Achievements: 39/78
-----------------------------------------------------------------------------------------------------

If you have not already been doing so, be sure to make a point out of kicking Infected off of rooftops or high places to chip away at the This Is Harraaaaan! Achievement


Old Town – District C:
Text Collectible #56 – Voicemail #2: Leave the Radio Station Outposts & head East over to another apartment building; get to the top floor suite & we can find this Voicemail on an end table beside a backless couch.

Text Collectible #57 – Note #31: Head South East now across the square to get onto the roof of the next building. Hop over a small chain link enclosure up here & we can find this Note on the floor underneath one of the umbrellas.

Text Collectible #58 – Note #30: On the same roof, look across from where we found the Note under an umbrella to find a different one beside a steel fire escape hatch underneath the second umbrella here.

Text Collectible #59 – Note #32: Drop down from the chain link enclosure onto the next lower part of this building’s roof; look to the right of the next steel fire escape hatch to find another Note.

Text Collectible #60 – Voicemail #7: Head to the location for Side Quest – Lost In Space & locate Dawud. Deal with him, & walk over to the main entry way of the apartment where we can find a Voicemail on a drawer across from the shoe rack.

Remember that this Side Quest does not count for our Achievement for some reason… good Xp though.

Captured Safe Zone #17: After finding the Voicemail/saving Sammy, head to the building South of our position to find our final Inactive Safe Zone. Clear the Infected, block off an entrance, & restore power to activate it.


Achievement #38 – Now It’s All Safe: Capture all 17 Safe Zones.
There are well over 17 Safe Zones in the game, but only the ones we physically go to clear out & restore power to count towards the Achievement that are not a part of any Quest. There are 12 to restore in The Slums & only 5 here in Old Town.

Quarantine Zone #8 – New Antalya Apartments: Just West of our new Safe Zone, we can also find our final Quarantine Zone to raid at the New Antalya Apartments. Find the 4 Disaster Relief Packages inside to complete it.


Achievement #39 – Trespassing: Complete all 8 Quarantine Zones.
There are 5 Quarantine Zones in The Slums & 3 in Old Town we need to complete to unlock this Achievement.

There are two DLC Quarantine Zones, the Holy Year Tunnel & the Three Moons Restaurant. These do not count towards the Achievement.

Text Collectible #61 – Voicemail #11: Carry on West from the Quarantine Zone out towards the city boundaries. Out here, look to your left on the lower level of a building to find a Workshop we can enter through its garage door. Enter inside & we can find the Voicemail on the reception desk.

Old Town – District A:
Pursue Jade at Harran University to progress the Main Questline & we will unlock some new Side Quests to complete.

Side Quest #34 – Rupert the Gunsmith 1: Speak with Fidon again after talking to him about Jade at the University to receive this Side Quest.

Side Quest #35 – Do You Believe? 1: Speak with Mufid at Harran University to unlock this Side Quest.

The Side Quest – Fountain, given by Mort Norris, does not count towards our Achievement.

Make your way to the Waypoint & locate the source of the music. Speak with Ishaq to progress this Side Quest into another night time herbal fetch quest. Woo…

Pass the time at a close by Safe Zone & locate the 6 Night Herbs, return them to Ishaq to complete the Quest.

Side Quest #36 – The Shadow of the King 1: As soon as we complete the previous Side Quest we will automatically unlock this one. Speak with Ishaq again to hear a prophecy of a potential boss fight…

Old Town – District B:
Side Quest #34 – Rupert the Gunsmith 2: Go to Rupert’s apartment in District B & speak to the good wizard & the Quest will complete just like that.

Side Quest #37 – Health Potion 1: After we complete Rupert the Gunsmith, we will receive this Side Quest next. Search the two pharmacies & locate some insulin to return to Rupert.

Text Collectible #62 – Note #33: During Side Quest – Health Potion, enter into the pharmacy to the far North & search the back room behind the reception desk to find this Note on a steel desk near a computer.

Side Quest #37 – Health Potion 2: Search the pharmacy computer to find the location of someone who has insulin & head over to their apartment. Follow the leads to the pizzeria & find the insulin to return back to Rupert to complete the Quest.

Side Quest #38 – Blocks For the Boy 1: Before we leave the Magic Fortress, speak with the child Kadim to receive this Side Quest. Collect Kadim’s blocks then speak with the good wizard to finally learn where his wife has gone.

Side Quest #39 – Dungeon 1: Speak with Rupert again, & we can receive the key to the basement to go & speak with his wife Jasmine. After we visit her, return to Rupert to complete the Side Quest.

Side Quest #40 – Troll 1: A new Side Quest will become available here at the Magic Fortress from a girl… who I guess doesn’t get a name… but we will need to go & slay a Goon in a nearby parking lot for her. After we kill it, we then have to kill the Demolisher which is the actual troll; of course it is. Return to Rupert for the final time to complete this Side Quest.
Sequence 15: Sending Them A Message
1. Old Town: District D, District B, District A, District C
2. Side Quests: 43/44
3. Text Collectibles: 67/67
4. Achievements: 42/78
-----------------------------------------------------------------------------------------------------


Old Town – District D:
Side Quest #36 – The Shadow of the King 2: Go to the large marker for this Side Quest & follow the signs. First, find the blood filled fountain, approach the hotel across from it & enter inside its doors.

Text Collectible #63 – Note #28: When we enter into the hotel, collect the Staff Key Card in the main lobby & unlock the reception room to be able to access all the room keys; be sure to grab room 101 off the floor. Head up to the second floor now & use the key card to open suite 101; we can find the Note on the dresser in the bedroom.

Text Collectible #64 – Note #27: Now head down the hall to the right on the second floor where we can find the open door to suite 107. When we enter, look on the TV stand off our right to find this Note.

Side Quest #36 – The Shadow of the King 3: Reach room 206 on the upper floor & pick open the Rais Supply Chest to loot Rais’s Gun to complete the Side Quest. No boss fight, only foreshadowing…

Old Town – District B:
Complete Main Quest – Higher Education to receive Main Quest – Public Face.

Side Quest #41 – Fan Zone 1: Before we leave to go find Michael Scott in the sewers, speak with Noah instead to receive this Side Quest.

Side Quest #42 – Legless Spider 1: When we leave Ember’s Tower after completing the previous Main Quest, Savvy will call us on the radio to give us this Side Quest.

Side Quest #41 – Fan Zone 2: Investigate the Fan Zone & take the elevator into the building to find the source of the distress call.

Text Collectible #65 – Note #34: Loot the Key Card in the waiting room & enter inside the broadcasting room of the Fan Zone. Inside the main news room, look near the red guest chairs at the center of the spotlight to find this Note on a nearby speaker.

Side Quest #41 – Fan Zone 3: Leave the Fan Zone & take the elevator to find a psychopath. Escape through the vents, dismember him, & leave the Fan Zone to complete the Side Quest.

Text Collectible #66 – Voicemail #13: This Text Collectible becomes available to us after we completed Side Quest – Health Potion. Reach the above location & drop into the center square of this block. From here, head up the stairs towards the West & look up to see a bunch of windows in an inner wing of the building. Near the top, we can see an open window with white sheets flowing out of it. Grapple up to it or climb to it manually to enter inside this top floor suite; we can find the final Voicemail on the kitchen dining table.

Old Town – District A:
Side Quest #42 – Legless Spider 2: Catch up with Spider & he will task with locating the final shisha materials he needs then deliver them all to a man named David. This is where the Side Quest gets weird. If your game is not bugged, this Side Quest will complete & you will then receive Side Quest #43 – Hell From Above.

Side Quest #43 – Hell From Above 1/Legless Spider 3: Chances are if you are like me, your Checklist for The Whole Story Achievement in the Extras – Statistics tab of the Main Menu will say that you have already completed this Side Quest.

If it is not auto-completed, then you will unlock this Side Quest shorty after turning in Side Quest – Legless Spider. We are tasked with locating the five Meteorite shards & bring them in to David to complete the Side Quest.

If your Side Quest is auto-completed, this will update Legless Spider & carry on that Quest instead. The glitch basically makes Legless Spider absorb the Hell From Above Side Quest. Most of the Meteorites are stuck in the cliff wall & easy to see; the one that is most annoying to find is the one in the river.

Find the Meteorites & return them to David. This will complete the Hell From Above or finish the Legless Spider Side Quest amounting to the same thing. One Side Quest left!

Old Town – District C:


Achievement #40 – Making Faces: Show the outside world that you're still alive.
Story Related. Carry on with the main story & complete Main Quest – Public Faces to unlock this Achievement.

Side Quest #44 – Chasing Past 1: Complete Main Quest – Rendezvous next, & speak with Tariq in the following Main Quest, The Museum. Speak with Tariq after figuring out how to get into the Museum & he will give us our final Side Quest to complete.

Text Collectible #67 – Note #29: Enter into the apartment complex for Side Quest – Chasing Past & head to the top floor of the stairs where we can find our final Collectible pinned to the suite 3 door.


Achievement #41 – It’s All In the Writing: Find all 67 Text Collectibles.
If you have been following along with this guide, we will unlock this Achievement after collecting our final Note. There are 17 Battle Journals, 34 Notes, & 16 Voicemails we need to find; Zombie Statues & Flags do not contribute.

No Collectible is missable & can be obtained at any point. If the Achievement does not unlock, check your Collectibles Tab in your Inventory to see which you are still missing.

Old Town – District A:
Side Quest #44 – Chasing Past 2: Find what happened to poor Mike & take some revenge. Return back to Tariq & we will receive the keys to the Museum armory as a reward; we will need to raid it to complete the Quest.


Achievement #42 – This Is Harraaaaan!: Kill 100 enemies by kicking them off the rooftops/cliffs.
Make a point of kicking/drop kicking Infected off of any rooftop you see them on in Old Town & we will eventually unlock this Achievement. If you still have not unlocked it once we enter Post-Game, head to the far end of the Infamy Bridge in The Slums & just kick off all of the Infected there. It is the single best place to farm this.
Sequence 16: Taking the Other Hand...
1. Old Town: District D, District A
2. Antenna
3. The Slums: Rais’s Headquarters
4. Side Quests: 44/44
5. Achievements: 47/78
-----------------------------------------------------------------------------------------------------

Old Town – District D:
Side Quest #44 – Chasing Past 3: Progress Main Quest – The Museum & enter inside it through the underwater entrance. When we surface in the undercroft, there will be a red door taking us to Rais’s Garrison. Ignore it, & instead head over to the barred door we can unlock with the key we got from Tariq. Loot the Hard Chest at the back of the room to complete the Side Quest.


Achievement #43 – The Whole Story: Finish 44 Side Quests.
This is a very misleading as there are 51 Side Quests in the game not 44, only specific Side Quests count. There is a built-in checklist you can reference in the Main Menu of the game in Extras – Statistics. Then scroll to the bottom & all the required Side Quests will be listed; if the Achievement does not unlock now, check the list & see which one you are still missing. No Side Quest is missable & can be completed even in Post-Game.


Achievement #44 – Tied Loose End: Deal with Tahir.
Story Related. Rescue Jade & defeat Tahir in a boss fight during Main Quest – The Museum.

Antenna:
We are now entering the final stretch of the Main Questline; completing this will send us into Post-Game where we can then mop up our final few Achievements before diving into the DLCs!


Achievement #45 – Vertigo: Activate the Amplifier.
Story Related. Place the Amplifier at the top of the Antenna… on the Antenna map & stop the bombing of Harran to unlock the Achievement.

Old Town – District A:


Achievement #46 – Now You Can Come In: Find Camden.
Story Related. Return to Old Town & get into Camden’s lab during Main Quest – The Clinic to unlock the Achievement.

The Slums – Rais’s Headquarters:


Achievement #47 – Bittersweet: Complete the game.
Story Related. Defeat Rais on top of his tower & collect the cure for Infection to complete Main Quest – Extraction, beating the Main Questline entirely, & unlocking our Achievement.

The Slums:
As of now, we are in mop up mode. Apart from the Online Coop related Achievements, the only Achievement you may still not have is the H0mo Homini Lupus Est Achievement. While we could have grinded it out prior to entering Old Town, it is actually very simple to unlock during The Following DLC so we will save it until then. Feel free to chip away at the Online Coop Achievements during this time as well, I will cover those in more detail in the final Sequence of the guide so skim down to it if you want to read up on those four Achievements. Note that for 3/4 of them you only need a single partner; for one you will need to play with three players & complete 5 Quests with the same people so keep that in mind!

Speed Leveling Agility: Our next goal will be completing the free Parkour Fever DLC. Before we attempt it however, you are going to want to max out the Agility Tree so that you can purchase the Ultimate Runner Ability giving us unlimited Sprint. This is essential for success.

There are two main ways of speed leveling Agility, one is extremely faster than the other, but relies on a glitch that may be patched one day. For the glitch method however, we need a (Censored by Steam) of Stamina Boosters. They take Herbs & Alcohol to Craft so ideally you have surplus of them.

For the glitch, we need to go to the Harran Prison DLC; this is free & a part of one of the few Title Updates. When we arrive at the Prison, turn around & there will be an open C-can that has a bunch of stacked military crates inside it with one single open orange Airdrop Crate inside it. The glitch relies on sprinting into this specific Airdrop Crate & repeatedly pressing crouch/slide to net us 30 Agility Xp every single time we do it. This is where the Stamina Boosters come in. You can on average get around 135 slides in per single Stamina Booster. 135 slides at 30 Xp a piece is around 4050 Xp every 1 minute 30 seconds (with the Booster XL Ability in the Survivor Tree). This is an insane amount of Xp per effort & blew any other strategy I attempted out of the water. To get from Level 23-24 Agility takes around 12 Stamina Boosters, so if you budget at least 10 Stamina Boosters for every Level you need to gain you should have more than enough to max it out.

A pro tip if you are on PC, is using the keyboard instead of a controller. This greatly increases how fast you can slide & is much easier on your hands. Simply hold down “W” & “Shift” to sprint into the Airdrop Crate, then spam the “C” key as fast as you physically can to speed level your Agility like never before. Special shout out to
RimoCreedeZzzz™ GameExploits & Thomas Reynolds for discovering & explaining this exploit.
Here is the original video I referenced:
https://youtu.be/soaSprvcmfE
In case this exploit gets patched, Jon The Chief discovered a bit tedious though extremely safe method of speed leveling Agility. For this exploit, you will want to switch your game Difficulty to Nightmare. To do this, go to the Main Menu & hit Play – Play Campaign then go into Advanced Options where you can select Play & Switch to Nightmare. You cannot switch game Difficulties if your current Quest is DLC; switch it to any Base Game Quarantine Zone to have this option appear. Nightmare Difficulty adds a big multiplier onto Xp earned…

When ready, go to the Infamy Bridge Safe Zone & then sleep until it is night. Once it is dark out & our Xp doubles yet again, climb up to the very top of the Infamy Bridge above our Safe Zone. Here we can find Ziplines that go to the end of the bridge across from us & back making a loop. Taking a Zipline gives us Ability Xp… see where this is going? Though tedious, this is one of the fastest & safest ways to speed level. While on the topic of safety, definitely have your Grapple Hook equipped. If you rush, sometimes you will accidentally jump off the bridge instead of grabbing the Zipline, which can be fatal & void all of your hard grinded Xp. The Grapple Hook is literally the difference between life & death up here.
https://youtu.be/HeTDn4B3pEY
Alternatively, you can simply sprint from one end of the Infamy Bridge to the other leaping over as many vehicles as you can to rack up Agility Xp. If you get overwhelmed by Volatiles, just jump off of the bridge to heal & try again. This is the method I ended up sticking to until I discovered the Harran Prison glitch…
Sequence 17: Catch That Parkour Fever!
1. The Slums
2. Old Town
3. Achievements: 49/78
-----------------------------------------------------------------------------------------------------

The Slums:
When you are ready, it is now time to catch some Parkour Fever, baby! There are 5 Parkour Fever Challenges in The Slums & 5 in Old Town we will need to complete. We will also have to complete the same Challenges, but at night as well to 100% this Title Update DLC. I recommend completing the night time Challenges immediately after completing them during the day so that the run is still fresh; it plays out exactly the same as in the day only visibility is worse & there is the potential for Volatile encounters though this rarely happens due to how fast we are running around.

Always try to maintain your Combo Counter at 10 for the boost to our speed. When falling from a decent height, try timing the Forword Roll Ability to keep up your momentum.

If you prefer having a video guide to follow along with, Gary Nicholson has some great tutorials to check out to help give you a better idea of where to go.
https://www.youtube.com/watch?v=H0rfrHuyeg8&list=PLC1Kpuc_FtoORyt9qqZ76fg7d1sv-5Zgu

Parkour Challenge #1 – End of the Tunnel:
Difficulty: Medium
Time Limit: 2:05
Number of Checkpoints: 18

Parkour Challenge #2 – First Assignment:
Difficulty: Medium
Time Limit: 2:15
Number of Checkpoints: 26

Parkour Challenge #3 – Favela Fever:
Difficulty: Medium
Time Limit: 1:25
Number of Checkpoints: 22

Parkour Challenge #4 – Tiptoeing to Gazi:
Difficulty: Medium
Time Limit: 2:00
Number of Checkpoints: 23

Parkour Challenge #5 – Twister:
Difficulty: Hard
Time Limit: 1:10
Number of Checkpoints: 17

Old Town:
Parkour Challenge #6 – Diagonal Run:
Difficulty: Hard
Time Limit: 1:45
Number of Checkpoints: 15

Parkour Challenge #7 – Tower Run:
Difficulty: Hard
Time Limit: 2:45
Number of Checkpoints: 17

Parkour Challenge #8 – On the Edge:
Difficulty: Hard
Time Limit: 2:40
Number of Checkpoints: 19

Parkour Challenge #9 – Blue District Fever:
Difficulty: Hard
Time Limit: 1:55
Number of Checkpoints: 26

Parkour Challenge #10 – Not So Obvious:
Only becomes available if you head to its exact location on the map.
Difficulty: Hard
Time Limit: 3:05
Number of Checkpoints: 16


Achievement #48 – The Boy Who Could Run: Complete all 10 Parkour Fever Challenges.
These are some tricky Achievements to get & will require lots & lots of replaying the Challenges until you memorize the bulk of the course. Having the Ability Tree maxed out & having infinite Stamina makes this much easier.

Unfortunately, these Achievements are a little buggy & the game may not track your progress occasionally after completing a Challenge. It still counts, but Steam won’t record it. Make a note of which ones don’t track & carry on; usually after completing another Challenge it will update & be current again.

If you know you have completed all 10 & it has not unlocked, quit the game & repeat any of the 10 Parkour Fever Challenges to get it to unlock.


Achievement #49 – GD Parkour Instructor: Complete all 10 Parkour Fever Challenges at night.
These are much harder than doing them during the day as visibility is garbage. That is about it though; you go so fast that the Volatiles rarely ever notice you. These will take more than a tries & some luck with your run to get.

If you know you have completed all 10 & it has not unlocked, quit the game & repeat any of the 10 Parkour Fever Challenges at night to get it to unlock.

By this point, you may have earned a Point or two for the Legend Tree. There are 10 Abilities we can level in it each needing 25 Points for a total of 250 Points to max out the Legend Tree. Do not worry too much about what to spend the Points on; just cater to your play style. We have the option of respecing these Points at will so it is a non-issue when we will need a more specific build for Hellraid later on…

62% Complete
Sequence 18: The Following
1. Main Quest: The Way Out, Kaan & Able, Gaining Credence, Stranger In A Strange Land, The Gathering, Anomalies, Vanitas
2. Achievements: 56/78
-----------------------------------------------------------------------------------------------------
DLC Breakdown – The Following: (10)
Story Related: (5)
Missable: (1)
Character: (1)
Slay: (2)
Miscellaneous: (1)


When you are ready, it is now time to begin The Following DLC. The DLC can be accessed from the Main Menu; go to Play & select a New Game to begin. The DLC will recognize our Save File from the Base Game & load us in with all our Abilities & even our Weapons/Storage. There are no Difficulty related Achievements. You will spawn into The Following with your exact loadout from the Base Game so keep that in mind before you start…

There are tons of Collectibles available on this DLC, but the only one that has to do with Achievements are the Scarecrows found in fields. These actually respawn so it is not much of an issue…

The Countryside – The Way Out:


Achievement #50 – Afraid to Get Wet: Reach the end of the cliff.
Story Related. Exit the sewers & reach the end of the cliff sequence to stand above the river way below. There are multiple ways of reaching this point, especially if you have a Grapple Hook…

The Countryside – Kaan & Able:


Achievement #51 – Formidophobic? Interesting…: Destroy 50 Scarecrows.
When we unlock Buggies to drive, make a point of going out of your way to drive through fields to smash Scarecrows as well as Infected; we need to destroy 50 Scarecrows & 500 Infected for some Achievements…Doing this will also increase our Driver Level which we need to get to Level 12.


While this Achievement does not need to be farmed immediately, I found a good circuit using 3-4 respawning Scarecrows in this field. By the time you smash the last Scarecrow, the first one will have respawned making it the perfect farming route; be sure to nail some Infected along the way!

The Countryside – Gaining Credence:
Completing this Main Quest will grant us the Rank of Stranger in the eyes of The Mother; we will need to reach the Rank of Believer for the I Felt Your Presence Achievement. We will accomplish this just by doing Side Quests through out the DLC so keep your eyes open.

The Countryside – Stranger In A Strange Land:
This is where the Countryside will open up to us & we will get a slew of new Waypoints on our World Map to go & explore.


Achievement #52 – It Wasn’t That Hard, Was It?: Win Bilal’s race.
Missable. Finish a few Side Quests & return to Bilal’s Gas Station. On the notice board inside, we can find a poster giving us Challenge – Burning Rubber. Speak with Bilal about it & go to the Challenge start location.

What makes this Achievement Missable, is if we fail the race. We have 3:20 minutes to drive through all 23 Checkpoints. The race itself is not very difficult; the Virals occasionally can knock you off course which is the most tedious part. If you are worried you will not complete the Challenge, pause & select Restart Challenge before the timer runs out! This will not void the Achievement & you can just give it another attempt until you win. You basically have a minute’s worth of error time so do not stress too much!

That was the last Achievement we really have to pay attention to; all the others will come naturally as we try to complete the Main Questline. Drive your Buggy often to accumulate Driver Xp & to run over Infected!

The Countryside – The Gathering:


Achievement #53 – I Felt Your Prescence: Witness the cult's meeting.
Story Related. Complete enough Side Quests or tasks to reach the Rank of Ally in the eyes of the Faceless. Once we do, an Acolyte will call us on the radio asking us to meet them at the Eye of the Sun. Partake in the “Kool-Aid” & meet the Mother.


Achievement #54 – I Don’t Approve of Mindless Fun: Kill 500 Zombies with your vehicle.
This will come naturally as we complete the DLC, just make sure to mow through as many Infected as you can on route to your different destinations; we get 75 Xp per kill towards our Driver Level!


Achievement #55 – H0mo Homini Lupus Est: Save 15 Survivors from Rais's men.
This is a difficult Achievement to unlock as saving Survivors from “bandits” is a rare Random Encounter. Saving Survivors from Rais’s men & Bandits found in The Slums, Old Town, or the Countryside contributes to this Achievement.

For unlocking this Achievement in The Following DLC, keep your ears open for Survivors calling for help about Altars being attacked. This indicates a Survivor being assaulted by Bandits. This is the fastest & most common way to unlock the Achievement with how fast we can rip around the map in our Buggy. Once you know the locations of a few Altars, just drive back & forth between them to trigger these Events; sleep to reset them. Unlocking the Achievement in The Slums or Old Town can be a lot more tedious…

There are 25 Altars in the game; here is a map screenshot from Map Genie showing their locations. Simply drive around close to Altars & do circuits to eventually trigger these Random Events.


The Countryside – Anomalies:
We will unlock this Main Quest after reaching the Rank of Believer.

The Countryside – Vanitas:
We will unlock this Main Quest after completing the previous one.


Achievement #56 – I Was Waiting For You For So Long: Reach the inner circle.
Story Related. Complete enough Side Quests or Random Encounters to reach the Rank of Disciple to unlock this Achievement.
Sequence 19: Fuel For the Feeding
1. Main Quest: An Unfinished Story, The Fate of the Fool, At the End of the Tunnel, The Following
2. Achievements: 60/78
-----------------------------------------------------------------------------------------------------

The Countryside – An Unfinished Story:
We will unlock this Main Quest after completing the Vanitas.

The Countryside – The Fate of the Fool:
We will unlock this Main Quest after completing the previous one; drive away for a few kilometers & we will receive it over the radio via an Acolyte.


Achievement #57 – Sweaty Palms?: Kill a Demolisher with a vehicle.
Similar to in Old Town, we can find Demolishers attacking Survivors as a Random Encounter or just spawning naturally throughout the Countryside. While it is recommended that you upgrade the Reinforced Cage & Ram of the Buggy, this can technically be done with a basic Buggy too. The Demolisher must be finished off by being rammed by the Buggy, but it can be weakened using other Weapons as well.

The Countryside – At the End of the Tunnel:
We will unlock this Main Quest after completing the previous one; leave Jasir’s Farm & we will receive it over the radio via an Acolyte.

When we reach the Lighthouse, this is the point of no return & we will be locked into the final Main Quest of the DLC. This is not a big deal though as, like the Base Game, we get Post-Game free roam after it is complete.


Achievement #58 – And You Liked Him, Didn’t You?: Meet your old friend again.
Story Related. Reach the top of the Lighthouse at the end of Main Quest – At the End of the Tunnel to unlock this Achievement.

The Countryside – The Following:


Achievement #59 – What If You Picked the Other One?: Make that call.
Story Related. When we find The Mother, we will have two separate Endings we can choose from: helping her or denying her. Choosing either will unlock our Achievement.

If you choose “Sacrifice”, you will purge the entire Harran area containing the infection but killing everyone. If you “Call the Mother on her (Censored by Steam), we will have a boss fight as well as receive the community theorized “cannon Ending” that leads us into Dying Light 2… & the “Be the Zombie” game mode…

The Countryside – Post-Game:


Achievement #60 – You Realize It’s Only Points, Do You?: Reach Driver Rank 12.
By the end of the DLC you should be very close to reaching Driver Rank 12 unless you have strictly just been driving to point A to point B. For our final mop up, just drive around & start completing Carnage, Slammer, or Race Challenges. As you travel between them, smash as many Infected as you can as well as driving offroad & taking jumps to earn the last bits Driver Xp you need.

Note that The Following is also a great place to play with Friends Online to unlock our Online Achievements due to how many extra Side Quests there are…

76% Complete
Sequence 20: The Bozak Horde
1. The Stadium
2. Trials: 8/20
3. Achievements: 60/78
-----------------------------------------------------------------------------------------------------
DLC Breakdown – The Bozak Horde: (5)
Story Related: (1)
Secondary Objectives: (1)
Slay: (2)
Online: (1)


When you are finished with The Following DLC, return to the Base Game & return to any location that has a teleporter poster that will take us to the Bozak Horde DLC. It was ideal we save this near the end so that we are as strong as possible before attempting this. Our final Achievement will require us to complete a run of this DLC within a time limit…

Pay attention to each of the 20 Trials & try completing them as fast as you can. Do not stress too much about time limits as this is a Repeatable Quest & will probably take us a few attempts… We only get three Lives per attempt of the DLC Quest, failing those will require us to restart the entire Quest. As well, this Quest must be done in a single sitting; quitting at any point before completing it will send you back to the very beginning upon reloading the game.

The Together Till the End Achievement will require us to complete this DLC with a Friend to unlock the bonus 21st Trial; its information will be covered in the final Sequence of the guide…

The Stadium – Underground Parking Lot:
Once you open the lobby doors, the timer will begin & not pause (unless you of course pause the game) until you complete the DLC Quest.

Trial #1 – Bomb Deactivation 1: When you open the lobby doors to begin the Trial, quickly sprint through the underground parking lot to your right & drop down the two tiers to reach the white van with “Prove You’re Faster” on it. Open the back & stop the Detonator to complete the Trial.

Turn around from the van & loot the Trial Reward from the green Loot Crate behind us.

Trial #2 – Viral Slayer 1: Three Virals will spawn close to the van we deactivated the Ankle Bomb at; kill them to continue. I recommend standing on top of the van or high points so that you cannot got overwhelmed by them; if you are coordinated enough, you can finish them with the Stomp Ability to save your Weapon Durability & time.

Trial #3 – Viral Bomb Deactivation 1: Like the previous Trial, kill the Virals to continue; there are ~10 of them.

After killing two to three Virals, a new Detonator will activate & we will have to quickly deactivate it, or our Ankle Bomb will explode. It is found in the upper level of the parking lot, at the far end directly across from where we first entered, up above on the piping. I found it easiest to stand up on the piping close to the Loot Crate here & use Stomp continuously to kill the Virals as they jump up to us.

Trial #4 – Bolter Prize 1: When this Trial begins, four Bolters will jump out of the backs of yellow vans in the parking lot carrying 1 Medkit each. Sprint after them & use Tackle to knock them to the ground for an easy kill. They can also be taken out with the DIY Throwing Knives we can find in a green Loot Crate near the previous Ankle Bomb Detonator.

The Stadium – The Complex:
Be careful, it is very easy to fall to your death accidentally in this area, especially during the Parkour Trials!

Trial #5 – Bomb Deactivation 2: We can find the Detonator in the caged area of the lower level of the parking lot. To get inside, leap off of the nearby yellow van to get over the cage wall. Be careful as two Virals will harass us when we try to tear the Detonator cover off… Note that the best melee Weapon in the DLC, the Military Machete, is inside the orange Loot Crate nearby!

Shortly after deactivating the first Detonator, we will be informed that four more Detonators are now active. Sprint to the top level of the parking lot close to where we found the Detonator for Trial #3, & we can see a hole in the top wall. Exit through it & leap across the platforms to reach the Detonators; go as fast as possible & not let the Virals catch up with us! There are two Detonators on our left & two on our right when we enter. One the three Detonators is a fake & will be a cheap Weapon instead; the fake is the first Detonator off our left when we enter the complex.

Trial #6 – Parkour 1: When the Trial begins, we need to reach the lower levels of the complex to get to the rally point to spawn the Checkpoints & begin the Challenge. There are 10 Checkpoints we need to pass through; you can see where the next Checkpoint will spawn before reaching the current one. We basically go from the bottom of the complex to the top, then back down to the bottom.

Trial #7 – Goon Slayer 1: From where we completed the last Trial, two Goons will burst through the wall behind us (up to four of them if you are playing with Friends). If you were lucky & looted Throwing Weapons use them; there is also a Propane Tank to the right of where they burst through the wall, we can use as wall. Definitely use Dodge & strike them in the head! This Trial may take a few tries to perfect & cost you a few runs… Head strikes are critical!

Loot their dropped Heavy Rebar Weapons & beak them down into Metal Parts so we can Repair our Military Machete.

This Trial is extremely simple after we unlock Bozak’s Bow…

Trial #8 – Bolter Prize 2: There will be five Bolters that appear for this Trial; at least two to three of them spawn close to where we killed the Goons… Tackle them!
Sequence 21: Be the Bozak
1. The Stadium
2. Trials: 14/20
3. Achievements: 60/78
-----------------------------------------------------------------------------------------------------

Yes, I am aware of how irritating it is breaking the guide up halfway through the Trials into a new Sequence. If I had the choice, I would have all 20 Trials in one Sequence… but I hit my word limit & had to split it… there was no feasible way I could shave off an extra 2000 words to make them all into one. My apologies.

The Stadium – The Complex:

Trial #9 – Bomb Deactivation 3: Once again, we will have four Detonators appear on the upper level to be deactivated. Only two of the four are actual Detonators this time, the other two are fakes with Weapons.

Trial #10 – Parkour 2: Get to the starting point close to where the previous Parkour Trial was at the very bottom of the complex & run through the Checkpoints as fast as you can. There are 10 Checkpoints to pass through.

Trial #11 – Gas Runner: For this Trial, we need to grab three Gas Cans (up to six if you have Friends) & run them over to a hole in the wall off our right. While there are two that spawn off our left along the concrete beam we completed the previous Trial on, it is much easier to run up to the stockpile of four Gas Cans & use those instead. Obviously if you are required to, you will need to use those other two Gas Cans as well.

If you are solo or only need three Gas Cans, grab the four (always good to bring the extra one just in case) Gas Cans here & throw them over the railing onto the upwards angled walkway towards where the hole is. Then take the Gas Cans along the long walkway towards the hole, & aim for the center of the red platform directly below us to throw the Cans down to. Once they are all down, grab a Gas Can, stand at the edge of the platform & look at the two wall tiles directly above the hole (one is almost falling off, while the other is set in place; aim for the white portion of it) & this will always get the Gas Can through the hole.

If you have Friends & NEED them all, someone has to distract the Demolisher(s) while someone else throws the Cans back to the upper levels. This is yet another Trial that will break your run a few times until you perfect it…

Trial #12 – Viral Slayer 3: With all the Gas Cans through the wall, a door will open & we must quickly proceed to an elevator that will take us up to the final stage. When we go through the tunnel, get on the Zipline as soon as possible for the fastest route!

When we land on the elevator, we will then have to fight off some Virals as it rises. We get a wave of 2, 2, 4, 4, 4, & 4; this is very overwhelming & we will burn through some Medkits & a Metal Part or two. The trick to this Trial is sprinting around the elevator in circles & using Tackle to knock the Virals off the map as soon as they drop down. If you are fast enough, you will never get swarmed until the end of the Trial.

When too many Virals spawn, walk backwards around the elevator & swing that Machete like mad… If there is a brief reprieve without Virals, Repair your Weapon if it is below half & you have the Metal Parts to spare. Repairing is inevitable, but ideally you can do it when you are not being mauled!

After they are killed (it can be glitchy & take up to 30-60 seconds to register sometimes), we need to rush over & open the elevator doors. Exit the elevator & quickly open the Loot Crate off our left.

The Stadium – Tower Ruins:
Be sure to try looting the random Loot Crates on this level in between Trials. You will want Firecrackers, Ammo, & of course Guns!

Trial #13 – Parkour 3: Once you have opened the Loot Crate, immediately lift open the garage door straight ahead of us to continue.

As soon as it is opened, we will launch into another Parkour Trial, this time unfortunately being chased by infinitely spawning Virals. There are 17 Checkpoints total!

After we complete the Trial, we must quickly run up onto a hanging red c-can & release it to collect the Double Barrel Shotgun before we can continue.

Trial #14 – Bolter Hunter: Unlike previous Bolter Trials, this time we HAVE to kill all 10 Bolters. With our new Shotgun, we need to quickly run around & gun them all down; try to make the shots count as we need ever buck for the final Trial…
Sequence 22: Mastering the Horde
1. The Stadium
2. Trials: 20/20
3. Achievements: 63/78
-----------------------------------------------------------------------------------------------------

The Stadium – Tower Ruins:
Trial #15 – Viral Deactivation 2: When this Trial begins, sprint to the far right (from where we entered from the elevator) part of the area & get up to the upper level where an orange c-can is. Before the Detonator activates, we need to kill the lone Toad & at least one Viral. When it activates, sprint to that c-can & we will have to break an Easy Lock to reach the Detonator. Deactivate the Detonator asap or the Virals won’t stop spawning!

Use Firecrackers if you have them to lure Virals away from the Lock.

Once the Detonator is deactivated, kill the remaining Toads & Virals to complete the Trial.

Trial #16 – Delivery Boy: Before this Trial begins, sprint as fast as you can towards the orange c-can at the highest point of the map on top of the blue building. Quickly open the Loot Crate here to grab the Packages. There are unfortunately a LOT of Packages we have to deliver; work your way around the map clockwise or counter clockwise & place them all in the chutes.

There are suicidal Hazmat Infected that will run around & explode on us; always keep yourself at full health & avoid them. If you have Firecrackers, don’t be afraid o use them to lure the Hazmats away or just to shoot them with a Gun.

Trial #17 – Parkour 4: The starting point for this Trial is on the tall blue building at the opposite end from where the upper orange c-can is. As soon as you walk through the starting point, immediately get on the Zipline in front of us to get to the far end before the timer even starts to get a head start towards the first Checkpoint. There are 11 Checkpoints for this Trial; it is absolutely (Censored by Steam) chaos around us with Toads, Virals, & suicidal Hazmats so be careful!

Trial #18 – Bomb Deactivation 4: The Detonators for this Trial are of course, locked behind Easy Locked c-cans so we need to pick them to access them. Of the four, only two are actually Detonators as well. We will also be bombarded by Toads as well, so try clipping them with a Gun if you can.

One Detonator will be in the orange c-can immediately at the bottom of the Zipline we previously took in the other Trial. When you get near the other orange c-can that is correct, Bozak will say “Oh good for you” which is how you will know to not waste time picking the Lock otherwise; he will laugh at us if we choose a fake Detonator.

Use Firecrackers when Lockpicking to keep the Virals off us!

Trial #19 – Bolter Prize 4: Another Bolter Prize Trial, fortunately we do not fail this one for not killing all the Bolters. Try looting as many Medkits as you can for the final Trial! A Pistol is extremely handy for this Trial to save our Shotgun Ammo…

Trial #20 – The Demolisher: This is a difficult final Trial, but not impossible, especially if you have full ammo for your Shotgun. We will need to kill 25 Virals & 1 Demolisher; there are up to 4 Demolishers depending on how many Friends you have with you. Focus on taking out the Virals first, then the Demolisher. Use high points or the inside of c-cans to our advantage so the Virals do not swarm us.

When all is left is the Demolisher, just unload all of our Shotgun & Pistol Ammo into its head to kill it. If you are running low on time, pass through the Gates marked on our mini-map for bonus time.


Achievement #61 – Get the Bozak: Complete Bozak's Challenge.
Story Related. Complete all 20 Trials in The Bozak Horde DLC Quest with any completion time to unlock the Achievement. After around 15 tries, I was able to beat it in around 35 minutes having died once that run during Trial 7 against the Goons.

Note that this Achievement was glitchy for me & did not unlock right when I completed the DLC. It only unlocked after I quit the game back to my Steam Library for some reason…

The Stadium:


Achievement #62 – Electric Whisper: Learn how to craft Electric arrows.
Now that we have completed the Bozak Challenge at least once, we will have unlocked Bozak’s Bow. Now when we begin the DLC again, we will start off with it in our Inventory, though we will have no Arrows. Arrows have to be looted off of dead Virals. Arrows can be re-looted from corpses as well!

To unlock this Achievement, we need to kill 10 Virals with Bozak’s Bow. I recommend just completing a dud run of the DLC just focusing on unlocking the Achievement in the first few Trials.
There is no Achievement for unlocking Incendiary Arrows by killing 10 Bolters with the Bow…


Achievement #63 – Things That Go Ka-Boom: Learn how to craft Exploding arrows.
This is definitely the hardest Achievement of this DLC. To unlock this Achievement, we have to complete all 20 (21) Trials in under specific time limits depending on how many Friends you are playing with.

If you are on point, you can actually get to Trial 20 in around 26 minutes. I could have beaten the DLC much faster if I did not die twice on Trial 20… having only 5 seconds left before passing 31 minutes. Not counting my previous attempts at just beating the DLC, this took me around 6 tries to beat it under 31 minutes.

The times are:
Solo – 31 Minutes or less
2 Players – 28 Minutes or less
3 Players – 26 Minutes or less
4 Players – 25 Minutes or less

Some tips for attempting this Achievement:
  • Always loot the Military Machete & Arrows when you can!
  • Breakdown any extra Weapons into Metal Parts to Repair the Military Machete; carry at least one other Weapon to mop up the regular Infected with to not waste Durability
  • Take full advantage of Bozak’s Bow, it can be very effective at killing Goons, Toads, & Bolters quickly
  • If you know where a Trial begins or Detonator spawns, sprint there after completing the previous Trial before the next one begins to save time
  • More Friends does not mean less Difficulty; unless they are all Dying Light veterans like yourself or have the DLC memorized, it is safer to do this solo or with one other savvy Friend
  • Typically, but not always depending on the Trial, dying means you will have to restart the DLC as precious minutes can be wasted
  • Repetition, repetition, repetition
  • The higher Legend Rank you are, the easier this will be, but I do not recommend grinding hours worth of Xp for it

The final Achievement for the Bozak Horde DLC is the Together Till the End Achievement. If you have already been playing Coop, you will have most likely unlocked it naturally; I will be covering the Achievement description in the final Sequence of the guide.

80% Complete
Sequence 23: Hellraid
1. Main Quests: Clavis Stones, Imprisoned, Beneath the Seals, Disrupt the Ritual, Sacrificed
2. Achievements: 66/78
-----------------------------------------------------------------------------------------------------
DLC Breakdown – Hellraid: (10)
Story Related: (2)
Secondary: (3)
Character: (1)
Collectibles: (1)
Slay: (2)
Miscellaneous: (1)


With nothing left to do in Dying Light, make your way back to Brecken’s or Ember’s Tower & if you have this DLC installed, we can find a Hellraid Arcade close to where the Merchants are. Insert your soul & enter Hellraid.

Before we can unlock the majority of the Achievements (& spawn our Text Collectibles) for this DLC, we will need to complete Story Mode first. For our first run, anytime you find Skeletons, try your best to get to high points & either kick them off or Grapple throw them off to kill them by fall damage for the Throw Me A Bone Achievement. We need to accumulate 50 kills.

Enemies are not unlimited. Whenever you enter a new room, farm them all out to maximize our Xp to increase our Hellraid Rank.

Hellraid – Clavis Stones:


Achievement #64 – Into the Lava: Kick enemy into lava…
After we collect the second Clavis Stone during the Main Quest, we will make our way into the third tier of Hellraid which contains a room with lava. As soon as we enter the room, quickly run over to the bridge that spans over it & kick/Grapple throw enemies into the lava until the Achievement unlocks.

They just have to fall into the lava, not strictly being kicked into it. The caveat is that the lava itself must kill the enemy, not the fall damage.


Achievement #65 – Clavis Was A Key All Along: Put Clavis Fragments into Arena.
Story Related. After you collect all three Clavis Fragments, place them in the center of the boss room unlocking the Vault & our Achievement.

Hellraid – Imprisoned:
Release Lucius from his magical binds to progress.

Hellraid – Beneath the Seal:
With Lucius rescued, we will now return to the main hub of Hellraid & our new base of operations. Here, we can access Bounties as well as our unlocked Weapons from a Requisition Chest. There are now two separate options for us: Story Mode or Raid Mode.

Story Mode is its own deal that can be completed for cumulative Coins & Xp, however, all of our remaining Achievements are tied to Raid Mode.

The final Main Quests are pretty short & easy; I recommend completing them for extra Xp as well as to gain access to the unique Bow, Corrupted Justice.

Hellraid – Disrupt the Ritual/Sacrificed:


Achievement #66 – Throw Me A Bone: Kill 50 Skeletons with fall damage.
The final Main Quests for the DLC are a great way to rack up kills for this Achievement for how many Skeletons are thrown at us. Whenever you come across them & a two-tiered room, get to the upper floor & kick or Grapple throw them off continually until the fall kills them. We can chip away at this across our entire Hellraid playthrough…
Sequence 24: Get That RAAAAIIIID!
1. Raid Mode
2. Achievements: 71/78
-----------------------------------------------------------------------------------------------------

Raid Mode – Playthrough 1:
While we playthrough our first run of Raid Mode, we need to loot everything that is not nailed down & Dismantle as many Weapons as possible to earn Coins. For the Time to File A Tax Return Achievement, we need to beat a run of Raid Mode with 3000 or more Coins. It is important to note that three new Text Collectibles were added to the DLC in a previous update; they do not contribute to the Well Read Achievement.

As well, begin building arsenal of your most powerful Weapons & save them; we will need every edge we can get for our final two playthroughs of the DLC. For when we have to beat this on Nightmare Difficulty, we want a (Censored by Steam) ton of throwable Flasks & Shivs as they will make things much easier without us needing to grind for Legend Ranks. Loot everything, & start hoarding!


Achievement #67 – Beginnings Are Hard: Die three times on the first floor, before collecting first Clavis Stone.

Start up Raid Mode, & immediately run off of the top of the tower where we spawn to kill ourselves, using up all three Lives. Alternatively, you can also just immediately quit to the main hub as well.

Re-enter Raid Mode, & this time we will complete it in full…

Mysterious Scroll #1 – The Count’s Blood-Covered Letter: From where we first spawn, turn around to look at the statue of Count Begeor behind us; we can find our first Mysterious Scroll at the base of the pedestal to the left.

Mysterious Scroll #2 – Vara’s Request: Break the first Seal & enter into the following room which will be a long dining hall. Defeat the enemies, & before pulling the Lever to let us carry on, head to the far end of the dining hall up a set of stairs into another dining room. Here, we can find a Mysterious Scroll off our right on a wooden cabinet next to a Chest.

Mysterious Scroll #3 – Mysterious Book: Exit back into the main dining room, & take a right, into the kitchens. Go past the very tall shelves to the back of this room where there will be a bookshelf near another Chest. Investigate this bookshelf & we can interact with a red book on the bottom shelf that stands out. Doing so will open up a Secret Room where we can find this Mysterious Scroll on the floor next to the Weapon rack. Heh, panda book…

Mysterious Scroll #4 – Library Notes: Pull the Lever now & exit the dining hall. Disable the next Seal in the smithy & make your way down to the library. Pull the Lever to enter it from the hall full of casks, & head into the reading room immediately off our left. Against the left wall here we can find this Scroll on the floor near a table wedged in between two bookshelves.

Mysterious Scroll #5 – The Last Report: Go to the upper floor of the library now where the Lever to open the lower floor gates are. Before leaving the upper floor, head out the window across a beam to get to a room on the far side. We can find this Scroll in the left corner of this room on the floor next to a skeleton.

Mysterious Scroll #6 – Anat’s Instructions: Kill the Torturer Boss & destroy the following Seal to collect the First Clavis Stone. Pass through the prison & we will enter the torture room next. Defeat the enemies inside then head over to the left side of the lower floor to find a room close to the bottom of the stairs we can enter.

Follow this hall along to the end, then enter another room off our left to find an interrogation chamber with a very uncomfortable chair in its center; the Scroll can be found on a table against the wall here.

Mysterious Scroll #7 – The Appearance of the Chosen One: Break the Seal in the second prison room & we will enter into a room with a pool full of blood. From where we enter, head to the far-left corner of the lower left floor to find this Scroll tucked behind a large book on a podium against the wall.

Mysterious Scroll #8 – The Fate of the Chosen One Part One: Collect the Second Clavis Stone & enter into the following room with a broken statue in its center. Make your way in behind it & we can find this Scroll on top of a sarcophagus at the back.

Mysterious Scroll #9 – Anat’s Letter: Enter into the lava room now & make your way across the wooden walkway towards the exit doors on the upper floor; we can find this Scroll to the left of the doors on a chair.

Mysterious Scroll #10 – The Fate of the Chosen One Part Two: Enter into the final room at the bottom of the tower with the Third Clavis Stone & before grabbing it, look to the wall off our left from the pedestal to find our final Scroll on a chair.


Achievement #68 – Well Read: Collect all 10 Notes.
Collect all 10 of the Mysterious Scrolls to unlock this Achievement. A patch added in three extra Notes, but they do not contribute to this Achievement; these Notes all pertain to Lord Hector.


Achievement #69 – Time to File A Tax Form: Earn more than 3000 Coins in one run.
Complete the rest of Raid Mode & defeat the Minotaur Boss. If you have been looting a lot & dismantling Weapons, looting the vault should put you in the clear. If you completed Side Quest – Mysterious Portal, you will probably have well over 3000 Coins collected…


Achievement #70 – Blocked By Ba’al: Reach level 10 Hellraid Rank.
If you beat the Main Questline, a few Bounties, & a full run of Raid Mode you should have more than enough Xp to reach Hellraid Rank 10. If not, do not worry, as we still have a minimum of two more runs left…

Raid Mode – Playthrough 2:


Achievement #71 – Fast As Hell: Finish Hellraid under 30 minutes.
By now, we should have a decent supply of Weapons & have a good grasp on what to do in Hellraid. While still playing on Normal, we now have to speed run a playthrough of Hellraid in under 30 minutes.

Skip any fight that is not necessary, & whenever we entire a “Wave room”, seek & destroy all the enemies in them as fast as possible. Forget about health, & just attack with blind abandon. If you have amassed a good collection of Orange Tier Battle Mallets you should be able to annihilate pretty easily. When you come to the Torturer & Minotaur Boss, just spam Rusty Shivs or use your Corrupted Justice Bow to dispatch them with ease. Coop can definitely help speed things along as you can multi-task/juggle enemies better, but it is not mandatory.

I was able to beat this solo on my first attempt in under 22 minutes so you should not have too much trouble; lots of error room!
Sequence 25: Literal Hell
1. Raid Mode – Nightmare Difficulty
2. Achievements: 73/78
-----------------------------------------------------------------------------------------------------

Raid Mode – Playthrough… A Lot:
Now, for the hardest Achievement in Dying Light… beating Hellraid on Nightmare Difficulty. You will see everywhere that “Fists are better than Weapons”. In theory, yes, but only if you have 25 points put into Unarmed. With a base damage of 5 & a maxed out multiplier at x375, Fists can deal 1875 a swing… & they never break. So again, yes, that is extremely useful but even to get to Legend Rank 25 will still require a long long time of grinding… but I do not have the time for that.

Instead, we will be relying on Throwables & exploiting Obi-Wan Kenobi’s greatest weapon, the high ground. Time is not an issue, & we can take as long as we want. Preparation is the key to succuss & we can farm for Health Potions, Throwables, & good Weapons on Normal Difficulty before we attempt a Nightmare run.

To change your game Difficulty to Nightmare, you first have to switch your current active Quest to any Base Game Quest, not DLC. Select a Quarantine Zone & quit to the Main Menu. Then go to Play – Play Campaign & select Advanced Options. Here, we can select “Play & Switch to Nightmare” which will boot our game over to Nightmare Difficulty. Then load your game & return to Hellraid to continue.

General Tips:
  • The High Ground: Getting to high points is the number one most life saving strategy as it gets you out of range of most enemies where we can then pick them off one by one.
  • The Stomp Ability: If you can get any enemy onto the ground, then using Stomp on them is an instant kill & saves our Weapon Durability. For Armored Skeletons or anyone else you can’ be bothered with, build up some speed with sprint & Dropkick them to knock them over for an instant Stomp kill.
  • The Grapple Ability: Grapple can be equally broken if your timing is right. With Grapple, we can throw enemies into Spikes, Lava, off of ledges, or just onto the ground so you can Stomp them.
  • Mini-Map: Pay close attention to your Mini-Map to see enemy placement; this is literally eyes in the back of your head to see if enemies are coming up behind you & how fast!
  • LOOT: Don’t be afraid to take your time & loot! It will only make things easier as you can replenish Health Potions, Weapons, & Throwables.
  • Order of Operations: Kill Recruits first, tie up Priest Mages with Acidic Flasks, then Skeletons, then Giant Skeletons. Serfs are jokes; Torturers are critically weak to the high ground & Corrupted Justice…
  • Give Ground: If you do not have Spellcasters or Recruits to worry about, then give ground when fighting slower melee enemies; backtrack into previous rooms if you need to. Walk backwards away from attacks & strike afterwards.
  • Crusader’s Remorse: This is my favourite Weapon in the DLC (not just because I own the actual Darksword Armory Danish Greatsword in real life…) It is fast, strong, but has range! It is very effective at attacks while we back peddle as the enemy can’t hit us, but we can hit them. Put what little Legend Rank Levels we have into the Two-Handed Weapons so we can bump Crusader’s Remorse from the 800s to 1000s. That & Healing Efficiency… because that is also pretty important.
  • Priest Mages: These are the hardest enemy in Hellraid; they are fast & they hit fast. Even at full health, they can maul you to death in under a second if you are not careful! Throw Acidic Flasks at them to put them out of commission; throw two to kill them.
  • Potion of Endurance: Endurance Potions make us invulnerable for a brief period of time… essentially what will get us safely through the “Wave rooms”.
  • Potion of Power: Power Potions increase our damage dealt. Extremely useful when facing Torturers or the Minotaur Boss; in tandem with the Corrupted Justice Bow to be extra cheap!
  • The Mysterious Portal: Just don’t.
  • The Final Waves: When we place the Clavis Stones into the sockets, we will have to fight waves of enemies before the Minotaur arrives. Before each wave, drink a Power & Endurance Potion to increase survivability. Back peddle around the arena & kill the melee targets; if Priest Mages are present, use Acidic Flasks asap. Try leaving at least one Skeleton or Serf alive at the end of each wave so can go around & loot the area.
  • Minotaur Boss: Save as many Arrows as you can & a Potion of Power for the Minotaur. When it finally arrives, get to a high point, drink your Potion, & perform as many Headshots as possible to kill it. Unload all your Throwables if you have to. The Minotaur is our freedom. Be sure to take out the Recruits & Spellcasters before we take our vantage point to kill the Minotaur! If you leave at least one enemy alive, ideally a Skeleton, a new wave will not spawn!
  • Running Low On… Everything: If you have no Weapons, Health Potions, Arrows, or Throwables then return to Normal Difficulty & complete a solid playthrough or two of Raid Mode looting everything you can to restock.


Achievement #72 – Wake Up!: Finish Hellraid on Nightmare.
Story Related. If you have a good supply of Health, Power, & Endurance Potion this is not the worst if you take your time with it. I was able to complete this solo on my second attempt at only Legend Rank 6… but I also logged 130 hours on the game within a month writing this guide. Channel those Dark Souls skills; the key to success is not to rush through it & try your best to fight as many enemies one on one as possible.

Hellraid – The Final Playthrough:


Achievement #73 – Non omnis moriar: Finish Hellraid with only one life left & 0 Medkits.
This Achievement is easier than it sounds especially when it can be done on Normal Difficulty. The only actual problem with it, is that we have to have 0 Health Potions in our Inventory… Hence why it should be saved to the very end of our Hellraid playthroughs when we will no longer need them.

When you have <5 Health Potions & completed the Wake Up! Achievement, this Achievement only comes into play during our final moments against the Minotaur Boss. When the Minotaur appears, & you still have them, drop yourself down to a single Life by dying. Then kill the Minotaur (but be sure to have some Acidic or Shocking Flasks afterwards so we can hurt ourselves).

With the Minotaur dead, & us at 1 Life, kill the remaining enemies in the arena to spawn the exit Portal. We now need to drain all of our remaining Health Potions. Throw a Flask down, walk into it to damage ourselves, then heal until we have no Health Potions left. With only 1/3 Lives & 0 Health Potions in our inventory, walk through the exit Portal to unlock the Achievement.

93% Complete
Sequence 26: Online Coop
1. The Slums, Old Town, The Countryside, The Stadium, Hellraid
2. Achievements: 78/78
-----------------------------------------------------------------------------------------------------

Now it is time for our final Achievements, the Online Achievements, my least favourite kind of any game. Switch your Online status to either LAN or Private to play with people you Invite on your Friends List or set it to Public for a jubilee of randos. Be sure to set Coop Competitions to Frequent so that they appear more often as well!

All of Harran:


Achievement #74 – I’ve Got Your Back: Complete 1 Quest in a Co-op game.
When you are teamed up with at least one other person, complete any Main, Side, DLC, or Repeatable Quest with them to unlock the Achievement. For a quick grind, just choose any Quarantine Zone to repeat.


Achievement #75 – Lucky 7: Win 7 Coop Competitions.
As you play with your Friends, occasionally a pop will appear asking if you wish to participate in a Competition; all Players must accept the request before it will initiate. If you are playing with a Friend who is helping you, just have them lose to get a point towards the Achievement; as an added perk, if you both tie, then all of you will win in the eyes of the Achievement!


Achievement #76 – Harran Athletics: Take part in 10 Coop Competitions.
Win or lose, simply participate in 10 Coop Competitions to unlock this Achievement.


Achievement #77 – Polyamory: Complete 5 Quests in a single Co-op game with the same 3 partners.
Now this is probably the most pain in the (Censored by Steam) Achievement you will have to get; who has three Friends these days?! Be it through Public channels, your own Friends circles, or the comments section of this Steam Guide, link up with three other Players & just grind out any 5 Quests together to boost this Achievement.

To avoid dropouts, quickly speed run the same Quarantine Zone over & over again.

The Stadium – Coop Run:


Achievement #78 – Together Till the End: Be the last man standing.
For our final Achievement, take your best mate who has The Bozak Horde DLC, & enter into the Stadium with them. All we need to do is complete the DLC so final score or time limit does not matter in the slightest. Be mindful that your three Lives are shared between you all however…

When you reach the end of the DLC & defeat the Demolisher Boss Trial, we will enter into a special final Trial, Trial #21. For this final Trial, it is a fight to the death & last man standing will win… & unlock this Achievement. For fairness, you will probably have to do this DLC at least twice together so you can all earn the Achievement. Remember, sharing is caring!

It should be noted that this Achievement is incredibly bugged; even on the Console versions of the game. People report the Achievement unlocking after their first attempt... or up to their tenth. Some things that may potentially help are: Whoever is hosting the game does not go for the Achievement or open the box for the Dual Gun, a non-host (going for the Achievement) opens the box & kills the host/other Players at the end with the Dual Gun, & the trick I see helping some people is to keep shooting the final Player alive even when they are dead for a few seconds & it might trigger the Achievement.
Conclusion:
Dying Light is just straight up a great game. The story is not all that original, however the gameplay is ridiculously addicting; it was very hard staying on task to write the guide & not get sucked down the rabbit hole of killing Infected on the Infamy Bridge… just for fun. 100% is pretty darn easy with the only thing that may give you pause is Hellraid on Nightmare Difficulty & the Online Achievements. Speaking of…

Jolly Cooperation:
If you need a partner for some jolly online cooperation & Achievement boosting, feel free to ask for or offer your assistance in the comments section below. All I ask is that if you no longer need help or no longer wish to give it, delete your comment so that the section isn’t cluttered, or people do not try to contact you in vain.

If this guide helped you achieve 100%, rate the guide or let me know in the comments. Helps me know if I am doing things right!


100% Complete
Thank you for choosing Cynical Guides, & I will see you in the next one!

If you are interested in a little bit of patronage, support my projects & consider buying me a coffee. If not, no worries; my guides are, & will always be free content. Achievement Hunting is my passion, & writing these guides is a way for me to give meaning to a life long hobby!
https://www.buymeacoffee.com/cynic0055

If you enjoy my style of writing guides, be sure to check out my profile for a full list of my works.
https://steamcommunity.com/sharedfiles/filedetails/?id=2992727030

96 opmerkingen
Banana Milk Glorper 2 mrt om 13:51 
idk if this is known, but a group of 4 of us were doing Polyamory and Lucky 7.
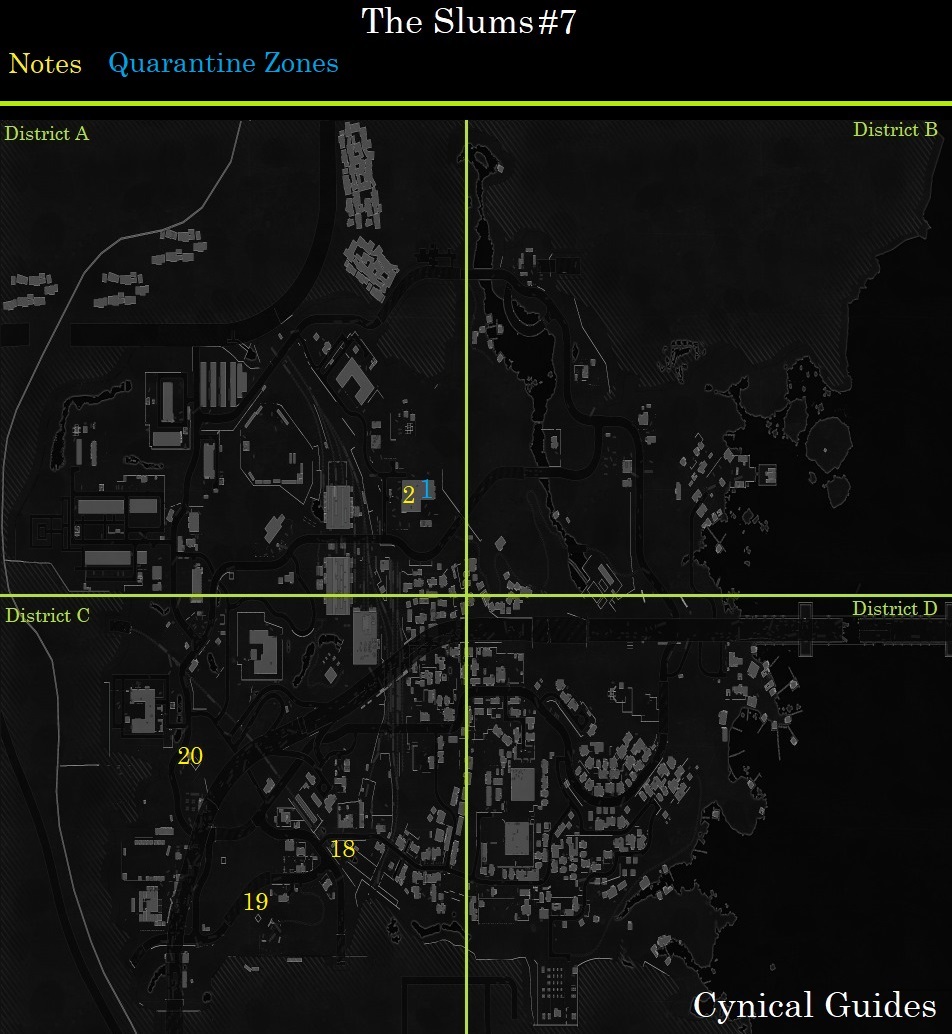
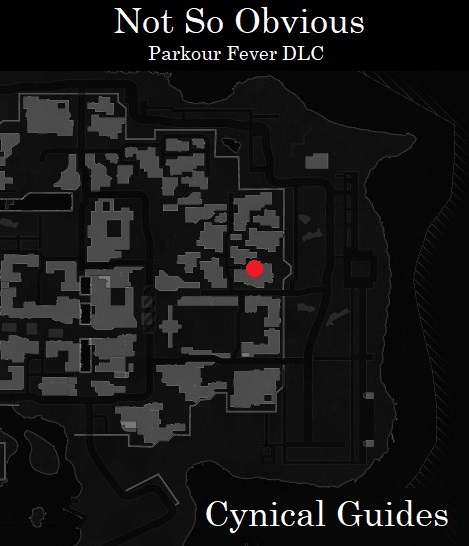
We did Stuffed Turtle QZ twice and it unlocked Polyamory for all of us.
After that we broke into two groups for Lucky 7.
You can get Lucky 7 very fast if you have one person stand at Stuffed Turtle QZ entrance, set a Waypoint across the street to trigger a Race Competition. The person losing goes starts the QZ once the Race is over. You do the QZ, and repeat. Removes the cooldown of the Competitions.
Cynic 0055  [auteur] 1 mrt om 1:20 
Hey Komilj, as far as I am aware that is not the case. You should be able to collect all Collectibles whenever. Some will only become available after completing certain Side Quests, but completing them won't lock you out of going back to grab them.
Komilj 1 mrt om 0:17 
I read somewhere that the "It's all in the writing" ach is missable due to some notes being locked in some side quests. Is this true?
Cynic 0055  [auteur] 5 feb om 10:13 
Hey HarambeVirgin, as far as I am aware, you should be able to most if not everything in the game together. There will probably be some Main Quests that you both will have to do solo occasionally, but otherwise, all Side Quests & Collectible hunting you can definitely do together.

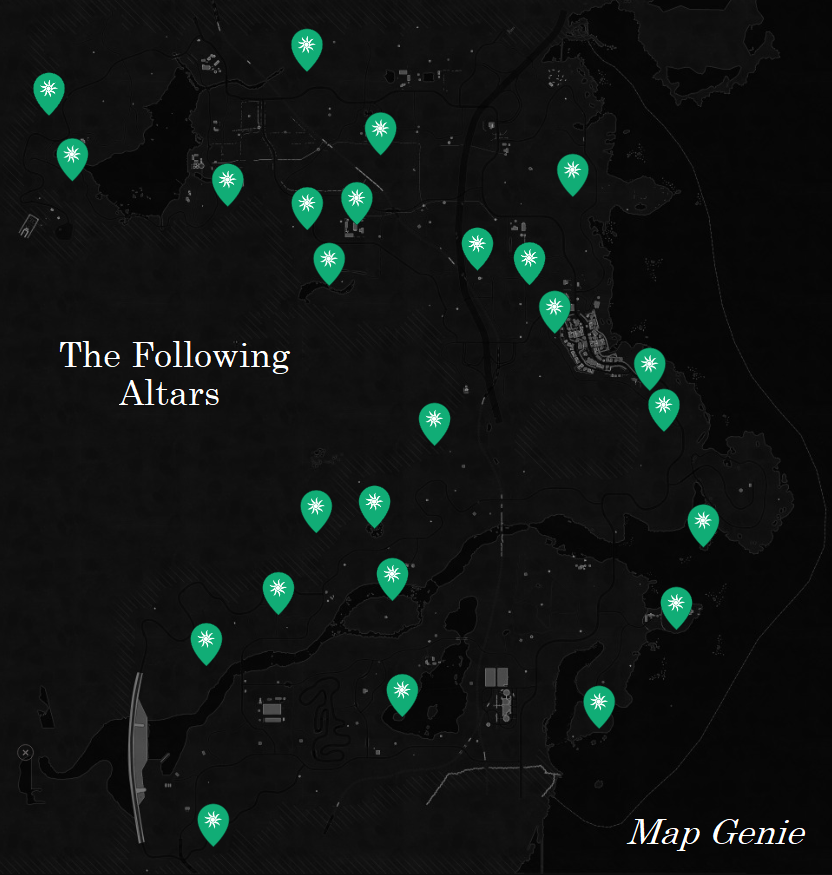
The three DLC expansion (Bozak, Following, & Hellraid) can both be played Co-op as well.
HarambeVirgin 4 feb om 21:00 
Hey Cynic, my girlfriend and I achievement hunt together. I was wondering if we can play together and both get the achievements at the same time or would we need to play on our own worlds?
Ellocofonseca69 7 jan om 15:24 
Hello, i'm looking for people to help me achieve Polyamory and Together Till the End. Feel free to add me if you're interested :stimulation:

I'll also help you in the "Together Till the End" achievment if you need obviosuly.
Val4SV 28 nov 2024 om 11:38 
Cynic, alright I will try and get a crossbow if I will find in a trade place, I will let ya know if I got it, and thank you for the tips.
Cynic 0055  [auteur] 28 nov 2024 om 11:31 
Hey Val4SV, I am not 100% sure if this will help, but I did some quick research & can potentially suggest some things that may or may not work. Firstly, you do need to own the Bozak Horde DLC & have it installed (but you do not need to use the Bozak Bow specifically).

Any & all Bows are usable (including Crossbows which is actually what I used to get the Achievement myself). Lastly, it has to be "one shot, one kill" so you have to instantly kill Rais' men with a single Headshot. Early game Bows don't do a lot of damage but Crossbows should almost always be instant kills with successful Headshots. :ToolsOfDestruction:
Val4SV 28 nov 2024 om 0:23 
hey cynic, I am trying to get the achievement "Robin Hood Theory", but it doesnt seem to work, I am using a normal bow and I headshotted many of rais mens, no body shots nothing, do I need the bozak bow dlc or no? or is the achievement that really bugged.
Brothaa 21 nov 2024 om 2:27 
I'm still grinding out Hellraid and Bozak Horde, but I wouldn't mind grinding out the co-op achievements real quick. Have a mate who's installing it right now, but would love some help with Polyamory. Add me if you want to grind it through :))