Core Keeper

Core Keeper

340 ratings
Optimal Mob Spawning & Farming - Comprehensive Guide!
By ZeroGravitas
Spawn algorithm fully explained, optimised mob farm examples, based on months of in-game testing + new data mining. SPOILERS for game mechanics, biomes, mobs, bosses. [0.5.1.2 Update]
14
12
5
2
12
6
2
3
5
2
3
2
2
   
Award
Favorite
Favorited
Unfavorite
Introduction
Don't be intimidated by the large amount of written details, here. Just looking at the first couple of infographics will probably give most players a strong idea of the shape of things. Which should make a big difference to how you approach mob farming. The rest is for referencing specific eventualities. Of which I'm kind of trying to cover everything! 😵

Gif (right) of most mob types (in 0.5.1.2) spawning together simultaneously and fighting it out. The simplest type of optimised farm type. Similar to those shown in the first graphic, below, and then explained in Example 1, near the end.

Don't be afraid to skip about with the section navigation links, or to ask me a quick question in the comments. I won't tell anybody off for not reading everything!

(Update notes moved to end of guide.)
Mob Spawning Mechanics
This is how the main mob spawning algorithm currently works in Core Keeper 0.5.2.1 (graphic made in 0.4.3). It was discovered after weeks of careful in-game experiments (and one major dead-end). Understanding these basics will let you design drastically more productive farms.


Fully illuminated world map by Craigins. "Mob Grid" lines can be shown by the Map Tool[maptool.ceschmitt.de] for your map, updated in real time as you play (follow instruction there).

Annotations in more detail:

(a) The world is divided up into 16 x 16 tile cells (of 256 tiles area), by the mob spawning algorithm.

(b) Only cells that have their centres within 208 tiles of the player's current position can receive spawn events.

(c) This is a roughly 13 cell radius. So ~530 cells can be active at the absolute maximum.

(d) The transition between cells is between tiles. And the origin of the world coordinate system is the bottom left corner of the default spawn location tile. From there you could manually measure out cell boundaries, without using the Map Tool website.

(e) Spawn events occur at a different time for every cell.

(f) Spawn events have a 15 minute interval by default, for cells in a new world, or a very isolated part of an old map. But this can rise to as high as 22 minutes. Which seems to be (from my limited testing) when more of the (64x64 tile) map chunks have been generated, by exploration, within the 200 tile radius around the player's current position.

(g) A spawn event looks at all the tiles in a cell, starting from the bottom left. Scanning right, then up to the next row.

(h) For each tile of valid spawn surface that it finds, it rolls the appropriate set of chances for the related mobs (see below).

(i) Every mob is treated separately. So that, many (or theoretically *all*) different types can be spawned simultaneously. Not reducing the chances at all for mobs from different surface types.

(j) Optimal farm design will try to maximise the number of different mobs spawned in every cell, within range of player.

(k) Biome borders are geometrically defined, ignoring the undulating canyons and contrasting ground type. The biome your character is currently stood in is always shown at top right of the full map. No name is shown (blank) for dirt/neutral biome, between the others. This is relevant for some spawn surfaces (explained below).

(l) The angle of the biomes is randomly assigned at world creation, so everyone's map looks different.
Spawn Surface Types and Mob/Boss Alliances
Below - mobs are in rows according to the spawn surface type(s) they can come from. These are grouped and colour coded by which other mob types and bosses they are unable to hurt. I've called these 'alliances'. And yes, mobs can be used to farm bosses!

.png]

Explanation of column headers, etc:

• "Max Spawns per Event" - Most mobs are limited to have only 1 of that exact type spawned in any given event. Regardless of how many tiles of their spawn surface are present. Mold infected Cavelings are an exception with 4. Mushrooms with 2 (though not strictly a mob).

• "Min Tiles Req(uired)" - no mobs are permitted to spawn unless the algorithm finds at least this number of their spawn surface tiles in the current cell. Most commonly, this is 6 tiles. Note: strictly speaking, the 1 limit is actually 0. But, logically, nothing can spawn without at least 1 tile, anyway.

• "Spawn Chance per Tile" - these percentage odds are rolled for every mob type that can spawn, for each surface tile the algorithm finds in a cell, during a spawn event.

Source: the above 3 quantities, for each mob, were 'data mined' directly from game asset files. With the help of guide instructions from Cysidus, who uses this technique to to gather precise information for the Wikizet[corekeeper.wikizet.com].

• "# Tiles for 90% Spawn Chance" - Because there are only 256 tiles in each cell, lower spawn chance mobs may need multiple cells full of their spawn to reach 90% chance. Across multiple, staggered spawn events, of course. 90% is an arbitrary guideline figure to aim for, that's 'good enough'.

This was calculated from by figuring out the cumulative chance of *not* getting a spawn in X tiles. See full graph later on for finding all intermediate values!

• Spawn chance decay - A pre-existing mob in the cell decreases spawn chance, for that mob type only, by a factor of 5 each. E.g. 30% down to 6%, for one, or 1.2% with 2 mobs. † Not for Mold mobs: Infected are hard capped at 20, Tentacles at 5.

As found by careful experimentation (method may be explained at a later date) and appears to correlate numerically with data from asset files, although the exact mathematical route of calculation is not certain.
Tile Stacking Precedence and Spawn Blocking
Only the (visibly) topmost spawn surface type has any chance to spawn mobs. Those beneath are blocked. Butt the game is currently quite inconsistent about which other types of tiles will block spawns.

In general, those appearing on top of a spawn surface will block it. But there are several types, highlighted in red, that also block slime surfaces that appear on top. This can be useful, though. E.g. to have the poison effect with the risk of spawning purple slimes that might break things.

.png]

The debuffs, from the various slimes types, all work on mobs (and players) from under Spike Traps. but mostly not through Conveyors. Despite spawning mobs through, without impediment (thankfully). The current exception is acid, with will hurt mobs (not players) through conveyors. Although this is never enough to kill any mobs, on its own.

.png]

I've shown fences because players can walk along the top or bottom of a tile with a horizontal fence segment on it. If that has a slime type on it too, it appears the player is walking on the slime, but receives no rebuff from it. However, I see no practical use for this.


The player character blocks all spawns within a 6 tile radius. So don't stand in the middle of your spawn area:

Graph of Spawn Chance by Number of Tiles
Here's a complete overview of the different base probabilities for spawning each mob type, for every possible number of spawn surface tiles within a single cell:


► Notes:

• Small (Sea) Tentacles are listed twice, for their higher spawn chance in coastal tiles vs open water.

• 256 tiles is the maximum in each 16x16 cell.

• The curves are bunched up near the origin because many types have such a high spawn chance per tile. (Maths heads can look at a version with logarithmic scale, below, to get a clearer view of this region of the graph.) Showing there's no point having more than a dozen tiles for spawning the basic slimes, cavelings, etc.

• The diamond points are plotted to show the minimum tile limits. Many mob types already have a very high spawn chance with just this minimum permitted number of tiles. Hence the possibility for very compact farms of these base type mobs.

• See there's absolutely no benefit in going beyond ~15 tiles of spawn surface for the base tier mobs; by this point they will be virtually guaranteed to spawn every time.

• For a good chance at each of the second tier of mobs (Red Slimes, Big Larva, Shaman, etc) one would need to dedicate most of a spawn cell to their surface type. But there's a diminishing benefit for each additional tile. So it's still optimal to spread a limited number of spawn surface tiles out over as many cells as possible.

• This is especially true for low spawn chance mobs, like Brutes, Core Sentries, etc. E.g. 100 tiles of Stone Moss in a cell will give ~40% chance of a Brute, vs ~70% with a full 256 tiles. So having 2 cells with 100 tiles of Stone Moss, each, will give higher odds (~80%) of a Brute within 1 spawn event cycle. Split over 2 events at a different time in each cell.

.png]
Bonus graphic for maths enthusiasts.
FAQ - What Does NOT Affect Spawning
Does a spawn surface have to be placed on dirt or natural ground?

No. What's underneath doesn't matter at all. Bridges are just as good and spawn rates remain the same. Any additional spawn surfaces under the top one are ignored, too. See graphic in the section below on "Tile Stacking Precedence [etc]".


Does light stop mobs spawning?

No.


Can mobs only spawn off-screen?

No, they can spawn right there in front of you! As long as the spawn surface tile is over 6 tiles from a player - a small exclusion radius. It may just seem like nothing is happening in a farm, because each spawn cell only gets an event once every 15-22 minutes.


Do mobs spawn faster in certain biomes?

No. Except that Crabs (Beach Sand) and Sea Tentacles (any water) must be inside The Sunken Sea biome to work at all. There is no biome effect on spawn rates.

This is contrary to my initial experiments, before figuring out the spawn cell mechanic. I got spurious results, due to the way specific spawn chambers overlapped multiple cells, or lay entirely within just one, getting fewer spawn events over an hour, or whatever.


Is there a mob cap?

No. There's no overall limit on how many mobs, in total, can exist in the entire world, or within 200 tiles of player. However, large numbers of loaded-in mobs will indirectly limit real tile spawn rate, due to CPU load reducing the game's FPS and tick rate. And some players have seen individual mob types reach an apparent cap under extreme circumstances, following a temporary bug that allowed unlimited mob spawning.

Mobs of a specific type, e.g. Big Larva, decrease (by a factor of 5) the chance of another spawning inside that spawn cell. Only in that cell. Small Larva and Cocoon spawning is unaffected, in this example. Only Mold mobs have a hard cap (20 Infected, 5 Mold Tentacles), within a cell. Because their spawn chance is not decreased by existing mobs of their types.
Killing Mobs with Automation
The second part of designing a farm is how to kill the many mobs you've spawned!

It is important that this process is reliable, because there's no off switch for mob spawning, aside from being far away. So if your mobs stop dying, they can start accumulating pretty fast. Potentially causing a major fps reduction in a few hours. Less time for the biggest of farms.

All mobs have out of combat self-healing - their green flash effect. This kicks in whenever *they* are not actively attacking something. This makes weak damage sources like Acid Slime and Drills unable to kill any mobs on their own. Even in normal difficulty worlds.

However, all Spike Traps now block self-heal, too. (Including Galaxite Traps). This is true for all mobs, now, not just slimes. Which directly aggro on, and try to attack the traps themselves, suiciding.

The self-heal blocking effect lasts for a few seconds after a hit. And it means that even the lowly Hive Spikes can kill the toughest of mobs! Even in hard mode... Eventually. Provided the mob is continuously stuck on at least 1 trap. Either by covering the entire spawn area with them, or conveying the mobs into a small kill box with traps.

Either way, it's not possible to collect the dropped loot automatically, with Robot Arms. Because most of the mobs with break the arms. Either directly targeting them, or as collateral damage.

Turrets attack from range, when seeing an enemy in their cone of vision, within about 13 tiles. However, they do not currently halt mob self healing. So they are tricky to use alone. The most reliable way is to build a (fairly complex) line of turrets firing through each other, to stack their damage output into a single spot. See this Steam guide by Frost.

.png]Summary of automated damage sources.

Traps, other objects and mob hit-boxes are all unloaded at around 105 tiles from a player. Notice that this is half of the 208 tile spawn range. This disparity can lead to extremely large accumulations of mobs: if the kill area stops working (beyond 105 tiles), but mobs continue to spawn (within 208 tiles) and pile up. That is, in conjunction with conveyor collection, which moves mobs over any distance range, like they do with lose items.

Research method note: I probed the load-in range of Spike traps by setting one in a small conveyor loop with Caveling Hunters on. They remain aggo'd on the trap for a while after it hits them, trying to shoot it once the conveyor moved them out of melee range. By lining this up in front of a long open corridor, I was able to see the range at which they stopped shooting me, by carefully moving away (and back) a tile at a time. I also observed their projectiles travelling to a range of 200 tiles, maximum (by teleporting further out quickly to spot them).
Mob Stats and Additional Notes
Mob-vs-mob shooting galleries may be the best option. They can more easily kill mobs on conveyors, such that the loot can be automatically collected without breaking the Robot Arms.

They will also work the same in hard mode, given that mob damage is doubled along with health, cancelling each other out. Thus, mob stats may become relevant to decide which mobs to use against the others: health, damage, range, etc. In addition to the alliance groupings (above).

Although, in truth, the options are limited. Especially for monsters: only Bubble Crabs are both containable and able to do enough damage at range. Cavelings can use Scholars (Urban Moss), Assassins (Valley Moss) or maybe Hunters (Lush Moss), but the Gardeners may get in the way.

.png]
• Shrooman die easily to spike traps (in normal mode), allowing automated mushroom harvesting. They don't attack drills that hurt them, either.
• Orange Slimes are passive vs players, until hit.
• All slime colours aggro on spike traps that hit them, jumping to their death; one trap can be enough for a whole spawn chamber. But not hive spikes.
• Ranged spear thrower. Will almost always spawn as a pair with...
• Melee spear user.
• Small Larva are passive vs other mobs. But attack torches and players.
• Big Larva attack most player placed objects: e.g. furiature, electronics, chests (not doors or wire). Also mushrooms, harvesting them (credit: Rice Gnat).
• Cocoons only hatch with player proximity and are not targeted by any mobs. However, they only reduce their own spawn chance and block a single tile.
• Cavelings sometimes attack weaker walls when enclosed (e.g. dirt, clay) and automation (drills, arms). Not doors.
• Shaman's fireball attack applies a burning affect that hits for 21 additional damage every 3 seconds.
• Brute attacks break ground covering tiles and walls! They see over walls and attack players/enemies within 2 tiles. Beware!
• Hunter bullets can travel up to 200 tiles range. They will also fire at spike traps, for a short while after moving out of melee range (e.g. on a conveyor).
• Gardeners can place up to 5 snare plants, total, if they pass over a tile of (Wilderness) grass (in any biome) while they are aggro'd.
• Snare Plants will only ever attack players. They can not be hit by projectiles. Up to 5 are spawned per Farmer, on Wilderness Grass when Aggro'd.
• Purple Slimes poison other mobs on hit, so could be used for (75%) anti-heal.
• Only Mold Infected Cavelings can spawn multiple (up to 4) per cell in one event. They do not reduce the chance of more spawning, until a hard cap of 20.
• Mold Tentacles don't reduce the chance of more spawning in their cell until they reach a hard cap of 5. (From in-game experiments.)
• Crabs and (sea) Tentacles can only spawn on tiles within the Sunken Sea biome area.
• Because Sea Tentacles prefer to spawn adjacent to solid ground they can mostly be blocked by lining coasts with bridge tiles.
• Blue slimes slide further when jump-attacking and their slippery debuff can send other mobs flying.
• Scholars use a healing beam on injured Sentries and other Scholars.
• Sentries are motionless and passive until activated by damage or close proximity (8 tiles) to player. They then have the longest targeting range (18 tiles).
• Bomb Scarabs can fly over gaps, self detonate at low health and have an extremely low spawn chance limited to only the Desert. Impractical to farm.
• Assassins have the highest total ranged damage output of any Caveling, with their rapid 3 dagger volleys.
• Move by sliding faster when aggro'd, jump attacks at close range.
• Lava Butterflies fly over gaps but are still affected by conveyors and traps.
Mob Drops Overview Cheatsheet
Why spawn mobs? One might want them for skill farming or pure entertainment. But most of the time it's all about their sweet, sweet loot drops! Here they all are, at a quick glance. To help figure out which mobs and spawn surfaces are going to be most useful for what you are after:

b.png]

Exact percentage drop chances for all these enemies are available via this index of mobs on the wikizet wiki[corekeeper.wikizet.com].

Not shown in above table:

• Hive Mother Larva spawns (red variants) do not have any drops. Hence why their trophies come from the regular Larva (at a lower drop chance). These 'adds' are good for skill farming combat abilities, though.

Acid Larva[corekeeper.wikizet.com] can not be spawned like other mobs. So, to farm their trophy, you would have to create new worlds to explore their native Hive sub-biome in The Clay Caves.
Example 1 - Rainbow Mob Battle Mini Farm
The simplest possible farm exploiting the full capacity of the spawn algorithm. This is one of the two cells shown in the first infographic (top). It was made in 0.4, before the desert update:


Spike Traps are used, here, primarily to stop the mushrooms accumulating and blocking the Fungal Ground. If slimes win the fight, they will eventually suicide onto any traps, too. Otherwise, the mobs just kill each other. This has the advantage of working the same in hard mode worlds. Where mob health and damage are currently both doubled up.

However, with all surfaces laid in the fairly minimal proportions (above), the fight outcomes are quite variable. Changing between alliances (Cavelings, Slime, Infected), depending on exact spawning positions and mob's targeting.

Super-quick and easy to set up, the disadvantage is that it scales up horribly; you have to collect drops manually. Also, if a Caveling Brute spawns (unlikely but possible) they will rip up a lot of the other spawn tile types with their attack. This is a very major design consideration for all farms. Especially those with conveyors.


These are all the drops from just under 9 hours of AFKing the two little rainbow farms in the top infographic. About 70 spawn events, equivalent to 17.5 hours on one cell, or 15 minutes on 70 cells. (Hunter drop rates have been reduced since this was done.)


► Build Tutorial:

The spawn surfaces in this example appear (left to right) in the natural order of acquisition. As one normally progresses through a world. So, players could gradually build up these farms as they go.

Stone Moss Cavelings, or higher, should reliably kill the lesser mobs, but then be left alive. Thus requiring players to kill them, or full spike coverage, or conveyors to a kill room.

There's no need to separate the cells from each other (with moats, or walls). Just around the outside, to stop mobs causing trouble elsewhere.

If you want to avoid finding the exact spawn cell grid location, using the Map Tool[maptool.ceschmitt.de] and/or carefully measuring (in game) from the spawn origin point, you could instead:

Lay 1 tile wide strips of spawn surface in long lines. One of each type, adjacent, for as much space as you can make. Repeating the stripe pattern every 16 tiles, so that each spawn type will naturally still have the base number in each spawn cell. Regardless of how those align, exactly. Use floor tiles, torches, or something else to help count the gaps.

Of course, you could have double of triple rows of e.g. Chrysalis. Or alternate blue and purple slime in sections 8 tiles long, within a single row.

Updated gif for 0.5 Desert of Beginnings:
Example 2 - Optimal Auto-Sorted All Mob Farm
This is designed to be the ultimate farm, integrating all the knowledge and tricks, above! Its form has been been dictated by the various limitations and idiosyncrasies of Core Keeper:

(1) To feed loot directly into chests, all the mobs must be killed while still on conveyors.

(2) Automation can't do this, so mob-vs-mob kills are required.

(3) Ranged attacks (>2 tiles away) must be used against Brutes, to prevent them breaking conveyors. Tentacles are awkward to spawn in enough numbers to do this with reasonable efficiency. So Crabs must be used. So farm must be in range of the Sea Biome.

(4) Maximising spawns per 16x16 cell means each must contain all spawn surfaces. But Brutes must be kept from interacting with any non-Cavelings, so there must be a two way split. Making the main spawn areas look like interleaved fingers, or battery electrodes.

(5) To be able to extend the spawn areas, indefinitely, topology dictates the relative position of the kill loops. Including the overflows from the shooting gallery loops. Because conveyor lines can not cross.


Again, to show the spawn cell positions in my world, the "Mob Grid" button was used on the Map Tool website: https://maptool.ceschmitt.de/#

(6) Robot Arms, collecting from the kill loops, are carefully shielded with walls and restricted angles, to protect from collateral damage; 2 consecutive stray hits will break them.

Any Caveling miners or Big Larva that get to the back of the loops could also spontaneously break them. But the huge amount of firepower prevents this, in normal operation. A large accumulation of monsters, on the left kill loop, is more likely to break that arm, as mobs attack each other. But this can only happen if the kill area is out of (~200 tile) player range, while the spawn areas are inside.

(7) The automatic door, at the end of the Caveling collection line, can be used to shut off farming for repairs, or such. More importantly, the tile gap in the conveyor means any (edge case) accumulation of Cavelings will pile up there, instead of the loop. Without this, in extreme cases where that kill loop became over-saturated, the ranged Cavelings were able to kill most of the crabs. The gap tile has poison slime as a bonus, reducing self-healing. But they die so fast to bubble spam it's not important.

(8) Spawn areas for the Scholars' shooting gallery have only 7-8 tiles of Urban Moss, making the odds of any Sentries spawning very low. However, I did have to cull the odd one manually, because they tend to jam up the conveyor loop. They don't contribute to firepower, either, because they are inactive by default.

(9) Shooting gallery has an extra tile of conveyor inside the end turns, to prevent Scholars getting jammed into the corners and blocking the circulation. Rotating the shooting mobs spreads out any damage to them, so they don't ever die.

(10) Mold ground, under the shooting loops, stops the mobs running against the conveyor and opening up gaps. More importantly, it stops any randomly running off the overflow conveyor. Allowing the back-flow conveyor section to be only 1 tile. That is only overcome when mobs stack up and push the extra off. To be killing on the opposite side.

(11) Robot arms on the shooting loops clear loot from rare deaths, there. But are not important; none of mine died during my 4.5h test.

Example section of the main spawning area, which features all 9 (biome flexible) spawn surface in every cell.

(12) The relative proportions of spawn surfaces can be adjusted depending on what (higher tier) mobs you want to farm.

(13) I used a significant amount Chrysalis to ensure Big Larva spawn regularly. I then initially convey all Larva in the opposite direction to the other monsters, bringing them back down a line of Fungal Soil, running across all the cells. This pretty much ensures that the mushrooms are all harvested between each new spawn event, to stop them stalling out spawns. However, this setup costs a lot of potential spawn area space (~12.5%) taken up with walls.

(14) The 2 tile gap between Cavelings and Monsters takes another 12.5% of the spawn area. But mirroring the layout, vertically, from row to row, means you only need one separating gap per cell. The wall is necessary to prevent ranged attacks, too.

(15) The main collection conveyor is kept a little way off the border line, because mobs can reduce spawning in multiple cells that their overlap. Having Mold Ground under the collection line is just a bonus; most of the monsters move too slowly, most of the time, to randomly walk off the side of a conveyor.


(16) The spawn area of this farm can be extended above and below, in all directions. This example only used ~14 cells to spawn mobs, but could reasonably be extended to use several hundreds! Over 500 maximum, by my calculation. But FPS reduction from all the mobs, being collected, would limit the value of that, past a point.

(17) The kill loops could be extended (downwards) to provide more firepower, if needed (unlikely). Similarly, it's assumed that you would expand the Scholar spawn area out to the left and Crab's Beach Sand to the right, to ensure against any attrition.


4.5 hours of loot from AFKing the above farm. That is, all the items beyond 1, in each slot. A selection of all (unstackable) equipment in the last 2-wide chest. The money is from selling all the actual equipment that dropped during the run.

(18) The chest auto-sorting system relies on filling out all the slots of each chest with the items you want to collect in it. So any other types don't fit, falling to the ground outside instead, then pulled off by the drills.

The drills are on a 1 second oscillator circuit, turning them on and off again, before they can damage or breaking chests. This is just a Delay Circuit feeding back to the 3rd input of a Logic Circuit. 2 input on = output on. 3 inputs on = output off. Repeat after a 1 second delay.

(19) Automatically farming Sea Tentacles is absolutely possible. But automatically collecting their drops means deploying a drill or robot arm to every single tile of water they might spawn in! You need 14 tiles just to hit 50% odds of a spawn (45 for 90% odds). Then there's a only a 31% chance a Tentacle will drop any loot. Which is mostly the same as crabs.

So this design (using Mold Infected to kill them) is pure novelty:


Example 3 - Full range mega-farm by KanSer


Not spawn cell optimised! He built this to make use of the full ~200+ tiles of maximum spawn range - the entire region from the core to Ghorm's slime ring! With many thousands of tiles of conveyors, to bring the mobs to a central collection point.

However this build was made before I'd figured out the spawn cell mechanic. Hence it uses single spawn surfaces over very large areas. Which is very inefficient for the basic mobs, so not recommended, here.

In particular, because blue and purple slimes have no secondary tier of mobs, anything past ~10 tiles of those slime tiles (per cell) is pure waste. Lush moss, too. But his farm spawned plenty of the higher tier mobs from the other surface types. So, apart from those slimes, it maybe OK if you're after a more even split of mob types. And you don't want a lot more of the basic tier mobs for free.

This mostly killed the mobs with poison + spikes and a bunch of entertaining fighting amongst themselves. But the Stone Moss Cavelings had to be kept separate, because of the brutes potential to break the conveyors, in battle. Instead, they were taken on a tour up and down 3 entire lengths of the Mold spawning area. With a 2 tile gap between the conveyor and the Mold ground, so that Tentacles might kill the Cavelings without incident.


Drop collection relied on the player wearing 2 magnet rings to pull them in from range and deposit them manually for an auto-sorting system to store away.

KanSer kindly lent me his save to experiment on: I dammed up the mob collection conveyors to accumulate a huge number of mobs. This didn't appear to slow down the spawning of different mob types. Which gave me confidence that there is no overall mob cap on spawning more. Just grindingly slow frame rates that makes more = less. Down to 2fps here!:

Update Notes
0.4.5 - Removed stone and grass as Caveling spawn surfaces.

0.4.8 - "Fix limit for how many mobs are spawned." reverted a bug introduced 3 days earlier.

0.5.0.0 - Added new spawn surfaces (and enemies): Clay Moss (Caveling Spearman and Caveling Skirmisher), Valley Moss (Caveling Assassin), Desert Sand (Bomb Scarab), Ground Lava Slime (Lava Slimes, Lava Butterfly).
- Health scaling increased for later game mobs (up by ~80% Sunken Sea).
- Mobs no longer regenerate health while taking trap damage (basic Spike or Hive Traps can now kill all mobs).
- Added new traps: Poison Spike Trap, Galaxite (Flame) Trap, Stone Turret, Galaxite Turret.
- Levers now generate power and doesn't block movement.
- New ambush spawning mechanism: Larva from Clay biome walls, Omorth tentacles in Sea biome, Bomb Scarabs in the Desert.
Links
• Large parts of this guide have been translated, here on the Japanese wiki[wikiwiki.jp]:

• Dakon has started a beginner tutorial video series for mob farms:

Acknowledgements:
Credit: Thanks to all those mentioned above, for help. Also to various Discord users who've hung out in the University Thread to discuss my findings and give feedback on my infographics, as I've slowly made each one.

Fellow creatives: if this material inspires some of your content, I'd appreciate a quick shout-out and link back to this guide. 👍

• Core Keeper content and materials are the intellectual property of their respective owners. The above textual and graphical guide information is provided under a Creative Commons Attribution-NonCommercial-ShareAlike 4.0 International licence (CC BY-NC-SA 4.0[creativecommons.org]). For as far as this is compatible with Steam community terms and conditions. Specifically, I do not consent to duplication of of my original work for commercial use. Which includes websites running advertisements besides copies of this material (you know who you are).
99 Comments
PBLivingston Jul 21 @ 10:34pm 
@ZeroGravitas I've watched crabs and various cavelings die without being aggro'd on anything, as long as they stayed on the acid. If they left the acid for about (or maybe exactly) a second, they'd heal, but otherwise they'd die after a few minutes. I'm not sure if they would heal after aggro'ing on something and then losing aggro while on acid, though. Scholars will still heal Sentries and each other while taking acid damage. No surprise there, though.
ZeroGravitas  [author] Jul 21 @ 4:04pm 
@PBLivingston - Things could well have changed. Or, was it that they don't heal while aggro'd..? So might the acid kill method be contextual?
PBLivingston Jul 21 @ 1:37pm 
Also, here's a mostly useless, minor correction or something that was changed:

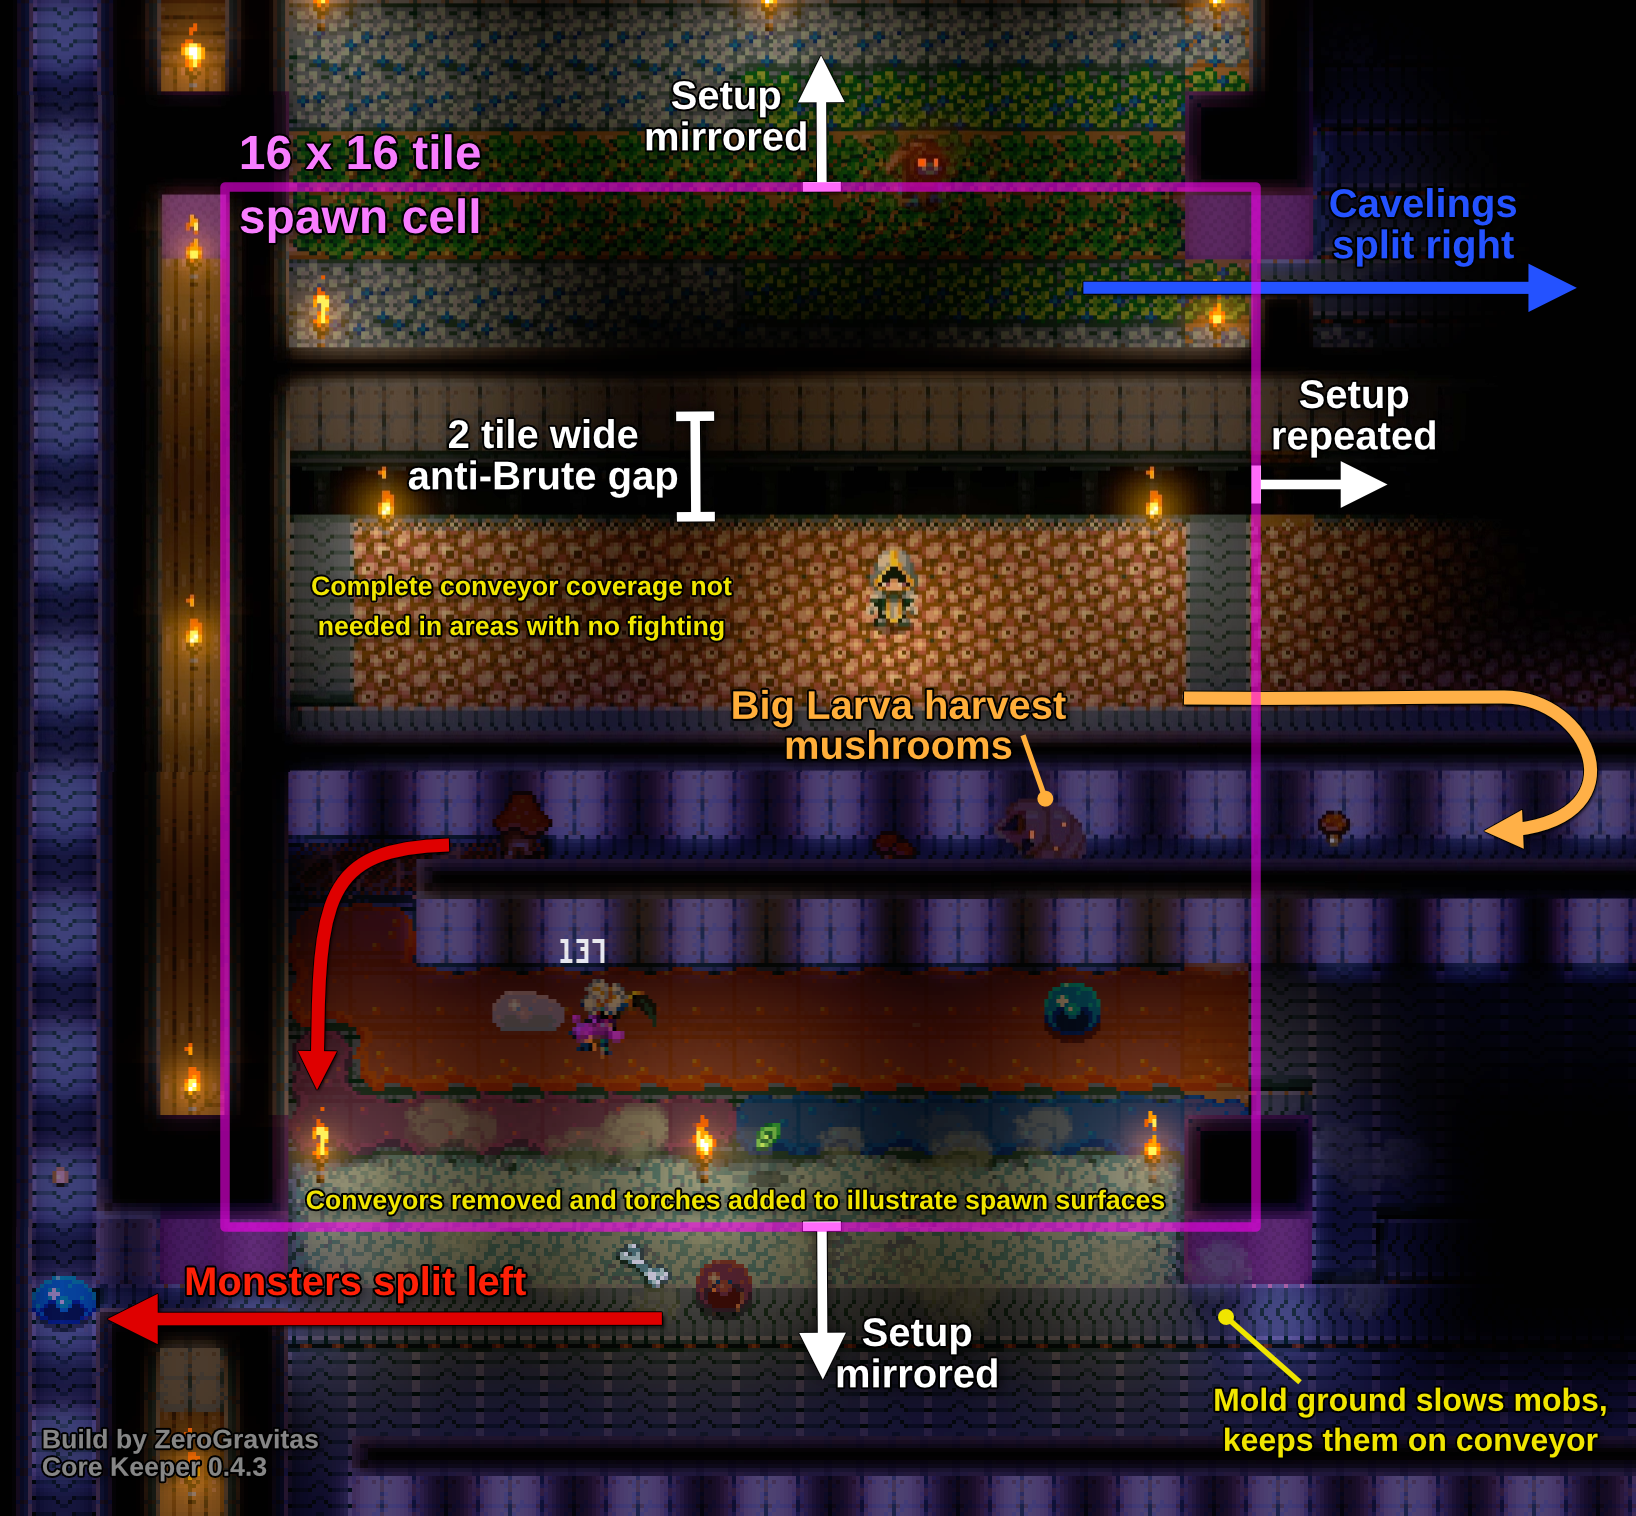
Mobs don't seem to regenerate health when taking acid damage, so as long as they don't walk off, acid can in fact kill things on its own.

It's abysmally slow and only really useful for protecting arms from Caveling Miners (can fight conveyors on mold and can break arms) in very niche situations, but even on hard difficulty, it is reasonably effective in those situations.
PBLivingston Jul 21 @ 1:02pm 
I added crystal crust to my farm once I found it, but it seems my stone bricks walls were not sufficient to contain the mimites. I replaced them with metropolis blocks for now, but if anyone knows which blocks are safe from mimites, I would love the info. I'm currently gambling with the metropolis blocks, but I assume blocks requiring higher mining damage are better. They don't break floor covering tiles, so the spawn tiles and conveyors have been perfectly safe.
Water Monkey Apr 17 @ 7:37am 
Oh I thought they broke walls and stuff like brutes. Nevermind then, especially since I have't gotten to em yet
ZeroGravitas  [author] Apr 16 @ 1:33am 
@Water Monkey - Oh, I see, the Google Sheet @Imsomeguy linked back in Feb last year. Sorry, clean forgot.

I didn't think the Core Sentries (from Urban Moss) break any ground tiles? That been changed, or not what you mean? Or like, turrets, doors or other objects? When aggro'd on other mobs.
Water Monkey Apr 15 @ 5:17am 
Oh I hope you get better soon. And I was talking about the spreadsheet someone in the comments here made awhile ago. As for the design, that's okay I'll just try to make little patches for just the scholars and crabs then. Though I am worried about the guardians in the scholar moss area smashing things so any advice is appreciated
ZeroGravitas  [author] Apr 4 @ 3:35pm 
@Water Monkey - I've only published the above info on how to make my farm design. Maybe you are thinking of one that Darkon showed off on YouTube, with the spreadsheet design..?

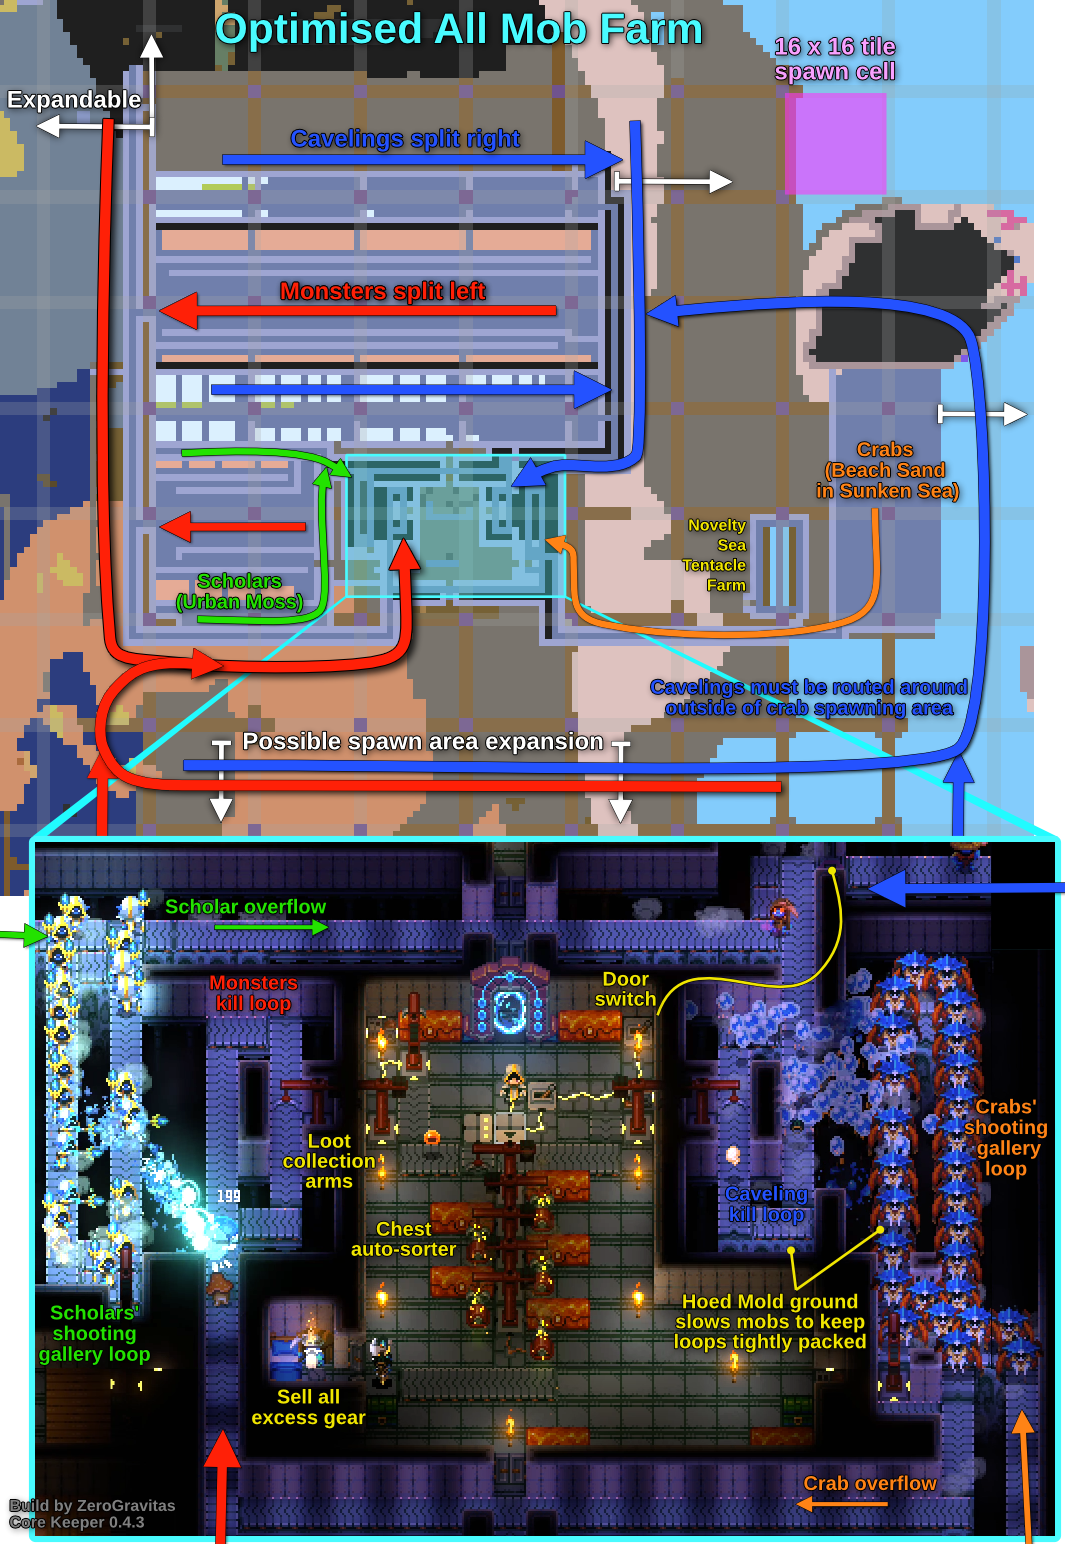
I know my design is very complex. Sorry, a more detailed walk-through was more than I was capable of making. And sorry for the delay answering, I've just had Covid for a second time and it doesn't' play well with my pre-exisiting ME/CFS.
Water Monkey Mar 19 @ 5:55pm 
Seems I forgot about the scholars area. Sorry if my questions seem annoying, I have a learning disability so I have difficulty understanding the pictures. Like the connections between the arms the chests and so on seem complex to me
Water Monkey Mar 18 @ 1:20pm 
I saw the google spreadsheet for the spawning area so that's good. But how do you make the sorting area and the area for crabs?