Borderlands 2

Borderlands 2

1,726 ratings
Leveling As: Gaige, the Mechromancer
By Albinosaurus
This is the first of what I hope to make into a guide series "Leveling As." My goal is to provide some useful information on how to get through various segments of the game as each class. This will not be a full blown walkthrough of the game, and I will assume that you have at least completed normal once and have seen the main story all the way through. That said, possible spoilers within.
3
2
13
2
   
Award
Favorite
Favorited
Unfavorite
Intro
This guide series will have a build-centric focus. That is to say, I am going to provide specific build advice to help you through the leveling process, and as such levels will be more important than your actual story progress.

Gaige is very powerful when played properly, and her damage scaling is quite impressive when used with the right kind of weaponry. For the purposes of this guide, I am going to exclude the most "broken" or "OP" weapons that most other guides will suggest since I want to keep the guide focused on your actual build and not on how long you're willing to farm.
The early game / Core build explained
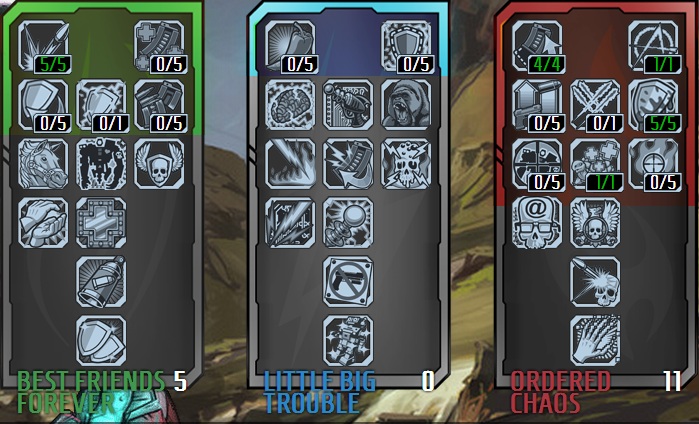
From levels 6-21, you want to aim for these core skills in this order:


Anarchy: This is obvious. Building stacks increases damage, but lowers accuracy.

Smaller, Lighter, Faster: This is required to advance in the Ordered Chaos tree, but it also synergizes with Anarchy to help you build stacks faster.
Blood-Soaked Shields: This is your primary survival skill. Each time you kill an enemy, your shields are instantly recharged to full. This is especially potent on nova, adaptive, turtle, and absorb shields. If you like to use the Bee (unique shield), this is amazing for that shield as well.

Note that DT's kills do not proc this effect, only your own kills.


Discord: This is primary to keep you from losing stacks on accident, but skilled players can toggle its effect for increased burst dps when needed. This is easiest to accomplish with Tediore reloads (weapon thrown like a grenade). I do not know off-hand if Anarchy stacks apply to the thrown component of Tediore reloads, but I believe they do.

Close Enough: 50% chance to ricochet bullets to nearby enemies. The ricochets will basically always hit unless the enemy physically moves out of the way, or put another way, the ricochet has 100% accuracy from the point of impact to the space the target occupies at the moment of impact. Fast moving targets like Rakk can sometimes (but not often) evade the ricochet attacks.

The primary benefit of this skill is that it basically negates the penalty of Anarchy stacks by ensuring an average of at least 50% accuracy so long as you hit near the enemy. This is not a sniping build, so feel free to jump in the air and target their feet, or simply do so from a high ground position.


While using this build, you are free to use pretty much any high capacity, rapid-fire, or multiple projectile weapon type (ARs, SMGs, Shotguns, auto pistols, etc). Do not use precision weaponry like revolvers, sniper rifles, e-tech dart pistols, etc. Preferably, you will want to have an elemental SMG as your primary go-to weapon, a triple or quad barrel shotgun for burst dps, a high damage launcher (only for Fight For Your Life easy pick-ups), and a free slot to try whatever sounds like fun or put your favorite gun in.

Concerning Buck Up, this may have some use in multiplayer, but even then I would not recommend it. DT's entire job description is to keep the enemies shooting at him and to kill them. You don't want him running to you, causing you to take collateral damage from stuff aimed at him, only to try to restore a measly 30% shield when you already have Blood-Soaked Shields to keep you alive. As for your allies, they have the tools in their builds to keep themselves alive, and it is not your job to compensate for their poor planning or build.

Assuming you are going through the main story, be sure to stop in Tundra Express and farm Varkids for good exp/loot. All you do is go to the farm house and aggro all the varkids, run in circles while avoiding damage so that they'll go into their pods and evolve. It's up to you whether you want to farm adults, badasses, or super badasses, but you get bonus exp if you kill the pods before they hatch. You will also want to complete the Fink's Slaughterhouse arena to get the unique AR Hail[borderlands.wikia.com]. While you do not need this weapon for the build, it is quite complementary to it and is recommended. If you farm enough varkids and clear the arena, you should be around level 20 by the time you're ready to take on the Wildlife Preserve.
21-40, completing normal and leveling for TVHM
It is worth going out of your way to farm the Bee[borderlands.wikia.com] shield for the sake of fast leveling, but you don't have to. When you finish normal, you will want to level to 40-42 in one of three ways:

a) Kill the Warrior repeatedly.
  • Lots of exp per kill
  • Tons of eridium per kill
  • Lots of blues/purples and a chance at legendaries
  • Can use the Rakk farming method if you only want exp (very boring though)
  • Gets really repetitive
  • Most of the gear won't be relevant by the time you reach Sanctuary in TVHM, so it's only really for twinking purposes or to find a good class mod

b) Do Hero's Pass runs. This is less boring than the Warrior, and lets you complete many challenges due to the enemy diversity and all the containers lying around. No bonus chance for legendaries (meaning it's nearly 0%) since there are no named enemies in this zone. This area can be cleared very quickly with more players.

c) Complete optional DLC. This is the most fun way to do it, but also the most time-consuming. Still a great option if you want to knock out some achievements that you haven't earned yet.

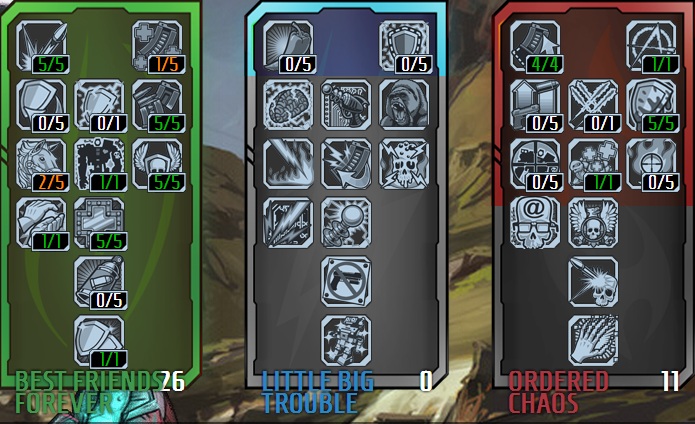
The build progresses as follows:


The Better Half: This skill gives you a substantial dps increase while also helping you to build Anarchy stacks faster. Just watch your ammo count, because you will be chewing through rounds faster than a fat kid through a cookie store. NOW I WANT COOKIES!

Upshot Robot This skill turns DT into a freaking GOD. As long as there are enemies to kill and they don't deplete his health, he will be out nearly all the time, so don't ever feel like you need to save your action skill for anything. Spam that button!

Deathclap This just adds a huge aoe attack to DT, but it does A LOT of damage and is ALWAYS worth the 1 point investment.

Made of Sterner Stuff You will enjoy the added survival from the damage reduction and DT will enjoy melting things even faster. It's totally win/win.

The rest of the points are discretionary. The allocation I show is my preference, but there really is no wrong way to go from here. Just make sure you get down to...

Sharing is Caring This shield has a few specialty uses in the form of roid, nova, spike, adaptive, or special effects of unique shields (Black Hole[borderlands.wikia.com] comes to mind). If nothing else, it will just add survivability to DT, which makes him almost never go away when paired with Upshot Robot.

Once you reach level 40-42, you will be ready to advance to playthrough 2 (TVHM). I highly recommend that you acquire at least 1 good slag weapon before you start it.
40-50, TVHM
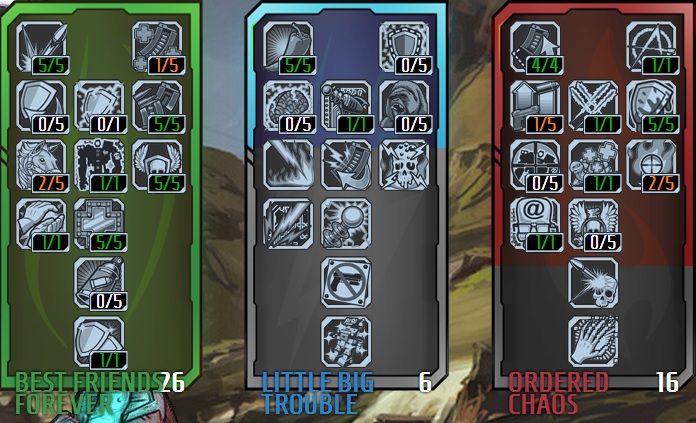
Your main goal is to complete this playthrough. As with normal, the gear you find here will be made obsolete very quickly in UVHM, so focus on leveling and progressing. Here is the progression of the build:


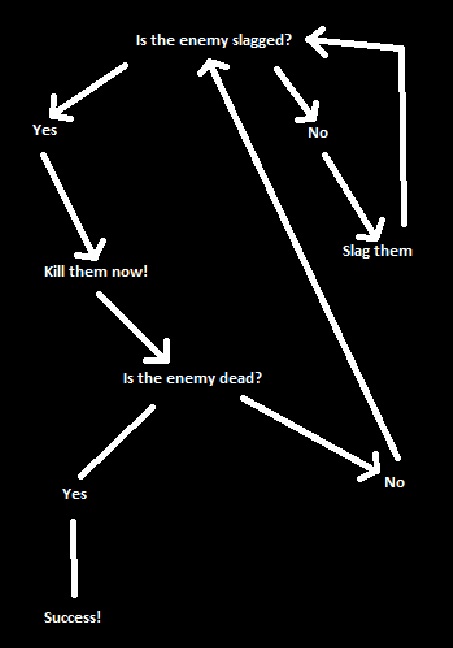
In TVHM and UVHM you get bonuses to swap speed and bonus damage to slagged enemies, so take advantage of that. Get yourself a really good slag weapon (Slagga[borderlands.wikia.com] is quite good), swap to a strong elemental SMG, and unload on them. Rinse, repeat, ???, profit!

The points up to Rational Anarchist are discretionary, so do what works for you, but don't pass up Robot Rampage. These two should be quite self-explanatory by now. From then on, it's time to start down the Little Big Trouble tree. Start with More Pep to proc your elemental effects more often, which will save you ammo and increase your damage output.

EXTK909 points out that The Stare is apparently bugged:
  • Deathtrap will sometimes target players with the laser, this deals no damage but wastes Deathtraps duration timer.
  • If Deathtrap's target dies sometimes he will not lock onto another target but stay in the laser position for the remaining duration of The Stare. There is a very small chance that he will lock onto an enemy target, this target can even be one that he would not normal use his abilities against.
  • Deathtrap does not actually sweep the laser across the battlefield as stated in the description.

I can confirm points 1 and 3, but have never experienced point 2. This skill isn't crucial to the build or anything, but I personally like providing more tools to DT. The only skills I refuse to give him are 1-2-Boom (because it sucks) and Buck Up (because it detracts from his purpose).
Thanks, EXTK, for pointing that out.

TVHM is where you will probably start farming specific enemies for certain weapons or gear, so your loadout can vary quite widely from that of another Gaige player--even one using this same guide/build. The important thing here is to use what works. Try to focus on killing enemies as fast as possible while not getting constantly downed. At this point, you may want to consider reading a couple of the other guides here to find which loadout you have access to and that you think would be successful for you. Do note that you can clear TVHM without the use of any legendaries with this build, so use your own judgment to decide if it's going to slow for you or if you are able to shred through it quickly.
50-72, UVHM
The same advice from the TVHM section applies here with two important notes:

a) Slag is required to progress at any decent pace.


b) Farming legendaries is actually meaningful and highly encouraged. To this end, I highly recommend completing most of the quests in the game to have access to their farm locations and creatures, but be sure to look up the items you want beforehand since some items are missable and some of them go away upon completion of the quest (like the Grog Nozzle[borderlands.wikia.com]).

Here is the final evolution of the build:


Update: For a slightly more min-maxed build, try this:


After a little more testing, I decided to drop The Stare because I'd simply rather have the points elsewhere, and More Pep just isn't needed if you're already using rapid-fire or multi-projectile weaponry. I never get Buck Up, 1-2-Boom, or Shock and AAAGGGGHHH!, because they frankly just suck and aren't worth the point investment. Myelin is really taken for the Shock resistance since shields get instantly owned in 72+ anyway, which is also why I favor all the extra max health, damage reduction, and health regen talents. 20% Cooler gives 30% cdr at 5/5, and DT is vital to your survival at this point, so keep him out as often and as long as possible. Unstoppable Force is completely optional, but I favor it for the movespeed and to help top off my Bee shield when only taking light fire. If you are using Black Hole, Rough Rider, or basically anything other than an amp shield, feel free to move these points elsewhere. Always take Blood-Soaked Shields unless you are using the Roughrider, but this is probably a bad shield for Gaige since she doesn't get anything that really benefits from having her shields constantly depleted, as described on the wikia:

"
  • Deathtrap may still attempt to use Buck Up; Interacts well with Sharing is Caring
  • Unstoppable Force and Myelin lose utility
  • Fancy Mathematics and Blood Soaked Shields rendered useless
[/i][/list]"

Anarchy, Smaller, Lighter, Faster, Close Enough, The Better Half, The Nth Degree, and the anarchy stack generation talents are where your huge dps scaling comes from, so don't pass those up.

::A Note On The Nth Degree::
I previously underestimated this skill (though I still thought it was amazing, if that puts it into perspective). It turns out that when used with Close Enough, if a bullet ricochets off a surface (Close Enough) and hits an enemy (let's say, "enemy A"), then ricochets off enemy A to hit enemy B, it will not do the 50% damage that Close Enough would normally incur; instead, target B takes FULL DAMAGE from the attack. This means that The Nth Degree provides a substantial dps increase while also making ammo far more efficient.

Another important point is that you can use this skill with weapons that have predictable projectile trajectories like the Sandhawk, Unkempt Harold, Heartbreaker, etc to maximize your damage against large groups of foes. Combine this with The Bee for god-like damage and... Great success!
Thanks again to EXTK909 for this bit of info.
Update: Recommended Gear (And where to find it)
First play through / low level

Getting to Sanctuary is simple enough, but the game will introduce you to your first challenge in Frostburn Canyon. The difficulty here is that you will encounter a lot of enemies that deal fire damage as well as resist it, as well as a number of Badass Psychos. Thankfully, the devs have squirrelled away a nice rare SMG for you to use, and it is easy to find.


The Lascaux[borderlands.wikia.com]. This weapon can come in many variants, so feel free to save/quit and run it a few times to find one you like. Don't worry too much about it being "perfect," though, since you will likely be replacing it in a few levels anyway.

The Slagga[borderlands.wikia.com]/Maggie[borderlands.wikia.com]

I highly recommend the Slagga for TVHM and UVHM. Getting it is simple. SImply start the quest chain in Sanctuary at the bounty board for the Zaford/Hodunk rivalry (this is a reference to the Hatfield/McCoy rivalry), and complete it up until the showdown. You will have to choose which side to side with. If you side with the Zafords (kill the Hodunks), you can farm this last encounter for the Slagga.

Unlike other extra projectile weapons (namely shotguns, usually), the Slagga only consumes one round to fire three. It also has a very high slag chance, and respectable damage to boot. This is a great fit for Gaige, since her class skills don't offer many options for slag, and this leaves her a little bit gear-dependant in this regard. Sure, she gets Interspersed Outburst if you go really deep into the LBT tree, but it's unreliable and requires you to commit a lot of points away from stronger options.

If you have other good slag options, Magic Missile[borderlands.wikia.com] for example, you might consider siding with the Hodunks (kill the Zafords) to farm the Maggie. Those who played the first Borderlands will recognize this style of revolver known as "masher." This is the only revolver in Borderlands 2 of this type. Other than the relatively low mag size and fire rate (compared to SMGs or ARs), this weapon can output a surprising amount of damage when used by Gaige.

Whichever way you go, these weapons are easy to access, easy to farm, and very powerful for their respective level.

Class Mods

This one really depends on what DLC you have and if the ideal mods happen to drop for you or not.

As a rule, these are the ones I stick to:

Prodigy
+Accuracy
+Reload Speed
  • Cooking Up Trouble
  • The Better Half
  • More Pep
Punk
+Fire Rate
-Mag Size
  • The Better Half
  • Annoyed Android (1 point this)
  • Smaller, Lighter, Faster
Legendary Mechromancer (drops from loot midgets)
+Action Skill Cooldown Rate
  • Cooking Up Trouble
  • The Better Half
  • 20% Cooler (1+ point)
  • More Pep (1+ point)
  • Strength of Five Gorillas (1+ point)
  • Smaller, Lighter, Faster
Slayer of Terramorphous (Only if using fire weapons as primary)
+Burn Chance
+Burn Damage
+Max Health
  • Fancy Mathematics (1 point)
  • Made of Sterner Stuff (1+ point)
  • Evil Enchantress (1 point if you are far enough down this tree)
  • Interspersed Outburst (you probably shouldn't be this deep in the tree)
  • Preshrunk Cyberpunk
Necromancer (from Tiny Tina)
Chaotic: Fire Rate
Neutral: Mag Size
Lawful: Accuracy (you probably don't want this)

Evil: Crit Damage (you don't want this)
Neutral: Mag Size (stacks with prefix)
Good: Reload Speed
  • Made of Sterner Stuff
  • Strength of Five Gorillax
  • Wires Don't Talk (you probably shouldn't be this deep into the tree)

Shields
The Bee[borderlands.wikia.com]
The Bee is a legendary amp shield dropped by Hunter Helquist. The shield features:

Low capacity
Long recharge delay
Fast recharge rate
By far the highest amp damage in the game relative to other amp shields of similar level
No shield drain from amped shots

This is one of those "OP" shields that if you can avoid getting hit, you will do godly damage as any class, but far more rediculous as a Mechromancer. To get this shield, you must first progress the story to the Arid Nexus: Boneyard. Then go back to Sanctuary and get the quest "This Just In" from Mordecai. Complete the quest and return to Mordecai. From now on, Hunter Helquist will always spawn on that tower in the radio room. Farming him is very fast and easy since he is right next to the zone-in, and you can simply save/quit/continue to respawn him as much as needed. If you are lucky, the shield will rarely come with the "Inflammable" prefix, which bears fire immunity as long as you have any amount of shield still remaining.

::Important Note About The Bee::
The bonus amp damage is divided by the number of projectiles listed on a weapon's item card. For example, a shotgun with x12 projectiles will divide the bonus damage of The Bee by 12 and distribute it evenly among each projectile.

However, weapons with unlisted bonus projectiles like the Sandhawk, Unkempt Harold, Slagga, etc get the full bonus for each projectile. THIS IS HUGE. This is also what makes The Bee so freakin' OP.

Black Hole[borderlands.wikia.com]
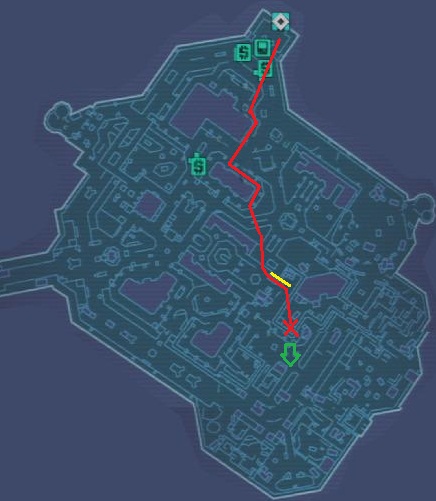
The Black Hole Shield is a legendary dropped by Foreman Jasper/Rusty in Opportunity during the quest "Hell Hath No Fury." I do not know off hand if he continues to spawn after completion of this quest, but I do not complete it. He will respawn every time if you are on that quest. Opportunity can be a fustercluck to navigate, so I've detailed a safe/fast route for you to follow here:


Follow the red line to the X. The yellow bars represent an area where you will walk up one of two "ramps" to a high plataeu that overlooks the Foreman's location, marked by the green arrow. If you follow this correctly, you should not encounter any enemies until you actually engage him. Be aware that across from this area is another high plataeu with scaffolding where lots of badass loaders and various types of surveyors can spawn.

This shield has two special properties to note:
-It procs a large singularity effect when your shields or health are depleted
-It does HUGE shock nova damage under these same conditions

The shield itself is ridiculous on Gaige once you have the Sharing Is Caring perk, because it will pull all nearby enemies into melee range of DT, right before it nukes them. Combine this with DT's Explosive Clap, and not much is likely to survive. Do note that this singularity effect going off when your health is depleted is quite handy for securing Second Winds.

Other Gear?
As for relics, most of them have only a single effect until you get the "Ancients" line on farm (usually from loot midgets on UVHM), so I'll leave that up to your judgment by simply saying that you should use whichever one compliments your needs the best. Sometimes this will be a certain damage type, maybe a certain stockpile relic, or a common and potent choice would be max shield capacity. Use the best one you find.

That's it for this update. There are tons of farming guides out there, so I won't be adding much more in the way of gear here. Do let me know if you would like something else added, though!
Closing Thoughts
I hope this has been helpful, or at least educational. Keep in mind that this build is best for leveling, but is strong overall and can do most end-game, non-raid content reasonably easily solo. There are many build variations, and even entirely other build options when playing as Gaige, and I encourage you to explore those, but hopefully this guide series will be useful as a starting point for those just wanting to get into the game without having to stress too much about what build they should use. That being said, there is quite a lot of depth to this game, especially where builds are concerned, so don't be afraid to experiment and enjoy the game.

Feel free to leave your own thoughts, comments, tips, advice, or build ideas in the comments. Remember: keep it friendly and constructive.

230 Comments
Loukingree Jun 22, 2023 @ 12:18pm 
ty ^^ I wanna try all of them eventually
Albinosaurus  [author] Jun 22, 2023 @ 12:10pm 
Those are fair considerations, and if the build helped you to analyze the mechanics and your style of play more deeply, I'm quite happy to let it serve an educational/informational role. I will say that even though I never got around to making a guide for him, Salvador is the most busted/exploitable character in the game, so do some homework on that if you're looking to easily crush UVHM and OP+. I just found it rather cheesy and preferred other characters more.
Loukingree Jun 22, 2023 @ 12:04pm 
I was thinking about Preshrunk Cyberpunk, and I think it's not enphazied enough that you actually need to go past 150 Anarchy stacks for that to be necessary, wich is an important thing to think about. And Idk at wich point Anarchy actually starts to be heavy on your accuracy, but shooting the ground is (very funny) very ineffective unless you really can't hit your shots anymore (50% chance to hit the shots, half the damage).

also, The NTH Degre is only every 5Th (from the ones that actually hit the target) at best for 100%.. But still sounds not good enough for 5 skill points :(

I saw some people complain about anarchy stacks ("farming the Marcus dummy for half an hour is horrible").. And now I understand. 1-2 stacks per reload, and if you die it's ALL gonne.. Very important to understand that and decide wether or not going past 150 stacks (wich is already a lot to farm for) is for you. Not for me, I die a lot.
Loukingree Jun 22, 2023 @ 12:04pm 
I loved your guide S2:steamthis: :), I actually understand many things about Gaige and some equipment now! That's how I can actually THINK about my dang build now lol, because I believe as much as this build is great, it doesn't really work for me.

And if this is the only way to go thro UVHM.. Thro farming Anarchy (and not dying), Imma stay at TVHM (not missing much honestly).

And play with a different char later of course!

Cheers:BL3Thumbsup::bandit::loot:
Albinosaurus  [author] Jun 22, 2023 @ 11:17am 
I'm glad this guide is still useful to people years after I have stopped playing. Thank you for your compliments and trying out the guide. :vaultkey:
MIKO FREEMAN Jun 22, 2023 @ 7:08am 
excellent first run guide, educational and entertaining, machro is fun, funny, and smartplay. using ricochets as main dmg, makes u look for new ways to do missions. i recommend u check fibber pistol from Mal, the ricochets can get to 3000%. lately i'm testing the use of infinity pistol with anarchy, and its so OP, i understand why developers made it "hard" to set. thanks for this guide :)))
Loukingree Jun 21, 2023 @ 8:51pm 
Loved it! Ty
AAAAAAAAHHHHHHHHHHHHHHHHHHHHHHHH May 25, 2023 @ 10:25pm 
awesome
Banana Man Dec 28, 2022 @ 5:42pm 
wait there's more than 4 playable characters???????
swyler Aug 2, 2022 @ 4:25am 
Based and Gaige-Pilled