Project Zomboid

Project Zomboid

Ocen: 344
Ultimate Multiplayer Guide [b41]
Autorzy: Aiteron i 2 innych współtwórców
I will tell you how to go all the way from buying the game to meeting other players online
8
5
2
2
2
2
   
Przyznaj nagrodę
Ulubione
Ulubione
Usuń z ulubionych
Introduction
Have you bought the game on Steam and want to play Multiplayer with friends or random players? Then this guide is for you. I will tell you how to go all the way from buying the game to meeting other players online.

IMPORTANT: Before you read this guide make sure you DO NOT have any mods!

[QnA] Mod Helper - build 41 MP

If you are still struggling with getting your server work after going through this guide, check this guides:
[QnA] Admin Helper - build 41 MP
[QnA] Client Helper - build 41 MP

For request help in the comment section below answering the following questions:
• What is your game version?
• Are you using the "Host" function or is it a dedicated server?
• Do you have any mods enabled?
• What is the exact Error (can be a screenshot)
• Share the Console txt file.
(Go to C:\Users\YourUserName\Zomboid > Open the console.txt > Copy everything from there to https://pastebin.com/ > Click “Create a new paste” > Share the website link of the new paste here)

You want to play on server
Installation
1. Open your Steam Library and find Project Zomboid in the list.
2. RMC (Right mouse click) the game, and open Properties.
3. Choose NONE (none is the latest stable build of the game)
4. Install (or update) the game.
5. Start the game.

Multiplayer options:
  • "Host" server - You can run a coop game. To join an existing one, you have to be invited by a Steam friend.
  • "Dedicated" server - Search in the "Internet" tab by its server name, or connect directly by using the server IP.

Filling the description.
  • Server name: Server name.
  • IP: Server IP if you are joining by one.
  • Local IP: Skip here.
  • Port: 16261 (This is the default Project Zomboid port)
  • Server password: Server password (Use if the server has one)
  • Description: Write or use the server description when adding to your Favorites.
  • Account Username: Write the nickname that you want to have on the server.
  • Account Password: Write your password that you will use for the server here.


How to find a public server:
Main menu > Join > Click the "Internet" tab and choose server you like. Or you can find region-based servers and coop servers in our Discord. TIS Discord[discord.gg] in LFG chats!

7. Have fun!
- If you have issues with connect to server or problems with game - check this guide:
[QnA] Client Helper - build 41 MP

How to run a "Host" server.
1. Start the game
2. Main menu > Host
3. Manage settings > Create new settings > Tune your server > Save
4. Back > Start
5. To invite your friends: ESC > Invite. Or invite them via Steam
6. How to make yourself an admin: /setaccesslevel "username" admin
Where username is your in-game name (with space and capitalized letters if you have those) and with ".


Server Memory Advice:
For a bare minimum, have 2Gb set as your memory for the server, for a better experience have at least 2Gb, additionally, add ~500Mb per any planned player that will be on the server.
-- Example: 4Gb for 4 players (2Gb Starting + 4*500mb = 4Gb) --

Remember!
Running a server is pretty demanding. You need an SSD drive, a stable internet connection, enough RAM for the server and your PC and players from your region !!!

Other:
- If you have issues with host server (for example Friends can't connect to server) - check this guide: [QnA] Admin Helper - build 41 MP
- For admin tools read this: Admin tools - build 41 MP
How to create a Steam dedicated server (on your PC)
If you want to host dedicated server on your PC, you will need to solve the following problems:
1. You need a public IP address for your PC, make sure your internet service provider has allocated one for you.
You can simply call your provider and ask if you have one.

How to Find Your Private and Public IP Addresses[www.howtogeek.com]
!!! Your private and public IP must be same
-- You do not need a public IP address to host a coop "Host" server.

2. You need to open these ports:
UDP: 16261 and 16262

2.1. Open ports in windows firewall

2.2. Open ports in your antivirus: (skip if you don't have antivirus on your PC)
Check how to open ports in antivirus in Google
(Example Google Search: "Antivirus open ports")
A note: Some aggressive AV programs ignore the exceptions, and removing AV can be only way to have your server run.

2.3 Open ports in your router: (skip if you have direct connect)
You can find guides on how to open the ports on your specific router by simply looking up the router name and writing "port opening" after it.
Example Google Search: "Asus router port opening"

Otherwise - Other players will not be able to see and connect to your server!


STEPS:
1) Go to your Steam Library > On the top left, click the "Games" menu and check "Tools" to allow game tools to show up in your Steam Library
2) Find the “Project Zomboid Dedicated Server” in your Steam Library
3) Rightclick the Dedicated Server Tool > Properties > Betas > NONE to update the server to the latest MP version (If needed).

You will now have two new folders:
The main server files are located by default here
"SteamLibrary\steamapps\common\Project Zomboid Dedicated Server"
The server settings are located here
"C:\Users\YourPCUserName\Zomboid\Server\servertest.ini"


4) Go to the servertest.ini and tune your settings.
Guide: Configure server - build 41 MP
5) Configure amount of RAM for you server
- Go to your "SteamLibrary\SteamApps\common\Project Zomboid Dedicated Server" folder
- Open StartServer64.bat in text editor
- Change next parameters:
Delete the -Xms16g parameter
Change the -Xmx to however much RAM you need for your server (Example: -Xmx6G)
Recommend amount of RAM: 2Gb as a start + 500Mb per player
So if you want play in team of 10 players, need (2 + 0.5*10)=7Gb of RAM
- Save and close this file.
5) Run the StartServer64.bat file
6) Wait until you see the successful "*** SERVER STARTED ****" message
DON'T CLOSE CONSOLE
7) Start your game > Click Join > Fill your server info on the right side of the screen
8) Click "Save" and now you can join your server from your "Favorites" tab.
9) HAVE FUN, DON'T GET BITTEN!

Note: Launching a server will open a command console window that begins executing the server on your machine. On the first run, it will prompt you to set a password for the admin account it will create. Don't lose the password you create !!!
How to configure a dedicated 'rented' server (or VPS) (Windows)
Komentarzy: 95
Juniper 21 marca o 22:16 
@Destroyer BG
Copy the batch file you use for your current server instance and then open it with a text editor, adding the following between -cp %PZ_CLASSPATH% zombie.network.GameServer and -statistic 0 :

-servername <your_name_here>

Make it all lowercase to be safe and do not use spaces. Then, inside your C:/Users/<user_name>/Zomboid/Server/ there should be another folder alongside servertest (or whatever your first server instance is named), matching the name inside the batch file, once you start the server instance for the first time.


@Ebonkoi
There is a StartServer64_nosteam.bat inside the server root directory, which contains -Dzomboid.steam=0 . This is what GOG players need to use for non-steam relay servers.
Ebonkoi 15 marca o 18:12 
Is it possible to create a server for crack players? I have the original game, but it's really annoying when a friend doesn't have the money to buy it and play it.
Destroyer BG 4 grudnia 2024 o 16:18 
Hello I want to ask can I make a second server somehow like keeping the one server that I have already hosted and create a new world to play with someone else?
Puppers 15 października 2024 o 10:59 
@osmar type /setaccesslevel "username" admin ...it is case sensitive so example for me would be /setaccesslevel Puppers admin
Osmar Telo 21 września 2024 o 10:16 
How do I become admin on the host server?
Lor 27 sierpnia 2024 o 14:40 
Holy christ I'm glad I found this, was tearing my hair out til I found your port config info here, seems the official wiki is incorrect -_- Said to map TCP to one of the ports.
Mickmane 23 sierpnia 2024 o 3:08 
My computer:

Windows 10 Home (64-bit, x64-based processor)
AMD Ryzen 5 2600X Six-Core Processor, 3.60 GHz
16GB RAM
GeForce GTX 950 Graphic card, Game Ready Driver 551.76
BenQ EL2870U Monitor, Native: 3840x2160
Mickmane 23 sierpnia 2024 o 3:08 
What if I want to start some other server than the default servertest.ini?

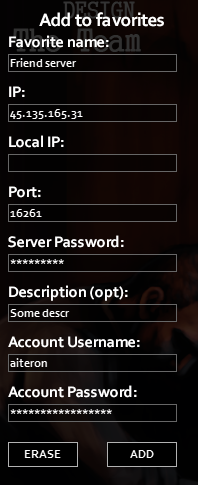
I've got a (so far only hosted in-game) server that I use for testing stuff, and a different one that I play on with a friend.

So far, I can only invite the friend once the hosted server loaded my character into the game. I would like a dedicated server (on my computer) that we can both join at the same time.

I do similar for Terraria; separate .bat files that launch separate config files for different worlds. Friends can walk around on the launched world(s) whether my character is present or not. (The Don't Starve Together dedicated servers are too complicated for me, but there I can tell the friend when to join, while still loading.)

Can you help here? :)

Thanks! :)
Cachorro Chupetao 22 lipca 2024 o 6:58 
@boomerman look at the final note
boomerman 15 czerwca 2024 o 3:58 
Hi,

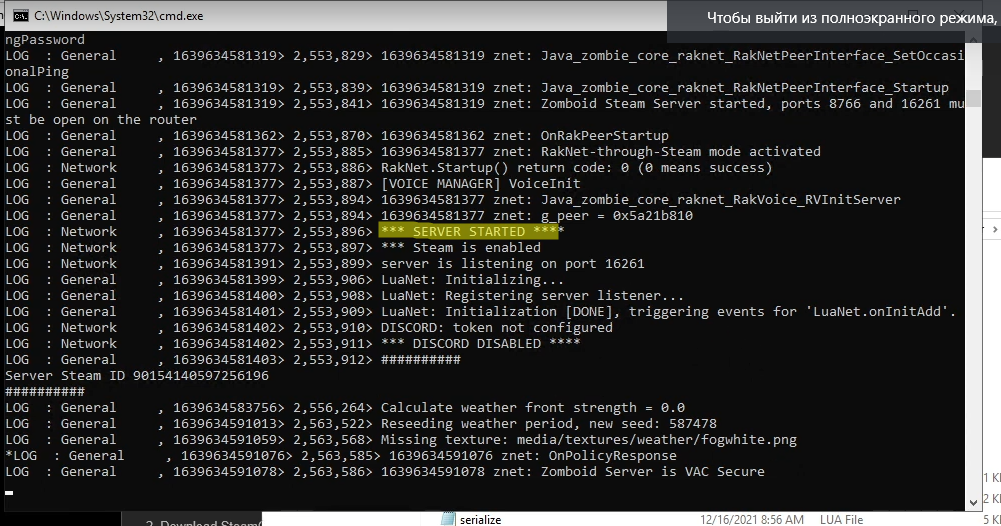
When I first launched the server, it didn't ask for the admin ID or password. Should I be worried?