Oxygen Not Included

Oxygen Not Included

87 valoraciones
Ultimate Divergent (Sweetle and Grubgrub) Ranching Guide
Por Magialisk
A step-by-step walkthrough for constructing simple, automated divergent ranches. Also includes a compendium of research and statistics on the performance of divergent critters.
3
2
6
2
2
2
   
Premio
Favoritos
Favorito
Quitar
1. Introduction
Last updated 09/17/2022 for the Fast Friends Update - Build 514967

I recently published a guide on ranching hatches (Update: and one for dreckos!), and then decided to play my first swampy asteroid. I knew there wouldn't be any hatches but I assumed I could ranch sweetles using the same strategies to provide food for the colony. While I wouldn't have the infinite energy that comes from burning coal, I intended to use plug slugs to take over that role and I thought the sucrose from sweetles could jump start an early rocketry program.

It didn't take me long to realize that my assumptions were quite flawed. Ranching sweetles (optimally) is quite different from ranching hatches. In addition, I found that there is far less information available online about the DLC critters, and some of what's out there is not quite correct. I ran several hundred cycles of testing on divergent critters, plus their interactions with grubfruit, and I wanted to share what I've learned.

Note that most readers can skip sections 3 and 4 of this guide and jump straight into ranch construction.
Those two sections are for collecting knowledge about divergent critters and assisting other designers in perfecting a divergent ranch.
2. Mark II - What's New?
In this iteration of the guide I not only added a bunch of new material but I overhauled the entire layout. There are far too many changes to list them one by one here. I started out by incorporating the improvements I recently made to my hatch and drecko guides. Specifically, removing reliance on solid filter technology, and cleaning up superfluous build options.

After multiple runs of building these ranches, especially post Spaced Out!, I realized that it takes a lot of rushing mechatronics skills and research to get to a half-functional state. The biggest impediment was the solid filter for sorting eggs, which in the original design was the very first upgrade from the fully-manual ranch. In Spaced Out! this tech requires 40 Applied Science research (400 radbolts) plus 30 Data Science research. This requires either launching a rocket to collect databanks, or analyzing 2-3 geysers (~10ea) and collecting a few more databanks from POIs around the map. Not to mention researching and building a virtual planetarium to use the databanks... it's really a whole lot of effort for one simple conveyor filter.

This improved build allows you to delay solid filter research until much later in the game, or at your discretion not use solid filters at all! You'll still need to skill up a Mechatronics Engineer fairly early, but I feel like almost everyone does that anyway. You'll also have to crank out 200 radbolts (probably from a manual generator) to research the conveyor receptacle. But this design can get up and running in a productive way much earlier in the game.

As for the build options, there is still a lot of choice and freedom in how you design your divergent ranch. I just removed the detailed build plans for multiple suboptimal designs. The original guide had three build options for a 25x4 stable, plus a "mini" 16x4 variant, and in my opinion it was just too hard to follow all that. This guide will still comment on other build options where appropriate, without showing detailed step by step builds. This allows me to focus on only the most optimal build plans.

In addition to the above tweaks, I've done a lot of new testing and compiled enhanced data, especially focusing on three areas:
  • Starvation ranching of both sweetles and grubgrubs (yes, it is possible, in fact with sweetles it’s optimal!)
  • Determining the impact of tending different numbers of grubfruit plants on grubgrub egg production
  • Optimization to produce either the maximum BBQ or maximum grubfruit preserve per unit of Sulfur
The above research culminated in huge efficiency gains in terms of KCal/sulfur . In the previous guide the most min/maxed variant of my “maximum meat” strategy could feed 28.7 dupes from a single 750 kg/cycle sulfur geyser. With the new optimizations I can present a game-tested design able to feed 37 dupes from the same amount of sulfur! While most people will never need to scale that large, it was fun to push the limits of what divergents can do.
3. Research and Game Mechanics
Most readers can skip sections 3 and 4 and jump straight into ranch construction.
This section documents various game mechanics and tests I ran to understand divergent critters, fact check what little information I could find online about them, and hopefully learn to optimize ranching them.

I'm documenting this information so other folks can potentially build upon it and come up with enhanced designs. If you're just here to build a ranch that works, you don't need any of this meta-info. But if you like game mechanics, or want to know why I made some of the decisions I did in my design, please read on.

For the record, the best information I could find prior to starting this guide is in the following two posts, which I used as my jumping off point for further research:

zach123b - Sweetles and Grubgrubs
https://forums.kleientertainment.com/forums/topic/123942-sweetles-and-grubgrubs/
MooChiChi - Divergents: The Solved Mystery
https://forums.kleientertainment.com/forums/topic/126611-divergents-the-solved-mystery/
- Ranching Divergents (Naively)
One of the first experiments I ran was to compare the meat production from straight ranching divergents against hatches. I built three automated ranches in the style of my previous guide and filled one with eight hatches, one with eight sweetles and one with six grubgrubs. Grubgrubs require 16 tiles per critter so six is the maximum capacity of a 96 tile ranch. The following screenshot shows the latter two ranches, along with the frozen storage for preserving and counting all resources produced.


I ran the ranches for ~450 cycles, taking measurements along the way. In the end I removed the first ~100 cycles worth of data to ensure the remaining data reflected the long term stable output. It takes a ranch 20-45 cycles to produce its first meat, so I didn't want the early meatless period weighing down the numbers. I also wanted to ensure that the counting duration spanned multiple critter lifetimes and replacements from eggs. The results I obtained are shown below:


The unstated unit in the screenshot is KCal/cycle after cooking the meat into barbecue. The hatch and sweetle data came out almost exactly as I expected, but the grubgrub data was significantly lower. I don't believe anything went wrong with the test, given the setup and counting method was identical to the other two, so I likely made a mistake in predicting egg counts based on their reproduction rate?

In any case, it is clear that ranching divergent critters solely for meat is not nearly as effective as ranching hatches. Hatch ranches produce ~50% more KCal per cycle by default, so we're going to have to combine divergents with farm crops to make up the difference.
- Divergent Reproduction
For the most part, divergents reproduce according to the same rules as other "standard" critters in ONI. They do not have the ability to infinitely reproduce while glum like shine bugs and pacu. The only thing unique about divergents is that they are capable of producing eggs for two types of sub-species.

I won't go into much detail as this is covered well in various other places (e.g FANDOM Wiki[oxygennotincluded.fandom.com]) but the term "divergent" refers to both sweetles and grubgrubs. Either critter can lay eggs of either type, with the chances of grubgrub eggs going up every time either critter tends to a Grubfruit plant.
    Wild Divergents
    At the beginning of the game only wild sweetles will spawn, but it is possible they may replace themselves with grubgrubs if spawned near a wild grubfruit plant. I ran tests on different combinations of wild, tame, fed, starved, groomed (happy) and glum divergents. The results are summarized below:
    • A wild sweetle will not reproduce while glum.
      • When starting a new game, sweetles often spawn in groups of 3-4 in small caves. If not dug out and given more room they will be overcrowded and glum, and most of them will eventually die before reproducing.
      • If you plan to acquire sweetles you'll want to locate their biomes and open up their caves relatively early to give them room. If it takes 35 cycles to find them, half of them may already be dead or beyond reproductive age. Early exploration must be a focus!
    • A wild sweetle which is not glum for at least 50 cycles (100 cycles for grubgrub) will lay exactly one egg in its lifetime.
    Tame Divergents
    Once you've tamed a divergent critter it is possible to maintain (grubgrubs) or even slowly grow (sweetles) the population through starvation ranching, as long as you continue grooming them. Feeding them in addition to grooming will rapidly increase the population, per the rules below:
    • A tame divergent which is neither groomed nor fed will not reproduce.
      • A groomed and starved sweetle will produce exactly two eggs before it starves, over roughly 24 cycles. If not tending to grubfruit these both have the default 98% chance of being sweetle eggs. If tending to grubfruit, depending on the number of plants, the first egg will have roughly a 10-20% of being grubgrub, and the second egg a roughly 20-40% chance.
      • A groomed and starved grubgrub will produce exactly one egg before it starves, over roughly 24 cycles. If not tending to grubfruit the egg has a default 67% chance of being grubgrub. If tending to grubfruit, depending on the number of plants, the egg will have over 90% chance of being grubgrub.
    • A groomed and fed sweetle will produce 14 total eggs over its 75 cycle lifetime while a groomed and fed grubgrub will produce 16 eggs over its 150 cycle lifetime.
    It is important to note that sweetles produce eggs almost twice as fast as grubgrubs (when happy), but live only half as long. Additionally, sweetles only provide 1600 meat while a grubgrub is worth 4800. So any strategy for maximizing food output should rely on ranching sweetles (double the egg production) and forcing them to produce grubgrub eggs (triple the meat). Because grubfruit is the only plant that increases the chance of grubgrub eggs, we see that any optimized divergent ranch must be a hybrid grubfruit farm as well.
    - Divergent Plant Tending
    Divergents can interact with plants in two interesting ways. Their first skill is to untangle grubfruit plants, allowing them to produce standard grubfruit instead of spindly grubfruit. This increases the number of calories per fruit, and allows the fruit to be used to create grubfruit preserve, an even higher calorie food with an extremely long shelf life. A single divergent, even wild or starved, can detangle 10 spindly grubfruit plants over the 8 cycle period it takes the plants to bear fruit. So if all you care about is untangling plants, you don’t need many critters.
    The second benefit of divergents is that they can “tend” any plant to provide a growth speed bonus. Sweetles provide a 5% tending bonus while a “Grubgrub rub” gives 50% bonus. Unfortunately, a starved divergent can only maintain this bonus on 1-1.5 plants per cycle. In order to maintain growth bonuses on a full farm, you’ll either need a lot of divergents or you’ll need to keep them fed. Note that the divergent tending bonus can be stacked with the fertilizer bonus from a farming station, however you can’t have both a grooming station and farming station in the same room without mods, e.g. Rooms Expanded.

    Optimal Tending – How Many Plants Can a Divergent Tend?
    In the guides I cited above it is claimed that a well fed divergent will keep the growth bonus active on 6-7 plants every cycle, but my early ranch designs were not matching that claim. As such, I designed an experiment specifically to test this. I set up three automated stables, each with 20 grubfruit plants. In the first I put 3 grubgrubs, in the second I put 4, and in the third I put 5. The idea was that if each critter really can tend 6 or more plants, 3 should be able to provide the 50% growth bonus to at least 18 of the plants, and probably all 20 most of the time. Having a 4th divergent in the stable should provide little to no benefit but would ensure all 20 plants are always tended, and the 5th divergent should not make any difference at all since all plants are already tended 24/7.

    In theory, a planted grubfruit produces one fruit every 8 cycles. The fruit is then cooked into preserve, worth 2400 KCal. Thus the expected output of a single plant is 300 KCal/cycle. In order to measure the above ranches I calculated the total amount of KCal produced over several hundred cycles, which reveals the overall growth bonus being provided to the plants. If it's less than the expected 50%, then not all plants were being tended all the time.

    Here is what my test ranches looked like, plus the frozen storage for collecting and counting resources produced:


    After over 300 cycles of running these ranches, the data collected does not match the expected 6-7 plants tended per critter.


    In my control test, I didn't quite obtain the expected 300 KCal/cycle from each plant. I suspect this is due to inefficiencies where once a plant is ready to harvest, a farmer has to run over from the other side of the map and get the fruit before the plant can start its growth cycle over again. Even so, I was only off by 3%, so I consider that a reasonable experimental error.

    The 3 grubgrub farm on the other hand was only able to maintain an average 33% growth bonus to the plants, compared to the control group, as opposed to the expected 50%. While spot checking the plants it was common to see 6 to 8 at a time that were not showing the tending bonus. It is clear that the critters were not able to sustain the bonus on 6-7 plants each, but in my estimation the correct value is around 4.3-4.5 plants per divergent. Adding a 4th critter provided a substantial increase to the effectiveness of the tending, only furthering the point, and as expected the 5th critter provided almost no benefit, only ~2%.

    It was curious that even with 5 critters, tending only 4 plants each, I only measured a 46% growth bonus compared to the theoretical 50%. I don't have a perfect explanation for this, but I believe a portion of the difference is because of the large number of tests I was running simultaneously. I had 7 ranchers tending to 25 grooming stations around the map, and a commensurate number of critters running around dragging on framerates. There were sometimes short delays between when a critter's grooming would wear off, and when a rancher could run across the map to groom it. For that short time, the critter would be glum and thus its tending rate would drop to the much lower default.

    I believe these numbers are still representative of normal gameplay, since just like the fruit harvesting delays, there will naturally be delays between when a critter is ready for grooming and when a rancher shows up. I suspect the "real" values in the game code would align with each divergent maintaining full growth bonus on 4.5 plants. That said, from from a practical perspective I believe the in-game optimum is to tend no less than 5 plants per divergent critter. Having 6-7 plants per critter will reduce your preserve KCal output by 7-8%, but even that is worth it considering the sulfur cost of feeding additional critters. My rule of thumb is to keep a ratio of 5-7 plants per critter for optimal sulfur usage, even though the growth bonus will not be able to be sustained 100% of the time.
    - Ranching Divergents (w/ Grubfruit)
    As has been shown multiple times above, ranching divergent critters in combination with tending grubfruit will greatly increase the amount of meat produced, in addition to giving bonuses to the fruit production. My next round of testing was to determine just how much meat and fruit could be produced in this way.

    For this test I set up two new automated ranches with 20 grubfruit plants and 5 divergent critters each. I ran them for over 300 cycles and then compared the total meat production to the earlier data.


    Table Note 1
    The eggs (and thus meat) produced from these two stables were mixed together, so I can only approximate which portion of the total was from sweetles and which was from grubgrubs. I know the total amount produced between the two was 7704.63 KCal BBQ / cycle, which is quite close to the 7794.65 I predicted (just over 1% difference), and pretty great for only 10 total critters. 10 hatches would produce a little under 6000 KCal, so we're doing much better than that!

    In the table, the "Measured" column is how I first chose to split the meat production, assuming that my predicted values were close to correct. The total amount of meat produced adds up, and the sweetle and grubgrub measured values are within a percent or two of where I predicted they should be. That said, it bothered me that in my initial test with grubgrubs not tending to grubfruit, a much easier scenario to predict since egg rates are constant, my predictions were off by a whopping 13+%. In addition, in the earlier non-tending test, sweetles out-performed my prediction, so I didn't feel comfortable assuming that they would underperform in this test.

    Just in case I made the same mistake in predicting grubgrub reproduction during this test as I did in the prior test, I decided to calculate rebalanced production numbers. These numbers reflect an assumption that the grubgrub performance would underperform my predictions by the same ~13% as before, and from there calculate what larger share of the total meat would have come from the sweetles instead. This rebalancing makes the sweetles outperform my predictions by ~6%, which isn't much different than how they performed in the non-tending test, where they outperformed by almost 4%.

    I believe that the real distribution of meat is somewhere in between the above values, and it's quite likely that a tame, fed and happy sweetle will produce 1000 KCal/cycle when tending grubfruit. That's exactly enough to feed one dupe, and 70% more output than a hatch! Grubgrubs tending grubfruit produce significantly less meat KCal per cycle than sweetles (~85% to 95% of a hatch) but are capable of boosting plant growth by 50% to make up additional calories. All in all these are pretty amazing critters!
    - Minimum Grubfruit per Divergent
    In the previous tests I’d measured meat output from divergents with no grubfruit tending against divergents with a 4:1 ratio of grubfruit in the stable (20 plants to 5 critters). This would be an ideal strategy for optimizing preserve output, but would be wasteful if you were trying to prioritize meat output instead. For the next tests I wanted to determine the impact of reducing the number of plants in a stable, and determine a minimum where grubgrub egg percentages were still high without wasting sulfur on extra plants.

    Standard Ranches (Feeding Critters)
    I set up new stables with 5 sweetles and either 5 plants (1:1 ratio) or 10 plants (2:1 ratio). I ran these for almost 800 cycles and plotted the results against my previous tests. I then computed a line of best fit to determine an approximate equation for the increase in meat production (due to increased grubgrub eggs) per additional grubfruit plant in a stable.


    From the graph it is clear that there are diminishing returns on meat production as more plants are added to a stable. I should point out that this is clearly not the an actual equation used in game code, but simply a model that approximates the expected response. In retrospect it probably would have been better (certainly simpler) to compute two straight lines, one from 0-5 plants and one from 5-20, but this works well enough. Breaking it apart, the first 5 plants (1:1 critter ratio) result in roughly doubling the meat output from just below 400 KCal per sweetle per cycle to just below 800 KCal. This is a roughly 20% increase in meat production per plant. After this, the next 5 plants (10 total, 2:1 ratio) raise production to ~900 KCal per sweetle per cycle, a gain of ~2.5% per plant. The last 10 plants raise the output to over 1000 (20 total plants, 4:1 ratio), which is an increase of just over 1% per plant.

    Based on the above data, my rule of thumb when trying to maximize meat output is to provide between 1 and 2 grubfruit plants per divergent in a stable. Specifically, this advice holds for divergents that are fed. The next subsection addresses differences for divergents that are starved.

    Starvation Ranching
    As was mentioned in the reproduction section, a population of grubgrubs can be maintained by grroming them without food, and a population of sweetles can be slowly increased. This drove me to repeat the above tests without feeding the critters to compare the results.

    For this test I created multi-level ranches with one stable of five fed sweetles and one stable of five starved sweetles. The stables had either 5 or 10 plants in them, exactly as in the previous tests. In this way I could subtract the results of the fed stables to determine how much output came from only the starvation stables by themselves.

    My test setup is shown in the below image:


    The results here were surprising. The first 5 plants (1:1 critter ratio) result in roughly quadrupling the meat output from ~70 KCal per sweetle per cycle to about 280. This is a roughly 60% increase in meat production per plant. After this, the next 5 plants (10 total, 2:1 ratio) raise production to ~320 KCal per sweetle per cycle, a gain of ~2.8% per plant. This part closely matches the prior results with fed sweetles. I did not measure results for starvation stables with 15 or 20 plants, but through extrapolation the last 10 plants should raise the output to around 366 KCal per sweetle per cycle (20 total plants, 4:1 ratio), which is an increase of about 1.5% per plant.

    From the above data, my conclusion was that in a starvation stable, you should always use a 1:1 ratio of grubfruit plants to critters. The gains obtained after this point are negligible compared to the initial gain of 4x meat output.

    For reference, the below table summarizes the values I will use for calculating divergent meat output given a specific ratio of grubfruit plants:
    - Sulfur Geysers
    When I originally published this guide I wanted to ensure that whatever ranch design I came up with was sustainable from a single sulfur geyser. Unfortunately, at the time I wasn't able to find information online about the expected output of this type of geyser. Even the FANDOM Wiki[oxygennotincluded.fandom.com] at the time showed '?kg/s'.

    I spawned and analyzed a couple dozen sulfur geysers and came up with the following information:


    To determine a geyser’s average kg/cycle you must account for the time periods it is inactive and not erupting. This requires you to analyze the geyser with a field research dupe to obtain it’s full specs. The formula for this is (Eruption sec / Total sec) * (Active Cycles / Total Cycles) * (g/s production) * (600 sec/cycle) / (1000 g/kg). Alternatively you can use the Geyser Average Output Tooltip mod to computer this information for you when analyzing a geyser. The mod displays in kg/s, so you simply have to multiply by 600 to get kg/cycle.

    From the data I collected it appears to me that ONI randomly generates sulfur geysers to produce between 700 and 1100 kg/cycle, averaging 900 kg/cycle. Since we don't know the distribution we have to make a few assumptions. If the distribution were normal (i.e. a bell curve) then you're more likely to find geysers around the center of that range. In fact, only ~16% of geysers would fall below ~800kg/cycle in a normal distribution. With some quick analysis I approximated the distribution and it appears to be uniform as opposed to normal. As such, any value in the range appears equally likely, as opposed to more likely to cluster around the center.


    In my estimation, 87.5% of geysers should produce at least 750 kg/cycle, so that seems to be a reasonable target to aim for in the design. A single grubfruit plant requires 10 kg/cycle, so if your geyser comes up short of 750 kg/cycle, the removal of 1-3 plants would be an easy in-game modification. In reality, you're likely to get closer to the average of 900 kg/cycle, but if I plan around that and come up ~20% short it could greatly affect assumptions of the design. It's much easier to scale up to consume additional sulfur, and I don't want my design to be completely hamstrung by a bad geyser roll, so we'll target sustainability at 750 kg/cycle.

    For what it’s worth, the FANDOM Wiki now says that sulfur geysers average 1.5 kg/s, which agrees precisely with my data of 900 kg/cycle. I’m not sure if their data was independently verified or taken from an earlier version of this guide, but in either case I’m confident that these are the correct numbers at least for the last several patches.
    - Misc / Other
    I wasn’t sure where else to mention this, but it seemed important enough that I couldn’t leave it out of the guide. For as long as I’ve been playing the DLC there has been a bug with harvesting grubfruit while the game is running at very high speeds. This bug does not exist in an unmodded game, however if you are using a mod like Customizable Speed or Speed Control to set game speed to 6x or 10x, you will notice that you lose most of your grubfruit crops.

    For some reason, at these modded game speeds, there is often no grubfruit produced when a grubfruit plant is harvested. The animations play correctly, dupes come to harvest the plants, there’s simply no fruit produced to be picked up when the animation completes. Throughout my thousands of cycles testing these ranch designs I tended to measure 50% or less of the expected amount of grubfruit. Running at the unmodded “high speed” setting this is not an issue and all of the expected grubfruit is obtained.

    I only mention this since speed mods are quite popular, particularly among late game players, the type who might want to build a ranch to feed 37 dupes from a single sulfur geyser :). If you’re running a speed mod and spend most of your playtime at high speeds, you should likely discount 50% or more of the grubfruit production expected from a ranch, or to be extra safe, plan to rely on meat production only. In that case, whatever preserve you obtain would be a bonus for space exploration.
    4. Theory Crafting and Optimization
    Most readers can skip sections 3 and 4 and jump straight into ranch construction.
    This section fuses together what was learned about game mechanics and the test results of the previous section to hopefully produce optimal divergent ranch designs.

    I discuss ways to optimize for either meat or grubfruit preserve, depending on which your colony needs. Any divergent ranch will produce a mix of both meat and preserve, but the ratio produced can vary greatly. In addition, I discuss how to optimize KCal produced per kg of sulfur, if you're not picky about whether the calories come from meat or fruit.
    - Maximizing for Grubfruit Preserve
    It should be obvious that the best way to optimize for grubfruit preserve requires tending to as many grubfruit plants as possible. The tending should be performed by grubgrubs, for the 50% growth speed bonus, and in order to keep sulfur costs under control as few grubgrubs as possible should be used. Throughout the guide I will refer to rooms of this nature as "farms" rather than stables, even though they are technically stables per the in game overlay. Rooms designed to optimize meat production (see the next subsection) will be called stables, to distinguish between them.

    Grubfruit Plant Count
    First we determine how many plants can fit in our farms. The standard options would be either 16x4 or 24x4 room sizes.

    In either room we need two tiles for the grooming station, 1 tile for the door which falling critters will pass through, and 1 tile for a critter feeder. From the above research it is not effective to starvation ranch grubgrubs as plant tenders, since starved critters reduce tending by ~80%. We're left with 12 or 20 tiles for plants, respectively.

    Of note, the control room I designed for this build, like the previous version of the guide, works best at either 16x4 or 25x4. As such, I will use 25x4 stables and farms rather than the standard 24x4 size. This gives room for one extra plant, bringing the total to 21. Frankly I prefer the "mini" 16x4 variant anyway, but I wanted to leave in the option for full sized stables and farms, and I wasn't able to optimize the design without the 25th tile.

    Grubgrub Count
    Now we know how many plants we can design around, 12 or 21. From the tests above, my recommendation was 5-7 plants per divergent, so ideally we'd want 2 grubgrub in a mini farm and 3 or 4 in a full size.

    Each grubgrub requires 16 tiles of space in the farm, so we can determine the maximum supported by our chosen sizes. A standard 16x4 room has 64 tiles, however we'll lose at least one of them so we won't have all 64 available. This caps the maximum grubgrubs in our mini farm at 3 (48 tile requirement) with plenty of room to spare. Our 25x4 room has 100 tiles, and again we'll lose a couple, but we should be able to fit 6 grubgrubs (96 tiles required). This would be very wasteful, at just over 3 plants per grubgrub, so I'll artificially cap our analysis at 5 grubgrubs.

    Based on these calculations, we should consider mini stables with either 2 or 3 grubgrubs, and full size stables with 3, 4 or 5 grubgrubs.

    Expected Efficiency
    Plugging in the values above and computing the expected outputs from the previous test data I produced the following two tables:
    Mini 16x4 Farms

    Full Sized 25x4 Farms


    The biggest takeaway from the above tables is that optimizing for grubfruit preserve produces very little barbecue. Grubgrubs simply don't reproduce often enough to create much meat.

    In addition, the tables highlight the potential of feeding grubgrubs with sucrose instead of sulfur. Unfortunately this only makes sense if you're already feeding sweetles for some other reason and you have no use for the extra sucrose. Otherwise, feeding 3 sweetles 20kg of sulfur each to produce 30kg sucrose for one grubgrub actually consumes 20% more sulfur than just feeding the grubgrub 50kg sulfur in the first place.
    - Maximizing for Meat
    The optimum strategy for maximizing barbecue is almost exactly opposite that for maximizing grubfruit preserve. From the research above, it should be clear that we want to raise as many sweetles as possible, and ensure they are exposed to grubfruit plants to produce grubgrub eggs. The first step in this design would be determining how many sweetles we can fit in our 16x4 or 25x4 stables.

    Sweetle Count
    Each sweetle requires 12 tiles of space in the stable, so we should be able to squeeze 5 (60 tile requirement) in our 16x4 stable (64 tiles total size). This allows us to use 4 tiles of space for other purposes.

    In the 25x4 stable we have 100 tiles of space, and even after losing a couple should be able to maximize the sweetle count at 8, which is a maximum size 96-tile stable.

    Grubfruit Plant Count
    From the research above, we determined that a 1:1 ratio of plants to sweetles gave huge gains to meat production, and additional plants up to a 2:1 ratio gave marginal gains as long as the sweetles were fed. If we choose to starve the sweetles, a ratio of exactly 1:1 was desired.

    For these reasons, we will consider mini stables with between 5 and 10 grubfruit plants, and full size stables with between 8 and 16.

    Expected Efficiency
    Plugging in the values above and computing the expected outputs from the previous test data I produced the following two tables:
    Mini 16x4 Stables

    Full Sized 25x4 Stables


    There are a lot of important takeaways from these tables.
    • Because of the grubfruit plants required to produce grubgrub eggs, any strategy optimizing barbecue is still going to produce a significant amount of grubfruit preserve.
    • Feeding grubfruit plants (10kg) for fruit is a very efficient conversion to KCal. This is best seen comparing the results of 5 fed sweetles with either 5 or 10 plants. Doubling the plants naturally doubles the output of grubfruit preserve, while also giving a 15+% bonus to meat production, all for a measly 50 extra sulfur.
    • Starvation ranching sweetles for barbecue is by far the most efficient strategy. You're only paying the sulfur cost of the plants, which is already very efficient, and getting enhanced meat production for "free".
    - Maximizing KCal / Sulfur
    Given the data tables above you should now be able to decide exactly how you'd like to design your own divergent ranch. Depending on whether your playstyle favors a meat- or plant-based diet, and whether your colony allows starvation ranching, you can mix and match the farms and stables above to target whatever amount of sulfur you have access to. I will give examples of what I believe to be optimal designs for three different scenarios below.
    --> Starvation Ranching For the Win
    In this "no holds barred" min/max strategy the theoretical best design would simply be a stack of as many starvation ranches as you have sulfur for. Feeding critters is just a waste of sulfur :)
    Unfortunately, even though the starvation ranches should repopulate themselves "on average" (2 eggs produced before starving, at least one should be a sweetle) there will be inefficiencies when there are not enough mature sweetles in reserve to immediately repopulate starved critters. Some ranches will be running with less than 5 critters waiting for eggs to hatch and replace them. For this reason I believe you would want at least one stable of fed sweetles to produce extra eggs over a longer period of time, smoothing out the average availability of replacements (14 eggs over 75 cycles vs. 2 eggs over 24 cycles). A purely theorycrafted optimum for our 750kg sulfur target might look something like these:
    Mini 16x4 Farms

    Full Sized 25x4 Farms


    I did not actually test those designs, as I was concerned the single stable with food would still not produce enough sweetle eggs. After several cycles of tending grubfruit, most eggs will be grubgrubs for the rest of the fed sweetles' lives, so you only get a portion of the benefit I was looking for. To find an optimum I decided to run two tests, and consider a new type of "breeder" stable.

    The breeder stable is what I called a "sucrose" stable in the original guide. It is a population of fed sweetles that are not exposed to grubfruit plants. As in the original guide, this stable ensures we have a steady supply of sweetle eggs, as these sweetles will almost never lay grubgrub eggs. They produce very little barbecue and no grubfruit preserve, so they're not an efficient investment on their own, but the extra sweetle eggs should hopefully improve efficiency in our starvation ranches.

    To test this logic I built two ranches of the mini 16x4 size, targeting 750 sulfur, as described in the table below. Note that these figures are the predicted outputs based on previous smaller-scale tests.
    Test Ranch without a Breeder Stable (Predicted)

    Test Ranch with a Breeder Stable (Predicted)


    In theory, the breeder stable should outperform a regular fed stable with grubfruit plants, since the saved sulfur can be reinvested into additional starvation stables. The real question is which of these designs, if either, could keep up sufficient sweetle egg production for their starvation stables.

    Just for fun, here is a screenshot of these two ranches (breeder version on the left), after they got up to full production:


    I started this test as you would in a normal playthrough. The ranches were completely empty, and I wrangled in only the first group of sweetles that would be tamed and fed. Specifically, 7 sweetles in the breeder ranch (2 breeders, 5 sweetles with grubfruit) and 10 sweetles for the other ranch (2 stables of 5 with grubfruit). The starvation stables were left empty to be auto-populated as more sweetles were born. I ran these ranches for over 850 cycles and measured the outputs. I then subtracted out the first 250 cycles or so to obtain long-term stable production numbers, which came out slightly less than the predictions:

    Test Ranch without a Breeder Stable (Measured)

    Test Ranch with a Breeder Stable (Measured)


    Remarkably, the starvation stables in both ranches produced exactly the same average barbecue output of 1258 KCal / cycle. This was ~10% less than I'd seen testing ranches with only one starvation stable, likely due to inefficiencies in repopulation which only get worse the more the system is scaled up.

    Throughout the test I noticed many occasions where stables on both sides were running with less than 5 critters. In some cases a stable was completely empty for short periods of time. After the ranches were stablized the one with a breeder stable had 60-80 sweetle eggs on hand at all times while the ranch with two regular fed stables had 50-70 eggs. Even with all these eggs and multiple incubators, there were occasionally delays in having enough mature sweetles available to immediately repopulate the stables. Even so, measuring by average meat output, there seemed to be no difference between generating eggs in a breeder stable vs. a regular barbecue stable with fed sweetles.

    The main takeaway seems to be that if you plan to maximize starvation ranching to feed a large colony, it is probably a good idea to add some breeder sweetles to ensure a steady supply of sweetle eggs. The sulfur saved in a breeder stable can be used to run even more starvation stables as shown above. I don't expect many will push the design anywhere near this scale, but at least it's been shown to be possible!
    --> "Humane" Barbecue Production
    I know from the forums many people do not like starvation ranching methods. If you share the opinion that drowning newborn critters is perfectly fine but starving them to death is not, then these are the designs for you. We strive to optimize meat output without using any starvation ranches, with boils down to feeding lots of sweetles and exposing them to grubfruit:
    Mini 16x4 Ranch

    Full Sized 25x4 Ranch


    There's not a whole lot to say about tweaking this version, it's a fairly standard ranch, with an optimal 1:1 ratio of grubfruit plants to force grubfruit egg production. If you're a hardcore carnivore and want to minimize grubfruit output you can remove a couple plants from each stable, however going below the recommended 1:1 ratio greatly reduces barbecue output as well.

    The main takeaway here is that by avoiding starvation ranching you're giving up about 1/3 of the possible KCal from the same input quantity of sulfur. For most players this won't matter, as this ranch can still feed 27 dupes from our below-average geyser, but if you like really large colonies you're leaving a lot on the table by wasting sulfur on feeding critters.
    --> Vegetarian-friendly Farming
    Feeding divergents just to tend grubfruit farms isn't a very efficient process, but if this is what fits your playstyle you can stack as many farms as you have sulfur for under a control room. One thing to keep in mind is that you still need sucrose to turn the fruit into preserves, and grubgrubs produce mud instead of sucrose. As such, the "breeder" stable above (in this capacity better called a "sucrose" stable, as in the original guide) can provide an efficient source of sucrose, saving on sulfur and producing less meat compared to a normal sweetle stable.

    I'm assuming here that the meat will be left to rot, or respectfully preserved in frozen suspension as a memory of the holy divergents, or otherwise not eaten by your vegetarian dupes. Otherwise, if you're willing to eat barbecue in addition to grubfruit, you're much better off running normal stables with sweetles instead of dedicated farms.

    Given our target of 750kg sulfur usage, the following two designs appear optimal, if just a hair over quota:
    Mini 16x4 Ranch

    Full Sized 25x4 Ranch


    One tip if you have lots of extra sucrose is to keep 2 critter feeders in the grubgrub farms, one each with sucrose and sulfur. Any sucrose they manage to eat is a savings of sulfur that you can reinvest into more plants, but it's hard to plan a design around that kind of resource variability.

    The last thing worth mentioning here is that in order to run farming stables your control room needs to be able to repopulate both sweetles in the breeder stable and grubgrubs in the farms. All the previous designs require sweetles only, so all grubgrubs could be butchered.

    In the original guide I used a "double dropper" control room design, with a critter dropper on either side. Unfortunately the space consumed by the critter droppers left little for incubators or other niceties. In the updated build plans I use a common control room design whether you're running stables or farms, and it repopulates only sweetles or grubgrubs, respectively. Extra space in the breeder/sucrose stable will be used to repopulate sweetles when running farms.
    - "Short Term" vs. "Long Term" KCals
    I felt this was an important topic to discuss prior to getting into the exact designs. Each of the stable options shown above produce some KCal from preserve and some from barbecue. However, the speed at which those outputs ramp up is very different.

    As an example, in the early game, you're going to set up a stable or two with probably 5-8 plants and 5-8 sweetles each. Eight cycles later the plants will make their first fruit, and you'll have plenty of sucrose to cook it into preserves. It's quick and reliable high quality food! If you look at the numbers for two such barbecue stables (assuming fully fed sweetles), it says they should feed almost 5.5 dupes each, or easily 10 dupes together. That sounds great, but if you try to scale your population to 10 dupes right away you'll quickly find your colony starving to death.

    The key is that these ranches take a long time to begin producing at their optimal rates. First and foremost, there is a significant delay before you will obtain your first KCal from meat. After setting up a stable you should see your first eggs in 5-6 cycles, your first larvae (assuming no incubators) around cycle 22 and your first meat around cycle 27. You'll be halfway to your 4th harvest of fruit by then, and the first round of meat (10 sweetles) adds only ~16,000 KCal to your stockpile (1.5 cycles worth of food for 10 dupes!). Not to mention, if you're trying to fill additional stables to scale out the ranch, many of the first generation won't be converted to meat at all.

    This leads into to the other factor which is that early on almost all of the eggs will be sweetles, worth only 1600 meat. That's half of what hatches produce, which is why a hatch ranch seems to come up to speed much faster. Once a grubgrub egg worth 4800 meat appears, which could be dozens of cycles in, it will take 33 cycles to hatch (again, assuming no incubators), and around 38 cycles to evolve into meat.

    Incubators help to significantly reduce these delays, but it is still worth considering that your production from plants in the early game will greatly outweigh your production of meat. For this reason I would consider only the preserve KCal/cycle numbers the "short term" output of a stable, and the combined preserve+bbq ("total" in the tables) the "long term" output. In the early game you should not scale your population much beyond what the short term (preserve only) numbers can sustain, and as you see your food stockpile growing you can gradually increase population to the stable long term production numbers. I don't have an exact crossover point, but I would suspect that around the second generation of grubgrub larvae, somewhere around 100 cycles from initial ranch construction, the full long term KCal output will be stabilized. Earlier, if using incubators to get meat faster. All numbers in the tables above were measured after several hundred cycles of running the ranches and then removing the first couple hundred cycles from the data.

    It's also worth reviewing here that fruit takes much longer to spoil than meat, especially after cooking it into preserves. This is very helpful in the early game before you obtain an infinite frozen storage setup in your kitchen. Specifically, with no refrigeration or sterile atmosphere, BBQ will only last 4 cycles while grubfruit preserve will last 33. A simple CO2 pit, still without any refrigeration, bumps those numbers to 5.5 cycles and 50 cycles, respectively. Losing food to spoilage in the early game can be a killer, so producing as much preserve as possible provides a substantial buffer against that threat.
    5. Objectives
    The objectives for my divergent ranch were essentially the same as those for my earlier hatch ranches. Generally, I wanted to automate as much of the process of running the ranch as possible, so all the dupes have to worry about is grooming.

    One difference was that hatches can eat just about anything, and can last for thousands of cycles on the basic rocks and minerals obtained from digging out your starting planet. Divergent critters require sulfur, and that comes in a far shorter supply. You should be able to dig plenty at the beginning of the game to get a ranch running, but eventually you'll need a renewable source. Currently, that means either a taming a sulfur geyser, or building a sour gas boiler. The latter is generally an advanced late-game build, so I decided to see how much food a divergent ranch could generate from a single sulfur geyser.

    Requirements
    • Must be a “horizontal” stable
      • This is just personal preference. However with divergent critters in particular you generally want to combine them with farmed grubfruit, and "vertical" stables are not as conducive to farming.
    • Must automate all required resource delivery
      • Divergent Food (i.e. sulfur)
    • Must automate all required resource extraction
      • Sucrose
      • Eggshells
      • Meat
      • Grubfruit (spindly or regular)
      • Grubfruit Seeds
      • Mud (If desired and only if ranching grubgrubs)
    • Must automate population maintenance to keep the correct number of sweetles or grubgrubs in each stable
      • Removal of eggs
      • Addition of new breeding critters when required (e.g. after natural death)
    • Must not allow juveniles into the breeding population
      • Juveniles should grow to adulthood prior to being chosen as a new breeder or slaughtered for meat
    • Must not use incubators (powered or unpowered) to manage eggs
      • Again just a personal preference. They take up a lot of room, a lot of power, and require dupes to interact with them. We’re aiming for full automation.
      • My opinion on incubators has changed since working on ranching dreckos. Both grubgrub and drecko are very long lived critters (150 cycles) so it can take a long time to get meat production going without incubators. In addition, there are ways to cut incubator power usage by 90% while still obtaining all the bonuses. For this reason my ranching guides now provide options for installing incubators, but they will of course work just fine without them as well.

    Goals / "Nice to Haves" (In approximate order of importance)
    • Should be sustainable from the output of a single "below average" sulfur geyser (750 kg/cycle).
    • Should minimize time between breeder critter death and replacement
      • i.e. should not wait the full ~19 (sweetle) or ~38 (grubgrub) cycles for a new egg to hatch and grow to adulthood
    • Should be a scalable design pattern that can expand food production to match available sulfur
    • Should confine breeders to a small area (≤6 tiles) to expedite grooming
    • Should be relatively easy to build, no tricky order of operations or dupe pathing
    • Should try to keep automation requirements reasonable (subjective, I know)
    6. Bottom Line Up Front - The Design
    As in my guide for ranching hatches, my design consists of a single control room paired with as many stable rooms as you need. The control room is a standard four tile height room that contains the automation logic and other infrastructure to support the stables. A single control room is built at the top of a stack of stables, and additional stables can be added at any time to the bottom of the stack.
    There are three types of stables in my design, breeder stables, barbecue stables and farming stables. Throughout the guide I’ll often refer to barbecue stables as just “stables” and farming stables as “farms”.

    An example ranch with a breeder stable and two barbecue stables might look something like this:


    Unlike the original guide, my reference design is now based on a “standard” 16x4 room dimension, which I previously called a “mini” variant. This follows from the recommended shift away from growing lots of grubfruit in farms towards ranching sweetles for meat. I intend to post build plans for a full 24x4 or 25x4 ranch in the future, but in my opinion that is no longer an optimal design.

    If you’d like to work on your own designs, the 16x4 plans can easily be scaled wider to accomodate more critters with minimal or no changes. Otherwise, the only real benefit of the wider design is to support dual critter droppers, for mixing farming and barbecue stables in a single stack. In that design both divergent types can be bred and delivered to stables, one on the left and one on the right, much like I presented in the original guide. Below I show the original control room design for reference, though I would recommend adding incubators and potentially some other minor adjustments.


    Since I no longer recommend farming stables for anything other than RP purposes, the benefit of a wider control room is mostly moot.
    - The Control Room
    The control room consists of two chambers which I’ve labeled in the screenshot below.


    Chamber 1 - Critter Dropper
    This is a fairly standard critter dropper, which allows critters to fall through door A into any stable that requires more critters. Divergents are never allowed in this room unless a stable is requesting more critters. The specifics of the automation logic are described in the construction section.

    Chamber 2 - Hatchery and Resource Sorting
    This is the core of the control room, where most of the action takes place. I’ve labeled two points of interest B and C.

    Any eggs, shells, meat, fruit, sucrose, and optionally mud produced in a stable will enter this chamber via conveyor and be deposited at chute B. Some of those resources will be exported to your base on conveyors, while others will be relocated to chute C. Depending on whether you’re running barbecue stables or farms, one type of divergent eggs will also be filtered out and sent to chute C. Chute C empties into an enclosed tile of water, so all eggs sent here will eventually evolve into meat. The resulting meat, shells and any other resources sent here are extracted diagonally and exported to your base via additional conveyors.

    Eggs that remain at chute B can be left to hatch normally or optionally loaded into incubators to speed the process. Larvae hatched via either method will be stuck in this chamber until they reach adulthood and are able to jump up and out to the critter dropper on the left. Once adult critters can jump up, they’ll be presented with one of two life-altering scenarios. If any of the stables require a new critter, both the mechanized airlock and the pnuematic (mesh) door above B will be open, allowing the critter to exit this room. If all of the stables are full, the mesh door will instead be closed, trapping the critter in the room. This will cause the divergent to eventually path into the pit (or if it was born on chute B, it’s already in the pit). Once inside the pit, the critter detector closes the door above and the surface tension of the water floods the pit and drowns the critter. Once there are no more critters in the pit, the door re-opens, resetting the trap, and meat is exported via conveyor. Note that the sweepers in this room can reach all floor tiles where resources could drop, even when the drowning trap doors are closed.
    - Breeding/Sucrose Stables
    The breeding stable must be the first stable built below the control room if you choose to use one. It is special in that it will eventually be the only stable reliably producing sweetle eggs. The sweetles in this stable are not exposed to grubfruit, thus will produce sweetle eggs with 98% likelihood. All other stables will be tending grubfruit and eventually produce grubgrub eggs with high likelihood. In addition, each sweetle in this stable will produce 10kg/cycle of sucrose, enough to cook around 20 grubfruit plants' worth of preserve.

    If you are running barbecue stables, and at least a couple of the stables are fully fed, then you will not need (and should not waste sulfur on) a separate breeding stable. If you intend to run only starvation stables for barbecue (zero fed stables), then a breeding stable is mandatory in order to keep up with the demand for new sweetles, plus the sucrose for turning fruit into preserve. If you’re running farming stables with grubgrubs then you’ll also need a breeding stable as a source of sucrose since grubgrubs produce only mud. As such this stable is mandatory for farming builds.

    If you do choose to use a breeding stables for sweetle eggs or sucrose, there are many ways it can be designed. The only requirements are a grooming station and critter feeder, absolutely no grubgrub plants, plus one or more sweetles. As you won't normally need a full stable of 5 critters, you can split the stable and use the remaining space for other purposes.

    Below I show two examples of a breeder stable, one with 27 tiles of space to accommodate up to 2 sweetles, and a second with 36 tiles of space to accomodate up to 3.


    As shown above, installing incubators and a second drowning trap is one option for the otherwise extra space to the right of the breeding stables. This will greatly speed up the conversion of unwanted eggs into meat, getting your ranch up to full production much faster. In the long run incubators don't produce any "extra" meat, so it's perfectly acceptable to use this space for anything else that you like. Exercise rooms, extra farm tiles, or even opening up the whole stable space for a 4th or 5th breeder sweetle is perfectly acceptable.

    It should be noted here that since a sucrose stable is mandatory to pair with farming stables, I recommend the 3-sweetle version shown above. The single incubator will be used to ensure consistent sweetle production, so the stable will stay full. A critter dropoff is also required in the breeding stable when used with farming stables, as is shown in the screenshot. This is considered the reference design for a farming build, which will be detailed in the below build plans. For barbecue based builds you have a lot more flexibility with the extra space in this stable, you do not require a critter drop off, and if you're using fed barbecue stables you will not need a breeder stable at all.
    - Barbecue Stables
    These stables are fairly straightforward. They contain the maximum number of sweetles for their size with just enough grubfruit plants (1:1 ratio) to optimize the chances of producing grubgrub eggs. A grooming station is required to keep the critters happy, and you can choose to feed them with a critter feeder, or starve them. In a starvation stable you'll replace the critter feeder with a critter drop-off, which simplifies maintaining an exact population. All resources produced in a stable are swept away to the control room, and sweetles are replenished from the critter dropper when necessary.


    From an efficiency standpoint, starvation stables produce more meat per unit of sulfur consumed. This is because you're only spending 50kg sulfur per cycle to feed 5 plants, vs. 150kg/cycle for feeding the plants plus 5 sweetles at 20kg sulfur each. However, in order to keep up with the demand for replacement sweetles, at least two barbecue stables should be built with a feeder, or else a breeding stable is required to produce more eggs. It is not recommended to rely on only starvation stables, as variability in egg production may cause them to not sustain themselves indefinitely.

    The empty space to the right of these stables can be repurposed for any other use, as discussed in any of my other ranching guides. In this specific case, however, it should be noted that the Rooms Expanded mod opens up a unique opportunity. In addition to adding other fun room types, this mod combines the base game's "stable" and "farm" rooms into an "agricultural" room, allowing both a grooming station and farming station to operate in the same room. Since these stables contain both critters and plants, you could choose to boost fruit production by placing a farming station in the extra space to the right. In the base game, the stations would cancel each other out and the whole ranch would fall apart, but if you're already using this mod the growth boost from farmers applying fertilizer (double plant growth speed!) is a compelling option. None of the statistics in the research section account for this boost, since it's only possible with a mod, but it should be easy enough to approximate results by doubling the expected fruit output in the tables. Remember that you'll need double the sucrose to keep up with the extra fruit, but as long as you're feeding some sweetles you'll generally have more sucrose than you can ever use.
    - Grubfruit "Farm" Stables
    Technically these are still stables per the ONI room overlay, however I’ll often refer to them as farms throughout the guide. Note that while farming was the backbone of the original guide, my later tests showed farming to be much less efficient than maximizing barbecue from sweetles. I mostly maintain information on this option for completeness, however I no longer recommend it for most players.

    The farming stable is nothing special. It's just as many grubfruit plants as can fit in the stable, with the minimal amount of grubgrubs to properly tend them. A grooming station and critter feeder are required to keep the critters fed and happy. All resources produced are swept away to the control room, and grubgrubs are replenished from the critter dropper when necessary.


    Farms are the only stable variant which do not require a critter dropoff to help maintain population.
    Installing a dropoff would require removing a plant, which would decrease the already mediocre efficiency of the farm by 8-9%. Second, if you're running two grubgrubs per stable, the stables are large enough to support a third grubgrub that is accidentally dropped from above. The extra grubgrub will also reduce efficiency by consuming additional sulfur, but will not cause the stable to stop producing eggs the way an extra sweetle would in any other stable.

    One recommendation if you have extra metal is to install an extra critter sensor in each farm, as per the "option 2" configuration for fed barbecue stables. See the critter cropoff configuration section for more details. This way if a farm ever has more grubgrubs than you need you will be alerted and can instantly convert them to meat, rather than paying sulfur to feed them.
    7. Construction
    The following sections describe how to build a complete ranch (i.e. a control room and first few stables) in a progressive fashion. The expectation is that you would begin the early game with fully manual stables and an empty control room, then gradually build up to the final design. Once the original stables have been automated, additional stables can be added at the bottom to grow with your colony.

    Note that the upgrades do not necessarily have to be installed in the order presented. You might choose to install resource extraction prior to sulfur delivery, for example. This was just a logical way to break the design up into smaller feature chunks that can be added whenever you have the appropriate research and materials.
    - Early Ranching - Zero Automation
    Early in the game the control room is not used at all, however its skeleton should be built along with your first stable(s) to ensure the space is reserved. Below I show two examples of initial construction. The ranch on the left is an example barbecue focused ranch, with a 2-sweetle breeding stable, one fed barbecue stable, and one starvation barbecue stable. Presumably, all stables added in the future would be starvation stables. The ranch on the right is instead focused on grubfruit farming, using a 3-sweetle sucrose stable, and two farming stables. This will allow me to show how each type of stable would eventually evolve into full automation, and allow you to design any kind of ranch stack to suit your needs.


    *IMPORTANT* - Note the different doors used in the breeder stable floor, depending on whether the stables below are for barbecue or farming. In a barbecue ranch the control room will be full of sweetles, which will be supplied to all stables (breeder and barbecue) from the critter dropper. As such, a mechanized airlock is required to "catch" the critters. In a farming ranch the control room will be full of grubgrubs, which need to fall "through" the breeding stable to reach the farms below. As such, a pneumatic door is required to never catch critters.

    Once you've constructed an initial skeleton, you'll want to provide water (or another liquid) to the drowning traps and then delete the bottle emptiers. Unlike my experiments with hatches, I've had lots of trouble with small amounts of water in a trap for divergent critters. With small amounts of water (e.g. 40g to 100g per tile) The trap will frequently "jam". What I mean by this is all of the water will push into one tile, and the critter will hide in the other tile with the air pocket. They will eventually starve to death but that takes a long time and meanwhile no meat is being produced. I've never seen this issue with the "normal" 100kg of water per tile, so I recommend emptying a full 200kg bottle from the pitcher pump into each trap.

    After filling the trap with water, you may want to build a storage bin and collect any eggs you find on the map. You can either disallow eggs or deconstruct the bin once they're collected, and they'll fall to the floor. This is not necessary but can help consolidate eggs and larvae in the control room before you invest in automation.
    - 1st Upgrade - Egg Removal
    As soon as you acquire the mechanical engineering skill and the appropriate research, the first thing you’ll want to automate is extraction of eggs from the stables. This is primarily because if eggs are left in a stable you will suffer from the ‘cramped’ debuff, preventing more eggs (and thus meat) from being produced.

    Unlike my hatch ranches, you can't use the "eggspam" approach (mechanized doors as stable floors) to drop eggs to the bottom of the ranch and delay this upgrade. Most of the floors of these stables are required to be farm tiles for growing grubfruit, so you'll need to rush mechatronics and get rid of eggs as soon as possible.

    Once you have the research and dupe skill necessary for construction, this upgrade requires 400 refined metal for each control room, breeder stable or barbecue stable, and 600 refined metal for each farm. This covers the addition of one conveyor receptacle and one (or two for the farms) conveyor loader per stable.
    Barbecue Ranch Example

    Farm Ranch Example


    Note that the conveyor rail is shown poking through the floor of the bottom stable to signify that it would continue to run down through as many stables as you would like to add.

    The loaders in each stable (but not the control room) should be set to allow all materials *except for* sulfur. Later in the build we'll be automating sulfur delivery to the stables to feed the critters and plants, and we want to make sure it can't be removed by these loaders. Any other resources found in a stable, in particular critter eggs, will be delivered to the control room.

    The loader in the control room should be set to the type of critter egg you will *not* be repopulating in the stables. So for barbecue stables you would set it to grubgrubs, and for farming stables it would be sweetles. This will ensure the unwanted eggs are removed and dumped into the single tile of water to the right. For now, all other resources can be left to sit in the pit.

    Once this upgrade is fully constructed you can build a tile above the small pit on the right side of the control room to fully enclose the second chute and water.
    - Optional - Incubators
    At any point after automating egg removal, you can decide to add incubators to the control room and/or breeder stable. For the record, you cannot use incubators in the extra space of the barbecue stables, as those eggs will count against the critter limit of the stable and cause the critters to stop reproducing. The breeder stable is fully divided into two separate rooms to prevent this behavior.

    Incubators greatly speed up the hatching of eggs, which helps in two ways. First, any unneeded eggs are more quickly turned into meat, decreasing the time it takes for your early ranch to sustain your colony's food needs. Second, it makes new critters faster to populate additional stables in the early construction stages of the game. You might have only captured a dozen wild sweetles but want to expand to four or five full stables (20+ critters) as soon as possible, for example. Additionally, if you're running a large number of starvation stables you'll need incubators for more rapid repopulation. Starved sweetles only live about 24 cycles compared to 75 for fed sweetles, so you'll be going through new sweetles about 3x faster.

    As shown in the BLUF section, a control room can fit up to three incubators, and designs were presented to support either one or two incubators in a breeding stable. The existing sweeper in the control room can reach all three incubator locations, however if you place incubators in the breeding stable another sweeper will be required to fill it with eggs. A critter dropoff is also required with the incubators in a breeder stable (it already exists in the control room) to allow dupes to remove hatched critters from the incubators. This dropoff should be set to 20 critters, no auto-wrangle, and will be the only dropoff in your ranch set to the "unwanted" critter type. Further details are provided in the following section on configuring critter dropoffs.

    Each incubator costs 200kg of refined metal and to maximize power efficiency each should be installed with a timer sensor (25kg) and a few pieces of automation wire (~25kg) as shown below:
    Barbecue Ranch Example

    Farm Ranch Example


    The timer sensors should be set to ensure that there is never more than one incubator activated (and consuming power) at any time during the cycle. You can see this in the screenshot above as only one of the nine sensors is showing green. This is achieved using the "reset timer" button in the sensor configuration window. You should stagger each sensor's green time to start right as the previous sensor ends, or with a small amount of overlap.

    The purpose of the above is to enable the incubator just long enough (45-60 seconds) for a rancher to run across the map and lullaby the egg. The incubator will then switch off and another incubator switch on, and this will repeat through all incubators. The lullaby incubation bonus will continue to affect the egg even after power has been removed from the incubator, which some consider an exploit. If you're in that crowd, feel free to not use the timer sensors, and instead power your incubators 24/7.

    If using incubators in the breeding stable you'll also need to activate the second drowning trap, which I forgot to show in the screenshot above. This is very simple, it only requires a critter sensor set to "below 1" and a piece of automation wire to control the door. It should be 35 refined metal in total.


    This trap does not need to tie in to the repopulation automation which will come later, it just needs to convert critters to meat as quickly as possible.

    Note on Farming
    If you are running farming stables you will need a way to remove sweetle eggs from the enclosed water tile, which cannot be accessed diagonally by dupes, to bring new sweetles into the sucrose stable. As such it is essentially mandatory to run one incubator with a sweeper next to the sucrose stable as shown above when running farms.
    - Critter Dropoff Configuration
    This seems to deserve its own section as the critter droppers are the only things requiring configuration in the original skeleton design. There will be a critter dropper in the control room, another in each breeding, sucrose or starved barbecue stable, and another if using incubators in the empty space of a breeding stable. Unfortunately there's no room for a dropoff in a fed barbecue stable, so I'll show two solutions below for how to deal with that.

    Note that I neglected to show a critter dropoff in the breeding stable screenshot for barbecue stables, but it should go in the exact same place under the sweeper as the one shown for farming stables. The two will be configured differently, however, per the information below.

    Control Room
    The dropoff in the control room must be set to 20 of the critters (and larvae) that you will be repopulating, i.e. sweetles for stables or grubgrubs for farms. This allows ranchers to bring extra critters from a stable back to the control room, in the event the critter dropper releases too many critters. Unlike my more complicated hatch ranch design, the automation for this critter dropper is much smaller and simpler, and will occasionally drop 2 or more critters instead of 1. The default priority level (5) is a good choice for the control room dropoff.

    Note that critters inside a drowning trap (open or closed) do not count as being inside the control room, so even if you have a lot of larvae in the trap waiting to grow up and drop into a stable, there will not usually be 20 other critters to prevent ranchers from bringing back extras.

    Breeding Stable
    The dropoff in a breeding stable is there to ensure the stable does not go above population, causing the sweetles to stop breeding. If the critter dropper supplies too many sweetles to this stable, they'll be auto-wrangled and carried away. It should be set to the number of critters you want to maintain, e.g. 2 or 3, accept only sweetles (no larvae) and auto-wrangle enabled. The priority can be left on default (5), the same as the control room.

    Sucrose Stable
    If you're running farms you'll need a sucrose stable, and that sucrose stable will need a critter dropoff to allowing ranchers to deliver new sweetles. The critter dropper will be dropping grubgrubs into the farms, so this will be our only way of repopulating sweetles.

    The dropoff in the sucrose stable must be set to the number of critters you want to maintain, e.g. 2 or 3, accept both sweetles and larvae, with auto-wrangle enabled. In addition it must be set at least 1 priority level higher than the dropoff on the right with the incubators. You might leave the one with the incubators at the default of 5 and bump this one to 6, for example.

    Given the above, dupes will remove newly hatched critters from the incubators and first consider carrying them through the door to the sucrose stable, if it needs a sweetle. If it's full, they'll drop the larvae instead in the room with the drowning trap. Just like the barbecue design, If for any reason too many sweetles get into the sucrose stable, they will be auto-wrangled out. However in this case, the only other room allowing sweetle dropoff is the one to the right with the drowning trap.

    Starvation Barbecue Stables
    The droppers in a starvation stable should be set at least one priority level higher than that of the control room. They serve the same purpose as the dropoff in the breeder stable, preventing overpopulation. However, setting the priority one higher allows a rancher to carry sweetles between stables if necessary, quickly balancing population.

    To be specific, if all the dropoffs were set the same and one stable had 6 sweetles while another had only 4, the rancher would first carry the extra sweetle to the control room, where it would eventually path into the critter dropper and fall to the underpopulated stable. By raising the priority on all the stables, ranchers will instead consider carrying extra sweetles to an underpopulated stable first, and only deliver extra sweetles to the control room if all other stables are full.

    Fed Barbecue Stables
    As stated above there is no room to install a critter dropoff in a fed barbecue stable, at least on the left side of the door which we consider the real "stable" part of the room. That said, it is just as important to control the population in these stables. To that end I describe two options for getting around this, each with their own pros and cons. Both options are shown in the following screenshot:


    Option 1
    The first approach is to install a critter dropoff on the right hand side of the dividing door and configure it exactly the same as a starvation stable.

    This stable is technically all one room, so the dropoff will work perfectly to remove extra critters, which is the primary function. However, it creates a possibility where extra critters from another stable could be delivered here, where they are on the wrong side of the door and unable to eat or be groomed. This is not a huge problem, the critter will starve to death and be replaced from the critter dropper, but until that happens your efficiency will be decreased and you'll have one less critter producing eggs. Additionally, it should be noted there is no sweeper coverage to the right of the door, so the critter's meat will be left to rot and offgas pollution.

    As a workaround to the above, you can set the priority of the dropoff in fed stables to one level below that of the control room. This ensures that extra critters are first delivered to starvation stables, then to the control room, where the critter dropper can repopulate fed stables as necessary. I haven't full tested this approach since I tend to use "option 2", but I see no reason it wouldn't work as described.

    The advantage of this approach is that it's dead simple and cheap. The downside is if for any reason a critter gets delivered to this dropoff it will stay there taking up space and bringing down the efficiency of your ranch until it starves to death. Worse, you will not be informed so cannot step in and resolve the problem manually unless you happen to see the critter out of place.

    Option 2
    The second approach is to install a second critter sensor in the stable and connect it to an automated notifier. If set to "above 5" the sensor will trigger the notifier if the stable ever goes above the desired population. The notifier can be set to generate an alert sound, pause the game, zoom you to the offending stable or simply display a message on the screen such as "stable overpopulated".

    Since there is no critter dropoff in this option your ranchers cannot auto-wrangle the extra critters away, however once alerted you can issue a wrangle command manually to have the extra critter(s) removed, or issue an attack command instead to skip straight to meat production.

    The main downside of this approach is that it costs 60 refined metal to build the sensor, notifier and wiring, and you still have to manually deal with any overpopulation events. Compared to the "free" critter dropoff that resolves this problem without requiring your interaction, it can be hard to justify the extra metal.
    - 2nd Upgrade - Sulfur Delivery
    This upgrade requires no refined metal, as we're only installing conveyor rails and receptacles to provide sulfur to the existing auto-sweepers. The sweepers will load sulfur into the critter feeders, as well as use it to fertilize the plants.

    As before, the conveyor rails are shown sticking out the bottom of the lowest stable, to be continued through any stables later added to the ranch. A source of sulfur (e.g. from a geyser) must be shipped in and connected to these rails. It doesn't particularly matter where that connection is made, however if ONI gets confused about too many inputs and outputs on the bus you may have to add a conveyor bridge to force a travel direction.
    Barbecue Ranch Example

    Farming Ranch Example


    This placement of these receptacles in the barbecue stables is not critical, they could easily be placed in the center as shown for the farms. While the farms require central placement to be reached by both sweepers, I prefer the aesthetics of hiding the rails behind doors and tiles as much as possible, so I moved them to the left side in the barbecue build. As always, these are just meant as examples for you to build upon as you prefer.
    - 3rd Upgrade - Resource Export
    The cost of this upgrade is 1000 refined metal in the control room, for four conveyor loaders and a second auto-sweeper. These will be responsible for exporting all resources produced in the stable to your base for consumption. If you installed an incubator in the breeder/sucrose stables you'll also require a conveyor loader there at a cost of 200 refined metal.

    This upgrade is identical whether you're running stables or farms, so I'll only show one configuration:


    Breeder / Sucrose Stable
    The conveyor loader is installed in the "nook" between the autosweeper and enclosed water tile, and a conveyor rail is run left through the floor to join the rail coming up from the stables.

    The only resources produced in this room are eggshells and meat, so those are the two materials that must be enabled on the loader. Alternatively, you can set the loader to accept all materials *except* critter eggs. This will keep the room clean if any other materials are dropped on the floor.

    Control Room
    It is important to configure the conveyor loaders properly. First and foremost none of these four new loaders can ever be allowed to accept critter eggs.

    The existing loader on the far left is already configured to send unwanted eggs to the chute in the water tile on the right. It was stated earlier that other materials can also be diverted to that side, which will now be necessary for any materials exported by the two right loaders. As an example, if you want to export mud, it will come up from the stables to the left chute, get loaded into the left loader and dropped out the right chute, then picked up and loaded onto one of the two conveyors on the right.

    The two loaders in the middle, directly above the incubators, must be set one to allow eggshells and the other to allow meat. This is because these are the only two loaders reachable by both sweepers, and shells and meat will be produced in the two drowning traps on either side of the room. Additional resources can be added to these two conveyors, as long as one is accepting eggshells and the other accepting meat.

    What I like to do is add grubfruit, spindly grubfruit and sucrose to the meat conveyor, and send all of the above to my kitchen. That leaves only mud (if you're running grubgrub farms) and grubfruit seeds to be exported, and there are two available loaders to the right to accept these. Those materials must then be allowed on the far left conveyor as well to be brought over with unwanted eggs.

    There are several other ways to configure these conveyors. You might put mud and eggshells on the same conveyor and send them to an industrial brick to produce lime and dirt. You might want to send sucrose to your rockets on its own conveyor and only have the overflow from there sent to your kitchen. In any case, you should be able to find a combination where the 4 available loaders can supply all 7 resources (and any other collected debris) to your base.
    - 4th Upgrade - Repopulation
    At this time your ranch is almost fully automated, with sulfur being delivered to feed both plants and critters, and all products removed and sorted for distribution. Depending on how many cycles have elapsed, you may not need to automate repopulation for a while, but note that sweetles only live 75 cycles as compared to 100 cycles for hatches. Many of the initial sweetles found in the wild will be 30-50 years old at the start so I recommend not delaying too long and risking a population crash.

    The cost to upgrade the control room is around 365 refined metal, which covers two AND gates, an OR gate, a NOT gate, a filter gate, two critter sensors, a timer sensor, and about 33 pieces of automation wire and wire bridges. In addition, each stable (except for the sucrose stable, if you're running farms) requires about 100 refined metal to cover a critter sensor, NOT gate and about 9 pieces of automation wire. Since this upgrade is the same whether you're running stables or farms, I'll again only show one configuration:


    The critter sensors in any stable or farm should be set to "Above X" where 'X' is one less than the number of critters desired in the stable. For example a barbecue stable needs 5 sweetles, so the critter sensor is set to send green when "Above 4". In a farm with two grubgrubs this would be "Above 1", etc. This produces a "stable full" signal which has two purposes:
    1. The signal goes two tiles down to the mechanized airlock in the floor of the stable, keeping it open so dropped critters can fall through to other stables below. If the sensor detects less critters than desired in the sable, the output changes to red and the door is instead closed to capture any falling critters.
    2. The signal also goes through an inverter and is connected with the same inverted signal from all other stables, before routing up to the control room. Using OR gates to combine these signals is unnecessary, as a green signal from any stable will override the red signals from other stables. I refer to this inverted signal as the “critter needed” signal, as if any stable is below its threshold it will trigger the control room to allow dispensing new critters from the dropper.

    In the control room, the sensor in the critter dropper should be set to "Above 0", only opening the dropper door if there is a critter in the room. The sensor in the drowning trap should be set to "Below 1" keeping the door open any time there is no critter in the trap. The timer sensor in the dropper room is used to alternate the door open and closed, eventually trapping a critter in the door and squeezing them out the bottom into a stable. To give them time to trigger the falling animation you'll want the door closed time to be around 3x the length of the open time. The values should be adjusted based on the fastest game speed you play on. I play with a speed mod on 6x-10x speed and have found that opening the door for 10 seconds then closing for 30 works for me. At normal 1x speed that would be equivalent to 1 second open followed by 3 seconds closed. Finally, the filter gate is set the same as the red setting of the timer sensor, in my example 30 seconds. The purpose of this gate is to make dropping multiple critters less likely, however it will still happen on occasion.

    Note that when first building this automation, it is likely that the doors above the drowning traps will seal closed before the critter sensor and/or automation wiring can be built in the pits. You'll have to have a dupe change the doors to 'open' to access the area and complete the build, or temporarily deconstruct an automation wire telling the door to close. Other doors may also lock closed, potentially trapping dupes inside the control room. Be prepared to issue open commands or [de/re]construct wiring to release the dupes.
    - Explanation of Automation Logic
    This is another one of those "If you don't care why it works, feel free to skip ahead" type sections.

    The automation circuit in the control room really only exists to control three doors. In the annotated screenshot from above these are the pneumatic door marked 'A', the mechanized airlock above chute 'B', and the pneumatic door above that, to the right of the '1'. I will call these doors A, B and C, respectively.


    Note that the automation is substantially simpler than that used in my hatch ranch guide. In the original guide this was because farms are generally run under capacity so an accidental double drop would not stop a stable from reproducing. While this is no longer true for barbecue ranching, it was still necessary to conserve space for incubators to support optional starvation ranching. Double drops are dealt with by ranchers, moving extra critters to critter dropoff locations.

    Door A - The Critter Dropper
    This door receives its signal from an AND gate, so it will only open when both input conditions to the gate are true.
    1. There is at least one critter in the dropper room, as detected by the critter sensor
    2. The timer circuit is outputting a green signal
    The timer circuit alternates between green and red, opening and closing the dropper doors whenever a critter is in the dropper room. It's entirely random whether the critter will path into the door while it is open, so it can take a few tries. Once it paths inside, the red portion of the timer keeps the door closed for long enough to ensure the critter is pushed through to a stable below.

    Door B - The Drowning Trap
    This door receives its signal from an OR gate, so it will open any time either of the two input conditions is true.
    1. Any of the stables are producing the “critter needed” signal.
    2. There are zero critters in the drowning pit, as detected by the critter sensor.
    If any stable drives the “critter needed” signal, this door will remain open, preventing any critters from being drowned. This ensures we don't accidentally kill young larvae who were born inside the trap but haven't yet aged enough to jump into the critter dropper.

    Once all stables are full, the "critter needed" signal turns red and the door is controlled by the critter sensor in the trap. If there are no critters in the trap, the door remains open to allow them to path inside. Once there are critters in the trap, including newborn larvae, the doors are closed to complete the evolution to meat.

    Door C - Entering the Drop Room
    Like the dropper door, this door receives its signal from an AND gate, so it will only open when both input conditions to the gate are true.
    1. At least one of the stables are driving the “critter needed” signal.
    2. There are no critters already in the drop room.
    The former condition is straightforward, the "critter needed" signal comes up from all the stables directly to this AND gate. The second condition requires a little bit more explaining.

    The signal begins with the critter sensor in the drop room, which is set to "Above 0", that signal is then inverted, so instead of being true any time one or more critters is in the drop room, it can now only be true if there are exactly zero critters in the drop room.

    As soon as a critter walks into the drop room through this open door, the critter sensor and inverter cause the signal to immediately go red, closing the door behind it. This tries to prevent more than one critter from entering the room at once, but there will be mistakes when multiples enter simultaneously. Once the critter enters the open dropper (Door A) it is no longer technically "in" the dropper room, thus the critter sensor signal turns green. We don't want door C to immediately open and allow more critters in, so the filter delays this green signal by enough time to ensure the critter is dropped.
    - Tidying Up
    Once all the automation is installed, the bottom of the critter dropper should be tiled over to complete the construction. It's only three tiles, but I recommend constructing in layers from the bottom up, first the bottom tile then the two on top. The tiles in question are shown below:


    The only thing left to do then is add a bit of decor to the stables to keep your ranchers happy while they spend their days grooming critters. If you are using the "landing tile" design poking into your main ladder corridor as shown in all the screenshots, then placing statues on each floor landing will go a long way towards maximizing decor.

    Unfortunately, there's not a lot of room for decor in the stables themselves, but it's possible to squeeze in some moulding, and eventually pixel packs.
    - Adding Farming Stables
    Eventually, you'll want to grow your colony beyond what the starting stables can provide food for. At that time it is easy to expand the ranch stack downwards with additional stables.

    As shown in the above overlays, the sulfur input conveyor, resource output conveyor and "need a critter" automation signal run vertically through all stables in the stack. By constructing a new stable per the above design and then connecting those three points it can instantly support the existing automated ranch, receive new critters and sulfur, and ship out any resources produced.
    7. Summary
    Well, this turned into a very long guide! (And got even longer for Mk II) Hopefully with this information you can plan your own divergent critter ranches, and determine the right mix of critters and plants to provide a stable food supply for any number of dupes.

    As far as I know this is currently the most complete collection of information on divergent critters, but even I didn't test everything. I really hope other folks will come along and build upon this information, and create even better designs for optimizing the production of divergents.

    Examples of areas in which this work could be expanded include:
    • I did very little testing on wild critters and did not include any of the results in this guide. You cannot increase the population of wild critters, they lay exactly one egg to replace themselves, so scaling up to feed dozens of dupes seemed challenging.
      • One idea I had involved taming exactly 1 sweetle to grow a tame population with and following the guide above. Meanwhile all the wild sweetles would eventually replace themselves with grubgrubs if exposed to grubfruit plants, and those wild grubgrubs could be assigned to a farm with a fertilizer station instead of a grooming station. This would stretch the available sulfur much further since the wild critters don't need to be fed, but it felt like too much micromanagement and an extremely slow start on food production.
    • There are likely ways to reduce sulfur consumption by "partially" feeding critters or reducing the number of plants in the stables
      • My first thought here would be a system of dropping small amounts of sulfur onto the floor of the barbecue stables on a timer, instead of providing food at all times via critter feeder. You'd have to calculate the kg of sulfur required and the time period to keep the critters out of starvation, and there may or may not be any savings vs. allowing them to eat all the time.
      • I had another crazy idea for a multi-stage ranch that has only one barbecue stable with grubfruit plants. The idea would be to introduce new sweetles here, leave them to tend the plants for some number of cycles, and once their grubgrub egg chance is high enough, move them to another stable with no plants, where they will continue to produce grubgrub eggs. The original stable would get new sweetles and the cycle would repeat. This would save significant sulfur by not feeding plants in any of the other stables, but I haven't given much thought to how you would automate such a ranch
    In any case, I believe there's still a little room to squeeze out sulfur efficiency with sweetles and the "maximum meat" strategy.
    8. Thank You!
    Thank you for reading this guide and I hope you found something worthwhile to take away from it!

    I also want to thank a few other folks whose research saved me a bunch of time. It's far easier to verify someone else's results than to build confidence in your own results from nothing. Both of these posts were mentioned above but I wanted to mention them again here with a thank you.

    zach123b - Sweetles and Grubgrubs
    https://forums.kleientertainment.com/forums/topic/123942-sweetles-and-grubgrubs/

    MooChiChi - Divergents: The Solved Mystery
    https://forums.kleientertainment.com/forums/topic/126611-divergents-the-solved-mystery/
    49 comentarios
    Samuel L 19 OCT 2024 a las 7:30 a. m. 
    y u no use this design for door dropper?:
    https://www.youtube.com/watch?v=QIuhmhPLSFk
    Lupi 23 AGO 2024 a las 6:44 p. m. 
    Hi @Magialisk :)
    Lanthrudar 18 AGO 2024 a las 3:28 p. m. 
    @Magialisk Thanks for the response. I played with the system after I posted that and figured it out, but thanks for the response back!
    Magialisk  [autor] 18 AGO 2024 a las 5:20 a. m. 
    @Lanthrudar the critters cannot "swap levels" per se, as you mentioned they walk over the doors. The control room up top is designed to push critters through the doors, and once they start falling they'll fall through any open doors until they hit one that's closed. So once they're on a level they stay there forever, and the control room dispatches more to levels that need them. This same mechanic addresses your second question, sweetles will never be dropped from the control room, they are repopulated manually. This is described in the section called "Critter Dropoff Configuration". Thanks for your interest in the guide!
    Lanthrudar 26 MAY 2024 a las 10:20 p. m. 
    Hi, great guide. Appreciate the time spent both researching and also writing it up.

    I had a few questions...

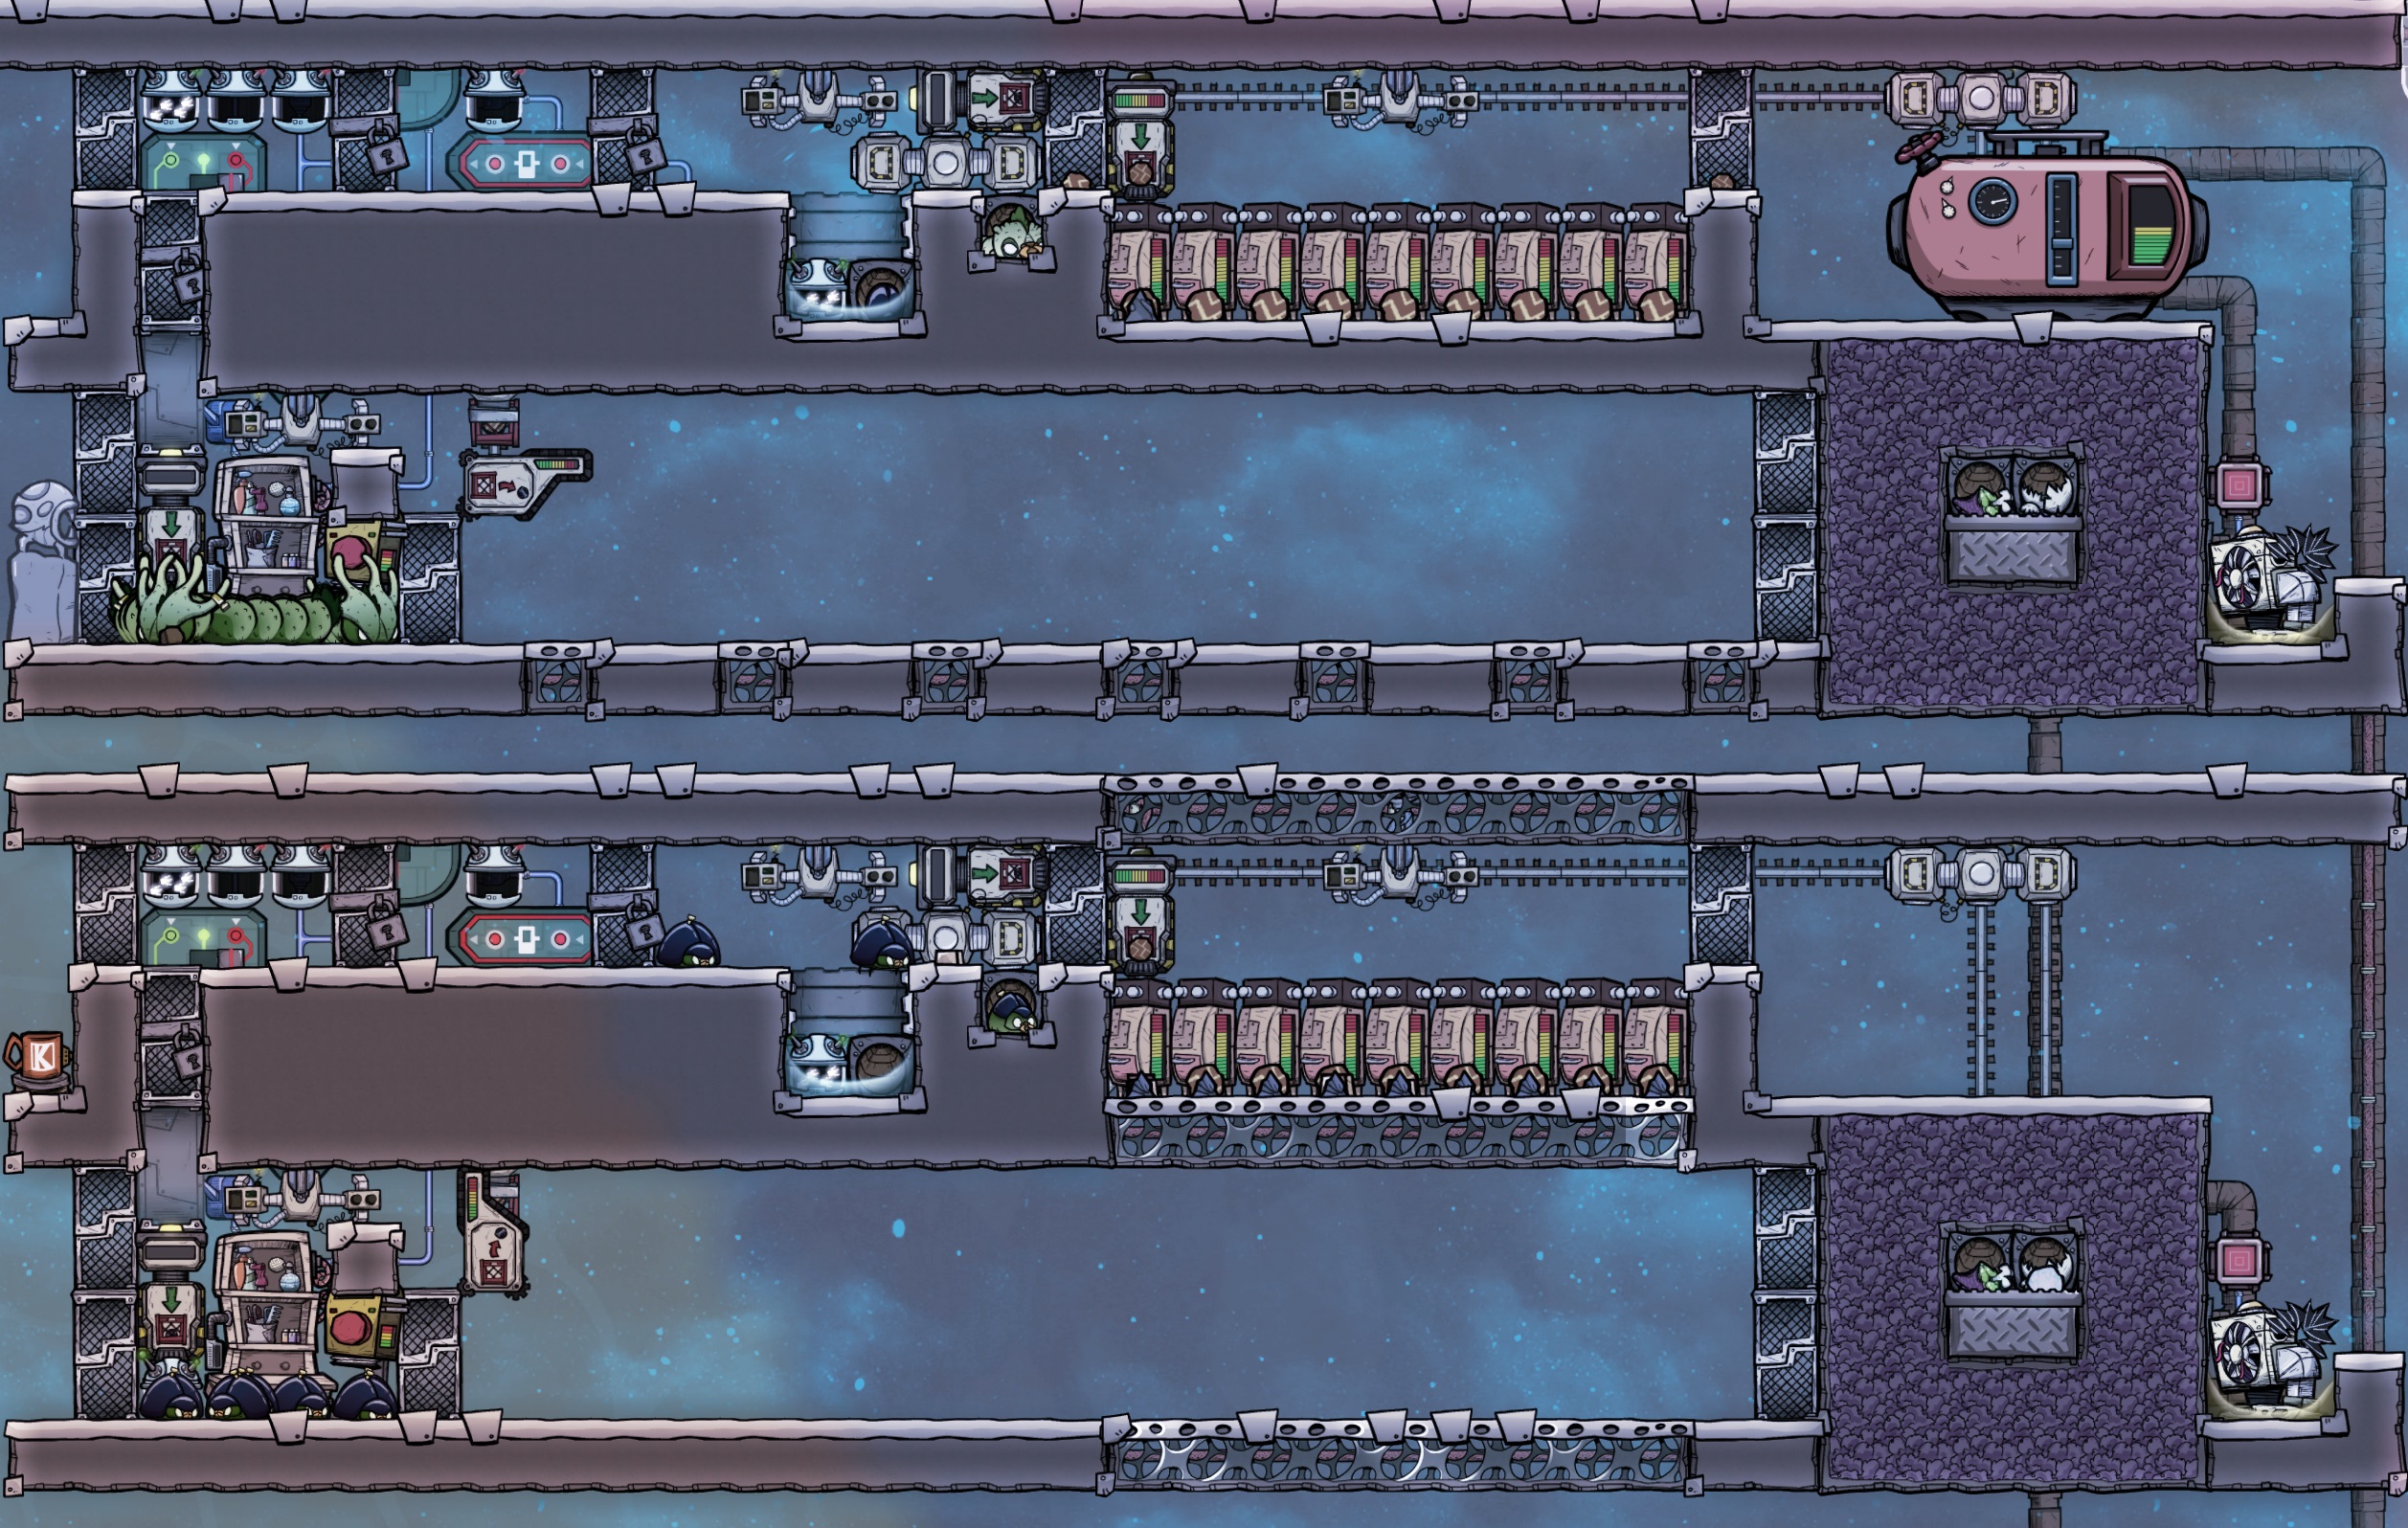
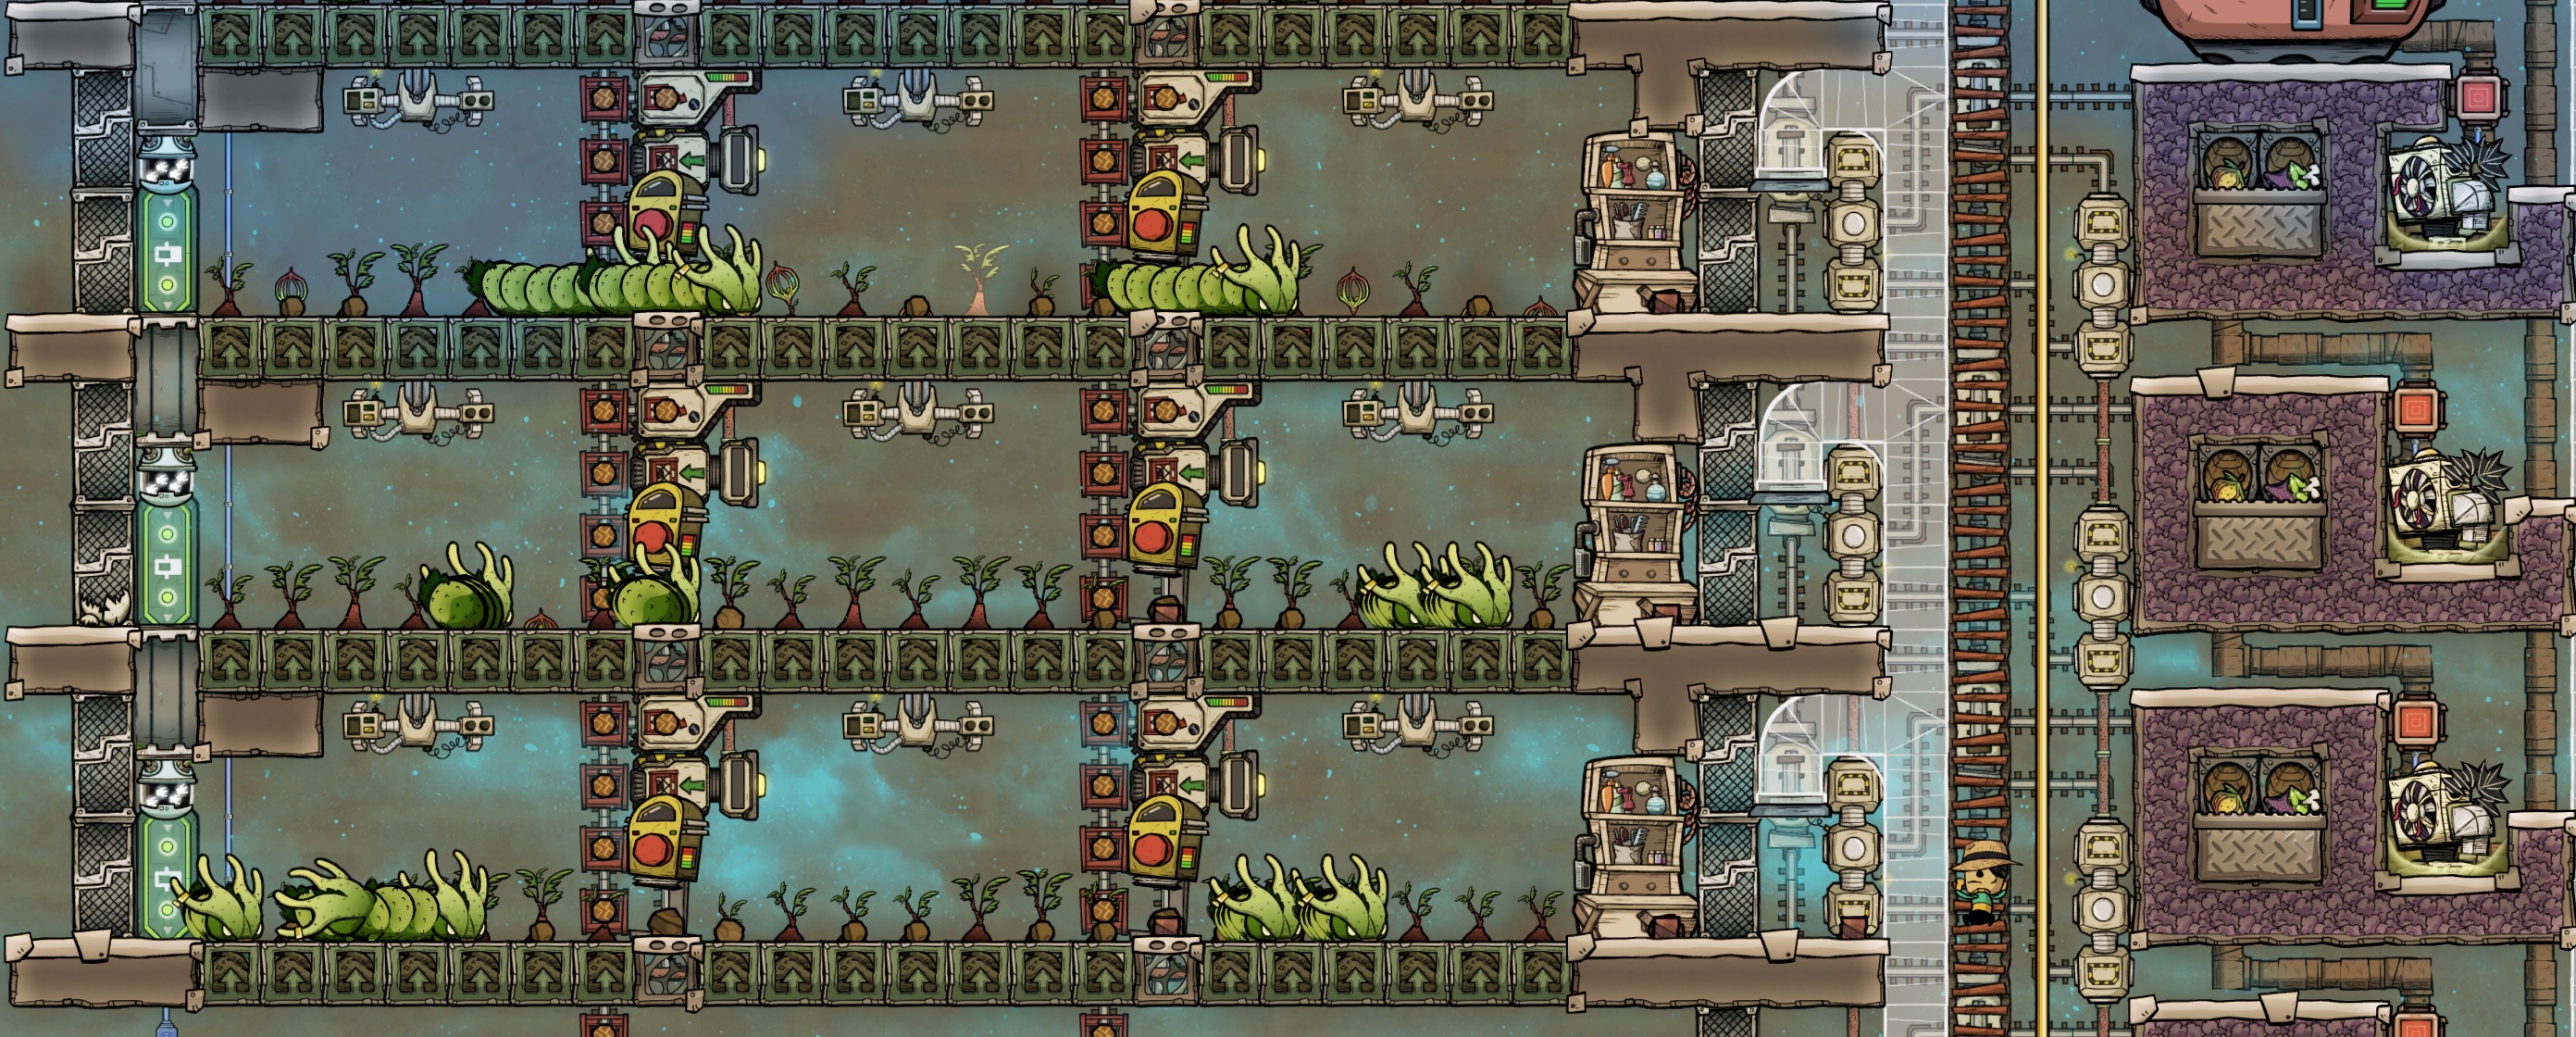
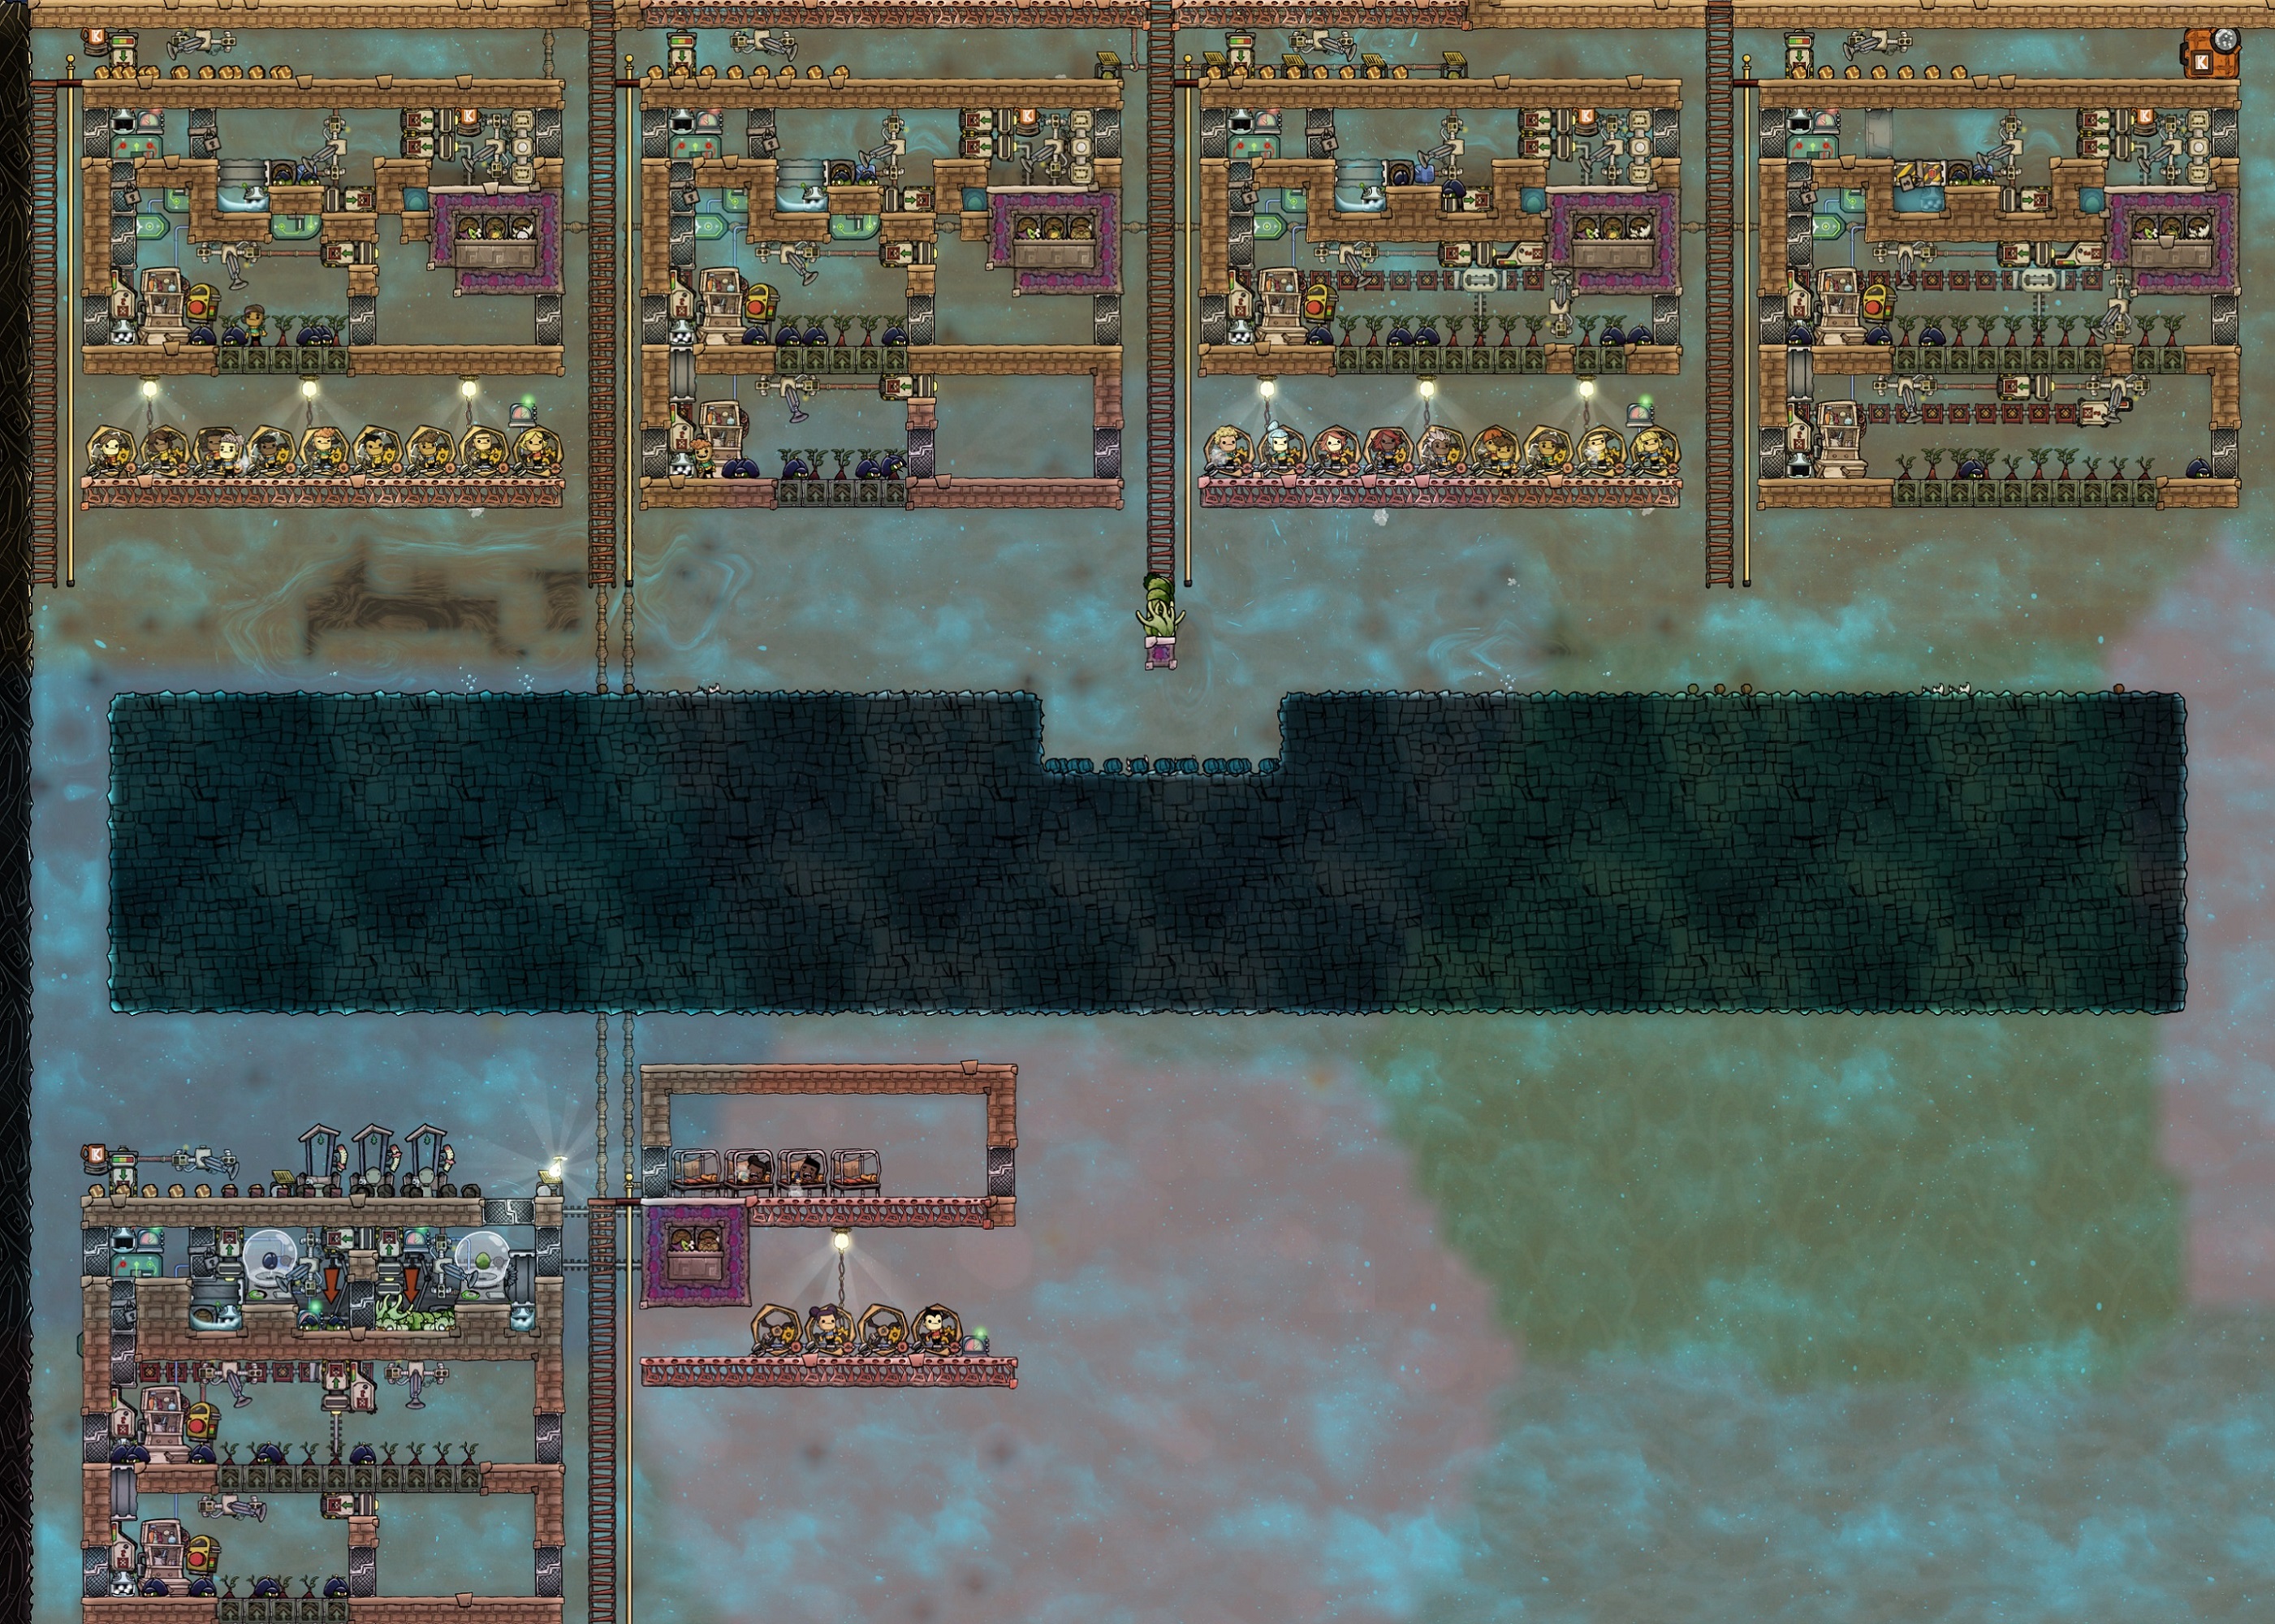
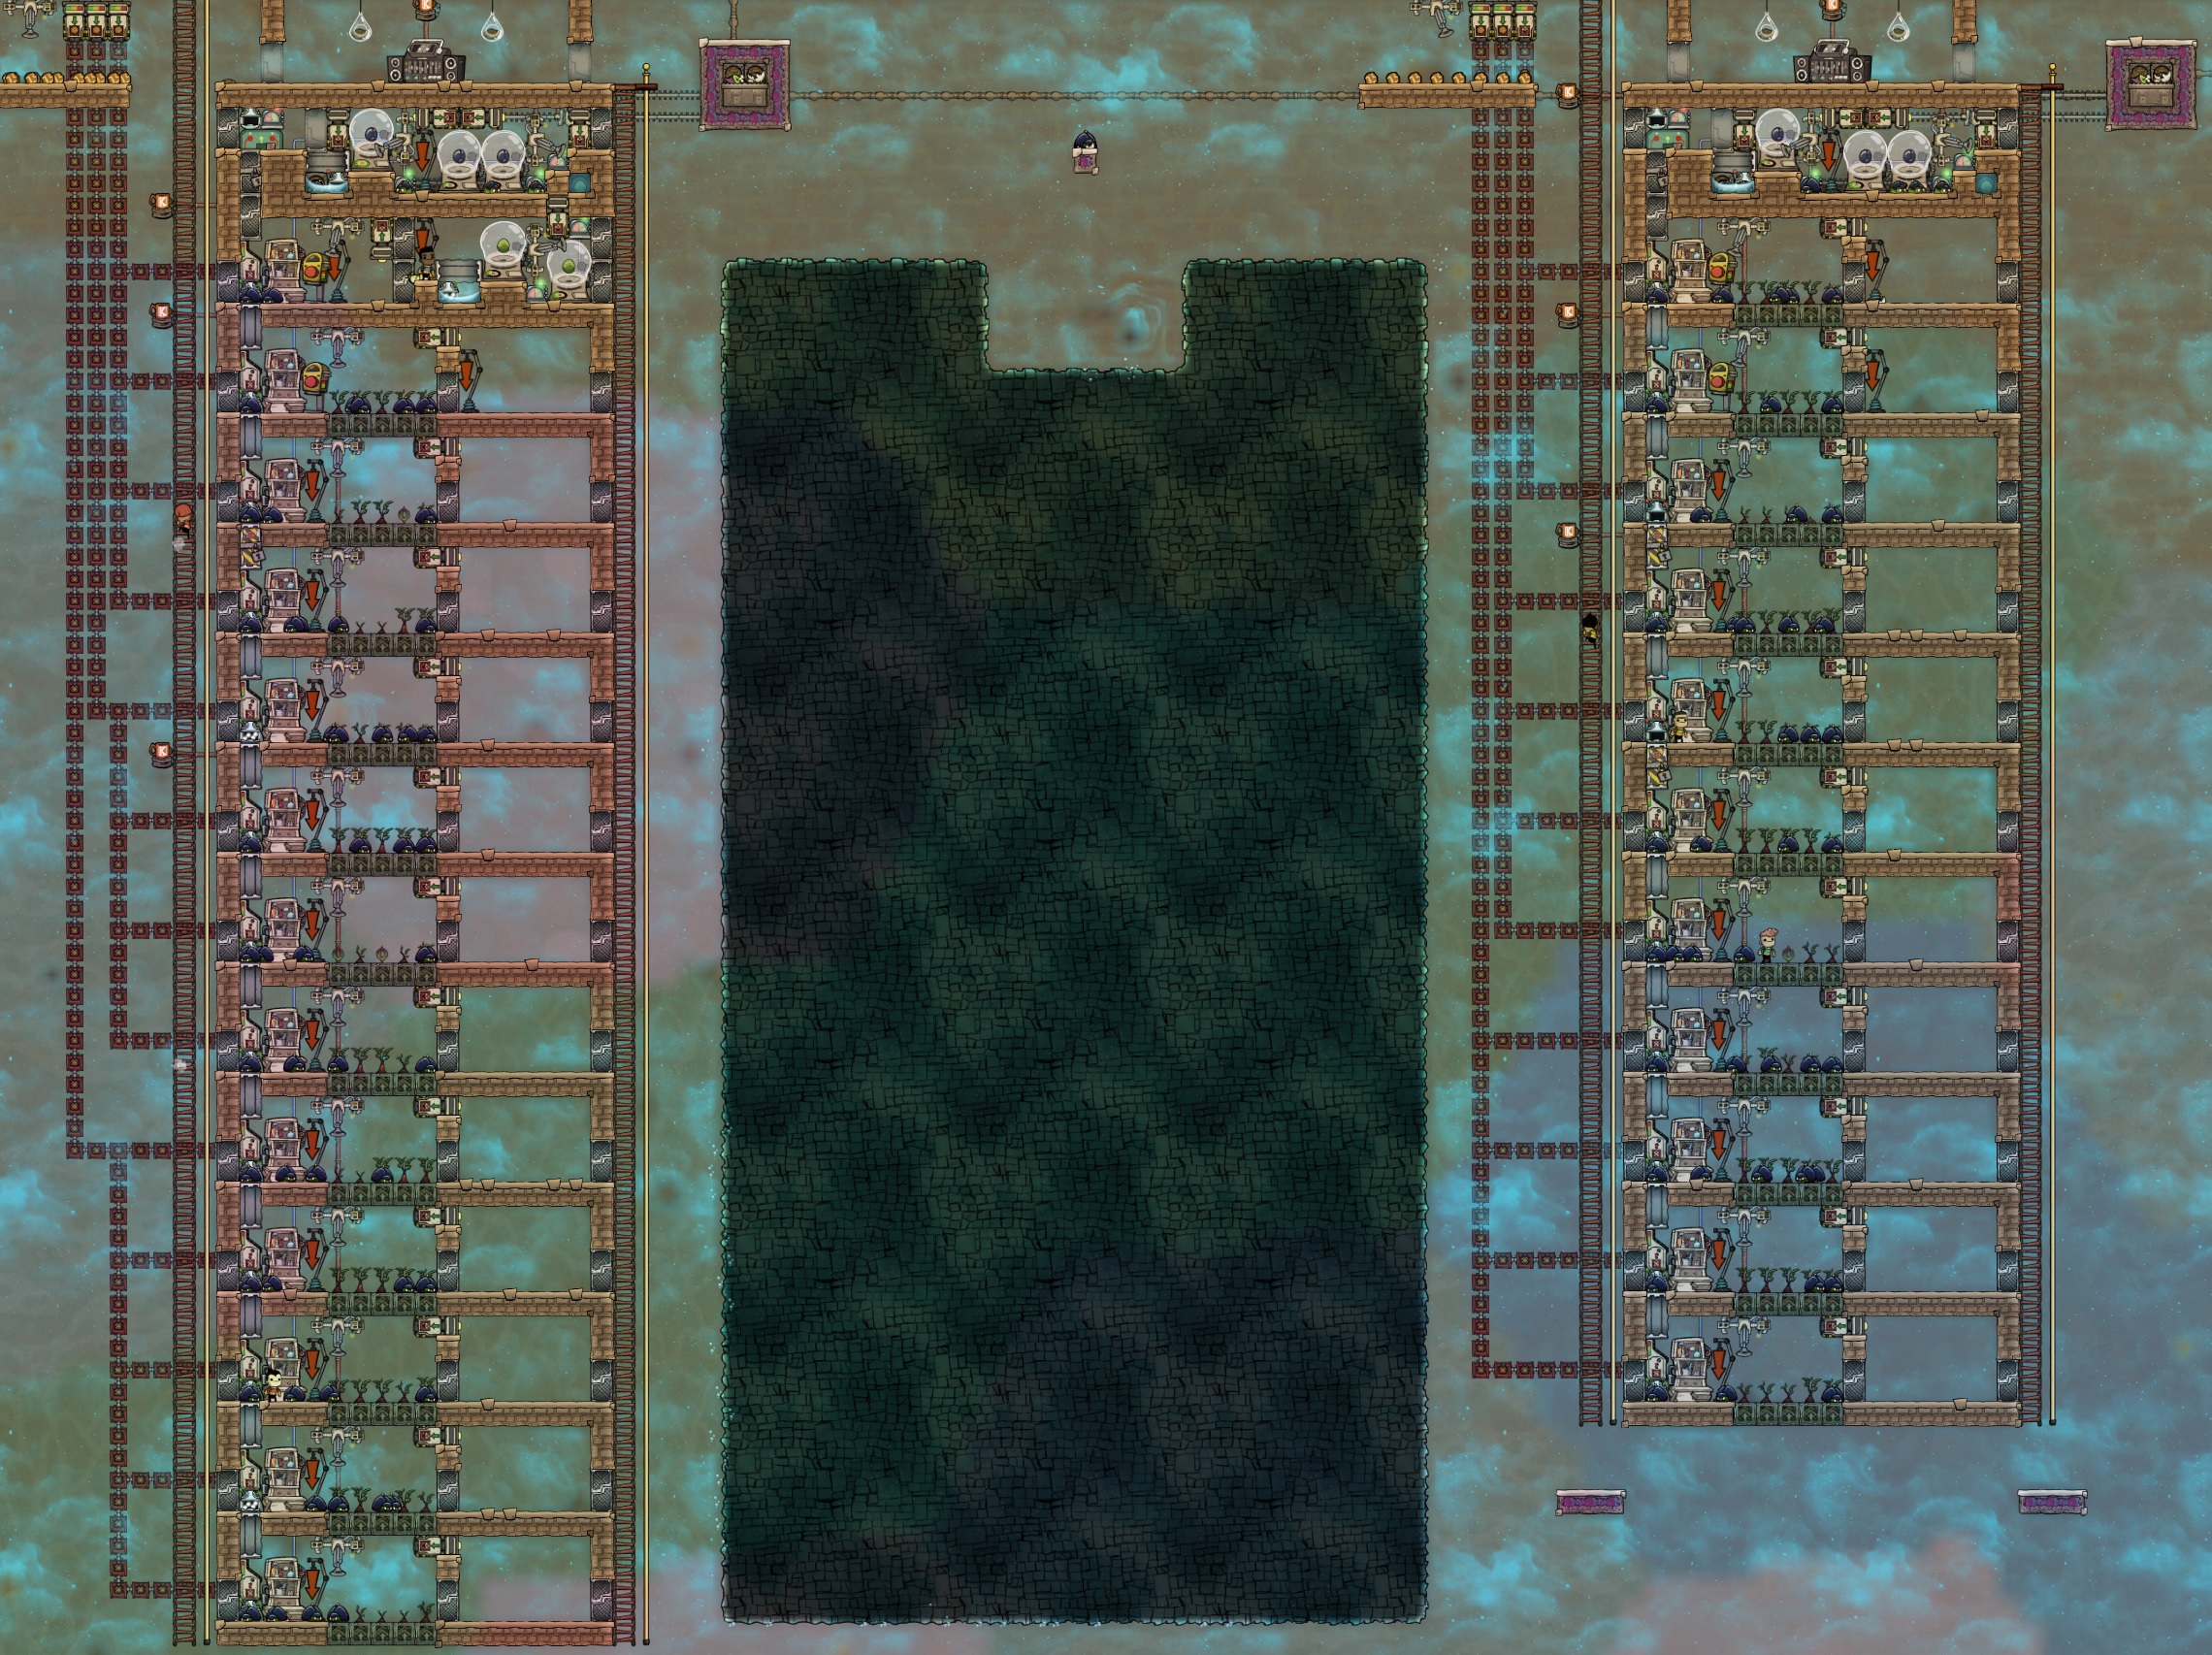
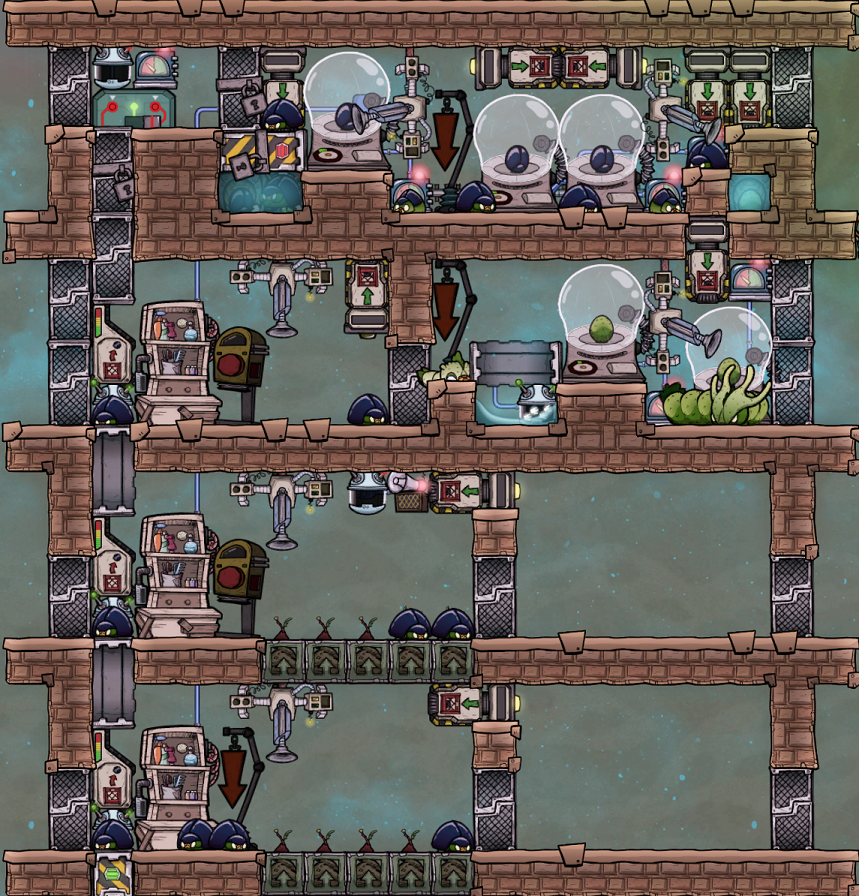
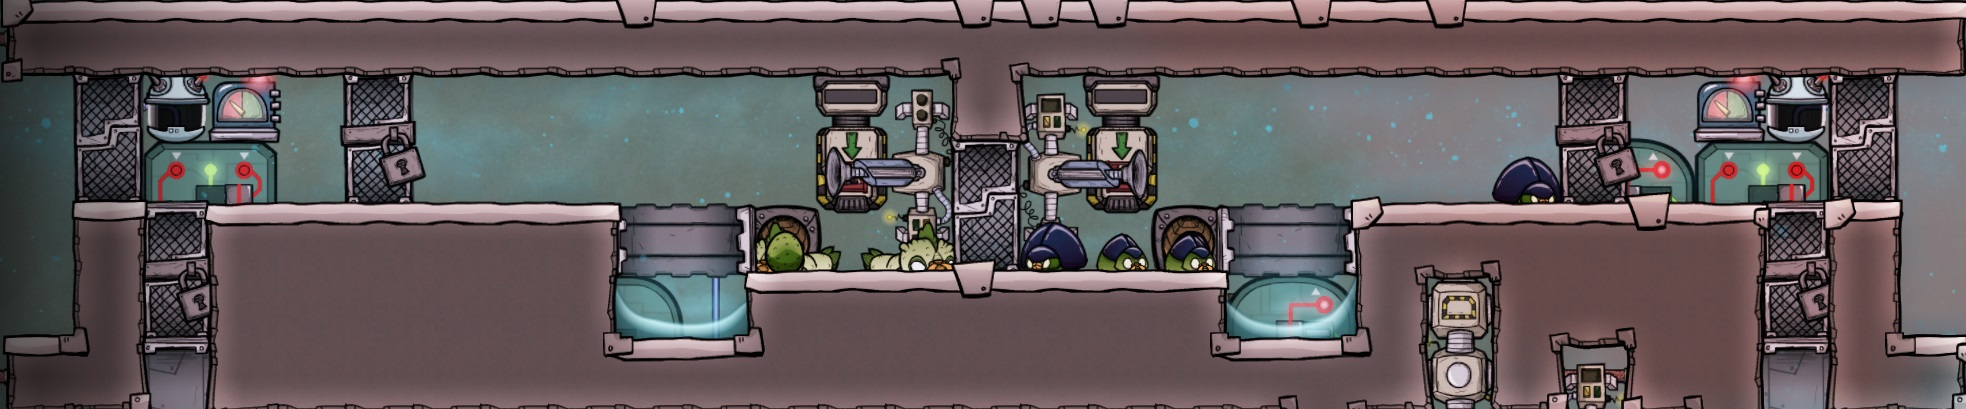
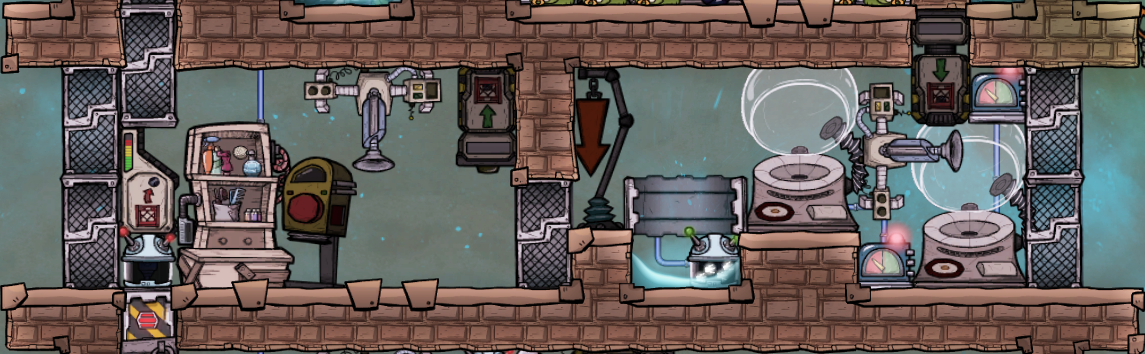
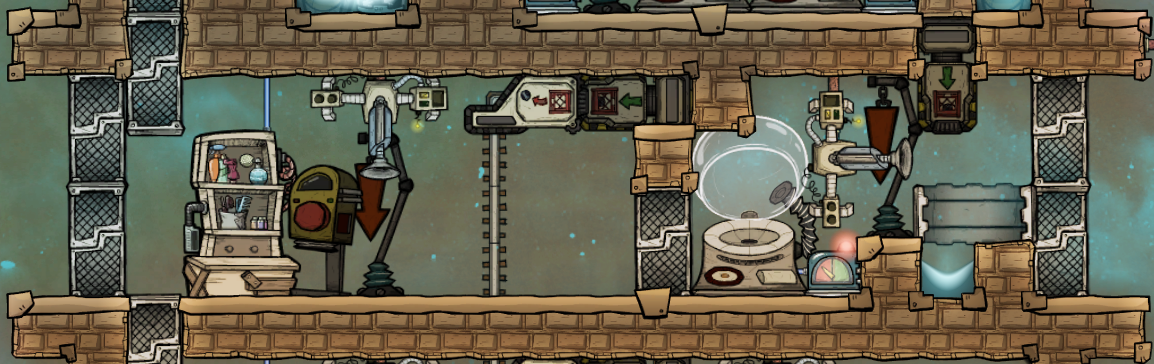
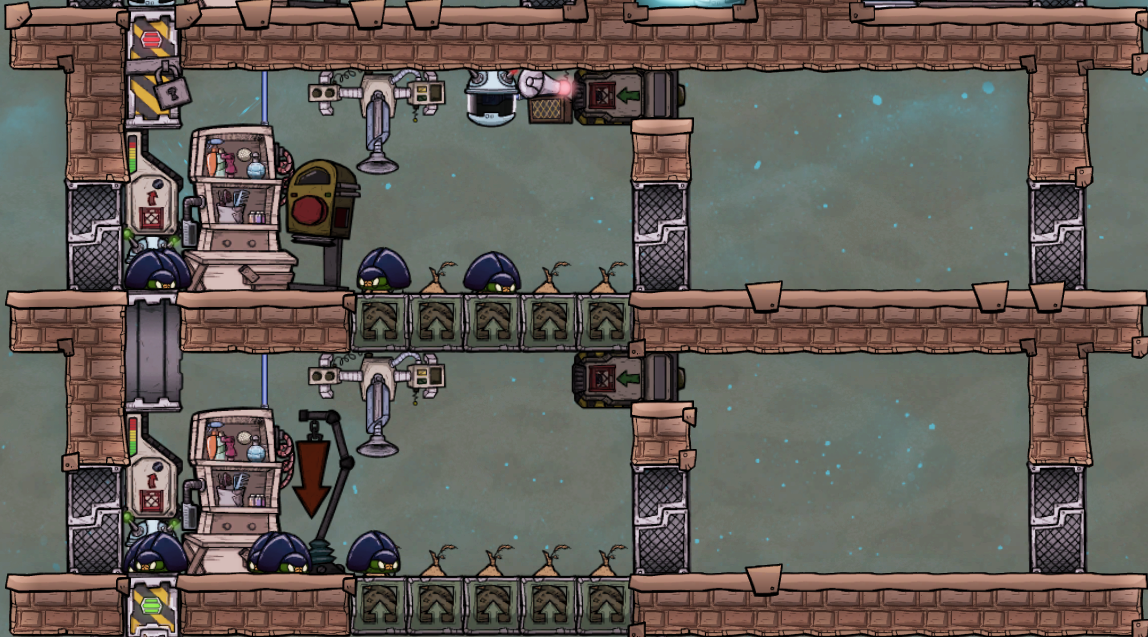
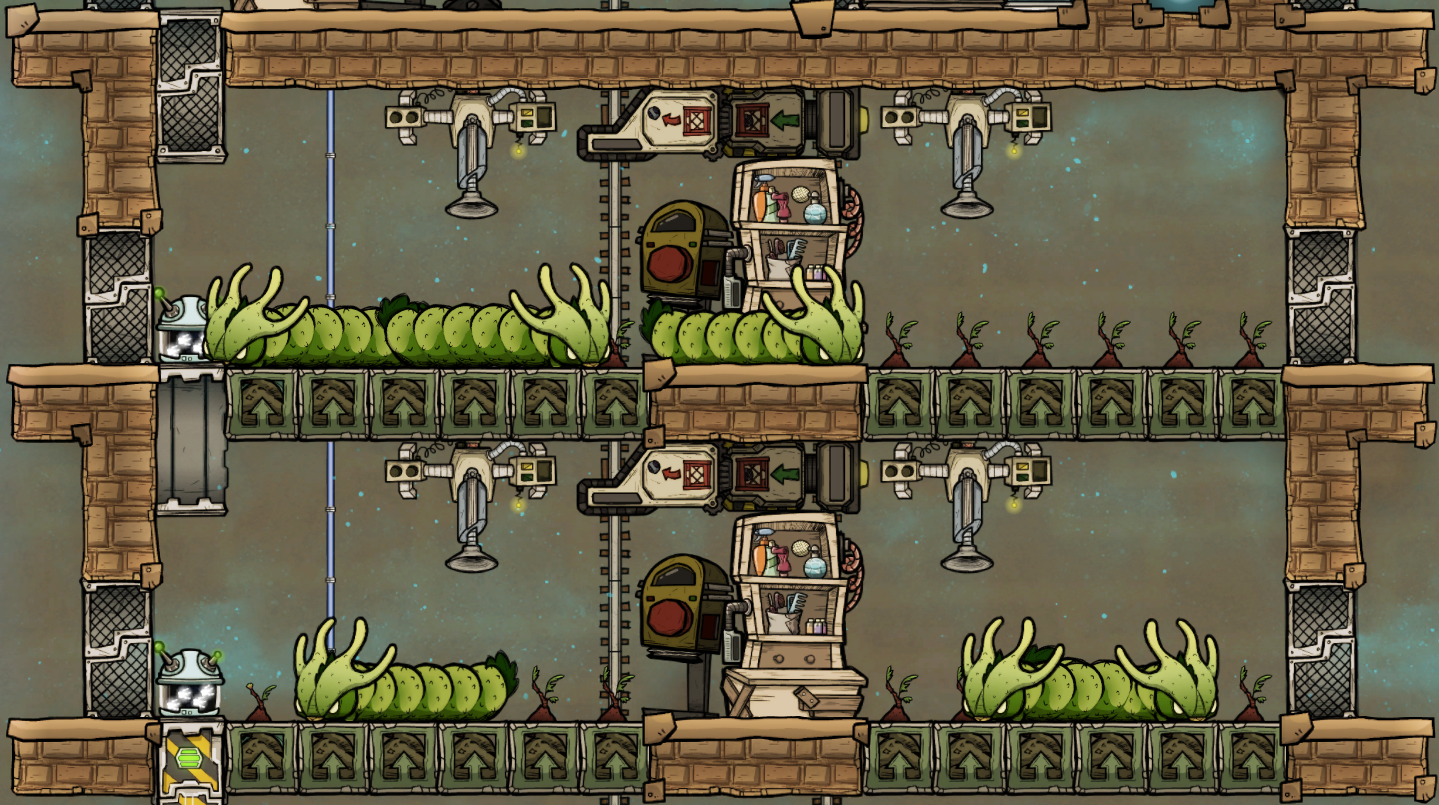
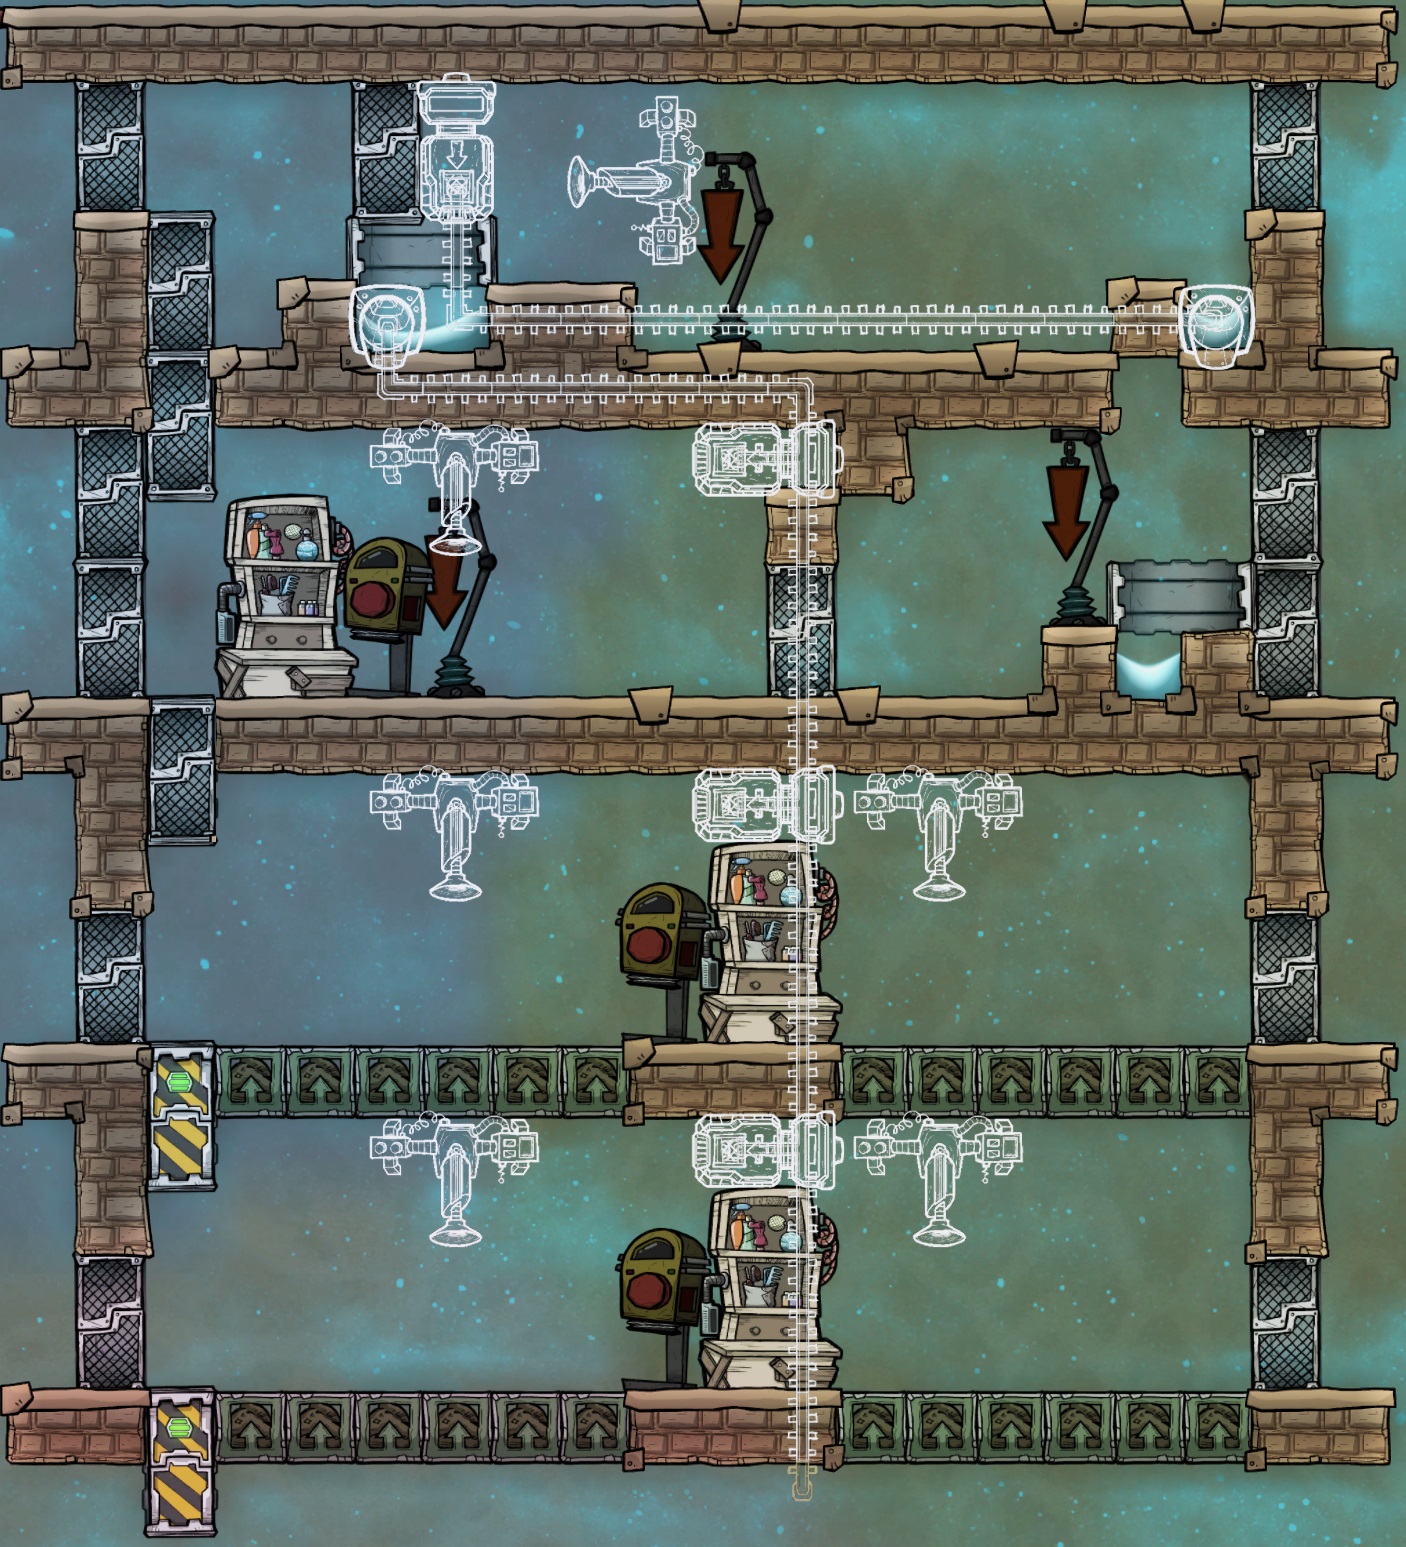
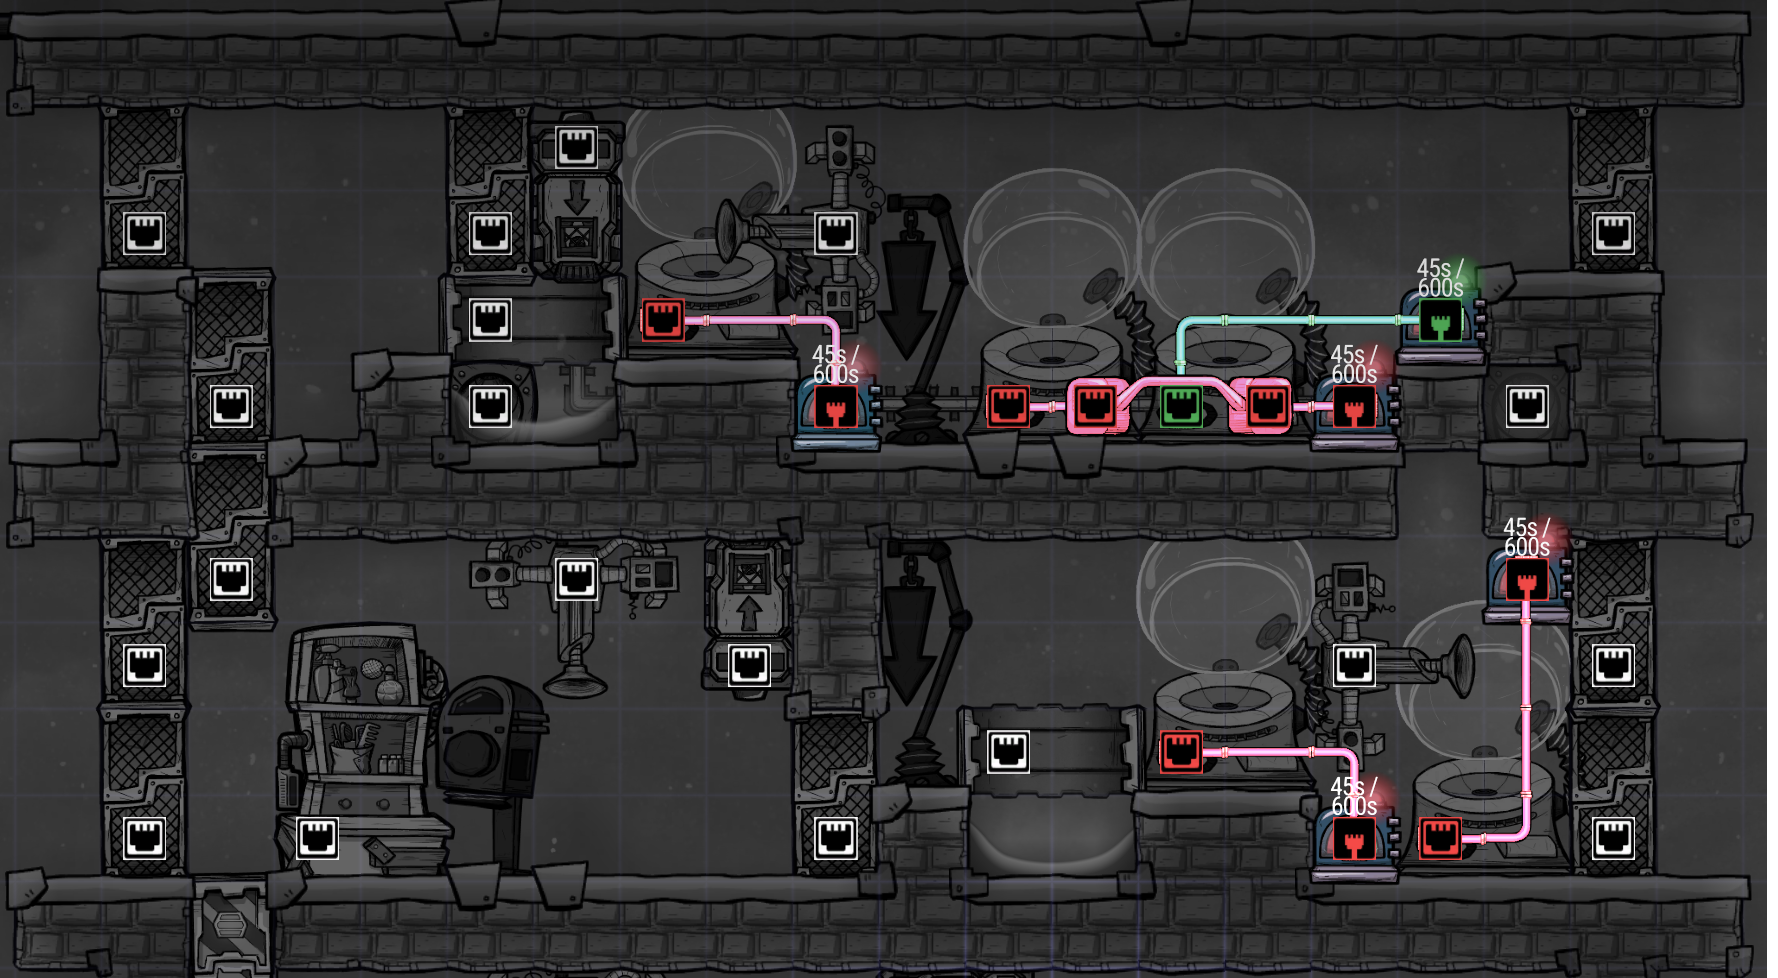
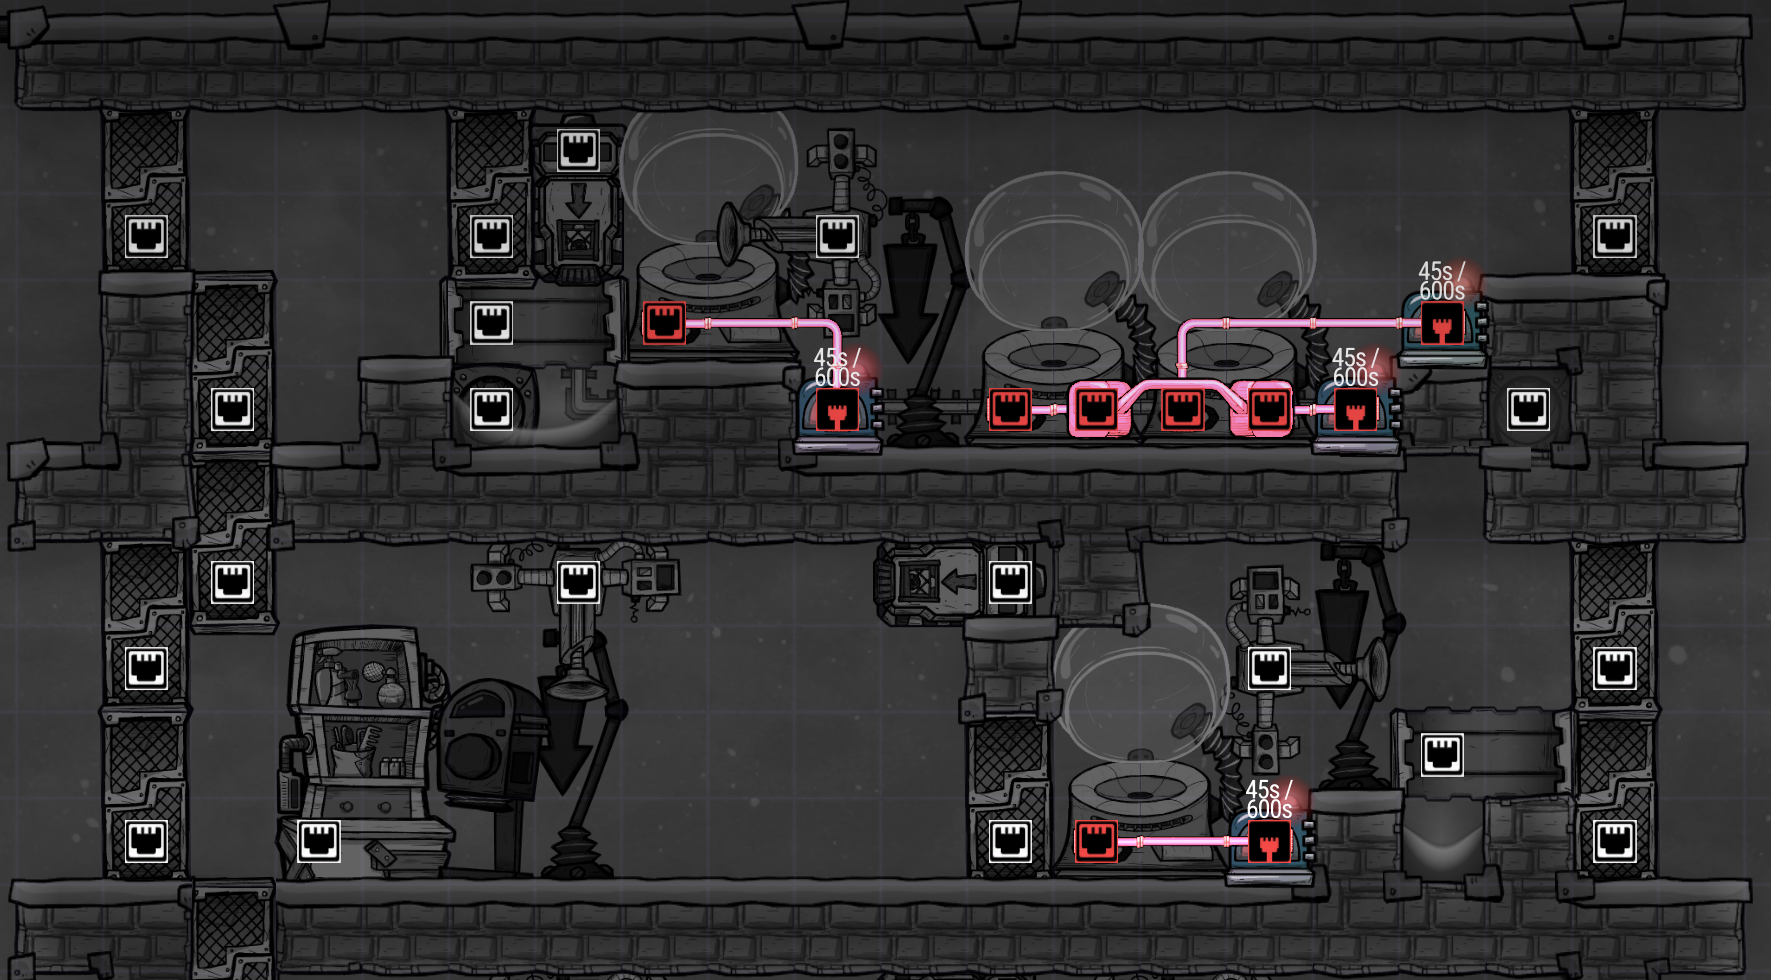
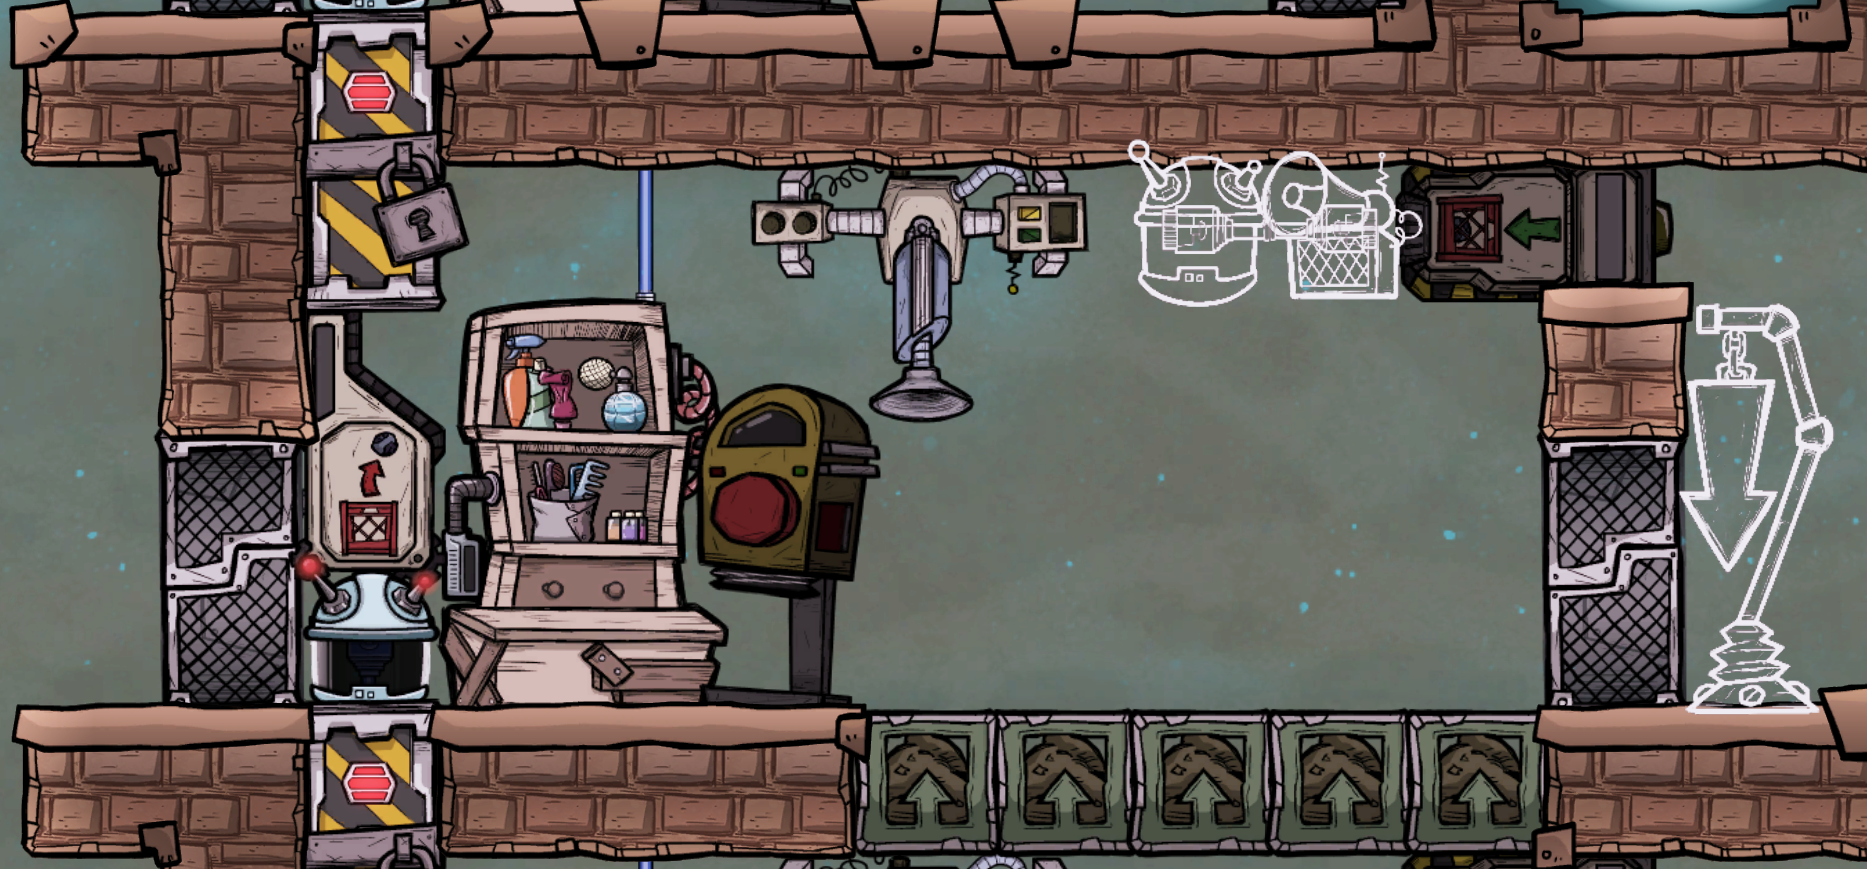
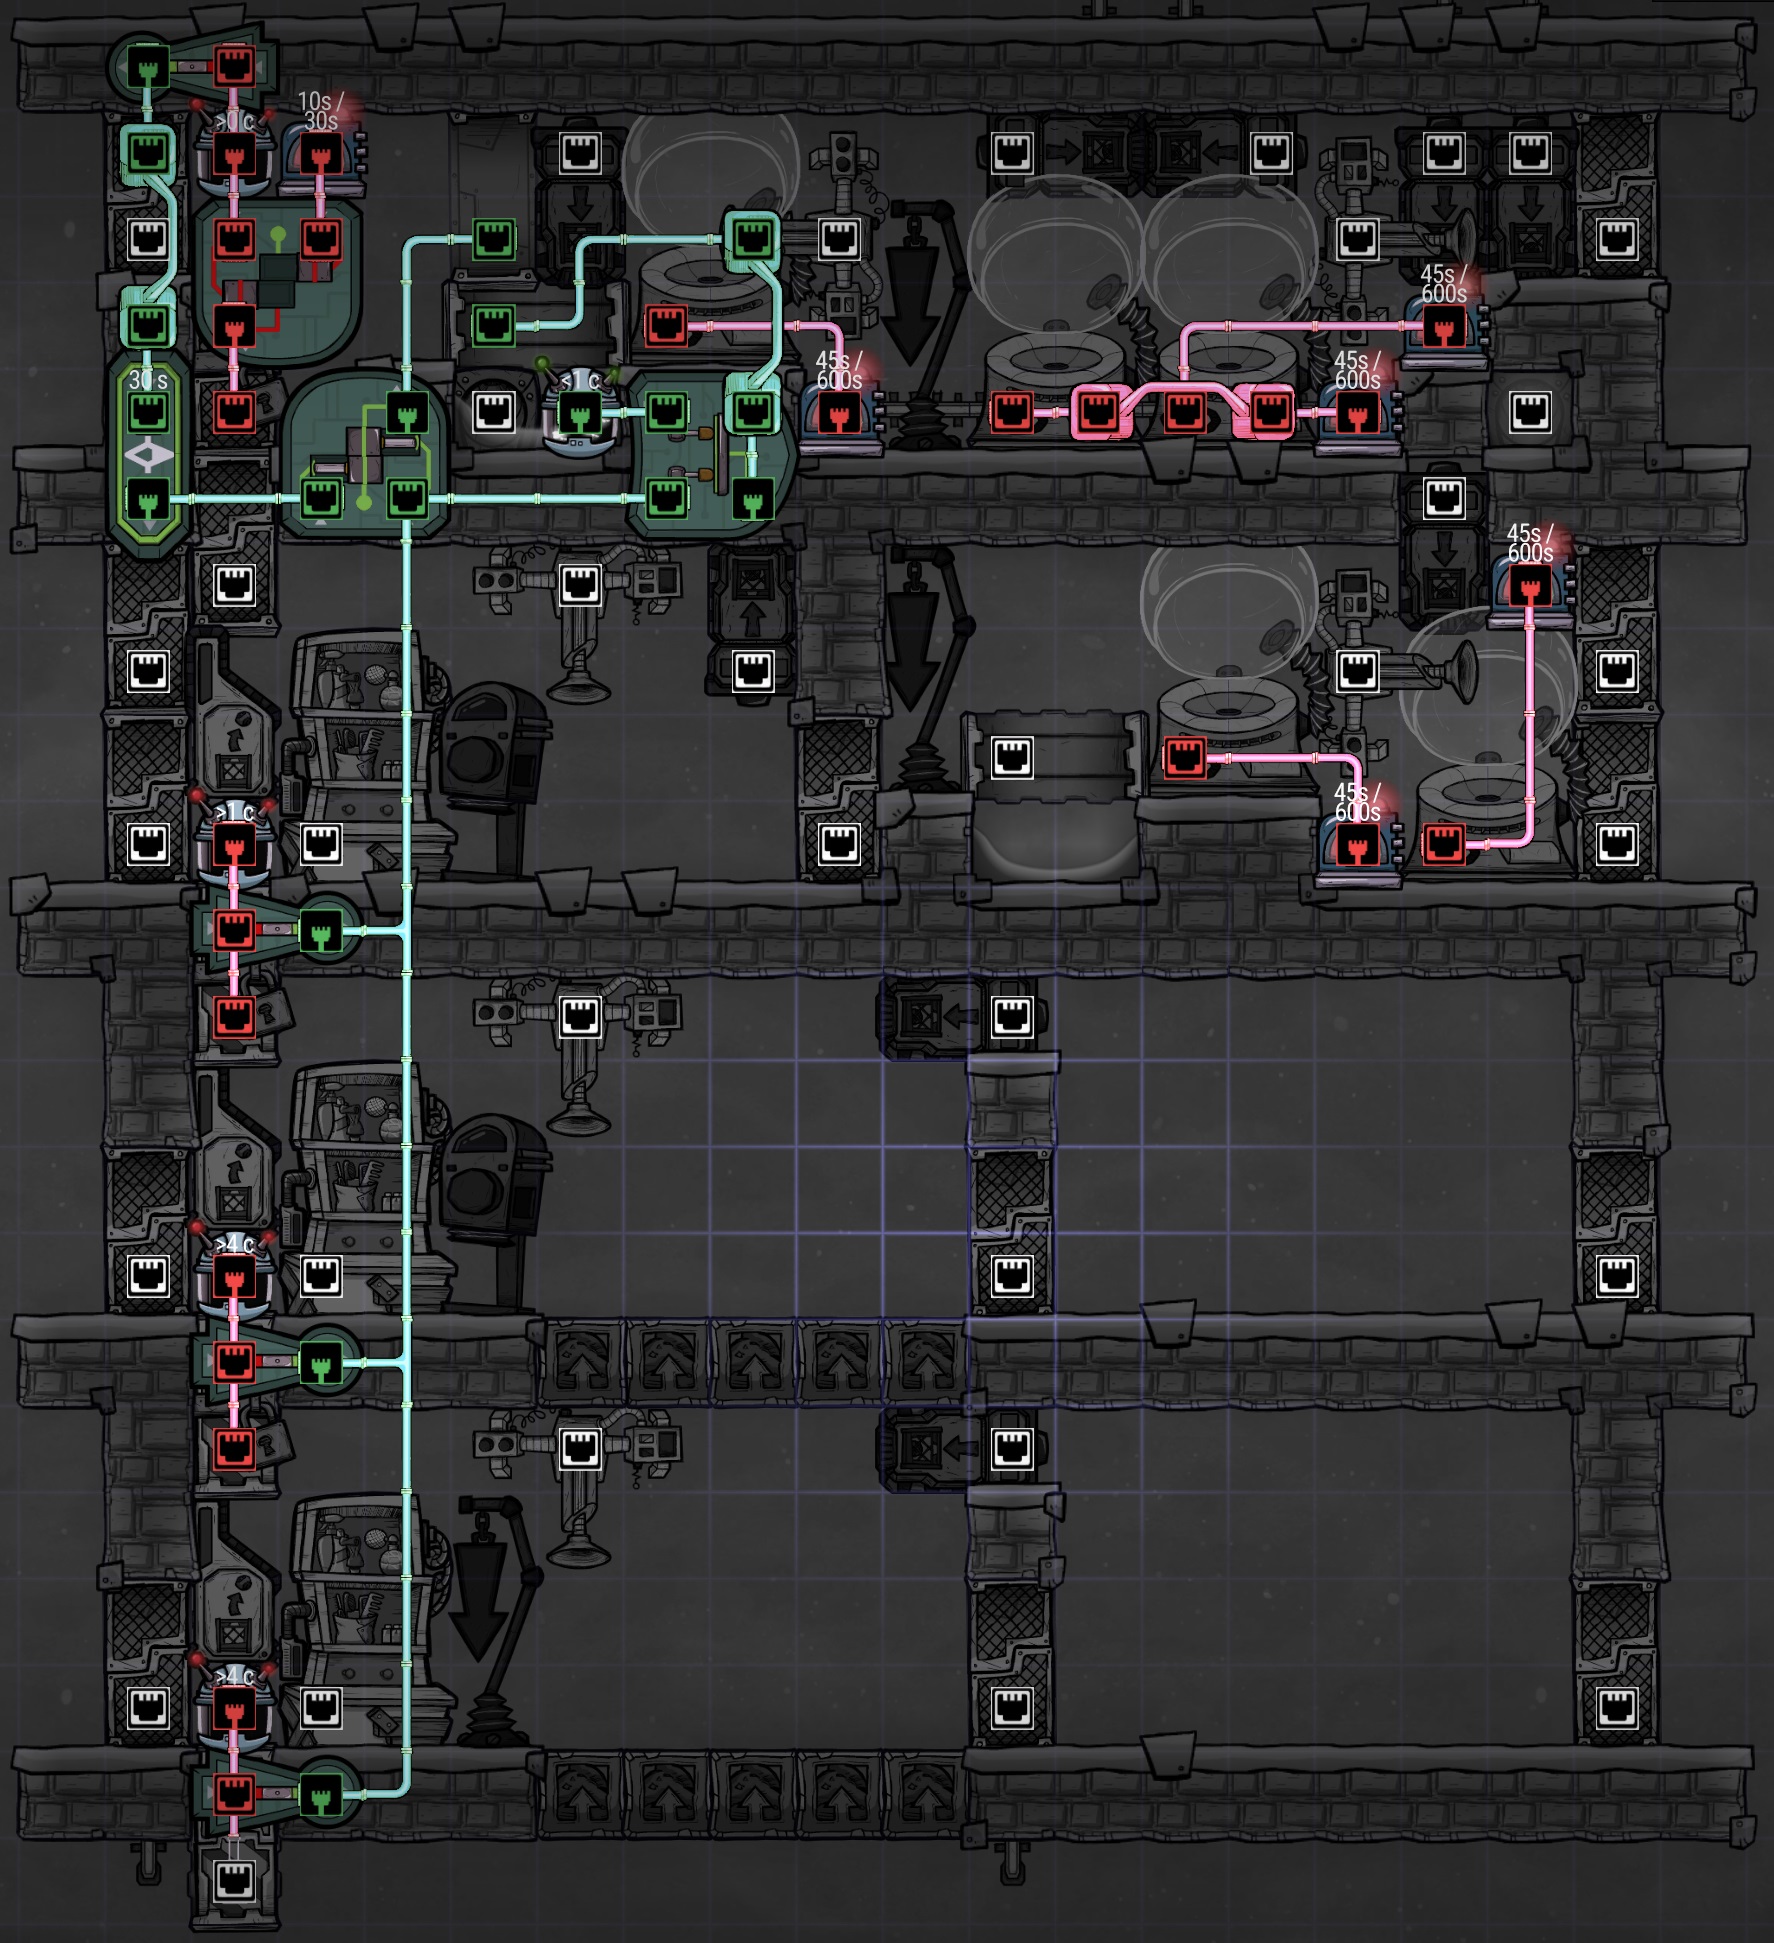
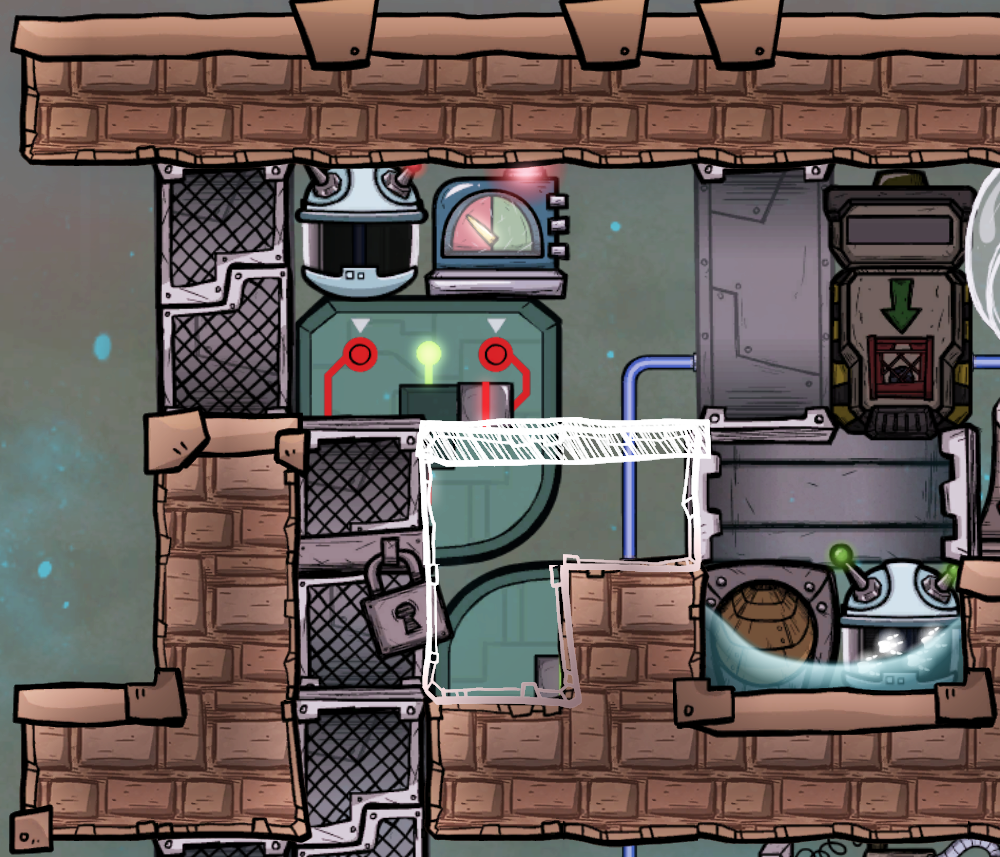
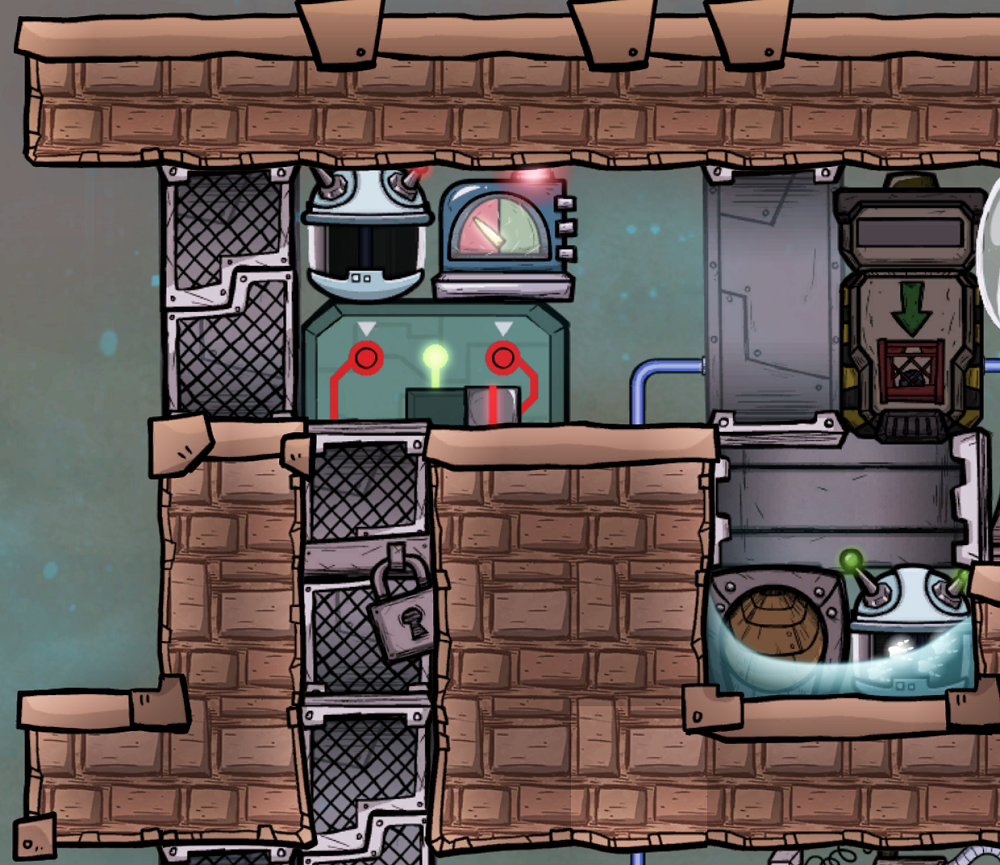
    1) I have not played with doors acting as dividers, like shown here, but the critters seem to walk over the doors, not fall through. I assume this is expected behavior, but how do the animals then swap levels?

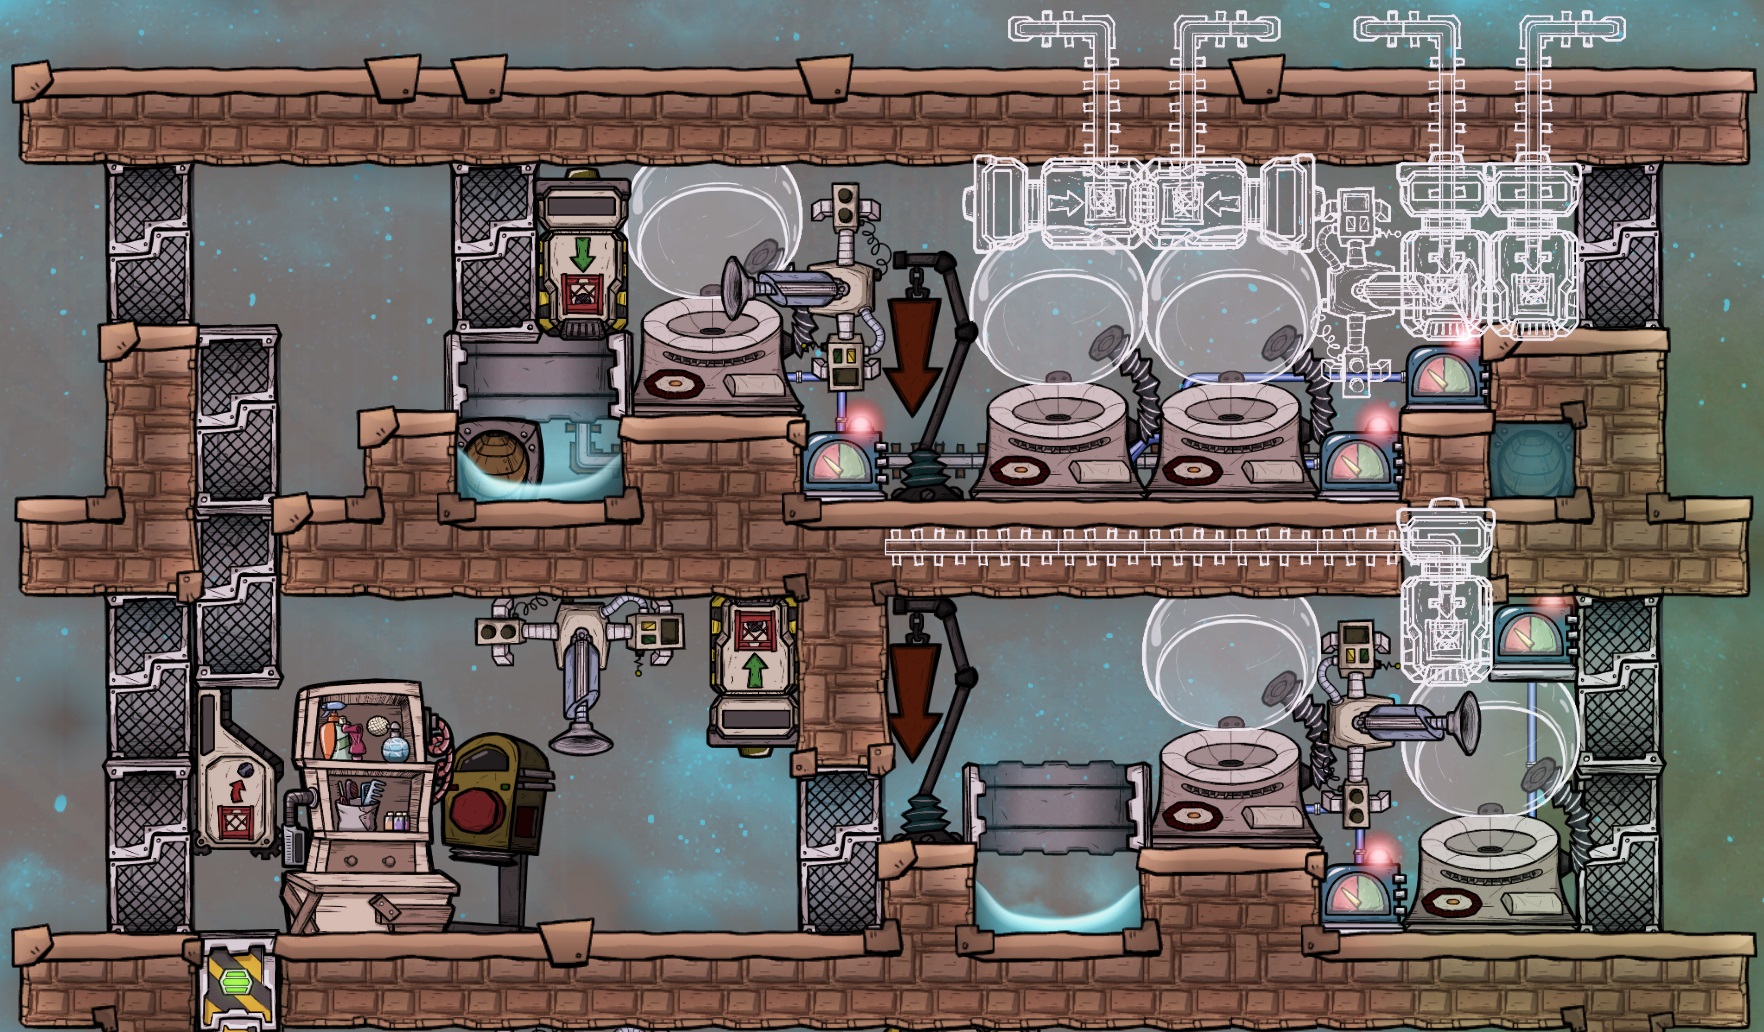
    2) I'm doing the "non min-max" style and made farming instead of bbq (played with hatch ranches forever, thought this would be a nice change of pace :) ) layout. If the sweeties are in the sucrose room, and we set it to try to drop them to the actual farm, is that expected? It didn't seem to make sense, if we're trying (I assume) to only have grubgrub's at the farm level?

    How to breed the sweeties and not drop them to the farms?
    VitaKaninen 18 OCT 2023 a las 11:40 a. m. 
    Looks like this was fixed yesterday.

    [Game Update] - 577063
    * Spaced Out! only
    * Fixed Grubfruit plants not dropping fruit when playing on higher game speeds.
    Magialisk  [autor] 7 OCT 2023 a las 4:05 a. m. 
    @VitaKaninen wow that amazing! Thank you for reporting the bug. I never run at anything other than "pause" or 10x, and just like your bug report I never lost a fruit at 1x when I was testing it, so I assumed it was my 10x speed mod causing the issue. To think if I'd have looked closer I could have reported the problem almost 2 years ago!
    VitaKaninen 6 OCT 2023 a las 5:45 p. m. 
    Great guide! You talked about there being a bug when harvesting Grubfruit if you are playing at a faster speed, but you said that this only applies when using mods to go faster than intended. I was having issues with losing fruit even playing at 3x speed, so I made a bug report about it and they said it would be fixed in a future update. Just wanted to let you know the good news.

    https://forums.kleientertainment.com/klei-bug-tracker/oni_so/grubfruit-plants-do-not-drop-fruit-when-playing-on-3x-speed-r42433/
    NobbynobLittlun 30 AGO 2023 a las 3:44 p. m. 
    This guide is amazing. I greatly appreciate that you show a low tech ranch, and then how it upgrades in stages. Will definitely be checking out your other guides.
    Magialisk  [autor] 6 AGO 2023 a las 12:51 p. m. 
    @Tarsis I really appreciate your kind words and I'm glad you're enjoying the guides! I've been taking a break from ONI for several months, but some of the latest patch notes have me curious again. It looks like you can ranch gassy moos now! I've enjoyed the challenge of figuring out each unique critter, and I remember when I first wrote this divergent guide there was so little known about their mechanics. Luckily the rest of my guides were more about optimizing well understood mechanics, vs. figuring them out from scratch!