Nioh 2 – The Complete Edition

Nioh 2 – The Complete Edition

111 ratings
Nioh 2 Math School: The Total Damage Formula
By Yanxi
This course teaches students about the Total Damage Formula, as well as how to use it to compare the various damage bonuses in Nioh 2. Welcome back to school!
15
5
2
5
2
2
2
   
Award
Favorite
Favorited
Unfavorite
Class Announcements
Announcements from the course instructor are posted here.

Final Assessment Re-opened
July 23, 09:00 EST

By popular demand, the Final Assessment of the Nioh 2 Math School has been made available again for all newcomers to participate in. I will happily grade any new attempts on the Final Assessment.

Here's a huge thank you to all the past students who participated in the Final Assessment last June! I hope you enjoyed taking this course as much as I enjoyed teaching it.

Link to the Final Assessment:
Nioh 2 Math School – Final Assessment[forms.gle]


Final Assessment Posted
June 5, 08:00 EST

The link to the Final Assessment is now posted. You may find it in the section at the bottom titled Final Assessment. Good luck and have fun!


Added information about Sword of Execution stacking
May 30, 00:30 EST

I added an example incorporating Backstab Damage, Sword of Execution and the Weak Spot Bonus to the section titled Notable Case Studies – Part III to address some students' questions about the Sword's Mystic Art.


Course Syllabus


Originally posted by a struggling Nioh Math student:
"Since this is an elective, I thought it would be a bird course. Turns out it's not easy at all! I'm totally screwed for the final. I hope the prof is nice enough to give me a passing grade."

Originally posted by cramming Nioh Math students:
"Do these bonuses stack additively or multiplicatively? Jeez, this is too complicated. I'll just ask around for the test bank."

Originally posted by a graduated Nioh Math student:
"Professor Yanxi's exam was hard, but fair. As long as you keep up with the readings, you should be able to pass with a decent grade."


IMPORTANT ANNOUNCEMENT:
Due to the COVID-19 pandemic, in-person classes for the course NIOH2-MATH-101 have been cancelled. Instead, the course content will be delivered entirely through online remote learning. No tuition refunds or discounts of any amount will be provided — our course instructors have done everything in their ability to ensure that the same professional quality of course content is delivered.

You are expected to have a stable internet connection and attend every virtual session; Zoom is not required. It is your responsibility to diligently keep up with the course content, lest you fall behind before the final exam.

Stay healthy and stay safe,
Nioh Community Institute


Introduction
Welcome to Nioh 2 Math School: The Total Damage Formula! My name is Yanxi, and I am an Assistant Professor of Mathematics here at the Nioh Community Institute. I am very excited to be your instructor for this course.

You can find my office in the Mathematics Department of the Nioh Community Institute campus. I am happy to provide virtual Office Hours on an appointment basis; please send me an email to set up a meeting during normal business hours to discuss the course content.

Course
NIOH2-MATH-101
Section
A – Online
Term
Spring 2021
Instructor
Yanxi, Assistant Professor
Office
Email
Office Hours
By Appointment

Please note that this is Section A of NIOH2-MATH-101. If you are not enrolled in this specific section, please exit this session and return during your specified time slot. This course is currently at full capacity, so we cannot have students attending any other sections.


Course Overview
In Nioh 2, there is an endless amount of damage bonuses and buffs to choose from. Figuring out how these bonuses and buffs contribute to your total damage output has proven to be extremely difficult—this is evident by the numerous questions our students ask every day on the Steam forums, Reddit and Discord.

This course was designed to introduce you to the Total Damage Formula, as well as how to apply it to your everyday encounters. It will explain which bonuses stack with which bonuses, which bonuses contribute most to your damage output, and how to calculate your total damage multiplier so that you can make comparisons between your equipment.

I would like to emphasize that this course covers the Total Damage Formula for Melee attacks only—not Yokai, ranged, elemental, Onmyo or Ninjutsu attacks. The formula for each of these other attack types is a whole beast in itself, and they require a lot more research from the excellent professors of our academic institution.


Course Learning Materials
The required textbook for this course is Professor Ocean Machine's Nioh 2 Build Bible.[docs.google.com] In-class exercises will frequently instruct students to navigate to pages inside this textbook to acquire external information.


Course Goals and Learning Objectives
By the end of this course, students will be able to apply the following learning objectives:
  1. Determine how much damage each bonus adds to your total damage output
  2. Understand which damage bonuses stack with each other
  3. Distinguish between additive and multiplicative bonus stacking
  4. Identify which damage buffs are currently applied to your character
  5. Compare the damage output potential between builds
  6. Apply your understanding to optimize your total damage multiplier


Course Graduation
Writing the Final Assessment of this course is completely optional.

However, students who choose to write the assessment and score a grade of at least 70.0% will be considered "Officially Graduated" and personally awarded a Graduation Diploma signed by the Nioh Community Institute.


Final Assessment Information
The Final Assessment may be accessed any time from June 5, 2021 to June 30, 2021.

The assessment has been reworked to be significantly more difficult than it was in past years. It will require advanced analytical skills and creative applications of the concepts learned in class, with the intention of simulating problems that the Institute's Professors face while conducting real mathematical experiments.

Ultimately, this turns the course graduation into a rewarding endeavor focused on personal development and the gaining of knowledge. At the end of this course, students will look back at where they started and be amazed at how far they have come.


Cheat Sheet (Too long; skipped class)
For those of you bad apples who like to skip class, I do not support your decision, but I can sympathize with it—especially during this devastating pandemic. Here is an ultra-short summary of the course that provides you with a good-enough level of knowledge in 60 seconds.

If you decide to drop this course, you will still be able to access this cheat sheet at any time for your future reference. The registrar has provided you with permanent access to this section, so you may return to our course website at any time to review the Total Damage Formula.

Please keep in mind that this cheat sheet alone is not enough to help you pass the final exam. Achieving a passing grade in this course will require you to listen attentively, follow the in-class examples, and attempt the practice questions after every session.


The Total Damage Formula
In sentence form:
Total Damage = [Base Damage] × [Passive Damage Bonuses] × [Active Damage Buffs] × [Debuffs: Reduced Defense + Saturation + Confusion] × [Out-of-ki Bonus] × [Weak Spot Bonus]

In numerical form:
Total Damage = (Base Damage) × (1 + x % of Passive Damage Bonuses) × (1 + y % of Active Damage Buffs) × (1 + z % of Reduced Defense + 20.0% Saturation + 50.0% Confusion) × (1 + a % Out-of-ki Bonus) × (1 + a % Weak Spot Bonus) or (1 + b %) if Out-of-ki Bonus is active


How to Use It
  1. Find your Base Damage – the damage your action deals without any bonuses
  2. Add all your Passive Damage Bonuses together
  3. Add all your Active Damage Buffs together
  4. Add any Debuffs you plan to inflict together
  5. Multiply the three sums with your Base Damage
  6. You now have your total damage output.

If you attack an out-of-ki enemy or an enemy's weak spot, the game will automatically apply a variable bonus to your total damage output.

If you attack the weak spot of an out-of-ki enemy, the game will automatically apply a second smaller variable bonus to your total damage output.


Examples of Passive Damage Bonuses


Examples of Active Damage Buffs


All Three Damage-related Debuffs


A full list of the bonuses found in each category is provided in Appendix D.[docs.google.com]


Suggested Approach to Readings
If you've gotten this far, you should applaud yourself for not being a bad apple! As recognition for your perseverance, I am acknowledging that this course is probably harder than what you signed up for. You may even experience information overload at multiple times throughout this course. To alleviate this, I have provided several strategies to help you tackle the course content below.


Bare Minimum Readings – "I just need the credit"
If you just want to learn and use the Total Damage Formula in as little time as possible, you only need to read these sections:
  • The Total Damage Formula
  • Steps to Using the Formula
  • Damage Multipliers of Common Builds

This amount of readings is likely to earn you a C grade in this course. While this is not a very high grade, I would be happy enough knowing that you understand how to use the Total Damage Formula.


Complete Readings – "I actually care about my GPA"
If you would like to earn a B or A grade in this course, then you must complete all the readings. To facilitate this, the course has been divided into three sessions:

Reading Session 1/3
Start with these four sections. Then, take as long of a break as you need—you'll have a lot of information to digest!
  • The Total Damage Formula
  • Breakdown of Categories – Player
  • Breakdown of Categories – Enemy
  • Appendix D

Reading Session 2/3
After taking a break and clearing your mind, come back and read these sections. Then, take another well-deserved break to digest some more information.
  • Steps to Using the Formula
  • Damage Multipliers of Common Builds
  • Optimizing Your Damage Output

Reading Session 3/3
Finally, finish with these three sections. I think you'll find these sections very interesting because they are case studies of what you are likely to experience once you graduate from this course.
  • Notable Case Studies – Part I
  • Notable Case Studies – Part II
  • Notable Case Studies – Part III

If you can reach the end of this course, then you are a very dedicated student! I can assure you that the concepts you learn here will seep into your in-game performance. You will be very proud of yourself for getting this far.


Optional Readings – "I'm trying to get into grad school!"
These sections contain supplementary information that you may read if you want to learn more about the subject matter. While these sections are not mandatory at all, if you are planning to earn admission into a post-undergraduate program, it is in your best interest to read them.
  • Appendices A, B and C

If you read the entire Appendices in search of supplementary information, then you are totally grade A+ material. Who knows, one day it might be you who carries on with our legacy and ends up teaching the next class!


––– SESSION 1 –––
That's it for the course syllabus. Are you ready to do some math? Let's start today's class!

The Total Damage Formula
Everything from this point on may appear on the final exam.

To begin, here is the Total Damage Formula in literal terms:

Total Damage = [Base Damage] × [Passive Damage Bonuses] × [Active Damage Buffs] × [Debuffs: Reduced Defense + Saturation + Confusion] × [Out-of-ki Bonus] × [Weak Spot Bonus]

Visually cleaning it up and separating the terms:

Total Damage = [Base Damage] × [Passive Damage Bonuses] × [Active Damage Buffs] × [Debuffs: Reduced Defense + Saturation + Confusion] × [Out-of-ki Bonus] × [Weak Spot Bonus]

Next, here is the same formula in numerical form so that in-game bonuses can be plugged in:

Total Damage = (Base Damage) × (1 + x % of Passive Damage Bonuses) × (1 + y % of Active Damage Buffs) × (1 + z % of Reduced Defense + 20.0% Saturation + 50.0% Confusion) × (1 + a % Out-of-ki Bonus) × (1 + a % Weak Spot Bonus) or (1 + b %) if Out-of-ki Bonus is active

In the formula, each term separated by the multiplication operator (×) represents a category of damage bonuses. As you can see, the first three categories are Base Damage, Passive Damage Bonuses, and Active Damage Buffs.


The Scholars Behind the Formula
The professors who discovered the first four lines of the formula (Base Damage to Debuffs) are Vikaluka, Adderflail, rbFrosty and LOLSAN.

The professors who discovered the fifth line of the formula (Out-of-ki Bonus) are Brilliant_Suns_Gaming and Yanxi.

The professors who discovered the sixth line of the formula (Weak Spot Bonus) are Adderflail and Yanxi.

You may have seen these faculty members rushing around the Nioh Community Institute campus. Professor Adderflail in particular spends most of his time conducting research in the Fextralife Wiki Lab. They are all very busy fellows, but you are definitely encouraged to send them a greeting if you run into them!

In case you would like to ask them something, here are their office locations:


Breakdown of Categories – Player
The first three categories of the Total Damage Formula—Base Damage, Passive Damage Bonuses and Active Damage Buffs—are applied to the player, so they contribute to your damage output when you place stats on your equipment or activate buffs in combat.

Since the bonuses in these categories are primarily determined by your equipment and skills, they can be prepared before you start any mission. Thus, you have the most control over these categories.


Base Damage


The Base Damage category is our starting point. It represents the damage you would deal while you are completely unequipped, without bonuses, and unbuffed against an enemy who is not debuffed, out of ki, or attacked at a weak spot. In other words, it is your damage output before any bonus is included.

Example:
You remove all your equipment and relevant bonuses, head to the Training Dojo and perform a Mid Stance Quick Attack against the Yoki. The attack deals 1,000 damage. The Base Damage of your Mid-stance Quick Attack is 1,000 damage.

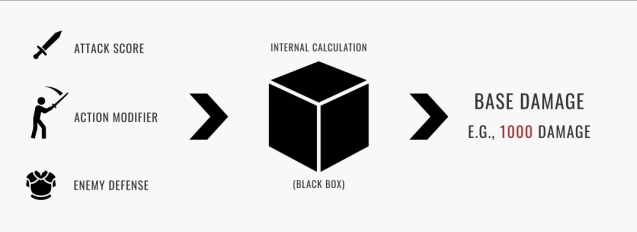
Technically, Base Damage is the catch-all category that encompasses:
  • Your total Attack value
  • The unique damage modifier associated with your action (A.K.A. Action Modifier)
  • The enemy's Defense value
The Nioh 2 program then uses these values in an internal calculation to compute and produce a damage output number.

Due to the lack of datamining in Nioh 2, this internal calculation has yet to be defined; it is a black box. Fortunately, this calculation is not important to us because we are primarily interested in the Base Damage number that it spits out—in our case, the 1,000 number.

Items that influence your Attack value and are then incorporated into the Base Damage's internal calculation include:
  • Your on-hand weapon's Attack value
  • Increasing stats that increase your weapon's Attack value (e.g., Heart for the Sword)
  • Your Soul Cores' Attack values multiplied by your Guardian Spirit's Attack multiplier
  • Equipment stats that increase your Attack


Passive Damage Bonuses


The Passive Damage Bonuses category encompasses all damage bonuses from your equipment and skills that do not have to be actively applied to your character. Typical characteristics of these bonuses are:
  • They are listed on the Special Effects page of your Status menu
  • They are not displayed as an icon below your Health and Ki bars (with two known exceptions)

Examples of Passive Damage Bonuses are:
  • Melee Damage + x %
  • Melee Damage vs. xxx Enemy + x %
  • Backstab Damage + x %
  • Damage Bonus (Onmyo Magic Power)
Notable Passive Damage Bonuses despite having buff icons:
  • Fists – Unbroken
  • Axe – Inner Light

You might have spotted a pattern across all these examples: they all contain the word "Damage". While there are certainly exceptions, stats along the line of "xxx Damage" or "Damage Bonus" are often placed in the Passive Damage Bonuses category.

It is important to keep in mind that while Passive Damage Bonuses may be visible on the Special Effects page of your Status menu, they will only be included in the Total Damage Formula when you fulfill the specific criteria of the effect. For example:
  • Melee Damage – Included when you perform a melee attack
  • Melee Damage vs. Purified Enemy – Included when you use a melee attack on a Purified enemy
  • Active Skill Damage – Included when you perform an Active Skill
  • Backstab Damage – Included when you attack an enemy from behind

Additionally, multiple Passive Damage Bonuses will be included in the Total Damage Formula if your action simultaneously fulfills multiple criteria. For example, the four bonuses listed above would all be included when you perform a melee-distance Active Skill against a purified enemy from behind.

When the criteria of multiple bonuses are fulfilled, the Passive Damage Bonuses category of the Total Damage Formula will be depicted as:

Total Damage = (Base Damage) × (1 + currently fulfilled Passive Damage Bonuses) × ...

Note: To see the bonuses that belong to each category of the formula, please view Appendix D.[docs.google.com]

Note 2: An index of the bonus value for many stats is found on the Wiki's Special Effects page.[nioh2.wiki.fextralife.com]


Active Damage Buffs


The Active Damage Buffs category encompasses all damage bonuses that are applied as a temporary buff on your character. Typical characteristics of these buffs are:
  • They have a special name (e.g., Versatility, Death Dancer)
  • They are activated during gameplay and expire after a certain period of time
  • They are displayed as an icon below your Health and Ki bars (with one known exception)
Examples of Active Damage Buffs are:
  • Increased Attack
  • Versatility
  • Cleansing Prayer
  • Switchglaive – Wildfire Flux
Also, there is one notable Active Damage Buff that does not have a buff icon:
  • Awakened Weapon's natural 30% damage bonus

Now, when it comes to stacking Active Damage Buffs, Professor Adderflail's general rule is:
Originally posted by Professor Adderflail:
When multiple status effects of the same type are applied at the same time, they are all active and count down concurrently, but only the most beneficial effect applies.

"Same type?" What does that mean? Let's navigate to the page titled "Buff Values"[docs.google.com] of Professor Ocean Machine's textbook. On this page, you will see that there are three conflict groups of buffs:
  • Conflict Group #1:
    The Increased Attack buff, symbolized by the Sword icon:


  • Conflict Group #2:
    The Parry buff, which consists of Sword's Leaf Glide and Dual Swords' Heavenly Flow.
    These two buffs use the same Sword icon as Conflict Group #1, but they do not conflict with the first group and can thus remain active at the same time:


  • Non-conflicting Group:
    All remaining buffs are in this category. These buffs do not conflict with any other buff.

Now, we will use Professor Adderflail's general rule to stack the Active Damage Buffs:
  1. Add the strongest currently active buff of Conflict Group #1
  2. Add the strongest currently active buff of Conflict Group #2
  3. Add all active buffs in the Non-conflicting Group

As a result, the Active Damage Buffs category of the Total Damage Formula will be depicted as:

Total Damage = (Base Damage) × ... × (1 + Highest of Conflict Group #1 + Highest of Conflict Group #2 + All of Non-conflicting Group) × ...

I know that the part about stacking the Increased Attack buff can be very confusing. Please don't be worried! We'll get some practice with this in the questions at the end of this session.

Note: To see the bonuses that belong to each category of the formula, please view Appendix D.[docs.google.com]


Breakdown of Categories – Enemy
The remaining three categories of the Total Damage Formula—Debuffs, Out-of-ki Bonus and Weak Spot Bonus—are applied to the enemy, so they only contribute to your damage output if the enemy is afflicted with the category's respective status effect. This means that you have to manipulate the enemy during battle in order to benefit from these categories.

Since enemies have different behaviors and elemental weaknesses, it is more difficult to utilize these categories. Thus, you generally have less control over these categories.


Debuffs


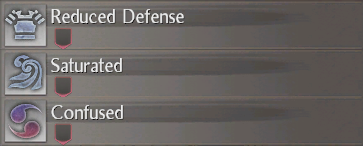
The Debuffs category consists of Reduced Defense, Saturation and Confusion. These three bonuses combine additively with each other.

Reduced Defense

Prior to Patch 1.11 (The Tengu's Disciple),[nioh2.wiki.fextralife.com] the Reduced Defense debuff directly reduced the enemy's defense, causing it to take more damage.

In Patch 1.11, the behavior of the Reduced Defense debuff was modified to simply increase the enemy's damage taken by the debuff's specified percentage, rather than reduce its defense.

This means that a 20.0% Reduced Defense debuff placed on an enemy increases the damage it takes by 20.0%—no calculations involving its defense are required. Thus, any Reduced Defense debuff is treated as a damage multiplier in the Total Damage Formula.

The Reduced Defense debuff stacks on an enemy the same way that the Increased Attack buff stacks on the player: the current strongest Reduced Defense debuff is the one that applies.

The most common sources of the Reduced Defense debuff are:
  • Weakness Talisman
  • Reduced Defense (Onmyo Magic Hit)
  • Reduced Defense (Grapple) from the Maeda clan

Saturation

Similarly to the Reduced Defense debuff, the Saturated status effect increases the enemy's damage taken by 20.0%. Since it is also grouped into the Debuffs category, it combines additively with the Reduced Defense debuff.

Confusion

Similarly to Saturation, the Confused status effect increases the enemy's damage taken by 50.0%. Since it is also grouped into the Debuffs category, it combines additively with the Reduced Defense debuff and Saturation.

The combination of these three Debuffs in the Total Damage Formula is depicted as:

Total Damage = (Base Damage) × ... × (x % of Reduced Defense + 20.0% Saturation + 50.0% Confusion) × ...


Out-of-ki Bonus


The Out-of-ki Bonus provides a damage bonus against Humans who are out of ki and certain Yokai who are out of maximum ki. Against Humans, this bonus applies to a single attack. Against certain Yokai, it applies to every attack until they summon a Yokai Realm or Dark Realm.

The value of the Out-of-ki Bonus is "a" %. Unfortunately, due to the lack of datamining available in Nioh 2, the true value of a is impossible to be determined. However, testing has shown the value of a to range from 55.0% to 85.0%.

Note: For more information regarding the variable "a", please see Appendix A[docs.google.com] and Appendix C[docs.google.com] in the Appendices section.


Weak Spot Bonus


The Weak Spot Bonus provides a damage bonus against Humans and Yokai when attacking their weak spots. Application of the Weak Spot bonus is evident by the increased font size of the outputted damage numbers with a horizontal line striking through them.

The common belief is that damage numbers with the increased font size signifies a Backstab. This is not the case. Rather, the increased font size indicates a weak spot attack and will be displayed by any attack that strikes one of the following target locations:
  • The backs of Humans and Yokai
  • The heads of Humans (ranged hits)
  • Horns of Yokai
  • Any other glowing breakable crystals attached to Yokai

Since multiple locations on an enemy's body may be considered weak spots, there is no presence of a "Damage-from-behind" bonus or a "Backstab Multiplier" bonus, but rather an all-encompassing "Weak Spot" bonus. If the weak spot does happen to be the enemy's back, then the Backstab Damage bonus will also applied.

The back and horn weak spots are considered standard weak spots since they are found on many of the enemies in the game. For these standard weak spots, the value of the Weak Spot Bonus is also "a" %—the exact same value as the Out-of-ki Bonus explained above.

Non-standard weak spots include abnormal Yokai body crystals such as Kasha's wheels and Daidara Bocchi's fingernails. These weak spots generally receive a Weak Bonus bonus that is much higher than a. Non-standard weak spots are found on a relatively small amount of enemies in the game, and our Professors are currently conducting experiments to learn more about the Weak Spot bonuses of these abnormalities.

In this guide, assume that only standard weak spots are accounted for in the Total Damage Formula. Information about non-standard weak spots will be taught in another class.


Additional Information about the Scaling of "a"
Professor Adderflail and I have so far made the following observations about the value of "a":
  • a is influenced by Attack score and Action Value
  • a can range from 55.0% to 85.0% depending on Attack score and Action Value
  • a inversely proportional to Attack score and Action Value
  • a is unaffected by stances (same value for Iai Quickdraw in high/mid/low stance)

Observed values of "a":
Using a Level 190(+1) Sword with 1507 Attack

Stance
Action
Value of "a"
High
Quick Attack
64.62%
Mid
Quick Attack
73.53%
Low
Quick Attack
78.82%
All
Iai Quickdraw
64.35%

As you can see, the value of "a" generally increases as the Action Value of the attack decreases. For questions on the final exam, a specific value of "a" will be given to you to use in your calculations.


Interaction Between the Out-of-ki Bonus and the Weak Spot Bonus

If the Out-of-ki Bonus is already applied to the enemy, then the value of the Weak Spot Bonus will instead be "b" %. While a significant amount of further research is required to determine the exact relationship between a and b, current experiments have shown the value of b to range from 60.0% to 65.0% of the value of a. This results in "b" generally being about 40.0% to 45.0%.

This "a" or "b" interaction is accounted for in the very last line of the Total Damage Formula:

Total Damage = (Base Damage) × ... × (1 + a % Weak Spot Bonus) or (1 + b %) if Out-of-ki Bonus is active

Note:
For more information regarding the variables "a" and "b", please see Appendix B[docs.google.com] and Appendix C[docs.google.com] in the Appendices section.


––– SESSION 2 –––
Take as long of a break as you need! Return here when you're ready to start the next session.


Test Your Understanding
Before you move onto the next section, you are welcome to have a try at the following practice questions.


Question 1
The Reduced Defense, Saturation and Confusion Debuffs combine multiplicatively with each other.

A) True
B) False

Answer: B


Question 2
The Reduced Defense Debuff does not reduce the enemy's Defense value—it simply increases the damage taken by the enemy.

A) True
B) False

Answer: A


Question 3
Which item does the Base Damage formula not consist of?

A) The Action Modifier of the attack
B) The Attack + x stat on the player's gloves
C) The Melee Damage + x % stat on the player's on-hand melee weapon
D) The enemy's Defense value
E) All of the above are found in the Base Damage formula.

Answer: C


Question 4
What is the total bonus of the player's Active Damage Buffs category in this scenario?

Hint: Use Professor Adderflail's rule in tandem with Professor Ocean Machine's textbook.[docs.google.com]

The player has the following items equipped:
  • The Tengen Kujaku Guardian Spirit
  • Increased Attack (Amrita Absorption)
  • Increased Attack (Onmyo Magic Hit)
  • Increased Attack (Winded Enemy)
Additionally, the following events occured:
  • The player absorbed Amrita in low stance 7 seconds ago.
  • The player absorbed Amrita in high stance 4 seconds ago.
  • The player has not used an Onmyo Magic ability.
  • The player had last winded the enemy 35 seconds ago.

A) +10.0%
B) +15.0%
C) +20.0%
D) +25.0%
E) None of the above are correct.

Answer: B


Question 5
Which attacks are depicted by damage numbers displayed in the larger font with a line striking through the numbers?

A) Attacks against glowing crystals attached to Yokai
B) Attacks against the backs of enemies
C) Attacks against the weak spots of enemies
D) Head shots against Human enemies
E) All of the above.

Answer: E


Steps to Using the Formula
As a reminder, here is the Total Damage Formula in numerical form:

Total Damage = (Base Damage) × (1 + x % of Passive Damage Bonuses) × (1 + y % of Active Damage Buffs) × (1 + z % of Reduced Defense + 20.0% Saturation + 50.0% Confusion) × (1 + a % Out-of-ki Bonus) × (1 + a % Weak Spot Bonus) or (1 + b %) if Out-of-ki Bonus is active

As you have probably noticed, the black box variables a and b introduce a boatload of complicated calculations that intimidate even the most mathematically-adept of us.

To prevent our calculations from becoming extremely complicated, from this point on I will be assuming that the value of "a" is 60.0% and the value of "b" is 40.0%. Thus, the Total Damage Formula with these assumptions will be depicted as:

Total Damage = (Base Damage) × (1 + x % of Passive Damage Bonuses) × (1 + y % of Active Damage Buffs) × (1 + z % of Reduced Defense + 20.0% Saturation + 50.0% Confusion) × (1 + 60.0% Out-of-ki Bonus) × (1 + 60.0% Weak Spot Bonus) or (1 + 40.0%) if Out-of-ki Bonus is active


Step 1: Begin with 1.00
First, each category of the Total Damage Formula begins with a (1 + ...). The number 1 represents the default multiplier for that category of 1.00. When a category is empty, it has no effect on your total damage output and thus multiplies it by 1.00.

Conversely, if each category instead began with (0 + ...), then an empty category would multiply everything else in the formula by 0.00, resulting in your total damage output being 0. That would be a disaster!


Step 2: Add All Bonuses Within the Same Category
Second, within each category, all bonuses belonging in that category combine additively with each other. This means that any percentages would be simply added together, and then added to the default 1.00 value. For example, consider these two damage bonuses in the Passive Damage Bonuses category:

Passive Damage Bonuses:
  • Melee Damage +20.0%
  • Active Skill Damage +20.0%

When the player attacks an enemy with an Active Skill, the Passive Damage Bonuses category would be depicted as:

Add all applicable bonuses: 20.0% + 20.0% = 40.0% Add to 1.00: 1.00 + 40.0% = 1.40

As a result, the Total Damage Formula up to this point would be depicted as:

Total Damage = (Base Damage) × 1.40 → Passive Damage Bonuses × ...


Step 3: Multiply Separate Categories With Each Other
Third, the total sum of each separate category combines multiplicatively with the others. For example, consider that in addition to the Melee Damage and Active Skill damage, the player has nine stacks of Versatility, Carnage and the Ninjutsu Power Pill currently active.

Passive Damage Bonuses:
  • Melee Damage +20.0%
  • Active Skill Damage +20.0%

Active Damage Buffs:
  • Nine stacks of Versatility (+60.0%)
  • Carnage – Increased Attack (+40.0%)
  • Power Pill – Increased Attack (+25.0% at maximum)

Remember the "Buff Values"[docs.google.com] page of the textbook? Take a look there for Carnage and the Power Pill. They're both in Conflict Group #1! Can you guess which of the two we will be using in our formula? If you guessed Carnage, you would be correct.

As a result, the Total Damage Formula up to this point would be:

Passive Damage Bonuses = 1.40 Active Damage Buffs = 2.00 Total Damage = (Base Damage) × 1.40 → Passive Damage Bonuses × 2.00 → Active Damage Buffs × ...


Step 4: Putting it All Together
Finally, we will include the rest of the categories in the formula. Consider a player who has the following bonuses and an enemy who has the following conditions:

Passive Damage Bonuses:
  • Melee Damage +20.0%
  • Active Skill Damage +20.0%

Active Damage Bonuses:
  • Nine stacks of Versatility (+60.0%)
  • Carnage – Increased Attack (+40.0%)

Debuffs:
  • Afflicted with a 20.0% Reduced Defense Debuff (+20.0%)
  • Afflicted with Saturation (+20.0%)
  • Afflicted with Confusion (+50.0%)

Out-of-ki Bonus:
  • The enemy is not out of ki
  • It is not eligible for the Out-of-ki bonus

Weak Spot Bonus:
  • The enemy is not attacked at a standard weak spot
  • It is not eligible for the Weak Spot bonus

The Total Damage Formula would be depicted as:

Passive Damage Bonuses = 1.40 Active Damage Buffs = 2.00 Debuffs = 1.90 Out-of-ki Bonus = 1.00 Weak Spot Bonus = 1.00 Total Damage = (Base Damage) × 1.40 → Passive Damage Bonuses × 2.00 → Active Damage Buffs × 1.90 → Enemy has 20.0% Reduced Defense Debuff, is Saturated, and is Confused × 1.00 → Enemy is not out of ki × 1.00 → Enemy is not attacked at a weak spot Total Damage = (Base Damage) × 5.32

As a result of all the mentioned bonuses and buffs in the Total Damage Formula, the player will deal 5.32 times the amount of its Base Damage.


The Formula In Practice
Now, imagine that the player's Active Skill named Sword Ki deals 1,000 damage when no bonuses or buffs are present. In other words, the Sword Ki Base Damage is 1,000.

The resulting Total Damage Formula from adding all the mentioned bonuses and buffs would be:

Using Sword Ki: Total Damage = Base Damage × 5.32 Total Damage = 1000 × 5.32 Total Damage = 5320

As a result of all the mentioned bonuses and buffs in the Total Damage Formula, the player's Active Skill Sword Ki will deal 5,320 damage; it would otherwise deal 1,000 damage if no bonuses, buffs or debuffs were present.


Adding the Out-of-ki Bonus and the Weak Spot Bonus
Remember those values "a" and "b" that we assumed to be 60.0% and 40.0%? I didn't forget about them! Let's see what happenes to our formula if we use the exact same scenario, but this time with the two bonuses applied.

In addition to the previously mentioned bonuses:

Out-of-ki Bonus:
  • The enemy is out of ki
  • It is eligible for the Out-of-ki Bonus "a" = 60.0%

Weak Spot Bonus:
  • The enemy is attacked at a standard weak spot
  • It is eligible for the Weak Spot Bonus "b" = 40.0%

Now, the Total Damage Formula would look like:

Passive Damage Bonuses = 1.40 Active Damage Buffs = 2.00 Debuffs = 1.90 Out-of-ki Bonus = 1.60 Weak Spot Bonus = 1.40 Total Damage = (Base Damage) × 1.40 → Passive Damage Bonuses × 2.00 → Active Damage Buffs × 1.90 → Enemy has 20.0% Reduced Defense Debuff, is Saturated, and is Confused × 1.60 → Enemy is out of ki × 1.40 → Enemy is attacked at a weak spot Total Damage = (Base Damage) × 11.9168

Using Sword Ki again:

Using Sword Ki: Total Damage = Base Damage × 11.9168 Total Damage = 1000 × 11.9168 Total Damage = 11917

What?! The Sword Ki dealt 1,000 Base Damage, and now it's dealing 11,917 damage?

It looks bonkers, I know. To help you believe this, ask yourself if you've ever seen the damage numbers you dealt on an enemy from behind while they were in the grapple state. They were some of your highest damage numbers ever, weren't they?

That's because, at that exact moment, the Out-of-ki Bonus and the Weak Spot Bonus were stacking multiplicatively with every other bonus you already had. In other words, any total product of bonuses you had would be multiplied by another 1.60 × 1.40 = 2.24, resulting in you dealing more than double your already buffed damage.

That's the power of multiplicative stacking! We'll learn more about this in the Optimizing Your Damage Output section.


Damage Multipliers of Common Builds
Some of the most common questions I see asked by students are about how certain builds compare with each other. In this section, I have compiled the total damage multiplier of the most popular builds for students to use as a quick reference when creating their own builds.

Every one of these entries was calculated in an isolated environment, meaning that no other bonuses are present in their Total Damage Formula. Additionally, it does not account for any playstyle adjustments or buff uptimes related to the build. It simply provides the maximum total damage multiplier given the bonuses of the build.

Finally, please note that I have included the Awakened Weapon's natural 30.0% damage bonus in only the builds that use Magatsuhi's grace. If you would like to account for the Awakened Weapon's damage bonus in graces without Magatsuhi's grace, simply add 0.30 to the Active Damage Buffs category of the entry.


Individual Graces
Note:
Assume that all criteria are fulfilled to achieve the maximum damage multiplier.
(E.g., maximum stacks, sheath attack, Awakened Weapon)


Grace (A→Z)
Passive Damage Bonuses
Active Damage Buffs
Total Damage Multiplier
Acala
1.00
1.55
155%
Ame-no-Uzume
1.00
1.70
170%
Futsunushi
1.50
1.00
150%
Izanagi
1.30
1.30
169%
Magatsuhi
1.20
1.30
156%
Susano
1.00
1.60
160%
Takeminakata
1.32
1.00
132%


Graces with Susano
Build (A→Z)
Passive Damage Bonuses
Active Damage Buffs
Total Damage Multiplier
Susano 6 / Acala 7
1.00
2.15
215%
Susano 6 / Ame-no-Uzume 7
1.00
2.30
230%
Susano 6 / Futunushi 7
1.50
1.60
240%
Susano 6 / Izanagi 7
1.30
1.90
247%
Susano 6 / Magatsuhi 7
1.20
1.90
228%
Susano 6 / Takeminakata 7
1.32
1.60
211%


Graces with 6-piece Oyamatsumi
Any 7-piece grace with 6 pieces of Oyamatsumi's grace will have the exact same maximum damage multiplier as its respective entry in the Individual Graces table.


Corruption Builds
Note 1:
All entries in this table include the Awakened Weapon's natural 30.0% damage bonus.


Note 2:
The Awakened Weapon's natural 30.0% damage bonus is in the Active Damage Buffs category and Melee Damage (Awakened Weapon) is in the Passive Damage Bonuses category.


Build (A→Z)
Passive Damage Bonuses
Active Damage Buffs
Total Damage Multiplier
Magatsuhi 7 / Genryu 6
1.40
1.30
182%
Magatsuhi 7 / Genryu 6
(Dark Realm)
1.52
1.30
198%
Magatsuhi 7 / Sarutahiko 6
1.50
1.30
195%
Magatsuhi 7 / Susano 6
1.20
1.90
228%


Sheath Attack Builds
Note:
The applicable Sheath Attack is specified underneath each build.


Build (A→Z)
Passive Damage Bonuses
Active Damage Buffs
Total Damage Multiplier
Futsunushi 7 / Gallant 6
(Iai Quickdraw)
1.69
1.00
169%
Futsunushi 7 / Gallant 6
(Night Rain)
1.89
1.00
189%
Futsunushi 7 / Master Swordman 6
(Sign of the Cross)
1.65
1.00
165%
Futsunushi 7 / Susano 6
(All Sheath Attacks)
1.50
1.60
240%

Empowered Onmyo / Ninjutsu Builds
Note:
The bonus of Empowered Ninjutsu and Empowered Onmyo Magic was calculated using the formula on their Wiki page. The build is assumed to have 1,000 power.


Build (A→Z)
Passive Damage Bonuses
Active Damage Buffs
Debuffs
Total Damage Multiplier
Marici 7 / Susano 6
(Empowered Buff Active)
1.00
1.90
1.10
209%
Tsukuyomi 7 / Susano 6
(Empowered Buff Active)
1.00
1.90
1.10
209%


Optimizing Your Damage Output
Now that you've learned how to use the formula, you may be wondering how you can use it to increase your damage output. In this section, we will experiment with the different categories to determine the most efficient way to increase our total damage multiplier.


Theory: Optimizing Damage Bonuses
The overarching theory is: the closer your categories are to each other, the higher your overall damage multiplier will be.

To illustrate this theory, imagine we are given a 100% damage bonus to distribute among the Passive Damage Bonuses and Active Damage Buffs categories. This 100% bonus may be distributed in an infinite number of different ways, but distributing it evenly across both categories yields the greatest damage multiplier:


For students who prefer visual representations, here is the same data plotted in a graph:


As you can see, the damage multiplier gradually increases from 200% to 225% as the two categories approach each other. Think of it this way: by balancing the damage categories, we gained a 25.0% damage multiplier boost!


In Practice: Optimizing Damage Bonuses
Realistically, we will never be able to perfectly balance our categories because there are many different stat bonus variations, set bonuses, graces and buffs in the game. Instead, we can use our knowledge of the theory to accomplish the next best thing: roughly increasing all the categories to ensure that none of them lag behind or stay at 1.00.

To illustrate, consider the example below where we gradually add bonuses to categories that are at 1.00. While the initial 40.0% bonus adds exactly 40.0% to the total damage multiplier, each subsequent bonus in a different empty category will add more to the total damage multiplier than its specified amount.

Begin with 40.0% in Passive Damage Bonuses, which increases the total damage multiplier by 40.0%:

Passive Damage Bonuses = 1.40 Total Damage = (Base Damage) × 1.40 → Passive Damage Bonuses Total Damage = (Base Damage) × 1.40

Adding Versatility (+60.0%) subsequently increases the total damage multiplier by 84.0%:

Passive Damage Bonuses = 1.40 Active Damage Buffs = 1.60 Total Damage = (Base Damage) × 1.40 → Passive Damage Bonuses × 1.60 → Active Damage Buffs Total Damage = (Base Damage) × 2.24 2.24 - 1.40 = 0.84 Adding 60.0% to a category with a 1.00 multiplier increased the total damage multiplier by 84.0%.

Adding Weakness Talisman (+20.0%), Saturation (+20.0%) and Confusion (+50.0%) subsequently increases the total damage multiplier by 202%:

Passive Damage Bonuses = 1.40 Active Damage Buffs = 1.60 Debuffs = 1.90 Total Damage = (Base Damage) × 1.40 → Passive Damage Bonuses × 1.60 → Active Damage Buffs × 1.90 → Debuffs Total Damage = (Base Damage) × 4.26 4.26 - 2.24 = 2.02 Adding 90.0% to a category with a 1.00 multiplier increased the total damage multiplier by 202%.

As you can see, diversifying our bonuses by incorporating Versatility, Weakness Talisman, Saturation and Confusion increased our total damage multiplier to a whopping 426%!

The reason for such a large increase in the total damage multiplier is due to multiplicative stacking across categories. By incorporating these different categories, we took full advantage of all the multiplication operators in the formula and our multiplier skyrocketed.

In contrast, if we were to add the exact same figures of these bonuses to only the Passive Damage Bonuses category—leaving all other categories at 1.00—then the total damage multiplier would be drastically lower.

Passive Damage Bonuses = 1.00 + 0.40 + 0.60 + 0.20 + 0.20 + 0.50 Passive Damage Bonuses = 2.90 Active Damage Buffs = 1.00 Debuffs = 1.00 Total Damage = (Base Damage) × 2.90 → Passive Damage Bonuses × 1.00 → Active Damage Buffs × 1.00 → Debuffs Total Damage = (Base Damage) × 2.90 Adding 290% to the Passive Damage Bonuses category increased the total damage multiplier by 290%.

The final total damage multiplier is 290%.


Summary of Optimizing Bonuses
Here is a table that summarizes our findings in this section:

Category Added
Bonus Added
Increase in Multiplier
Cumulative Multiplier
Initial Values
0%
0%
100%
Passive Damage Bonuses
40%
40%
140%
Active Damage Buffs
60%
84%
224%
Debuffs
90%
202%
426%

And all bonuses placed in a single category:
Category Added
Bonus Added
Increase in Multiplier
Cumulative Multiplier
Initial Values
0%
0%
100%
Passive Damage Bonuses
190%
190%
290%
Active Damage Buffs
0%
0%
290%
Debuffs
0%
0%
290%

In conclusion, we learned that having perfectly balanced categories in the Total Damage Formula yields the maximum total damage multiplier. In practice, this goal is impossible to achieve due to the sheer amount of different bonuses in the game.

Thus, we set out to accomplish the next best thing: adding bonuses to as many different categories as possible to ensure that none of them are left at 1.00. When we did this, we discovered that—thanks to the power of multiplicative stacking—each subsequent bonus made an even greater contribution to our total damage multiplier.

The moral of the story is: diversify your bonuses to reap huge damage gains!


Additional Ways to Increase Your Damage Output
In addition to diversifying your bonuses, there are numerous Active Damage Buffs that you can add to your gameplay to drastically increase your damage output. Most of these buffs have relatively minor drawbacks compared to the benefit they provide, so they are strongly worth considering.
  • Carnage (+40.0%) – While this conflicts with all other Increased Attack buffs, its damage bonus is on the higher end of the spectrum and its duration is significantly longer than any other Increased Attack buff. Combined with a high Onmyo Magic Power and the Amplification Mystic Art, the duration of Carnage can reach upwards of 1.5 minutes.

  • Berserk (+50.0%) – As easy as it is to detest Nuppeppo, nobody can deny how good its soul core's buff is. Berserk is in the Non-conflicting group and adds a whopping 50.0% to your Active Damage Buffs category, which is just 2.0% more than eight stacks of Versatility. Keep in mind that the 50.0% increased ki consumption and ki damage taken can put you into some dangerous situations, so do take a bit of caution before going berserk!

  • Soul Purge Talisman (+55.0%) – A sleeper hit Onmyo Magic Spell that adds 55.0% to your Active Damage Buffs category. Although this requires 999 familiarity to reap the greatest benefit and reduces it to 0 upon finishing, you can prevent this by finishing the mission before it reaches 0.[nioh2.wiki.fextralife.com] Combined with a high Onmyo Magic Power and the Amplification Mystic Art, the duration of Soul Purge Talisman can reach upwards of 3 minutes.

  • Versatility (+60.0%) – I'm probably preaching the choir here! As you saw above in the Damage Multipliers of Common Builds section, any build with 6 pieces of Susano's grace is a force to be reckoned with. If you are interested in spicing up your gameplay while receiving an incredibly impactful Active Damage Buff, Versatility is right up your alley.


––– SESSION 3 –––
Take another long break, and then return when you're ready to complete the homestretch!


Test Your Understanding
Before you move onto the last section, feel free to test how much information you have successfully absorbed so far.


Question 1
Performing a High Stance Active Skill with the following bonuses equipped will result in which of the following Total Damage Formulae?
  • Melee Damage +15.0%
  • Active Skill Damage +15.0%

A) Base Damage × (1 × 1.15 × 1.15) × ...
B) Base Damage × (1 + 0.15 + 0.15) × ...
C) Base Damage × (1 + 0.15 × 0.15) × ...
D) Base Damage × (1 + 1.15 + 1.15) × ...
E) None of the above are correct.

Answer: B


Question 2
What would the player's total damage output be in this scenario?

The following items apply to the player:
  • The player's Active Skill named Sword Ki deals 1,000 Base Damage
  • Melee Damage +15.0%
  • Active Skill Damage +15.0%
  • Nine Stack of Versatility, Carnage and Berserk are active
  • The enemy is afflicted with the debuffs 20% Reduced Defense, Saturation and Confusion
  • The enemy is not out of ki
  • The enemy is attacked at a standard weak spot

Assume that the value of "a" is 60.0%.

A) 13,832 damage
B) 8,645 damage
C) 9,880 damage
D) 7,904 damage
E) None of the above are correct.

Answer: C


Question 3
What is the maximum total damage multiplier of a build consisting of seven pieces of Ame-no-Uzume's grace and six pieces of Susano's grace?

Assume that no other damage bonuses besides those provided by the graces are present.

A) 230%
B) 272%

Answer: A


Question 4
What is the most optimal way to distribute a 100% damage bonus among the Passive Damage Bonuses and Active Damage Buffs categories?

Assume that all categories initially have no damage bonuses present in them.

A) 100% in Passive Damage Bonuses and 0.0% in Active Damage Buffs
B) 0.0% in Passive Damage Bonuses and 100% in Active Damage Buffs
C) 25.0% in Passive Damage Bonuses and 75.0% in Active Damage Buffs
D) 50.0% in Passive Damage Bonuses and 50.0% in Active Damage Buffs
E) All of the above distributions will result in the same total damage multiplier.

Answer: D


Question 5
If the player has a total of 25.0% from bonuses in the Passive Damage Bonuses category, then how much will adding nine stacks of Versatility increase the total damage multiplier by?

Assume that all categories initially have no damage bonuses present in them, and that all criteria to receive the Passive Damage Bonuses are fulfilled.

A) 75.0%
B) 85.0%
C) 60.0%
D) 40.0%
E) None of the above are correct.

Answer: A


Question 6
In the Optimizing Your Damage Output section, we found that sequentially adding bonuses to each empty category of the Total Damage Formula increased the damage multiplier by a greater amount.

Now, you are invited to add the Out-of-ki Bonus and the Weak Spot Bonus to the same scenario to discover how much they contribute to the total damage multiplier. Prepare to be amazed!

Category Added
Bonus Added
Increase in Multiplier
Cumulative Multiplier
Initial Values
0%
0%
100%
Passive Damage Bonuses
40%
40%
140%
Active Damage Buffs
60%
84%
224%
Debuffs
90%
202%
426%
Out-of-ki Bonus
60%
?
?
Weak Spot Bonus
40%
?
?


Part A
Adding the Out-of-ki Bonus increases the damage multiplier by ___ and increases the cumulative multiplier to ___.

To simplify rounding issues, start with 426% in the cumulative multiplier column.
Please round each final answer to the nearest whole number.

A) 160%, 682%
B) 256%, 586%
C) 160%, 586%
D) 256%, 682%
E) None of the above are correct.


Part B
Adding the Weak Spot Bonus after the Out-of-ki Bonus was applied increases the damage multiplier by ___ and increases the cumulative multiplier to ___.

To simplify rounding issues, use your rounded answers from Part A in all calculations.
Please round each final answer to the nearest whole number.

A) 140%, 955%
B) 273%, 822%
C) 273%, 955%
D) 140%, 822%
E) None of the above are correct.

Part A Answer: D
Part B Answer: C
The final table will look like:
Category Added
Bonus Added
Increase in Multiplier
Cumulative Multiplier
Initial Values
0%
0%
100%
Passive Damage Bonuses
40%
40%
140%
Active Damage Buffs
60%
84%
224%
Debuffs
90%
202%
426%
Out-of-ki Bonus
60%
256%
682%
Weak Spot Bonus
40%
273%
955%


Notable Case Studies – Part I
In this section, I have provided analyses of concepts that typically raise questions from students. Some of them may be relevant to your build!


Analysis of ✦Attack Bonus (STAT)
Disclaimer:
Any calculation related to Base Damage is extremely complicated because nobody knows the true formula for Base Damage. Considering this limitation, I will be providing a conjecture about the effectiveness of ✦Attack Bonus (STAT). This is purely my educated guess, and until more concrete information about the Base Damage formula is discovered, this is the best we can do.

As we've learned, the Base Damage category is a black box: it inputs your total Attack Score, your action's hidden Action Modifier, and the enemy's Defense to output a damage number that we use as the starting point in the Total Damage Formula.

Since ✦Attack Bonus (STAT) directly affects your weapon's Attack value and consequently your overall Attack Score and Base Damage, it is also a part of that black box. Hence, it is unfortunately impossible to determine exactly how much it contributes toward your damage output.

On the bright side, the Faculty of Mathematics has provided numerous inputs suggesting that ✦Attack Bonus (STAT) is one of the best stats of the Special Effects: Damage pool that you can have on your weapon. Here is a summary of the inputs:
  • Attack Bonus (STAT) provides these increases[nioh2.wiki.fextralife.com] to your Attack Score (Base Damage category)

  • Since it is vested in the Base Damage category, its benefit is received by every single one of your actions (including Yokai Abilities) and has a 100% uptime

  • Additionally, being vested in the Base Damage category means its benefit combines multiplicatively with every other category of the Total Damage Formula

  • Using what we've learned in the Optimizing Your Damage Output section, adding to your Base Damage further diversifies your categories and increases your total damage multiplier

Next, here is a table of my experiments regarding the damage increase of ✦Attack Bonus (STAT) to the Sword's Mid Stance Quick Attack:

Target
Yoki
Mission
Dojo
Difficulty
Dream of the Nioh
Stone of Penance
Not Equipped


Weapon
Sword
Weapon Name
Mino Uchigatana
Rarity
Ethereal
Scaling
B+ Heart, C Skill, C Strength
Stats
200 Heart, 10 Skill, 10 Strength
Familiarity
999
Action
Mid Stance Quick Attack


Bonus
Weapon Level
Attack Score
Damage Output
Percent Increase
None
1(+0)
625
79
-
Attack Bonus (Heart) AA
1(+0)
711
90
13.92%

None
100(+0)
1,113
135
-
Attack Bonus (Heart) AA
100(+0)
1,298
152
12.59%

None
200(+0)
1,497
169
-
Attack Bonus (Heart) AA
200(+0)
1,777
194
14.79%

None
200(+30)
2,552
269
-
Attack Bonus (Heart) AA
200(+30)
3,008
318
18.22%

None
200(+60)
3,602
390
-
Attack Bonus (Heart) AA
200(+60)
4,058
454
16.41%

None
200(+90)
4,652
549
-
Attack Bonus (Heart) AA
200(+90)
5,108
638
16.21%

None
200(+120)
5,188
655
-
Attack Bonus (Heart) AA
200(+120)
5,644
776
18.47%

According to the results, the ✦Attack Bonus (Heart) stat at rank AA provides a 13.92% Base Damage increase for the Level 1 Sword and an 18.47% Base Damage increase for the Level 200(+120) Sword. This test was performed at 200 Heart using Sword Mid Stance Quick Attacks, so the Base Damage increases will be different for you students. My analysis below will treat 13.92% as the true bonus for the sake of choosing a number.

Before we even consider any multiplicative stacking across categories, a 13.92% increase to Base Damage vastly outweighs 4.2% Melee Damage, which is the next most versatile bonus.

When we do consider multiplicative stacking, this 13.92% bonus is multiplied by every other category of the Total Damage Formula, including your existing Passive Damage Bonuses. As we know from the Optimizing Your Damage Output section, increasing any category above 1.00 results in larger gains than its stated percentage when other categories are already increased.

Thus, by adding ✦Attack Bonus (Heart), we have further diversified our categories, and the 13.92% Base Damage increase results in our total damage multiplier increasing by more than 13.92% when any other formula category is increased.

Total Damage = (Base Damage × 1.1392) × (1 + x % of Passive Damage Bonuses) × (1 + y % of Active Damage Buffs) × (1 + z % of Reduced Defense + 20.0% Saturation + 50.0% Confusion)

In conclusion, our faculty believes that the ✦Attack Bonus (STAT) bonus is highly likely to be better than any other damage bonus in the Special Effects: Damage pool. It provides quite a large bonus on its own, and when stacked multiplicatively with all the other categories in the Total Damage Formula, it increases your total damage multiplier by a very significant amount.


Notable Case Studies – Part II
Corrupted Weapons and Melee Damage (Awakened Weapon)
If you have 7 pieces of Magatsuhi's Grace, you would assume that its +20.0% Melee Damage (Awakened Weapon) bonus adds onto the Awakened Weapon's natural 30.0% damage bonus for a total of 50.0%, right?

Think again! Both of these bonuses are in different categories of the Total Damage Formula. Thus, they stack multiplicatively:
  • 20.0% Melee Damage (Awakened Weapon) is a Passive Damage Bonus
  • Awakened Weapon's natural 30.0% bonus is an Active Damage Buff

Passive Damage Bonuses = 1.20 Active Damage Buffs = 1.30 Total Damage = (Base Damage) × 1.20 → Passive Damage Bonuses × 1.30 → Active Damage Buffs Total Damage = (Base Damage) × 1.56

As you can see, 7 pieces of Magatsuhi's grace provides a 156% total damage multiplier in the absence of any other damage bonuses.


Cleansing Prayer and Melee Damage vs. Purified Enemy
Many students believe that Izanagi's 6-piece +30.0% Melee Damage vs. Purified Enemy bonus and the 30.0% damage bonus of Cleansing Prayer III are simply added with each other to result in a 60.0% damage bonus or 160% total damage multiplier.

After coming this far in the course, I'm sure you know that this is not correct! Both of these bonuses are in different categories of the Total Damage Formula. Thus, they stack multiplicatively:
  • Melee Damage vs. Purified Enemy is in Passive Damage Bonuses
  • Cleansing Prayer III is in Active Damage Buffs

Passive Damage Bonuses = 1.30 Active Damage Buffs = 1.30 Total Damage = (Base Damage) × 1.30 → Passive Damage Bonuses × 1.30 → Active Damage Buffs Total Damage = (Base Damage) × 1.69

As you can see, 7 pieces of Izanagi's grace provides a 169% total damage multiplier in the absence of any other damage bonuses.


Izanagi's Grace vs. Magatsuhi's Grace
Behold, the Jedi versus Sith debate that students love to argue about. Have you ever wondered whether Corruption or Purity weapons deal more damage? Let's dissect that.

You can see in the two case studies above that 7-piece Izanagi's grace provides a 169% total damage multiplier while 7-piece Magatsuhi's grace provides a 156% total damage multiplier. Now, let's combine each of them with 6 pieces of Susano's grace to further compare them.

7-piece Izanagi / 6-piece Susano:
Passive Damage Bonuses = 1.30 Active Damage Buffs = 1.90 Total Damage = (Base Damage) × 1.30 → Passive Damage Bonuses × 1.90 → Active Damage Buffs Total Damage = (Base Damage) × 2.47

7-piece Magatsuhi / 6-piece Susano:
Passive Damage Bonuses = 1.20 Active Damage Buffs = 1.90 Total Damage = (Base Damage) × 1.30 → Passive Damage Bonuses × 1.90 → Active Damage Buffs Total Damage = (Base Damage) × 2.28

As you can see, the Izanagi / Susano combination provides a 247% total damage multiplier and the Magatsuhi / Susano combination provides a 228% total damage multiplier in the absence of any other damage bonuses.

Keep in mind that this does not account for your uptime on Cleansing Prayer or Awakened Weapon. To account for them, consider that:
  • Cleansing Prayer typically has more uptime when you are playing in single-player against Yokai, where you don't have anybody else to purify the Yokai pools

  • Awakened Weapon typically has more uptime when you are playing in multi-player and you have stacked a lot of Sentience Charge on your equipment

You should also decide whether you value the Anima Charge and Yokai Ability Damage bonuses of Magatsuhi's grace or the HP and ki recovery bonuses of Izanagi's grace more.

In the big picture, they're both excellent. Essentially, choosing between Purity and Corruption is akin to choosing between the Jedi or the Sith.

Do you enjoy being on the Light Side or the Dark Side of the Force?


Notable Case Studies – Part III
Grapple Damage and the Maeda Clan
The damage numbers of grapples can be quite difficult for students to understand. This case will explain how to get the most out of your grapples.

First, it is important to know which factors affect grapple damage. Here is a list of the factors that apply specifically to grapples. Note that damage bonuses that would already apply to standard melee attacks such as Melee Damage +x % are implied in this list.

Base Damage
  • The unique Action Modifier for grapples that is hardcoded into the game

Passive Damage Bonuses
  • Grapple Damage
  • Thrust Damage – only applies to the first hit of the grapple
  • Active Skill Damage – the grapple is an active skill!
  • Melee Damage vs. Zero-ki Enemy
  • Finishing Flair
  • [High/Mid/Low] Attack Damage (if performed while in the respective stance)
  • [High/Mid/Low] Active Skill Damage (if performed while in the respective stance)

Debuffs
  • Reduced Defense (Grapple)

Out-of-ki Bonus
  • Since the enemy is out of ki or out of maximum ki, the Out-of-ki Bonus applies
  • This bonus is not relevant for damage comparison of grapples because it is built into the grapple action and cannot be removed
  • This bonus will consequently be treated as part of the grapple's Base Damage.

Weak Spot Bonus
  • Since grapples use the larger sized font of damage numbers, the Weak Spot Bonus applies
  • Since the Out-of-ki Bonus is already applied, the Weak Spot bonus uses the value of "b"
  • This bonus is not relevant for damage comparison of grapples because it is built into the grapple action and cannot be removed
  • This bonus will consequently be treated as part of the grapple's Base Damage.

I know what you're thinking: "This list is so overwhelming! I just want to see big grapple numbers."

Sorry for the wall of text! Here are the best ways to significantly increase the damage of your grapples:
  1. Add the Grapple Damage bonus (does not conflict with the Special Effects: Damage pool)
  2. Add the Melee Damage vs. Zero-ki Enemy bonus
  3. Add the Finishing Flair bonus
  4. Add Reduced Defense (Grapple)

Of these four methods, the most impactful method is adding Reduced Defense (Grapple) from the Maeda Clan. This bonus adds an enormous 100% bonus to the Debuffs category. To illustrate how beneficial Reduced Defense (Grapple) is, examine the formula with the following bonuses:
  • Grapple Damage +20.0%
  • Melee Damage vs. Zero-ki Enemy +20.0%
  • Reduced Defense (Grapple) 100%

Without Reduced Defense (Grapple):
Passive Damage Bonuses = 1.40 Active Damage Buffs = 1.00 Debuffs = 1.00 Total Damage = (Base Damage) × 1.40 → Passive Damage Bonuses × 1.00 → Active Damage Buffs × 1.00 → Debuffs Total Damage = (Base Damage) × 1.40

With Reduced Defense (Grapple):
Passive Damage Bonuses = 1.40 Active Damage Buffs = 1.00 Debuffs = 2.00 Total Damage = (Base Damage) × 1.40 → Passive Damage Bonuses × 1.00 → Active Damage Buffs × 2.00 → Debuffs Total Damage = (Base Damage) × 2.80

From the above two examples, you can see that adding Reduced Defense (Grapple) increases the total damage multiplier of grapples from 140% to 280%. Let's now apply these multipliers to a grapple that deals 10,000 Base Damage.

Without Reduced Defense (Grapple):
Total Damage = (Base Damage) × 1.4 Total Damage = 10,000 × 1.4 Total Damage = 14,000

With Reduced Defense (Grapple):
With Reduced Defense (Grapple): Total Damage = (Base Damage) × 2.8 Total Damage = 10,000 × 2.8 Total Damage = 28,000

In the final two examples, including Reduced Defense (Grapple) increased the damage of the grapple from 14,000 to 28,000. What an enormous difference! This is why the Maeda Clan is among the most impactful clans in terms of increasing your damage output.

So, what are you waiting for? Enlist in the Maeda Clan today!


Backstab Damage, Sword of Execution and the Weak Spot Bonus
While this was mostly discussed in the section Breakdown of Categories – Enemy: Weak Spot Bonuses, I have provided additional information here that hopefully helps reconstruct your knowledge of the Backstab concept.

In Nioh 2, damage numbers depicted by the large font with the horizontal line striking through them represent a Weak Spot attack—not necessarily a Backstab attack.

For virtually all enemies, their back is considered a weak spot. Thus, attacks that hit the enemy's back incidentally implement the Weak Spot Bonus and display the large font. If the attack hits any of the enemy's other weak spots, the large font will still be displayed.

This means that the game recognizes when:
  1. A weak spot is attacked
  2. The weak spot attacked is the enemy's back

Upon recognition of a weak spot being attacked, the game will apply the Weak Spot Bonus to the Total Damage Formula. If that weak spot happens to be the enemy's back, then the game will also apply the Backstab Damage bonus to the Total Damage Formula.

For Sword users, the Sword's Mystic Art Sword of Execution is the exact same thing as the bonus Backstab Damage +20.0%, and stacks additively with any other Backstab Damage bonuses you have equipped.

The Backstab Damage bonus and the Weak Spot Bonus are located in different categories of the Total Damage Formula: the former is located in the Passive Damage Bonuses category, while the latter has its own category.

This means that Backstab Damage combines additively with all other Passive Damage Bonuses and combines multiplicatively with the Weak Spot Bonus:

Total Damage = (Base Damage) × (1 + x % of Passive Damage Bonuses including Backstab Damage bonus) × ... × (1 + 60.0% Weak Spot Bonus) or (1 + 40.0%) if Out-of-ki Bonus is active

To put it into practice, consider the following scenario for the player and the enemy:
  • +8.0% Backstab Damage
  • Sword of Execution (equivalent to +20.0% Backstab Damage)
  • The enemy is not out of ki
  • The enemy is attacked from behind
Attacking an enemy's back would result in the following Total Damage Formula:

Passive Damage Bonuses = 1.28 Active Damage Buffs = 1.00 Debuffs = 1.00 Out-of-ki Bonus = 1.00 Weak Spot Bonus = 1.60 Total Damage = (Base Damage) × 1.28 → Passive Damage Bonuses × 1.00 → Active Damage Buffs × 1.00 → Enemy has no debuffs × 1.00 → Enemy is not out of ki × 1.60 → Enemy is attacked at a weak spot Total Damage = (Base Damage) × 2.05

There you go! I hope this helps students who are curious about how Backstab Damage, Sword of Execution and the Weak Spot Bonus combine.


Stacking of Zero-ki Damage Bonuses
The zero-ki damage bonuses in Nioh 2 are Melee Damage vs. Zero-ki Enemy, Finishing Flair, Increased Attack (Winded Enemy) and the Out-of-ki Bonus. In the Total Damage Formula, they are located in the following categories:

Passive Damage Bonuses
  • Melee Damage vs. Zero-ki Enemy
  • Finishing Flair

Active Damage Buffs
  • Increased Attack (Winded Enemy)

Out-of-ki Bonus
  • An unknown value "a" % applies

Thus, Melee Damage vs. Zero-ki Enemy and Finishing Flair combine additively with each other, and then combine multiplicatively with both the Increased Attack (Winded Enemy) buff and the Out-of-ki Bonus.

For a detailed course explaining when each of these zero-ki bonuses applies, feel free to walk in on my other other course named The Stacking of Zero-ki Bonuses Against Yokai!


Appendices
This section contains the Appendices that I referred to throughout this course.


Appendix A: Discovery of the Variable "a"
Click here[docs.google.com] for a walkthrough of my discovery of the "a" variable.


Appendix B: Discovery of the Variable "b"
Click here[docs.google.com] for a walkthrough of my discovery of the "b" variable.


Appendix C: Extensive Analysis of the Variables "a" and "b":
Click here[docs.google.com] to view my research notes on the "a" and "b" variables.


Appendix D: List of Categories and Stats
Click here[docs.google.com] to view the list of stats belonging to each category of the Total Damage Formula.


––– END OF COURSE CONTENT –––
You're a fantastic student for getting this far! You should be very proud of yourself. I'm sure you'll perform excellently on the final exam. Read on to find a list of useful resources and practice questions for preparing for the final exam, as well as specific details about the final exam itself.


Test Your Understanding
Feel free to try these practice questions to see how well you understand the case studies.


Question 1
If the ✦Attack Bonus (STAT) effect increases your Attack Score from 5,000 to 5,500 (10.0%), then it will increase your total damage output by 10.0%.

A) True
B) False

Answer: B


Question 2
The 7-piece bonus of Magatsuhi's grace, +20.0% Melee Damage (Awakened Weapon), combined with an Awakened corrupted weapon's natural 30.0% damage bonus results in a 50.0% damage bonus.

A) True
B) False

Answer: B


Question 3
What is the total damage output of a grapple that deals 5,000 Base Damage when combined with the following damage bonuses?
  • +6.0% Active Skill Damage
  • +12.0% Grapple Damage
  • Reduced Defense (Grapple) 100%

A) 11,200 damage
B) 10,900 damage
C) 10,600 damage
D) 11,800 damage
E) None of the above are correct.

Answer: D


Question 4
What is the total damage output of a Low Stance Quick Attack against a Yokai enemy's back when combined with the following damage bonuses? The enemy is not out of maximum ki.
  • The Low Stance Quick Attack deals 1,000 Base Damage against the same enemy.
  • +5.0% Melee Damage
  • +7.0% Backstab Damage
  • Increased Attack (Amrita Absorption)
  • The player absorbed Amrita 7 seconds ago.
  • Assume that the value of "a" is 60.0%
  • Assume that the value of "b" is 40.0%

Round your final answer to the nearest whole number.

A) 1,971 damage
B) 1,977 damage
C) 1,725 damage
D) 1,952 damage
E) None of the above are correct.

Answer: A


Student Resources
Here is a list of the resources that we frequently referred to during the course.


General
  • Nioh 2 Wiki – FAQS[nioh2.wiki.fextralife.com]
    Fextralife's excellent Wiki FAQs page for all things Nioh-related.

  • Nioh Community Institute Server[discord.gg]
    The main campus of the Nioh Community Institute. Many of our findings stem from the experiments conducted on this campus.

Related to Course Content


Final Assessment
The link to the Final Assessment is posted at the bottom of this section.


Purpose of the Final Assessment
Writing the Final Assessment of this course is completely optional.

Students who choose to write the assessment and score a grade of at least 70.0% will be considered "Officially Graduated" and personally awarded a Graduation Diploma signed by the Nioh Community Institute.

The assessment has been reworked to be significantly more difficult than it was in past years. It will require advanced analytical skills and creative applications of the concepts learned in class, with the intention of simulating problems that the Institute's Professors face while conducting real mathematical experiments.

Ultimately, this turns the course graduation into a rewarding endeavor focused on personal development and the accumulation of knowledge. By the end of this course, students will look back at where they started and be amazed at how far they have come.


Final Assessment Details
The assessment is open-book. You are permitted to use any external resources, including a calculator, the textbook, the Appendices and the Nioh 2 Wiki. You may even use the Nioh 2 game during the assessment. However, since the assessment is primarily theoretical, the Nioh 2 game is not likely to help.

The Final Assessment may be accessed any time from June 5, 2021 to June 30, 2021.

You have an unlimited amount of time until June 30, 2021 to complete this assessment. This means that you can leave whenever you need a break and continue your progress at a later time.

There is no way to cheat on the assessment because it is completely open-book. Collaboration with other students is not prohibited, but will reduce the personal satisfaction that you gain from passing the course.

Your final grade will be given to you within one week of completing the assessment. In order to pass this course, you are required to score a grade of at least 70.0% on the final assessment. Successful writers will be personally awarded a Graduation Diploma signed by the Nioh Community Institute Faculty of Mathematics.

Course ID
NIOH2-MATH-101
Section
A – Online
Term
Spring 2021
Instructor
Yanxi
Restrictions
Open-book
Time Allocated
Unlimited
Maximum Attempts
Unlimited
Date Available
June 5, 2021, 08:00 EST
Date Closed
June 30, 2021, 23:59 EST

Number of Pages
7
Total Number of Marks
100
Graduation Requirement
70.0%


Before You Begin
You will need a Google account to access the assessment. If you do not wish to use your personal Google account, please take the time to create a new account before you begin.

You may contact me at any time while you are working on the Final Assessment to ask me questions. The fastest way to reach me is through Discord. My Discord username is Yanxi#1218.[discord.com]


Saving Your Progress
You are permitted to exit the assessment and continue your progress at a later time. To save your progress, please complete the following steps:
  1. Navigate to the last page of the Final Assessment titled Save or Submit

  2. In the question box, select:

    "I am not finished. I am saving my progress so I can continue working on it later"


  3. Click Submit

  4. Your progress will be saved and a response receipt will be sent to your email address.


Resuming Your Progress
To resume your progress, please complete the following steps:
  1. Open the response receipt sent to your email titled Nioh 2 Math School – Final Assessment

  2. In the email, select Edit Response

  3. You may now continue working.

While you are editing your response, a harmless message will pop up at the bottom left corner of your screen every time you change pages. To remove this message, click Open Blank Form and immediately close the blank form:


I apologize in advance for this message. Unfortunately, it cannot be disabled.


Link to Final Assessment
Reminder:
You will need a Google account to access the assessment. If you do not wish to use your personal Google account, please take the time to create a new account before you begin.

Here is the link to the Final Assessment:
Nioh 2 Math School – Final Assessment[forms.gle]

I wish you the best of luck!


Special Thanks
I would like to extend special thanks to the following individuals:


Faculty of Mathematics
  • Professor Adderflail[discord.com] A.K.A. u/gaydesperado
    Discoverer of the original Total Damage Formula and main editor of the Nioh 2 Wiki. Adderflail provided an endless amount of Wiki pages that I constantly referred to while designing this course. Adderflail also helped me discover and test the Weak Spot Bonus.

  • Professor Vikaluka[discord.com]
    Discoverer of the original Total Damage Formula. Vikaluka provided constant advice while I was designing this course and pointed out errors I made along the way. Vikaluka also helped me discover the Weak Spot Bonus.

  • Professor rbFrosty[discord.com] A.K.A. u/Frostitutes
    Discoverer of the original Total Damage Formula and expert on bonus optimization. Frosty taught me the extremely important and confusing theory in the Optimizing Your Damage Output section. This section wouldn't exist without his infinite patience while teaching our Institute this concept. Feel free to visit his office to talk more about this topic!

  • Professor LOLSAN[discord.com]
    Discoverer of the original Total Damage Formula. LOLSAN introduced me to the Crystal target in Calamity's Pulse, which helped immensely while testing. He also helped me troubleshoot Base Damage testing against the Crystal target.

  • Professor Brilliant_Suns_Gaming[discord.com]
    Co-discoverer of the Out-of-ki bonus. Brilliant_Suns_Gaming has guided me in conducting many experiments and taught me how to properly support my theories.

  • Professor Ocean Machine[discord.com]
    Creator of the Nioh 2 Build Bible, which I had on my second monitor the entire time I was designing this course. I have clicked the link to his resource about 50,000 times.


Faculty of Computer Sciences
  • Professor Sadocommando[discord.com]
    Professor Sadocommando is the shaman of our Institute's Computer Sciences department. He is the provider of many scripts that serve as tools for gathering mathematical data in Nioh. I used his NPC Speed script countless times during testing to freeze enemies in place. The Weak Spot Bonus would not have been discovered without Sadocommando's fantastic tool.


Members of Other Faculties
  • unohehe[discord.com]
    Fellow Institute member and good friend who read sections of my course and provided interpretations of my teachings and theories. Unohehe always listens to my theories and helps me improve my communication so that it can be tailored to help more students.

  • Dean AGreyDawn[discord.com]
    One of the Deans of the Nioh Community Institute! Dean AGreyDawn has provided excellent feedback and incredibly inspiring comments on my past courses. Every day, he works extremely hard to ensure that the Institute is a warm and welcoming place for new students to learn in. Dean AGreyDawn's kindness encourages me to create more learning materials for students.

  • thesoothsayer3211[discord.com]
    Fellow Institute member who taught me many basics about ki management. Soothsayer also provided me my first Level 1 Ethereal weapon, which helped me drastically improve my gameplay when starting out. He also examined my Weak Spot Bonus discovery and suggested I test it on other targets to see how it varies.

  • xxx XXXRDMKINGz uchihaz xxx[discord.com]
    Fellow Steam member who read sections of my guide and provided extensive feedback on how to make it more engaging to students. After uchihaz read my first draft, I realized that this guide was a long, boring overload of information. Uchihaz encouraged me to spice it up, and from there I came up with the college theme. Without uchihaz's advice, this course would be a total slog.

  • Dean LaughingDragon[discord.com]
    Another one of the Deans of the Nioh Community Institute! Every day, Dean LaughingDragon goes out of his way to provide very informative answers to students. Dean LaughingDragon personally examined my Weak Spot Bonus discovery and suggested I test it with ranged weapons, which further increased our knowledge of the concept and planted seeds for future experiments.

  • Fat Valentine[discord.com]
    Fellow Steam member who provided a plethora of information about the Base Damage Formula to the community. He has conducted extensive research on enemy HP values and something called "par-values". While his findings are beyond the scope of this course, you may certainly find them interesting! You can find his work in post #4 of this thread.


Thank you for taking NIOH2-MATH-101!
I hope you all had a wonderful time taking this course! I genuinely enjoyed every minute spent teaching you about the Total Damage Formula.

In preparation for the final exam, every student's questions, inputs and insights are more than welcome in the class forum located below. I will do my absolute best to provide informative responses to your inputs so that you are able to ace the final exam.

Happy studying, and see you at the exam!

Assistant Prof. Yanxi[discord.com]
Nioh Community Institute[discord.gg]


9 Comments
jayparkin Jan 19 @ 2:19am 
Your commitment to the bit makes me even more committed to taking this course next semester.
Yanxi  [author] Jul 12, 2021 @ 3:34pm 
Glad to hear that! Thank you for bringing up this topic, Cows with Guns. You taught me something new that I haven't learned before. It was a very interesting case study.
{5LINE}Cows with Guns Jul 12, 2021 @ 12:51pm 
https://imgur.com/a/dthtXaW

I may need to correct myself; it appears I forgot about familiarity when i was doing self-testing earlier.

7 whetstones later and the numbers look right about according to your math.
Yanxi  [author] Jul 12, 2021 @ 11:09am 
Thank you for your input, Cows with Guns!

Attack Bonus (STAT) has a unique behaviour in that it simply adds to your Attack Score—nothing else. Furthermore, it never appears on your Status menu Special Effects page. Since it simply adds to your attack, then multiple Attack Bonuses of the same stat actually do stack.

Here is an example:

Attack Bonus (Magic) A+ from the player's on-hand melee weapon
Attack Bonus (Magic) B from Jurojin's Grace

At 200 Magic, the grade A+ on your weapon will add exactly 408 Attack to your total Attack Score, and the grade B on your grace will add exactly 176 Attack to your total Attack Score, for a total of 584 added Attack. These are the same amounts they would add if you weren't stacking them.

The results show that the two Attack Bonuses (Magic) stack additively, without any conflicts.

Why don't you send me an image of your Tombokiri and Warrior of the East set bonus? Maybe we're missing something.
{5LINE}Cows with Guns Jul 12, 2021 @ 10:36am 
The tl;dr summary

This guide is inapplicable until Dream of the Wise at the earliest (NG+++) according to the specified graces and attack bonuses (at least 200 hours in for new players).

If I may add: Stats-based attack bonus do not stack (I tried stacking attack bonuses via tombokiri and its Warriors of the East set bonus, Constitution A).
Yanxi  [author] Jul 11, 2021 @ 8:14pm 
Please don't feel intimidated, Varador! This class will take you from zero to confident.

There's also no rush to start tackling this class—it will be here forever. Given your amount of hours in the game, there might be some terms you haven't seen before. Try your best for now, and as you get further into the difficulties (New Game+++ and beyond), everything will begin to fall into place.
Battenhall Jul 11, 2021 @ 7:02pm 
I am simultaneously horrified and intrigued by this.
Yanxi  [author] Jun 5, 2021 @ 7:53pm 
Thank you, Professor Ocean Machine. The fact that your resource is our textbook in this course speaks volumes about how useful it is to the community. Very nice of you to stop by!
Ocean Machine Jun 5, 2021 @ 2:43pm 
Amazing. Stay in school kids.