Fallout 4

Fallout 4

206 beoordelingen
Maximising XP Gain
Door Magic Man
A guide on how to maximise the average experience gained by your character in Fallout 4. Excellent for if you are aiming to reach Level 50 so that you can obtain every achievement or if you are aiming for a level high enough to obtain every single level-up perk.
10
4
20
7
2
4
3
2
   
Prijs
Toevoegen aan favorieten
Toegevoegd aan favorieten
Verwijderen uit favorieten
Introduction
Fallout 4 features a vastly different level-up and perk system than the games that preceded it.

Previous Fallout games would usually feature a perk that would increase the XP gained or a perk that would immediately level you up. These perks would be considered a newbie trap as they would be useless once the game's level cap was reached and thus a waste of a perk slot.

Fallout 4 does not feature a level cap and allows players to obtain every single perk in the game. However, the level requirement to achieve this is extraordinarily high.

Assuming that a player does not pick up any of the S.P.E.C.I.A.L. Bobbleheads or the "You're S.P.E.C.I.A.L." book in Shaun's bedroom before reaching 10 in a S.P.E.C.I.A.L. stat in order to maximise them, then they will have to reach Level 272 in order to obtain every perk. This increases to Level 286 when the additional perk levels from the Far Harbor and Nuka-World DLC packs.

Now take into account the fact that each level requires 75 XP more than the previous to reach, meaning that you need to earn 3,092,251 XP to reach Level 286.

Now that is indeed a ton of XP. Considering that the game's final achievement for levelling up is "Legends of the Wastes" at Level 50, which requires 98,001 XP, you are truly in for the long haul if you want to earn this naturally.

The goal of this guide is to maximise your XP gain to make the levelling up process less excruciating, so that whether you want to reach Level 50 or Level 286, you can do it as quickly as possible. Let's go through some of the methods...

How Fallout 4 Applies Modifiers:
When it comes to XP, Fallout 4 will apply its modifiers in a specific order:
1) Percentage modifiers (i.e.: +20% damage bonus)
2) Multiplier modifiers (i.e.: 1.25x damage modifier)
Game Modes
Fallout 3 had an XP multiplier dependent on the difficulty that the game was being played on, which would cause the player to receive 0.5x XP on Very Easy up to 1.5x XP on Very Hard. While this multiplier was removed in Fallout: New Vegas, a similar XP boost is given in Fallout 4's Survival mode.

Playing in Survival mode causes all enemies that are finished off by the player to give a 2x XP multiplier. This can massively increase the XP gained when farming, but it does come with many drawbacks, including:
  • Kills made by companions will not give doubled XP
  • Compared to Normal difficulty, the player deals 75% damage and receives 400% damage
  • The player must manage dehydration, starvation, exhaustion, fatigue, and illness
  • Manual saves, quick-saves and auto-saves are disabled as saving can only be done by sleeping
  • Fast travel is disabled
  • Locations take over an in-game month to repopulate

There is also the issue that if Hardcore is ever turned off, you can never try it again on that file. This means that you can't test the waters with it and you must commit to it.
S.P.E.C.I.A.L. Stats
When choosing your S.P.E.C.I.A.L. stats at the beginning of the game, you are told that the higher your Intelligence stat, the more XP you will gain.

The following multiplier is applied:

XP_Final = XP_Base * (1 + (3 * Intelligence)/100)

Below is a table comparing different values of Intelligence to the multiplier received:

Intelligence
XP Multiplier
1
1.03
2
1.06
3
1.09
4
1.12
5
1.15
6
1.18
7
1.21
8
1.24
9
1.27
10
1.30
11
1.33
12
1.36

For example, a quest is designed to give 200 XP will give 206 XP to a player with 1 Intelligence and 260 XP to a player with 10 Intelligence.

From all of this, you might expect that the way to maximise your XP gain is to simply pick 10 Intelligence at the start of the game and to use the "You're S.P.E.C.I.A.L." book and the Intelligence Bobblehead to further increase the stat to 12. However, the next section will give us a perk that makes this significantly more complicated...
Level-Up Perks
Previous Fallout games offered numerous level-up perks which could increase the speed of levelling up. This included Fallout's "Swift Learner", which would give a bonus to all XP gained, Fallout 2's "Here and Now", which would immediately increase your character's level by one, and Fallout: New Vegas' Lonesome Road's "Lessons Learned", which gave a bonus to XP gain that increased with every level.

These perks were generally considered to be almost worthless, as the level cap would give a limit to how many perks could be obtained on a single character, which in turn would make the faster levelling perks an effective waste of a perk slot once the level cap was reached.

Fallout 4 only offers a single level-up perk for increasing XP gain, but the lack of a level cap entirely negates the reason why these perks were unpopular as there is no limit to how many perks can be acquired beyond the amount that there are. Even after every perk has been obtained, levelling up still gives the benefit of increasing the character's maximum Hit Points.

Idiot Savant:
Stats:
  • "You're not stupid! Just... different."
Rank
Requirements
Stats
1
  • Luck 5
  • Level 1
  • 3x XP earned from any source via random boost
2
  • Luck 5
  • Level 11
  • 5x XP earned from any source via random boost
3
  • Luck 5
  • Level 34
  • 5x XP earned from any source via random boost
  • 3x XP earned from kills within 60 seconds of a previous random boost
  • These two multipliers will not stack - the former is prioritised over the latter

Review:
Below is the mathematical formula for calculating the proc (Programmed Random Occurance) rate:

Proc_Rate = max((12 - Intelligence),1)%

Below is a table comparing the Intelligence stat to the outcomes:

Intelligence
Proc Rate
Chance of at Least 1 Proc in 3 Attempts
1
11%
29.5031%
2
10%
27.1%
3
9%
24.6429%
4
8%
22.1312%
5
7%
19.5643%
6
6%
16.9416%
7
5%
14.2625%
8
4%
11.5264%
9
3%
8.7327%
10
2%
5.8808%
11
1%
2.9701%
12
1%
2.9701%
13
1%
2.9701%
14
1%
2.9701%
15
1%
2.9701%
High Intelligence vs. Idiot Savant
From reading the previous two sections, you can probably tell that we've reached an impasse. A high Intelligence stat will give increased XP, but this will also decrease the chance of Idiot Savant from activating.

So what value of Intelligence leads to the highest average XP gain? Below is a table of the values of XP given by up to Rank 2 of Idiot Savant:

Intelligence
w/o Idiot Savant
Idiot Savant (1)
Idiot Savant (2)
1
1.03
1.2566
1.4832
2
1.06
1.2720
1.4840
3
1.09
1.2862
1.4824
4
1.12
1.2992
1.4784
5
1.15
1.3110
1.4720
6
1.18
1.3216
1.4632
7
1.21
1.3310
1.4520
8
1.24
1.3392
1.4384
9
1.27
1.3462
1.4224
10
1.30
1.3520
1.4040
11
1.33
1.3566
1.3832
12
1.36
1.3872
1.4144
13
1.39
1.4178
1.4456
14
1.42
1.4484
1.4768
15
1.45
1.4790
1.5080

Below is a graph of the values displayed above:


From these values, we can see that the optimal value for Intelligence is 2 when using Idiot Savant (2). In order for a high Intelligence build to reach a higher level of XP gain, the character would require an Intelligence of 15 or higher.

The Case For 1 Intelligence:
While the table and graph above show the optimal Intelligence for Idiot Savant (2), it does not take into account the 3x XP multiplier given by Idiot Savant (3) due to the difficulty of calculating how much of a difference this would make in the long-term, however I am almost certain that it would cause a higher average XP gain than with 2 Intelligence and Idiot Savant (3). I may update this with a statistical analysis at a later date.

The Case For 2 Intelligence:
While the previous subsection discussed why 1 Intelligence is actually optimal for XP gain, there is one major advantage to choosing to have 2 Intelligence instead - the "Medic" perk.

If a player chooses to play with 1 Intelligence, this means that they will only recover 30% of their maximum Hit Points with a single Stimpak. This can be increased to 33% by picking up the Medicine Bobblehead in Vault 81.

Although this won't make much of a difference at low levels (as the player can rely on food for healing) or at very high levels (where the player will likely have a stockpile of Stimpaks and won't take much damage anyway), this can be a major issue for a mid-level player.

Medic (1) is required to open clinic-type stores in settlements and Medic (2) gives an alternative option to save Andre Michaud in the Far Harbor DLC.

The Case For 15+ Intelligence:
While it may be difficult to reach and maintain 15+ Intelligence, there is one major advantage of it over a low Intelligence build - perks.

The Intelligence stat is a barricade to many of Fallout 4's most important perks:

Intelligence
Perk
Effect
2
Medic
Increases the amount of Hit Points restored by Stimpaks, the amount of radiation removed by RadAway, and the rate at which they work.
3
Gun Nut
Allows the player to create gun mods from scratch without having to find them on other weapons.
4
Hacker
Allows the player to hack more difficult terminals.
6
Science!
Allows the player to create high-tech weapon mods and settlement machinery.
9
Nuclear Physicist
Increases the duration of Fusion Cores.

A low Intelligence build will make it take significantly longer to get the best gun mods. Unlike Cait with lockpicking, Nick Valentine will be permanently locked out of a terminal if he fails to hack it. This means that a few areas of the game may become inaccessible to the player. The most powerful settlement machinery, such as high-end water purifiers and turrets will be uncraftable. And finally, Power Armor will not be as efficient, as the best mods for it will be uncraftable and the Fusion Cores will not last as long.

All of this will be true until the player decides to use their level-up points on increasing their Intelligence, which on an XP optimised build will be when the player has finally reached the level where they can maximise every perk.
Magazines
Lying around the world of Fallout 4 are numerous magazines that can be picked up. Each one collected will give you a permanent bonus, even if you later on put the magazine away or even sell it. Of the 121 magazines in Fallout 4 (131 with all DLC add-ons), three of them will have a direct impact on our XP gain.

Live & Love #05 - Beware the Man Handler:
Stats:
  • +25% XP gained from successful charisma checks on men

How to Obtain:
This issue can be found in Bunker Hill.[vignette.wikia.nocookie.net] Enter the monument in the centre of the settlement and climb the stairs all of the way to the sniper's nest. Be sure to only pick up the magazine, as taking anything else will cause the rest of the settlement to attack you even if nobody saw you do it.

Review:
An increase in XP gained from persuading men can be very useful. You should aim to obtain this magazine as early as possible there are a limited number of speech checks in the game. This combines very well with Piper's companion perk.

Live & Love #10 - An Experience to Remember:
Stats:
  • +5% XP gained from all sources while adventuring with a companion

How to Obtain:
This issue can be found in Hotel Rexford in the town of Goodneighbor.[vignette.wikia.nocookie.net] Upon entering the hotel, it will be on the bar counter to your right.

Review:
Although it is a slight increase in XP gained, it will add up over time. I would recommend obtaining this after as early as possible, but after Live & Love #05 so that you can get additional XP from passing a charisma check with Finn as you enter Goodneighbor. From this point on, I would recommend that you always travel with a companion.

Live & Love #12 - The Secretary Charmer:
Stats:
  • +25% XP gained from successful charisma checks on women

How to Obtain:
This issue can be found in Fiddler's Green Trailer Estates.[vignette.wikia.nocookie.net] The magazine is inside of a trailer in the south-east with a motorcycle leaning against it.

Review:
The counterpart to Live & Love #05, the XP boost given is very useful. You should aim to obtain this magazine as early as possible as there are a limited number of speech checks in the game.
Companion Perks
There are 13 potential companions in Fallout 4, increasing to 16 with all of the DLC add-ons. Every companion (other than Dogmeat and Ada) will slowly bond with you as you travel with them. Their opinion of you is tracked by an affinity value in the game's code that will increase as you perform actions that they approve of and will decrease if you do things that they dislike.

If you consistently make a companion happy for a long time, the game will eventually say that they idolise you. Some companions will require you to complete a personal quest for them before they can reach idolisation, but neither of the two in this guide will require that. Once they idolise you, talk to them and they will reward you with a perk that represents their character. This perk is permanent, meaning that even if you ask them to leave or if you then cause them to hate you, you will not use it.

Gift of Gab:
Stats:
  • +100% XP gained from successful charisma checks
  • +100% XP gained from discovering new locations

How to Obtain:
Gift of Gab is a companion perk earned by being idolised by Piper Wright. Piper can become your companion after you complete the quest "Story of the Century", which is available as soon as you enter Diamond City.

Piper's affinity can be raised by performing some of the following actions:
  • Helping innocent civilians
  • Picking locks that are not owned
  • Being generous
  • Telling the truth
  • Attempting to avoid violence in dialogue
  • Helping the Minutemen and settlements
  • Helping the Railroad
... And more. A full list of Piper's likes and dislikes can be found here[fallout.fandom.com].

Review:
This perk effectively doubles your XP gained from charisma checks and discovering new locations, so it is highly recommended that you start the game with a high Charisma stat and that you get this perk as early as possible as there are a limited number of locations to discover.

Lessons in Blood (Nuka-World DLC):
Stats:
  • +5% XP gained from kills
  • +10 Damage Resistance

How to Obtain:
Lessons in Blood is a companion perk earned by being idolised by Porter Gage. Gage can become your companion after you complete the quest "An Ambitious Plan", which is the second main quest of the Nuka-World DLC add-on.

Gage's affinity can be raised by performing some of the following actions:
  • Picking locks
  • Stealing items
  • Modifying weapons
  • Choosing sarcastic dialogue choices
  • Asking for more money
  • Helping the leaders of the raider factions in Nuka-World
... And more. A full list of Gage's likes and dislikes can be found here[fallout.fandom.com].

Review:
A 5% increase in XP from kills is very small, but it can certainly add up - especially when boosted by Idiot Savant. The additional 10 Damage Resistance can also be useful throughout the game. Although it can be very useful to get this perk early, it is important to note that the game recommends that players wait until Level 30 before attempting to play through the Nuka-World DLC.
Temporary Perks
There are four temporary perks in Fallout 4 that can increase the amount of XP that is obtained for a few hours before the perk is removed.

Quiet Reflection:
Stats:
  • +5% XP gained from all sources for 8 hours

How to Obtain:
Sit down on a pew in the All Faiths Chapel in Diamond City.
This perk will not be awarded if the player currently has either the Well Rested or Lover's Embrace perk.

Review:
Early on into the game, when you have no settlements outside of the north of the map and you don't own the Home Plate in Diamond City, this can be a good way to get a small XP boost for free while questing in central Boston or the south. Unfortunately, once settlements have been established this action becomes useless as Well Rested or Lover's Embrace will be easily available.

Well Rested:
Stats:
  • +10% XP gained from all sources for 8 hours

How to Obtain:
Sleep in any bed that you currently own or are renting.
In Survival Mode, you must sleep for a minimum of 7 hours.
This perk will not be awarded if the player currently has the Lover's Embrace perk or if they would get the Lover's Embrace perk from sleeping.

Review:
Once you have many settlements available, this perk will replace Quiet Reflection while you are travelling with companions that you have not romanced or cannot romance.

Lover's Embrace:
Stats:
  • +15% XP gained from all sources for 8 hours

How to Obtain:
Sleep in any bed that you currently own or are renting while a romanced companion is nearby.
In Survival Mode, you must sleep for a minimum of 7 hours.

Review:
If you aren't currently aiming to max another companion's affinity, you should generally stay with a romanced companion for this perk. In a later section of the guide, I will give a breakdown to the advantages and disadvantages of each companion.

The Captain's Feast (Far Harbor DLC):
Stats:
  • +10% XP gained from all sources for 2 hours

How to Obtain:
The Captain's Feast perk is obtained by consuming "The Captain's Feast" item that is a reward for completing the quest "Rite of Passage" which is given to you by Teddy Wright in Far Harbor after completing a few other side quests for the people of Far Harbor, namely "Blood Tide" from Cassie Dalton, "Hull Breach" from the Mariner and "Safe Passage" from Captain Avery.

Review:
Unfortunately, on top of being a very small XP boost, you can only obtain the item once. You cannot perform the quest again and you do not receive a recipe to create more. It may be slightly helpful to consume it before handing in a few high XP quests, but I will not count it with any future calculations as it is not repeatable.
Lover's Embrace - Which Companion Should I Use?, Part I
An important part of maximising XP is ensuring that the Lover's Embrace perk is consistently in effect.

Some companions can be romanced when you reach maximum affinity with them. This will require a successful charisma check. Below is a table breaking down which companions can and cannot be romanced:

Can Romance
Can't Romance
Cait
Curie
John Hancock
Paladin Danse
Piper Wright
Preston Garvey
Porter Gage (Nuka-World DLC)
Robert MacCready
Ada (Automatron DLC)
Codsworth
Deacon
Dogmeat
Nick Valentine
Old Longfellow (Far Harbor DLC)
Strong
X6-88

Alongside these companions, the Lover's Embrace perk can also be obtained by flirting charisma checks with Magnolia, who performs in The Third Rail in Goodneighbor, and Gilda Broscoe, who lives in Vault 118 beneath the Cliff's Edge Hotel in the Far Harbor DLC add-on. Unfortunately, these two characters can only be bedded once and doing so will result in an affinity reduction if any romanced companions are with you when you do it.

Below is a review of each of the eight companions that can be romanced in terms of how good they are for farming XP:

Cait
Pros
Cons
  • Great in combat - double-barrel shotgun
  • Can pick any lock
  • Likes lockpicking
  • Likes pickpocketing
  • Indifferent to theft
  • Requires the companion quest "Benign Intervention" to reach max affinity and romance
  • Dislikes chem usage and chem addiction after her companion quest
  • Does not give a daily item
  • Dislikes helping settlements
  • Dislikes helping the Minutemen
  • Dislikes helping the Railroad
  • Dislikes helping the Brotherhood of Steel
  • Dislikes helping the Institute

Review:
Doing radiant quests for the four factions and the settlements is one of the best ways to farm XP. Cait punishes the player with a dislike every time that they begin any of these radiant quests, which single-handedly secures her as a bad candidate for an XP farming companion.
Rating: Very bad. Avoid at all costs.

Curie
Pros
Cons
  • Great in combat - laser rifle
  • Gives a daily item - stimpak
  • Constant max hit points causes her to have more health than all other companions until the player reaches Level 105
  • Indifferent to chem usage
  • Likes helping settlements
  • Indifferent to helping the Minutemen
  • Likes helping the Brotherhood of Steel
  • Requires the companion quest "Emergent Behaviour" to reach max affinity and romance
  • Dislikes chem addiction
  • Dislikes pickpocketing
  • Dislikes theft
  • Constant max hit points causes her to have less health than all other companions once the player reaches Level 108
  • Dislikes helping the Railroad
  • Dislikes helping the Institute

Review:
Although Curie will not like the player starting radiant quests with the Railroad or the Institute, most radiant quests performed will be helping settlers. Curie's daily stimpak, companion perk and extremely high amount of hit points make her an excellent companion when you are at a low level. Having the perk Chem Resistant (2) can get around the potential for chem addiction if you are relying on them at earlier levels. Even once you reach Level 108, Curie's hit points are so high that nothing will take her down.
Rating: Very good. Use for a morally good character who will perform radiant quests for settlements and the Brotherhood of Steel.

John Hancock
Pros
Cons
  • Does not require a companion quest to reach max affinity and romance
  • Gives a daily item - chems
  • Likes chem usage and addiction
  • Likes helping settlements
  • Indifferent to helping the Minutemen
  • Indifferent to helping the Railroad
  • Indifferent to helping the Brotherhood of Steel
  • Mediocre in combat - sawn-off double-barrel shotgun
  • Dislikes theft
  • Dislikes helping the Institute

Review:
Hancock's daily chems can be useful for a low-level character. He is the only companion who actually likes it when you get addicted to chems, even after being romanced. His weapon of choice isn't very effective unless he is within extremely close range, which is something his AI is infamous for not doing often.
Rating: Good. Use for low-level chem-reliant characters who will help any faction other than the Institute.
Lover's Embrace - Which Companion Should I Use?, Part II
Paladin Danse
Pros
Cons
  • Great in combat - laser rifle
  • Extremely high Damage Resistance and Energy Resistance
  • Likes power armor usage
  • Likes Vertibird usage
  • Likes helping settlements
  • Likes helping the Minutemen
  • Indifferent to helping the Railroad
  • Likes helping the Brotherhood of Steel
  • Requires the companion quest "Blind Betrayal" to reach max affinity and romance
  • Companion quest is far into the Brotherhood of Steel quest line
  • Siding against the Brotherhood of Steel in the main quest line will stop Paladin Danse from being your companion
  • Does not give a daily item
  • Bad for stealth
  • Dislikes chem usage and chem addiction
  • Dislikes pickpocketing
  • Dislikes theft
  • Hates helping the Institute
  • Completion of companion quest means that the Brotherhood of Steel will be hostile to you while you are his companion

Review:
Although he's great in a fight, the outcome of the quest "Blind Betrayal" completely ruins Danse as an XP farming companion. Although he might like performing Brotherhood of Steel radiant quests, that doesn't matter if the person that you accept the quests from would begin shooting you both as soon as he saw you with Danse. His fondness of using Vertibirds is negated. Brotherhood of Steel patrols and Vertibirds are very common to encounter as you wander the Commonwealth, meaning that you will be encountering even more hostiles as you travel.
Rating: Very bad. Avoid at all costs.

Piper Wright
Pros
Cons
  • Does not require a companion quest to reach max affinity and romance
  • Gives a daily item - sweet food
  • Indifferent to chem usage
  • Indifferent to chem addiction
  • Likes lockpicking unowned locks
  • Likes helping settlements
  • Likes helping the Minutemen
  • Likes helping the Railroad
  • Bad in combat - 10mm pistol
  • Dislikes pickpocketing
  • Dislikes theft
  • Dislikes helping the Brotherhood of Steel
  • Dislikes helping the Institute

Review:
Piper is an excellent choice to be your first companion to romance. You can kill two birds with one stone by getting the perk "Gift of Gab" and with a charisma check, you can romance her and have easy access to the perk "Lover's Embrace". Piper is also indifferent to both chem use and chem addiction. Her food items can be helpful very early on in the game, but they quickly lose their effectiveness. Her choice of weapon is also not too helpful.
Rating: Good. Use for a higher-level morally good chem-reliant character who will perform radiant quests for settlements and the Railroad.

Preston Garvey
Pros
Cons
  • Does not require a companion quest to reach max affinity and romance
  • Indifferent to chem usage
  • Loves helping settlements
  • Indifferent to helping the Minutemen
  • Indifferent to helping the Railroad
  • Mediocre in combat - laser musket
  • Does not give a daily item
  • Dislikes chem addiction
  • Hates pickpocketing
  • Dislikes theft
  • Dislikes helping the Brotherhood of Steel
  • Dislikes helping the Institute

Review:
Piper may be the best first choice for romance, but Preston is easily the fastest romance. He loves it when you help a settlement and his indifference to chem usage can be helpful for low-level characters. With the perk Chem Resistant (2), his dislike of chem addiction can be avoided. His laser musket is an inconsistent powerhouse in combat. Preston will take many seconds between shots and miss occasionally.
Rating: Good. Use for a morally good character who will perform radiant quests for settlements and the Railroad.

Porter Gage (Nuka-World DLC)
Pros
Cons
  • Does not require a companion quest to reach max affinity and romance
  • Great in combat - handmade rifle
  • Likes picking locks
  • Likes theft
  • Indifferent to helping settlements
  • Indifferent to helping the Minutemen
  • Indifferent to helping the Railroad
  • Indifferent to helping the Brotherhood of Steel
  • Indifferent to helping the Institute
  • Requires the Nuka-World DLC
  • Player is recommended to start Nuka-World at Level 30
  • Does not give a daily item
  • Dislikes chem usage
  • Hates pickpocketing

Review:
Porter Gage may dislike you joining any of the main factions, but he is completely indifferent to you completing any of their quests. His dislike of chem usage might be bad for low-level characters, but this will be avoided if the player waits until Level 30 to attempt the Nuka-World DLC add-on.
Rating: Good. Use for a mid-level character who is willing to aid any faction that they have already joined.

Robert MacCready
Pros
Cons
  • Great in combat - sniper rifle
  • Gives a daily item - ammunition
  • Can pickpocket anybody
  • Indifferent to chem usage
  • Likes lockpicking owned locks
  • Likes pickpocketing
  • Likes theft
  • Indifferent to helping settlements
  • Likes helping the Minutemen
  • Indifferent to helping the Railroad
  • Indifferent to helping the Brotherhood of Steel
  • Requires a payment of 250 caps to obtain as a companion. This can be reduced to 100 caps with charisma checks. MacCready will also pay you the caps back after you complete part of his companion quest
  • Requires the companion quest "Long Road Ahead" to reach max affinity and romance
  • Dislikes chem addiction
  • Dislikes helping the Institute

Review:
The 250 cap payment can be a hurdle for a low-level character to jump, but it can be reduced to a 100 cap payment with high Charisma, which this guide highly recommends.
Rating: Very Good. A great long-range combat companion for helping every faction aside from the Institute.
XP Results
To maximise XP gain, it is vital for you to do the following:
  • Have an Intelligence of 1
  • Have Idiot Savant (3)
  • Reach maximum affinity with both Piper Wright and Porter Gager (Nuka-World DLC)
  • Obtain Live & Love issues #05, #10 and #12
  • Travel with a romanced companion
From here, you have the following options:
  • Sleep in a bed with your romanced companion for a repeatable temporary XP boost
  • Consume the Captain's Feast (Far Harbor DLC) for a one-time temporary XP boost
  • Play the game on Hardcore Mode for an XP boost

Below are two tables listing the XP multipliers. Here are a few important notes:
  • The Captain's Feast is not included as it can only be used once.
  • The 1.03x XP multiplier from having 1 Intelligence is not included.
  • I am not entirely sure if any characters with speech checks are considered to be genderless. Please notify me if there is any certainty on this, either way.

Normal Mode:
w/o Lover's Embrace
w/ Lover's Embrace
w/o Idiot Savant Boost
  • 1.05x XP gained from quests
  • 1.1x XP gained from kills
  • 2.05x XP gained from discovering new locations and successful charisma checks with genderless characters
  • 2.3x XP gained from successful charisma checks with men and women
  • 3.3x XP gained from kills within 60 seconds of a previous Idiot Savant boost
  • 1.2x XP gained from quests
  • 1.25x XP gained from kills
  • 2.2x XP gained from discovering new locations and successful charisma checks with genderless characters
  • 2.45x XP gained from successful charisma checks with men and women
  • 3.75x XP gained from kills within 60 seconds of a previous Idiot Savant boost
w/ Idiot Savant Boost
  • 5.25x XP gained from quests
  • 5.5x XP gained from kills
  • 10.25x XP gained from discovering new locations and successful charisma checks with genderless characters
  • 11.5x XP gained from successful charisma checks with men and women
  • 6x XP gained from quests
  • 6.25x XP gained from kills
  • 11x XP gained from discovering new locations and successful charisma checks with genderless characters
  • 12.25x XP gained from successful charisma checks with men and women

Hardcore Mode:
w/o Lover's Embrace
w/ Lover's Embrace
w/o Idiot Savant Boost
  • 1.05x XP gained from quests
  • 1.1x XP gained from kills that were finished off by others
  • 2.05x XP gained from discovering new locations and successful charisma checks with genderless characters
  • 2.2x XP gained from kills that were finished off by the player
  • 2.3x XP gained from successful charisma checks with men and women
  • 3.3x XP gained from kills that were finished off by others within 60 seconds of a previous Idiot Savant boost
  • 6.6x XP gained from kills that were finished off by the player within 60 seconds of a previous Idiot Savant boost
  • 1.2x XP gained from quests
  • 1.25x XP gained from kills that were finished off by others
  • 2.2x XP gained from discovering new locations and successful charisma checks with genderless characters
  • 2.45x XP gained from successful charisma checks with men and women
  • 2.5x XP gained from kills that were finished off by the player
  • 3.75x XP gained from kills that were finished off by others within 60 seconds of a previous Idiot Savant boost
  • 7.5x XP gained from kills that were finished off by the player within 60 seconds of a previous Idiot Savant boost
w/ Idiot Savant Boost
  • 5.25x XP gained from quests
  • 5.5x XP gained from kills that were finished off by others
  • 10.25x XP gained from discovering new locations and successful charisma checks with genderless characters
  • 11x XP gained from kills that were finished off by the player
  • 11.5x XP gained from successful charisma checks with men and women
  • 6x XP gained from quests
  • 6.25x XP gained from kills that were finished off by others
  • 11x XP gained from discovering new locations and successful charisma checks with genderless characters
  • 12.25x XP gained from successful charisma checks with men and women
  • 12.5x XP gained from kills that were finished off by the player
21 opmerkingen
Zippydaspinhead 3 mei 2024 om 13:17 
15+ int is easy so I disagree there. 10 INT 5 LUCK 6 PER 4 END start stats + VT Lab coat which can be found in vault 111 + beer and You're Special book + Bobblehead = 14 INT.

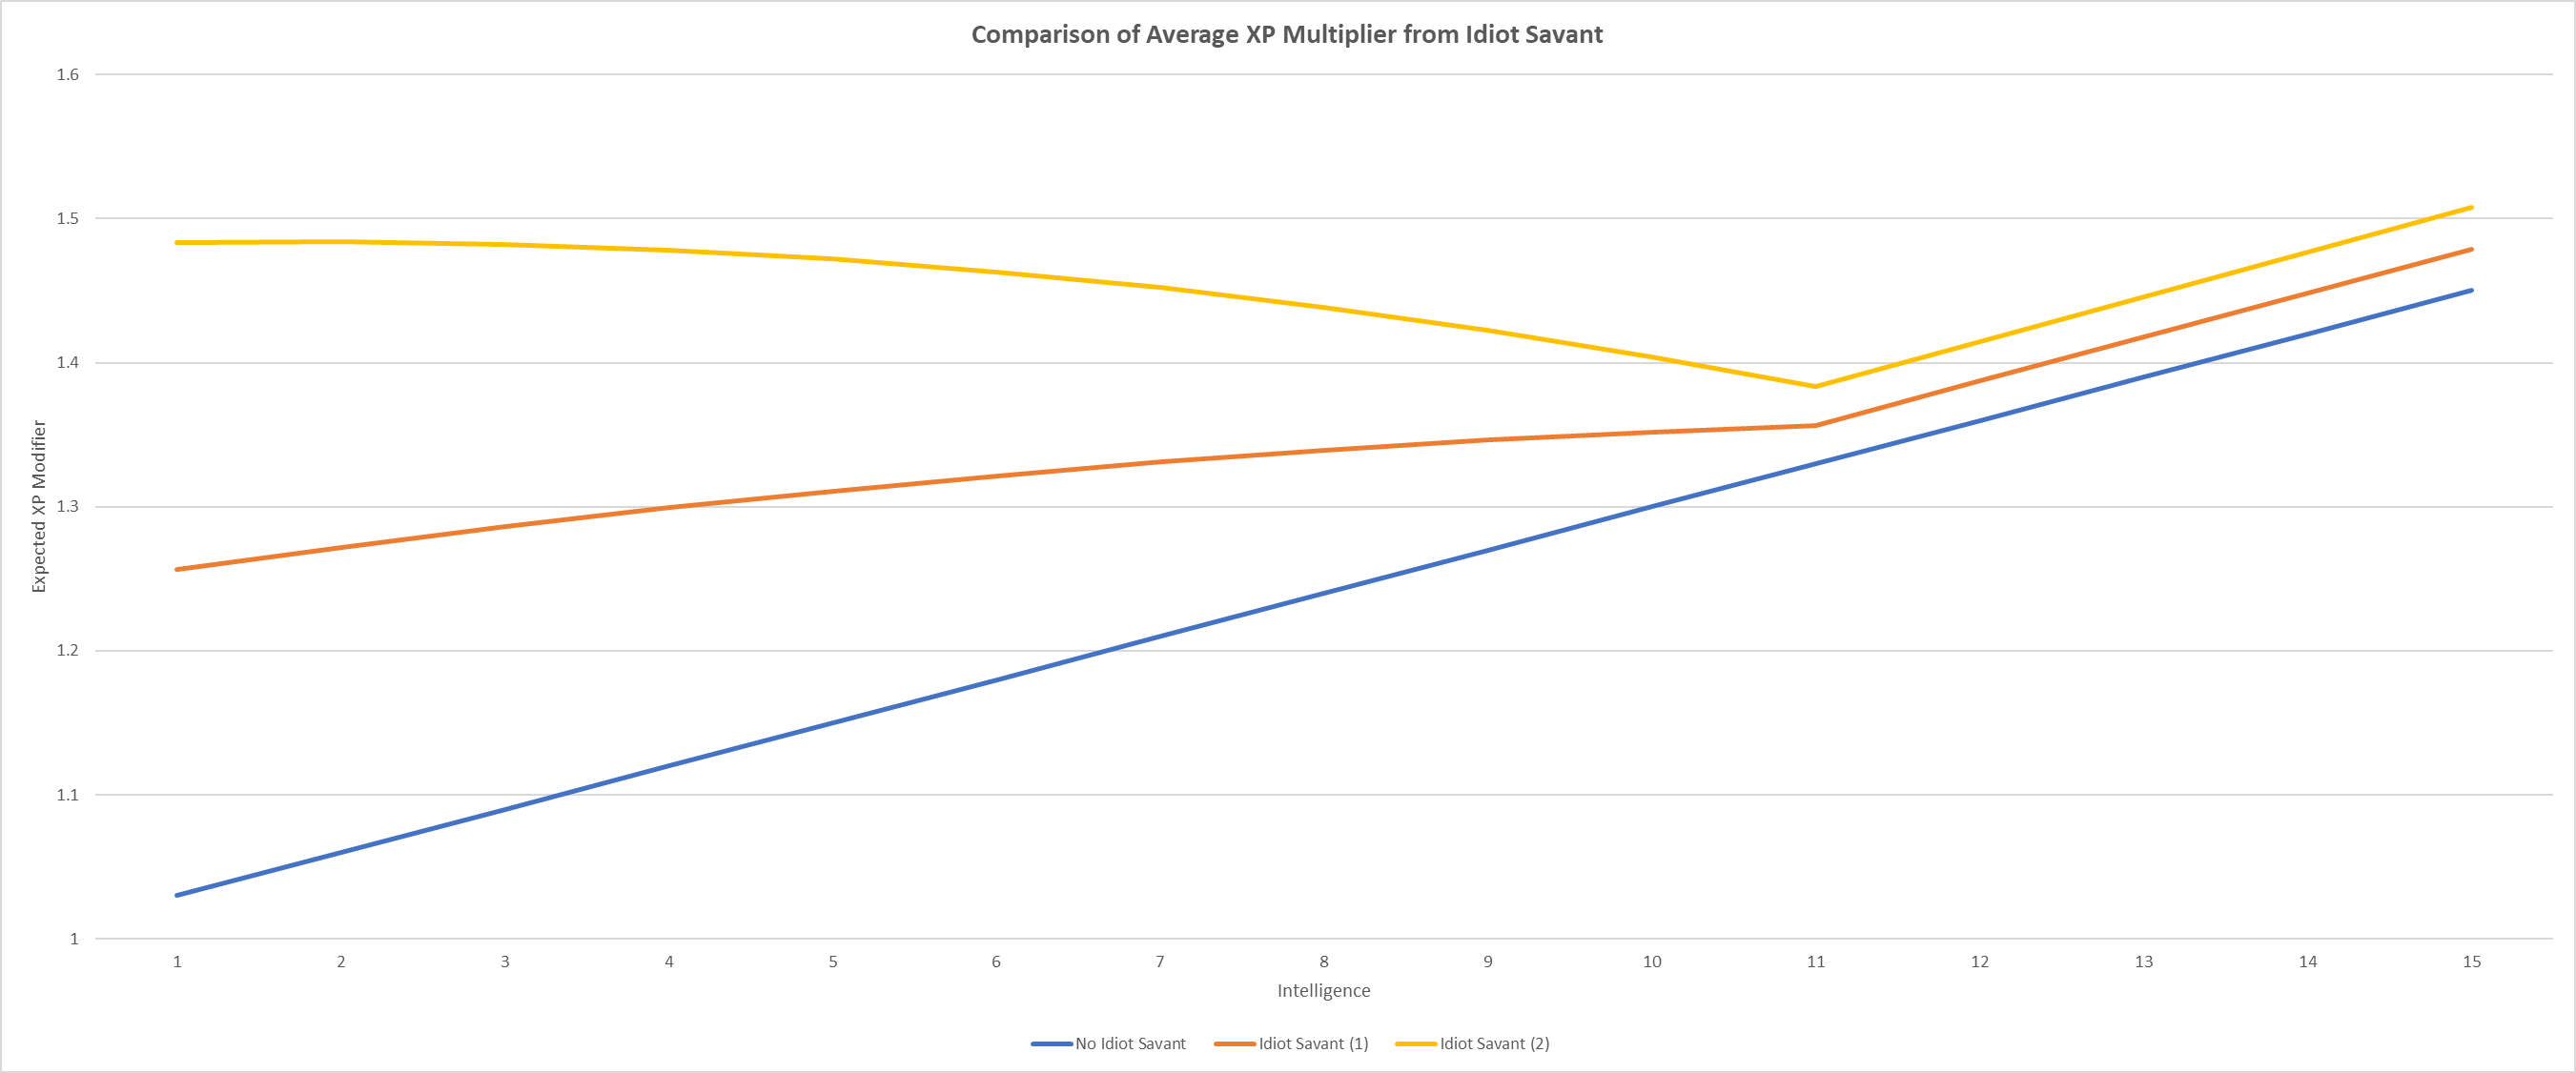
During the run to the public library to get the bobblehead you are almost guaranteed to find a raider with a ushanka hat. +1 = 15 already. You're now at the breakeven point in the first hour or two of gameplay. If you take Night Person early in your leveling, you get an additional +2 during the night for 17 and now we're at net gain of XP over 1 int. You are sleeping for well rested or lover's anyway

Further in you can get the Captain's Hat from far harbor and Liam's Glasses for a net benefit of +3 int, and another +1 from Night Person level 2 available at level 25. 18 base from stats and clothes, 21 for half the clock.

4 END is just to survive, it gets you toughness and life-giver availability. This is flexible depending on build and playstyle so put those 3 where you like really.
ZanyScum 25 aug 2021 om 23:56 
> cause them to hate you, you will not use it.
You probably wanted to say "will not lose it"?

Thanks for the guide!
Madolite 1 apr 2021 om 8:10 
Great guide. Also, consider the time spent gaining XP. The quicker you kill enemies and do XP-related actions, the quicker you level. So get those OP weapons ready.

I noticed that you had posted Nuclear Physicist as increasing Fusion Core duration only. This is incorrect. It also increases radiation weapons' damage by 50/100 percent. This affects not only the Gamma Gun, but also the Radium Rifle (Far Harbor DLC) as well as the Ultimatum (CC Tunnel Snakes mod). The latter two weapons are extremely powerful, especially against humans, as they both deal normal as well as radiation damage, allowing you to wade through those gunner and raider hideouts and earning you a lot of XP much faster.
Phlipper 11 mrt 2021 om 16:38 
give that man a ceegar!
why_1999 1 mrt 2021 om 15:20 
you probely put SOOO much work into this :steamthumbsup:
beeswax 22 feb 2021 om 10:18 
Great guide :cozybethesda:
Raigeki 30 dec 2020 om 6:10 
thank you
Sovereign 29 dec 2020 om 9:30 
nice
FDR'sThinkTank 28 dec 2020 om 21:52 
It's almost like they put no thought into the process of leveling up at all when they made the game. All the non-combat perks are thrown in as an afterthought.
FauxPunkFatigue 10 dec 2020 om 14:27 
very thorough