Heroes of Hammerwatch

Heroes of Hammerwatch

849 ratings
The Ultimate Heroes of Hammerwatch Guide
By Bweeks and 1 collaborators
This guide will be an overview of all aspects of the game including classes and setups used from low to high NG+ along with some other guides that help with farming in some way. This guide is by no means the only way to play the game, just what has been working for me, feel free to explore other options. If these is anything in particular you would like to see in this guide please leave a comment.

If interested all of my characters are around NG+20 or higher with paladin being NG+50

*Also I have tons of runs on my YouTube channel with commentary for each class if you are looking for more content.

https://www.youtube.com/c/Bweeks173

Special thanks to Krugo for helping create this guide. You can find more of his stuff at: https://www.twitch.tv/krugotv

also much credit to the information in the heroes of hammerwatch wiki, http://wiki.heroesofhammerwatch.com/Main_Page
14
11
58
4
7
6
5
2
6
3
4
3
3
2
2
   
Award
Favorite
Favorited
Unfavorite
Heroes of Hammerwatch


Introduction:
Welcome to Heroes of Hammerwacht (HoH for short) a Pixel Art, Rogue-lite, Indie, RPG. A small but entertaining game in which you can invest a lot of hours and I mean A LOT, especially if you like this kind of game. You take control of one of eight heroes and try to rebuild the Town and end the reign of the evil dragon Thundersnow on top of the Tower. You will find a lot of valuable items on your journey and turn your characters into strong and powerful heroes!


About the Game:
Heroes of Hammerwatch released last year on the first of March 2018 and the frist DLC "Pyramid of Prophecy (PoP for short) saw the light of day this year on the thirteenth of march 2019. This game offers several ways to increase the strength of your heroes and can keep you busy for a long time. The main way to increase the strength of your heroes is the Guild Hall and the Class Title system in the base game. If you already own the dlc then the statues are the main way to increase the strength of your heroes together with the class title bonus of two classes. Check out the "Everything about the Guild Hall and "Statues" sections of the guide.


Base Game:
The Base Game of HoH focuses on the Class Title System, the Magic Anvil and Drinks you can purchase at the Tavern. To get far in the game, you should play all Classes and increase their Titles as much as possible and attune each Item with the Magic Anvil.

In order to do this you have the following content at your disposal:

Classes: Choose and master one of 7 classes, but you should play them all!
The Town: 6 Tier Upgrade System and a quantity of purchasable Upgrades and Items.
The Tower: A randomly created dungeon, consisting of 6 acts, a total of 16 floors and 6 Bosses.
Drinks: Find and use powerfull Drinks on your adventures!
Magic Anvil: Find blueprints and attune Items to increase the strength of almost every Item!
New Game Plus: A way to make the Game more difficult and achieve more strength.
Customization: Use colors you already have or find them in the Tower to paint your Heroes.
DLC
Pyramid of Prophecy:
Pyramid of Prophecy is the first DLC for Heroes of Hammerwatch and you can call it an expansion. In PoP a lot of game changing features are added to the game. The expansion introduces two new game modes: the Pyramid of Prophecy and the Arena, a new class: the Gladiator, Statues for upgrading your characters in a new way, and some new items.

Here is an overview of the content added:

Classes: New Gladiator Class with new title bonus!
The Town: New Desert Town called the City of Stone.
The Pyramid: A new campaign with three new bosses, new items, and a new way to play the game.
The Arena A second new game mode that allows your character to fight to the death versus waves an enemies to unlock more power.
Potion Upgrade: Completing the Pyramid will give you a permanent upgrade to your potion.
Statues: Find blueprints to upgrade 8 new statues that give you characters unique power and customization!
Customization: More New dyes!


Witch Hunter:
Witch Hunter is the second DLC for Heroes of Hammerwatch and, unlike the first DLC, just a single class DLC. The DLC introduces a new class the Witch Hunter, for more see "Witch Hunter Class Guide".

Here is an overview of the content added:

Class Witch Hunter with new title bonus.
Items A new item set "Tools of Exorcism"
Companion Introducing the Raven
Blood Rites Sacrifice your HP for new bonuses


Moon Temple:
The third dlc for Heroes of Hammerwatch. Qoncquer the mysterious Moon Temple and claim it's rewards or prove yourself in the brand new mercenary gamemode.

Here is an overview of the content added:

The Moon Temple: A new campaign with three new bosses, and new items.
Mercenary Mode: A brand new way to play the game and earn brand new cosmetics.
Town: Fast travel between all dlc areas
Everything about the Guild Hall
Guild Hall:
What is the Guild and what does it do? Well, the Guild provides permanent bonuses to all your characters and shows your overall progression in Heros of Hammerwatch. Your guild can be accessed by pressing the default key [G].

There are two tabs of importance to us: "Guild & Heroes" and "Accomplishments". The other two tabs "Bestiary" and "Itemiary" are just a built in wiki for Monsters and Items in the game


Guild & Heroes:
The "Guild & Heroes" tab shows you your Guild Level/Experience, your Class Title Bonus for every Class, and a list of all your Characters with Level, highest Tower NG and Pyramid NG completion and even more information by clicking on the red tab with the little yellow arrow. More about Class Titles later in this section.


Accomplishments:
The Accomplishments tab shows exactly that, all of your Accomplishments, the Guild Experience each Accomplishment requires (displayed as sword by hovering over the progression) and with bosses you have defeated with each class at the bottom. By completing Accomplishments you earn Experience for your Guild. After completing enough Accomplishments, the level of your Guild will increase and you gain some one time bonuses and permanent bonuses.


Class Titles:
Every Class not only increases their own stats as you get further and further in your adventure but also provide useful bonuses to all the other classes as well and you complete more and more NG levels.

Dont belive me? Then check this out:

The table only shows bonuses up to NG+2, but there is no limit!


Further NG+ completions will increase the bonus by the following amount!

Paladin: +5 Armor
Ranger: +5 Attack Power
Sorcerer: +0.5 Mana Regeneration
Warlock: +5 Resistance
Thief: +10% Gold Gain
Priest: +0.4 Health Regeneration
Wizard: +5 Skill Power
Gladiator: +20% Primary Critical Strike Damage
Witch Hunter: +20% Skill Critical Strike Damage


Recommendation:
Play Paladin and Warlock first, they provide strong defensive bonuses to make runs with other classes a bit easier, especially if you try our builds provided later in the guide. Ranger is a good starter class as well because you are able to keep your distance from the enemies and provide other classes with extra Attack Power. I wouldn't recommend to start with the Priest. His class title looks useful at first but it's pretty much useless if you get lifesteal. However he is pretty strong in high NG.


Classes


Class Availability:
Heroes of Hammerwatch offers 7 playable classes (9 with the dlc) with different skills and themes. Melee, Range, Spellcaster or something in between.

The Paladin, Ranger, Sorcerer, and Warlock are playable by default.

The Thief, Priest, Wizard, and Gladiator have to be unlocked, the Witch Hunter must be bought.


Base Game Classes

Unlocking the Priest:
The Priest is unlocked by repairing the Chapel in the Tier 2 Town Hall upgrades.

Unlocking the Thief:
The Thief is located in the Prison (Act 2) and must be released from one of the jail cells, which is opened by pressing a button hidden somewhere in the stage.
After the Thief has been freed, you must rebuild the Tavern with Ore in the Tier 2 Town Hall upgrades.
The Thief appearing in a jail cell is random, and may not appear in a playthrough.
The Thief will not appear for any players if the host of the multiplayer game has already unlocked the Thief.


Unlocking the Wizard:
Break open a cracked wall located in the Armory (Act 3) and speak to the person inside.
Once you speak to this person, purchase the Magic Shop with Ore in the Tier 3 Town Hall upgrades.
The hidden room appearing is random, and may not appear in a playthrough.
The hidden room will not appear for any players if the host of the multiplayer game has already unlocked the Wizard


DLC Classes

Unlocking the Gladiator:
You have to complete the Arena once to unlock the Gladiator.

Unlocking the Witch Hunter:
Well, you have to spend money to unlock the Witch Hunter because he is a DLC class.
NPC Guide
Elianda, The Apothecary:
The Apothecary is unlocked by finding and interacting with a NPC found next to the first spring you find in Act 1 of the tower.


Once unlocked this NPC will show up in town next to the general store and allow you to buy the following upgrades:
  • Potion charges
  • Health per potion charge
  • Mana per potion charge
  • Health gained by picking up food
  • Mana gained by picking up mana crystals
These upgrades are per character. Purchasing every upgrade costs 78,400 gold.


Blacksmith Barro:
The Blacksmith doesn't need to be unlocked and will be in your town at the beginning of the game, he is located around the center of town near the combat dummies. This NPC will allow the following upgrades:
  • Armor
  • Primary damage
  • Primary critical chance
  • Primary critical damage
  • Movement speed
These upgrades are per character. Purchasing every upgrade available costs 498,000 gold.


Gambler:
The the left corner of the Tavern you will find a new NPC after you rescue the Thief from the Prison and unlock the first tier of the Tavern. This NPC will allow you to gamble gold, the gambling is based off the card game "battle" which flips cards from the dealer and the player one at a time. The card with the highest number wins. A draw will result in the dealer winning and the spike trap card is considered a "joker". The player doesn't have any influence besides the amount of gold he or she can bet. There is a guild hall accomplishment for winning gold.


General Store
The General Store selling random items and keys. As you upgrade the town you will see more and more powerful items, you will also have the option to reroll the items in the shop before you buy them. The keys have the same prices 100g for Bronze, 250g for Silver, and 500g for Gold.


Magic Shop:
The Magic Shop will become available in the town after you find the wizard in act 3, reach tier 3 in your Town Hall, and unlocking the Magic Shop. The shop located on the left side of the town, inside the town you can find a mage where you upgrade the follow stats:
  • Resistance
  • Skill damage
  • Skill crit chance
  • Skill crit damage

These upgrades are per character. Purchasing every upgrade available costs 323,000 gold.


Oliver, The Ore Trader:
The Ore Trader is unlocked by finding and interacting with a NPC found next to the first elevator you find in Act 1 of the tower.


Once unlocked this NPC will show up in town next to the mines and allow you to convert gold into ore or ore into gold. As you upgrade your town hall the rates will become better and better. Ore is a great way to store "gold" and avoid taxes.


Tailor:
The Tailor is found within the guild hall. Talking to him will allow you change the colors of your character and rename it.

Dyes:
Dyes are found while going through the dungeon similar to blueprints and tavern drinks where uncommon dyes are found on NG1 and above, and rares on NG2 and above.

There are a total of 55 colors to choose from, 41 of which are dyes that you can find in the tower.
Each class has its own type of material it can wear:
  • Everybody but Paladin can wear cloth
  • Ranger, Thief, and Gladiator wear Leather
  • Paladin, Warlock, and Gladiator wear metal


Baltzar's Book of Monsters
Baltzar is found within the guild hall. Talking to him will allow you to use the Bestiary. For more information see "Bestiary Guide".


Simon The Showman
Simon is found just above the Town Hall. Talking to him will allow you to buy companions and change the settings. Companions pick up gold and ore for you.

This are the companions you can buy:
  • Imp 25k
  • Scarab 50k | Requires DLC: PoP
  • Raven 100k | Requires DLC: Witch Hunter
  • Cat 25k
  • Dog 25k
  • Wyrm 100k | Requires DLC: Moon Temple

NOTE:
You have to buy a companion on every character, they are not shared between your characters!
DLC NPC Guide
Retired Gladiator:
The retired gladiator can be found in the City of Stone in the Pyramid of Prophecy expansion.
He is found near the arena area and offers the following upgrades:

Each upgrade cost 1 Sword token and gold. The Sword tokens are obtained by completing the arena. The gold can be calculated by the rank of the upgrade times 500. There is no limit to the amount of upgrades you can buy or the order you buy them in.


Sculptor:
The Sculptor can be found in the City of Stone in the Pyramid of Prophecy expansion. He is found near the center of the town. The Sculptor allows you to setup and upgrade the statues you have found in the Pyramid campaign by collecting blueprints. There are 8 statues in total and 3 can be active at any one time. There is no limit on the level that statues can be and levels will never be lost. Statues can be changed at any time your character is in town for no fees, also the statues are account wide and will affect characters in the Tower campaign and the Pyramid of Prophecy campaign.
Fountain Guide and Setup

After Unlocking the fountain in town, you will be able to throw money into it in chunks of 50, 100, 500, 1000, or 10,000 gold.
The money thrown in will stay in the fountain across all characters and cannot be removed.
The money in the fountain determines the maximum cost of the fortune you can activate. Fortune cost is capped at 200M gold.

Upon selecting and paying for your fortune, you cannot change the fortune without dying or completing a run.


Cost:
The cost of your fortune depends on how many positive and negative effects you turn on, with the final cost being 150 * ((2^FORTUNE) - 1) gold.
If you have negative or 0 fortune, the cost is 0.


Fountain Effects:
If you have a negative fortune value, you will gain extra gold and experience based on how negative it is.
The bonus is +(5 * FORTUNE)% gold and experience gain. You do not get any bonus Ore from this.
Many fortunes can only be chosen once the fountain has been upgraded to Tier 2.

The Fountain is a useful resource to cover any weaknesses you feel that you have with a character or build. For instance a lower level character may want to put all negatives to get extra experience while a higher level character will try to get as many effect in their favor as possible. Generally the most positive effects you have the easier it will be for you to complete the run. Almost everything can be manipulated in some way. Below is a list of all the fountain effects divided by positive and negative.


Personal setup:
My personal fountain setup changes depending what I am doing and what build I am playing. It usually varies mainly on if I am playing a primary build or a skill build.

Here is an example of a setup I would use for most situations:

Gentle Traps +2
Toppled Towers +2
Safe Corridors +2
Plentiful Gifts +4
Mysterious Guidance or Abundant Shops +5
Glass Walks +6
Treasure Hunt +6
Demolished Spawners +6

Lousy Consumables -1
Enemy Overseers -5
Miners’ Strike -6
Agile Adversaries -6
Dry Springs -7

This setup cost 38,250 gold for per run but can be adjusted to cost more or less depending on your budget. Eventually 40k will be nothing for you and you can decide to go higher if you really want to increase you chances of success even more.

To make it cheaper you can enable Relentless Threats (-5) or even Spicy Potions (-2)
To make it better for skill builds you can disabled Lousy Consumables -1 and enable Exceptional Consumables (+3)

Gentle Traps and Safe Corridors become a must for progression runs as you start losing more and more armor and resistance from the NG levels. Glass Walks and Treasure Hunt will give you more items that you can't get any other way providing you with more set bonuses, damage, and survivability.

Starting Items for NG0 and NG+1
Look for one of the kings items to help you through the run. For Primary builds take Sword of Kings and for Skill builds take Scepter of Kings. Most of the time you can just take damage without any issues, but if you are struggling against a certain part of the game grab the armor or resist.


Some other good items to look out for in the shop are the following:

Stun and Disarm items:


Evasion Items:


Luck Items:


Other useful Skill Build Items:


Other useful Primary Build Items:


Tavern and Drink Farming Guide
How it works:
The Tavern is unlocked by purchasing it in the Tier 2 Town Hall upgrades once the Thief has been found in the Prison.You may purchase drinks you have found in the Tower or Pyramid at the tavern to gain special buffs to aid you on your journey, these effects will not be removed unless you die or complete the run. If you have drink charges they will be used by default otherwise you will have to pay gold for drinks that you don't have in stock. Common drinks are 500g if out of stock, which uncommon is 2000g, and rare is 5000g.

Common Drinks:
You can find the following drinks in NG0 or higher:


Uncommon Drinks:
You can find the following drinks in NG+1 or higher:

]

Rare Drinks:
You can findthe following drinks in NG+2 or higher:


Recommendation:
Many of the common and uncommon drinks won't be too challenging to find and many of them are not used in the endgame builds. I would recommend farming all the rare drinks that you need using the Speed farming videos found later in the guide.


Magic Anvil Guide
How to unlock:
The Magic Anvil is a feature of the game that once unlocked will allow the character to attune themselves to many items in the game and craft 1 item at the beginning of each run for ore. To unlock the Magic Anvil you will need to find it in the Act 3 Armory and interact with it. The Anvil has a chance to spawn in NG+0 and the chance increase drastically as the NG+ level increases.


Once you have interacted with the Anvil it will now show up in town next to the blacksmith. In addition to being in town now you will also start to be able to collect blueprints as you play the game. The blueprints will appear randomly in levels as you progress in the game, collecting these blueprints add it to the Anvil for all characters (allowing you to attune or craft the item before a run). In NG+0 you will find common blueprints, NG+1 you will find uncommon blueprints, and lastly NG+2 you will find rare blueprints.


How it works:
At the Anvil you can spend skill stars to attune any item you have currently found the blueprint for. Common items will cost 3 skill stars, Uncommon 9 stars, and Rare 18 stars. This attunement is not account wide but per character, each character will have to spend their own skill stars on attunements for them. Attuning an item acts as if you have a second copy of that item in your inventory not a double effect of the attuned item. The reason to say you have "two" vs "double effect" is that certain items have a percent chance to activate, so if you have an items with 10% proc chance doubling it would give you have 20% proc chance instead having "two" makes it to where you have two separate 10% chances to activate the proc. Attunements do not affect the number of set items you have or the set bonus.

You can forge 1 item at the start of each run using the anvil and the blueprints you have unlocked. Common items cost 5 ore to craft, Uncommon cost 10, and Rare cast 25. There are some items you can not attune, but you are still able to craft them.


Bestiary Guide
Basics:
The Bestiary is a feature of the game that once unlocked will allow the character to attune itself vs any enemy in the game. Attuning will increase the damage the enemy takes while reducing the damage the enemy deals. This is very useful for troublesome enemies as you gain NG+ levels.


How to unlock:
The Bestiary can be unlocked by finding it in act 4 in the Archives. The room will be marked with a beast icon on the map, this room can be revealed by pressing a button or appear naturally. The book has a chance to be found in NG+0 and increases with each additional NG+ level.


How it works:
When you return to town the book will now be in the guild hall. When you interact with the book you will be able to spend skill points to attune enemies. Attuning is permanent for your character but can be refunded with gold. When refunding the bestiary it will cost 250 gold per star you have invested.


One thing to note is that you can attune the same enemy multiple times. Level 1 attunements increase the damage that enemy takes by 20% and reduces the damage that enemy deals by 5%, each increase in attunement level will increase the damage the enemy takes by 20% but the enemies damage reduction has a diminishing return. The amount of skill stars required to attune will double with each level.

Monsters are divided into 5 tiers, similarly to how items are divided and each tier cost a different amount of skill stars to attune you character against them:

Legendary: (Final bosses) 10 Skill Stars
Epic: (Non-final Bosses) 8 Skill Stars
Rare: (Mini-bosses) 6 Skill Stars
Uncommon: (Elite monsters) 4 Skill Stars
Common: (Normal monsters) 2 Skill Stars


Attunement Strategy:
Personally I didn't use the bestiary till I had unlocked all my skills and attuned all the useful items at the magic anvil for my character. After this time I had a good idea of what the troublesome enemies were for my character. I would recommend doing the same for your characters. If you feel you are struggling vs certain bosses, elites, normal monsters don't be afraid to attune vs that enemy, you can always change this at a later time.

Some "safe" enemies to attune or prioritize attuning are the following:
  • Fallen Paladin, Ranger, Thief, Sorcerer, Priest (Ghost)
  • Red, Blue, and Green WIsp
  • Act 5 Casters
  • Battlements' Trolls
  • Act Bosses


Tower vs Pyramid Attunements:
Another strategy you can use is to respec your skill stars for the content you are doing. I would only do this if you are planning on staying the in pyramid or the tower for a long time (many NG+ runs) The bestiary contains all the enemies for the Tower and the Pyramid but the Tower and the Pyramid has their own exclusive enemies with no overlap.

By default I have all my attunements only in the tower enemies and no attunements for enemies found in the pyramid. I want maximum benefit when I am doing the tower and don't want to waste any starts on the pyramid enemies during that time. I do recommend attuning enemies in the pyramid when you are looking to increase your pyramid NG+ level get higher statue blueprints. I respec'd my skill stars and ran a ton of pyramid in a row to get the maximum benefit for the gold I spent (went from NG+15 to NG+30). After I was done with the pyramid I respec'd the stars back to the tower enemies to progress NG+ tower runs. Since it will take me so long to get my statues from level 20 to 30 I won't have to worry about needing to respec again any time soon, this will save me gold in the long run instead of swapping attunements back and worth for each level of the pyramid or tower.

Arena Guide
Basics:
Well, the Arena is one of the features added with Pyramid of Prophecy the first DLC for Heroes of Hammerwatch. It provides an survivle style gamemode with ever increasing difficulty and permanent Upgrades for your Heroes! The Arena is a large open room filled with random generated traps and obstacles and your goel is to defeat all enemy waves.


How it works:
To enter the Arena you have to speak to the guy standing infront of his donkey with cart in the City of Stone (new Town).

Like I mentioned before, the Arena is a large open room filled with random generated traps and obstacles and your goel is to defeat all enemy waves. These enemies may appear in the middle of the Arena, at the entrance in the north or at the entrance in the south. If you survive all seven rounds, you'll get gold, ore, experience and most importantly five sword tokans if it is your first time clearing that rank of Arena on that character.

You can spent your Sword Tokens at the Retired Gladiator located near the NPC to enter the Arenan in the Town of Stone.


Altar:
From time to time during the skirmish there will be events that occur in the middle. Most often, the game will say “The Altar offers you a powerful boon!” When this happens you can go to the middle and activate the center circle to receive a temporary buff, similarly to if you found a monolith. You only have about 10 seconds to grab the boon before it goes away however. There are sometimes other events, starting in Arena rank 5(?), that will make the fight harder in some way, (examples are falling boulders or sandstorms) but will increase the crowd’s enjoyment. To disable these events, activate the circle in the center. In Multiplayer all players must be on the altar to deactivate the event


Items/Drinks and Buffs:
During the fight in the Arena the mood of the spectators has to be considered. A good mood ensures that the spectators throw you bags of Items, Potions and Consumables. The constant killing of enemies is enough to keep the mood up. One thing to keep in mind is that you will lose all Items and Buffs you receive while fighting in the Arena by advancing to the next Rank or leaving the Arena. This is also true for curses, which stay in effect for a whole round but are removed with the next rank.

This does not effect the Items and Drinks you buy in the Town. You will keep them if you advance to the next Rank but you will lose them if you leave the Arena.

Note: If you collect a Drink in the Arena you get the effect immediately.


Retired Gladiator and Recommendations:
Now that you have earned some Sword Tokens you can go to the Retired Gladiator and Upgrade your Hero with permanent Upgrades (see picture).

If you want to calculate the Gold needed for any level simply use this formula:
Gold Cost = 500 x (level of Upgrade)
It costs one Sword Token every time.

I only recommend buying armor or resistance depending on whether you use Calis or Cedric. Especially if you have the statue on level 20,
because every point of armour/resistance is also
a point of Attack Power/Spell Power.


Modifications:
Update 96 has added a few switches that you can use to spice up your arena experience and make it less boring and tedious. You are able to complete one rank within 3 minutes, way faster then before the Update.

Current Switches:
Faster spawns - Enemies spawn with a higher frequency
Shorter skirmish - Skirmishes are two waves shorter | only 5 waves
Faster enemies - Enemies have increased movement speed

Recommendation:
You should take all three Switches all the time. There is no reason not to take all of them. If you have some trouble then you could only use Shorter skirmish and Faster spawns or enemies depending on whitch one you have no problem with.


Crit Chance, Crit Damage, Luck and Combo
We will be using these modifiers greatly across all the builds so I figured I should make a section to talk about these modifiers.


Critical Strikes:
Each Attack and Skill has a % chance to do a Critical Strike. The chance and amount depends on the Items obtained, what Drinks were taken from the Tavern, and what Upgrades the player has gotten in town. Each Critical Strike Chance instance is rolled separately. For example a Heartseeker (12.5% chance to Critical Strike with Primary Attacks) and an Assassin's Dagger (7.5% chance to Critical Strike with Primary Attacks) do not equal a 20% Critical Strike Chance in this game. Instead, there is one 12.5% chance for a Critical Strike and another 7.5% chance to Critical Strike. Effectively giving you 19% chance to get a single Critical Strike. It is possible to hit multiple Critical Strikes this way resulting in a "double Critical Strike" with one damage source.


Critical Damage:
Critical Bonus is the extra damage that a Critical Strike gives you vs a normal hit. The damage can be calculated multiplying the base damage with the Critical Strike Damage.


Luck:
Luck is a stat that increases rolls of Evasion and Critical hits. Luck also increases the activation chances of Items, Drinks, Skills, and Statues. The equation to calculate the new chance is as follows: Chance/0.95^Luck


Combo:
Combo can be unlocked by picking up the Combo Sphere in your first Red Room which can be found after defeating the first boss. Combo is unlocked for all characters permanently once the orb is picked up.

A player gets in combo by killing 10 enemies in quick succession. The combo will be maintained for as long as you keep rapidly killing enemies or as long as items activating combo keep activating. During this time you will be surrounded by a magenta sphere denoting your combo state along with a sound being played.

Being in combo will give the player increased movement speed and allow them to do attacks that would otherwise pin them in place such as the Wizard's Meteor Shower or using a primary attack while moving.

Primary Builds vs Skill Builds
Primary builds focus on scaling up their Primary Attack (left-click by default) and their Divine Blessing from the Chapel. The Divine Blessings act as a second Primary Attack. Primary Attacks cost no Mana and can be used as much as you like. Scaling the damage on a Primary Attack Build can be done in a number of ways: Critical Strike Chance, Critical Strike Damage, Attack Speed, damage added to Primary Attack, Attack Power and increased damage.

Skill builds focus on casting Skills using their Mana or dealing damage with their Passives. Passives, Items, and Statue damage effects, and non-Divine Blessings bonuses are also considered Skills. Scaling damage on Skill Builds can be done in a number of ways: Skill Critical Strike Chance, Skill Critical Strike Damage, Skill Speed, damage added to Skills, Skill Power and increased damage.

Primary builds and Skill Builds do not change depending on the class or the damage type. All classes have a Primary Attack and Skills, Attack power will still scale your Primary Attack regardless of if it's Magical Damage or Physical Damage while Skill power will scale all your Skills regardless of the damage type including Hybrid Damage.

Armor penetration and Resistance penetration are specific to the damage type of your Skill or Primary Attack. Hybrid damage does half Physical Damage and half Magical Damage so Primary Attacks and Skills will only receive 50% effective benefit out of any penetration items/buffs.

In this guide we build each class as a Primary Attack build or a Skill build. There is some room for builds that focus on Primary Attacks and Skills equally but so far they haven't been stronger than focusing directly on one or the other.


Builds

Now there are two options.

Option Nr.1:
You just want to copy a build for your class and play the game. No problem, just click here[docs.google.com] and you get to a spreadsheet with some builds you can copy.


Option Nr.2:
You want to copy a build and want to learn why this setup and how it works? No problem either, just follow the guide and you can learn more about a setup we recommand for each class.

Combo Builds and Moonshine builds
In this guide we mainly talk about combo build variants. In the latest patch a new drink was added that allows you to also play without combo. The new drinks is markham's moonshine:


As you can see this drink scales you damage based on the number of items you have vs giving you damage while in combo like Wicked Sickness:


For a build to get the same amount of damage as one using Wicked Sickness you will need to have at least 40 items in your inventory, this can usually be done around the end of act 3. From there you will start gaining more damage than a Wicked Sickness build. I have had some runs where I end with 80 items while 5 of them being spheres which count as two items. This gives us 420% damage vs the 200% with Wicked Sickness. The main difference between these two builds will be early game when you have less than 40 items and the ability to drop Frenetic Eruption as a drink.


Frenetic Eruption is only needed if you are playing a build that needs a way to get into combo. With markham's moonshine getting into combo is impossible. Therefore we can also swap Frenetic Eruption for any other drink.

For Primary builds using Markham's Moonshine I usually run the Groovy Ghost in this new slot:


The evasion from groovy ghost is amazing and welcome on all primary build, this could be swapped to your liking.

For Skill builds using Markham's Moonshine I usually run the Hairy Magus in this new slot:


This new drink is also really powerful, increasing our skill cost which helps our damage with the Wylmir Statue:

while also keeping our mana high with all the crits we deal.


The Following builds are all setup for combo variants but can be adjusted to use markham's moonshine. I wouldn't recommend using a moonshine build until you have leveled a solid replacement statue for bolgarth since it will do nothing for the moonshine builds but it very power to use on all your characters early game:


The easiest swap would be to substitute bolgarth with Ozreth for all classes:

Paladin Class Build Guide

This will be a Primary Attack Build for the Paladin. The focus lies on Attack Power,
Luck, Critical Strike Chance and Critical Strike Damage.


Sword (Primary Attack)
Melee attack that deals Physical Damage in an arc covering X degrees.

Charge
Dash forward. Enemies in your path take Physical Damage. Upgrades increases the dash speed and range.

Lay on Hands
An active ability that heals the Paladin and nearby allies along with providing a 25% chance to block some Magical Damage for a few seconds.

Whirlwind
A spinning attack that deals Physical Damage to nearby enemies and lasts for a few seconds.
While spinning your shield still faces toward the direction you're aiming, and you are still able to use your primary to attack.

Shield
The Paladin's most signature feature is the shield, which blocks most incoming projectiles in an arc in front of the player, and has a 25% chance to block some Physical Damage.
The shield is still able to be used while using Whirlwind, and will point toward the direction aimed.

Stunning Blows
The Paladin has a chance to stun the enemy for 2.5 seconds.

Flames of Devotion
Adds 1 Magical Damage per stack to all of your Skills and your Primary Attack with each Primary Attack. Each stack lasts 1 second.

Skill Order:
  • Lvl up every skill once
  • Lvl up Flames of Devotion to lvl 2
  • Lvl up both Sword and Shield to max, do as you please
  • Lvl up Whirlwind to max
  • Lvl up both Charge and Lay on Hands to max, do as you please
  • Lvl up Stunning Blow to max


STARTING ITEMS:
Lucky Hat and Heartseeker are my go to for this build, the extra Critical Strike Chance will help smooth out our damage and allow us to get into Combo easier. The Luck from Lucky Hat will increase our changes of getting a Critical Strike even more in addition to increases the proc chance on Frenetic Eruption.

I would also recommend using Magebane for high NG+ levels instead of Heartseeker when you are using Stab in The Dark for Critical Strike Chance.

When rolling the shop you can look for some of the items below to make your start even stronger:


DRINKS:
Frenetic Eruption allows us to put all our Critical Strike Chance to work along with our Luck to trigger Combo easily.

Once we are in Combo we will be staying in Combo all the time. This drink is a free 200% damage for us.

This drink does more damage than our actually Primary Attack and since it's all Magic Damage it will force us to focus more on Magic Damage than Physical Damage.

Overflowing Physique gives us a huge bonus to our HP pool without changing our gameplay. We aren't planning on using Skills unless it's the start of a boss fight or we are standing still. We will usually still have enough Mana to use Charge and Lay on Hands as needed.

Choose Crazy Eye for more Critical Strike Chance when using Heartseeker + Lucky Hat.

If you go with Magebane use Stab in The Dark


STATUES:
This statue is amazing, at rank 20 it will give us 100% Armor as Attack Power, making Armor an equal damage bonus to Attack Power but with the benefit of Armor! As this rank increases past 20 you will gain more damage from Armor than Attack Power. Keep this in mind when buying at the shop or spending Arena Points.

Kyra helps keep our Attack Speed high so we can hit targets faster and lifesteal faster.

Bolgarth gives us some extra time in Combo in case we ever hit a huge unlucky streak with our Critical Strikes. It also gives us extra AoE damage every 5th attack. At rank 10 it gives us an extra 5 seconds in Combo!

After NG+10 or when you get a nice level Ozreth Statue / Phalarath Statue, I would recommend swapping from Bolgarth and Kyra to Ozreth and Phalarth to get more of a damage increase.


Bolgarth and Kyra are great in the early game but their damage doesn't scale very well into the late game. Also note that this will increase the usefulness of the poison items and disarm / stun item when using these statues, look out for them.


BLESSINGS:
We will be in melee range all the time and would like to take as little damage as possible. It's way easier to get damage than defense in this game.

We currently are using Blessing of Mind for more mana regen so we can charge faster and more often. If you feel you have enough mana regen you can take Blessing of Intellect to do more damage. Most of our damage is Magic Damage so this will be the best blessing to take for damage.

This is the sole place we get lifesteal with this build, this allows us to not have to run Bloodthirst Ring or Crimson Death.

I use Divine Blast to get extra AoE when clearing with melee Primary Attacks.

NG+0/1
NG+2
Ranger Class Build Guide

This will be a Primary Attack Build for the Ranger. The focus lies on Attack Power, Luck, Critical Strike Chance and Critical Strike Damage


Bow and Arrow
Fire an arrow that deals Physical Damage and pierces enemies.

Flurry of Arrows
The Ranger spins around multiple times and fires arrows in quick succession. Does Physical Damage based off your Bow and Arrow.

Grasping Roots
Immobilize all enemies around the Ranger for a few seconds. Enemies caught have their Armor reduced by a percentage based on tier.

Powershot
Charge up a powerful Magic Damage arrow that has infinite pierce.
The shot takes 1 second to fully charge, letting go early will result in a lower damage shot that doesn't go as far.
The player is slowed by 90% while charging the shot, unless they are in Combo.
The arrow has 50% resistance pierce.

On the Prowl
Increases player movement speed by 25% and Evasion by some % for a few seconds when casting a skill.

Marked Prey
A bonus % Critical Strike Chance and the same % chance to mark an enemy on Critical Strike with the Bow and Arrow. Marks last for 2.5 seconds.
When marked, all damage the enemy receives has a 5% chance to be a Critical Strike.

Twinned Arrows
The Ranger's Primary Attack has a % chance of splitting and seeking a new target on enemy hit. Split arrows deal 66% damage and can sometimes hit the enemy they split from.
The split arrow will shoot off to a side at about a 30 degree angle from the main shot but will aim for a target up to 90 degrees away from the main shot.

Skill Order:
  • Lvl up every skill once
  • Lvl up Twinned Arrows to lvl 2
  • Lvl up Bow Shot to max
  • Lvl up both On the Prowl and Marked Prey to max, do as you please
  • Lvl up both Flurry of Arrows and Powershot to max, do as you please
  • Lvl up Grasping Roots to max


STARTING ITEMS:
Lucky Hat and Heartseeker are my go to for this build, the extra Critical Strike Chance will help smooth out or damage and allow us to get into Combo easier. The Luck from Lucky Hat will increase our changes of getting a Critical Strike even more in addition to increases the proc chance on Frenetic Eruption.

I would also recommend using Magebane for high NG+ levels instead of Heartseeker when you are using Stab in The Dark for Critical Strike Chance.

When rolling the shop you can look for some of the items below to make your start even stronger:


DRINKS:
Frenetic Eruption allows us to put all our Critical Strike Chance to work along with our Luck to get into Combo easily.

Once we are in Combo we will be staying in Combo all the time, this drink is a free 200% damage for us.

This drink does more damage than our actually Primary Attack and since it's all Magic Damage it will force us to focus more on magic damage than physical damage.

Overflowing gives us a huge bonus to our HP pool without changing our gameplay. We aren't planning on using Skills unless it's the start of a boss fight or we are standing still. We will usually still have enough Mana to use Flurry of Arrows and Grasping Roots as needed.

Choose Crazy Eye for more Critical Strike Chance when using Heartseeker + Lucky Hat.

If you go with Magebane use Stab in The Dark


STATUES:
This statue is amazing, at rank 20 it will give us 100% Armor as Attack Power, making Armor an equal damage bonus to Attack Power but with the benefit of Armor! As this rank increases past 20 you will gain more damage from Armor than Attack power. Keep this in mind when buying at the shop or spending arena points.

Kyra helps keep our Attack Speed high so we can hit targets faster and lifesteal faster.

Bolgarth gives us some extra time in Combo in case we ever hit a huge unlucky streak with our Critical Strikes. It also gives us extra AoE damage every 5th attack. At rank 10 it gives us an extra 5 seconds in Combo!

After NG+10 or when you get a nice level Ozreth Statue / Phalarath Statue, I would recommend swapping from Bolgarth and Kyra to Ozreth and Phalarth to get more of a damage increase.


Bolgarth and Kyra are great in the early game but their damage doesn't scale very well into the late game. Also note that this will increase the usefulness of the poison items and disarm / stun item when using these statues, look out for them.


BLESSINGS:
It's way easier to get damage than defense in this game if you feel like you don't need more defense pickup Path of Warrior.

We currently are using Blessing of Intellect for more damage. Most of our damage is Magic Damage so this will be the best blessing to take for damage. If you feel you don't have enough Mana Regeneration you can take Blessing of Mind.

This is the sole place we get lifesteal with this build, this allows us to not have to run Bloodthirst Ring or Crimson Death.

I use Divine Hammer for the ranger to deal more single target damage where I am aiming, I find it more consistent than using Divine Strike. Divine Strike is also still really good and might outperform Divine Hammer in some situations but I prefer Divine Hammer at this time.

NG+0/1
NG+2
Sorcerer Class Build Guide

This will be a Skill Build for the Sorcerer. The focus lies on Skill Power, Luck, Combo, Skill Critical Strike Chance and Skill Critical Strike Damage.


Frost Shard (Primary Attack)
Fires a frost shard that deals Hybrid Damage. The shard can ricochet a certain number of times off walls or enemies before breaking.
The shard’s damage will increase by 10% for every ricochet it does.

Comet
Drops a comet that deals Hybrid Damage split among all enemies it hits. Enemies are frozen in place for two seconds.
The comet drops a fixed distance from the sorcerer in the targeted direction. This can be cast over walls allowing you take take out enemies from a position of safety.

Frost Nova
Unleash a large number of frost balls in all directions around the Sorcerer dealing Hybrid Damage.
If a frost ball bounces off a wall, it will ricochet towards the nearest enemy's position.

Orb of Winter
Spawns a slow moving ice orb that moves forward for several seconds, unleashing ice shards in all directions that deal Hybrid Damage.
The orb will bounce off of walls, spawners, and any enemy that has a life bar. The shards unleashed by the orb will also bounce off of walls.

Biting Chill
Slows and freezes enemies hit by the Sorcerer's skills by a percentage for a few seconds.

Ice Barrier
Every time the Sorcerer casts a skill, he is given an ice shield stack which can block a percentage of damage
The stacks are visible in the bottom right next to your Skills, in the same column as Monolith Buffs.

Shatter
Enemies that are frozen solid will explode when killed, dealing Hybrid Damage to nearby enemies.
This effect can also be triggered by other players who kill the frozen targets.

Skill Order:
  • Lvl up every skill once
  • Lvl up Shatter to lvl 2
  • Lvl up Frost Nova to max
  • Lvl up Orb of Winter to max
  • Lvl up Frost Shard to max
  • Lvl up both Ice Barrier and Biting Chill to max, do as you please
  • Lvl up Comet to max


STARTING ITEMS:
Lucky Hat and Staff of Volatile Casting are my go to for this build, the extra Critical Strike Chance will help smooth out or damage and allow us to get into Combo easier. The Luck from Lucky Hat will increase our changes of getting a Critical Strike even more in addition to increases the proc chance on Frenetic Eruption.

When rolling the shop you can look for some of the items below to make your start even stronger:


DRINKS:
Frenetic Eruption allows us to put all our Critical Strike Chance to work along with our Luck to get into Combo easily.

Once we are in Combo we will be staying in Combo all the time, this drink is a free 200% damage for us.

Evil Infusion will allow us to lifesteal with all of our Skills and Items, just be careful not to spam Skills when you aren't actually hitting anything or you will lose HP for no reason.

This Drink will give us even more must needed Skill Critical Strike Chance, the more the better.

Lastly we use Elemental Bruiser which will give us huge damage bonuses while having Wylmir selected.


STATUES:
This Statue is amazing, at rank 20 it will give us 100% Resistance as Skill Power, making Resistance equal damage bonus to Skill Power but with the benefit of Resistance! As this rank increases past 20 you will gain more damage from Resistance than Skill Power. Keep this in mind when buying at the shop or spending Arena Points. Also make sure you are picking up Mana Crystals for more Resistance, Mana Regeneration, and damage!

Another amazing Statue for skill builds. It will give us damage for the cost of our skills. We increase our Skill's mana cost with Elemental Bruiser and that will increase the damage while using this statue!

Bolgarth gives us some extra time in Combo in case we ever hit a huge unlucky streak with our Critical Strikes. It also gives us extra AoE damage every 5th attack. At rank 10 it gives us an extra 5 seconds in Combo!

After NG+10 or when you get a nice level Ozreth Statue, I would recommend swapping from Bolgarth to Ozreth to get more of a damage increase.


BLESSINGS:
We play at ranged so we don't need the defense, most of our damage will be with Skills so this will be an easy choice.

The Sorcerer needs a ton of mana, lets get more with Blessing of Mind.

This is a Skill build that is using Critical Strike Chance to scale our damage, Skill Critical Strike Damage is hard to get so this is really worth it.

None of the Divine Blessings fit the sorcerer but I have enjoyed Divine Hammer the most so far. Divine Strike would be my second choice at this point.

NG+0/1
NG+2
Warlock Class Build Guide

This will be a Skill Build for the Warlock. The focus lies on Skill Power, Luck, Combo, Skill Critical Strike Chance and Skill Critical Strike Damage.


Soul Dagger (Primary Attack)
Apply the Soul Consumption DoT on all enemies hit, dealing Magical Damage. The DoT hits a number of times based on the tier.
5% of this damage is returned to the player as Health, and 10% of the damage as Mana.

Lightning Bolt
Fires a bolt of lightning that strikes multiple targets near impact location dealing Magical Damage to each target.
If the same target is hit multiple times, each hit deals 50% less damage.

Summon Gargoyle
Summons a gargoyle that stuns and fires bolts of lighting at nearby enemies dealing Magical Damage.
Gargoyles will link to other nearby gargoyles and Eye of the Storm, generating more lightning arcs.

Eye of the Storm
Generates an electrical storm over the Warlock that fires bolts of lighting at nearby enemies dealing Magical Damage.
The storm lasts for several seconds and will create extra lightning arcs when near the Warlock's gargoyles.

Extended Domain
Increases the effective range of all Warlock's Skills by a given percent.

Soul Cleaver
Soul Consumption spreads to nearby enemies, dealing reduced damage.

Stormlash
All lightning bolts from the Warlock's spells have a chance to chain to a nearby enemy dealing a portion of the previous hit's damage.
The enemy must be within the original attack's range to be chained to.

Skill Order:
  • Lvl up every skill once
  • Lvl up Stormlash to lvl 2
  • Lvl up Extended Domain to max
  • Lvl up both Soul Dagger and Soul Cleaver to max, do as you please
  • Lvl up Gargoyle to max
  • Lvl up Eye of the Storm to max
  • Lvl up both Lightning Bolt to max


STARTING ITEMS:
Lucky Hat and Staff of Volatile Casting are my go to for this build, the extra Critical Strike Chance will help smooth out or damage and allow us to get into Combo easier. The Luck from Lucky Hat will increase our changes of getting a Critical Strike even more in addition to increases the proc chance on Frenetic Eruption.

When rolling the shop you can look for some of the items below to make your start even stronger:


DRINKS:
Frenetic Eruption allows us to put all our Critical Strike Chance to work along with our Luck to get into Combo easily.

Once we are in Combo we will be staying in Combo all the time, this Drink is a free 200% damage for us.

Evil Infusion will allow us to lifesteal with our all Skills and items, just be careful not to spam Skills when you aren't actually hitting anything or you will lose HP for no reason.

This Drink will give us even more must needed Skill Critical Strike Chance, the more the better.

Lastly we use Elemental Bruiser which will give us huge damage bonuses while having Wylmir selected.


STATUES:
This Statue is amazing, at rank 20 it will give us 100% Resistance as Skill Power, making Resistance equal damage bonus to Skill Power but with the benefit of Resistance! As this rank increases past 20 you will gain more damage from Resistance than Skill Power. Keep this in mind when buying at the shop or spending Arena Points. Also make sure you are picking up Mana Crystals for more Resistance, Rana Regeneration, and damage!

Another amazing Statue for Skill Builds. It will give us damage for the cost of our Skills. We increase our Skill's Mana Cost with Elemental Bruiser and that will increase the damage while using this Statue!

Bolgarth gives us some extra time in Combo in case we ever hit a huge unlucky streak with Critical Strikes. It also gives us extra AoE damage every 5th attack. At rank 10 it gives us an extra 5 seconds in Combo!

After NG+10 or when you get a nice level Ozreth Statue, I would recommend swapping from Bolgarth to Ozreth to get more of a damage increase.


BLESSINGS:
We play at ranged so we don't need the defense, most of our damage will be with Skills so this will be an easy choice.

The warlock doesn't have issues with Mana thanks to Soul Consumption so we just grab more damage, also the Warlock doesn't have any Skills that do Physical Damage.

This is a Skill Build that is using Critical Strike Chance to scale our damage, Skill Critical Strike Damage is hard to get so this is really worth it.

Divine Strike does Magic Damage which scales very well with our other Blessings. It also has a low cooldown and our Primary Attack attacks really quickly.

NG+0/1
NG+2
Thief Class Build Guide

This will be a Primary Attack Build for the Thief. The focus lies on Attack Power, Luck, Combo, Critical Strike Chance and Critical Strike Damage.


Twin Daggers (Primary Attack)
Two quick melee attacks with each dealing Physical Damage.
Movement speed penalty while attacking is decreased as the daggers are upgraded.

Throwing Knives
Throws multiple knives in an arc. Each knife deals Physical Damage and pierces multiple enemies.
Each time a knife pierces an enemy it deals 10% less damage to the next enemy hit.

Grappling Hook
The Thief fires a grappling hook in the direction aimed which continues until hitting something or reaching its max length, upgradeable with tier.
If it hits something you are pulled towards it, but will not be pulled over gaps. The grapple can also be interrupted by hitting a wall.
Hit enemies are stunned for a few seconds and the player is able to grapple onto chests.
The player has 100% evasion while being moved by the grapple.

Smoke Bomb
The Thief throws a smoke bomb that stuns all enemies in a large area for a few seconds.
The smoke lingers for a few second, giving all players increased Evasion while within it.

Sidestep
Grants a chance of Evasion against all incoming damage and a single guaranteed dodge that is recharged after a few seconds.

Slice and Dice
Gain stacks for every hit with Twin Daggers. Each stack provides a 2% Attack Speed Bonus.
Stacks last for 2.5 seconds unless a new hit connects. After 2.5 seconds all stacks are lost.

Vicious Cuts
Each hit with Twin Daggers has a chance of lowering the target's Health by 5% of it's current health.
This works on bosses too.

Skill Order:
  • Lvl up every skill once
  • Lvl up Vicious Cuts to lvl 2
  • Lvl up both Twin Daggers and Slice and Dice to max, do as you please
  • Lvl up Side Step to max
  • Lvl up Throwing Knives, Grappling Hook and Smoke bomb to max, do as you please


STARTING ITEMS:
Lucky Hat and Heartseeker are my go to for this build, the extra Critical Strike Chance will help smooth out or damage and allow us to get into Combo easier. The Luck from Lucky Hat will increase our changes of getting a Critical Strike even more in addition to increases the proc chance on Frenetic Eruption.

When rolling the shop you can look for some of the items below to make your start even stronger:


DRINKS:
Frenetic Eruption allows us to put all our Critical Strike Chance to work along with our Luck to get into Combo easily.

Once we are in Combo we will be staying in Combo all the time, this drink is a free 200% damage for us.

This drink does more damage than our actually Primary Attack and since it's all Magic Damage it will force us to focus more on Magic Damage than Physical Damage.

Overflowing gives us a huge bonus to our HP pool without changing our gameplay. We aren't planning on using Skills unless it's the start of a boss fight or we are standing still. We will usually still have enough mana to use Hookshot and Smokebomb as needed.

This drink helps our Evasion even more which is the bulk of our defense.


STATUES:
This statue is amazing, at rank 20 it will give us 100% Armor as Attack Power, making Armor an equal damage bonus to Attack Power but with the benefit of Armor! As this rank increases past 20 you will gain more damage from Armor than Attack Power. Keep this in mind when buying at the shop or spending Arena Points.

Kyra helps keep our Attack Speed high so we can hit targets faster and lifesteal faster.

Bolgarth gives us some extra time in Combo in case we ever hit a huge unlucky streak with Critical Strikes. It also gives us extra AoE damage every 5th attack. At rank 10 it gives us an extra 5 seconds in Combo!

After NG+10 or when you get a nice level Ozreth Statue / Phalarath Statue, I would recommend swapping from Bolgarth and Kyra to Ozreth and Phalarth to get more of a damage increase.


Bolgarth and Kyra are great in the early game but their damage doesn't scale very well into the late game. Also note that this will increase the usefulness of the poison items and disarm / stun item when using these statues, look out for them.


BLESSINGS:
We will be in melee range all the time and would like to take as little damage as possible. It's way easier to get damage than defense in this game.

Most of our damage is Magical Damage, we use this Blessing to do more damage you can also use Blessing of Mind if you are having issues with Mana Regeneration.

This is the sole place we get lifesteal with this build, this allows us to not have to run Bloodthirst Ring or Crimson Death.

I use Divine Strike to get extra passive procs by more hit occurring to the enemies, Divine Blast could also be a good option if you would rather AoE damage vs single target damage.

NG+0/1
NG+2
Priest Class Build Guide

This will be a Primary Attack Build for the Priest. The focus lies on Attack Power, Luck, Combo, Critical Strike Chance and Critical Strike Damage.


Smite
A mid-ranged attack dealing Hybrid Damage. Every upgrade increases the area of impact.

Holy Light
Fires a beam of holy light that builds up and deals Magical Damage along with healing allies inside it by a base plus 1% of their max health.
The beam has a charge up time before dealing or healing the maximum amount and damages enemies in a small AOE.
The beam can travel through players healing all of them at once.

Consecrated Ground
A magic circle is placed on the ground that lasts for a few seconds. Enemies within its area take Magical Damage that hits every half second.
25% of the damage dealt is returned to allies standing within the area as health. This heal is affected by the Priest's Remedy.

Aura of Purification
An active ability that creates an aura around the player affecting both players and enemies.
Enemies have their speed and Resistance lowered, while allies gain a damage reduction effect.

Divine Protection
This passive shield absorbs a portion of incoming damage at the cost of some Mana per damage absorbed.
Endless Potential makes this shield free and the drain can be reduced by effects making skills cheaper to cast.
The Ring of Transmutation will help sustain this shield, but will only return mana from the damage that the player actually takes.

Remedy
The priest regains health more effectively from all sources. Listed HP regen is also affected invisibly.

Celestial Orbs
Multiple orbs rotate around the Priest that fire small beams of holy light, dealing Magical Damage. These beams can be aimed by hitting the target with Holy Light.
The orb's range when using Holy Light is based on the level of your Holy Light skill.

Skill Order:
  • Lvl up every skill once except Divine Protection
  • Lvl up Celestial Orbs to lvl 2
  • Lvl up Smite to max
  • Lvl up Consecrated Ground, Aura of Purification and Remedy to max, do as you please
  • Lvl up Holy Light to max
  • Note: Divine protection should only be picked if you are able to max it. The mana costs are way to high for the lower lvls. If you are able to max it, do it and then follow the list.


STARTING ITEMS:
Lucky Hat and Heartseeker are my go to for this build, the extra Critical Strike Chance will help smooth out or damage and allow us to get into Combo easier. The Luck from Lucky Hat will increase our changes of getting a Critical Strike even more in addition to increases the proc chance on Frenetic Eruption.

I would also recommend using Magebane for high NG+ levels instead of Heartseeker when you are using Stab in The Dark for Critical Strike Chance.

When rolling the shop you can look for some of the items below to make your start even stronger:


DRINKS:
Frenetic Eruption allows us to put all our Critical Strike Chance to work along with our Luck to get into Combo easily.

Once we are in Combo we will be staying in Combo all the time, this drink is a free 200% damage for us.

This drink does more damage than our actually Primary Attack and since it's all Magical Damage it will force us to focus more on Magical Damage than Physical Damage.

More damage but we take more damage, this drink can be swapped around depending on how you feel. Last Stand is also a good option here.

Choose Crazy Eye for more Critical Strike Chance when using Heartseeker + Lucky Hat

If going Magebane use Stab in The Dark


STATUES:
This Statue is amazing, at rank 20 it will give us 100% Armor as Attack Power, making Armor an equal damage bonus to Attack Power but with the benefit of Armor! As this rank increases past 20 you will gain more damage from Armor than Attack Power. Keep this in mind when buying at the shop or spending Arena Points.

Kyra helps keep our Attack Speed high so we can hit targets faster and lifesteal faster.

Bolgarth gives us some extra time in Combo in case we ever hit a huge unlucky streak with Critical Strikes. It also gives us extra AoE damage every 5th attack. At rank 10 it gives us an extra 5 seconds in Combo!

After NG+10 or when you get a nice level Ozreth Statue / Phalarath Statue, I would recommend swapping from Bolgarth and Kyra to Ozreth and Phalarth to get more of a damage increase.


Bolgarth and Kyra are great in the early game but their damage doesn't scale very well into the late game. Also note that this will increase the usefulness of the poison items and disarm / stun item when using these statues, look out for them.


BLESSINGS:
We will be in melee range all the time and would like to take as little damage as possible. It's way easier to get damage than defense in this game.

We currently are using Blessing of Mind for more Mana Regeneration so we can keep our Mana Barrier blocking as much damage as possible. If you feel you have enough Mana Regeneration you can take Blessing of Intellect to do more damage. Most of our damage is Magical Damage so this will be the best Blessing to take for damage.

This is the sole place we get lifesteal with this build, this allows us to not have to run Bloodthirst Ring or Crimson Death.

I use Divine Blast to get extra AoE when clearing with Primary Attacks.

NG+0/1
NG+2
Wizard Class Build Guide

This will be a Skill Build for the Wizard. The focus lies on Skill Power, Luck, Combo, Skill Critical Strike Chance and Skill Critical Strike Damage.


Fireball (Primary Attack)
Launch a fireball that explodes and deals Magical Damage to nearby enemies. Every upgrade increases range and area of impact.
Damage value is based on distance from the center of the impact location:
A direct hit yields +2 base damage against that enemy, decreasing the further away the enemy is from the impact site.

Fire Breath
The Wizard fires a tight cone of fire dealing Magical Damage in the direction aimed.
The fire pierces all enemies that don't have a visible HP bar and leaves some fire on the ground at the end of the cone.
While casting this spell the Wizard is rooted in place unless the player is in a Combo.

Blast Wave
Unleash a blast wave around the Wizard that deals Magical Damage. Hit enemies are confused and slowed for a few seconds.
Additionally, all blockable shots (Skeleton arrows, maggot shots, and wisp shots) will be destroyed in the area of effect.

Meteor Shower
Calls down several meteors to strike the ground around the Wizard dealing significant Hybrid Damage.
While casting this spell the Wizard is rooted in place unless the player is in a Combo.

Combustion
All Skills inflict a burning DOT, dealing Magical Damage each half second for a couple seconds.

Flame Shield
Reduces incoming damage by some % and casts Blast Wave when hit. Can only be activated again once the cooldown finishes.
The cooldown can be viewed next to your skills at the bottom right, in the same column as Monolith buffs.
Blast Wave will not be cast if it has not been leveled up.

Scorched Earth
All Skills leave a burning AOE that deals Magical Damage to enemies standing on it.
The second upgrade doubles the duration of the AOE.
Multiple layers of Scorched Earth can be placed on top of each other and will all deal damage.

Skill Order:
  • Lvl up every skill once
  • Lvl up Scorched Earth to lvl 2
  • Lvl up Fireball to max
  • Lvl up both Meteor Shower and Combustion to max, do as you please
  • Lvl up both Blast Wave and Flame Shield to max, do as you please
  • Lvl up Firebreath to max


STARTING ITEMS:
Lucky Hat and Staff of Volatile Casting are my go to for this build, the extra Critical Strike Chance will help smooth out or damage and allow us to get into Combo easier. The Luck from Lucky Hat will increase our changes of getting a Critical Strikes even more in addition to increases the proc chance on Frenetic Eruption.

When rolling the shop you can look for some of the items below to make your start even stronger:


DRINKS:
Frenetic Eruption allows us to put all our Critical Strike Chance to work along with our Luck to get into combo easily.

Once we are in Combo we will be staying in combo all the time, this drink is a free 200% damage for us.

Evil Infusion will allow us to lifesteal with our all Skills and Items, just be careful not to spam Skills when you aren't actually hitting anything or you will lose hp for no reason.

This Drink will give us even more must needed Skill Critical Strike Chance, the more the better.

Lastly we use Elemental Bruiser which will give us huge damage bonuses while having Wylmir selected.


STATUES:
This Statue is amazing, at rank 20 it will give us 100% Resistance as Skill Power, making Resistance equal damage bonus to Skill Power but with the benefit of Resistance! As this rank increases past 20 you will gain more damage from Resistance than Skill Power. Keep this in mind when buying at the shop or spending Arena Points. Also make sure you are picking up Mana Crystals for more Resistance, Mana Regeneration, and damage!

Another amazing Statue for Skill Builds. It will give us damage for the cost of our Skills. We increase our Skill's Mana Cost with Elemental Bruiser and that will increase the damage when using this Statue!

Bolgarth gives us some extra time in Combo in case we ever hit a huge unlucky streak with Critical Strikes. It also gives us extra AoE damage every 5th attack. At rank 10 it gives us an extra 5 seconds in Combo!

After NG+10 or when you get a nice level Ozreth Statue, I would recommend swapping from Bolgarth to Ozreth to get more of a damage increase.


BLESSINGS:
We play at ranged so we don't need the defense, most of our damage will be with Skills so this will be an easy choice.

The Wizard doesn't have Mana issues due to not being able to spam Skills very much, so we just grab more damage.

This is a Skill Build that is using Critical Strike Chance to scale our damage, Skill Critical Strike Damage is hard to get so this is really worth it.

Divine Strike does Magical Damage which scales very well with our other Blessings.It also has a low cooldown and our Primary Attack attacks fairly quickly.

NG+0/1
NG+2
Gladiator Class Build Guide

This will be a Primary Attack Build for the Gladiator. The focus lies on Attack Power, Luck, Combo, Critical Strike Chance and Critical Strike Damage.


Trident (Primary Attack)
Strike your enemies with your trident that deals Physical Damage to enemies. Every upgrade increases the base damage and the amount of Primary Weapon stacks that recharge every 0.5 seconds.
The Trident stacks can be used to dish out a flurry of attacks without cooldown to unleash phenomenal damage on the Gladiator's foes.

Crippling Net
The Gladiator throws a net that disarms, slows, and gives a damage boost on netted enemies.
The trap slows the snared enemies by 80% for 3 seconds.
The skill has a charge-up. By holding the net, the range is increased rapidly to allow further throws.

Spinning Gladius
Throws a gladius in a forward direction that starts spinning in place for 3 seconds on impact.
Each upgrade improves the Magical Damage dealt per second.

Pit Fighters
Call upon a group of pit fighters to fight at your side for 15 seconds.
The pit fighters have their own Health, Armor, and Resistance that scales level of the Skill.
They attack with shortswords dealing Physical Damage, this also scales with the level of the skill.

Planned Attack
Guaranteed Critical Strike when expending stack of trident.
Planned Attack has stacks separate from Trident's stacks, meaning not all of Trident's stacks will be a guaranteed critical if you have less Planned Attack stacks than Trident stacks.
Planned Attack stack number and recharge time scale with the level of the skill.

Riposte
Reduces damage of one instance within 0.2 seconds after attacking with Trident.
Blocking with Riposte replenishes 1 stack of Trident.

Strength in Numbers
Increases the amount of Pit Fighters and Spinning Gladius.

Skill Order:
  • Lvl up every skill once
  • Lvl up Strength in Numbers to lvl 2
  • Lvl up Trident to max
  • Lvl up both Planned Attack and Pit Fighters to max. do as you please
  • Lvl up Spinning Gladius to max
  • Lvl up both Riposte and Crippling Net to max, do as you please


STARTING ITEMS:
Lucky Hat and Heartseeker are my go to for this Build, the extra Critical Strike Chance will help smooth out or damage and allow us to get into Combo easier. The Luck from Lucky Hat will increase our changes of getting a Critical Strike even more in addition to increases the proc chance on Frenetic Eruption.

I would also recommend using Magebane for high NG+ levels instead of Heartseeker when you are using Stab in The Dark for Critical Strike Chance.

When rolling the shop you can look for some of the items below to make your start even stronger:


DRINKS:
Frenetic Eruption allows us to put all our Critical Strike Chance to work along with our luck to get into Combo easily

Once we are in Combo we will be staying in Combo all the time, this drink is a free 200% damage for us.

This Drink does more damage than our actually Primary Attack and since it's all Magical Damage it will force us to focus more on Magic Damage than Physical Damage.

Overflowing gives us a huge bonus to our HP pool without changing our gameplay. We aren't planning on using Skills unless it's the start of a boss fight or we are standing still. We will usually still have enough mana to cast Crippling Net as needed to increase our damage and slow the enemies.

Choose Crazy Eye for more Critical Strike Chance when using Heartseeker + Lucky Hat

If you go with Magebane use Stab in The Dark.


STATUES:
This Statue is amazing, at rank 20 it will give us 100% Armor as Attack Power, making Armor an equal damage bonus to Attack Power but with the benefit of Armor! As this rank increases past 20 you will gain more damage from Armor than Attack Power. Keep this in mind when buying at the shop or spending Arena Points.

Kyra helps keep our Attack Speed high so we can hit targets faster and lifesteal faster. Often times you will bypass the cooldown of your primary attack but when you run out of Trident stacks you still want to be able to hit fast and lifesteal quickly.

Bolgarth gives us some extra time in Combo in case we ever hit a huge unlucky streak with Critical Strikes. It also gives us extra AoE damage every 5th attack. At rank 10 it gives us an extra 5 seconds in Combo!

After NG+10 or when you get a nice level Ozreth Statue / Phalarath Statue, I would recommend swapping from Bolgarth and Kyra to Ozreth and Phalarth to get more of a damage increase.


Bolgarth and Kyra are great in the early game but their damage doesn't scale very well into the late game. Also note that this will increase the usefulness of the poison items and disarm / stun item when using these statues, look out for them.


BLESSINGS:
We will be in melee range all the time and would like to take as little damage as possible. It's way easier to get damage than defense in this game.

Most of our damage is Magical Damage, we use this Blessing to do more damage.

This is the sole place we get lifesteal with this build, this allows us to not have to run Bloodthirst Ring or Crimson Death.

I use Divine Blast to get extra AoE when clearing with Primary Attacks.

NG+0/1
NG+2
Witch Hunter Class Build Guide

This will be a Primary Attack Build for the Witch Hunter. The focus lies on Attack Power, Luck, Critical Strike Chance and Critical Strike Damage


Repeater Crossbow
Fires 4 bolts in quick succession. Each bolt deals physical damage that ignores armor.
Bolts pierce enemies but lose 50% damage with each enemy pierced.
Every upgrade increases the base damage and the amount of armor ignored.

Flaming Hounds
The Witch Hunter unleashes a Flaming Hound that bounces in a forward direction.
The hound explodes when bouncing dealing magical damage which is increased by 50% with each bounce.

Branding Ward
Places a ward on the ground that triggers when enemies get close.
Enemies hit by the ward take magical damage and are branded.
Branded enemies take 100% more damage.

Witch Pyre
Places a pyre on the ground that last for 7.5 seconds.
Enemies that hit the pyre ignite an explosion dealing magical damage.
Enemies close to the pyre also start burning.
The pyres have their own Health, Armor, and Resistance that scales with the level of the skill.

Fanatic Zeal
Generates stacks of Fanatic Zeal when casting a skill.
Each stack increases critical hit chance for all attacks and skills by 2.5%.
Fanatic Zeal stack number and duration scale with the level of the skill.

A Murder of Crows
Unleashes Crows when taking damage that defend the Witch Hunter.
Cooldown reduced per level.

Searing Torch
Throws a torch towards a random nearby enemy when casting a skill.
The torch explodes on impact dealing magical damage and applying burning.

Skill Order:
  • Lvl up every skill once
  • Lvl up Repeater Crossbow to max
  • Lvl up Fanatic Zeal to max
  • Lvl up Searing Torch to max
  • Lvl up A Murder of Crows to max
  • Lvl up Branding Ward to max
  • Lvl up Witch Pyre to max
  • Note: Leave Flaming Hound at rank 1.


STARTING ITEMS:
Lucky Hat and Heartseeker are my go to for this build, the extra Critical Strike Chance will help smooth out or damage and allow us to get into Combo easier. The Luck from Lucky Hat will increase our changes of getting a Critical Strike even more in addition to increases the proc chance on Frenetic Eruption.

I would also recommend using Magebane for high NG+ levels instead of Heartseeker when you are using Stab in The Dark for Critical Strike Chance.

When rolling the shop you can look for some of the items below to make your start even stronger:


DRINKS:
Frenetic Eruption allows us to put all our Critical Strike Chance to work along with our Luck to get into Combo easily.

Once we are in Combo we will be staying in Combo all the time, this drink is a free 200% damage for us.

This drink does more damage than our actually Primary Attack and since it's all Magic Damage it will force us to focus more on magic damage than physical damage.

Overflowing gives us a huge bonus to our HP pool without changing our gameplay. We aren't planning on using Skills unless it's the start of a boss fight or we are standing still. We will usually still have enough Mana to use Flaming Hounds to keep up the crit bonus stacks from Fanatic Zeal.

Choose Crazy Eye for more Critical Strike Chance when using Heartseeker + Lucky Hat.

If you go with Magebane use Stab in The Dark


STATUES:
This statue is amazing, at rank 20 it will give us 100% Armor as Attack Power, making Armor an equal damage bonus to Attack Power but with the benefit of Armor! As this rank increases past 20 you will gain more damage from Armor than Attack power. Keep this in mind when buying at the shop or spending arena points.

Kyra helps keep our Attack Speed high so we can hit targets faster and lifesteal faster.

Bolgarth gives us some extra time in Combo in case we ever hit a huge unlucky streak with our Critical Strikes. It also gives us extra AoE damage every 5th attack. At rank 10 it gives us an extra 5 seconds in Combo!

After NG+10 or when you get a nice level Ozreth Statue / Phalarath Statue, I would recommend swapping from Bolgarth and Kyra to Ozreth and Phalarth to get more of a damage increase.


Bolgarth and Kyra are great in the early game but their damage doesn't scale very well into the late game. Also note that this will increase the usefulness of the poison items and disarm / stun item when using these statues, look out for them.


BLESSINGS:
It's way easier to get damage than defense in this game if you feel like you don't need more defense pickup Path of Warrior.

We currently are using Blessing of Intellect for more damage. Most of our damage is Magic Damage so this will be the best blessing to take for damage. If you feel you don't have enough Mana Regeneration you can take Blessing of Mind.

This is the sole place we get lifesteal with this build, this allows us to not have to run Bloodthirst Ring or Crimson Death.

I use Divine Hammer for the Witch Hunter to deal more single target damage where I am aiming, I find it more consistent than using Divine Strike. Divine Strike is also still really good and might outperform Divine Hammer in some situations but I prefer Divine Hammer at this time.
Speed Ore Farming Strategy

Speed Farming Guide (Pre-PoP)
This farming strategy can also be used for item blueprints and drinks in the base game. If you have the Pyramid of Prophecy expansion we have another guide for that.

Use "v_forced_aspect_ratio 3.2" in the console to zoom out greatly (helps with seeing the whole map without old map) and take Treasure Hunt from the fountain.

Speed Farming Guide (PoP expansion)
This farming strategy can also be used for item blueprints, drinks, and statues as long as you have the Pyramid of Prophecy expansion.

Companions
New Profile Series
A series where I start a new profile and record everything as I play through the game while explaining everything as I go.

82 Comments
Darkcarnival Jun 6 @ 9:30am 
@[NF] Zeonax' most of the areas in the final act that are "secrets" require the glasswalks from the fountain in order to be able to reach
[NF] Zeonax'. Oct 13, 2023 @ 5:09pm 
Great guide bro, do you know how reach the secret places on act 6? I can't find anything to cross and reach that sites.
Батя Andreasа Aug 15, 2023 @ 2:09pm 
Спасибо:lunar2020hearteyesrabbit:
Revalopod Aug 1, 2023 @ 8:53am 
I was confused about it too at first :steamhappy:
Caelignis Aug 1, 2023 @ 7:50am 
thx a lot revalopod i sure didn't register the information about the drinks as i haven't yet unlocked all of them
Revalopod Aug 1, 2023 @ 5:22am 
You guys just didn't read the guide properly. Look at the drinks part, particularly Incendiary Demise: "This drink does more damage than our actually Primary Attack and since it's all Magic Damage it will force us to focus more on magic damage than physical damage"
Brutalbic Jul 31, 2023 @ 10:35pm 
I was going to write a similar comment to Caelignis, the same blessing is written for the thief but they don't do any magic damage?
Caelignis Jul 31, 2023 @ 6:05pm 
hello, first of all, magnificent guide really thorough i read every part watched every video and felt your love for the game as i'm starting to really love it too.

Now the core of my comment is the section below feel free to read it as you please.

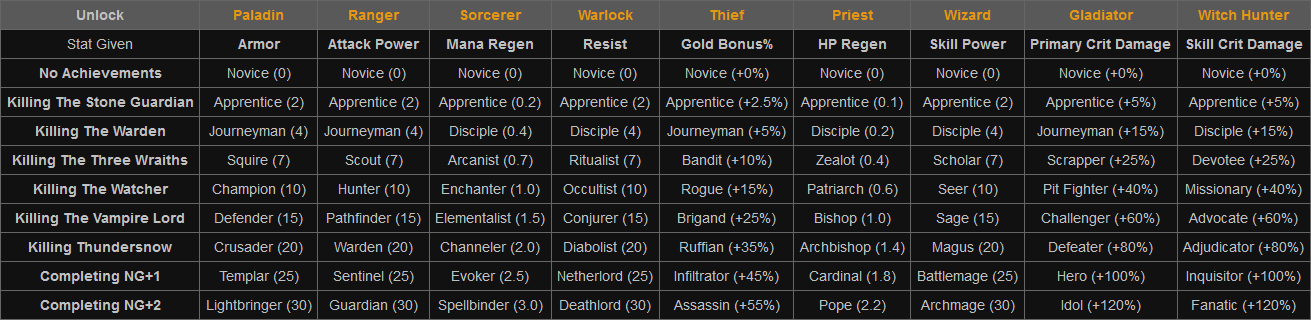
i think that you maybe made a mistake on the ranger part, you showed blessing of intellect because magic damage is the most that the ranger does.

but as you said earlier it is a primary build and his primary does physical damage and all of the ranger skills do physical damage except for the charging arrow.

maybe there is a mistake there.
75338 Apr 27, 2023 @ 11:34am 
Hey great there's a potion button and it doesn't work until I find some guy??
75338 Apr 27, 2023 @ 11:26am 
Could use a section for brand new beginners on where to go since the game won't tell you. I loaded up, made a Paladin, talked to some people in town, found no quests that would track, found an entrance to the mine (wasn't there supposed to be a tower??) and quickly died. What did I do wrong?