Darkest Dungeon®

Darkest Dungeon®

1,943 ratings
The Complete Guide to Provisions
By Psychedelic Adventurer
An quick guide to help you choose the right equipment for each dungeon type, and what party members to take.
*Image heavy*


7
35
3
6
4
2
2
   
Award
Favorite
Favorited
Unfavorite
Intro


Hi everyone, and welcome to my guide. This is meant as an addition to my earlier piece:
https://steamcommunity.com/sharedfiles/filedetails/?id=390184756
However, it comfortably sits on it's own, and you don't need it to use it to get the most of out this guide. This project arose mostly so me, and others, can easily pull up a general table for what works in each dungeon type. I will be adding to it as time goes on.


Disclaimer: Some statistical information and some graphics are sourced from the DD wiki. I was going to write up my own, but quite frankly the wiki is very reliable and accurate, and the graph does a great job at informing the reader.


I hope you find this both informative and easy to follow; sorry it took so long for someone to upload a guide on this here. You can follow me, and see my works here:

My complete selection of guides
The Basics
Darkest Dungeon is a zone-based RPG/RogueLite. That is to say that each different zone, or area of corruption in the case of DD, has a completely different strategy one needs to employ to survive. The higher the difficulty, the larger the differences get.

Don't let Cthulu catch you with your pants down: Zone and Difficulty scaling
On the lowest difficulty, it would probably be possible to steam roll most tile sets, regardless of area variance, with only minor effects. However, once you go to normal + it will be impossible for you to ignore them. You will constantly be getting hit with Plague or Bleed procs, and the occasional disease thrown in for good measure. And that isn't even mentioning the gigantic buff that enemies get in their ability to dish out Stress. The rarer and zone-specific an enemy is, the higher the chance the difficulty scale will effect them.

Dress for the job you want: Party composition


Party composition is key if you want to even hope to survive the Dark Dungeon. As we have already coverd, each zone has varience which makes some areas easier to cover with certain characters. Areas which have low damage/high stress, it will be to take party which specialises in Stress Management/Hard hitters. A dungeon with high damage, and a high percetage of bleed and plague procs, you'll want to take 2 types of healer, at least one tank, and a damage dealer.


Buy more stuff to get more stuff: Provisions and pickups
Apart from pure stat boosts from quirks, trinkets and inventory items will be your main way to stay alive in the field, espcially on long or difficult dungeons. As already stated, each zone will have different enemies and thus, will require a different party compositon. It will also call for different items prior to going into the dungeon itself. As i'm sure you already know, Darkest Dungeon's zones are litterd with objects which you can interact with, these are called 'curios'. A lot of these objects will grant specific things depending on state percentage, and who touches them. Suffice to say however, the odds will not usually be in your favour if you go around grabbing or opening every single little thing you find. Your party will either be crippled with all manner of plagues or deseases, given new, unhelpful perks, or just cripple them with insanity; suffice to say, the odds are not in your favour. There is hope. To eliminate most threats objects can have on your team, simply interact with the object with the corresponding item.

For example: A Confession Booth, when touched without Holy Water (which you can buy from the Vendor prior to going in) with have a 50%chance of High Stress, a 25% of Loot, or a 25% chance to remove a Negative Quirk. These are not good odds. Learning what goes where is key to keeping your party healthy and more importantly, sane.

Here if is a complete list of all curios, along with the corresponding item to nullify their negative effects.
https://steamcommunity.com/sharedfiles/filedetails/?id=386706480
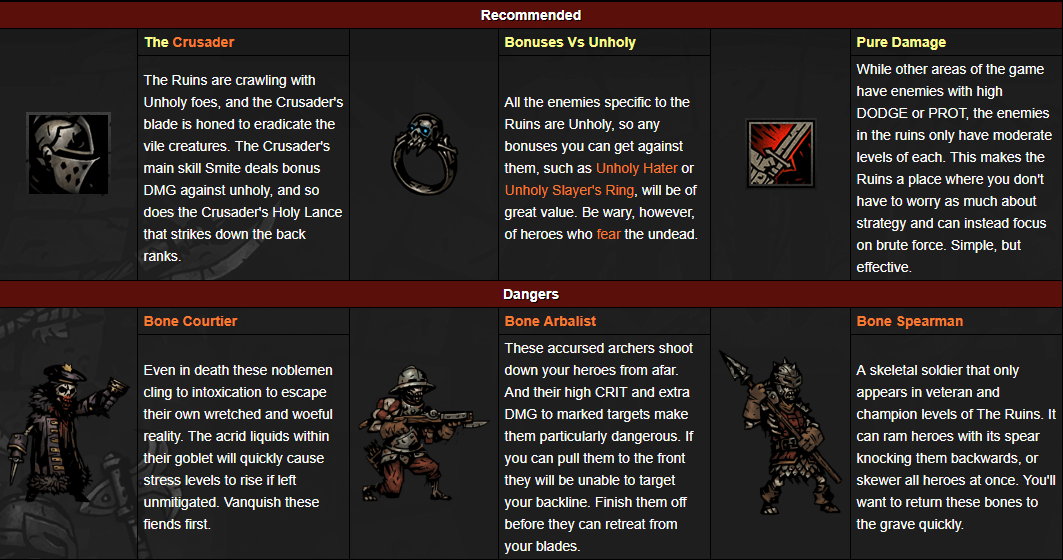
The Ruins

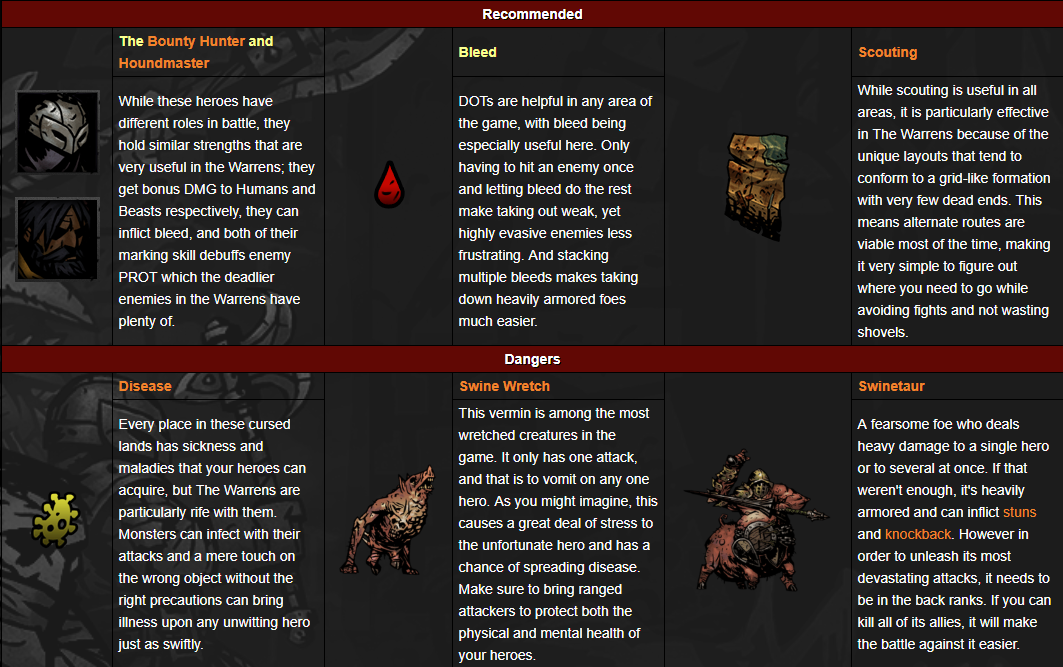
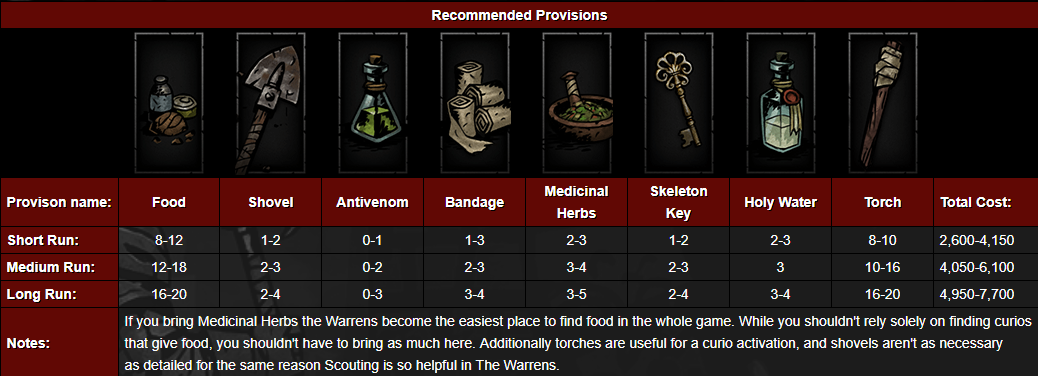
The Warrens
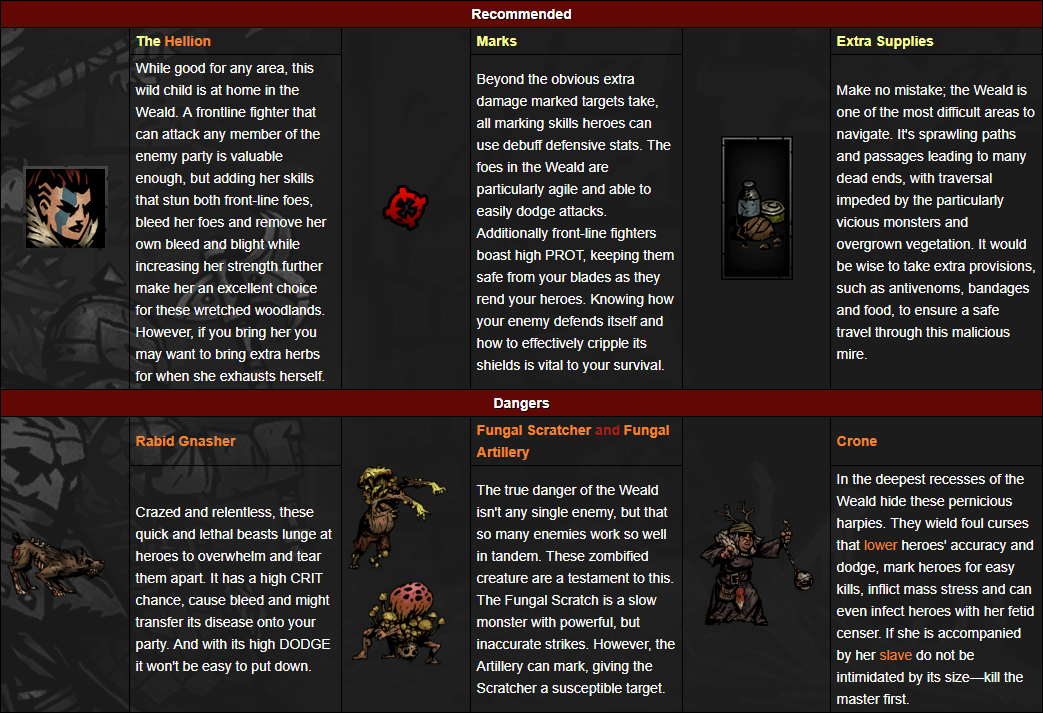
The Weald
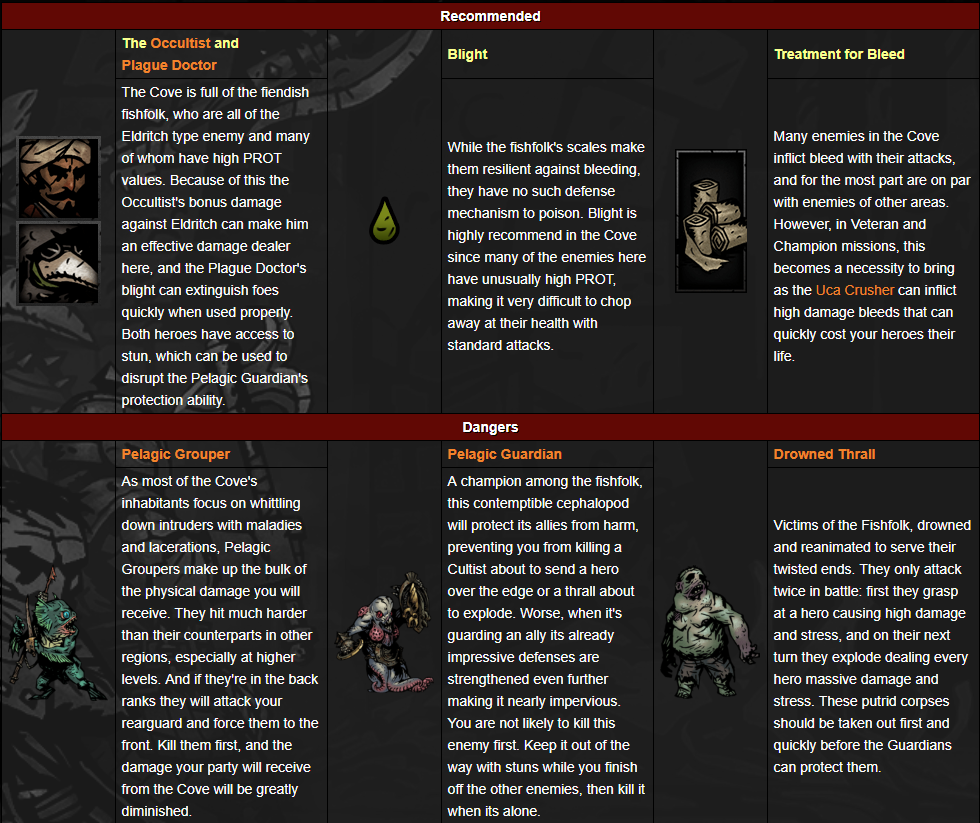
The Cove
The Crimson Court


Yes, I know the tile-set is just called 'The Court', but the title of the DLC sounds better so I'm keeping it. ( ͡° ͜ʖ ͡°)

The Crimson Court is the first expansion to Darkest Dungeon, bringing with it new trinkets, new enemies and bosses, a new character, annnd a new tile-set: The Court.

Dirty Bloody suckers everywhere!
Ok, so no doubt you have already guessed (or even played it already, imagine that. Huehuehue) that this DLC is vampire themed. Everything revolves around blood, disease, and pointy noses.

The Courtyard brings new vampiric enemies that inflict massive blight procs and will do there best to infect you with a new disease called The Crimson Curse.


The Crimson Curse:

This curse takes for the form of a persistant status effect that carries with it all the normal quirks of a disease. However, you cannot cure the curse and if not checked, may spread to the rest of your party and barracks.


Hint: Those who are cursed are immune to all diseases, and are cured from the ones prior to infection. While it is difficult to exploit this, when the curse is cured, all diseases are also cured.


Status Effects:

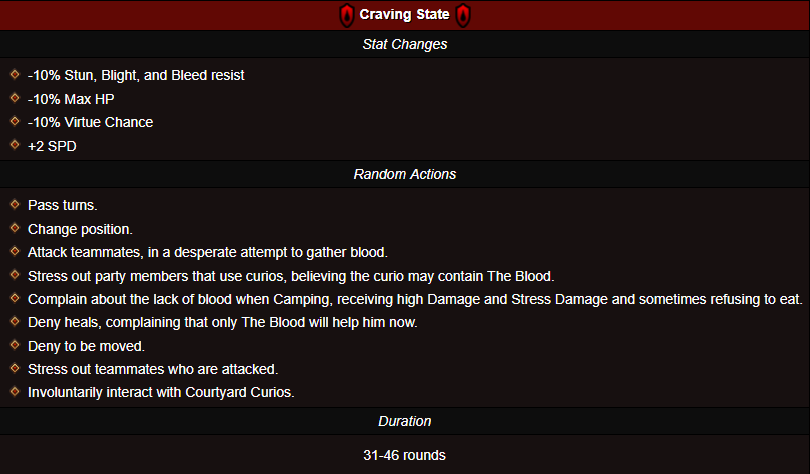
The Curse acts as a progressive blight to your party, which gradually weakens and drives the inflicted further into madness. The longer a party member goes without The Blood, the weaker they become [See stats below]. However, if you give them The Blood, they enter Bloodlust state [Also see stats below] which vastly improves their stats, often at the cost of their sanity and those of their party with random actions.


Removing The Curse
There a number of ways one can remove the curse, all of which are extremely difficult prior to beating the main missions of the Crimson Court DLC.

The Fanatic, a random chance boss [See section below for details and provisions] will chase any infected hero. If killed, he will drop The Cure, which instantly removes the curse from one party member. The cure is best used on party members who are under heavy penalties from the Curses' effects and damaging your party.

By defeating bosses. When you kill a Courtyard boss, all the heroes in that party will be immediately cured of the Curse. This effect is extended when you killed 'The Baroness', as when you kill her your entire roster of heroes (in mission and at the Hamlet) are cured.

Completing the "A Bewitching Predator" quest allows you remove the curse at the Sanitarium.

Provisions
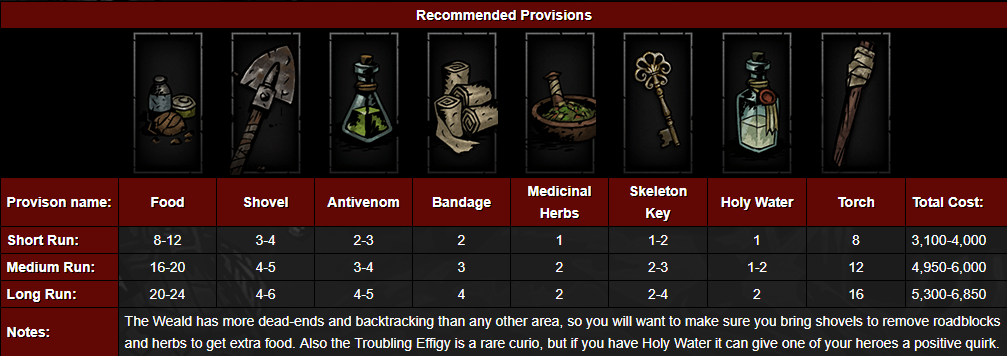
This section will be more complicated than usual, purely because loot in this dungeon is considerably better than in the others. Instead of the usual money and precious stones, most loot will come in the form of some very useful trinkets, which you can either sell or use. Hence, this list will take this into account.

  • All of the food (plus always pick up any additional food you find, you will need it).

  • All of the Torches (athough this tileset is set on 100% light at all times, the torch gives you an accuracy bonus of +4, which allows you to better counter the +Stress and -Bleed Resistance debuffs).

  • 5-8 Bandages – Enemies proc blight heavily, but bleed procs are also common. Also, they may be useful on the curio 'Pile of Strange Bones'.

  • 3-6x Shovels – If you want to get all of the curios and make sure you have enough left to destroy the obstacles in your way, bring the maximum amount. If you don't want the curios, bring 3 - nuff said.

  • 4x Holy Water – Not only can you use it on the curio Damned Fountain (there is another, but its a negative effect), you can also use it to counteract the effects of the heavy stress hits your party during battles. DO NOT USE HOLY WATER ON HEROES THAT ARE SUFFERING FROM NON-PASSIVE CRIMSON CURSE EFFECTS


It is worth noting however, that using holy water on a character who only has the passive effects of Crimson curse can use Holy water. However, if they are Wasting, Craving, or have Bloodlust, do not give them Holy Water.


  • 3-6x Medicinal Herbs – Generally just used to counter the debuffs of most enemies. Depending on your skill and party level, use accordingly.

  • As this dungeon is considered a 'special event' type, it possible to return to the Courtyard at any time. Simply return later with a fresh party and the game will return you to exactly where you last left off. Unfortunately the game counts this as a defeat, with appropriate stress gains.

  • All of the Antivenom – use to counter the heavy Blight that turns up on this tile-set.

  • All of the the Blood – take as much as possible. Unused vials will be returned to your stock when leaving the courtyard and won't be sold back to the vendor. Used to keep your Heroes in check, and to give to the various curios and random corrupted individuals, who will give you loot in return.

Because of the extreme prevalence of Bloodsucker type enemies, be prepared for any party member that goes inside to become inflicted with the Crimson Curse,. Bringing large amounts of The Blood is therefore a necessity, not only for Curios, but to assuage your heroes' cravings.

The biggest threat in this dungeon will the consistent and large amounts of stress your party will take. Your heroes will gain stress at a rate of 1 point per square, and considering the obscenely long hallways that can up to 20 squares, rapid stress gain is a serious concern. Add that to the constant stress damage dealt by many vampiric enemies, and stress can quickly grow in an
impossible to handle descent into madness (and negative quirks).

Party Composition


Best picks: Vestal - Jester - Crusader/Flagellant/Man@Arms - Leper/Helion/Flagellant
OK picks: Occultist - Arbalist/Highwayman - Abomination/HoundMaster - Bounty Hunter
Bad picks: Antiquarian, Plague Doctor, Shieldbreaker


As this is a vampire-based expansion, most of the enemies will be looking to eat your head rather than bash your skull in or drive you nuts, your party will usually do that job for them once they catch the Crimson Curse.

The Bloodsucker type-enemies that infest the Courtyard are vulnerable to Bleed and resistant to Blight. Many also have strong defenses against stun while others are weak against stun (especially Sycophant and Chevalier).
If a Vampire is able to wound a party member with the attack "The Thirst", they will mutate into a second form Bloodlust form with a different and more damaging move set. With this in mind, your best bet is to bash them into jelly before they can chow down and upgrade into a more dangerous form. However, since you'll constantly be taking Stress damage from BloodLight, the enemies, and your own infected party members, you'll need to bring a Stress reliever, aka - Jester. Vestal will main everyone's health, while Jester makes sure everyone is sane.

Tanks like Leper (personal choice) and Flagellant are great first responders, and the latter can move the party's stress onto himself with endure while the Jester is also removing stress from the Flagellant with inspiring tune. This strategy is enough to hold an entire Courtyard quest.
The Farmstead


The Farmstead is a new tileset that is introduced in the Color of Madness DLC package.
Unlike the Crimson Court, this DLC is almost entirely made up of combat scenarios in a wave-based format.
  • The first two missions act as a tutorial to the mechanics of the new mission type: Endless mode, where you are pitted against wave after wave of monsters until you are defeated or you flee.
  • When characters are 'killed', they become lost in space and time. Said characters will reappear in the Hamlet a few weeks later, with their trinkets gone (you can retrieve them from the Shrieker boss later, often with a negative quirk attached.


Hint: An important thing to remember, there is no penalties for feeling, (except for losing out on that waves loot) in fact the game expects you to.


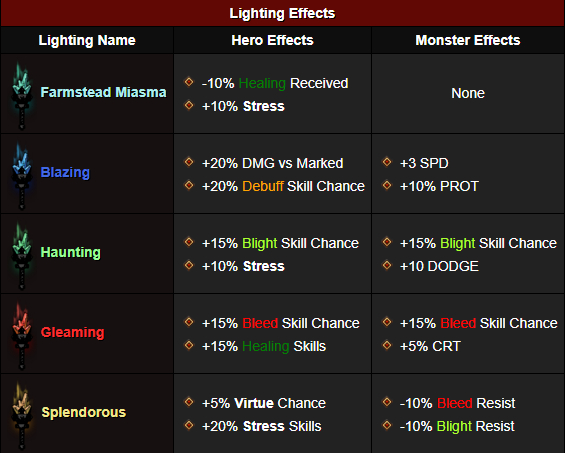
To represent the unusual passage of time, your party will have access to different 'Light' modifiers which are introduced randomly in between waves.
Here is the complete list of Lighting modifiers:


Reflections
'Reflections' are mutators which pass for endgame modifiers when the player has killed over 200 enemies. These handicaps vastly increase the difficulty of the quest in different ways from that point onward.

These stat modifiers also stack on top of other Light modifiers already present in whatever wave the party is present in.


Provisions
  • Max Food - Your party doesn't need to eat, but will come in handy if you manage to make camp.
  • Max Bandages - Generally normal enemies won't cause bleed, but the bosses do. Stock up.
  • Max Holy Water - Very useful in fighting later rounds and indispensable in boss battles.
  • Max Anti Venom - Almost all enemies cause blight. Very, very useful.
  • Ignore Shovels and Torches


Party Composition

The Colour of Madness DLC is unlike all the rest in that it isn't just about hard you can hit, it's matter of making sure you can get. The endless mode is a matter of endurance, meaning that it will be absolutely paramount that you take both a Healer, both for Physical and Stress management.


Best picks: Vestal - Jester/Flagellant - Man@Arms - Man@Arms
OK picks: Occultist - Jester - Grave Robber (for camp buffs) - Crusader
Bad picks: Antiquarian, Arbalest, Any character with the crimson curse


This is actually quite a balanced mode, with most party compositions working to some extent. However, if you want to be able to tackle enough waves to hit the bosses, you will need a full specked out party. However, a warning: do NOT bring characters with the Crimson Curse unless you have a massive supply of Blood vials.

The best party comp as said above is the Vestal, Jester or Flagellant combo, and two Man@Arms to keep your line secure and tanking most of the damage that is thrown at them. Always start every battle with Bolster if you can to minimise damage on your party, then grind them out with Riposte and Defender to counter attack and chip away at them.

Jester will alternate between maintaining Battle Ballad on M@A's to keep priority over enemies, as they all hit like a truck, especially the bosses. Vestal will focus on mass heal, and dealing the odd bit of damage.

So yeah, there are some tips and tricks to surviving the last DLC. Now all that remains is to brave The Darkest Dungeon.
[Spoilers] The Darkest Dungeon


The Darkest Dungeon doesn’t operate like any other zone in the entire game. Before now, you can cheese through the game with bad tactics and generally come out with a stressed out gang and a few jaws hanging off our heroes pulped faces – nothing a good night at the brothel won’t fix.
Not anymore. Almost every attack will induce high amounts of stress, every blight and bleed deals high damage, and every encounter has a good chance to be the last. Bringing the right provisions are absolutely essentially for this run, on top of well statted characters with genetic freak-level quirks.

Modifiers:

  • As a rule of thumb, escaping the Darkest Dungeon encurs severe penalties. Should things go pear shaped: when you retreat, a random party member will die (representing them holding back the evil tide of eldritch horrors one last time to buy their comrades time to escape). However, if there is only 1 party member left, they will not die.
  • If you must flee, un-equip all trinkets before abandoning the quest to avoid losing them. You should also be aware that you cannot retreat at all during the game's final quest.
  • Characters who successfully complete a quest in the Darkest Dungeon will refuse to go back ever again (Unless you’re on Radiant’ difficulty. Such Heroes are marked by a torch in a Hero roster and candles on their stat page. However, even though they cannot be used in the Darkest Dungeon again, they can still be a major asset to you: it's still possible to send them on other quests, and they grant additional resolve XP to all other party members from then on. Best of all, marked Heroes will not occupy a space in your barracks, meaning you can recruit 4 more without dismissing anyone or having anyone die. This becomes very useful in running death spiral missions to bring as much coin to the estate as possible, in case you need the extra cash.

Extra Variables:
  • The map layout is always the same, room are scouted as you move forward.
  • Reinforcements are always in effect regardless of it being on/off in the options menu.
  • There are no traps, blockages, or night-time ambushes. Additionally, Hunger checks also occur more rarely than normal. Consequently, you don't need to waste inventory space and funds buying shovels, keys, and an overabundance of food
  • There is no loot. You are guaranteed an Ancestral Trinket by killing the first Boss of the Darkest Dungeon. Additionally, each of the first three quests will only have a single room containing an unlocked chest with loot - these chests are guaranteed to hold an Ancestral trinket (which cannot be a dupe of the one that the boss dropped).
  • If you fail a quest in the Darkest Dungeon, it will only strengthen the resolve of those left behind, giving a x2 multiplier to Resolve XP Bonus in the next quest. If you succeed, all your Heroes in the Hamlet, including those returning from the successful quest, are inspired, and have all their stress removed. This particularly useful on Stygian difficulty, where time is also against you.

Provisions

All of the food
All of the bandages
All of the holy Water.
All of the herbs
16 torches (or more), depending on how the fights go.
Buy as much as you can, don't spare any expense.


I have included maps that show exactly where each fight occurs, where each item is, and most importantly, where the boss can found. Thanks to mrbunnyban for his exceptional work.


Mission specifics

We Are The Flame

Map: https://steamcommunity.com/sharedfiles/filedetails/?id=608914647
  • Lots of Stress
  • Lots of Bleed
The Boss:Shuffling Horror has a serious chance of shuffling your party.
  • The Rapturous cultists do not attack your heroes directly. When you killed all the other enemies, use this time to heal and stress heal your party.

Party Comp
Jester - Occultist/Highwayman - Grave Robber/Houndmaster/Man@Arms - Crusader/Hellion
Bad picks: Leper /Arbalist//BountyHunter

Lighting the Way

Map: https://steamcommunity.com/sharedfiles/filedetails/?id=609501784

Provisions

All of the Food
All of the Bandages
6+ Antivenom
All of the Holy Water
All of the Herbs
All of the Torches.
You need the Talisman of the Flame in your invent

  • Heavy Bleed throughout Dungeon
  • Boss causes Plague and can hit heroes to death door in one hit.
Highest DPS from Bosses in the game. BRING HEALS

Party Comp
Vestal/Arbalist -Hound Master/Vestal - Hound Master/Man@Arms/Crusader - Man@Arms
Bad picks: Everyone else.

Belly of the Beast

Map: https://steamcommunity.com/sharedfiles/filedetails/?id=612528410

Provisions

All of the food
All of the Antivenom
All of the holywater
All of the herbs
All of the torches (NO SERIOUSLY, ALL OF THE TORCHES)

  • This dungeon is huge, quite possibly the longest one you have experienced. You will be supplied with 4 campfires.

  • Fasting Seals are a viable option for those who do not want to compromise on inventory space. These will make so none of your party members need to eat.

  • The party has to get to the centre of the map. where the Locus Beacon is guarded by one final Mammoth Cyst. The enemies in this dungeon are dangerous, but unremarkable. You will run into at least one Templar, however, these are significantly weaker than it's mini-boss counterparts; lacking the Revelation ability and having only one action per turn.

  • Your main worry in this fight will getting teleported by a new enemy: the White Cell Stalk. Every round you are in combat with a enemy group with a Stalk in it, the higher the chance you'll be teleported to a random dead-end on the map. This is a brutal punish for those turtle, so don't dilly-dally! If you so get teleported, just fight your way back to the centre while avoiding other Stalks.

Party Comp
Best picks: Plague Doctor - Occultist/Houndmaster - Houndmaster//Man@Arms - Hellion
OK picks: Jester, Vestal, Leper (only if he has insane damage), Graverobber.
Bad picks: Everyone else.

Hell is in the heart

Here we are gentleman, at the end of everything. It's been an honour serving with you, now just a little further.

Provisions

All of the Antivenom
All of the Holy-water
All of the Herbs
All of the bandages
No need for Food or Torches

Party Comp
Best picks: Vestal - Plague Doctor - Highwayman/Bounty Hunter - Crusader
OK picks: Everyone, except...
Bad Picks: Abomination


This is essentially Darkest Dungeon, Boss-Rush edition. The final push. You will be fighting 4 bosses (or at least 4 phases of the same entity) in a row, each with it's own rule sets.

Boss phase 1 - Ignore the obvious target (The Ancestor himself), and go for the Reflections. This can take some time. Keep doing this until Phase 2 starts.

Boss phase 2- A quick and easy game of cat and mouse. Ignore the "Absolute Nothingness", which can't be destroyed, and hit the Boss. He will shift from position to position as you hit him.

Boss Phase 3 - A quick reprieve. This is the time to heal up and beat the everloving snot out of the "Gestating Heart". Each hit will heal the attacker but inflicts a small blight proc.

Hint: All procs and debuffs on the Boss carry over into the final phase, so if you have them,pour them on.
One final Stand
Boss Phase 4 -The Alpha and the Omega - The Heart of Darkness. It's really not that bad, considering what you have already faced. The Boss inflicts heavy bleed and high stress but that's about it.
Once you have taken him down to 2/3 and 1/3's of his health consecutively, the Heart will use his ultimate ability:
Come Unto Thy Maker.

This ability has had a fair bit confusion spun around it, and no wonder. Here is the long and short of it.
This ability will reduce a full size party from 4 to 3, and then 3 to 2, based on the damage it has received. This means that if one or more party members have already died before The Heart deploys his secret weapon, it will simply choose not to use it - it cannot kill your party outright. Come Unto Thy Maker is only used a maximum of two times.


Now, make their sacrifces not be in vien, deal with The Heart once and for all.
It doesn't put up much of a fight and at 1/3 health, two heroes should be able to finish it off very quickly.

Congratulations! You've "won!"
If only it were so easy.
Conclusion
Well, I hope you have found this guide useful, but I suspect this this won't be the end for you. I wrote this guide as a way for newcomers and Vets alike, to quickly check what to bring to different dungeons, then jump in. Although the Darkest Dungeon section turned into a small guide in its own right, there are other guides that might be more useful to you since they go into way more depth. This was simply to give you a simple, bullet-pointed stat sheet to help you on your way.

Again, you can find more of my guides HERE .


<3

[Optional] Donate!
If this guide helped you out, and you would like to say thanks,throw something my way.
Of course this is not necessary however; It just gives me a little more insentive to write and edit more in the future!

https://steamcommunity.com/tradeoffer/new/?partner=38602821&token=A3SrzMse

33 Comments
libero2711 Aug 25, 2023 @ 3:33am 
you said "bloodlust state [see stats below]" but there arent any bloodlust stats below... otherwise, great guide
๓คɭ Sep 25, 2021 @ 12:04am 
More holy water in weald. Half way a short run now and needed atleast 3 due to fountains (-stress) and a effigy that could have given a positive quirk, it does say effigy is rare but ive had 2 in that run already and used the 1 of the first. Damn i wanted that second one too. :*(
Stele Jun 24, 2020 @ 3:48pm 
Thanks! I didn't take enough bandages, and lost my Houndmaster between the 2nd and 3rd boss rooms. But managed to finish it with 3, whew.
Psychedelic Adventurer  [author] Jun 24, 2020 @ 12:55am 
Turns out I left that one out because I had reached the max word count for the section. I've moved things around a little and added to the section there.

Thanks for reporting that mistake. :thumbsup:
Stele Jun 23, 2020 @ 8:21pm 
So... awesome guide. But it's missing the one thing I was looking for today. Provisions for DD#2, Lighting the Way.
Psychedelic Adventurer  [author] Apr 5, 2020 @ 12:51pm 
As a rule of thumb, Laudanum just isn't good enough to warrant its price and, more importantly, it's invent spot in regular dungeons. There are a few boss encounters where Laudanum isn't bad when you absolutely know that you will be facing high amounts of enemies (or perhaps one single enemy is more common) that deals Horror. The Baron from TCC is one such encounter.

Glad you all are liking the Guide. Pleasure as always.
Tui Apr 5, 2020 @ 12:33pm 
Thank you for the guide! Any tips about when to buy Laudanum?
Thrandir Mar 30, 2020 @ 6:01am 
Thanks for the guide a well written piece.
Whisper Mar 25, 2020 @ 10:42am 
This is extremely well written, with an admirable endeavor to appeal to the reader with a very polished visual presentation. It's also full of very good insights that will benefit me even after 200 hours roaming the dungeon. 5 stars guide, thank you for sharing.
Psychedelic Adventurer  [author] Mar 22, 2020 @ 3:54am 
Glad you found it useful.
As to buybacks, there is a large degree of variance between the items' buyback value. Torches and food (bought with 75G) is bought back at 5G. Whereas Keys (bought at 200G, or some other premium items are bought back at 20G.

At best you will get a rebate of 10% of the lost funds. Hence it's prudent to only buy what you think you will need, with margin for error. Generally, it is still best to over-prepare, even if it means throwing out some supplies later for valuable items, especially because money is always in plentiful supply.