Left 4 Dead 2

Left 4 Dead 2

86 ratings
Modder resource: Weapon Attachments Guide for custom weapons
By мяFunreal
This is a guide for modders.
It shows you how to properly handle the gun attachments so that particles are at the correct spot.
   
Award
Favorite
Favorited
Unfavorite
Introduction
Attachments are a very important part of gun mods.
If you don't have them set up properly then the shell ejections may come out of the barrel and the flashlight and laser will appear from thin air.

So make sure your mods have them set up properly.

Note:
Around 20th of August 2021 Authoring tools got and update in which they just deleted the "QC String" box which we need.
Good job Update team. useless as ever :)

So here's the "old" version that actually works.
https://cdn.discordapp.com/attachments/689810102013788265/878937459927441438/hlmv.7z
(Unpack the 7z into steamapps\common\Left 4 Dead 2\bin )

If you cannot use that link, Join the Dead4Mods Discord server[discord.gg] and head to the "Misc_tools" channel. it is a pinned comment.
Prerequisites
In order to even load your gun in HLMV you must compile it with a different name or location.
HLMV is set up to always load content from the pak01_dir.vpk files.
If you compile your model with the exact model name it will replace ingame, hlmv will ignore it.
Just rename the $modelname line to whatever you want.
Easiest thing is to just comment a your modelname line so it's ignored, and adding a second one just containing $Modelname !/temp.mdl.

Then load !/temp.mdl in HLMV, make the attachments as shown below, save them in the qc.
Do not forget to swap the $modelname lines back before shipping!

By the way, Since you are making the gun mods, you can add bones that are in the correct location for attachments. that way you only have to worry about the attachment rotation. But that is up to you.
Understanding the Attachment setup.
Once you have opened your model in HLMV, head to the "Attachments" tab.
The picture below is that you will see.
1. The attachment points you have compiled into your model
2. The bones you have available for attaching things to. You could attach the flashlight to the pump shotgun pump if you so desire.
3. input field for location and rotation
4. QC string field. Holds the finished QC line that you can copy into your QC file.

If you do not have any attachments visible, simply add the following qc line to your qc file with an attachment name listed below, this will give you an attachment point that you can manipulate in HLMV:
$attachment "NAME" "ValveBiped.flash" 0.00 0.00 0.00 rotate 0 0 0

WARNING
If you edit the location and rotation of an attachment and accidentally select another attachment, then all the settings you have made will be reset to the compiled settings. Be careful when editing the attachment values.

The Attachments you can have for worldmodels are:
Muzzle_Flash
Muzzleflash lights
Flashlight
Flashlight and laser
Shell
Ejection port for spent shells.

The Attachments you can have for viewmodels are
Attach_muzzle
Forwardnode
Where bullet tracers spawn.
Attach_shell_eject (old)
muzzlesmoke (new)
Smoke that appears after rapid firing. Either end of barrel or in the chamber.
Muzzle_flash
Muzzleflash lights
Flashlight
Flashlight and laser
Shell
Ejection port for spent shells.
Attach_muzzle (or forwardnode), Attach_shell_eject and Muzzle_flash should be in same spot with same rotation. Together, they build the complete muzzleflash.

To move the chosen attachment around, use the Translation text box.
To rotate it, use the Rotation text box

The rotation works like this:
X is along blue line
Y is along green line
Z is along red line

Now that you know how the system works, you need to know how the attachment has to be orientated to get the desired result. The pictures and descriptions below will show you how.
Muzzleflash
Muzzle_Flash - red line in firing direction.
Attach_muzzle - red line in firing direction.
Attach_shell_eject - red line in firing direction.
muzzlesmoke - red line in firing direction.
Flashlight and Laser
Flashlight (worldmodel) - blue line in firing direction.
Flashlight (viewmodel) - red line in firing direction.
Shell Ejection
Shell (right side, worldmodel) - blue line up, red line right.
Shell (left side, worldmodel) - blue line up, red line left.

Shell (right side, viewmodel) - red line up, blue line right.
Shell (left side, viewmodel) - red line up, blue line left.
Camera
The viewmodel also has an optional camera attachment. Technically it has two, but only one is actually used.
The one that is used it called "attach_camera"
The only purpose it serves is to animate camera rotation onto the screen. only rotation. movement is impossible

The correct orientation for the camera is as follows:
"attach_camera" - Red line in looking direction, Blue line pointing up.
In a nutshell, Red points towards where you will be looking while blue shows where "up" is.

Sometimes when you build a viewmodel the screen will rotate 90° clockwise. you can fix that by either:
  • Rotating the "ValveBiped.attach_camera" bone in the other direction (usually 90°CCW) to make it straight. You can do that in all poses or with the bone directly.
  • Deleting the "attach_camera" attachment. This is the easiest fix if you do not want to have any camera rotation in the first place.
  • Rotating the "attach_camera" attachment itself so that it fits.
19 Comments
мяFunreal  [author] Jun 20, 2024 @ 3:24am 
haven't tried it.
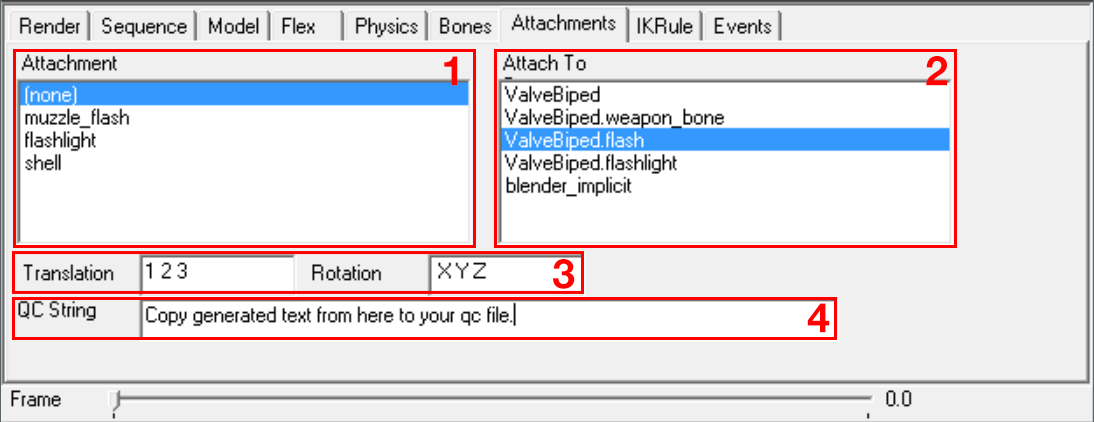
But i'm pretty sure adding more attachment spots won't help.
Unhappy Cotton Candy Feb 3, 2024 @ 9:22am 
I wonder if adding more muzzle flash for the world model is possible? ;-;
мяFunreal  [author] Jun 23, 2022 @ 5:23pm 
remove the camera attachment.
If you use $includemodel, hex edit the camera attachment name. my includemodel guide shows how
Lipan Jun 23, 2022 @ 12:57pm 
How do I remove the camera movement of weapons, melee and items, both when pushing, reloading or drawing
мяFunreal  [author] Dec 2, 2021 @ 10:01am 
yeah i know.
ArachnitCZ Dec 2, 2021 @ 9:13am 
dont know if you know this already, but on december 1st theyve updated the hlmv to fix the missing buttons

https://cdn.discordapp.com/attachments/834178038316007495/916013377187368990/unknown.png

id still keep using the old one though because it seems to load faster and probably has less issues still

unrelated but they changed the studiomdl as well but i dont know what was changed
Edison Gar Sep 2, 2021 @ 4:20am 
I thought it was my hlmv or my PC went shit for a minute right there, thanks for providing the old hlmv.
мяFunreal  [author] Aug 29, 2021 @ 6:32am 
yea they fucked up HLMV in a recent update.
get the "old" version here: https://cdn.discordapp.com/attachments/689810102013788265/878937459927441438/hlmv.7z

if you cannot download it, join the Dead4Mmods discord and head to "Misc Tools" https://discord.gg/4qtmzBP
AvengedDeathAlert Aug 28, 2021 @ 9:16am 
The typeable text boxes no longer appear for me for some reason.
мяFunreal  [author] Apr 24, 2021 @ 2:31pm 
no. you should see the location and rotation of the crosshair move immediately.