Dota 2
73 ratings
Tips and Tricks for Beginners
By Booji Boy
This no-nonsense guide will teach you some tips and tricks that will get you understanding the options menu, some important keys to bind, and some general tips that most new players forget/don't learn. This guide is intended for both new comers to the genre and those who are new to Dota 2.
   
Award
Favorite
Favorited
Unfavorite
Introduction (and what this guide isn't)
The purpose of this guide is to teach new Dota 2 players some of the intricacies of the user interface and specifics of the game. This guide will not teach you what the game is about/how to play it for the very first time. If you don't know anything about the game of Dota 2 I suggest watching the following video for an overview of the game:

Of course the ultimate new player guide is Purge's "Welcome to Dota, You Suck" which has helped many a new player. You can check it out here[purgegamers.true.io].

Ideally, this guide is for the person who has played their first 20-40 games.
Here is some of the things you will learn:
  • What the autoexec.cfg is and why you might want to use it
  • What the in-game options do
  • Some buttons you may want to bind
  • Some in-game features that may help you improve
  • A list of small tips to consider while playing

I'm far from a good Dota 2 player, but hopefully this collection of tips and tricks will help you up your game.

I understand the guide is long, I don't really expect anyone to read it in one sitting. Look over to the guide index on the right and jump to a part that is useful to you so you can get learning right away.

If you like the guide, please give it a thumbs up!
The Options Menu (Hotkeys)
As a new player, it is sometimes hard to know what binds are important. This section acts as a crash course of sorts and also tells you which keybinds are more important.

Abilities
Ability Learn: This one isn't as important as you might think. You probably already figured out you can click the gold "level up" bar to enter Ability Learn mode, but you can just as easily press Ctrl + Ability Hotkey to learn an ability instantly if you've leveled up.

Unit Actions
Select Hero: This is a pretty important bind. It is bound to F1 by default, but I suggest binding it to something you can reach easily (I use spacebar). For new players, it's often easy to get lost in team fights. Double tapping the hotkey for this action will re-center your camera's view on your hero. This is also really great for looking across the map: you can click on the minimap to see what your teammates are up to and simply double tap your hotkey to re-center your camera.

Select All Other Units: This one is quite useful for micro heavy heroes. You can press this hotkey to select all other units besides your main hero and issue commands to them. However, a better use for this is usually for micro-ing illusions (either from spells or an Illusion Rune) as you often need to control them on the fly and can't really assign them control groups since they last a limited time.

Select Courier: Another important key. Hopefully even in the few games you've played you've already noticed what a big influence a courier can make. Being able to select the courier with a single key saves you time, and once you remember the courier's abilities you can easily chain together a few keystrokes to select the courier, grab your items, and send them to you. Best part about this key is it doesn't drag your camera away from what you are paying attention to, it only selects the courier. I have this one bound to "C" for quick access.

Courier Deliver Items: This one is not quite essential, but if you can find a good spot for the keybind then you might as well use it. Pressing this hotkey will tell your courier to deliver any items it may have to you (if it's not carrying any of your items it will return to your Fountain to grab your stash and then start coming to you). There is a button on the UI that does this as well, so the keybind is not essential. Be careful of grabbing the courier when it's delivering items to someone else as pressing this hotkey gives it a new command.

Items
Shop: This is another big hotkey. The shop is probably the second most important thing in Dota 2 besides your hero. Being able to browse the main shop to buy items saves valuable time, and this hotkey also works when you are in a sidelane/secret shop. Bind it somewhere where you can easily hit it, I like to use "X".

Purchase Quickbuy: This was the main catalyst for putting this guide together. So many of my friends don't use this hotkey and they constantly waste time opening/browsing the shop to buy items or losing money they could have bought an item with because they couldn't fumble the shop open in time.
Before I explain what this key does and how to use it, you need to understand what Quickbuy is. When browsing the shop, if you Shift + Left Click any item, the items needed to create it will appear in your Quickbuy space (next to your total gold, on the bottom right of your screen). Notice that the items have a golden border around them. That means that you have enough gold to buy that item. If you're low on gold, don't worry: when you reached the required gold you will hear a bag of coins drop and the border of the item will turn gold.
Now imagine you are laning early game and have enough gold for Boots of Speed. You don't want to buy them and use your courier because you are pushed back to your tower and your mid needs the courier to send some items his way. Your plan is to push out your lane enough to get to your side shop and buy the boots. But before you can do this you get hooked by Pudge! Assuming he gets the kill, you would have lost the gold you could have used towards your Boots of Speed (and maybe you can't even buy them anymore!). This is why this keybind saves gold and time. If you are going to die and have enough gold to buy your boots, you can simply press your Purchase Quickbuy hotkey and buy the item before you die and lose gold. This is also useful if you are in a close teamfight and manage to get enough gold to complete your big item: you'll hear the bag of coins drop and you can click your hotkey to buy the item to ensure you'll have it even if you die. I like to use "B" for this hotkey. No matter what you choose to bind it to, bind this key and use it often!

Purchase Sticky: This is another optional keybind. On the very right of your Quick Buy space is a Purchase Sticky space. By default this is the Town Portal Scroll. Pressing this hotkey will buy that item every time (as long as there is no purchasing cooldown). You can actually replace the Town Portal Scroll by clicking down on an item and dragging it on top of the Town Portal Scroll. If you do, keep in mind it's best to replace it with a consumable item, such as Sentry Wards or Dust of Appearance. Leaving it as a Town Portal scroll is recommended though. I usually don't use this hotkey because you can just Right Click the Purcahse Sticky space to buy that item.

Chat
Chat Wheel: This can be a great shortcut for those of you without microphones or typing ability. Pressing this hotkey brings up the Chat Wheel, which has most of the messages you will be typing during your average Dota 2 game anyway. You can customize the wheel from a preset list of phrases that range from "current time" to "requesting gank." It also prints the message out in chat!
The Options Menu
This part of the options menu contains gameplay specific toggle options. Hopefully this will explain what most of the commands do better than the game does.

Game
Auto Attack: With this option turned on, you will attack enemy creeps and heroes nearest to your location without having to issue an attack command first ("A" by default). For some newer players, like me, it's annoying having this option on because you constantly have to issue Stop ("S") commands to avoid attacking the creeps automatically. However, there are some advantages. Namely, when chasing down a juking hero you don't have to worry about right clicking on them on the split second they are visible to attack them. If you have Auto Attack on your hero will automatically attempt to attack them if they are in vision and close to where you clicked. However, you could also just A + Right Click when chasing down juking heroes.

Auto Attack After Spell: Turning this option on means your hero will attempt to attack something as soon as a spell is cast. I keep this turned off because I play with auto attack off and want to maintain consistent behavior, but theoretically it would be OK if you had only one of them on. The biggest issue with leaving this on is you have to press “H” if you don’t want to attack after casting a spell (for example, to avoid attacking a Nyx Assassin while he has Spiked Carapace on).

Auto Purchase Items: Turn this off. This will make your hero buy items on their recommended item list automatically. It's good to have flexibility with starting items!

Auto Select Summoned Units: Turning this on will select any units you summon (including illusions) as soon as they spawn. I usually leave this one on to save time.

Double Tap Ability Self Cast: Turning this on will allow you to cast your spells on yourself (if the spell is able) by double-tapping the spell hotkey. I would recommend those with butter fingers have this off, as you can sometimes waste a clutch spell on yourself in the heat of the battle by tapping the key twice.

Unifed Unit Orders: This is another big time saver. If you need to quickly move all your units, you can simply hold Ctrl + Right Click to issue the same order to all of them. There is really no reason to turn this off unless you hit Ctrl a lot accidentally (weirdo).

Hold Alt to Highlight Hero: With this option turned on, holding down Alt will show a large green arrow that points to your hero. This can be useful if you get lost a lot in teamfights.

Show Player Names Over Healthbar: This puts everyone's Steam Name above their character in the field. Best to just keep it on unless you really don't like the visual clutter.

Show Hitpoints Over Player Healthbar: This places your health as a numerical value above your health bar that is above your hero. This one is really up to personal preference. Personally I look down at my UI health bar enough to know my health, but some people might like not having to look so far in a fight.

This shows what the "Alt Highlight Hero" option looks like, as well as demonstrating HP Bar Numbers and Player Names.
Shop Always Uses Hotkeys: I recommend having this off. It actually takes a bit of control away from you if any of your keybinds conflict with the Shop hotkeys as those will take precedence. Also it's already pretty easy to browse the shop without hotkeys anyway.


Minimap
Minimap Simple Colors: Turning this on makes your team mates only green icons and the enemy into red icons. I used this a lot when I first started playing to help simplify things, but you probably want to turn this off sooner rather than later. The biggest issue with this option is it forces you to hold Alt to check which heroes are which, and that can cost you time.


Draw Hero Icons: Dota 2 features two alternate hero icons for the minimap: Pixel Art and Hero Names. If you turn this off the minimap will show the names of each hero instead. When you are holding down Alt you will see your hero icons on the minimap switch to your set choice. I usually prefer the icons, as the names can be hard to read when multiple heroes are in the same spot.


Names/Icons Always In Minimap: As you can see in the screenshots above, having the icons/ names on the map at all times is confusing when multiple heroes stack close together. It's almost always a good idea to leave this off.

Draw Minimap on the Right: If you are coming from League of Legends or feel like you keep clicking on the minimap on accident when retreating/attacking, then you can toggle on this option. The minimap will be moved onto the right and your items will be moved to the left of your screen.
In-Game
This section will be the easiest to read and digest, as it is simply composed of some simple tips that can help improve your play. Many new players overlook a lot of these tips, so make sure you read up.

Understanding the Top Bar
You've probably noticed while playing that all 10 heroes appear in a bar on the top of your screen. What might not be immediately obvious is that the bar also shows your teams ultimate states in the form of a diamond under each hero. From left to right: No Point in Ultimate, Ultimate Ready, Ultimate on Cooldown, No Mana for Ultimate. Recognizing these can help cut down on miscommunication.

Let Your Teammates Know Cooldowns
You can Alt + Click spells and items to let your teammates know if they are ready. This is context sensitive, so it will tell teammates whether your spell/item is ready, on cooldown (with the remaining time listed), or if you need mana to be able to use it. Items that require a gather (Arcane Boots, Mekanism, Smoke) also ping the ground when you Alt + Click them to let your teammates know that they should gather next to you.

Default vs Classic Store
Valve was nice enough to include the option to switch our Store UI to look similar to the interface the original DotA had. You can switch your store layout by clicking the "view" buttons at the top right on the store. The default view has a few advantages: you can easily see the names of all the items and their prices. However, the Classic view allows you to quickly see all the items in that specific store tab at the cost of having to remember each item by its icon (not so hard after a while) and what each item costs. You can always hover over the item to check its name and cost, but obviously this is not optimal when you are looking for a specific item and don't remember its icon.

Bonus Tip: See that little Magnifying Glass icon at the top of the store? You can type there to search for an item.

Courier UI
The Courier UI is completely optional to use. It's very simple to understand what each button does: Pressing the "Flying Donkey" button selects your courier, Pressing the "Running Boot" button gives your flying courier a speed burst (this icon will countdown if the speed burst ability is on cooldown) and pressing the "Backpack Deliver" icon will send the courier to you to deliver your items (this will be replaced by a picture of the hero the courier is delivering items to). Pressing the "Backpack Deliver" icon is the same as pressing your Courier Deliver Items hotkey, so be careful not to steal the courier away from someone who is using it to get their items delivered.

Learn Your Courier Hotkeys
Learning your Couriers hotkeys take a short amount of time but has big advantages. You can easily select your courier, grab your stash items, and send the courier your way in two seconds without moving your camera from your hero or your eyes from what is happening around you. The hotkey order is: (Select Courier hotkey, Retrieve Items hotkey ("D" by default), Deliver Items ("F" by default), then tap your Select Hero hotkey to reselect your hero (it will also recenter your camera). If you are pressed for time and have a flying courier, you can press the Courier Speed Burst hotkey ("R" by default) when the courier is selected to make it fly to you faster.

Checking Your Buyback Gold
Hopefully you know that when you die, you can Buyback to instantly respawn if you have the gold and your Buyback is on cooldown. However, many new players don't know that you can actually check to see if you are Buyback ready. When mousing over your Total Gold a tooltip will pop up to tell you if your Buyback is on cooldown and how much gold you'll have to pay. Note that this does not take into consideration how much gold you will lose when you die!

Check your Enemies Inventory
Don't forget that you can check the inventories of your enemies! This can go a long way in avoiding a smoke gank on someone carrying a Gem of True Sight or using invisibility next to an enemy that has a Dust of Apperance. You can check any enemy heroes' inventory by Left Clicking on them. This will also show you their level and skills, but not which skills they have leveled. Don't forget to scout enemy heroes items even when you are dead.

Bonus Tip: If you have vision of your enemy, you can select them to check their inventory. Remember to check the inventories of enemies in other lanes if you are a mid hero looking to set up a gank.

Know What the Sidelane Shop Sells
Another short tip that will save you time: The Sidelane shop sells many good early game items that are often used in recipes of other items. Notably, all boots except Boots of Travel and Tranquil Boots can be completed from just items in the Sidelane Shop. Some other popular items you can snag from the Sidelane Shop:
  • Magic Stick
  • Blink Dagger
  • Town Portal Scroll
  • Energy Booster to complete your Arcane Boots
  • Helm of the Dominator (all the recipe items can be grabbed from the Sidelane Shop)
  • Ring of Health + Stout Shield (for 2/3 of a Vanguard)
  • Hood of Defiance (all the recipe items can be grabbed from the Sidelane Shop)
The Energy Booster and Blink Dagger are two items that most players often forget, so remember you can save time and leave the courier for your mid player if you know what items you can buy at the sidelane shop.

You Can Queue Your Actions
I'm not going to break down all the possible applications for this skill, but needless to say its very useful for heroes with channeled abilities (and is most often used heavily in regards to Sand King's Ultimate and Blinking in to damage heroes). This video by JJMerrill will explain it concisely:
Technical
Autoexec.cfg is a config file that runs as soon as the game client is launched, i.e. it executes automatically. You can use this file to tell the client to run console commands without having to open the console and type them in every time you launch the game. The list of commands that can be entered is very long, but if you decide to create an autoexec file you will only need a few anyway.

Creating Autoexec.cfg
Dota 2 does not create an autoexec file by default, so if you decide to create one you need to open a text editor. Creating the autoexec file by hand is easy: simply open notepad and save a document called "autoexec.cfg" (with no quotes). IMPORTANT: Make sure the file is not saved as "autoexec.cfg.txt" as this is incorrect and will not be read by the game. The autoexec file should go into your Dota 2 directory:
Steam/steamapps/common/dota 2 beta/dota/cfg

What to Put Inside Autoexec.cfg
So now that the autoexec file is in your Dota 2 directory on your computer, we need to put commands in the file for the game to automatically execute. Here are some commands that you may find useful:

Force Right Click to Attack: This option allows you to simply right click to deny creeps (if they are in deny range of course) instead of having to press "A" first. Off by default.
dota_force_right_click_attack “1″

Camera Hold Follow: If this is enabled, holding down your Select Hero hotkey will keep your camera centered on your hero. You can still pan around the edges of the screen (if you have that option set) but your hero will always remain on screen until you let go of the hotkey. Off by default.
dota_camera_hold_select_to_follow "1"

Spell Range Finder: This command creates an arrow on the battlefield when you cast spells that tells you when you are within range. If you are out of range, the arrow will fade and show where you will move to in order to be able to cast that spell. Note that the arrow only appears after you press the hotkey for a spell and before you target something (so it will not appear for AOE spells that use you as the target). Useful for skill shots. This is disabled by default.
dota_disable_range_finder “0″
The left side is when you are within range, the right when you are outside. Notice the slightly yellow color at the base of the arrow on the right side: this is where your hero will need to move (and will move) to cast a spell if you are out of range.

Minimap Misclick Delay: The time specified is the buffer period before any commands on the minimap can be registered e.g. if it is "0.5" the minimap will not "exist" (register any clicks) when you place your cursor on it for 0.5 seconds. This is useful if you find yourself clicking on the minimap on accident while in chaotic team fights. The default is 0.2 seconds
dota_minimap_misclick_time “0.5″
Health Per Vertical Marker: This changes how much health is divided by on hero health bars. The default is 250.
dota_health_per_vertical_marker ”250″
Minimap Ping Duration: This setting changes how long pings will appear on your minimap. If you sometimes miss pings, it's good to set it slightly higher. The default is 3 seconds.
dota_minimap_ping_duration ”5″
Minimap Hero Icon Size: This can increase/decrease the size of heroes minimap icons. The default is 600
dota_minimap_hero_size ”600″
Minimap Hero Scaling: You can use this to scale the size of hero icons on your minimap based on how close they are to other heroes. This does not work with the pixel art portraits. This involves several commands.
dota_minimap_hero_scalar 1 dota_minimap_hero_scalar_distance 12 dota_minimap_hero_scalar_minimum 500
The scalar distance is the proximity in pixels to begin scaling. The scalar minimum is the minimum size to scale the hero icon. Note: If you use this your scalar minimum must be lower than your Minimap Hero Icon Size.

There are a few more commands that have very specific usage, you can find them in this Team Liquid Thread[www.teamliquid.net].

Running your Autoexec.cfg
So hopefully you've either made your autoexec file by hand or used a generator[skyride.org]. Regardless, your autoexec file should look somewhat similar to this:

con_enable "1" dota_force_right_click_attack "1" dota_minimap_ping_duration "5" dota_disable_range_finder “0″ echo "Autoexec Successful."

You probably noticed two commands which I didn't explain in the last section:
con_enable "1" echo "Autoexec Successful."
These two commands, while not needed, are useful for your autoexec. Why? The line "con_enable 1" tells the game to enable the console. This is useful for us because the second line "echo Autoexec Successful" prints the message Autoexec Successful in the console.

So if everything has been saved correctly you should be able to launch Dota 2 through Steam and press the tilde key (~) to open the console. Now look for the line "Autoexec Successful" in the console. If you find the line, this means your autoexec.cfg file has executed properly!
Closing Thoughts
Hopefully these tips that I've picked up over a year of playing Dota 2 were helpful to some newer players. Obviously I still need to learn a lot about the game so if I missed any tips or I got any information wrong please post it in the comments below so I can correct the guide.
12 Comments
Aphotic Sep 13, 2015 @ 7:55pm 
how to hide the big annoying Red pointer that sometimes shows your hero when his inside trees or on the edge of the screen... please
mimizukari Feb 20, 2015 @ 7:50pm 
here's a tip, bind a key to dota_test_buyback for quick buybacks!
76561198123992456 Sep 1, 2014 @ 4:22am 
what is command to check other lanes in autoexec???
Blue Aug 8, 2014 @ 7:19am 
Just dropping by to ask if you want to be mentioned there by any specyfic nickname? I used your current one.
Here's the link: http://steamcommunity.com/sharedfiles/filedetails/?id=270350269
Booji Boy  [author] Jun 20, 2014 @ 3:32pm 
Yeah, that sounds fine Blue!
Blue Jun 20, 2014 @ 1:23pm 
Hi, wouldn't you mind if I posted link to your guide in my upcoming one (and credited you of course)? You covered things I wanted to leave for players (interface) and some I think you did explain very well (autoexec, console, options). I just don't see a point in writing about it if there is already a good guide here.

Omnicolour May 24, 2014 @ 1:22am 
Very, Very Nice guide!
I have learnt most of these things through playing for a long time, but how nice it would have been if I had found it early on. Well Done!
McFaj Feb 8, 2014 @ 1:01pm 
Nah, Shit
Booji Boy  [author] Oct 18, 2013 @ 11:32pm 
@Janfron1

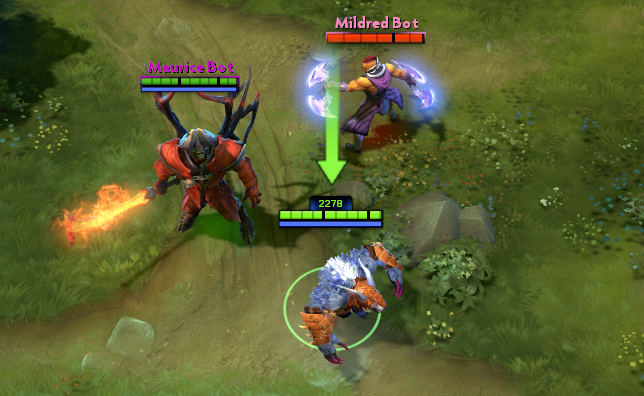
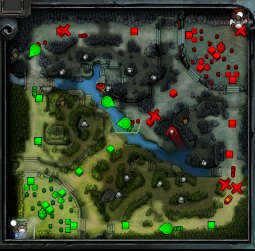
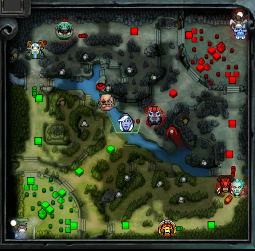
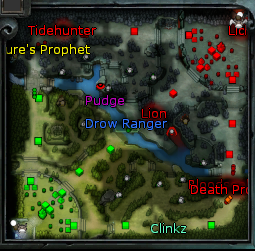
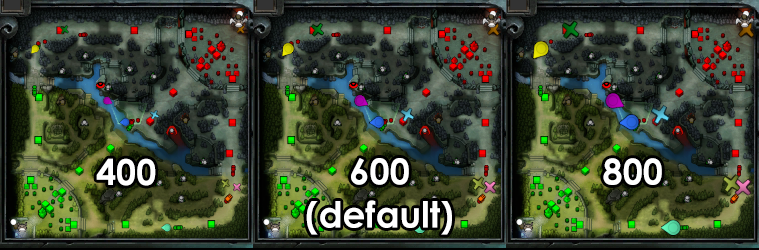
I'm assuming you're talking about pinging the minimap? Holding down your ALT key while clicking on the minimap pings it with a (!) icon. If you click on a structure, the icon will change to a shield icon (to signify you intend to defend the structure). Holding ALT+CTRL and clicking on the minimap will use a (X) icon, signifying caution.

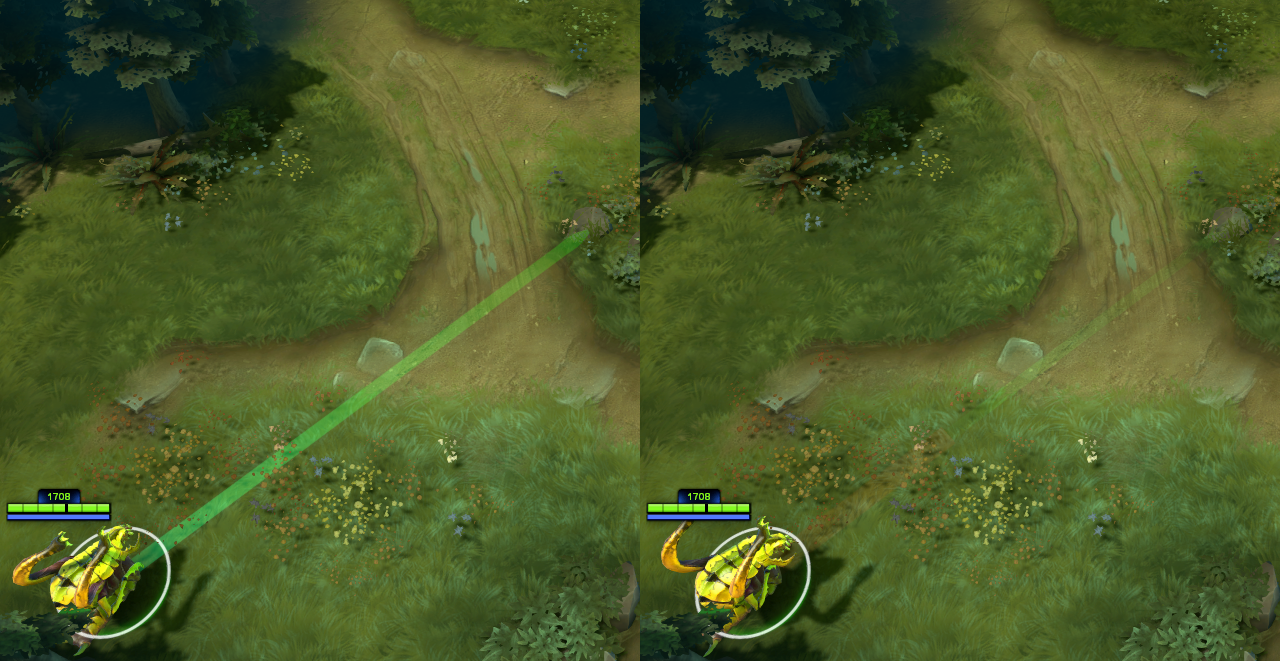
You can also draw on the minimap by holding the CTRL key by itself and dragging around the minimap.
76561198047050858 Aug 18, 2013 @ 5:30am 
And ho said the DotA community was full of mean people?