Dota 2
88 vurderinger
A Complete Guide to Luna Moonfang
Af CleavesF
Luna is one of the best, most versatile carries in Dota 2, not to mention one of the highest win rates (8th all time) according to Dotabuff. Please read my guide if you're interested to play with one of Selemene's best!
   
Pris
Føj til foretrukne
Gjort til foretrukken
Fjern som foretrukken
Introduction
"Selemene commands."


Luna has 4 skills:
  • Lucent Beam (Active - Q)
  • Moon Glaive (Passive)
  • Lunar Blessing (Passive)
  • Eclipse (Active Ultimate - R)

In-game Build Link: Pub Stomp Luna


Luna is easy to learn because she only has two actives, and only one can be spammed (Lucent Beam). This makes mana management fairly easy, and you usually never run out of mana throughout the game. In addition, Luna does fairly solid damage early game due to Lunar Blessing.

Her game impact is also astounding, with a overall win rate of over 54% all-time placing her 8th, second amongst carries after Drow Ranger. My personal win rate with Luna though sits right now at a whooping 62%+ (as of May the Forth be with you day 2013).

Pros:
Luna is super fast even without boots
Luna's Lucent Beam has excellent range and casting animation
Luna's attacks are strong throughout the game
Luna's mana burn is easily managed
Luna is blessed by Selemene, with Lunar Blessing giving your team extra damage
Luna is blessed by Selemene, with Lunar Blessing giving you full night vision
Luna is an excellent last hitter due to excellent animation, and can farm very fast starting mid-game
Luna has a good combination of physical and magical damage
Luna rides Nova, her Giant Panther given to her by Selemene to protect Nightsilver Woods
Luna has a heavy accent
Luna has freckles

From Dotabuff.com:
Luna has the 8th highest win rate, at over 54% (all-time)
Luna has the 4th highest GPM rate trailing only NP, SF and Alchemist (Luna without a midas!)
Luna has the 5th highest XP rate trailing only Meepo, SF, Naix and Riki


Cons:
Luna is a glass cannon (all damage, no health, at all points of the game)
Luna loves shiny things (item dependent)
Luna has no escape mechanism
Luna is easily isolated as a threat if you start beasting and teams will target you first
Luna has a heavy accent
Luna has freckles
Items
"Worthy of my arsenal."


Sub Slippers for Ring of Protection if building Tranquil Boots or Mana Ring first.

Core Items:
[/previewimg]

Situational Items:

Luxury Situational Items:


Beginning of the Game:
First sort out with your team if you're going solo mid or top/bot duo. This is usually the case in public games. Fancy trilanes can be done but they are very rare in pubs and usually only occur if you have at least a 3 stack. In the rare chance you get solo bot due to a jungler, just follow the solo mid guidelines.

Before you spend your money, you need to see if your team has a courier. If nobody buys the courier, just buy it. It sucks, but it happens in pubs sometimes.


If you bought the courier:
Psychologically get ready to buy wings (Flying Courier for $220) within 6 minutes of the game. With the money you have left buy the following: Iron Branch x3, Healing Salve, Tango.

If I go against a hero with a lot of attack speed, or a lot of slow I pickup another Salve or Tango. This situation usually presents itself as Drow Ranger, Clinkz, Huskar etc...

If you go against a hero that's a burst caster, like Lina then you want more stat boosts as you should be able to run away from their spells early game.


If they bought the courier:
Iron Branch x3, Tango, Healing Salve, Ring of Protection or Slipper of Agility or Circlet

Early Game:

The first thing I try to build early game is your Ring of Aquila and Magic Wand. If you're going against physical melee characters (in your lane or not) it might be prudent to build a shield for early survivability (more details in Troubleshooting section). Also buy Power Treads ASAP, remember to keep them in Agility and switch them to Strength or Intelligence when you need HP or Mana respectively. I've never run out of mana with Luna but I guarantee you you'll eventualy need that extra HP when escaping.

Early/Mid Game:

I usually start building Helm of the Dominator after I have Magic Wand, Treads, and Ring. It helps with survivability and gives you the ability to farm effectively. Again, depends on the situation. If the opposite team has a lot of magic then work on Black King Bar right away. Many consider BKB as core on Luna, but I've done very well in past games without it. It's very useful in the majority (51%+ for you mathematicians) of games, and you should get it most of the time. It's just not a 100% of all games buy. Black King Bar certainly helps in survivability in teamfights most of the time.

Mid/Late Game:

Eventually towards the beginning of late game you should be finishing up to your real damage dealers such as Manta Style, Satanic, Butterfly and Aghanim's Scepter. Currently many experienced Luna players will say Aghanim's Scepter is one of the worst luxury items you can get with Luna. The way I see it, it depends on the situation. Aghanim's Scepter is not the worst buy, especially if the opposing team has lots of low HP players (eg: casters). Now if the opposing team is well balanced, or has a lot of tanks, yes, Aghanim's is probably not your best choice. One exception to this is if you have several levels over the entire opposite team (~4 or more) then getting Aghanim's isn't as risky as you should be able to dispatch them with your XP superiority. See the Aghanim's Scepter Upgrade section for more information.


It's also good to note for beginning players that Butterfly isn't exactly easy to build. Butterfly is a bit "weird" to build since you need to buy an unconstructable item from the secret shop known as Eaglesong (picture above). At $3300, it's not exactly easy to hold on to that much money without dying (especially if you're just starting out in DotA2). Ditto for Satanic with a Reaver at $3200 (In comparison, Aghanim's Scepter is one of the easiest luxury items to build)


Manta is much easier to build, and getting Yasha in the process helps with your damage output mid game. Manta does require Ultimate Orb which can be a pain to save up for, but at $2100 is much more reasonable, and helps in survivability due to Strength increase.


If you are dying a lot, Manta Style or Shadow Blade should be your first option. With a nod to Shadow Blade if you're getting owned to the point you feel you are feeding. It's also nice that Shadow Blade is easier to build than Manta. Lots of people dislike Shadow Blade on Luna, but again, this item is not Core and is solely for survivability and ganks.

Please subcribe to the in-game build for quick access to the items listed in both my builds and the pro's builds.


As you can see from the screenshot above, it is possible to pub-stomp with Aghanim's Scepter. It is possible to pub-stomp without a "so-called-core" Black King Bar. Remember how well you're doing against the opposite team, and build your items from the situation. This screenshot does not show what I usually build when playing Luna, but it shows that you can win without BKB and win with Aghanim's. Just wanted to put it out there it is possible to own with Luna as long as you adapt to the situation. No single build is ever the best one for all situation.
Luxury Situational Items
"This will come in handy."

So it's late game and victory is in sight but so is a loss. What to do? Usually you're about an hour into the game and it can go both ways...

First off, you need to establish your survivability. Plenty of a DotA2 games can turn around at any moment, and as a carry nothing is more important than to pick the correct items during the situation. In this section I will cover when you should consider buying Heart of Tarrasque over Satanic, and when you should get the Divine Rapier.


Heart of Tarrasque over Satanic
Helm of the Dominator should give you survivability well into late game if you are doing well. When a game is close, you'll need to pickup Satantic or Heart. Satantic is excellent and gives you tremendous lifesteal. But on occasion you will die even with Satantic activated if the opposite team solely focuses on you despite your BKB activation.

You need to seize up their damage output from teamfights, if you've died once or twice in the last two teamfights... and it wasn't because of incompetence or mistakes on your team's part then check the opposite team's levels. If they're +2 levels there is usually hope (anything higher and it becomes very difficult). Lifesteal is awesome, and is a game winner, but on occasion pure health is much better than stealing life.

The problem with stealing life is simple: you have to damage the enemy in order to lifesteal. This is great when you are owning with lots of damage output, but Satanic is completely useless if you and your team are running away trying not to die. When the game is exceptionally close, to the point where you question if more lifesteal is the correct choice, the correct choice is Heart of Tarrasque!

I've played enough games with Luna to know that you can carry your team to the end, then mistakenly buy Satanic, and yet die even though your damage output kills some of their heroes. Remember, if you are the carry, you cannot afford to buy Satanic in a close match where the opposite team is trying to knock you out first (carry Luna) and thus your team out of contention of winning. Remember Luna is made of glass. This is still true late game even with Satanic. Heart of Tarrasque is the only item that officially makes Luna able to tank.

Conclusion: If the game can go either way and you've finished farming Reaver. Get a Heart. Helm of Dominator + Heart of Tarrasque should literally guarantee your survivability. With this combo you probably should never die again for the rest of the game if you play smart.


Divine Rapier:
There's only 3 reasons to buy Divine.
  • Because you're owning and riiiiiich!
  • Because all hope is lost and this might turn the tide...
  • Because the opposite team's carry is "harder" (Void, AM, Spectre, PA, PL)
If you are doing well, I usually do not buy Divine because it's too risky. Even if I have Satanic I usually do not take the risk of buying Divine. I only get Divine after I get a Heart and/or Satanic and I have a substancial level advantage on the opposite team. The picture below is probably one of the few times I would ever buy Divine while winning... and that's after having 9 lvls more than anyone on the opposite team (the game ended before I could buy it). The risk is just never worth it if victory is assured, as you cannot guarantee not dying and losing Divine Rapier (Luna is made of glass after all...).

If you are doing bad, farming for Divine is not worth it unless you already have Helm of the Dominator completed. You can turn around a game with this item but remember you have to be very careful. Also, if you need it fast you have to consider selling your items. Usually when Divine is the last hope you usually aren't free to farm 10 minutes for it. Sell everything but Manta and Helm of Dominator if you have to defend now (you should never do this, unless you know you are going to lose if you don't kill them next teamfight. In addition, don't sell anything if you can't make the cost of Divine with your items). Boots and mana regen is useless if the game is over. Hopefully if you're in luck Eclipse is available, and your Moon Glaives are maxed out. Start hitting whatever comes at your first, creeps, heroes whatever. Moon Glaives + Divine should take care of the rest. If you are successful, you should have enough money to buy your items back, but I would start with a Heart of Tarrasque since the game is on the line.

Obviously the Divine Rapier last hope strategy is not very effective (half the time you don't raise even half the amount), but it can be especially useful if the opposite team gets complacent due to their overconfidence. Also, it's a Secret Shop item, so you better buy a TP or hope the courier doesn't die.

The most logical reason to buy Divine is when you are playing against a team with a harder carry than Luna, which only comes from the fact most (not all) of these carries are complete trolls. Anti-Mage, Faceless Void, Phantom Lancer, Phantom Assassin and Spectre are probably the only carries that can outcarry a fully fed Luna very late game (i.e.: They're defending your push very well and your team has to retreat despite your team's gold/item/xp advantage). I have lost enough games versus harder carries because my team thought, "Hey, we're winning all the teamfights let's just farm instead of push to end" only to find out Void or AM is level 20-25 with Battlefury and Butterfly despite his 15 deaths, 10 minutes later out of nowhere.

If you are the hardest carry on your team as Luna, and their team has one of these harder carries, you have to consider buying Divine Rapier solely because nothing else will do against a fully fed PA, or Void, or AM, or Spectre. Usually this is around the 35-45 minute mark when your team is winning, but your pushes are too slow or not effective because they have amazing turtling skills. Good turtling with hard carries win games. I've won games with Spectre with 3 rax down and only tier 4 towers and the ancient standing by farming at the base with radiance. Eventually... if you turtle enough you'll get fed. Do not allow harder carries to steal your victory because buying a Divine Rapier was deemed too risky by your team because of turtling.


In this game, I told my team I was going to buy Rapier. At the time I had multiple levels on everyone, I also had the money. They all told me no, "There are better items for Luna". I listened to them and lost the game due to the Radiant's superior turtling. (FYI, I was trying out Na'Vi Kuroky's build hence MoM. It works, but in his video he actually buys the rapier against Void. Again a lesson learned the hard way...)

Basically, you cannot avoid throwing versus a "harder" carry if your game is going to run over an hour, in my case ~70 minutes. Any game over an hour will bestow upon you a fully fed carry eventually. Note that despite this I still had highest xp/min rate... and despite this, hitting level 25 first doesn't guarantee victory. I made the mistake of buying the wrong items (instead of Rapier I got BoT to quickly counterpush and worked on Daedalus).

Conclusion: Buying a Divine Rapier is like flipping a coin. You can win or you can lose whether your team bought it or not. I personally dislike this item even when I have Aegis of Immortality. The risk is too great when you are winning. And the risk is just about right when you are severely losing. But most of all, it is a must buy when you have reached dead end in your push game against a team wth a harder carry who is turtling.
Na'Vi Kuroky Pub Build
"Normally I look my enemies in the eyes when I slay them."


Early Game:


Mid Game:


Late Game:
[/previewimg]

MoM works in high ranked pubs? Guess it should work for us all then. Also look at how Luna uses high ground to Eclipse Rubrick without getting aggro. Also note that the only death stems from a greedy mistake on trying to last hit for a kill. Also note how the actual match is fairly close (in terms of kills) and how Luna easily out-carries Void due to Rapier.
iG.Zhou "The International" Build
"A Harvest Moon"

Tranquil Boots now suck on Luna

Why would I write anything about this build when you can watch it yourself?

Early Game:


Mid Game:


Late Game:

It's very interesting that iG.Zhou doesn't even build any lifesteal on Luna until late game --> no Helm of the Dominator. Then again, this is the pro level and in comparison public games are much more... "independent".

Another interesting thing to notice is when Zhou jungles/farms creeps. Immediately after a glaive hit, he runs away to minimize melee damage received. Hits, runs, repeats. You can see this throughout the game in the video above. 10-30 HP may not seem like much but it adds up especially when creeps are stacked.

Remember Tranquil Boots turn into Boots of Speed (the regular ones) after taking several hits. I agree that Tranquil Boots are very cheap for the movement increase, but remember it is only when you are not being aggroed. Once you take damage, they morph into the worst boots in the game. This is where Drum of Endurance comes in to compensate. during the time he doesn't have Drum of Endurance, you can see Zhou dies a couple times with Tranquil Boots.
Diffusal Blade Dota 6.83
"Diffusal Luna? noob" - Invoker in the Screenshot below


Diffusal Blade in 6.83 became a viable item for all Agility heros (and then some) due to the modification of making Manabreak not a Unique Attack Modifier (UAM).

That means if you build a core Luna with Manta, and Helm of the Dominator... You basically turn into a pseudo-Anti-Mage that burns mana with Diffusal and damage with your illusions. Illusions don't burn mana on ranged heroes. This does not matter, diffusal is amazing on all ranged agility carries now. I buy this thing on Viper, Drow... you name it, and now Luna.

Diffusal is one of the most cost effective Agility gain items, and it's one of the easiest to build due to the low cost of each component. You'll "essentially" get the Agility of an Eaglesong with Diffusal 2 with a much easier build tree.

The active, purge also has synergy if you buy a Shadow Blade. You can purge yourself of Dust detection which will allow you to escape since the cooldown on Dust is significantly longer than Purge.

As always, buying a Diffusal on Luna right now is still being experimented with, but with a magic heavy lineup you should rush this after BKB.

Thus far I build as follows:
1) Treads
2) Diffusal
3) Helm of Dominator
4) Yasha
5) Manta or Aghs

Add BKB in 2 or 3 if magic/cc heavy lineup.

Buying Ghost Scepter Only
Ghost Scepter. The item nobody in pubs buys. It's very situational on Luna, but buying it may win you the game.

Ghost Scepter is what you want to buy everytime you play against Juggernaut. Omnislash goes thru BKB and it's physical damage. That means when you drop BKB, you still die to Omnislash if it's 1 on 1 against Juggs.

Even if you Eclipse during Omnislash, not even Selemene can make Eclipse hit Juggs during Omnislash. Only Ghost Scepter (and Ethereal Blade) will stop this (with a few exceptions like Omniknight's Guardian Angel).

Once you use Ghost Scepter, Omnislash will prematurely stop (assuming no other targets). Remember to use it right after he casts it and not before otherwise you will not trip the ultimate's cooldown. Usually right after that, Juggs players will use Blade Fury and still be magic immune. Run during this duration since magical damage is amplified in Ethereal Form.

Once Blade Fury is done, Eclipse. Juggs is dead. EZ RARES.

This item is great for other right clickers: Drow, PA, Viper, Riki etc... but for these heroes you should go ahead and upgrade to Ethereal Blade. Juggs is a special case where you primarily care only to make yourself Ethereal with Ghost Scepter due to his ultimate.
Discussion on Ethereal Blade & Heaven's Halberd
"Interesting..."

Ethereal Blade
Active: Ether Blast - Converts you and your target into ethereal form. Target unit is slowed and cannot attack or be attacked, and takes 2.0x of your primary attribute + 75 as damage. (Ethereal units take 40% extra magic damage) Ally/Self Duration: 4 seconds Enemy Duration: 3 seconds Movement Slow: 80%

Ethereal Blade, much like Aghanim's Scepter is a very polarizing item. At a mana cost of 150 it is more than a Lucent Beam, but it does not always provide as much damage unless your Agility is maximized which usually doesn't occur until mid/late game.

There are three benefits to Ethereal Blade:
  • Right click attack immunity
  • Magic damage increase to your ethereal enemy
  • Can be disassembled so you can build Eaglesong into a Butterfly

There are three downsides to Ethereal Blade:
  • Magic damage increase to you
  • High mana cost
  • Right click attack immunity for your ethereal enemy

NOTE: Remember you can use Ethereal Blade on allies as well. Thus they take the extra magic damage, can't attack, and can't be attacked. They are not slowed, do not take Ethereal Blast damage, and it still can be cast when BKB is active or if they have Linken's.

The only time you should ever buy an Etheral Blade is if you need an Ghost Scepter. This occurs when you go up against physical heros (Phantom Assassin, Riki, Ursa, Juggs, etc...). If the opposite team has a Lina, Lion, Zeus or other burst damage dealers skip over Ghost Scepter and Ethereal Blade immediately.

When casting Ethereal Blade's active, the only thing you are able to do is use items, cast spells and run around. This means in order to deal damage after activation you have to have enough mana to cast Lucent Beam, or preferably Eclipse. The item also synergizes if you do have caster buddies on your team which should make swift work of most Ethereal enemies.

For example: When Ursa, a very easy to play dps hero, who can basically 10 hit most heroes if well fed, solo Roshan, is basically unstoppable unless you have a Vanguard (a no-no item for Luna), evasion, escape mechanism (Blink, Puck, Anti-Mage), Ghost Scepter/Ethereal Blade, a ton of health, or a crapton of dps and lifesteal. Taking him out of the fight for the 3 seconds usually can be the difference between life and death. Luckily Ursa is much less tanky of a dps hero than most (without a Heart of Tarrasque) and can surprisingly be dispached quickly especially with the magic damage buff.

Now remember that ethereal form is blocked by Black King Bar. Those wanting to be immune to everything... you cannot have this. This is actually very important when you use a Ghost Scepter since you are the only one in Ethereal form.

When using Ethereal Blade and both you and your target are in ethereal form, using BKB will dispell ethereal form just on Luna. Your target will continue to be ethereal unless they are purged of ethereal form (eg: diffusal blade).

Heaven's Halberd
Active: Disarm - Disarms the target for 4.5 seconds. Lasts 3 seconds on Melee targets. A disarmed unit cannot attack, but may still cast spells. Passive: Lesser Maim - Gives a 15% chance on attack to slow enemy movement for 4 seconds. Movement Speed Slow: 20% Maim Chance: 20%

The ONLY time you should buy this item is if you cannot complete Eaglesong even though you have Ghost Scepter (should always be your first buy when dealing with dps heroes, Talisman is good but 0% is better than 75% of right click attacks hitting you). Halberd is essentially the "strength" equivalent of an Ethereal Blade. It is also much cheaper/easier to build, but the disable against dps heroes is just as long. It also allows you to be attacked and you still can do everything normally (only the disarmed person just can't right click attack). That's where the price difference comes in.

The only advantage to buying Halberd over Ethereal Blade (which is not many) is this singular reason: Ghost Scepter only shares cooldown with Ethereal Blade; thus you can tandem their activations for 7-8.5 seconds of dps right click immunity (from one enemy).

Luna really has no real good use for Sange in any regard except this one, and it's only if you can't finish Ethereal Blade. If you finish Eaglesong later on, finish Ethereal Blade or Butterfly, sell Sange (but not before you have enough gold to make the item you're saving up for to take its place). Do not make Sange & Yasha if you already have Manta. Yasha derived items do not stack.
Discussion on Hand of Midas & Farming

Midas is a polarizing item on Luna because unlike most proper carries, she is a very effective farmer starting mid game with Moon Glaives. This is akin to Phantom Lancer illusions and Meepo's Meepos. Everyone else has to buy an item to get super fast farm which is either Battlefury, Radiance and/or Hand of Midas.

Not having to farm an item to effectively farm allows you to rush your core much faster. But having an item that helps you farm faster can make you an unstoppable force as you will level up much faster than everyone else. Luna can already do this with glaives, but let's take a quick example why Midas should occasionally be considered.

Have you ever played against Alchemist? Like a really good one? One that maxed out Greevil's Greed and got a Midas and had so much disposable income that they could always buyback? Well, Luna is one of the few carries that can even come close to matching Alchemist's farm GPM rate, but this is only true if she has a Hand of Midas. Will you outfarm Alchemist? The answer is no, but you'll be fairly close. Without Midas, you will not stand a chance by mid-game as Alchemist will have farmed most of his luxury items (if free-farming).

If you are to get Midas, you have to rush it. Ideally you should be able to finish Midas in approximately 5-8 minutes in a duo lane. Remember that by buying Midas you are slowing down purchasing your core items (i.e. you are in for the long haul in this game). This is obviously offset by the additional experience you get from using it as well as the added money from creeps.

The most important part of buying items once you have Midas is... you have to buy mid/high tier items immediately. It's usually not worth finishing a Ring of Aquila for example. I would just skip straight to BKB or Manta/Butterfly/Ethereal Blade first depending on the situation.

Buying Eaglesong, Reaver and Sacred Relic all become much easier to buy/rush with Midas. With it your XP/Min should not be less than 700. Just make sure the items you buy are the correct ones of the situation.

In this game, Alchemist is on my team but Luna still outfarms him by very little. Why would you go Midas when Alchemist is on my team? Why not? It's entirely possible Lone Druid outfarms us both, fortunately that wasn't the case.

Both Alchemist and I got free farm, and I couldn't risk getting out leveled due to a Midas Druid which might buy Radiance. Remember it's entirely possible your "harder" carry can be shut down as well.

A few tips on using Midas:
  • Try to use it on Largest Neutral creeps you can find to maximize XP gain
  • Try to use it immediately when the Cooldown Timer is up (i.e. Go to the creep before timer is up)
  • When Glaives are leveled, you will destroy creeps very fast, use Midas before you aggro.

Additional Farming Strategies:
  • When Manta is up, use the illusions to farm another camp
  • Use a dominated creep from Helm of the Dominator to stack camps (Ancients preferably)
  • Use Tangos or Quelling Blade (or have a teammate preferably) cut routes camp to camp
  • Have a support ward the enemy ancient camp, so you can farm it once and keep it from respawning for 4-5 minutes.

I know that most good Alchemists and Meepos can farm upwards 1000+ GPM. Believe it or not Luna can get close to this with stacked camps and Midas. Unlikely to outfarm Alchemist, but keeping up in high tier items is key especially if your team's pushing game is suffering to good turtle defense.

I personally recommend buying Midas when playing against Alchemist (as if this wasn't clear yet), Meepo and Lone Druid. Other heroes that get Midas regularly such as Lifestealer, Nature's Prophet and Doom are much less of a threat farming-wise; I occasionally get Midas if 2+ of these guys are on the opposite team (depend on how early laning goes).
Using your Active Items Properly
"Do not cross the Dark Moon."


Magic Wand:
Probably the most underestimated Core Item of all time across the majority of DotA2 heroes. Luna in this regard needs Magic Wand because what it does truly is magic! I find it shocking when playing games during a pub-stomp to see nearly nobody with Magic Wand! It's even more shocking if Magic Wand is part of your hero's Core Items. For Luna, in the majority of game you should have your Magic Wand throughout the entire game or sell it late game, no exceptions. People usually do two things wrong when dealing with Magic Wand:
  • They don't build it, ever.
  • They sell it too soon.

Hey look at this game (same pic as Divine Rapier section)... I'm the only one in the entire match that has Magic Wand! Gee... that 25 and 2 looks absolutely terrible because I was the only noob to keep my Magic Wand (or buy it). Selling it before the 35 minute mark is kinda early if you ask me.


Now look at this game, 3 people out of 10 have Magic Wand, a bit better but still not as high a percentage of ownership that I usually expect. Nevertheless, the team with the most Magic Wands wins again! I know the stats at Dotabuff.com show otherwise, but statistics don't always tell the whole story.

But now to the real story, how to use your Magic Wand and when. First of all, you have to get used to using Active Items. I know that using the ZXCVBN keys can be a pain, when they're so far away from QWER. Guess what? Remap your keyboard in the options menu or learn to use ZXCVBN. Personally I've mapped 1234 as Items 1, 2, 3, 4 and 5, 6 on my mouse buttons (I use a R.A.T. 7). Control groups I've macroed, and anyways, with Luna, you don't need more than 2 control groups if you're using Helm of the Dominator to take control of a creep.

Usage of Magic Wand should be reserved for 3 situations.
  • You are about to die.
  • You are out of mana, and you need it now.
  • You are running away from the enemy and one or more of the previous listings are also true

Reasons for retreat and low HP are self-explainatory. All that is needed is quick execution of your item key while running or hiding. The running low on mana reason is not so clear. Even if Luna is low on mana, I do not use my Magic Wand unless I need to cast a spell at that moment. If there's nothing going on and you're only laning or jungling creeps without fighting the opposite team there is no reason to waste any of your Magic Wand's charges.

The thing is, it is better to keep your Magic Wand's charges (1-15 doesn't matter) than to just use it because you're not 100% HP/Mana despite there not having any immediate need for HP/Mana. I cannot tell you how many times even 1-3 charges on the Magic Wand has saved my life or netted me an extra kill since I was able to use Lucent Beam.


Helm of the Dominator:
If you can micromanage (eg: control groups), I suggest you take over these guys specifically since they work well with Luna: Alpha Wolf (Critical Strikes), Centaur Khan (Stun), and Satyr Hellcaller (HP Regen). If you don't know how to micromanage, don't worry, winning with Luna doesn't come from micromanaging a creep anyways. In most of my Luna games I don't even waste my time. Just putting it out there for those who love the micro.


Manta Style:
Believe it or not, Manta Style is both an offensive and defensive item. And by defensive I mean it will save you from dying. One quick press of your item key and you will multiply by 3.

Offensive Use: This is fairly self explainatory, press the item key and destroy with Moon Glaives! Usually by the time you have Manta Style, your Moon Glaives should probably be maxed out which makes right clicking effortless, as well as targeting. The stuff should bounce all over and people on their team should be dropping like flies or running away like cowards.

Defensive Use: There's a couple of ways to use Manta Style defensively. First is using your Illusions as "wards" or scouts to scope out the enemy. The second is when you are getting ganked. If you activate sooner rather than later, Manta can occasionally save your life due to Illusion confusion (something we all suffer from). Running away while sending one Illusion this way and another the other way is a great way of losing the enemy. This is best done while running left or right as to obscure the real you as you are always the middle character. Usually the second detour is the real me, while I send an Illusion to my base to heal. Every once in awhile this will work, but many will see through your trickery so it's not highly effective.


Power Treads:
Once you have PT, select them to use Strength or Agility. In many games it is not worth using Agility until mid game (lots of tanks or high dps heros). Strength will give you more HP early/mid game which will definitely help. I usually turn it to Agility when Luna has about 1300 HP without PT selected on Strength. I know Agility is the primary attribute, but I've learned over many matches that Agility will end up making you die since the damage increase is not that great early game, but the extra 200 HP from Strength will save your life. I usually only go Agility early game during the lane phase if the enemy is also made of glass, and switch to strength when I'm about to die. During Mid/Late game I go full Agility and switch to Strength when I'm about to die. When used in conjuction with Magic Wand... it's a lifesaver! If you manage your spells correctly, you should never have to switch to Intelligence for more mana.


Ring of Aquila:
Turn it off when you want to pull back your creep lane, or during the laning phase when you don't want to push too hard. Otherwise ON all the time!
Using Your Skills Properly
"The night sees all."

One of the biggest mistakes beginners make when playing any character in DotA2 is that they waste their mana just because they have mana. Or that they cast a spell or skill just because it is available due to their low cooldown. These two reasons is why many people don't get better, and usually the reason they die so often.

The first skill you'll want to level up is Lunar Blessing. This will be the equivalent of buying yourself a Quelling Blade to help with last hits and denies in early game. Luna is item dependent, and if you can't last hit, you should Bot until you get familiar with her animation and timing of her right-click attack.

After that you want to alternate with Lucent Beam and Lunar Blessing until Level 5. Try to max out Lucent Beam first as Eclipse's damage is dependent on it. At Level 6, like most heroes, pickup your ultimate Eclipse. Your Lucent Beam should be at rank 3 (out of 4) when you receive Eclipse rank 1 when Luna is at Level 6 (See below, this is what your skill bar should look like at Level 6 in nearly all your games).


If you are having a hard time last hitting since your opponent is either denying you or harrasing you (All ranged heroes have longer range than Luna), it is acceptable to forgo a level of Lunar Blessing for one level of Moon Glaive. I usually only do this if I am solo laning or if I am being babysat and I am not getting my farm in a duo lane. If you are laning with another carry, which is very common in public matches it is best to forgo Moon Glaive and level up Lunar Blessing to give your partner extra damage as well. Lunar Blessing's damage is only truly realized in the early/mid game, especially during teamfights as everyone will get the bonus.

So the general rules with Luna is: Max out Lucent Beam ASAP. Grab Eclipse whenever possible, and grab Lunar Blessing over Moon Glaive. Moon Glaive is the last skill you should max out. Again grab one level of Moon Glaive to help with last hitting if being outfarmed early game but only at the cost of leveling Lunar Blessing, never at the cost of leveling Lucent Beam.

Now that you know the skill leveling progression, here is how to use your skills properly.

Lucent Beam (Active - Q)
Essentially your only skill during most of the game, you should try to not use Lucent Beam at all until you have rank 3 of Lucent (Level 5 Luna). Rank 1 and 2 of Lucent Beam early game do nearly no damage with high mana cost due to your low mana pool at low character levels (1-5). Once you have level 3 of Lucent Beam, you should harrass your opponent regularly because this is the time when it is possible to kill them (easily). Always try to keep 40% mana available, just make them use their Tangos and Salves. Try to not push the lane too hard as Luna is still very squishy early game and tower hits will decimate you easily. Stay behind your creeps and run back if you want tower hits.

Getting your first kill is tricky with Luna. You have to try to isolate the opponent you've harrased and surprise them into death. I usually run around the map to catch them from the side instead of head-on and hit them with Lucent Beam for that easy kill. Most players will heal or run back to their fountain to regen. If they do that, just farm the creeps and collect the XP. If they are not near the creeps fighting it out, they are not receiving that XP. That means when you force your opponent to leave the lane, you are currently earning XP they are not. Remember, games are not won on most kills. Chasing kills is how you lose games. You win games by using your brain. Even having superior XP over the opposite team does not guarantee victory.
If you need proof click this image on the left. Yes, that's a Sniper with a Divine Rapier. This game is a prime example that kills, xp and gold do not win games by themselves! Teamwork always wins.

We went after the throne. They camped out Rosh (at ancient creeps) thinking we would want both Aegis and Cheese (4th spawn). We smoked up, and rushed the Ancient without creeps. They lost focus on the objective of the game, and payed.

Lucent Beam is easily spammed, so do not just cast it to cast it. This is why you save your mana until Lucent Beam is at rank 3 so you get the most out of your mana. Mid and Late game mana isn't as big an issue, but always leave enough mana for Eclipse.

Learn the animation of Lucent Beam. Once Luna locks the animation for this skill, it doesn't matter how far away your opponent has run since the animation started, Lucent Beam will hit them. This skill is one of the best hero last hit skills in the game. Low cooldown, good damage, good range, excellent animation.

Lucent Beam gives solid damage throughout the game except very early game. Remember in some situation you should use this skill for the mini-stun to try to slow down escaping heros (usually when you and your teammates are chasing that one person).

Moon Glaive (Passive)
Last skill you level, basically your physical damage and farming skill. By midgame (around Luna Level 10) you should be able to farm with impunity due to not even having to think about last hitting.

Lunar Blessing (Passive)
Should be maxed before midgame, again only really worthwhile at the beginning as the extra damage is an added quantity as opposed to a percentage.

Eclipse (Active Ultimate - R)
Your amazing ultimate. No mini-stun, but powerful throughout the game. At rank 1 you can kill nearly all heros at Level 6 (Lina, Sniper, Drow... are like free food if isolated). If not, an additional rank 3 Lucent Beam should be enough to finish off anyone. Remember Eclipse hits random enemies. This is how they balanced this skill. So you must not detonate Eclipse when there are a lot of enemy creeps around. Early game I would not use if there is more than 1 creep around, and late game not more than 2 or 3 but only if the hero is alone. If it's a whole teamfight, and there's 2+ creeps, it becomes very hard for Eclipse to be effective at killing the opposite team. Yes the creeps will likely die from Eclipse, but all that damage is always better directed at heros.

During teamfights, if I have Moon Glaives leveled high enough, I will target the creeps to kill them fast and hit the heros at reduced damage so I can hit Eclipses more effectively. Remember, you are not an initiator, you come in after fight initiation. This is your bread and butter at your massive GODLIKE RAMPAGE kill-streaks.

Eclipse is also a very good early-mid game gank tool. Coming from the side of the jungle or behind the enemy heros to Eclipse "traps them" into a gank of doom. And by that I mean if they run back they get Eclipsed more, if they go the other way there are your teammates. Usually a gank like this should net your team 2 kills.

There is a slight delay in Eclipse so remember to cast it right before you enter the enemy's sight range. The delay comes from turning day into night.

If you ganked early-mid game well, Luna usually always has a massive character Level advantage on the entire opposite team. This should allow you to carry easily to victory unless you get overconfident and get ganked for laning solo (usually a no no if you don't have a TP or teammates with you or well warded jungles).
Aghanim's Scepter Upgrade for Eclipse
The 6.83 update buffed Eclipse and Aghanim's Scepter for Eclipse. Fortunately the mechanics do not change significantly. Eclipse maximum hit limit has been reinstated without Aghanim's but removed with Aghanim's and hits have been increased. The math is currently wrong but the concept is the same. I will update in time.

What a polarizing item this has become...
Now let's have a discussion on Aghanim's Scepter upgrade. Is it worth it? It really depends who you talk to. The community though, for the most part, thinks it is one of the worst purchases. I disagree that it is completely useless, and is quite useful in the following situations:
  • You have 4+ more levels against the entire opposite team
  • The opposite team has a lot (3+) of glass (low HP) heros.
  • You keep dying and can't save up enough gold for Ultimate Orb, Eaglesong and Reaver (not a good reason but at least you'll get more survivability from it)
The extra damage and hits from Eclipse will net you extra kills in the first two situations. In well balanced team and heavy HP tank scenarios... not so much. Aghanim's Scepter also adds in "buffer" if you would like to Eclipse into creep waves, but as before not recommended. Save those extra hits for heros and kill them.

The current argument to go with Butterfly before Aghanim's is that the extra damage will offset the Eclipse quantity. This is the main reason I go with Butterfly over Aghanim's in tank heavy or well balanced team games. Butterfly also helps in survivability with evasion versus tanks.

It helps to try Aghanim's in a game to see the difference in damage for yourself. Again, I believe that Aghanim's is very situational, but never a "never buy" as some would suggest.

The Math (aka math proofs):
Skip this section if you don't need to know the details, it's a bit hard to follow and just written for further explaination on why people dislike Aghanim's over other luxury items. Calculations do not include magic resistance. The calculations below include the maximum cap which no longer applies from the October update, but total beams remain the same. This means Eclipse is essentially the best 1 on 1 ultimate in the game next to LC's Duel.

Eclipse hits at the current level of Lucent Beam, which for this discussion is the maximum damage of 300. I will only compare rank 2 and 3 of Eclipse with maxed out Lucent Beam since this is a mid/late game item.


The increase in total hits is 2/2 (6 max), and the increase in beams is 1/2 (7 to 8, and 10 to 12). Wonderful math tells us 2 extra hits (4 to 6) is an extra 600 magical damage. So the totals without and with the upgrade on one enemy hero is capped at 1200 and 1800 damage respectively. Either way, 1200 isn't anything to scoff at, and neither is 1800.

At rank 2 of Eclipse without Aghanim's, Eclipse will deliver net 2100 damage or 2400 damage with (as you can see the total extra damage is negligible at rank 2 Eclipse). At rank 3 the net damage is 3000 and 3600 respectively. Again, individual enemies can only take a maximum of 1200/1800 damage respectively but Aghanim's is only realized if Eclipse is maxed out, otherwise it is just wasted gold.

Now think about Luna's solo combo with Aghanim's. Assuming you isolate a hero alone, the following is the maximum damage you can inflict with Eclipse: 1800 on one hero is absolutely devastating. Follow up with a Lucent Beam and that total is 2100 in about 3.6 seconds (0.6 second intervals for 6 hits, you cast Lucent Beam while Eclipse is active). Afterwards while Lucent Beam is cooling down your Moon Glaives you be able to finish them off (assuming they're not tanks). Without Aghanim's the maximum damage you can inflict on a solo enemy hero is 1200, 1500 damage with a Lucent Beam combo. The difference in damage is 600. On glass cannons, that usually means life or death. So you can see how Aghanim's is useful against teams with squishy heroes.

Now the only time Aghanim's gets really interesting is when you are aggroing 2 of the enemy, and with Eclipse maxed out at rank 3.

Maxed out, Aghanim's total damage if all 12 beams hit is 3600 damage. Assuming you are comboing Lucent Beam while Eclipse is casting renders 3900 net damage. Again, 1800 damage capped per enemy hero. Hey wait! 3600 divided by 1800 is exactly 2! Translation: if you isolate two enemy heros and use rank 3 Eclipse with Aghanim's both heros will get 1800 damage guaranteed (both get hit with a max of 6 beams and all 12 beams hit). Without Aghanim's both heros will get 1200 damage and only 8 of 10 beams will hit, wasting 2 (or 600 damage). So when aggroing 2 enemies, the difference in total net damage is 1200 (1800*2 = 3600, 1200*2 = 2400, difference of 1200).

This is where Aghanim's shines. Two enemy heros. Repeat after me. Two enemy heros. Once you use Eclipse on 3, 4 or 5 heros, Eclipse cannot guarantee maximum 1800 damage per hero. This makes Aghanim's an excellent tool when enemy heros are paired. The 1200 damage increase is absolutely devastating to pairs of heros.

Now since Aghanim's doesn't shine as brightly with 3+ heros, should you still buy it? Well, as previously calculated, the difference at rank 3 is 600 extra damage (3000 vs. 3600). That's 600 damage given randomly to the enemy team. Whether you can make up 600 damage with your Manta or Butterfly is up to you... (the answer is probably yes...)

This is why I argue your XP superiority or their team composition on whether you should buy Aghanim's. Again, try it out instead of getting manta in a game and see for yourself. Aghanim's is a sight to behold... but only when used properly in the right situations. The majority of situations always will dictate Manta or Butterfly first.

Easter Egg Failboat: As you can see from the picture description of Eclipse, the max hits per hero with Aghanim's at rank 1 Eclipse is 6, but the actual total beams with the upgrade is still 4. Maybe a buff to the Aghanim's upgrade in the future? Perhaps 6 beams at rank 1? Maybe honest mistake? Who knows!
Job 1 - Solo Mid/Safe Lane
"Lost in the woods are ya?"

Skill Leveling Note: When soloing a lane with Luna, at Level 3, rank up Lunar Blessing a second time instead of getting rank 2 of Lucent beam. This is because you get no benefits from a rank 2 Lucent solo as it probably won't net you a kill and rank 2 Lunar Blessing will help you last hit/harass much easier.

As solo mid, you should easily be able to out XP the rest of your teammates. In addition, the only other three responsibilities you have is to out XP the opposite team's mid, gank for your team and most important DO NOT DIE. Do not die. Do not die early game. Do not die. Dying is lost XP, lost gold, and giving XP and gold to the enemy. Read that again. Doesn't that sound awful? Everything you lose they gain. Not dying is more important than getting a kill in the majority of circumstances, especially in early game.

Luna's speed even without boots is excellent for escapes, initiations against your mid (1 vs 1, again Luna is not an initiator for team fights) and top/bot ganks.

Special note for LINA and LION: Lina's magic number is 450. Lion's magic number is 600. This is what their ultimates do in damage at level 6 without Aghanim's. These numbers do not include magic resistance, just make sure if you're near/under these numbers, it is best to run to heal if they are level 6 (or almost level 6). They both will one hit you dead. Special note for PUDGE: If you are going mid and they have Pudge, buy a ward (or a support preferrably) and place it on their side of the river so you can keep the creeps between you and his hook. That 150 gold will save you from giving him first blood.

When you get your Ring of Acquila, turn it off if you feel outmatched in mid so you can pull the creep line back to your tower. If you're owning mid, you should usually be able to destroy the mid tower by yourself after several creep waves.

Again, harrass the mid hero only with Lucent Beam rank 3+. I usually try to save Eclipse for top/bot ganks but it is very deadly when the mid hero is isolated with no creeps with you. So don't be afraid to use Eclipse 1 vs. 1 early game if it will net you a kill.

One last thing about Eclipse, DO NOT ACTIVATE ECLIPSE IF YOU ARE GOING TO DIE or if YOU JUST GOT GANKED SOLO. The cooldown is too long on Eclipse to waste it just because. If you activate Eclipse, you should have more than 50% health. Ideally 75%+ so you know it will finish (as it ends if you die).

Lunar Blessing should allow you to last hit very easily as well as deny. The only problem that can possibly occur is if you are matched with someone with slow (Drow, Viper) or longer range (Drow, Mirana, Sniper... basically everyone but a melee hero). They probably will focus on last hits and denies too, but once they reach Level 6 you should start getting very cautious and perhaps getting a rank of Moon Glaives which might be worthwhile to increase your attack range.

If you harrass correctly with Lucent Beam, last hit and deny well early game almost no characters should be able to keep up with you, even Drow (unless they are totally PRO). It's okay if you don't get kills in mid, though it's nice.

When ganking, I like to gank Easy Lane with Luna. Easy lane gives you the mathematically superior win % advantage. If you love winning, gank your Easy lane first. Demoralizing the opponent with 2 more deaths is much better than a failed gank where you only get 1 kill or no kills but opponents running with nearly no health.

Again, use the treeline and line of sight to setup the gank. Wait for them to push into your territory and then before rushing in sideways or behind them with Eclipse make sure your team is in position as well. If you Eclipse from the side or behind (3 vs. 2) they usually have no chance to survive if they are past the river into your territory. Keep doing this until mid-game when your job ends and pushing/defending begins.

If you have trouble holding mid... then your job is simple, hold the first tower as long as you can. Make them dive (run past your tower) to kill you. You can ask a teammate to take over for you or help, but losing a mid tower is much less devastating than losing a top/bot tower. Just make sure you Deny the tower when it's possible or when at very low health.

Rune Control: I never buy bottle on Luna when I'm mid. That's just me and personal preference. The good thing is Luna has a high movement speed, so you should be able to run to deny the runes when they respawn on the 2 minute timer unless you're outclassed by say Queen of Pain.

That is your job as solo mid. That's what you will do for 10-15 mins on your own. At the end of your solo phase, you character level should be well into the teens. If you're not at least Level 10+ after 10-15 mins... you are doing something seriously wrong and you're going to need to practice bots some more. Even if you are only defending your mid tower, be at the minimum competitive with their mid hero's level (no more than -1 in Levels, usually even) unless you're been feeding them.

Solo mid with Luna is fairly easy once you're familiar with her animations and mechanics. You'll be blessed by Selemene in no time!
Job 2 - Top/Bot Duo
"Awwww... are you not going to beg?"

If you're duo your job depends on your partner. If your partner is semi-carry or support, you should go for the last hits. The only time you forgo last hits is if your partner is a hard carry like Faceless Void, Anti-Mage, Phantom Lancer etc... Other heroes like Axe, Tidehunter, Ogre Magi, Lich, Mirana should forgo last hits for you. Mirana is a good carry, but you're much more powerful early and mid game, and Mirana is not a good carry until late game and if well farmed (if Mirana is going carry she should mid anyways for XP and she's a better ganker than Luna...). If they're stubborn about it, just fight for last hits if it has to be that way. If you do give up farm for a hard carry, dont' worry too much as Moon Glaives midgame will give you the super fast farm you've been waiting for.

The thing with Luna is that she is a terrible babysitter. You cannot save someone from being killed, not with your mini-stun on Lucent Beam, or trying to kill them. Eclipse doesn't kill as fast as say Lina's Laguna Blade. Your job with a hard carry is to just help them get that farm from kills. If they can't get it done, your job is to finish the job and take the farm for yourself with a Lucent Beam last hit. Do not last hit with Lucent Beam unless the target is running away from your hard carry.

Now your job is easier if you are the only carry in lane. Farm farm farm. Last hit and deny and kill whenever the opportunity arises. Push and pull your lane as necessary. Usually I do early pushes with Luna because killing is just so easy especially in public matches. Dominating your side lane early can be a very good reason for the opposite team to gank you. And they will, especially if their members go missing/ss to stop your push.

Make sure your team calls missing heros using the chat wheel (default Y). When missing, it is always best to retreat to your tower or quickly retreat into the jungle to catch the solo ganker by surprise with a fast 2 vs. 1 with no creeps. Which you know means auto-Eclipse kill. You should only attempt to catch the ganker in the jungle 1 vs. 1 if you have Eclipse ready.

If you do get ganked, successfully or not, you or your teammates will have to ward the jungle so it doesn't happen again. $150 bucks on a ward is a cheap price to pay versus a death. People are so stingy with their gold, even support when it comes with buying couriers and wards.

Luna duo lane is real easy, and it is where you should start when you are done with Bot practice before going solo mid as Luna in real matches.
Job 3 - Aggressive Trilane
"I'll have your trophies."

Before I discuss the Aggressive Trilane (offlane), I need to explain the criteria for a FAILED Trilane. They are as follows:
  • One of you dies during the trilane phase (non-gank death, a laning death)
  • The 1st tier tower has not been taken by the 10 minute mark
  • Your adversary is not turtling the lane, and they are getting last hits

These criteria are evidence of a failed trilane, and lack of trilaning skill. The only time these rules don't apply is if you're against another trilane. Otherwise if it's 2 vs 3 or 1 vs 3... your trilane should completely dominate.

If Luna is in a trilane she should be the only carry in the lane. Your partners in crime should have at least 2 of the following skills (in order of importance):
  • Stun (Earthshaker's Fissure, Vengeful Spirit, Lion...)
  • Harrass (Warlock's Fatal Bonds, ranged right-click)
  • Push (Undying, Nature's Prophet)
  • Slow (Tidehunter, Enchantress)
  • Heal (Treant Protector, Warlock)

Ideally having lots of disables and harrass should allow your trilane to control the lane. This is the main reason you trilane, to have complete control of the lane. This means the enemy is not getting optimal farm (very little last hits) and they're walking away from the creep line due to harrass. This also means you should be able to push their tower very aggressively.

One of the biggest mistakes in trilaning is the lack of aggression. There is no point to trilaning if you're afraid to dominate them and take their 1st tier tower early. Do not pull your lane... push them behind their tower and take it.

The goal of the trilane are as follows:
  • Farm for the carry, in this case Luna
  • No/Limited farm for the enemy
  • Pushing the 1st tier tower quickly and getting the last hit for Luna

Getting kills is much easier in a trilane, but it's best to do it early. It's not necessary to get kills in the trilane, this is very important. What is even more important is to control the lane and push it very hard so the enemy doesn't know what to do. They only have several choices:
  • Let you take the tower with no response
  • Defend the tower and likely die
  • Call for backup

Pushing the trilane is favorable as long as your 3 heroes outnumbers whatever they have in the lane. Once it's 3 vs 3 or more stop pushing. If you do this correctly with your teammates, you should be pushing that tower before the 5 minute mark if not the 2. Within 10 minutes that tower should drop if they don't call in for TP reinforcements. The earlier you push the tower the better. Ideally, you don't want the enemies to get their ultimates which may fail your trilane efforts. For example, if the lane has Dark Seer, Enigma, or even Bane. Once they get their ultimates, they can shut 2 or more of you down right by the tower which can kill you as you are helpless in their ults.

The way you get around sharing XP amongst 3 is by endless harrass and very aggressive push. Luna must capitalize on the farm. You should focus on last hits first, then denies. Do not deny at the cost of a last hit. If you do not last hit effectively, and/or the lane is not controlled through harrassment and a hard push you have failed the trilane.

The XP shared amongst 3 is made up by denying the enemy last hits and denies, and harrassing them behind the creep line. Obviously it is better if they are out of XP range of the creeps, but it is more important to focus on denying them last hit farm.
Job 4 - Safe Trilane

The Safe Trilane is an alternate strategy to employ, and tends to be more popular with farm intensive carries like Faceless Void or Anti-Mage. Luna excels at Aggressive Trilane due to Lunar Blessing, but occasionally a Safe Trilane is employed to guarantee maximized farm that an Aggressive Trilane doesn't.

Again, let me outline the criteria for a FAILED safe trilane:
  • Someone in the trilane dies (non-gank death)
  • The carry is not getting last hits
  • Your team does not control the creep equilibrium line (lane control)
  • The creep camp pulls are not double stacked
  • The creep camp is not immediately dewarded if it is warded by the enemy after 1 missed spawn.
  • Jungle 'gank area' is not warded

The main objective of a Safe Trilane is to completely control the creep equillibrium to where you want it to be. That means the creep line should seldom get close to the river. This is primarily accomplished by double stacking a creep camp (usually around x:53 seconds). Then on the next creep wave the camp is pulled to the creeps to pull the lane back to your tower. The reason a stack is necessary is because a single stack will push the lane as there will not be enough neutral camp creeps to kill off all the lane creeps.

One of the support's primary job is to babysit the carry and harrass. The other support will stack camps and pull as necessary while secondarily babysit when stacking/pulling is not currently needed.

During pulls, Luna should go to the creep camp and last hit as it will give more experience and gold than regular creeps. One of the supports should farm the lane by pulling the opponent creeps either to the creep camp or to the next creep wave by running backwards. The second support should babysits the camp in case of a gank from the jungle (usually the support with the stun, you cannot afford to let the carry die in a trilane).

The hardest part of the Safe Trilane is keeping the creep equillibrium beyond your tower range and within a reasonable zone of control not too far from your tower (preferably not past the side shop). The creep line should hopefully never get too close to the river at any time if the farm/deny and pulling are done effectively. Having the creep line in tower range will push the lane. Having the creep line just outside of tower range gives allows for maintained equillibrium (eg: no push/pull) and gives additional security if a gank is initiated.

Holding this creep equillibrium actually takes a lot of practice and is much harder to maintain if the opponent tries to farm the pulled creep camp, wards the creep camp, or has a lot of push. Supports have to be vigilant in dewarding or preventing warding in the first place with harrass. Ideally, the trilane should be able to maintain creep equillibrium due to superior coverage of last hits, deny and enemy harrass to prevent push. This means pulling the stacked creep camp should be done rather infrequently if the trilane is done effectively.

Despite it's name, the Safe Trilane is harder to execute than an Aggressive Trilane since the maintainance of the creep equillibrium in the "safe area" outside tower range is harder to pull off then to constantly push the lane.
Troubleshooting Part 1
"Hungry Nova?"

Here I will entail problems you will encounter with other heroes.


Silence
Silence kills your Eclipse and Lucent Beam, which only leaves you your Moon Glaives. And they don't start doing any real damage until midgame. Remember, heroes like Death Prophet, Drow, Riki, Silencer will all initiate with Silence. Also remember you don't initiate. Stay back and let your tank initiator initiate. Special shout out to Silencer for being exceptionally cheap with his "Curse you!" and silences.


Vile Magic
Lina, Lion, etc... is usually always certain death for Luna. If they are in the game against you, you have to get your Black King Bar (BKB) ASAP. I usually get it after Power Treads before starting Butterfly, Manta or Helm of the Dominator.
In this game, I was getting owned by Lina early game, I had fed her 2 deaths with no kills. I built BKB right after Power Treads, no Helm of the Dominator or Manta. Let's just say after I built that BKB, I carried my team to victory (it also helps 2 other teammates have BKB as well, as we had discussed a team BKB buy early game when we were losing *hint*). Do not underestimate Vile Magic!


Vile Melee
Get a shield, Poor Man's Shield or Stout Shield. Don't get Vanguard, it is too expensive and as a ranged hero you get nothing out of it. Poor Man's Shield also suffers 50% reduction in effectiveness, but it is much cheaper than Vanguard and adds to your primary attribute of Agility (eg: uses agility slippers). Poor Man's Shield is real cheap too. Usually start building Butterfly ASAP, before Manta Style since it will give you Evasion. Then you can sell off the shield after getting Butterfly if you need the item slot. Always buy the Talisman of Evasion component first, it's hard enough not dying while farming for Eaglesong.


BKB
Ohhh, so your opponent is smart enough to buy the Black King Bar? Guess what? Rush Butterfly and Satanic by jungling. Luckily it doesn't last too long after repeated use, when still new in the 10/9/8 second range, BKB is a teamfight winner. Be very careful as they usually will use this time to kill you first since Lucent Beam and Eclipse will be useless against them. Plan an escape when the other team is filled with BKB. If it's just one or two heroes with it... that just means more Eclipse for the other teammates (something people forget when buying BKB). Beware when the casters have BKB... that's when you should worry as they are your food.


Invisibility
Even people who play invisibility heroes hate other invisibility heroes. It is better to buy Dust of Appearance than to buy Sentry Wards. It's more instantaneous. You can buy a Gem of True sight but if the game is close, you'll likely die and drop it. Only buy Gem if you have many levels over the opposite team and beasting it. If you're not, dust dust dust. Always use it immediately after initiation by the opposite team, they will pop up. If your team is initiating don't use it until they come out to attack. If you're defending, stay by your towers, they have true sight. There is nothing else you can do with invisibility unfortunately.


Slow/Stun
Shadow Blade or Force Staff. Yes, I said it. You will never be able to run away from Drow or Spirit Breaker when aggroed solo. Blink Dagger doesn't work if you're attacked. Force Staff and Shadow Blade do. I prefer Shadow Blade since it does add more to Luna's stats and gives funner ganking opportunities with invisibility. Remember a quick double tap of your item key with Force Staff will shoot you forward in the direction you're facing. Also Force Staff goes through trees and destroys them, which means easier escape routes (and ganking opportunities but remember Luna is not an initiator!).


BloodSeeker's Rupture Ultimate
The problem with Luna is that she's fast. And you get used to running away from everything. Which means if you're cast with this, you'll probably die after 10 steps since you will have moved across the entire map. The only real solution against BloodSeeker is Shadowblade. Stop moving and POOF! Cross your finger that he's too cheap to buy dust after the first time you try this trick. With Shadowblade, you cannot use any spells or items while invisible or you will be revealed. You need to cast Eclipse and Magic Wand (or whatever else) before activating invisibility or you will be revealed.


Pudge's Hook/Mirana's Arrow
Never stop moving. Remember that these skills only grab/stun the first target it hits. So always have a creep in from of your line of sight of Pudge/Mirana. Hopefully they're not smart enough to hit you from a blindspot.
Troubleshooting Part 2

Illusion Characters
If they pick Naga, Phantom Lancer, Chaos Knight etc... then you probably should not pick Luna since... Eclipse will become completely useless. They probably will also build a Manta Style and bottle Illusion runes. That's not going to help. Sometimes you can get by with one of these guys (Manta on Luna and max Glaives) but if they have two or more, Luna is a terrible pick. Special shout out to Phantom Lancer for being exceptionally prolific with illusions, he is just the worst!


Beast Commanders
If they can micro minions like Broodmother, Beastmaster, Enchantress, Chen etc... then Luna is a bad pick, since Eclipse is again kind of useless. Luckily, most pub Enchantress players don't dominate creeps and nobody plays Chen in pubs. Also, good Broodmothers are hard to find and she does have a terrible win rate. Playing versus beast commanders is much more favorable than going against illusion heroes. Special shout out to Broodmother since she can be very prolific, even worse than Phantom Lancer on occasion with Spiderlings.


Orb Effects
Oh, so you're getting killed by Frost Arrows (Drow), Searing Arrows (Clinkz), or Burning Spear (Huskar)? Guess what I said about Vile Magic? Buy a BKB! BKB blocks all these orb effects (unique damage modifiers). No more slow from Drow, no more extra damage from their attacks. They're usually dead once you activate this against them one on one. This is probably the best kept secret in Dota 2, especially from people who keep dying to Drow's Frost Arrows and repeatedly try to run away (FYI: You can never run away from Frost Arrows unless you have magic immunity or escape mechanism, and that's assuming you're not silenced!).

Rescuing your Teammate
Ever try to rescue a teammate from certain death? Well let's just say it's not a really good idea with Luna. This type of job is best for Mirana, Centaur Warrunner and even Skeleton King. As I said before, Luna is a terrible babysitter, so rescuing is a losing proposition in the majority of cases. Every once in a while a mini-stun from Lucent Beam can help a teammate, but usually they'll end up chasing you to death as well. Unless you have help, just let them die especially if they're being chased by 3 or more enemy heros.


Evasion/Blur/Block
Playing against Phantom Assassin? Brewmaster? Someone has a Butterfly or Talisman of Evasion? Can't seem to dish out damage? Buy Monkey King Bar! If a hero has a Butterfly/Heaven's Halbert you will miss attacks due to evasion. Seldom will you ever run into this problem, but when it does, MKB is the only solution. Mini-bash is also nice, but honestly... true strike is what counts. Please note that evasion does not stack (Butterfly PA doesn't evade 60%). Special shout out to Faceless Void's Backtrack... which cannot be countered with MKB.


Large Critical Hits or Divine Rapier
Blademail is ALWAYS a viable option late game on EVERYONE. It is one of the few items that actually becomes more effective as the game goes on. Especially when Divine Rapier is in play against you or they're hitting crits that do 1000+ damage. Always activate Blademail when they are right clicking you. Nobody will notice Nova turned into a giant porcupine!
Advanced and Oddball Strategies
  • Once Moon Glaives are leveled, remember you can hit "further" by hitting something in range and bouncing further to your intended target (hopefully).

  • If you deny with Moon Glaives, the bounce will automatically target an enemy. Thus if you are faced with the decision to last hit a creep or deny a creep, you should always choose to deny your creep as it's highly likely your bounce will get you the last hit.

  • Outworld Devourer's Astral Imprisonment and Shadow Demon's Disruption can help you safely finish your Eclipse. Doesn't matter if they're on your team or not.

  • Wait to use Satanic when you are about ~35-40% health. People love bait for some reason.

  • Blink Luna is a viable option if your team is all AOE. That means Sand King, Enigma, Tidehunter, Magnus, etc... all blink initiate whilst you blink after they connect to land all of Eclipse. This works surprisingly well with Aghanim's (yes, I said it). Sick Combo: Earthshaker, Magnus or Enigma, and Disruptor (5th can be just about anything - I hope you can "see it").

  • Remember Force Staff works on enemies and allies. When the enemy turtles you can turn a 5 vs. 5 to a 4 vs. 5 by catching them off-guard. Obviously a rare buy on Luna... but it's a great offensive item. Usually only Bloodseeker/Batrider players seem to use this item offensively. If multiple players on your team have Force Staff, you can chain them as well. Nothing hurts more than prematurely forcing a 1 vs. 5 before a big teamfight showdown.

  • If you are in a pub where you are fighting for last hits in lane, buy a quelling blade. Then skip rank 2 Lunar Blessing and level Moon Glaives instead. This should allow you to more effectively last hit.

  • Remember that you can deny yourself by attacking neutral creep camps or Roshan. Your teammates can also deny Doom's Doom, Veno's Venomous Gale and QOP's Shadow Strike (poison dagger). You cannot deny Warlock's Fatal Bonds or Axe's Battle Hunger unfortunately.

  • If you have Battle Hunger and you're nowhere close to last hitting a creep to death, use Lucent Beam to last hit one. For some reason people don't like using Lucent Beam to last hit even if it means life or death.

  • If up against a team of mostly dps/right click heroes (3 or more), it is usually not a bad strategy for your entire team to stock up on Ghost Scepters, Ethereal Blades and Heaven's Halberds. Nothing is more annoying than Viper, Sniper and Drow being on the same team.

  • The above also applies to Magic Damage and stocking up on Black King Bars.

  • If you or your teammate have been "assassinated" while farming, it means they have wards (nearly always the case). Translation: If want to whack Roshan, smoke up and then whack him (unless they've been dewarding you, it's unlikely there's Sentries by the pit). Oh yeah, have the supports deward.

  • When following an nearly dead enemy going the side shop to TP out, do not Lucent Beam until you see the TP animation. The cooldown on Lucent Beam is longer than the channeling time on the scroll. You only get one chance at disrupting this escape.

  • Eclipse is blocked by Black King Bar. This shouldn't concern you too much since the beams will just pierce the lunar light onto the enemies that don't have BKB! So when you see say... 2-3 BKB activations, make sure you have those without BKB in your line of sight if you are going to use Eclipse to make sure they get the full effect from it. The 0.6 second casting between beams is really long when teamfighting. BKB both harms and helps the enemy when Luna is in play.
Luna and ____ Best Friends Forever!
Here is the math grasshopper:


Crystal Maiden
Probably my favorite babysitter of all time for any carry. CM will feed you kills. It's guaranteed especially with Lunar Blessing. Their lane partner will just run away as they know they cannot save their friend. Lunar Blessing + Ice = Fed Luna.


Drow Ranger
Slow, Silence, Precision Aura... there's a reason she's one of the most overplayed hero in the game right now and nerfed. Precision Aura + Lunar Blessing = Lots of dps. And lots of dps on Drow AND Luna is bad news.


Earthshaker
The great thing is that his ultimate is the exact opposite of Eclipse. He needs creeps/illusions/heroes for maximum damage. Eclipse needs no creeps/illusions for maximum damage. ES is an initiator, Luna is not. Usually one good Blink, Echo Slam and Fissure will rid the lane of creeps/illusions and allow for a ridiculously good Eclipse follow-up.


Faceless Void
A good Chronosphere + Eclipse + Moon Glaives = Teamwipe.


Jakiro
Frozen enemies burning in Jakiro's Ult + Eclipse + Moon Glaives = Teamwipe.


Lina
One of the best babysitters for Luna, she can help dominate early and mid game. If you do, there is no late game for Lina to be weak in. Laguna Blade + Dragon Slave + Lucent Beam = Lane Domination.


Night Stalker
Eclipse turns night into day for 10 seconds. Night Stalker knows that means insane movement speed (500+) with Phase Boots Active, 5+ seconds of silence, and a ridiculous amount of slow. Eclipse + Night Stalker = Dead enemy heroes.


Sand King
Blink Epicenter + Eclipse + Moon Glaives = Teamwipe. Excellent Babysitter.


Tidehunter
Ultimate Stun + Eclipse = Teamwipe. Excellent babysitter.


Vengeful Spirit
Vengeance Aura + Lunar Blessing = Lots of dps. Excellent babysitter. Nothing is more annoying than having two damage auras and two ranged heroes controlling a lane. This is my favorite laning setup with Luna and it seldom ever fails due to Vengeful Spirit's stun and aura in addition to Luna's ministun and aura.


Zeus
Zeus nukes + Zeus Ult + Refresher Orb + Eclipse = Guaranteed Teamwipe.
Enemies of Nightsilver and Selemene
Here are people that kill or severely hinder Luna's game. Watch out if there's multiples of these on the enemy team.


Batrider
Nightsilver, Selemene and Nova hate forest fires and so should you.


Bristleback
Can't kill them if you can't catch them.


Chaos Knight
1) Illusions
2) For some reason he will 4 second stun you 90% of the time
3) Dem crits
4) Usually brings BFF Wisp/Io with him


Faceless Void
He is the definition of "buy Divine Rapier and Satanic".

Juggernaut
Magic immunity, Omnislash. Like really? It's like Eclipse but like cheaper.


Huskar
A good Huskar is a headache for everyone. Unless your team has stuns/disables, it becomes very hard to kill him (especially midgame).


Mirana
Traitor to your cause and the Dark Moon and Selemene! If she uses her ultimate when you use Eclipse, not only do you not hit any heroes, but you completely wasted Eclipse one of the best teamfight ultimates in Dota! Luckily, good Miranas are fairly rare occurences.


Meepo
Just hope he's not Meepown. A good Meepo will never let you kill him with him superior Poof micro. BKB for this guy.


Nature's Prophet
Has lately become more popular, and he's just a PITA when you lose vision of him in Sprout.


Rubick
He will steal Eclipse.


Silencer
He just seems to drop his ultimate right before you need to Eclipse to teamwipe everyone. That ultimate will turn the tide in teamfights.


Skywrath Mage
Silence, slow and that ultimate that just seems to completely melt you.


Spirit Breaker
A good one will tower dive you and survive. A bad one will tower dive you and feed. Guess which one you're hoping for?


Viper
Longer range, poison, slow... everything necessary to kill you.


Wisp/Io
Wisp isn't really scary, he's just scary when he brings someone like Chaos Knight along, and he will.


Fun Stuff
  • No princess lives forever Mirana.
  • The Moon does play favorites Night Stalker!
  • Windrunner, slow down, and stay down!
  • Ahh... Zeus, the Heavens are with us.

All Luna sound files by DotaProject.com

Pyrion Flax Luna Guide (NSFW)

Replay Downloads & Analysis
1) Move replay to your Dota 2 directory
c:\Program Files (x86)\Steam\steamapps\common\dota 2 beta\dota\

2) Type in Dota 2 console, where # is the replay name (ex: playdemo 93427642)
playdemo #

Dota Replay Game ID 206914418
Download: https://copy.com/9nKJuK1mv6Qs
This game shows early game lane domination with Ogre Magi, and why Luna is better than Mirana and Night Stalker.

Final Score: 14/3/23
Dota Replay Game ID 206932497
Download: https://copy.com/oPZjEgjwKduF
This game shows how to escape an early gank and survive. It also shows good Magic Wand use.

Final Score: 13/1/17
Dota Replay Game ID 93427642:
Download: https://copy.com/Rdb9zhHywuXd
This game shows why you do not cross the Dark Moon.

Final Score: 25/2/10

Western Qualifiers The International 3
Rox vs. EG Game 3
Game ID:
197348059

Luna analysis: EG played Luna and late game had Boots of Travel, Manta Style, Satanic, Butterfly and Daedalus. Luna sold Manta for a Divine Rapier since Gyro had bought one earlier. EG made some serious mistakes on Luna which I personally believe cost them the game. The mistakes are as follows:

1) After selling Drums Luna does not sell off Tranquil Boots right away. She then buys treads very late game and then buys BoT literally minutes after upgrading to treads. Yes, it's a wasted ~1000 gold but that can be the difference between buyback and higher tier items.

2) Luna builds Butterfly, AFTER Gyro had already bought MKB. Thus Luna buying Butterfly gives her absolutely no benefit of evasion which is 2/5th the cost of Butterfly. Yes, the agility and attack speed is great, but evasion is completely unused. Evasion is a huge reason to get Butterfly, and to force your opponent to build MKB... but if they already have it building Butterfly at it's very high price is not the best item. Ethereal Blade, MKB, Eye of Skadi and Mjollnir would all have been better options at a cheaper price without the evasion penalty from Gyro's MKB.

3) In order to complete Divine Rapier, Luna gets rid of Manta Style due to the full inventory. This is the number one reason I believe EG lost game 3. Yes, the illusions suffer from reduced damage output, but at this point in the game those illusions are incredibly strong. The amount of coverage Manta and Glaives gives in teamfights for physical dps is what makes Luna such an effective carry. Her excellent balance of magic and physical damage is unsurpassed amongst carries. Getting rid of Manta cut her dps significantly. I wish Luna had sold off the Butterfly and taken Rapier, Manta, Daedalus, Satanic, Boots of Travel, BKB. Would have been a different game IMHO.

Rox vs. EG Game 2
Game ID: 197289232

If you apply what I have written in the guide correctly, this is what your Luna games should look like:
15 kommentarer
A 2. jan. 2015 kl. 6:26 
u should add to manta defensive use that it can be used to dispell debuffs much like diffusal blade
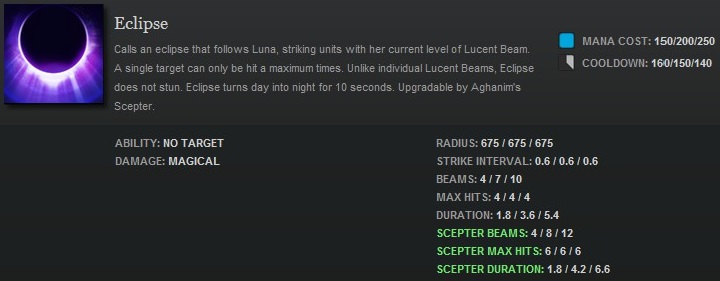
such as global silence
:D
medic gaming 19. maj 2014 kl. 6:09 
Really epic and detailed guide. Love it!
Zobie 15. apr. 2014 kl. 18:48 
This guide is amazing. I love it. And the pros and cons are hilarious hahaha. Very very nice guide. I always use it
Ashborne 9. dec. 2013 kl. 20:05 
That Pros and Cons was funny lol. I always read "Selemene" with Luna's voice and accent.
Mellithae 7. sep. 2013 kl. 11:17 
excellent guide, although i would mention that ethereal blade actrually adds a lot of agility, making it a exellent substitute for butterfly if the enemy carry has mkb, and is still useful even if you do not need the immune, because of the damage amp and dps increase, also it is possible to become invulnerable using BKB+ethereal if you use the bkb first, use the ethereal on another person(not self), and its EB, not ghost scepter(unless they changed it recently that is)
on ck: "For some reason he will 4 second stun you 90% of the time" lol, very true (but if hes on your team its 1 or 2 always:( )
CleavesF  [ophavsmand] 16. maj 2013 kl. 17:01 
Thank you for reading. I hope you please Selemene with your play.
Space.Marine 12. maj 2013 kl. 21:23 
Wow. Extremely detailed, thorough and fun discussion on Luna. This is what Steam Guides is about, thank you so much.
Noya 23. jan. 2013 kl. 16:22 
<3 Tranquils+Drums Luna. But yeah, I realize that Treads+Dominator it's better towards unorganized pub and will probably give you better results at surviving and farming safer :)

Another thing that you can add and I don't see mentioned (not specifically at least) its the fact that you can and should try to stack Ancient camps with a Dominated Creep. It can easily give you 100-200 extra GPM (considering each ancient camp it's about 300g worth) and powerlevel and farm a lot. It might be advanced, but once you get the feel of it, you can push that big items way faster.

Keep up the good work, guide is looking awesome.
BLIETBORNE 23. jan. 2013 kl. 9:37 
=)
CleavesF  [ophavsmand] 23. jan. 2013 kl. 9:27 
Okay. I watched the comp and I'm not sure if iG.Zhou's build is the end all be all but I'll post the video for those interested Noya. Please note that this guide is geared towards pub games. I'll also add discussions on Etheral, which like Aghanim's is a very divisive item.

Thanks for the comments, I appreciate it.