Human Fall Flat

Human Fall Flat

343 ratings
Workshop #1: Making Your First Level
By FlatHuman and 1 collaborators
This guide will show you how to create a level for Human: Fall Flat using the provided props and default Unity shapes - no modelling is required.
3
   
Award
Favorite
Favorited
Unfavorite
Create the project
The free version of Unity can be obtained from www.unity3d.com and has all the features needed to develop Human Fall Flat levels. When Unity launches, specify the project name, location and create a new 3D project.

To access ALPHA version of Human: Fall Flat workshop, you must:
  • Join HumanWorkshop group.
  • Get the modder branch of Human Fall Flat, the password is c9HStpsi34Q69F.

Import the HumanWorkshop.unitypackage located in the Workshop folder inside the game install directory to this new Unity project by selecting Assets>Import Package>Custom Package from the main menu. Clicking the Import button in the window that appears will add all the files to your project.

Replace TagManager.asset in the <YourProjectRoot>\ProjectSettings folder with the one from the Workshop folder to set-up tags and layers.

This is the first of the 2 guides that will allow you to create a level similar to one located at Project>HumanWorkshop>Examples>ExampleLevel. Take a look at the example scene if something looks confusing. You can also copy things from that scene if you don't want to set them up manually.
Basic level layout
In this step we will set up the geometry to provide the structure to the level. We will use Unity cubes to get the rough shape.

Level Root
Make sure nothing is selected in the hierarchy window. Right-click in the empty space in the hierarchy window and select Create Empty from the pop-up menu.
Rename this GameObject to "Level".
In the inspector window make sure the transform position and rotation are (0,0,0).

First Room
Right click the Level object in the project window and select 3d Object>Cube.
Press F2 and rename it to Room1Ground.
Set position to (0,-0.5,0) and scale to (10,1,10).
In the project window navigate to HumanWorkshop>Examples>Materials.
Drag "LevelGray" material and drop it on the ground cube in the Scene view or Project view.
Make sure to mark the "Static" checkbox located in the top right corner of the inspector.

Second Room
With the Room1Ground selected, duplicate it by pressing Ctrl+D or through the pop-up menu.
Press F2 and rename it to Room2Ground.
Hold down the Ctrl key and drag the Z arrow of this new object in the scene view until the position becomes (0,-0.5,12), making 2 meters between the ground cubes. You can also type the position in the inspector window.
Drop "LevelBrown" on the cube.
Change the physics material of the Collider to "Gravel". You can drag gravel from HumanWorkshop>PhysicsMaterials to the Material slot on the Box Collider component.

Exit Room
Copy the first room again, rename to Room3Ground and drag it along Z axis holding Ctrl creating a 4 meter gap from Room2Ground. The resulting position is (0,-0.5,26).
Change the scale to 2,1,10, making it a narrow passage.

Adding a rigidbody plank
The last gap is too big to parkour over, so let's create a plank that can be used to make a bridge.
Add another Cube as a child of the Level object.
Set position to (2,1,13), rotation to (0,45,0) and scale to (1.5,0.1,6)
Drop the "DarkBlue" material to contrast it from the ground.
Press the "Add Component" button in the inspector window and add Physics>Rigidbody component.
Set Mass to 20.
Add the "Human>Respawning Body" component to allow plank respawning when it has dropped off the level.
Add "Human>Collision Audio Sensor" to enable the physics collision sound effects when rigidbody collides with level geometry.
In the box collider component, change the Material to MetalSheet. This is done by clicking the small circle on the right of the field.

The scene should look like this when it's done:

Rigging the Required Components
For the level to become functional it has to have the following components:
  • Level component as a root with everything else underneath it.
  • A spawnpoint - this is where the player will start the level.
  • Fall trigger - when the player falls and hit's the trigger he will respawn.
  • Pass trigger - when the player collides with the pass trigger he completes the level on the next fall through the fall trigger.

Spawnpoint
Select the Level game object and press Alt+Shift+N to create an empty child (or pick "Create Empty" from the popup menu).
Rename this object to Spawnpoint.
In the inspector window, click the "Add Component" button and select "Human>Checkpoint". This will add a checkpoint script.

Level
Now select the Level object.
In the inspector window, click the "Add Component" button and select "Human>Level".
Drag your Spawnpoint object from the hierarchy view to inspector and drop it to the "Spawn Point" property of the Level component. This sets the spawn location on the level start.

Fall trigger
Select the Level object again and press Alt+Shift+N to create an empty child. Rename it to FallTrigger.
Add the Human>Fall Trigger component.
Add the Physics>Box Collider component. Tip: pressing the "Add Component" button and typing "b" will show all components that start from B making it easier to locate what you need.
Set the size of the box collider to (200,20,200) and move it down to (0,-30,0) to cover well beyond the area below the level.
Mark "Is Trigger" checkbox.
In the top of the inspector window set the layer to Triggers.

Pass Trigger
The Pass trigger is created the same way, but instead of Fall Trigger it uses the Human>Pass Trigger Component.
Set box collider size to (6,6,6) and move it to (0,-3,34) so it touches the end of the level and is located lower than the ground.
The Light
The Sun
Right click on the Level object and add Light>Directional Light.
Change the direction to (50,-30,0)
Set the color to very bright orange #FFF4D6FF.
Set ShadowType to SoftShadows, and adjust NormalBias to 0.

The Sky
Open the Lighting view from Window>Lighting in the main menu.
Set the following in the Environment Lighting:
  • Skybox - click a circle at the right edge and select "Sky", alternatively you can drag the "Sky" material from "HumanWorkshop>Examples>Materials" on the Skybox field,
  • Sun - drag your Directional Light object from the hierarchy to the Sun field,
  • Change Ambient Source to Color,
  • Pick grayish blue (#6C7B96) for the color of ambient light.
  • Change the reflection intensity to 0.7 to subdue the reflections a little.

Global Illumination
To match the games settings set the following:
  • Enable Precomputed Realtime GI
  • Set Realtime Resolution to 0.5, but you can tweak it to get optimal balance between quality and the size of the uploaded level. Additionally you can tweak per object settings, refer to the Unity manual for more details.
  • Disable Baked GI
  • Set General GI to Directional, and increase indirect intensity to 1.2

Here is the full scene hierarchy and the Lighting view when everything is set up:


Baking
You can build the lightmaps by pressing the "Build" button, or you can leave Auto checkbox on to bake the lighting in the background. Working on large levels Auto might be undesirable, but be sure to rebuild your lightmaps before publishing the level.
Exporting the Level
Configuring metadata
In the top menu select Window>Human export. Once the HumanExport window opens, enter the location where you want to keep your exported workshop levels, for example D:\Workshop. You can optionally dock this window to be easily accessible.

If this window does not open, locate HumanWorkshop\Scripts\Editor\HumanExport.cs, and please replace line 26 from:
var path = EditorPrefs.GetString("HumanWorkshopRoot", @"<paste workshop root>");
to
var path = EditorPrefs.GetString("HumanWorkshopRoot", @"C:\");
Fix is uploaded to steam, but might take a while to reach you.

Some metadata needs to be configured:
  • Specify the level title as it will appear in the game and Steam Workshop.
  • Enter the description for your level.
  • The final piece of metadata is a thumbnail, but it is configured from the game, when testing your level.


Exporting
Now it's time to click the Export scene button - it will create a subfolder in the workshop root folder that will contain your level and associated metadata.
Loading Level in the Game
Start the game and press WORKSHOP in the main menu. This page will show your subscribed workshop items. To open your own workshop levels you should click "CUSTOM" button.

Type the path to your root workshop folder or copy it from the HumanExport window in Unity. Both paths should match. Pressing enter should display the level that you've exported in the list. It will use a default "no thumbnail" icon next to the level.

Selecting the level and pressing play will allow you to test the level as your players will experience it.
Capturing a Thumbnail
With the level loaded, walk to a location that highlights your level and press F9 to capture a thumbnail.
Publishing to Steam Workshop
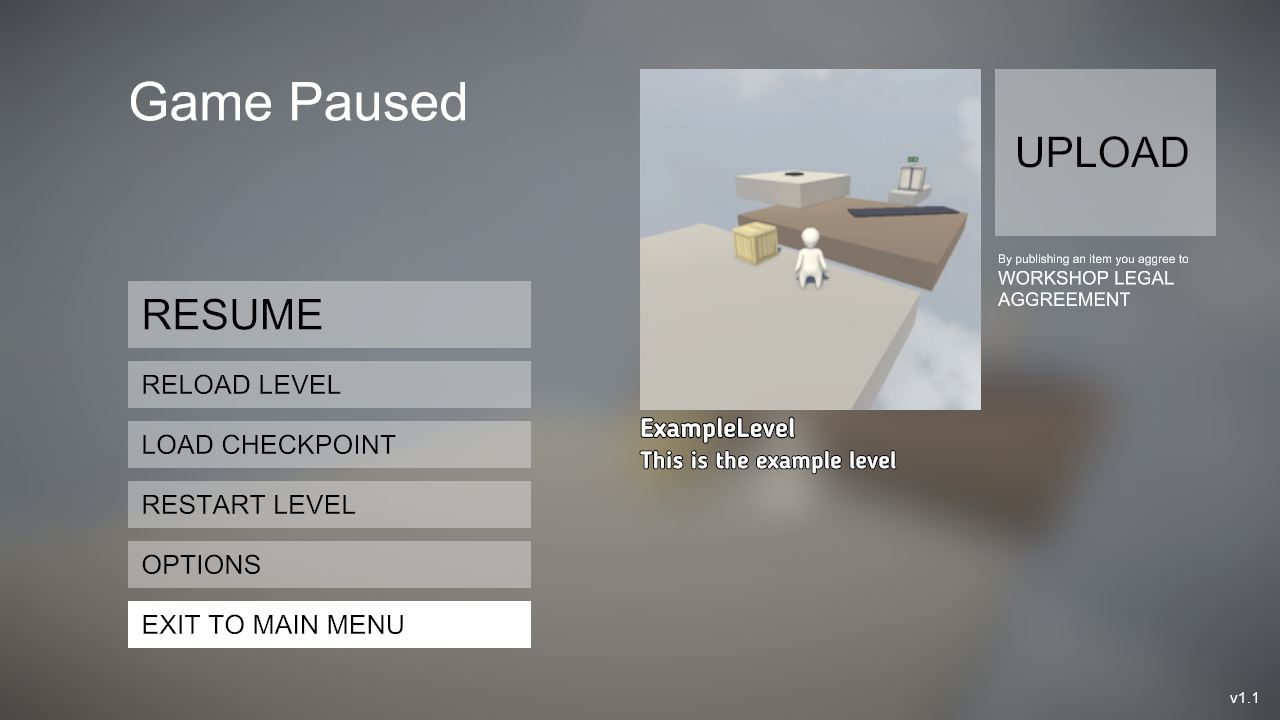
Accessing the pause menu looks different to usual.


It has the following additional functionality:
• Reload level button - allows reloading the level when you re-export it from Unity without restarting the game, even player location will be remembered so it's a nice tool to tweak the level as you go.
• A button to UPLOAD your level to workshop.
• A button to the workshop legal agreement: you should accept it if you have not done so yet and want to upload levels.
• Metadata for your level, such as title description and thumbnail. If the thumbnail or description are missing a reminder will be shown and the steam options are disabled.

Pressing the PUBLISH button will start uploading your level to Steam and the Steam overlay will appear once it's done.
Next Steps
Congratulations on creating your first Human Fall Flat level! If everyone stops at this point we will have 100 copies of same level.

Human workshop was built with creativity in mind, you are not limited to using the same props as everyone else. Here are some suggestions for continuing your journey:
  • To master level design, continue using simple shapes such as cubes to create a parkour level and challenge your friends in a speedrun!
  • Replace the cubes with some assets (start with free) from the asset store or from online model stores to create levels that have more personality than default Unity cubes.
  • Model unique levels and props - use your Blender, 3dsmax or Maya skills to create something great. Unity supports most of the popular modeling software - use the tools that you like!

Uploading changes
The workflow for tweaking the level is as follows:
  • Change the level in Unity,
  • Press Export Scene in the HumanExport window.
  • Press the Reload Level button from the pause menu in game.
  • After you are happy with the changes click the UPLOAD button in the pause menu to sumbit your changes to the Steam Workshop.

Stay tuned, as more guides are being created covering advanced topics!

152 Comments
2.0.7.6 Aug 29, 2023 @ 2:00pm 
please just make a tut vid
Monolith Feb 7, 2023 @ 2:38am 
What important components are needed in the project for the map to work? I'm using Unity 2017, "window> There is no Human Export", only through "Human>Human Export", and then throws the error "There are no level objects in the scene. Check out the sample scenes", which I can't understand.
Who can provide a card that is not sealed as "data"? I want to use it as a visual sample.
CreasedJays123 Nov 5, 2022 @ 5:46pm 
Look For the Lower Case 'L' And You
Will Be Kissed Tomorrow:
LLLLLLLLLLLLLLLLLLLLLLLLLLLLLLLLLLLLLLLLLLLLLLLLLLLLLlLLLLLLLLLLLLLLLLLLLLL LLLLL
*Now Look For The Q And Your Wish
Will Come True:
... ... ... ... ... OOOOOOOOOOOOOOOOOOOQOOOOOOOOOOOOOOOOOOOOOOOOO O.. .OOOOOOOO
*This Is Really Hard, Now Find The 'N':
MMMMMMMMMMMMMMMMMMMMMMMMMNMM
*Now Find The Mistake:
ABCDEFGHIJKLNMOPQRSTUVWQYZ
*Something You Really Want, After the
countdown!!!!!
10 9 8 7 6 5 4 3 2 1 Now Close Your
Eyes And Make A Wish! ;*;*;*;*;*;* Now
Paste This On 9 pages And Your Wish
Will Come True! Hurry, You Have 20
minutes! Or What You Wished For Will
JUP1TER Jun 30, 2022 @ 6:43am 
There is no HumanWorkshop folder, so i can't find LevelGray and Brown. Also there is several compilator errors. Unity 2015 just crashes, 2017 still have compilation errors. What can i do?
Meadow Jul 27, 2021 @ 6:13pm 
Do we need that specific version of unity, or can we just use any version?
Paul, the Russian Jan 26, 2021 @ 9:45am 
What is your version of Unity?
marinecvlr Aug 23, 2020 @ 2:06pm 
InvalidOperationException: Dependency HumanAPI.IGame not found

Does someone can tell me anything about this error I am getting ? Thanks for your help
Mango Aug 5, 2020 @ 2:37am 
I'm getting 'compilar errors' as well but have no Idea how to fix them.
schase Jun 6, 2020 @ 4:12pm 
I reached the end of the tutorial but I cant finish because it keeps giving me compiler errors unity demands a picture before you can export so im stuck, have do I clear the compiler errors?
Faithfoxです Jun 3, 2020 @ 12:54am 
The code DOES work

For people having trouble with the code working, download AN OLDER version of Unity that this package was made in. The version is 2017.4.13 which can be found
{LINK REMOVED}
Highly recommend using the Unity hub link on that site.

Feel free to friend me and dm me if you need help with errors or anything else, this is literally a game engine and without any experience can be really overwhelming. I'd love to help you!