7 Days to Die

7 Days to Die

118 ratings
Alpha 13 Guide (Indefinite Hiatus)
By Blood Flowers
A guide containing a FAQ (100%), a beginner section (60%), and an advanced section (.5%).
Note: This is still incomplete, only the FAQ has been finished. The beginner section has been started, and the advanced section is still yet to be done. Sorry, this stuff takes time and I'm just doing this for fun.
Updated to 13.6.

On indefinite Hiatus.
   
Award
Favorite
Favorited
Unfavorite
Table of Contents
  • FAQ
    • Forging
    • Tool Quality
    • Levelling Skills
    • Benefits of Skills
    • Cooking (Campfires)
    • Animals
    • Crafting guns
    • Temperature
  • Basic
    • Securing Clean Water
    • Securing Food
    • Where to loot
    • Surviving Dogs
    • Surviving Hordes
    • Surviving Screamers
    • Day 1 Goals
    • Basic Base Building
    • Various Base Examples
    • More to come...
  • Advanced
    • Coming soon...ish...
  • Update Log
FAQ (Part 1)
Table of Contents:
  • Forging
  • Tool Quality
  • Levelling Skills
  • Benefits of Skills
  • Cooking (Campfires)
  • Animals
  • Crafting guns
  • Temperature

Forging:
Here is how the forge works in A13:
  1. Once you are at a forge, and have some materials in your inventory, place some fuel into the fuel slot of the forge and your raw materials into the "input" slot of the forge.


    Like this:


  2. Turn on the forge and wait for the forge to begin melting your raw materials. You will notice this working as your raw materials will start decreasing in number and the numbers on the right hand side labelled "Iron: #, Clay:#, etc" will start increasing.


  3. Select what you want and the amount you want to craft. The amount of material that you "have" is based on the amount of material that you have melted in the forge already (and NOT the amount of raw material still remaining in the input slot nor the materials you have in your inventory).


  4. Some recipes will require a tool to be crafted. You can see this information on the top right hand side above the information about the recipe.


    The red "X" indicates that you do not have the required tool in its proper slot. After putting the tool into its tool slot (uuper right hand side):


    You will get a green check mark to now indicate you have the required tool to craft this recipe.


For more information, see this preview video (not mine):


Tool Quality:
Tool quality is determined by your Tool Smithing level and to a lesser extent, the number of iterations you have made of tools.
At level 1, your first tool will be of quality 1.
At level 100, all of your tools will be of quality 600.
Thus you will gain roughly 6 quality per level you put into Tool Smithing.

The number of iterations will slightly raise the quality of the tools you are making by 1 every so often. This requires somewhere between 2-5 (or more) iterations per 1 quality increase.

Thus, it is suggested that players spend the first night crafting lots of stone axes/stone shovels to increase their Tool Smithing to a higher level (10-25). It is also highly recommended that players put their early skill points from level ups into Tool Smithing exclusively.

Note: The information about determining quality holds true for each type of crafting. Some types of crafting will level more quickly than others, be easier to level, require more resources, or be used more frequently.


Levelling Skills:
There are two ways to level skills, by using your skills points that you gain from levelling up your character, or by doing certain actions enough times.

To level skills using skill points, go to your character screen and then head to the skill tab (there is a keybind for this, what it is depends on your settings). If you have the required skill points available, you can click on the skill and hit "purchase" above the description.


To level skills via actions, it will depend on the specific skill what actions are necessary to level it up. For skills that require hitting a target, you will get bonus experience in that skill if you destroy/finish the target.
  • Archery
    Hitting any block/zombie with arrows will increase your experience in Archery. Killing a zombie (and possibly breaking a block) will give bonus experience.
  • Armor Smithing
    Crafting (or repairing, but this is slower) heavy armor (iron and scrap metal) will increase your experience in Armor Smithing. You receive 10 experience per forged iron used (So crafting iron chest armor is very effective at levelling this skill) in addition to the base experience of crafting the item.
  • Athletics
    Punch things. A lot of people like to punch grass because it breaks in one hit and is useful early on.
  • Blade Weapons
    Hitting any block/zombie with a blade weapon (fireaxe, hunting knife, machete, bone shiv, chainsaw) will increase your experience in Blade Weapons. Killing a zombie (and possibly breaking a block/finishing gutting an animal/finishing cutting a tree) will give bonus experience.
  • Blunt Weapons
    Hitting any block/zombie with a blunt weapon (clubs and sledgehammer) will increase your experience in Blade Weapons. Killing a zombie (and possibly breaking a block) will give bonus experience.
  • Clothing
    Getting damaged by zombies (or fall damage, almost any damage really) while wearing plant fiber or cloth clothing.
  • Construction Tools
    Using a construction tool (stone axe, wrench, claw hammer, nailgun) to either destroy blocks or upgrade blocks. You get bonus experience for destroying a block (and possibly killing zombies/finishing an upgrade (?))
  • Gun Smithing
    Crafting bullets (and the blunderbuss) will increase your experience in Gun Smithing.
  • Medicine
    As far as I know of, this skill cannot be increased through actions. It also doesn't do anything even if you do increase it.
  • Misc Crafting
    Crafting items that do not fall into any other specific categories will increase your experience in Misc Crafting.
  • Scavenging
    Searching "Untouched" loot containers (only "Untouched") will increase your experience in Scavenging.

A lot of skills overlap or share similar functions.
Pistols/Rifles/Shotguns function similarly to Archery just with those specific weapons.
Heavy Armor/Light Armor function similary to Clothing just with those specific armor items.
Mining Tools is similar to Construction Tools just without the repairing and uses mining tools.
Leatherworking/Tailoring/Science/Weapon Smithing/Tool Smithing all function similarly to Armor Smithing but with their respective categories.
FAQ (Part 2)
Benefits of Skills:
Here is a quick rundown on what each skill does. I have put them into certain categories to make things easier (for me, hehehe).
Note: Most skills modifiers are separated between levels 1-49, 50-99, and 100. 1-49 have weak modifiers, 50-99 have stronger modifiers (noticeable), and at 100 the modifier is usually double (for decreased craft time, it is usually 1/4).

  • Crafting Skills: Increases quality per level, decreases the repair quality degradation modifier per level, decreases craft time, decreaes repair time.
  • Weapon Skills: Increases damage (entity only) with the specific weapon sets.
  • Scavenging: Increases the QUALITY of the loot (there is NO change to the rarity), and decreases search time.
  • Armor Skills: Decreases damage taken when wearing that type of armor.
  • Athletics: Increases damage while barehanded.
  • Medicine: Does nothing.
  • Tool Skills: Increases damage (block only) with the specific tool sets.
  • (Perk) Quality Joe: Increases the QUALITY of the loot that you find by a flat amount (25 at level 1, 50 at level 2, 100 at level 3).


Cooking:

This is very similar to how cooking was before, except now you keep the raw ingredients in your inventory until you decide to cook them. There are three slots for tools when they are required (exactly the same as with forging). Bonus: You no longer need a stick to cook "Charred Meat".
  • Input fuel.
  • Select what you want to cook (assuming you have the required ingredients and/or tools).
  • Select the amount.
  • Press "Cook".


No more placing into a grid, just select from the menu on the left hand side.


Animals:
After killing an animal (Sorry, you're going to have to learn how to do that on your own...), you can get meat/hides/feathers/bones/animal fat by using a Bladed Weapon on the corpse. This includes Fireaxes, Shivs, Hunting Knives, Machetes and maybe the chainsaw (?).


Crafting Guns:

After having read the appropriate book:


if you have a gun part in your inventory, clicking on it will bring up options that include "Assemble".


Click on this option, and you will be led to a screen where you drag and drop the appropriate parts into their slots.


Hit "complete" when you are done. Note: You can hit complete without filling all of the parts and you will get the gun but it cannot be used until all the parts are inserted.


Temperature:
How to manage heat:
Initially, when you don't have anything yet, you will want to run around naked in the desert (because this keeps you at around 90-95 heat). It's actually not that bad. Later on in the game, various items will give you negative insulation (to reduce heat).
Things that I have found:

  • Cowboy hat: -10
  • Kevlar Helmet: -5
  • Swat Helmet: -10
  • Football Helmet: -5
  • Iron Armor Pieces: -10 on chest, -5 on the rest.
  • Bandana: -5
  • Sunglasses: -5 (plus they make you look cool)
  • Drinking Red Tea: -10 (for the duration of the buff)
  • Drinking Yucca Juice: -10 (for the duration of the buff)
  • Being wet (go into snow, go into water, get rained on, etc)
  • Probably more things.

Furthermore: being in shelter will keep your cool in heat (and conversely warm in cold).

How to manage cold:
This is actually really difficult when you initially spawn in. My advice? Leave the snow biome until you have clothes. Honestly you will still freeze to death if you only have plant fiber clothes and cloth armor. You can however make a shelter and a fire and work around that, but it seriously hampers your ability to do things for an extended period of time.

Things that are good at increasing insulation:
  • Most clothes that you find: +5 to +10
  • Worn boots: +10
  • Puffer Coat (kill zeds, woodcutters drop these often): +30
  • Duster Coat: +20 (apparently there is a recipe book for this that is either absurdly rare or not in the loot table)
  • Skull Cap: +15

Furthermore: being in a shelter will keep you warm(er) in cold. Plus, a campfire will definitely keep you warm as long as you are close to it.


For more information on temperature, please see this post on the official forums:
https://7daystodie.com/forums/showthread.php?35698-Weather-Survival-Demystified
Basic (Part 1)
Note: Please take the screenshots with a grain of salt. I used creative mode because I don't have the time to make a whole new playthrough just for the sake of getting screenshots.

Temporary Note: This is incomplete. The guide is being published slightly early (because it does contain some useful information, at least in my opinion...) but I haven't had enough time to finish it. Hopefully Steam will let me edit this later (first Steam guide, so I have no idea how to use the guide making thing).

Table of Contents:
  • Securing Clean Water
  • Securing Food
  • Where to loot
  • Surviving Dogs
  • Surviving Hordes (Incomplete)
  • Surviving Screamers
  • Day 1 Goals
  • Basic Base Building
  • Various Base Examples (Incomplete)
  • More to come...
    -Surviving the feral (7th night) hordes
    -Farming (...maybe? maybe not...?)
    -Stealth


Securing Clean Water:
There are two main ways to secure clean water, looting it and boiling murky water.

Looting it:
Simply go into POIs and search loot containers such as cabinets, coolers, beverage coolers, fridge tops, most bags/purses. If you're good at finding POIs and prefer searching for your water, this is a possible method of securing clean water.

Boiling Murky Water:
This is generally the best way to secure lots of clean water. There are three major necessities for this method (aside from a campfire):
  • A cooking pot
  • Empty glass jars
  • A water source

Of the three, empty glass jars are extremely common. You will find these from looting random containers, off zombies, out of trash, when you drink from bottles, etc. You should really not have a problem finding these. If you want to make tons of them, you can make them in a furnace.

A water source is also fairly simple to find. Although A13 has made water sources slightly more rare, you can generally find ponds/lakes generated throughout the world and in the event that you cannot, there are puddle POIs that are fairly commonly found by following the small roads off of the main roads.

The last item required is a cooking pot. These are a pain to find if you're brand new at this game and have yet to make a furnace (if you do have a furnace, you can smelt some forged iron and then craft a cooking pot). If not, you will have to find a cooking pot. Cooking pots are found with high frequency in sinks (and ovens, but these are less common). You can also find cooking pots with 100% frequency in specific POIs such as:

Campsites (You even get a free sleeping bag):


All campsites will contain a cooking pot. Campsites are found frequently by following the little roads off of the main road.


Good Cabins:

Also found by following the little roads.


Certain Gas Stations:

Sorry, I don't have a picture for this. But, gas stations are pretty common pre-fabs. Several kinds of gas station buildings will have a cooking pot sitting out in the open near a campfire.

Other Various Buildings:
But these buildings are less commonly found so I don't have them listed.


You can then fill your jars from the water source and cook them in a campfire that has a cooking pot to make clean bottled water.


Securing Food:
This is fairly straightforward. Early on, you will get food primarily through looting and killing animals. Later on, you will probably want to build a farm (a different sub-topic).

Looting containers such as cabinets, ovens, various bags (purse/moldy bag/etc), tree trunks, coolers, etc will frequently result in finding canned food.

Killing an animal (sorry, killing is something you must learn on your own!) will result in you being able to harvest its corpse for meat. If you do not have a Blade Weapon, you will only secure a little meat and (if you kill a pig/deer/bear) a bone. You can then turn the bone into a bone shiv (a Blade Weapon) to harvest the next animal you kill for more meat, animal fat, leather, and more bones.

Using a campfire, you can cook the meat and use it as food. There are various kinds of foods that can be made out of meat. "Charred" meat is the type of meat that can be created in a campfire with no tools and just meat. It lowers your hydration but fills you quite well. "Grilled" meat gives the same stats as "Charred" meat but you lose less hydration - it requires a cooking grill to make (cooking grills are fairly easy to secure, after you have made a forge, or if you have excess short iron pipes, you can craft a cooking grill). "Boiled" meat requires both a cooking pot and bottled water (and it consumes the bottle as well). Although this does not lose any hydration (and instead gives some), it really isn't worth the loss of water early on. Furthermore, eventually you will be able to craft "Stew" or "Bacon and Eggs" which both outshine "Boiled" meat.
Basic (Part 2)
Where to Loot:
Now depending on what you are attempting to loot, you have some decisions to make. Looting is not simply purely about luck. Luck plays a large factor, but there is a bit of skill involved as well.

Note: I'm ignoring airdrops... because airdrops... are airdrops... so go loot them.

Finding stores/towns/cities:
Cities are very rare (aside from the guaranteed 0,0 hub) but are occasionally found in wasteland biomes. These are pretty dangerous for the beginner player early on in the game and should generally be avoided.

Towns are a lot more common and can sometimes be found towards the center of a biome by following the main roads. When you find yourself at an intersection, try to follow the road that heads towards the center of the biome by checking your map. Towns contain plenty of buildings that have few zombies surrounding the individual buildings (but many zombies in total throughout the town). Some towns will contain stores that will have a decent to large amount of zombies outside.

Stores are also fairly common and you will generally either find a town or store near the center of a biome (alongside the main road). Granted there are some cases where there is no prefab in the center of a biome, but that is not incredibly frequent. Stores will have several to many zombies outside but contain lots of useful goods. There are food stores (Shamway Foods, useful only in the beginning), tool stores (Working Stiffs, always useful), gun stores (Shotgun Messiah, more useful lategame when your loot quality increases), book stores (Born N' Nobles, useful early to midgame when you need lots of recipes), and medical stores (Pop N' Pills, useful throughout the game for bandages/antibiotics/med kits/painkillers).


Here it is on the map, somewhat near the center of the biome:


If you are looking for:
  • Normal Guns: Searching bags and gunsafes will net you a large amount of gun parts. These are common in towns.
  • Magnum Parts: Searching gunsafes and corpses (not zombie corpses, the loot container is named "corpse"). Corpses are common in caves, police stations, on top of stores, various other buildings.
  • Weapons/Armor: Search bags on the ground.
  • Tools: Cars and working stiff crates.
  • Military Grade Guns: Munitions boxes and shotgun messiah crates.
  • Medicine: Medical cabinets and Pop N' Pills stores.
  • Food: See above topic "Securing Food".

Surviving Dogs:
Disclaimer: Take the screenshots with a grain of salt, I spawned in the spikes and crafted the level 1 bow and arrows. I also spawned in the dogs because finding them with RNG spawning takes a while. These may not be "authentic" situations, but I have never died to a dog in any version of this game (and I have 700+ hours logged and made more zombie dogs than I care to count extra-dead).

There are a few things that you need to consider when fighting dogs:
  1. Dogs are probably stronger than you in melee combat (believe it or not, this is probably true for living dogs as well - and now you get to fight ones that can't feel pain or fear).
  2. Dogs are unable to catch you (provided you are not blocked or inhibited by terrain) even if you're running backwards. These reason for this, is that despite being slowed while running backwards, they require a moment to queue the attack animation, which slows them, during which time you get enough distance to cancel its attack. Running forwards, you're just as fast (maybe slightly faster, but then again, it's hard to tell if that's just their pathing being weird).
  3. Dogs will stop chasing you after 25 seconds.
  4. It is significantly easier to kill dogs if you spot them while they are at least 10-15 blocks away from you.
  5. It gets significantly easier to kill dogs as you advance in the game (you can oneshot them with a 150 quality bow, a steel arrow, and around 30 archery with a headshot).

Strategy 1:
If you are not confident that you can handle the dogs... literally just run away for 25 seconds (or just run away out of sight if you haven't been spotted).

Strategy 2:
Run backwards (hopefully you know what terrain you're running around on) in a straight line. Using a bow, aim slightly (very slightly) ahead of the dog and release. This is a very easy headshot. 2 shots like this with level 1 archery and a quality 1 bow will kill a dog.


I know in this image it's kind of hard to see (sorry...) but I hit the dog with an arrow a few moments before and have a second shot lined up to its head (well... it was lined up better afterwards and was a headshot). It's a little hard to let go of all my keys and press F12 while fighting these things...

Strategy 3:
While doing strategy 2, if the dogs are too close and you're not confident with your bow skills, place spikes. Actually, the whole bow part is unnecessary, because spikes have a very long placement range to begin with. For one dog, you will want about 10 spikes (more or less depending on how well you can place them - it takes about 3 hits to kill a dog).
Note: Many people call this a "noob" strategy or "go-to" advice, but it's actually very effective. I'm not going to lie, I use spikes all the time when I'm just starting out. It's simple, effective, and nearly risk-free.


For those who experience dogs that are somewhat avoiding the spikes or have weird pathing (for me they almost exclusively charge me in a straight line provided that I run backwards in a straight line), try to place the spikes within 1-2 blocks of the dogs current path so as to avoid giving it the time to dodge.


Naturally, once you've advanced far enough into this game, you can kill dogs with melee (spiked club one-shots them before they even reach you at some point).
Basic (Part 3)
Surviving Hordes:
I do not have pictures yet for this section, because I have no idea how to spawn a horde (gah console commands).

The wandering horde mechanic spawns a horde a given distance away from the player's location and they will "home-in" on that location (not the player). Depending on where that location is (which can be judged once the player detects the horde), players can then undertake various tactics to deal with the horde.

There are two strategies to deal with these hordes: avoidance or killing.

Avoidance:
If the player is at base when the horde is spawned, the horde will head towards the base, regardless of whether or not the player is detected. In this event, the player can utilize themselves as "bait" (yes, I know, it sounds quite terrifying) to lure the zombies away from their base. The zombies will no longer head towards their original destination if they detect you instead. Thus, running several hundred meters out with the zombie horde behind you (then escaping) will leave your base intact. If you have settings for "always run" or it is nighttime on default settings, I would advise only advanced players to attempt this tactic (since escaping is considerably more difficult).

Killing:
Hordes have various zombies that move at different speeds, thus making getting ganged up on in melee combat very likely. Thus, it is generally recommended to avoid melee combat with an entire horde during the early game. Instead, utilize ranged weapons (bow/crossbow/guns/etc) and spikes (either ones that you have in your inventory to place at any time or the spikes from your base if you're willing to repair your defenses). Focus zombies that are moving faster than the others so as to minimize the amount of zombies that reach you.

Surviving Screamers:
There are three main ways to deal with screamers: avoidance, stealth, and kill it and the horde it spawns.

Before that, here's some information about them:
  • Only 1 screamer spawns (A13.5 patch) per iteration
  • Screamers summon a horde (if they see you for long enough). The amount in the horde is determined by the value of the day until day 27 inclusively. The zombies will all be "normal" zombies. From day 28 to day 60 inclusively, there are 30 zombies in the horde. The zombies have a small chance of containing special zombies (approximately 5%). From day 61 to day 90 inclusively, there are 60 zombies in the horde with a slightly greater chance of containing special zombies (approximately 10%). There are a maximum of 12 zombies alive (from the screamer horde) at a time. Past day 90, there will be 100 zombies in the horde, with the same chance of special zombies spawning as days 61-90. There will be a maximum of 15 zombies alive from the screamer horde at a time.
  • A screamer only spawns if your heat map in a certain area (I think it's a chunk, but this is a guess) reaches 100% (then the heat map drops back to 0% and it will take getting it to 100% again to spawn another screamer)
  • Screamers are like homing missiles to the location where final instance of heat was generated

1. Avoidance
There are two subsets to avoidance, avoiding the spawning of a screamer or avoiding having the screamer see you.

To avoid the spawning of the screamer, you need to understand the heat map. The general idea though is to avoid constantly having your forges/campfires on, destroy gore blocks of animals, etc.

To avoid having the screamer see you, you need to take a few steps. Since screamers are "homing" to an extent, you will need them to "target-lock" somewhere they won't see you. The safest method of doing this, is to build a separate forge/campfire room from your main base. You may also want a method of killing the screamers without having to do it yourself (though you can). My personal preferred strategy, is to have my forge room 10+ blocks underground and then place a pit of log spikes directly above.


2. Stealth
This is fairly straightforward. Part of it is in knowing that a screamer is coming, and being able to get somewhere behind it without it seeing you. One good method is to have multiple entrances to your base on opposite sides (or an underground exit, etc). Once behind it, just headshot it (or use something to one-shot it).


3.Kill it and the horde it spawns
Well. This is pretty easy on the early days but later on, it's a serious pain. Past day 60, you probably won't want to attempt this without some good guns and plentiful ammo. During day 1-10 though, this is fairly straightforward. Just make sure to target the screamer first, then kill the small amount of zombies it spawns (1 on day 1 haha). I do not know if it has been changed, but leaving the screamer alive for too long (used to, it may still hold true) result in more zombies being spawned.


More to come...
Basic (Part 4)
Day 1 Goals:
Priority:
Your priority upon spawning depends on what biome you have spawned in.
  • Snow - If you are near a building, get inside and find clothes!
  • Desert - Attain a method of staying cool (Yucca juice is very useful for this). Proceed to goals.
  • Wasteland - Run for your life! (But seriously, you're very likely to die if you stay here)
  • Burnt Forest - Find a more temperate biome, you are likely to overheat (>100 degrees) here with -15 insulation. Coupled with the difficulty of attaining water early on, this is not a fun biome.
  • Normal Forest - You're in luck. Proceed to goals.
  • Mountains - I'm including the high elevation pine forests in this biome. These places are very cold at night/morning (and rather cold in the afternoon too...) so you will want to find clothes or create a shelter with a large amount of firewood for your campfire.
  • Plains - Once again, in luck. Proceed to goals.
  • Ocean - I'm not certain you can spawn in this biome (it's not really a biome, but there are large oceans randomly spread throughout 13.6), but if you do... swim to land.

Goals:
Here are some goals you may want to achieve during Day 1 to properly set you up for the early game.
  • Gather wood (1500+) (more is better, but you probably won't have time)
  • Gather small stones (200+)
  • Gather plant fibers (100+)
  • (optional)Craft wooden spikes (50+)
  • Secure a cooking pot (or loot lots of water)
  • Craft a bow
  • Craft (or preferably find) a melee weapon
  • Craft arrows (50+)
  • Find/create shelter (if you are desperate and it's nearly dark, just throw down 2-high wood frames on three sides, upgrade them, and a door on the fourth then wait until morning)
  • Find a suitable location that you will want to build at later on

The wood is used for fuel, upgrading and crafting wood frames, crafting various necessities. Small stones are for crafting arrows and stone tools. The plant fibers are for clothes (if necessary) and stone tools. At night, if there are no zombies around (because you killed them during the day) use the night to gather more raw materials. Otherwise, use some of what you have stored up to craft plenty more stone axes (to level up Tool Smithing) and wood frames.


Basic Base Building:
This section is intended to help players create a base for the first couple of weeks in game as well as create a solid foundation to increase defenses on their own for the remainder of the game.

What this section covers:
  • What to take into consideration when building a base
  • What is effective to defeat/delay hordes
  • Various base examples that will survive the first couple of feral (7th night) hordes

What to take into consideration when building a base:
When building your first base, your goal is primarily to create something that will be capable of weakening a horde as well as delaying that horde long enough for you to finish it off. Although this seems simple, there is more to it than just creating something defendable. You will want to consider the amount of time you need to build it (after all, the guaranteed 7th night horde comes when it turns night on Day 7), the cost to create/maintain it (because hordes will break things!), and your ability to expand your defenses (because the hordes get larger).
  • Time:
    While gathering your materials for your base, crafting them, and upgrading frames/spikes, you will need to consider the necessary time to prepare weapons, fight off random wandering zombies, and gather food and water. Thus, maximize your time available - kill off all the zombies around you during the day, so you have some margin of safety to continue building at night. Try to spend the first couple of days in game securing plentiful amounts of food and water so that you can spend the remaining time before the feral horde finishing your base.
  • Cost:
    With how A13 reworked resource gathering, crafting has changed significantly as well. You now require 30 wood for fully upgraded wood frames, 10 for normal spikes, and 30 for log spikes (each!). So assume for a second your base has 40 wooden frames upgraded, 20 log spikes, and 50 normal spikes. That's 2300 wood to build it. Assuming the feral horde will nearly rip it to shreds (and they rip wood to shreds very easily) you would need to spend anywhere between 30-60% of that material again to rebuild (remember, normal spikes can be destroyed) and repair (your walls are probably in tatters).
    Stronger materials such as scrap metal are (relatively) more rare than wood, but take significantly less damage (thus offering better defense). Wooden log spikes do not degrade just from use, so they are more cost-efficient (but less damaging!) than normal spikes.
  • Expansion:
    If you start a pit of spikes immediately next to your walls, you will have a hard time expanding (unless you build a second layer of walls outside of your spikes, but that's then inefficient because you would take damage to the outer walls without factoring in the spikes on the inside). Also if you only build to surround a small area, you will be unable to create a farm inside your base (and thus risking it getting run through by random hordes).

What is effective to defeat/delay hordes:
  • Location/Terrain:
    Using the terrain against zombies is an effective way to slow down/ease the battle against a horde. Take for instance, building against a very steep cliff. You now only need to consider building defenses on three sides, because if they come from over the cliff, gravity will be your strongest defender. Or, if you choose to build underground, you will be less noticeable, but it will generally prove to be much more difficult to defend against the feral horde (there are exceptions).
  • Walls/Spikes:
    Generally speaking, thicker walls are significantly more efficient than layered walls surrounding more defenses. The problem comes in when you attempt to upgrade the inner layers (since you often cannot reach them). Thus when building walls thicker than 2 blocks wide, you need to carefully weigh whether or not you plan to upgrade the inner layers (or just upgrade them as you go by starting off 2 wide, fully upgrading, then adding another layer, fully upgrading, then...).
    Log spikes are also more cost-efficient (and less time-consuming eventually) to have than normal spikes. Especially when fully upgraded, they do a significant amount of damage to zombies (back in A9, I had a spike pit surrounding my base that was 20 blocks wide - needless to say, the hordes never even made it to my walls). Yet, at the start, you probably will not have enough resources (or time) to make lots of wood log spikes (especially since the tier 1 log spikes are fairly weak). Instead, you will maybe have a layer or two of log spikes as the last layer of defense around your walls and a significantly larger layer of normal spikes outside of the log spikes. Normal spikes are very strong and a layer or 5-6 will significantly weaken the first feral horde (but can be destroyed before the feral horde even spawns due to random roaming hordes).
  • Zombie Pathing:
    Zombies have an awkward time with their pathing (something to do with the code). They have a surprisingly difficult time assaulting a base that does not have doors (on the outside). Where there are doors, zombies will all congregate and focus them down quickly, but where there aren't any doors, zombies bash the walls fairly evenly. Thus, as a player, you can make the most of this by jumping over your own walls/creating a removable path (using wooden frames - these things are magical).
Basic (Part 5)
Various Base Examples
:Disclaimer: These images/base designs are taken from the creators with their permission.


Description: An early to mid game base that includes an elevated living area and a kill-zone where the player can shoot zombies from above in safety. (Can be upgraded with log spikes along the bottom to increase safety and kill zombies)
Materials: High amounts of wood and low amounts of scrap iron.
How to build:

-Step 1: Create four 2x2 pillars that are 4 blocks high with 5 spaces inbetween each. Create a pedestal in the center.


-Step 2: Build a platform on top (five blocks up from ground level) of the pillars. Have the platform protrude over the edges of the pillars to prevent spider zombies from climbing up. In the center 3x3 area, fill with iron bars so that you may shoot through.


-Step 3: Build a second floor where you can place your chests/forges/etc. Add spikes to ground.

2. More to come...
Advanced
This section is not done yet. I will get to it soon. Just wanted to put the guide up mainly for the beginners to understand some stuff first. Will add more into here soon.

To do:
Finding Specific Items
Base Designs
Known Glitches/Bugs/Workarounds
Tips and Tricks
Escaping Techniques
Quickly Break Into Buildings
Building a Minibike
Avoid being Raided (multiplayer PvP)
Random Nifty POIs
Xml Editing (maybe...)
...more if requested?

Table of Contents:

Finding Specific Items:

This section is incomplete.

The below list is organized into: [Target Item] - [Loot Container (Probability)]
  • Calipers - Working Stiff Crates (Low), Frozen Lumberjack Zombie (Very Low)
  • Tool & Die Set - Working Stiff Crates (Low), Frozen Lumberjack Zombie (Very Low)
  • Rocket Launcher (Parts) - Shotgun Messiah Crates (Low/Medium), Munitions Box (Low)
  • Rocket Launcher (Full) - Shotgun Messiah Crates (Low), Munitions Box (Very Low)
  • Sniper Rifle/AK-47/SMG (Parts) - Shotgun Messiah Crates (Low/Medium), Munitions Box (Low), Supply Crates (Medium)
  • Sniper Rifle/AK-47/SMG (Full) - Shotgun Messiah Crates (Low), Munitions Box (Very Low), Supply Crates (Medium)
  • Small Engine - Working Stiff Crates (Low/Very Low), Cars (Very Low), Scrapping full quality Cars with a wrench (Low/Medium)
Update Log
Uhm. This section will be here so that you may know that I am still working on this...

Announcement:
As you may have noticed, I have not updated this guide in a long time because of various real-life issues. It is safe to assume that this guide will be discontinued (though still available) indefinitely. If anyone wishes to continue updating it, please contact me.
Once again, sorry, I have too much going on for the forseeable future that I don't even have time to play the game never mind update a guide on it.

To Do:
Until Completed - Various stuff
1/7 - Possibly complete the Basic Section
1/6 - Add pictures for Surviving Hordes
1/5 - Finish Basic Base Building (there's a lot to do...)


Log:
01/01 - Minor Fixes/Additions to Basic Section, Added Finding Specific Items (25%) to Advanced Section, Happy New Year!
12/30 - Added Day 1 Goals to Basic Section, updated for 13.6, Added Base Examples (10%) to Basic Section
12/26 - Added Hordes to Basic Section
12/24 - Added Basic Base Building (20%) to Basic Section, started testing some stuff in 13.6
12/23 - Added Dogs/Screamers to Basic Section
12/22 - Guide Created
Credits
Disclaimer: If there is anyone I haven't credited who did contribute, please message me or leave a comment and I will rectify that.

Credits:

7DaysToDie Developers:
-The Fun Pimps[7daystodie.com]

Steam Community Contributors:
-\AKA/TOM
72 Comments
Blood Flowers  [author] Jun 24, 2016 @ 6:43am 
Announcement:
As you may have noticed, I have not updated this guide in a long time because of various real-life issues. It is safe to assume that this guide will be discontinued (though still available) indefinitely. If anyone wishes to continue updating it, please contact me.
Once again, sorry, I have too much going on for the forseeable future that I don't even have time to play the game never mind update a guide on it.
PrideGroupIsEvil Apr 21, 2016 @ 2:43pm 
Blood, how about adding some people as contributers? this way you'r not keeping this guide updated alone. ill participate
PrideGroupIsEvil Apr 21, 2016 @ 2:42pm 
meh too bad he's stopped updating
Kalibur Apr 21, 2016 @ 3:17am 
Oh, and one more things.

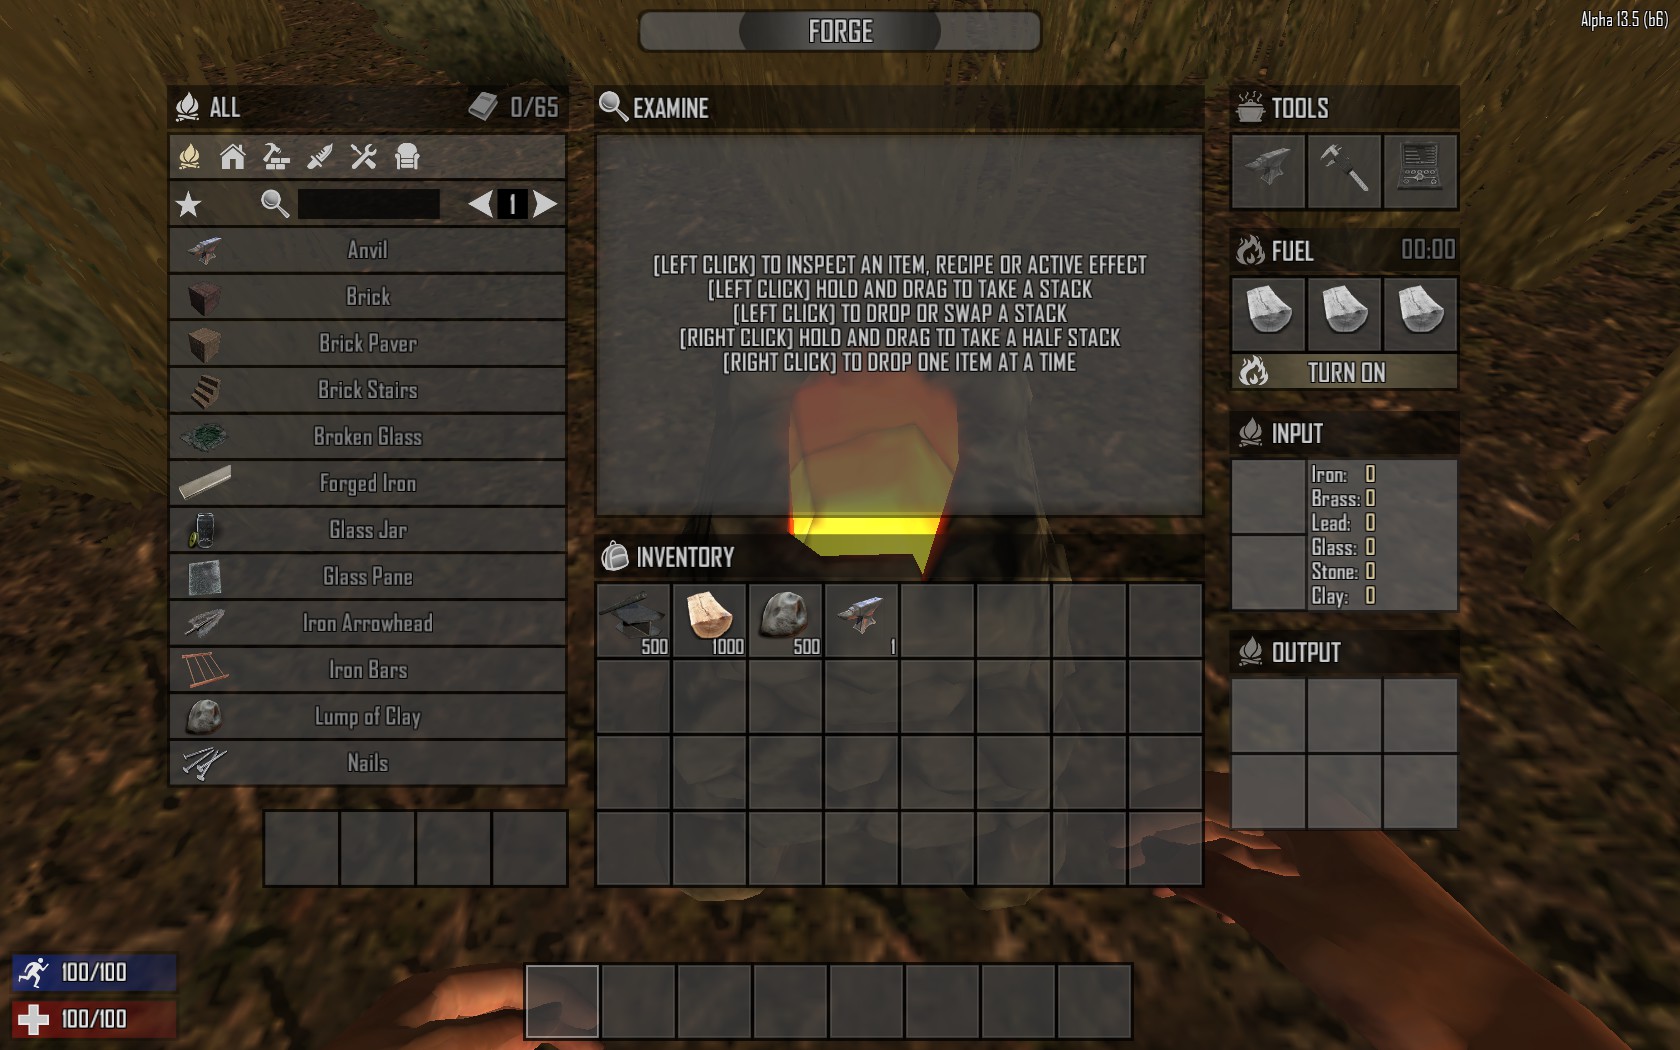
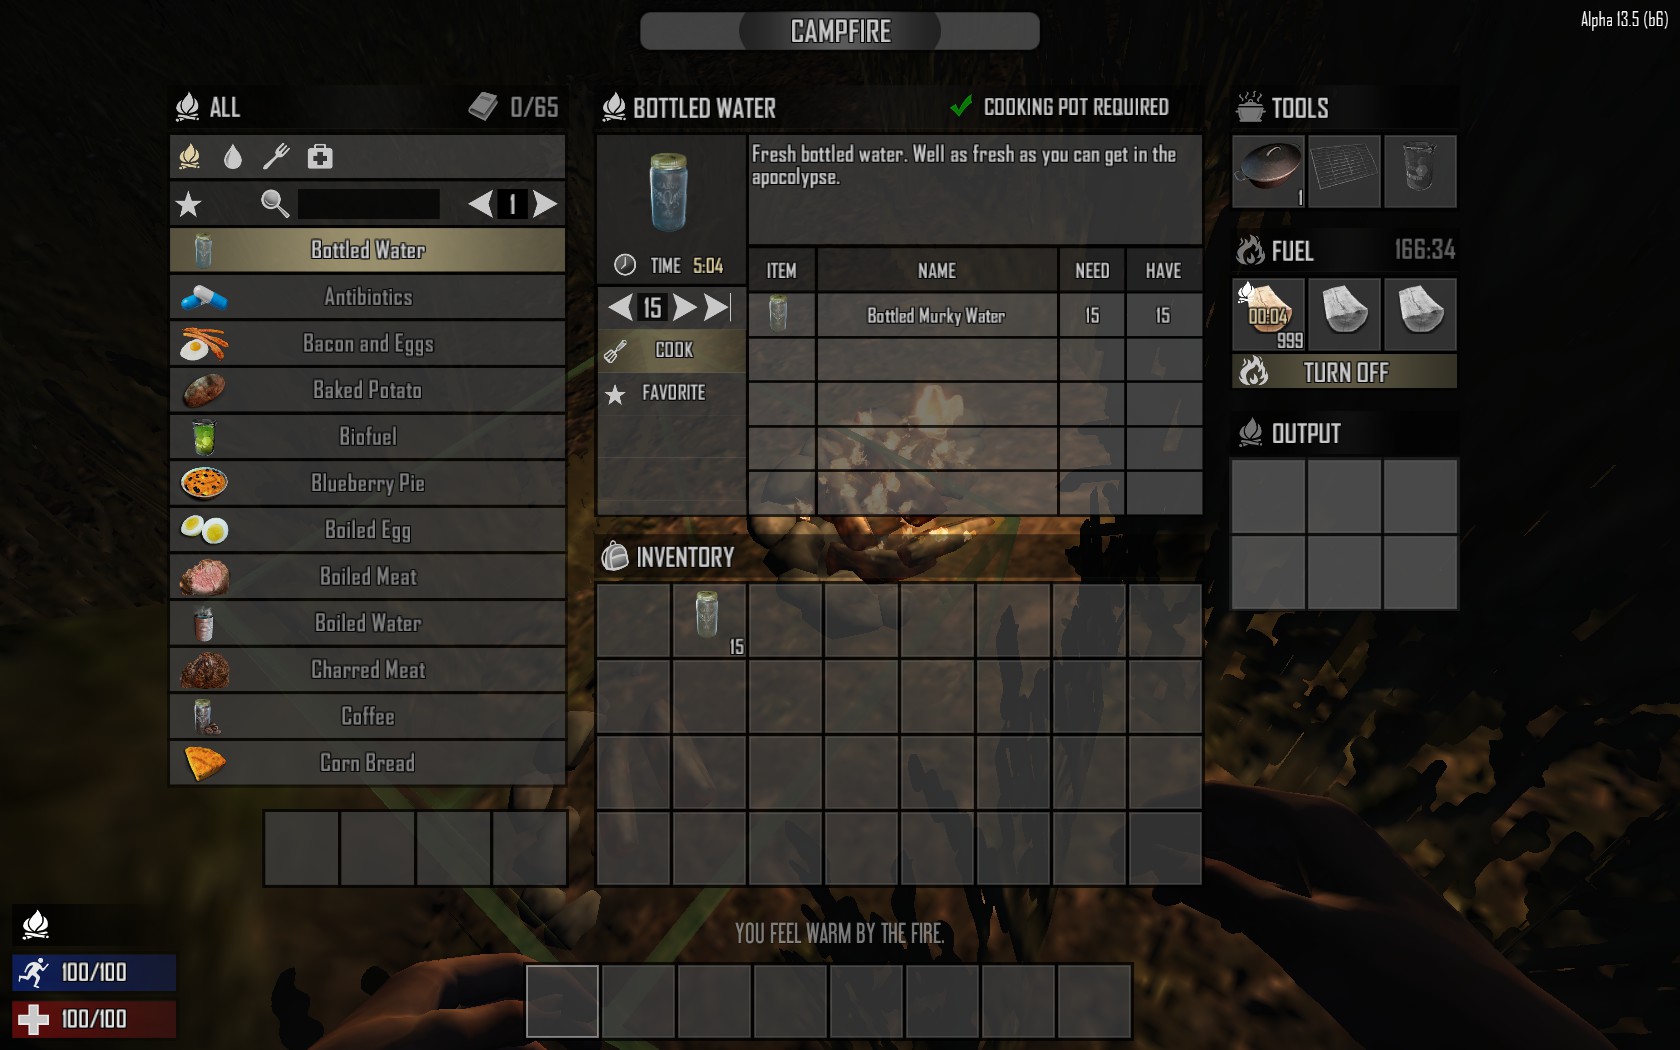
When you list off the water sourcing methods:

- A cooking pot
- Empty glass jars
- A water source

Don't forget to mention that you can hold and boil water in a tin can. These are also widely lootable!

Keep up the good work on this!
Kalibur Apr 21, 2016 @ 1:39am 
Great guide! If I may offer some constructive criticism. In this paragraph here:

"If you do not have a Blade Weapon, you will only secure a little meat and (if you kill a pig/deer/bear) a bone. You can then turn the bone into a bone shiv (a Blade Weapon) to harvest the next animal you kill for more meat, animal fat, leather, and more bones."

I think it's worth mentioning that you can (and should always) get a bone shiv from killing and harvesting a zombie corpse with a stone axe before killing an animal. Otherwise it's a real waste of the meat and leather you could get.
Villanelle Mar 1, 2016 @ 11:15am 
Oh, also -- I've gotten rocket launcher parts and schematics out of supply crates on multiple occasions. Actually, I think that's the only place I've ever personally found them lol I tend to have very bad luck with store crates.
Villanelle Mar 1, 2016 @ 11:10am 
Chainsaw definitely gives you meat from animal corpses, and sometimes bones. I don't think the hide survives, I've never gotten a hide from chainsawing animals. Not 100% sure about fat because 95% of the animals I've chainsawed have been zombie dogs (I love running headfirst into a horde with the chainsaw blaring and going all Evil Dead on those ♥♥♥♥♥♥♥♥ :)
Lochlan Feb 28, 2016 @ 6:17pm 
question what breed of cat is in the photo?
PrideGroupIsEvil Feb 15, 2016 @ 10:57pm 
quality joe increases the health of an item, at 100 you can still find low quality items under 100. but it'll be 100/100 instead of random/100
FroZen Feb 15, 2016 @ 9:57pm 
Great Guide!