Steam

Steam

809 ratings
Creating and Editing Steam Guides
By Jimo
I will give you directions and tips on how to create a Steam guide.
2
2
2
   
Award
Favorite
Favorited
Unfavorite
Introduction
This guide will give you directions and tips on how to create a Steam guide.

Steam guides allow you to share your own tutorials, tips and walkthroughs with the community. Before you'll be able to create a guide you'll need to own a copy of the product on Steam.


http://steamcommunity.com/sharedfiles/filedetails/?id=256625699
Creating a Guide
To create a guide visit the community hub for the title you want to create a guide for and select the "Guide" tab. From the guide tab select the "Create Guide" button. Before you'll be able to create a guide you'll need to own a copy of the product on Steam.


From the guide creation screen you'll need to give your guide a title, description and thumbnail image. The image you upload is visible next to your guide and should represent the topic your guide covers.


Tip: Creating a relevent and attractive thumbnail image is a good way to get extra visitors to your guide.


You'll also need to categorize your guide. These categories will help users find your guide more easily, you can choose as many categories as you like if multiple apply.


When you're done categorizing your guide accept the terms and conditions and select the "Save and Continue" button.

Once you've created your guide you can access it at any time by selecting the "Guides" button on your Steam profile.
Sections
Once you've created your guide you will be taken to the guide contents page. Your guide will not be visible at this point, this allows you to write content before others will see it.


You can segment your guide by creating sections. You can add as many sections as you'd like by clicking on the "Add a Section" button.


You can rearrange your sections by selecting the tab to the left of the list and dragging them into the order you'd like.


Sections will remain untitled until you name them. This can be done by selecting the "Edit this section" button and typing a name into the title field.

Whenever somebody reads your guide they will be able to quickly browse through each section by selecting the title on the section index located on the right side.


The section editor is where you'll be doing most of your writing. The editor uses basic markup language and has buttons for a number of different styling options. In addition to the button options there are a few extra tags such as tables, quotes and code boxes which need to be typed manually. Select the "Styling Help" button for detailed examples.


Tip: Using text styling can help to add emphasis. Tables are also a great way to clearly show information for people to follow.


Along the top of the section editor there are multiple tabs. You can select "Preview" to view how your section looks and to make sure all of your markup tags are in the right place. You can also choose "View Diffs" to display what has been changed in the editor since the last save.


Whenever you make a single edit to a section a blue bar will appear letting you know that changes have been made. To save your work select the "Save" button. To discard any changes in your current edit you can choose "Cancel".
Adding Contributors
You can add contributors to your guide which will give those you select editing privileges. Editing privileges allow users to add, remove and edit any existing content to the guide. This can be done by visiting the guide contents page and selecting the "add contributor" button.


Once selected a list of your Steam friends will appear. Click on the name of the person you want to add. You can click their name again at any point from this screen to remove them.


Tip: Contributors can edit and remove content without approval. Only add people you trust.


Once you've added somebody as a contributor they will receive an email asking them to follow some steps. Once accepted they will appear as a credited author on the guide and be given editing rights.
Adding Images
You're able to add images to your guide by using the uploader tool on the section editor and the guide contents page. Screenshots which have already been uploaded to your Steam profile can be used by selecting the "Screenshots" tab.


You can delete and rearrange the order of your images using the image library on the guide contents page. If you upload an image with the same name as one you've already uploaded it will replace it.


Tip: Adding images to your guide is a great way to demonstrate and draw visual interest to a subject.


Once uploaded you'll see a thumbnail of your image in the library, to insert it into your guide select it from the section editor. Once selected a number of insertion options will be displayed such as size and alignment.


If you select full-width your image will be upscaled to the maximum width of the section. Choosing half-width will downscale the image to half of that. Choosing original size will keep the original dimensions of the image, however if it exceeds the maximum width it will be downscaled automatically.


Tip: The maximum width of a section is 636 pixels.


The alignment will adjust how the image is displayed in-conjunction with your text. Aligning the image to the left or right will wrap text around the image. Inline will not affect text placement.
Adding Videos
You can add a YouTube video to your guide by selecting the "Insert YouTube™ Video" button.


You'll need to type in the YouTube video URL and select an alignment option.

Just like inserting an image aligning the video will adjust how the video is displayed in-conjunction with your text. Text will wrap around the video if you choose left or right, and full-width will not affect text placement.


Tip: You can monetize YouTube videos if you have the proper licensing. This can help generate some advert revenue from your guide. Check with the developer before monetizing your video to make sure it's ok.
Publishing
When you're done writing your guide you can preview it in its entirety by selecting the "Preview Guide" button located at the top.


If everything looks good you can publish your guide by selecting the "Publish Guide" button. Once published the guide will be visible to everybody.


Steam users can rate your guide like other community hub content by selecting the thumbs up or down icon. Guides with the highest rating in the last seven days will appear on the Steam overlay for the game they were created for and on the top of the community hub guide tab.


Tip: Guides will remain unrated until they receive at least 25 upvotes. Sharing your guides to popular social media websites is a great way to draw extra traffic to your guide.


Once your guide has been published you'll be able to view the "Authors Stats" box. This will display how many unique visitors and favorites your guide has received.


At any point after publishing your guide you can make changes by selecting the options found in the "Owner Controls" box.
Closing Notes
If you have any questions or comments regarding this guide please feel free to leave a comment below.


http://steamcommunity.com/sharedfiles/filedetails/?id=181142704
http://steamcommunity.com/sharedfiles/filedetails/?id=239845208
243 Comments
lightwo Mar 19 @ 8:25am 
You can't post under any ID, you need to "own" it, and that depends on how it's configured, and in the case of games, you need to have the game license.
lightwo Mar 19 @ 8:24am 
One of the ways you can find some "config" app IDs is by going to this page and sorting by app ID:

https://steamdb.info/sub/0/apps/

Steam Screenshots specifically is 760.
NeoRider7 Mar 19 @ 7:42am 
@lightwo, Did I understand you correctly that from the whole list it is best to limit my choice to only one application ID number 753?

By the way, you mentioned that there is an app ID for Steam Screenshots. What is its number?

Where can I find out the numbers of the other various app IDs?
Thanks!
lightwo Mar 19 @ 5:57am 
Every Steam app has an App ID, 753 corresponds to "Steam" and is used by Valve and many community members for Steam-related content
NeoRider7 Mar 19 @ 5:32am 
@lightwo, Thanks for the answers!
Could you please clarify what you meant by "Steam hub"?

The thing is that I use Google translator for Russian and it's not very clear to me what exactly was meant. Thank you!
lightwo Mar 19 @ 4:54am 
It's an oversight, I presume the most they'd do would be to prevent creating guides under expected App IDs. Besides, it is objectively better to publish Steam-related guides under Steam hub so that they don't get listed under an irrelevant hub.
NeoRider7 Mar 19 @ 4:51am 
@lightwo, I understand correctly that officially Steam forbids publishing guides under any app and without linking to a specific game?

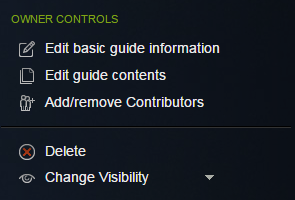
It looks especially strange if you publish guides under such nonsensical applications as "Steam Screenshots".

Thus, I fear that sooner or later Steam will pay attention to this and, quite possibly, ban such linking of guides to nonsensical apps.

What is the risk that my guide, which is linked to a nonsensical app, will eventually be deleted?
Zhenginator Mar 17 @ 2:43pm 
oi como é que eu reduzo o tamanho da imagem?
lightwo Feb 22 @ 2:57am 
You can edit the Create Guide URL to contain the App ID of any game/application you are allowed to post in the community of:

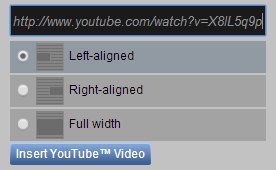
https://steamcommunity.com/sharedfiles/editguide/?appid=753

753 is the App ID of Steam, but you can replace it with many other ones, even nonsensical apps like Steam Screenshots if you really want to.
NeoRider7 Feb 22 @ 12:34am 
How to create a guide without being tied to the community of any game?
For example, how is this guide made? It is not tied to any game.
How can I do the same?
This is not discussed in this manual.