
Install Steam
login
|
language
简体中文 (Simplified Chinese)
繁體中文 (Traditional Chinese)
日本語 (Japanese)
한국어 (Korean)
ไทย (Thai)
Български (Bulgarian)
Čeština (Czech)
Dansk (Danish)
Deutsch (German)
Español - España (Spanish - Spain)
Español - Latinoamérica (Spanish - Latin America)
Ελληνικά (Greek)
Français (French)
Italiano (Italian)
Bahasa Indonesia (Indonesian)
Magyar (Hungarian)
Nederlands (Dutch)
Norsk (Norwegian)
Polski (Polish)
Português (Portuguese - Portugal)
Português - Brasil (Portuguese - Brazil)
Română (Romanian)
Русский (Russian)
Suomi (Finnish)
Svenska (Swedish)
Türkçe (Turkish)
Tiếng Việt (Vietnamese)
Українська (Ukrainian)
Report a translation problem


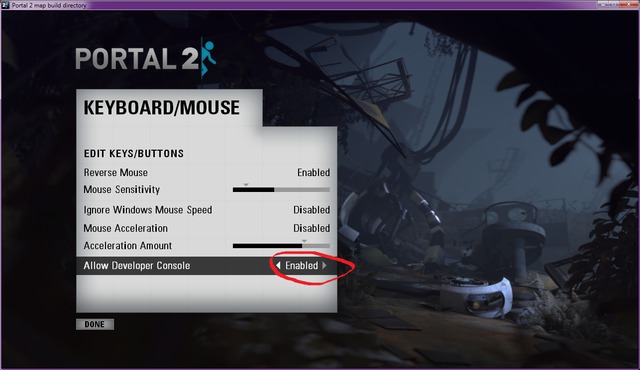

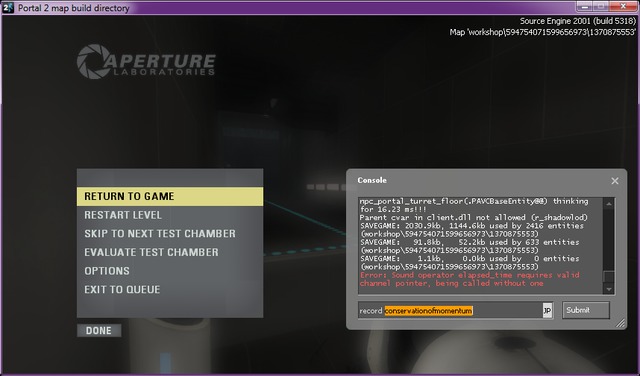


~sv_cheats 1
~host_framerate 60
~startmovie test
x264vfw [error]: incompatible input/output frame format (encode)
~endmovie
--------------------
test.avi --- 0 kb
--------------------
What am I doing wrong?
When I'm running my own script, I have to use pssuspend.exe from SysInternals to suspend the game executable (hl2.exe or portal2.exe) every once in a while, to let the compress/transfer program catch up on the files that the game wrote. Otherwise the game will keep writing TGA files faster than the other process can compress them, and the disk becomes full. I don't see SrcDemo2 possessing the suspending feature, and thus I think it's likely to suffer from the same problem on my computer.
It's easy to use, just make sure you match the folders in Portal 2 and srcdemo².