Foxhole
214 次評價
OutDated - Foxhole Guide for Builders V0.15
由 Bk_Owenk 發表
Basics that a combat engineer should know.
Contain: / Strategies for building / Common errors / Good defence layout / Special terrain [Game Version 0.15]

This guide is base on [Game Version 0.15], but some general concepts are still valid in 2022.

Good luck, have fun and remember to not let overburden slow you down at the front line.
2
   
獎勵
加入最愛
已加入最愛
移除最愛
Introduction
In foxhole, nothing is immortal.
Attackers can take down every "Protection" in game. From Sandbags, that can be destroyed quickly by most weapons , to fortress wall, which are very sturdy. It was only a matter of time for the attacker to destroy them.

=== BASIC ===
http://steamcommunity.com/sharedfiles/filedetails/?id=1091815740
See "Builder Role" in Foxhole Begginer's Guide by adyian for the basics of the basics.

This following section will include information that every builder in the game Foxhole should know before laying down blueprints and hammering building materials into the blueprints.
Basic Information of All Defenses
Foxhole
often used in spamming cheap defenses

Pro:
  • Low Cost
Con:
  • Low resistance to small arms
  • Weak fire power
Tips:
  • Quickly spam Foxholes at the front line to help claim sovereignty of the territory
  • Must build to guard the flank of any defenses with limited fire arc

Gun Nest

Pro:
  • Higher fire rate than the Foxhole
  • Have the ability to throw Frag Grenades at enemies within 20m
  • High resistance to small arms
  • Sandbag will not block trajectory
Con:
  • Relatively Expensive & Time Consuming (50 B-mat Foxhole > Upgrade 50 R-mat)
  • 7 HE grenades or 3 direct mortar hits will destroy the Gun Nest.
Tips:
  • Firing range: Daytime - 26m; Nightime - 22m.
  • Cost: 50 Basic Material + 50 Refined Material

Bunker

Need to be "built" between two Fortress Wall

Pro:
  • Strong and steady (41 HE)
  • Tall (Any obstacle that's lower than the canon itself will not block its vision and fire, for example Foxhole, Pillbox, Gun Turrert)
  • High resistance to small arms
Con:
  • The Bunker is unable to defend itself from the back. Make sure the back of your bunker is well defended and that no enemies can approach it.
  • Expensive (3 Fence > 3 Reinforced Wall > 3 Fortress Wall > 1 Bunker)
Tips
  • Building a Bunker next to a Heavy gate is really efficient. Anything in front of it will be shot on a long range.
  • Your character is likely to block the bunker's placement if you try to upgrade it from too close to the center of the wall. Make sure you stand to the side of the wall when trying to upgrade it.

Garrison House
Another kind of Bunker

Pro:
  • Relatively Inexpensive (Compare to Bunker)
  • Strong (Same a Bunker)
  • Player inside gains range bonus
  • High resistance to small arms
Con:
  • Can only be built at designated position
  • Building require CV
  • The garrison will only fire from windows with boards over them
Tips:
  • Place a sandbag in front of the entrance to stop enemies from rushing inside. The sandbag will slow them down and AI will finish them.
  • The building can be entered via the doorway that leads to a staircase up which is the second floor of the building, where players are able to access to use as an elevated shooting position

Gun Turret
Pro:
  • Dealing effective damage to Vehicle (It can disable a Half-Truck in 2 shot)
  • Amazing Accuracy (The shot it fires is guaranteed to hit the target)
  • Tall (Any obstacle that's lower than the canon itself will not block its vision and fire)
  • High resistance to small arms
  • Sandbag will not block trajectory
Con:
  • Vehicle Only (Only engage at vehicle produced by a Vehicle Factory)
  • Slow turning and firing speed
========================Citation========================
Some information about tips and cost are based on foxhole wiki, https://foxhole.gamepedia.com/Buildings
Basic Information of Protective Structures
Barbed Wire
Description: Slow down enemy infantry movement. Dismantled with a Wrench.
Cost: 20 Basic Material


Usage:
  • Can be placed in bushes to stop the enemy from ambushing from the bush.
  • Place about 20m around the defences to prevent the enemy from using HE on defences
  • Create "Man Make" choke point to force enemy into "Dead Zone"

Sandbags
Description: Provides cover for player during combat. Hard to destory via bullet.
Cost: 10 Basic Material


Usage:
  • Can be placed as cover to greatly reduce the chance of a player getting hit by a bullet
Tips:
  • Do not build sandbag in front or behind defenses, because it will hinder the firing arc of defenses such as foxhole and pillbox
  • Always build barbed wire on the side facing the enemy to prevent enemy from using your sandbag to their advantage.

Chain Link Fence
Description: Can stop passage, and can be upgrade to Reinforced Wall. Hard to destory via bullet, easy to destory by explosive. Cannot stop vehicle.
Cost: 15 Basic Material


Usage:
  • A basic barrier that is used to prevent passage through an area.
  • Supplement to barbed wire, can be easily span across large area
  • Can be upgrade to Reinforced Wall with 30 Basic Material

Reinforced Wall
Description: A metal upgrade of the Chain Link Fence that vastly increases durability. Hard to destory via bullet.
Cost: 15 Basic Material + 30 Basic Material


Usage:
  • A strong barrier that is used to prevent passage through an area.
  • Can stop vehicle
  • Can be upgrade to Fortress Wall with 50 Refined Material

Fortress Wall
Description: A durable concrete upgrade to the Reinforced Wall with very high health.
Cost: 15 Basic Material + 30 Basic Material + 50 Refined Material


Usage:
  • Can be placed as cover to greatly reduce the chance of a player getting hit by a bullet
  • Frag Grenade will have a hard time fly past it
  • Fortress Wall has two adjacent Fortress Walls it can be upgraded to a Bunker with 120 Refined Material

Gate
Description: A basic retractable gate that provides access to a walled off area. Easy to destory via bullet.
Cost: 30 Basic Material


Usage:
  • Players can see other players through the gate and weapons can be fired through it
  • Can be upgrade to a heavy gate with 100 Basic Material
Tips:
  • Gates can be easily take down by bullet. Upgrade to Heavy Gate as soon as possible.

Heavy Gate
Description: A strong retractable gate
Cost: 30 Basic Material + 100 Basic Material


Usage:
  • Provides access to a walled off area
Tips:
  • Heavy Gates do not shoot at the enemy. Build static defenses such as foxhole or pillboxes in front of gates to increase it's defensive value.

Tank Trap
Description: An obstacle that prevents vehicle access to an area. Can be dismantled with a Wrench.
Cost: 20 Refined Material


Usage:
  • Stops vehicle

========================Citation========================
Information about cost and description are based on foxhole wiki, https://foxhole.gamepedia.com/Buildings
Firing Angle

Exact firing distance are still unknown.
Map Intelligence & Watchtowers
Watchtowers Are Your Eyes
[Old Info] The game now has map inte, which is way better.

They are you and your team's eyes

Here is a link to the Offical Foxhole Wiki about map intelligence if you want to know more about the mechanic of map intelligence and watchtowers.
https://foxhole.gamepedia.com/Map_Intelligence
Combinations
Every defences have their pros and cons, so use them wisely.
Combination of multiple defensive structures are highly recommended
[Beware: Barbed Wire can block line of sight of the Defences if they are too close to each other]


Basic Combination 1; Barbed Wire & Foxhole, Gun Nest, and Gun Turret
[Beware: Barbed Wire can block line of sight of the Defences if they are too close to each other]
Pro:
  • Funnel attackers into killzones
  • Allow infantry in the defence side to pass. (Since the passage is in range of the Defences, enemy infantry will not be able to use it before disabling the foxhole)
  • Prevent attackers from attacking with short range explosive, such a HE and Satchel Charge

Con:
  • Takes long to build
  • Cannot stop vehicle

Example:


Basic Combination 2; Walled Pillbox
@`2DG`~2X_IK$Y2~OYYY.png]Pro:
  • Funnel attackers into killzones
  • Protect the pillbox from being flank
  • Make the wall not passive

Con:
  • One shot 5 kills; Enemy mortar can damage 5 structures in one shot
  • People who is brave enough can disable a pillbox by throwing a smoke grenade at it and build a sandbag in front of the pillbox.

Pillbox and Barbed Wire should always be together, never forget to protect the flank of your Pillboxes with Barbed Wire

Basic Combination 3; Barbed Wire & Gun Turret
Do not leave a passage between Barbed Wire, Gun Turret will not engage enemy infantry.

Pro:
  • Protects Gun Turret from enemy infantry
  • Prevent attackers from attacking with short range explosive, such a HE and Satchel Charge
  • Isolate enemy vehicle

Con:
  • Blocks infantry in the defence side as well

Basic Combination 4; Barbed Wire & Wall

Pro:
  • Prevent attackers from attacking with short range explosive, such a HE and Satchel Charge
  • Easy & Inexpensive

Con:
  • Useless against long range explosive, such as flag grenade launcher and mortar
  • Enemy can easily destroy the Barbed Wire first

    Example:
Not a good one, but it is better than nothing

Basic Combination 5; Upgrade 3 Walls to Bunker

Pro:
  • Strong and Sturdy
  • Can shot back at enemy

Con:
  • Expensive
  • Long Construction time

Basic Combination 6; Gap in Wall
LTDUS@XHW7}6Q0Y@T.png]Pro:
  • This can act as gates that can auto "Close"
  • Allow friendly access
  • Stop Enemy Vehicle

Con:
  • Stop Friendly Vehicle
  • Does not feel safe
  • Attacker can spot what is behind the walls
  • Can't upgrade to Bunker
Gates are always better, but they are expensive. And gates are useless when they are wide open.
Common Error
Never - build two defences right next to each other.

This group of buildings are even worse, it not only give the attack an opportunity to one shot 4 kill. It also...

RIP, Rest In Prison

To prevent this kind of situation from happening
  • Build on even ground, sometimes the terrain itself blocks structures
  • Do no build anything right next to another structure (Except Walls)

Never - build only one kind of defence/ all facing one direction


Never - Isolate your buildings completely
[Beware: Barbed Wire can block line of sight of the Defences if they are too close to each other]


Never - Obstruct a Gate


Never - Build Passive Defence
For exmaple, a wall than span a long distance without active defense, such as Foxholes or Gun Turret.
}H3.png]
Con:
  • Hinder players in the defense team
  • Enemies can easily breach the Great Wall by destroying a single wall only.
  • Hard to guard due to long distance
  • Defenders are basically blind, they have no idea what is happening at the other side of the wall
Pro:
  • can prevent one or two enemies from wandering into safe zones and distribute the supply line.
Improvement:
  • build some gates in between
  • Add defenses such as foxholes outside of the wall to remove blind spot (Basic Combination 6; Gap in Wall)
----
Make it non-passive by upgrading some of the walls into Bunkers [Lv4 Wall]
---
Barbed Wire as wall
Critical Error
Gun Turret Behind Walls
Your gun turret will not hesitate to shoot your own wall as long as the enemy vehicle is in its range. [Hopefully this bug will soon be fix]

Never - Put sand bags in front of or behide defences, especially pillbox
They can't shoot at enemies while a sandbag is hindering them.
As a attacker, you can disable a pillbox by throwing a smoke grenade and build a sandbag in front of pillbox.

Never - build anything on the road, nor walk on it for a long period of time
Except Gate and Barbed Wire.
Z$O7{A6}V35V9JXKWP.png]Con:
potentially hindering the flow of your team's supply line

Improvement:
If you want to prevent enemy vehicle from using the road
  • Build Gun Turret or Foxhole, and made sure they are connected to the Tunnel Network.
=== ADVANCE ===
This section includes more advanced elements such as, use the environment to your advantage and how to confronted with a bad defensive Layout.

To be a Advanced Architect, a player have to understand the purpose of defense and the function of every structure. [Visit "Builder Role" in adrian's Foxhole Beginner's Guide for a introduction of every defencive building in Foxhole]
Ethic
In this section, I will tell you what I think an Advanced Architect needs other than a hammer (not B-mat and R-mat ,of course).

Know Yourself + Your Enemies = WIN
Sun Tzu
To Know Yourself
  • Be a logistics yourself
    - Drive; see what will hinder your vehicle
    - Mine; understand what you need to guard a resource zone

  • Learn from your own mistake
    - Observe; grab a binocular, and watch how your defences are being breached
    - Change and Improve

To Know Your Enemy
  • Be an attacker yourself.
    - Join a demolition squad; see how they deal with enemy defences
    - Join a infantry squad; see how they protect themselves from enemy defence (Sandbags)
    - Ride a tank or half tank, be a gunner or a driver; see what is most harmful to vehicles, and what a vehicle can easily take care of
    - Operate mortar, artillery, and other explosives; see their limits are, and what they are good at
    - Learn from death; see what will kill you, and learn from it
"Environment"
Use the environment (Anything that comes with the map itself) to your advantage, and eliminate as much disadvantage that cost by the environment as possible


Pillbox Killzone
This is epic.
    What is good about this?
  • Barbed Wire and Walls created a no zone for the attackers
  • Barbed Wire in the bushes eliminated potential hiding spot for the attackers
  • Pillbox are fully protected by the Gate, Stone Fence, and Barbed Wire around it
  • Machine gun in the pillbox will grind any attacker in the range

    Con:
  • One pillbox should be enough
  • Sunken Pillbox would be less vulnerable against bombardments


Foxhole Bush People
I hate Bush People.
Put obstacles such as Barbed Wire in the bushes, so they cannot just sneak next to your defences and destroy them. The best solution is to always build at least 15m (Range of HE) away from the bushes

Stone Fence
Use Barbed Wire to prevent attacker for using the stone fence to your disadvantage''

Garrsion House
Bunker = Garrison House
Confronted With a Bad Defensive Lay-out
This Section is about how to confronted with a bad defensive lay-out.

An Advanced Architect not only have to know how to build a strong denfece system from the ground, they also have to know how to enhance defences that have already been built by others.

In this section, I am going to show you how to improve others defence system with your own "Defenses" and "Protection", using the knowledge you gain from the section "Basics" and "Common Error".

Example 1:
[Beware: Barbed Wire can block line of sight of the Defences if they are too close to each other]


Example 2
Advance Defensive Layout
Here are some examples of defences that I think are efficient. (some of these may be a too ideal)

Gun Nest + Barbed Wire + Sunken + GT


Great "Wall"
]K.png]
  • A invisible wall form by bullets from foxholes. Add watchtower along the way to monitor the defensive system.
  • Two watchtowers that both cover half of the bridge & other side of the bridge acted as a warming system. If the one that cover half of the bridge turns orange, we know enemy is on it
Pro:
  • Less costly than the bunker one
  • Require less time to build
  • Tunnel Network are protected

Con:
  • Easy to breach with long range explosive (it doesn't have strategic depth)

Outpost Fort

Pro:[/b]
  • Very Strong Defence
  • Keep the outpost safe

Con:
  • Can be breached by long range explosive
  • Expensive and time consuming
  • Limiting space for logistic to park their car

Multilayer defence
  • This is a very common square concrete fort, with 2 layer of fully upgraded walls.
  • Two watchtowers that both cover half of the bridge & other side of the bridge acted as a two stage warming system. If the one that cover half of the bridge turns orange, we know enemy is coming.


Watch out for flank


  • This is just an example, two layer of defences are definitely not enough.
  • My suggestion is to push as far as the team can, and build the first layer of defence there. (Some foxholes with a connected Tunnel Network, and some watch tower) After that, go back to the base and start building outward. It is important for the builder to build in a safe environment, since they are vulnerable due to over weight.

Pro:
  • While the first line of defence is under attack, builders can still reinforce and fortify the behind the first line of defence.
  • Takes more time and effort for the attacker to destroy multiple line of defense
Con:
  • Tunnel Network are always the weak point, if someone destroyed for the Town Hall or Outpost. The system fails no matter how many layers it has.
  • Takes longer to build
  • A Mortar team can pin point the tunnel network and disable the entire system. [Attacker should not be able to spot the Tunnel Network before they destroy the wall.]
-----------------------------------------------------------------------------------------------------------------------------
Please understand that in Foxhole, there is no perfect defences. If the attacker have enough long range explosive, such as mortar, it is only a matter of time for the attacker to wipe out the defences.

This Guide is about how to build a efficient defence system, which would create more obstacles for the attacker.
=== Must Read ===
Other Guides that help you understand better about Structure and Building.

Speical Thanks & Author's Note
Author's Note
  • Anyone that is willing to contribute to this guide can message me.

A guide like this take hours to make, please show the author some love by


Speical Thanks
  • Knight of the order of Fail
    Question regarding about "confronted with a bad defensive lay-out".

  • 乇乂ㄒ尺卂 ㄒ卄丨匚匚
    Information about "blinding defences with smoke grenade".

  • Tribal44
    Multilayer defence

  • [82DK] Kyo21943
    "Exit Blocked" Problem

  • Foxhole Begginer's Guide
    By adyian
    http://steamcommunity.com/sharedfiles/filedetails/?id=1091815740
26 則留言
Pyroide 2022 年 5 月 20 日 上午 1:08 
The good old days.
nondidjos 2022 年 4 月 8 日 上午 7:48 
(very outdated now)
prakash_anish 2019 年 9 月 17 日 上午 10:15 
Wow! That's some hard work. There will always be points to be criticised but at least you did your part. Please update it.
Barcel 2019 年 7 月 29 日 上午 12:45 
This needs to updated, tunnel networks are no longer a thing.
Wowie 2017 年 9 月 12 日 下午 10:58 
Nice guide, but badly organized. You should also go over how to build defenses in terrains other than "flat open field", expanding the "environment" section into its own category. The game has multiple terrains, so things that need covered include, but aren't limited to:

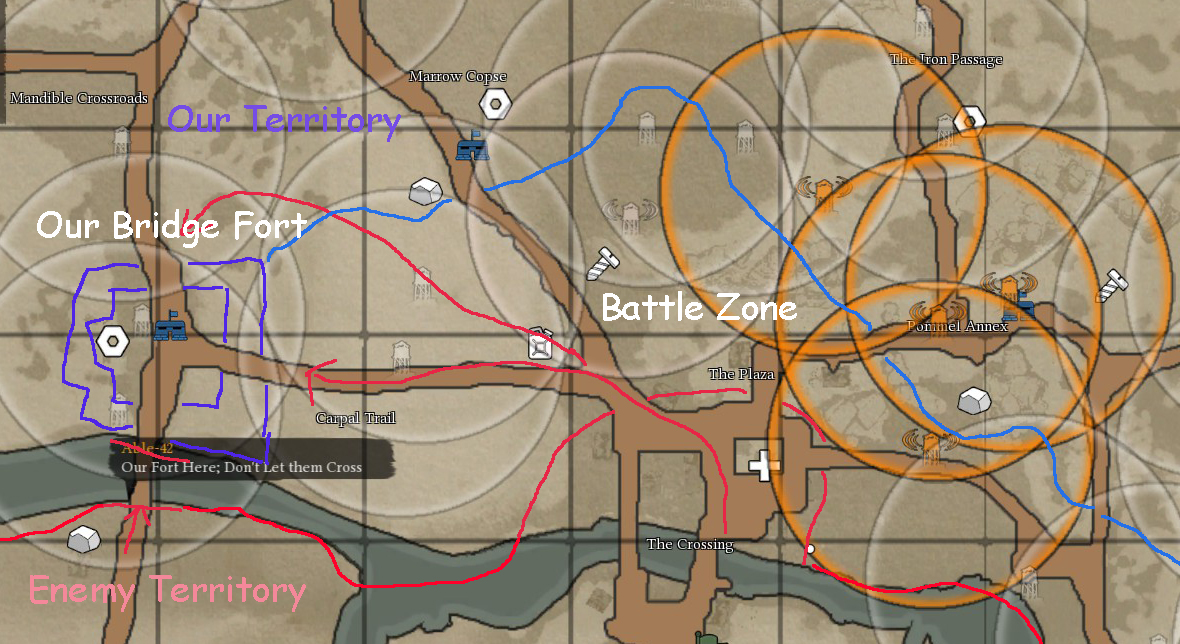
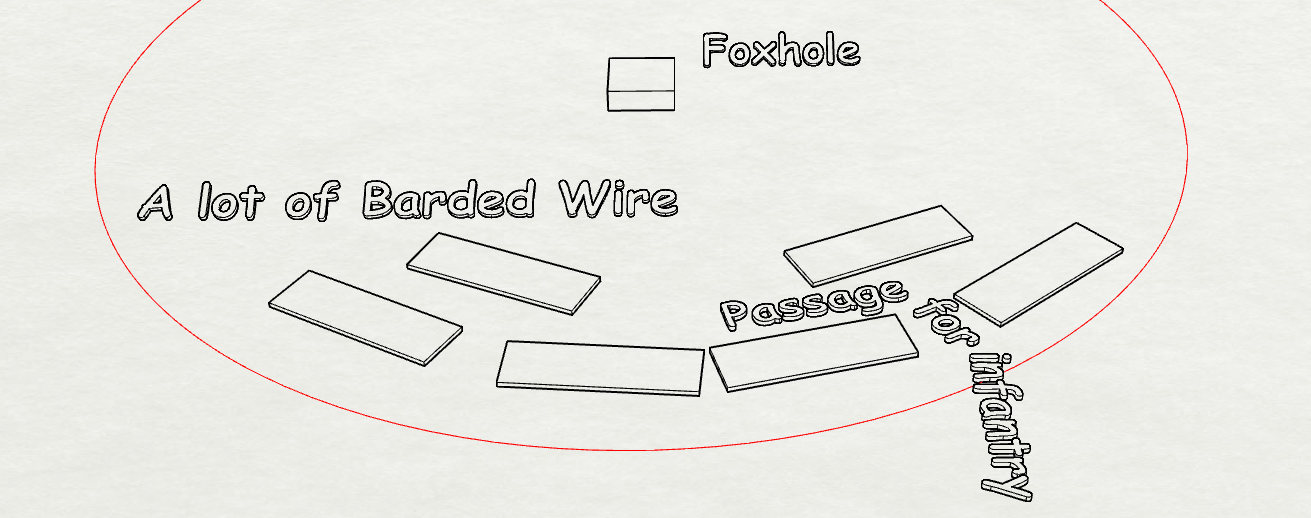
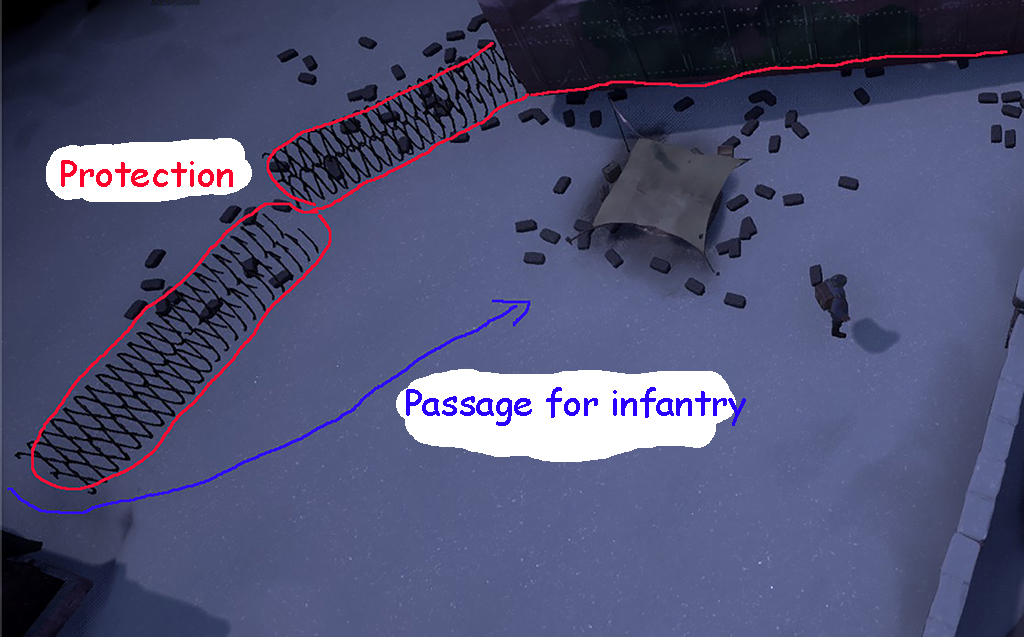
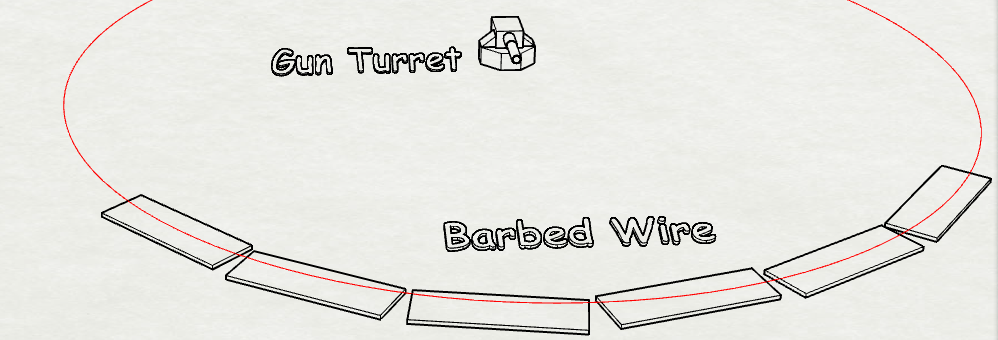
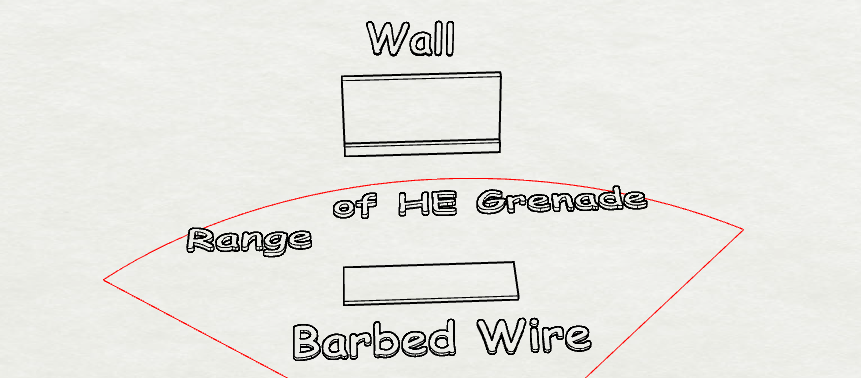
Forest (light). Forest (heavy/cramped) Urban (light). Urban (heavy/cramped). Hills (gradual). Hills (steep). Ravines/canyons. River (amphibious update). Coastline (amphibious update).

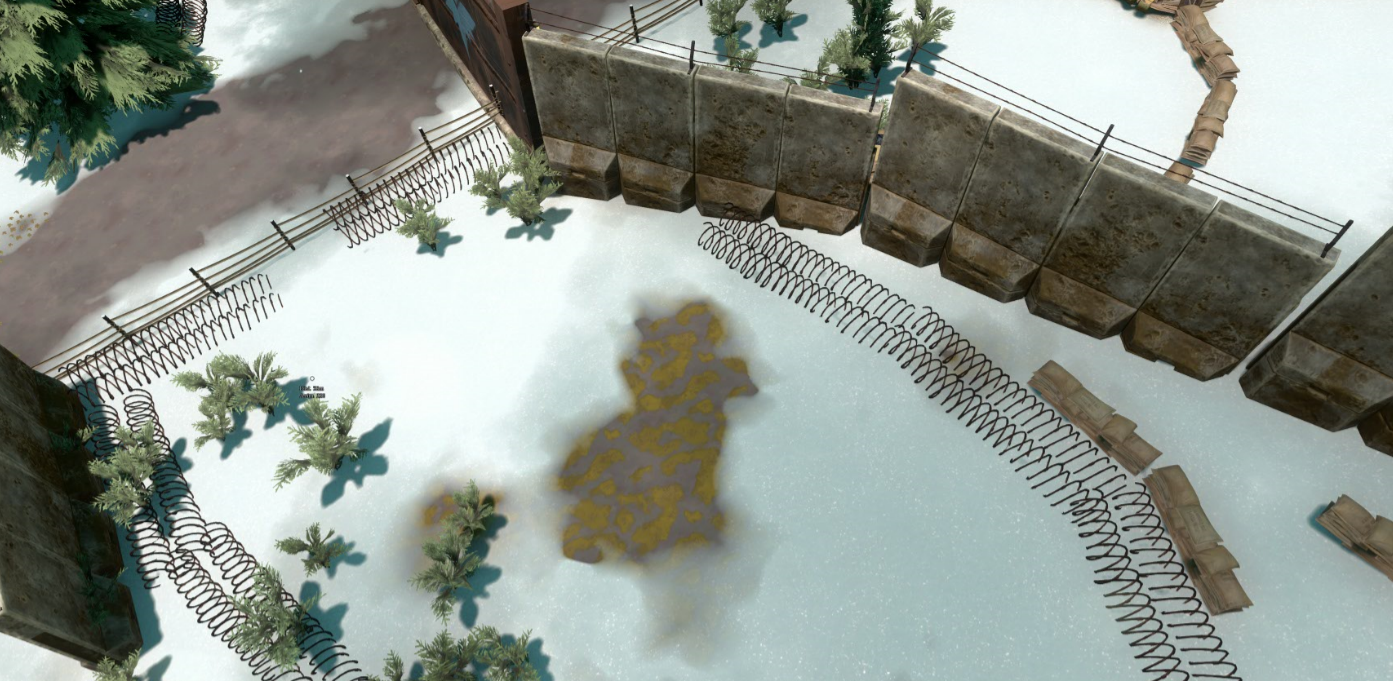
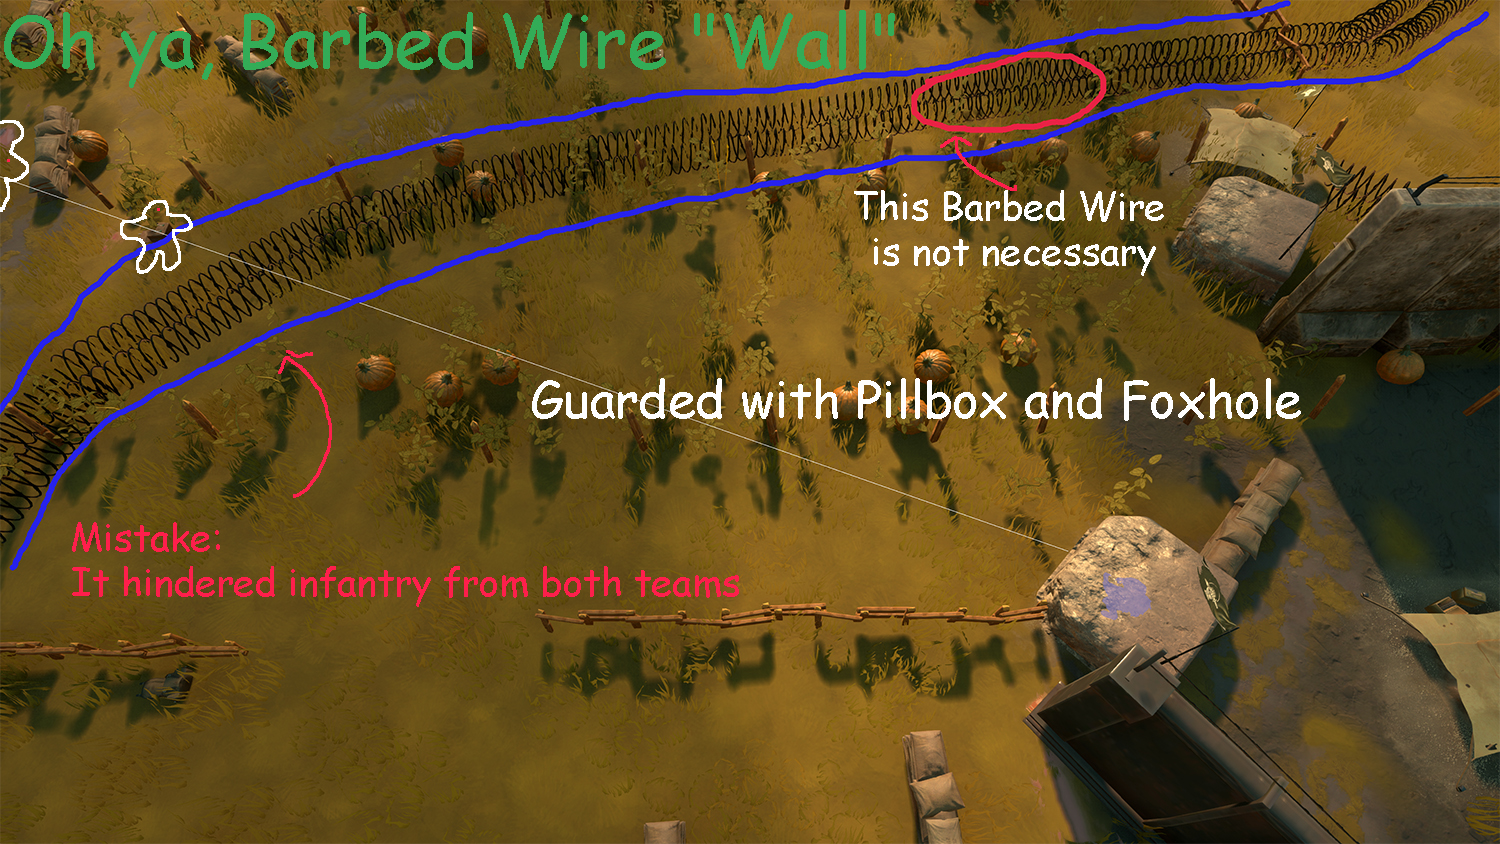
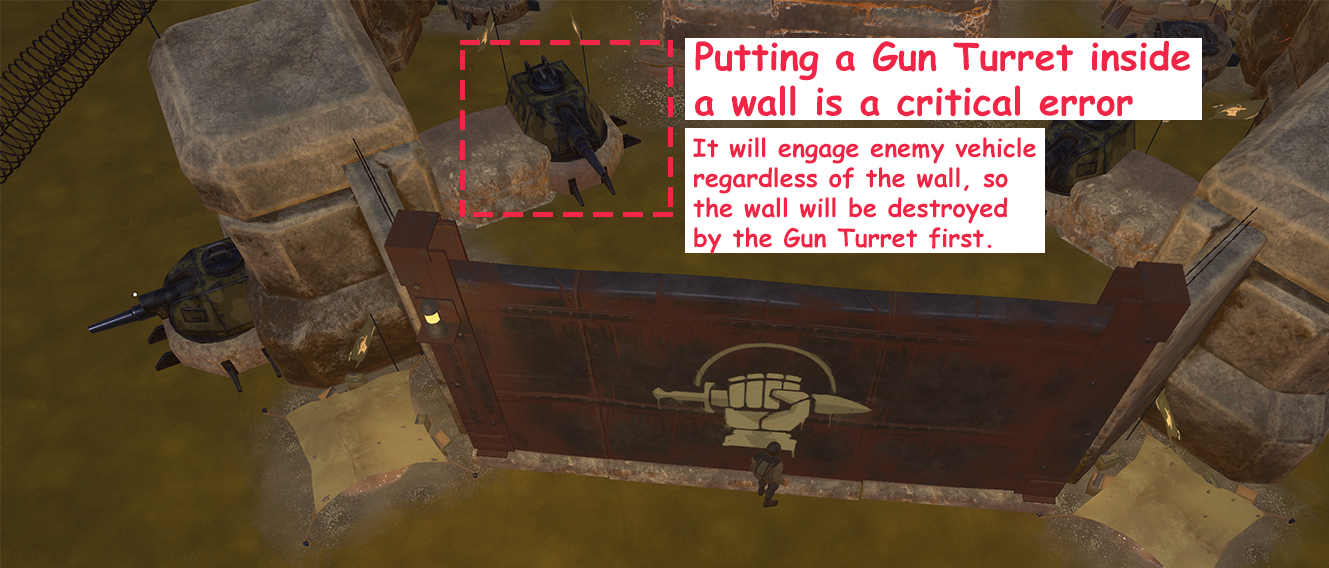
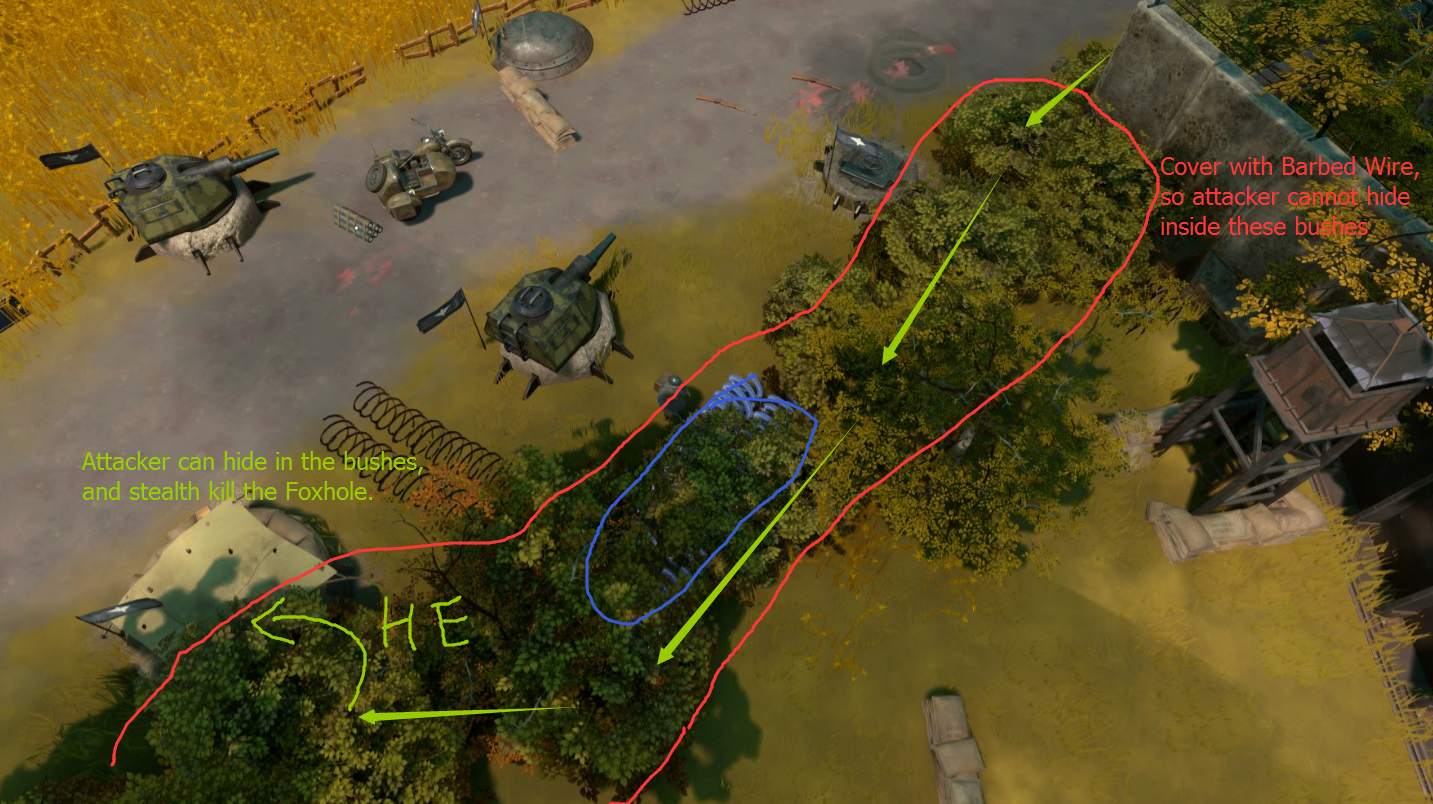
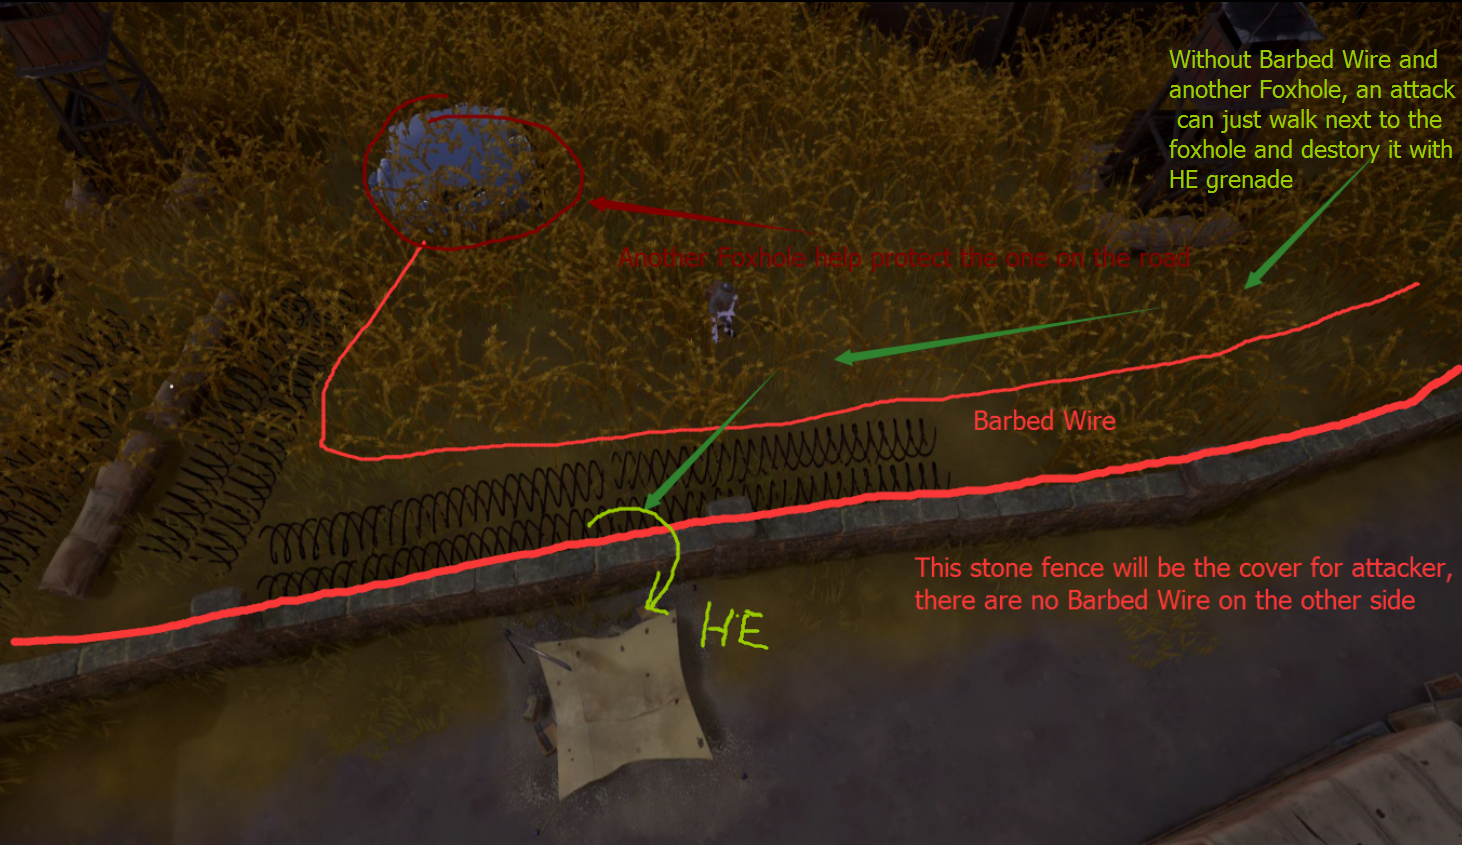
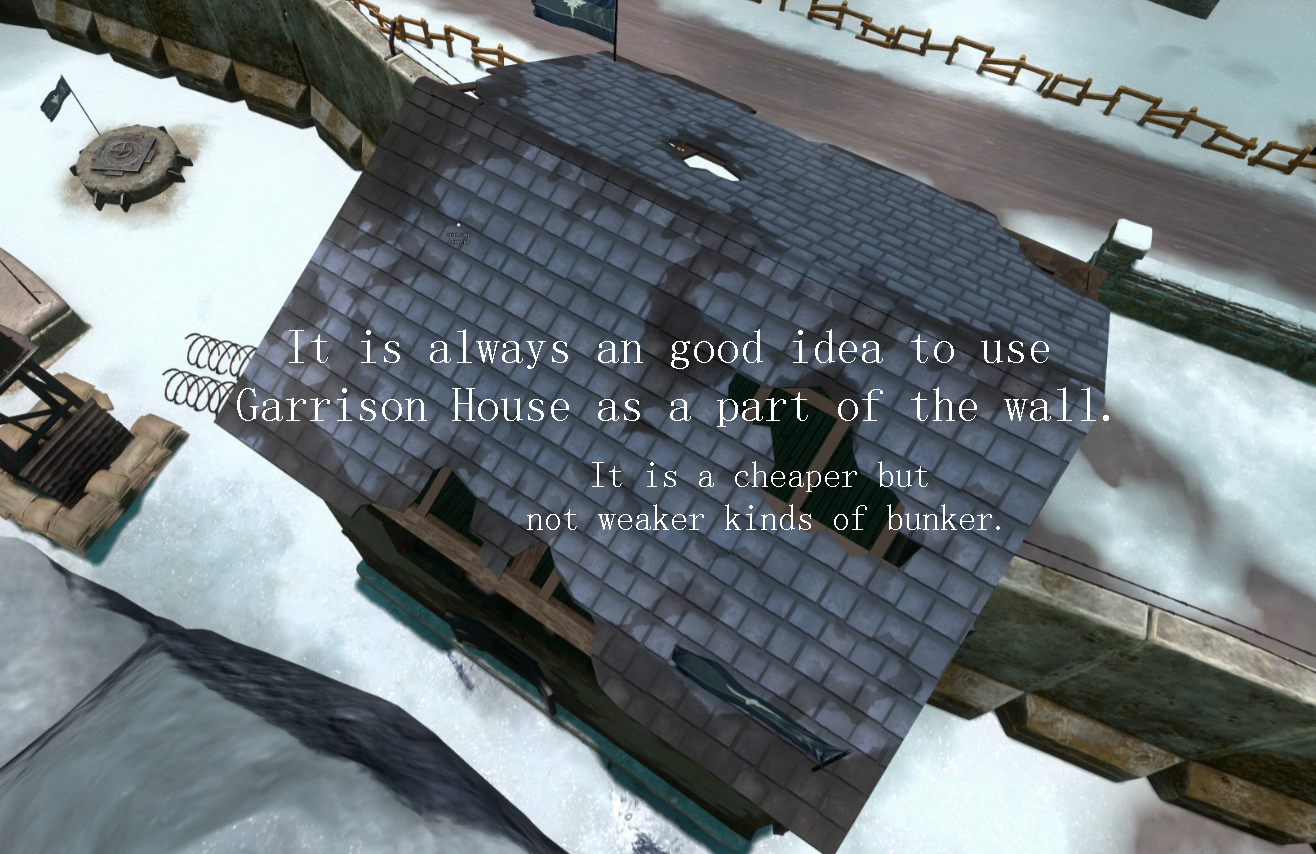
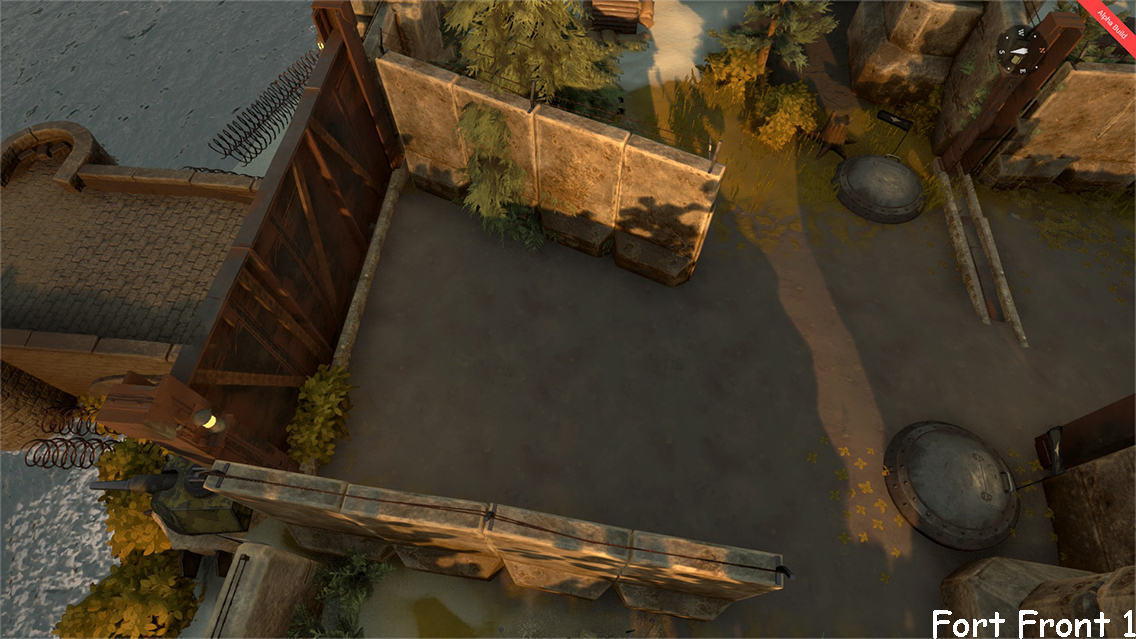
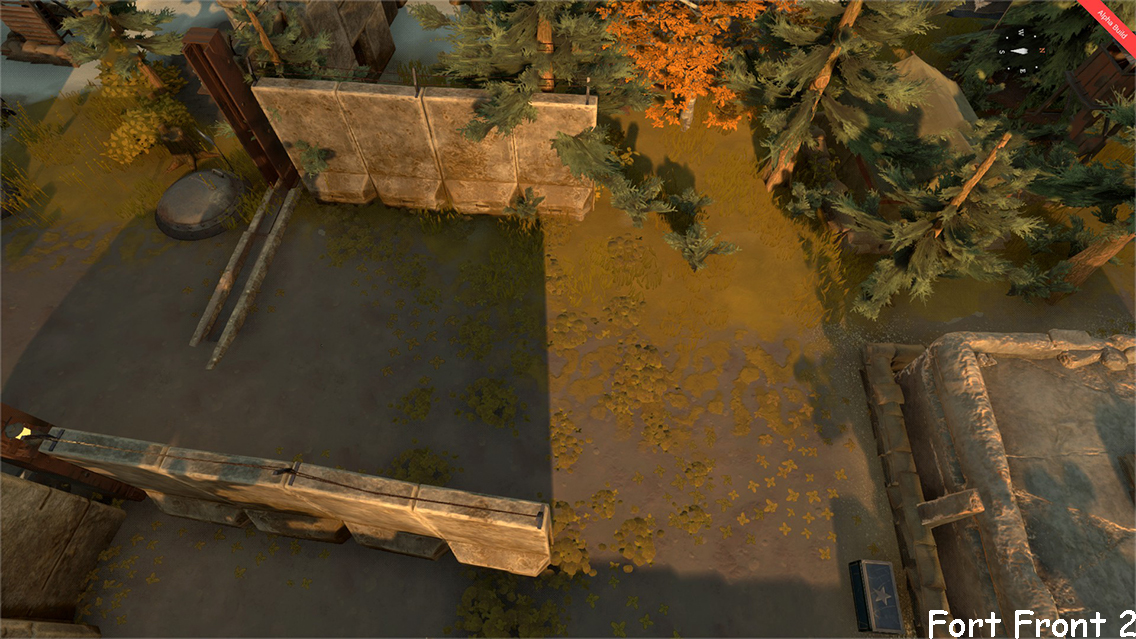
Some of these terrains are so obnoxious it's easier to just build defenses around them instead of trying to build defenses in them, but other times, you don't have a choice because it might be the only chokepoint, or where the line fighting is happening, etc. Trying to defend uphill in particular is practically impossible: Most auto defenses don't fire upward past a certain (shallow) angle. Building walls on slopes is tricky too otherwise you might accidentally end up with vault-able walls and not realize it.
Kyo21943 2017 年 8 月 28 日 下午 6:40 
Yeh, and make sure to build on even ground, sometimes the terrain itself blocks structures =/
Bk_Owenk  [作者] 2017 年 8 月 28 日 下午 6:26 
I still can't figure out how "Exit Block" works, but the safest thing is to no build anything right next to the foxhole.
Kyo21943 2017 年 8 月 28 日 下午 5:37 
Yo, i was mistaken about the Foxhole Exit, the exit of a Foxhole is actually where you entered from, so, if you enter from a side its blocked off or is underground, you will become stuck.
Damien 2017 年 8 月 21 日 下午 3:40 
haha this made laugh, the best one ive seen is multiple pillboxes all facing a wall XD
FUS 2017 年 8 月 16 日 下午 1:25