Nightmare Reaper

Nightmare Reaper

198 evaluări
The Compendium of Nightmare Reaper (Full Release)
De către A Level Is You!
The Complete Guide to Everything Nightmare Reaper, Gameplay-Wise [1.0 Release!]
17
3
23
5
2
6
4
2
   
Premiază
Adaugă la preferate
Preferat
Elimină din preferate
Introduction
Hello! This is a cohesive guide to everything that you'll encounter and utilize in your journey through the bizarre and creepy realm of Nightmare Reaper!

This guide will avoid the storyline of the game so as to not spoil what is going on except for the final boss, which will be noted with a big Spoiler Warning in front of it. You can read the notes within the hospital hub in between levels if you wish to learn about the story.

The contents below are current as of 1.0, but I will be doing my best to try and keep this up to date on a consistent basis. So, let's dive into the madness, shall we?


For other things not covered in this guide, I'll be leaving links / shoutouts to these folks down here for putting in their own good times and efforts. Thank you guys for doing these!


https://steamcommunity.com/sharedfiles/filedetails/?id=2793661248

https://steamcommunity.com/sharedfiles/filedetails/?id=2788790339

https://steamcommunity.com/sharedfiles/filedetails/?id=2789069504

https://steamcommunity.com/sharedfiles/filedetails/?id=2792600190
Update Log
To Do List:

- Update some enemy names.

UPDATE HISTORY

- 3.4: Added minor Powerup change / Horse Water / Reflection recoil reductions.

- 3.3: Added in descriptions for Redux / Speedrun Modes, added Mods option & description.

- 3.2.3: Added Patch 2.30 changes to Arena, Jade additions, and Weapon Stat effect colorations. Also added information for Ancient Fruits (apologies for the confusion, P4wn4g3, as I didn't realize the plants were interact-able!); added image for portal.

- 3.2.2: Add R.O.T.T. Porridge and Ankh Coins into their respective Health and Treasure sections.

- 3.2.1: Added C4 Walls into the Basics section underneath Shaped Charges; added Portal (No, not that Portal) EE into Environmental Objects; added air barrier pictures related to Oxygen in the Hazards section.

- 3.2.0: Corrected Overload in the Weapon Stats section. It was previously named Overcharge in this section and it resulted in some confusion. Apologies for this! Also added life soul quality information in the Health Orb section, updated Arena information, and combined the Time Slow section with I.T. as it's the same thing, therefore it was not required to be separate.

- 3.1.9: Added Main Menu section near the top of the guide, added default keybinds for all Skill Tree carts and accessing their sub-menus, and added external guide links / shoutouts to other guides at the top!

- 3.1.8: Added (and corrected) precautionary notes in NG+ and Weapon Stats sections for certain self-harm conditions on NG+ and above.

- 3.1.7: Rewrote some information groups in the Tips section, along with adding small notes for GP / Wall Kick and adding additional Pill information (this time regarding stacking).

- 3.1.6: Added additional New Game+ information and (x) Damage Multiplier Weapon Scaling for this mode.

- 3.1.5: Removed Orb Dispelling Aura and replaced it with Hunter Orbs (Apologies for the mix up on this one, as this hazard doesn't up often being only found in trap rooms).

- 3.1.4: Removed note about Gold pills not giving more Jade; added additional descriptions for elemental types for weapons; added Stardrop in Ammunition section.

- 3.1.3: Added explanations for Finder Pet and it's passives (after only using it twice and then realizing it does more than I thought, whoops), along with adding an explanation as to how Enemy Senses work in the Pills section.

- 3.1.3: Clarified NG+ unlocking conditions in NG+ section.

- 3.1.2: Added full Pill Mutator List & Toxicity amounts in Topaz section.

- 3.1.1: Added additional demonstration videos, Arenas section updated to include how earning Jade in Arena works, added screencap for second Ep. 3 boss.

- 3.1: Added full list of Topaz / Jade Tree Skills purchasable along with Pet Skills.

- 3.0.1: Better clarified Pills and Pill Slots in the Topaz section.

- 3.0: Episode 3 Content Finished (aside from To-Do List).

- 2.9: Completed Environmental Objects and Hazards sections (excluding one image).

- 2.8: Full enemy roster complete (excluding Ep. 3 Bosses), additional demonstration videos added, sections for Elites and NG+ added.

- 2.7: Completed full level list including Episode 3 Hubs and Arenas; updated enemy roster for Episode 1 in Enemy Types; added new events under Random Events; added additional information for Topaz / Jade trees including Pet Information.

- 2.5: Added Topaz / Jade Trees; added Ep. 3 WIP sections, moved Drudge Village and Halloween Event to Cut Content.

- 2.1 - 2.4: Began work on released 1.0 content.

- 2.0: Episode 2 content complete!

- 1.9: Filled enemy / hazard sections.

- 1.8: Added various sections, majority of Episode 2 levels, treasures, basics, and other details. Added enemy / boss / hazard WIP sections.

- 1.7: Replaced multiple images in the guide with their new respective spritework, added a couple of additions relevant to Episode 1.

- 1.6: Added note about fire resistance in the Tips section, along with a video of the Halloween Event. Entries removed.

- 1.5: Added Patch 4 improvements and additions along with adding two more videos in the Tips section and the Halloween Event!

- 1.4: Added additional tips to the Protips section.

- 1.3: Added small note to weapon stats and the knowledge that you CAN dash in any direction (Don't ask me how I didn't realize this earlier on.)

- 1.2: Weapon Stats have been added, and with that, the guide is currently complete as of Episode 1!

- 1.1: Added Levels and Bosses, along with reorganizing some sections.

- 1.0: Updated The Hospital into the guide, along with adding the alternate fire for the Nightmare Reaper powerup.

- 0.1 - 0.9: Began work on guide for Episode 1 content.
Main Menu / Game Settings / Save Slots
To start this guide off, we'll be exploring a little bit of the Main Menu, Game Settings, and Save Slot management. All can be accessed via pressing ESC at any time, which will pause all action around you as you flip out your trusty GameGal SP. (Note that graphics and quality settings will be omitted from this section.)


Skill Tree: Opens the Skill Tree for the current Cartridge you have selected. If you do not have a Cartridge, this option will not appear.

Weapons: Displays all of your weapons in your backpack that you've collected over the course of a level. Also displays your currently held weapons and weapon statistics. This can be accessed via pressing Tab.

Achievements: Shows your currently locked and unlocked achievements, along with their respective currency values that are rewarded to you upon completion.

Mods: This menu currently contains game modifiers that alter your experience with the game. These all disable Steam Achievements when used.

- Nightmare Reaper Redux: Begins a new save file / game of NRR, which is a more condensed, harder version of the main game with one third of the levels removed, a higher difficulty curve, double the gold earnings, triple the jade coin earnings, and an endgame to work towards.

- No Tutorials: Skips all tutorial levels in the game. Any game enhancing items that come from these will be automatically added to your inventory.

- Speedrun Timer: Begins a new game / save file, but with the addition of a speedrun clock added into the game that can be view at all times, along with showing your high score for that level and overall time.

- No Topaz: Restarts the current level and removes the effects of all Topaz upgrades purchased along with Pills; however, Topaz can still be earned, and upgrades can still be purchased with this modifier turned on.

Options: The Options menu contains your graphics, audio, and input settings. You can also access your Save slots via the Manage Savegame menu located here, and the Game Settings menu, which has a TON of things you should look into yourself.


Save Slot Menu: Displays the status of your current save file, including date and level. Save files with any Mods activated will be displayed in the bottom portion of the screen; otherwise, it will display as No Mods.
- Green Circle = Current file Loaded.
- Red X = Deletes the save file.
- Left / Right Yellow Arrows = Cycles to the previous / next save slot page. The number of pages will be displayed in the lower left.


Game Settings: A bunch of things are located here, including turning on / off abilities and other things. Please note that you can scroll down through this menu for more settings.


Back: Pockets your GGSP and returns you back to your current game.

Quit / Quit Arena / Quit Level: When Quit Arena / Level are displayed, this will fade you back into the Hospital. When only Quit is shown, this will close the game.
The Basics, Ep. 1
"Please open your eyes."

This section will not cover controls, as they are explained in game rather well with the tutorial level, so instead, this part will cover the heads up display portion.

HUD Elements

The Heads Up Display, well, if you're familiar with any kind of first person shooter, you should know what this is, but feel free to review it at your leisure, as there are some things here you should pay attention to. Here's what it'll look like in game.


Lower Left-hand Side / Main Stats


Portrait: It's you, the player character! Much like Doom or Wolfenstein, the more damage you take, the more bloody you will become. The portrait also alters accordingly depending on which of the four powerups you happen to come across, all of them being pretty cool to look at.


Health Gauge: Your health total. Basic stuff here. Starts at a default 100, but can be increased with skills found throughout the Skill Tree. You hit zero, you're dead, and you re-awaken in the hospital, losing all of your weapons aside from your primary weapon choice and the treasure that you have collected in a level, along with having to redo the level in a new configuration. Don't let death dissuade you, though, it's part of the experience!

Coin Total: Your current amount of coins! You use these to either buy skills located within the Cartridge, along with using them for the Slot Machine (both are described below). Coins are king in this game and can be acquired through various different means, so make sure you collect as much as you possibly can! In Arena Mode, the coin icon will turn green, indicating that you are now earning Jade instead of Gold.

Keys: Yep, there are keys that can be located in a fair amount of the levels, coming in red, blue, and yellow variants. These are only used to open color corresponding doors. If you have one, they will appear directly above the Coin Total. (Higher quality picture in the works)

Acquired Weapon: This icon will pop up above the Coin Total, showing what type of weapon you have picked up recently with a little star in the top right corner of it. Only one will show up at a time, and it will not show what rarity it is. (If you pick up a weapon, it will momentarily flash onto your screen with one of four different borders denoting rarity.)

Lower Right-Hand Side / Ammunition

This section is pretty basic, as it covers your currently equipped weapon ammunition, along with the three categories of ammo that you'll be using to do the shooty mc-bang bang with. Note that some weaponry can utilize two different ammo types that differ between their primary and alternate fire modes (The Demolitionist Rifle uses both light and heavy ammo for example)

Current Weapon Ammo: This will be above all the other ammunition, as it represents the current ammo type your weapon is using. This will change depending on what sort of weapon you're rolling with. If you are running a melee weapon, there will be no ammo counter here. A multiplier is applied to certain weapons as seen here, meaning this weapon will use 3 ammo instead of one per shot.


Light - This ammo type is for your bullet-based weaponry, including the Silenced Pistol, Pump Action Shotgun, and many others.


Heavy - This ammo type is used for the more explosive variety of weaponry that you'll come across. These include the Sticky Bombs, Seeking Launcher, Breach Launcher, along with others fitting this category.


Mana - This ammo type is for your more magical means of disposing enemies. These include the wide variety of spellbooks, the Poison Staff, and the alternate fire of the Ghost Axe. (Note: The Gem Staff uses no ammunition, so fire away to your heart's content!)

Upper-Right Corner / Current Level Information

This section displays the map and two statistics involving the current level that you are on.

Map - Ah, the map. If you're feeling lost, use this to get a bearing on your position. Your current position is shown as a white arrow pointing whatever direction that you are facing. However, the map will only display areas that you have explored and doors that you have not yet opened (unless you happen to get lucky with the Slot Machine, which will be covered later.) Doors that are able to be opened freely will be small, bright white lines, doors that are locked will be a darker color of grey, and openings that you have not explored will be gaps. (Note: The game will consider water / acid / lava rivers as openings, as there are gaps that lead off the map in them. Pay no mind to these.) Pressing M will bring up a larger view of the map.

Enemy Count - Denoted by a skull with red eyes, this is the total enemy count in a current level. The more enemies you kill, the more it shrinks. However, due to two particular random events, this count will increase. Kill all enemies in a level for a bonus at the end!

Treasure Count - Denoted by a gold chalice, this indicates the total amount of treasure in the current level. This is particularly handy for finding secrets, as the majority of the treasures shown will be located in these. Due note though that some secrets will have the aforementioned loot hidden in treasure boxes, which will NOT show up on this counter until you break them open. Weapons count as treasure as well.

Dash Charge - This is a cooldown icon that appears right below the Treasure Count, and will only be shown if you purchase the Dash skill in the Skill Tree. It will be briefly shown in full in between dashes before whittling down to nothing, where upon disappearing, you will hear an audible ding indicating that you are able to dash again. Dash skills will reduce this cooldown should you purchase them.

Powerup Meter - This icon will change depending on which powerup you acquire, and indicates the duration of the powerup before it expires. Multiple powerups can be obtained at one time, and will be shown here in a vertical column.

Left-hand Side


Level Name / Stats / Pill Mutators / NG+ Number:
With the addition of the new Topaz and Jade Skill Trees (which will be covered below in separate sections), this area of the screen will briefly flash in normal gameplay to indicate which Pill mutators are currently at play during the the course of the level if they are turned on. This area is also dedicated to arena stats, such as which wave you are currently on along with displaying the level name and NG+ difficulty. These can be brought up at any time via the Map menu.
The Basics, Ep. 2
These items below are only relevant from Episode 2 and onward, so if you aren't quite there yet, then no need to worry about these items.


The Grappling Hook - Hhhhhhhh. What a wonderful addition. It's a grappling hook! You can grab onto anything you see so long as it isn't over Grey Water. This includes objects and enemies alike! You can use it as often as you'd like, and can aim as far as you'd like with it. Using your movement keys while having it deployed will move you around as well. It can also be used to propel yourself in various manners, usually at high speeds, not to mention that you can swing with it. It's a solid addition and impossible to miss during the second tutorial level. In Episode 3, this will be upgraded to be usable across open water and voids alike (Note: You cannot skip this item unlike the cartridges.).


Shaped Charges - Found in the Episode 2 tutorial and onward, these are used to either progress through the level or to find secrets. You can find up to three of these per level, where they will be shown on your HUD right above where colored door keys are kept.


C4 Walls - The walls that you slap the C4 into! These can be a bit a tricky to spot at times, but these make the same gusting air sounds as secret walls do, so keep an ear and an eye out!
The Basics, Ep. 3
This section isn't going to be particularly long, as the game will give you small tutorials about how to use progression-based objects such as Barnacles, the Orb Pedestal, and the Teleport Totem. I will cover these in short detail in the Environmental Objects, Part 3 Section. The other notable to be had in Episode 3 is that your Grappling Hook will be upgraded to be usable over open water and the voids of the worlds ahead of you, turning it red in the process. Good luck from here on out!


The Hospital (The Main Hub)

After completing the tutorial, you will find yourself in a tiny, locked room of a mental hospital. As mentioned, I won't be spoiling as to how or why you're here, but if you are inclined, the notes on the table will explain your current situation as you progress further along in the game. Below, in numerical order, are the things aside from your bed that can be found in your room.

1.) The Episode 1 Map - This indicates your current location through Episode 1, and will change the further along you progress through Nightmare Reaper.

2.) The Notes - These are plot-relevant, written from the perspective of your doctor detailing your history and what is going on.

3.) These are the developer credits. Give 'em a look!


During the campaign, there will be certain points in which something different will happen, namely starting with your own door being open. There will be eight different instances of events, so don't directly get into your bed, go around and explore! There's eight notable objects that can be acquired, all of which open the doors leading to different areas of the hospital: two keycards, four set of keys, a pair of wire cutters, and a handwritten note. Make sure to grab these before you go into the next level.

Once Episode 1 is completed, a new sight will appear outside of your window: a high rise being constructed in the background. Throughout Episode 2, it will slowly but surely be built until completion.


The Downtown Area (Episode 2 Hub)


Upon completion of the second tutorial level, you are introduced to the second hub of the game, the Downtown Area. Here, you can choose one of three levels, each having their own themes, with three sections of the Downtown Area to progress through once the three levels in one area are completed. It doesn't really matter which ones you choose, as new enemies are introduced in the same progression regardless. Here, you can practice with the grappling hook and get used to the nuances it has, along with messing around in general.
The Wastes (Episode 3 Hubs)


Welcome to The Wastelands! The first of the three Hub levels that comprise the entirety of Episode 3. Here, you will be introduced to your grappling hook being upgraded to be usable across open water and voids alike, but unlike the Episode 2 Hub, the Episode 3 Hubs count as their own acts. You will be from here on out fighting your way through to your choice of one of the two next Stages, complete the Stage in its entirety, then brawl your way back through to the other Stage to do the same. Once both are complete, you may then head to the Act boss and fight them to progress to the next Hub area. The Sorcerer's Mansion is the following Hub Act, with Buried Ruins being the final Hub and thusly ending level to the game. Once finished, you will be tasked with finding certain items around the hospital (if you have not found them already) with the exception of one that only shows once you have beaten the game: A friend to keep you company while you sleep through the nightmares of New Game +.
The Gold Cartridge (Primary Skill Tree)


Press I once acquired to access the Skill Tree at any time.


This item can be acquired in Hollow Stone, Part 2 near the very end of the level right before the exit. Impossible to miss, as it is in the very center of the room with a golden glow emanating from it. There will also be a large, golden aura around it, making it even more clear as to where it is.


Picking this item up will allow you to access the almighty Skill Tree, in which you may purchase skills that augment your character with a variety of benefits, such as faster walking speed, more health, more, well, anything, really! I won't be covering what all is in the skill tree currently (this may be covered in a whole separate guide as there's a lot to go over with it).


There are 8 total worlds in the current build, each housing a number of skills that you may pick and choose from, provided that you complete a required skill beforehand. The minigame overworld is similar to that of Super Mario Bros 3, with the platforming of the original SMB.


If you wish to challenge yourself, you may opt to completely skip this and any of the other Cartridges and go for a no skills run, though it is NOT recommended to skip it if this is your first time through the game. This challenge is reserved for when you are much more familiar with the game's mechanics, combat, and platforming. Your choice, I'm not one to judge, but be prepared for the difficulty that comes with it.

(Note: Unlocked Topaz bonuses will always be present unless all saves are deleted regardless of you picking it up or not.)
The Topaz Cartridge (Pills and Permanent Cross-Save Buffs)

Press T to access (once acquired).

Press Z while in the Topaz minigame to bring up the Pill menu.


Being found a little bit later on in The Immemorial Woods, the Topaz cartridge enables you to utilize mutators called Pills, which can add beneficial bonuses such as extra gold or more positive events, but at the cost of adding in negative mutators called toxicity. The higher the Toxicity, the more nasty the negative modifiers become. Below is an example of 250 Toxicity, the maximum amount you can reach. These can be equipped on and off to your liking by pressing Z in the minigame itself after being acquired through chests in it. In each Zone of the Minigame there is one NPC that sells +1 Pill Slot, which will increase the amount of Pills you can equip per level.


In addition to Pills, the skills unlocked through the Topaz cartridge are permanent buffs for any and all future saves or playthroughs, so these are worth acquiring. The manners of acquiring the Topaz currency requires simply progressing through the main storyline, each level giving you 100 Topaz to use, along with all Topaz being accrued into one single pool. (Do note that earlier saves from Early Access will have their total Topaz amounts factored into your current playthrough. Thank you for this, devs.) Topaz can also be earned within the Pokemon-styled minigame included. Gold and Jade both can be exchanged in the Topaz minigame at small vending machines for Topaz.

NOTE: Pill mutators affect Arenas. Pill mutators also stack with others, but you cannot equip more than one of the same exact type.
I.e. - 15% + 30% Elite = 45% Elite Chance, but you cannot equip two - five 30% Elite Chances.

Pill Mutator List / Toxicity Amounts:
15% Elite Chance - 5
30% Elite Chance - 10
-20% Damage Taken - 5
-30% Damage Taken - 10
+10% Positive Events - 20
+20% Positive Events - 40
+25% Ammo Spawning - 5
+50% Ammo Spawning - 10
+5% Gold - 10
+15 Gold - 30
+30% Gold - 60
+50% Gold - 100
+10% Life Soul Quality - 5
+20% Life Soul Quality - 10
+10% Enemies - 5
+25% Enemies - 10
-30% Enemy Senses* - 5
-60% Enemy Senses - 10

(*Enemy Senses determines how aware an enemy is of your presence within a general vicinity without you shooting. It also determines how long enemies stay actively hunting you before stopping / losing track of your trail, and how fast their reaction times are when it comes to attacking.)


Topaz Passives / Skills:
+1 Pill Slot x 5
+1 Max Life x 20
+1 Start Life x 20
+5 Start Light Ammo x 3
+3 Start Heavy Ammo x 3
+3 Start Magic Ammo x 4
+3 Max Light Ammo x 12
+1 Max Heavy Ammo x 9
+2 Max Magic Ammo x 10
+1% Crit Chance x 10
+20% Crit Multiplier x 10
-1% Recoil x 10
-1% Reload Time x 10
+10% Pickup Range x 10
+5% Kills Bonus x 5
+5% Treasure Bonus x 5
+5% Secrets Bonus x 5
+5% Completion Bonus x 5
+1% Weapon Quality x 5
+1 Coin Value x 15
+1% Treasure Value x 15
+10% Weapon Value x 15
The Jade Cartridge (Arena Unlockables, Skills, & Pet System)

Press Y once acquired to access the Jade minigame.

Press Z while in the Jade minigame to access the Cargo menu, where you can equip / unequip ship parts / pet abilities, and also check out unlocked upgrades via "Check Unlocked Upgrades". A diagram in the upper right corner shows which warps contain pet upgrades and for which pet. All upgrades have their own colored categories:
- Red: Ship Cannons / Engines
- Orange Red: Ship Shields
- Orange: Ship Scanner (These unlock progression through the Jade Tree)
- Dark Blue: Pet
- Light Blue: Pet Skills
- Teal: Pet Passives
- Purple: Movement / Player Skills (such as Wall Slide and Immunities)
- Yellow: Player Passives (such as additional headshot damage)


Found once you've acquired a minimum of two Arena Sigils (all of which are located within the Hospital) and utilize the second hospital bed down the hallway, you'll awaken within the Arena Hub, where upon collecting the Arena Sigil here unlocks the Sewers Arena, and with it, the Jade Cartridge! Note: Jade Tree skills do not cross over between save files.

HOWEVER.

All skills that are unlocked within this skill tree can be used in the main storyline as well, so while the Arenas are completely optional, the skills that are unlocked in this mode are absolutely worth your time. How worth it? Well, along with giving a wild variety of stat bonuses like bonus headshot damage, extra oxygen, full immunity to acid lakes and lava, and others.


Skills Not Shown in Above Picture:
Acid Immunity
Lava Immunity

Upgradeable Jade Passives - The following can be upgraded up to a maximum of four times. Note that this list will not include ship upgrades as they are not relevant to your character, only the minigame:
+25% Headshot Damage
+25% Clutter Combo Time
+25% Clutter Combo Reward
+25% Kill Combo Time
+25% Kill Combo Reward
+100% Throwing Damage
+25% Red Barrel Damage
+2% Life Soul Quality
-5% Dash Delay
-25% Ammo Respawn Delay
+15% Fire Strength
+15% Ice Strength
+15% Shock Strength
+5% Elemental Resist
+25% Oxygen
-23% Explosion Shake


Pets & Pet Upgrades

Oh, did I mention you can unlock pets with this? Yup, there's four each, each with their own specializations and skills to help you along your journey, up-gradable to having two out at the same time. A maximum of two pet skills can be active at one time. At least one skill is needed to be equipped in order for a Pet to do anything. These can be equipped via the Cargo menu in the Jade Minigame. All Pet Passives can be upgraded up to four times.

- Aggressor (West, then North Tree in the Galaxy Minimap): Your damage dealing type. Comes with three different elemental damage options.


Aggressor Skill List:
Main:
- Fire Projectile
- Ice Projectile
- Shock Projectile
Passive: x 4
+50% Damage
+20% Fire Rate
+50% Range
+25% Elemental Strength

- Protector (West, then South Tree): A pet that heals you, along with offering projectile reflection and the charming of enemies into attacking each other in confusion.


Protector Skill List:
Main:
- Healing
- Enemy Charm
- Projectile Reflection
Passive: x 4
+50% Healing
+20% Healing Rate
+50% Range
+25% Additional Enemy Charmed Time

- Finder (East, then North Tree): A pet that helps you locate treasure with an audible ding should you be finding yourself in those situations where you just have ZERO idea where that last bit of treasure is located. Comes with options to alert you of hidden walls and other secrets. (Note: The pet does not "pick up" treasure, but it does extend your pickup range greatly. Finder Memory is how often the pet "dings" you as a reminder, along with showing them on the map for you as yellow-orange pixels)


Finder Skill List:
Main:
- Find Treasure
- Find Secret Walls
- Find Secret Items
Passive: x4
+2 Finder Memory
+20% Finder Rate
+50% Range
+50% Finder Duration

- Soul (East, then East Tree): This pet provides more of an alternative support option, which it can either blow up the corpses of fallen enemies, cause debuffs on enemies, or spawn Powerups for you to utilize at random intervals. The Powerup Creation ability is useful if you're gunning for the Snail / Cheetah / Mirror / War achievements.


Soul Skill List:
Main:
- Corpse Explosion
- Enemy Weaken
- Powerup Creation
Passive: x 4
-10% Soul Cost Amount
+50% Range
+25% Enemy Weakened Duration
+50% Corpse Explosion Power

For the Jade currency, this can either be earned through Arena gameplay or within the Gradius-styled minigame itself.
Weapon Stats, Part 1
So, you've found your first few weapons! Great! But you're probably wondering to yourself: What do these stats MEAN? Thankfully, they aren't as complicated as you might think! So, let's take a peek at your weapon screen, shall we?


This screen shows what kind of weapons you have currently acquired in a level, along with denoting what rarity, value, level of weapon, weapon type, and stats come with them, as well as if you've acquired them recently. Weapon rarity affects the kind of stats that you'll see on a weapon, so I shall be going over those below. Note that each type of rarity will have their own distinctive sound when they drop, along with a periodically flashing, circular aura!


Grey / Common - These weapons have no modifiers. They are the basic variants of the kind of weapons that you'll come across. These drop all the time, but they aren't bad as they aren't affected by negative stat modifiers.


Green / Uncommon - These weapons will have only one modifier to them. Not bad, though sometimes the stat in question can be rather tiny. (Looking at you, 1% Crit Chance)


Blue / Rare - These weapons will have two modifiers to them. These modifiers can be good or bad depending on what said stats are. Say you might get a boosted magazine size, but longer reload time. Or you might get a weapon with a high leech chance, but has Blood Ammo.

Gold / Legendary - The most rare weapons in the game, these can either have three or four stats that can wildly change how a normal weapon operates. Usually the 4th modifier will be a negative one, but sometimes you'll luck out and get something absolutely amazing or strange.


Now that we've discussed rarity, let's go over the stats themselves!

- As of 2.30, Rares and Legendaries will have different colors to their stats as well to indicate good (gold) and negative (red) effects, as is shown below:


Homing - Precisely what it means. The projectiles for your weapons will now hone in on enemies, even around corners to a certain point. A solid stat to have for any weapon, just pay in mind that your shots will target the CLOSEST enemy to you in front of your reticle.

Automatic - Turns semi-automatic weapons into full auto ones. Great examples of this are the katana and 9mm pistol being turned from point and click, to hold M1 to win.

Non-Automatic - Turns automatic weapons into semi-auto.

Explosive Ammo - Gives the rounds in your weapons explosive properties on a scale from 1 to 3, 1 being the lowest and 3 doing the most damage. This can be combined with elemental stats to give weapons explosive elemental properties. Awesomeness.

Kickback - Gives your weapons a backwards force to them, pushing you backward with each shot, 1 being the lowest, and 5 being "Gotta Go Fast". Chainsaws with a Kickback 5 property are guaranteed to send you rocketing all over the place.

Infinite Magazine - One of the best stats on a weapon that you can acquire, these weapons never have to be reloaded, instead drawing straight from your ammo pool much like how Spellbooks or Wands never need to be reloaded. Combined with a positive percentage Fire Rate stat, these turn ordinary weapons into auto fire variants. Just, a really good stat.

Blood Ammo - These weapons use no ammo of any sort! It's infinite!.... But there's an evil catch: It uses your health points as ammunition! Not entirely a bad stat, as it does help you with saving ammunition, but at the same time, it isn't so great on other weapons (A chained saw with this stat is just asking for a quick death). If you choose to run a weapon with this stat, try to get one with a decent Leech Chance so you may regenerate the health you lose. The Protector pet statted up for healing also works for negating Blood Ammo cost.

Attack / Attacks - This stat is a fun one. For every time you fire a weapon, it will let off an additional round at no extra cost (provided the Ammo Consumption is not a positive number). This stat also affects alternate fire modes as well (aside from Aim Down Sight weaponry) and Summon weapons like the Necro Skull and Smartgun.

Size/Projectile/Missile Size - On projectile weaponry, this will either increase or decrease the size of said projectile. If it is a positive percentage, then it will be bigger; if negative, it will be smaller. On melee weaponry, this will affect the attack range of the weapon as well; positive means a bigger hitbox in both range and size, while negative means a shorter effective range.

Area Size - This stat will affect what kind of area an explosive type weapon will have. A positive number in this will indicate a bigger range for the explosion, while negative indicates a smaller radius.

Magazine Size - Affects the size of the magazine in the weapon. Plus means a larger amount of ammunition can be stored in said weapon, minus is less.

Ammo Consumption - This stat only affects weaponry that use more than one round at a time, examples being shotguns. A positive in this stat means it uses more ammunition to fire, while negative means it uses less, which is more beneficial as it helps with ammo conservation.

Knockback - Affects how much your weaponry literally knocks an enemy backward. Higher percentiles means more force is applied to an enemy. This stat can be a blessing and a curse at times.

Pull - The opposite of Knockback, this stat will yank enemies toward you instead of pushing them away.

Charge Time - This stat affects some weapons that have a charge mechanic to them. Less Charge Time means, well, less time to charge, while positive indicates it'll take longer to charge said weapon.

Reload Time - Determines how long it takes to reload the weapon. Negative numbers means less time, positive means more.

Attack Rate / Fire Rate - These stats are interchangeable and work in the same fashion, just with different style of weapons. A higher rate means it shoots or swings faster, while a lower rate means it shoots or swings less often.

Leech Chance - A weapon with this stat will have a chance to steal health from enemies upon hit. A higher percentile means the weapon will be more likely to leech.

Critical Chance - A weapon carrying this stat will have a chance to perform a critical attack (denoted by a particular sound and red impact splotches on enemies when it happens), dealing bonus damage to an enemy. Higher percentage = More likely to happen. On NG+1 and above, beware of explosive weaponry with this stat, as it can go over the self splash damage threshold and kill you.
Note: With Summon weapons such as the Necromancer Skull and Smartgun, larger than normal variations will spawn at random points that deal out their own crit damage.

Pierce Chance - Weapons with this stat have a chance for your attacks to pierce right through an enemy and hit whatever is on the other side of them. You'll know when your shots pierce when a yellow splotch and its own distinctive sound plays!

Recoil - Affects how much kickback a weapon has on it. Higher percentages means more kickback to the weapon and making it harder to aim, while less means the weapon will be more steady as you fire it.


Weapon Stats, Part 2
Elemental Effects - There are three in total, usually on weapons that do not have an element to them. The higher the number, the more elemental damage and elemental effects are applied to an enemy. The three stats are:
- Fire Effect - Sets enemies on fire and deals DoT (Damage over Time) effects.
- Ice Effect - Slows enemies and will freeze enemies solid when they're at low enough health. (Bosses are also susceptible to this, so bring an ice weapon if you want to speed up a boss battle a bit).
- Shock Effect - Slows and interrupts enemy attacks with stun effects.

Stun Chance - Weapons with this property will have a percentile chance to stunlock enemies much like how melee weapons are capable of.

Random Projectile - Gun will fire a randomly selected projectile from the giant pool of them within the game and will always use that one for that weapon. Examples of this is a shotgun shooting a cluster of knives, a P90 shooting nails, and a tri-barreled grenade launcher that shoots black holes.

Free Shots - Gun will have a chance to refund your round back into your gun, essentially giving you whatever you expended back as if it was never spent.

Overload - Gun will build up a charge as you shoot your weapon, changing its tone and flashing as your buildup deals extra damage, but at the cost of mildly injuring you once the overcharge goes off. The only way to get rid of Overcharge is to overload and take the damage, or to not use that weapon if you're a little low on health.

Burst Fire - Does exactly what you think it does: you burst fire three shots for every one shot you take. This means everything, including Nukes.


x Damage - Upon entering NG+, there will be a new type of weapon status that will drop with it's own particular guitar twangs and feature their own flame auras exuding from them These are damage multiplied weapons ranging in values starting with double the amount of damage (2x) to to quadruple (4x) for Level 1 weapons starting with Episode 1, where it'll then appear on Level 2 weapons on Episode 2 with Level 3 being the last to acquire it. Once NG+1 is beaten, the Damage Multiplier will wrap around to Level 1 weapons again and scale up from 5 to 7 times the amount of damage appearing, following the same pattern with each progressive Episode and NG+ completion.
Note: On NG+ and above, certain weapons can inflict damage upon you, even with 100%
self splash damage reduction, as these weapons can overcome the damage threshold or deal alternative methods of damage.


And that should do it for stats! Hopefully these will help you determine if a weapon you have is worth using. Not all Legendaries are good, ya know (Ever seen a Six Shooter with almost 500% Knockback, 15+ shock effect, and 50% Fire Rate, but only two rounds can be fired at a time before needing to reload it? I have).
Health Orbs
Now, for the meat of the guide! Every single thing that you will encounter, whether it be health, items, powerups, hazards, enemies, and everything in between will be covered in this section below!

Health Orbs: These will be your primary means of regaining health. They are floating orbs of four different colors, each indicating what amount of health that you will gain from them upon pickup. They drop ONLY from two sources: enemies, and the Slot Machine. These are base values for each, but can be modified with the Health Pickup / Soul Value skills located within all Skill Trees.

Life Soul Quality: A purchasable upgrade in the Jade skill tree, this increases the amount of yellow and white orbs that drop from enemies.


Blue Orb - 1 Health Point


Green Orb - 10 Health Points


Yellow Orb - 50 Health Points


White Orb - Full Restore (Save these for when you REALLY need them!)


R.O.T.T. Wall Porridge - 20 Health Points (Is this healthy?)


Ancient Fruit - 20 Health Points


Ankh Potion - 20 Health Points
Ammunition
These can be found either lying around the map on the floor, or from enemies (with the exception of the Stardrop, as it is only found in one particular Secret room type). These will be needed if you wish to do the Boom Pow McBang Shooty thing (unless you're going for a melee weapon run, a Gem Staff only run, or a kicking only run (God help you if you attempt this)). These are base values for each of the ammunition types that you can pick up along your journey, though they can be increased through the 25% Item Pickup skills.


Light Bullets (Small) - 5


Light Bullets (Large) - 20


Heavy Shells (Small) - 2


Heavy Bullets (Large) - 10


Mana Sphere (Small) - 5


Mana Sphere (Large) - 20


Stardrop - All Ammo Filled
Powerups
Ahhh, the Powerups. These come in four entertaining varieties, and they CAN be combined if you're lucky enough to find another nearby. The duration of these skills can be increased with the two 25% Powerup skills located in World 2 of the Skill Tree. All of these will have their own distinct, circular auras around them to help better point them out! As of the Trading Card Update, Powerups will now float towards you if you are close enough to them.

Nightmare Reaper - You become the Nightmare Reaper herself, complete with red horns, glowing red eyes, a menacing aura complete with unearthly voices, and a pair of floating red orbs that appear in your hands. This is the game's berserker mode, as during the duration of this powerup, you can fling these orbs as MUCH as you want, destroying anything and everything in your way. You can still take damage from enemies in this mode and you can absolutely accidentally kill yourself with this powerup, so don't go too wild with this one. A fun fact: you can use the explosive nature of these orbs to rocket jump with to get into areas your normally cannot reach, but take heed as these will eventually damage you (provided you do not have the chained saw on hand). This does not count towards the Burning Soles achievement, however. This powerup also has a secondary fire consisting of a steady, powerful beam attack. This attack does NOT damage you, which is useful for NG+.

V - Your eyes take on a bright green glow, along with a green aura fills your screen. Time slows down for everything but you! Projectile weapons (such as the alt fire on the knife, along with explosive weaponry and the spellbooks) ARE affected by this powerup and will be slowed down, but bullet based weaponry, melee weapons, and the Gem Staff are not affected. So, if you want to go full blown Dio by throwing a crapton of knives, you can! A side note: moving platforms are also affected by this powerup, so take it into consideration if you're attempting platforming in dangerous areas.


Horse Water - You have consumed the Boomer Juice™. You become attuned with your weaponry, being able to shoot, strike, and reload at a significantly higher rate, while your jump height and movement speed are increased for the duration. Handy for jumping up to areas you normally aren't able to reach (if you do not have the chained saw), or for just utterly annihilating a room full of enemies. With the Trading Card Update, Horse Water now significantly reduces your recoil.


Reflection - Half of your face becomes someone else, perhaps another you from an alternate dimension. You grow four arms, and are now able to dual wield ANY weapon in the game for the duration that you are currently using. Useful for clearing out rooms filled to the brim with nasty critters. With the Trading Card Update, this Powerup also reduces your recoil by a large margin.
Treasure
The bread and butter for all of your skill purchasing / gambling needs, treasure is EVERYWHERE. It can drop from enemies, be found lying around the map, hidden away in secret areas, dropped from certain random events, stuffed away in little brown treasure boxes and other objects, and can even be earned from getting clutter and enemy combos! There's many methods of acquiring it throughout the game.


Upon completion of a level, by default, you will get a base amount of treasure, but bonuses will be awarded for getting 100% kills, secrets, and treasures respectively by an amount of 50% (these amounts can be increased individually through all three Cartridge trees in various manners) Weapons will also be sold for coins at the end of every level aside from only ONE that you pick, and the value of these can be increased as well with another skill in World 3 (A side note, at the beginning, you can only keep Level 1 weapons, but there is a skill that allows you to keep Level 2 weaponry in World 4, with World 7 having 2 holdable weapons and World 8 with keeping Level 3). The base stats for coins and treasure are listed below, but can be increased with the purchase of the variety of Coin and Treasure value skills found in the three Skill Cartridges.

________________________________________________________________

Tier 1


Coin - 1


Gold Bar - 10


Chalice - 50


Treasure Chest - 200


________________________________________________________________

Tier 2


Emerald - 500


Ruby - 1,000


Sapphire - 2,000


________________________________________________________________

Tier 3


Pyramid - 3,000


Rhombus - 5,000


Cube - 6,000


________________________________________________________________

Tier ?


Ankh Coin - 100 (?)
Environmental Objects, Part 1
This list contains things that you will come across in your adventure through your insane dreams, some of them will be necessary for progression through the game, others will be hazardous to your health, while others are there to help you along your journey.

Progression-Based Objects

These, for the most part, will be used to further your progress, as the title suggests. Floor / Wall Switches will have their own auras around them in case if you're having trouble locating them.


Floor Switches - There are two different varieties of the floor switch, ones that you only need to walk over once, and ones that need a weight atop of them. Both of these are used to open doors. The former ones aren't an issue, just step on them and you're good to go. The latter variety MUST have something to keep them pressed down. There will ALWAYS be a steel barrel nearby that you can use to keep this switch pressed, but if you're cheeky, any kind of barrel will work, including explosive barrels.

Wall Switches - These switches are used for three different purposes: opening doors, operating elevators, and turning off traps. With doors, it can be anywhere from just one switch to three of them needing to be activated, so keep an eye out for them! For elevators, well, it makes them go up or down, to put it simply. The last use is for turning off the traps in a challenge room, or opening a door in said challenge room. Sometimes they'll be there, other instances, they won't, depending on the particular challenge the room has in store for you.


Seals - These demonic seals, which always come in groups of three, MUST be destroyed by any means necessary in order to advance through the level. Usually they'll be in rooms stuffed to the brim with enemies, so you'll want to either take care of them while you're moving along or get rid of them after you've killed all enemies in the area.


Ending Portal - It's the level exit. It's always in its own room, with no enemies in it. Required to go through to complete the stage. Don't immediately go into it though, check around the room for Wall Cracks or Dog Treats! The Exit Portal will be marked on your map as a purple dot, so you'll know which room it'll be in!


Beneficial Objects
These are objects that are generally useful for your survival throughout the game, so keep a sharp eye out for some of these!

Clutter - Clutter is EVERYWHERE in this game, whether it be wall decorations, barrels, objects, whatever it may be, if it's destroyable, it's considered clutter. The game encourages you to wreck as much mayhem as possible, and it even has a Clutter Combo counter that appears along the lower right hand side of your HUD. Starting at 5x (meaning five objects), you will earn coins for destroying things starting at 10 coins, and it will multiply the more objects you annihilate. You can also pick up the majority of clutter objects and throw them at enemies if you'd like!


Barrels / Boxes - While also considered clutter, these will sometimes drop one of the following three items: a weapon, ammunition, or treasure. Destroy all of them on sight, as more often than not, you'll get something worth your time out of them!


Weapon Box - These come in two varieties: ones that can be found randomly on a level all on its own, and ones that can be found at the end of challenge rooms. A weapon is always guaranteed from these, so go get 'em! These will have circular auras around them to help you discover them easier.


Golden Weapon Box - Just like above, but these are guaranteed to drop Level 3 weapons. Snazzy!


Treasure Box - The sneaky treasure box! They're small and quite easy to miss, not to mention they're hidden all over the place in levels if you have a keen eye. Usually found in challenge rooms and secret rooms, they will always drop a gold bar, a chalice, or a treasure chest. They're often in hard to reach or out of the way spots, snuck behind waterfalls, even hidden in plain sight as night stands! Be on the lookout for 'em!


Wall Cracks - The distinct howling of air, along with a minor crack in the wall, is a surefire indicator that there's a secret! Kick the crack to open the wall up and claim your prize! Sometimes another Wall Crack can be found in these rooms, so search carefully around. They can be blend in with some of the walls though. Keep an eye and and ear out for them, as they're worth the trouble, trust me.


Platforming Objects

These objects are mainly used for platforming. Not much else to be said about them!

Elevator Platforms - They take up up or down. ...That's, that's it. They are also used in certain challenge rooms to launch yourself via jumping as you go up.


Jump Pads - They bounce you up into the air! Some challenge rooms use these, some areas in the game do as well. Mind the drop afterwards!


Floating Platforms - The last platform object, they come in two sizes, large, and small. They can either move around or stay in place via uh, magic. Yeah.
Environmental Objects, Part 2


Manholes - Use these to traverse underground, either for secrets or for level progression. Listen for the secret wind sound near one if it does. If it doesn't, you'll just rap along the top of it.


Power Cell - Used for plugging into wall ports. These emit a soft green light from in their cores from time to time so one is able to see them in the dark if needed.


Wall Port - An empty wall switch that uses a power cell to activate. Look around nearby for one, as they usually aren't too far off from where these are located.


Industrial Elevator - Used to lift a player up, or to block a player from entering a secret area right beyond it. If it's blocking a door, there will be a switch somewhere in the level to open it, revealing the goodies inside.


Timer Switches - These particular switches are found in Trap Rooms or out in the wild, these are often used as a timer for you to run against the clock, usually by lowering or raising water levels.


Hook Switch - These can only be activated by hitting them with the end of your grappling hook. They tend to run on timers, so whatever you need to get done with it, hustle!


Hook Lock - A Trap Room feature, using this will disable your grappling hook for the whole trap room until you choose to leave, limiting your mobility options in them.


Accelerator Pad - These will send you or enemies flying in whatever directing they're facing for a short distance. Dashing or grappling through them will increase your velocity exponentially.


Portal - A blue / black, humming portal that will teleport you to any one red summoning circle scrawled into the ground randomly anywhere on the current level that you are on. This can only be found in one particular Easter Egg room type.
Environmental Objects, Part 3

Barnacle - Hanging from the roof much like their Half-Life counterparts and making a distinctive noisy racket, Barnacles tend to hold either progression-based objects like Power Cells or Teleport Runes, but more often they hold a fair bit of worthwhile treasure. In order for if to disperse its prize, first, you must find a Crystal Formation, then feed it a Yellow Crystal.


Crystal Formation - A rock formation holding a Yellow Crystal. Destroying the rock will release the crystal and enable it to be picked up like an object.


Yellow Crystal - Feed these to Barnacles in order for them to drop their prize!


Orb Pedestal - Humming with a strange energy, these pedestals hold an orb that you can grab ahold of and take with you for a limited amount of time. This orb can be let go and will stay where it is until the pedestal refreshes it back into place. If placed on an Air Vent, the Orb will be carried by the air currents. The timer starts as soon as you pick up the orb.


Orb Switch - Throw the Orb from the Orb Pedestal into one of these to active it.


Air Vent - With a gust of air, these will push you and anything else in whatever direction these are aiming toward, whether it be high up into the air, or off sideways into a particular direction.


Teleport Obelisk - Standing before you is a pillar of stone with an empty spot for an activated Teleport Stone to be placed into it, where it will break apart into an Instant Teleport for you to walk through.


Rune Rock - Break this to reveal an unactivated Teleport Stone.


Teleport Stone - Dropping from Rune Rocks, these must be held over a flame or set on fire by one of your weapons in order to activate it, where it then can be placed into a Teleport Obelisk.


Teleport - Teleports instantly transport you to a different area. These come in two varieties: Green (which means you can go through it) and Orange (which is an exit portal for green teleports). Note that objects and enemies can go through these too.
Hazards, Part 1
Welcome to the hazardous materi- I mean objects section! These are littered all over the place, and you will come across all of them throughout the course of the game, so get to know them well, because they can and will kill you if you aren't paying attention. These can be used against your enemies as well, so keep that in mind!

Torches / Torch Stands - The least lethal of the hazards found in the game, they are found all over the place through the game lighting up the environment. Stepping onto a destroyed one of these will cause you to momentarily take fire damage. A useful thing to note that these, along with standing lamps, can be picked up and carried with you to light up darker areas if you're having trouble seeing. Candles also fit into the light source category, but do not harm you if you step on them.


Explosive Red Barrels - Just as the name implies. They're red, and they go boom. Absolutely dangerous to stand near, but you can use them to your advantage via either throwing them or setting them off with a weapon (Please don't kick these unless you have the bought skill to do such). Be aware that enemies can shoot these while you're holding them, so don't hesitate to fling them at a moment's notice.


Floor Spikes - They're sharp, pointy, and they do the ouch when you step on them. Not a hard concept to understand. They come in three variations: ones that are always protruding, ones that periodically retract and pop back up, and ones that remain hidden in the ground until you step on them. The last ones emit a very distinct sound when you do, giving you a heads up to move or take damage.

Fire Spouts - Plumes of flame shoot out of these. Fire is bad for not only the initial damage you take, but it also causes damage over time effects to you. Two different kinds to be found here: the periodically firing ones, and the ones that only spout fire if you step on them. Much like the hidden floor spikes, a distinct sound will be heard once you step on them, so move away!


Nail Turrets - Nestled into the walls of certain challenge rooms later in the game, these shoot in two different intervals, letting off clusters of nails flying at high speeds. They are currently not found elsewhere in the game, so no need to worry about looking out for these, unless you're trying to go for the prize at the end of said challenge room. These will deal a varying amount of damage, but can be avoided if you time your movements right.


Spike Orbs - These are floating red orbs that upon going near them will immediately protrude spikes out of them. These are only found in the challenge rooms located in the Descent. Treat them like floor spikes, don't touch them.


Heights - This right here, along with acid water, lava, and enemies, is among the most lethal things in the game you will come across, and most likely will result in your first death of the run. Falling damage is no joke, and WILL kill you instantly. A good amount of challenge rooms and areas of the game are built around heights, so watch where you are stepping. One wrong move and it's back to the hospital you go. Falling damage can be halved with the purchase of a skill in World 2, or negated completely via the Double Jump ability (if you time it right) and the chained saw, surprisingly enough! These last two tricks will be discussed at the end of the guide.

Acid Water - Gooey green acid! What fun! Well, not really. You will take constant damage standing in this stuff, and it will kill you pretty quickly if you don't get out of it. Some areas will have pits that cannot be escaped from filled with these (usually in challenge rooms later in the game) unless you blast jump out, use the chained saw, or have acquired the double jump ability.
Note: This can be negated via purchasing the Acid Immunity skill found in the Jade Skill Tree.


Lava - What's there to say about it? It's LAVA. Don't fall into it, as if you do, you will lose a large chunk of health on top of suffering lingering fire damage afterward. AVOID FALLING IN AT ALL COSTS. Know that if a weapon or treasure falls into lava or acid, after a few seconds, they will be destroyed. This does affect your treasure count by removing them from the count, but you will lose said weapon / treasure in the process. Up to you if you wanna risk it for that biscuit.)
Note: This can be negated via purchasing the Lava Immunity skill found in the Jade Skill Tree.


Lightning Pillars - Arcs of electricity shoot in a vertical direction in between these. Lightning is painful, so try not to stand in between these if you can help it.
Hazards, Part 2


Grey Water - Otherwise known as open water, this water differs from the blue variety found in Episode 1 in that uh, oh, you can't swim in it. You'll take 5 damage every time you fall in, and your grappling hook will NOT WORK across any gap of open water like this (except in certain circumstances like certain trap rooms) in Episode 2. I learned this lesson the hard way sooo many times. In Episode 3, this is immediately negated.


Vehicles - New to Nightmare Reaper are CARS! Yup, you heard it here. Do they explode with a sickening, violent force when shot enough times? Absolutely. You can take out groups of enemies with these, but try to not get caught in the explosion as it'll definitely kill you, if not wound you badly.


Transformers - These explode with the force of vehicles, but with a lot less shots needed. You fart on these things and they'll blow up, usually in your face. Exercise extreme caution.


Trap Eye - Completely harmless on their own. However, they're eyes, and once they're open, it usually leads to....


Rocket Turret - ......These opening fire with homing rockets, the REALLY good homing rockets. And these will never stop firing until you're out of the range of the Trap Eye, or if you're just out of its range in general. You can shoot the rockets out of the air to detonate them at a safe distance.


Lightning Rod - Firing in intermittent or constant pulses, these will shoot out an arc of electricity at you for a sharp degree of damage if you're too close to them. If they're found in the water, the water will be electrified every time these go off, so time your jumps to not get shocked.


Barbed Wire - Treat these like Floor Spikes. Touch = Ooof ouchie.


Shock Orb - Found in Trap Rooms, these lock you from using your grappling hook via electrocuting you, along with dealing a very small amount of damage to you from the lingering shock effects.


Toxic Barrels - When shot or thrown, these explode much like the Poison Rod's alternate fire, or the Acid Dragon's acid globs. CORROSION.


Vending Machines - They explode like toxic barrels, but unlike those, these cannot be moved around. These do sting so keep a bit of a distance away from them.


Cancer Mouse - It's HE. Explodes and leaves radiation splats behind while letting out a "Woah!"
Hazards, Part 3
Oxygen Bar - With the addition of Episode 3 comes oxygen-deprived environments. These will always have a "barrier" of some sort to indicate when you are transitioning between them, such as a force field or a waterfall. Once you are past the barrier, the Oxygen Bar will appear on your hud where the Boss Life meter appears, slowly ticking down to nothing, where you will then suffocate and take damage over time. Getting back into a normal environment immediately resets the Oxygen Bar. The amount of Oxygen you can hold can be doubled via the purchasing of Jade Tree skills +25% More Oxyen, with a maximum of 100% more, or double the amount.

Oxygen-deprived areas are found in both Moon Terror and the Crushing Depths, and are separated by distinct borders in each as shown below:


Blue Spike Orbs - Just like the Red Spike Orbs, but these move around along set pathways.


The Void - The bottomless, anxiety-inducing void of nothingness. This will not instantly kill you should you fall into it, but you will get a few moments of heart-stopping contemplation of how badly you've messed up before respawning back onto land once again. Enemies can be shot off or fall off, and will suffer similar consequences of taking damage upon respawning back on land. You can save yourself with the grappling hook and reel yourself back in, so not all is lost!


Lightning Bush: Pulsing out orbs of electrical energy at periodic intervals, these hang around in various areas drifting down these orbs in whatever direction you are in after a short period of time to cause electrical damage.


Tentacle Vine - These linger around along similarly infested tile, not seeming to do much but be noisy and annoying until you realize that touching one damages you, and they splatter with a small pool of acid upon destruction. These will regenerate over time.


Flesh Pod - Hanging around along either the ceiling or floor, these tend to come in clusters, usually being a light source of a room as well somewhere. Be aware however that these can and will explode, so take care around them.


Fire Trap Orbs - These are basically the giant explosive fireballs launched from the Fireball book, but with the notable difference of these will pop "loose" if one goes off, shifting them around before they too explode with horrific force into a nasty chain reaction. These also can follow you in certain rooms. If you touch one, RUN.


Hunter Orbs - A cloud of electrical balls hovers slowly but surely towards you no matter where you go inside of a trap room, these will deal DoT electrical damage to you if you stand still or cross through them (if you have the invincibility dash, then you can dash through them harmlessly). The only way to stop these is to either leave the trap room, or to hit the trap room switch (which may or may not turn these off).
Random Events, Part 1
Just as the name implies, Random Events have a chance of happening only after you've cleared out a room. You'll know that a Random Event triggers almost immediately after the last enemy is killed in said room with one of three different dings being heard. As to what event will happen, well, wait a few moments and you'll find out...

Dangerous Events

These events are the kind of events that'll screw you over in a heartbeat. Handle them with swiftness, because they aren't going away until you destroy the source. In order to help you locate these, bright glowing footsteps will be seen along the floor, along with a floating little orb that will lead you right to it. You'll know when you are close when you hear their distinct jingling, much like wind chimes.


Flame Trap - One of the three Elemental Traps, the room will start to fill with large, angry red orbs that start to explode with the force of red barrels. RUN! They will keep spawning and follow after you in a trail, blowing up anything and everything in their way to kill you. Destroy the source and you'll be safe.


Ice Trap - The second of the Elemental Traps, large chunks of icicles will start to fall from the sky above you. These will not only follow you, but also appear in front of you to try and damage you. Like the Flame Trap, run and destroy the source quickly!


Electric Trap - The last of the three Elemental Traps, orbs of electrifying force will start to spawn all around you, spreading outwards in a horizontal direction. Same with the other two, kill it and kill it fast.


Gravity Trap - Without warning, the gravity will suddenly shift around you, sending you and everything in the room all over the place. In Episode 1, gravity will remain off until you kick your way on over to the trap to destroy it. In Episode 2, this trap will alternate gravity in short intervals, though you'll be able to make your way over to it easier with the grappling hook.


Ghost Head Trap - The area around you will suddenly start growing dark, and from out of seemingly nowhere, your face will show up directly in front of you, rotten and horrific. LOOK AWAY! Quickly turning away right as it screams will negate any damage you will take if you otherwise look straight at it. Work your way towards the trap while doing this, and destroy it.


An image of what the Ghost Head looks like. Don't bother wasting your ammo on it.


The Red Orb - Run.


Zombie Swarm - What are those bampfhing noises? You're about to find out really quickly as a god awful amount of Mini-Zombies start to spawn out of thin air around you. No trap orbs here to deal with, just the ridiculous swarm of the little hissing monsters. As mentioned below in the Enemy Types section, explosives are your best friend along with melee weapons, as trying to shoot them with bullet weapons will prove to be an utter pain.


Pistol Zombie Swarm - Same as above, but with HITSCANNERS. Same strats as above, but you'll want to be a bit quicker on killing them all this time around. Episode 2 only event.


Fire Mage Swarm - Oh look, it's a cute little fire mage throwing little fire balls! ..... Oh, there's uh, there's more of them. A lot of them. Hope you got fire resistances!


Another Round - Yup, another wave of enemies just spawns on in. These are always the same kind of spawns that you would normally find in the level you are currently in.


Red Crystal Spawn - It's the Red Crystals again! Handle them like you would with them any other time: with a copious amount of violence. No image here for this one, as Red Crystals are covered down in the Enemy Types, Part 2 section.


Neutral Events

These events are not inherently dangerous aside from their own particular set of circumstances, those of which I will go into detail now.

Golden Bunnies - The room will be filled with a good amount of glowing, golden bunnies! They aren't really fast and do not harm you in any fashion. Shooting them will make them explode into treasure, but beware: doing this will have a chance of spawning the Space Marine. Leaving them alone will not cause this to happen. So it's your choice: spare them and get nothing, or shoot them and get treasure, but incur the wrath of the Marine in the process. Personally though, it's worth the effort of killing them.


Slot Machine - The only other thing that you can spend your money on aside from skills is the SLOT MACHINE! Spend the required amount listed above the floating orb, and take a gamble! My advice though? Move a good distance away after you start the spin, as you'll find out below in the list of rewards / punishments for the Slot Machine.


- Rewards -
- Shotgun - Drops a random weapon of a random quality
- Gold Bar - Drops a large amount of gold bars
- Chalice - Drops a good amount of chalices
- Treasure Chest - Drops a decent amount of treasure chests
- Powerup - Drops a random powerup
- White Orb - Drops a White Health Orb
- Map - Will reveal the entire level on your minimap, including secret areas!
- Punishments -
- Red X - No prize, spin again!
- Skull - Will spawn an enemy
- Explosion - Well, it explodes, along with you in the process, hence the recommendation to back away from it upon every spin.
Random Events, Part 2
Beneficial Events
These events are good ones! Not all of them are bad in Nightmare Reaper. They will require effort on your part, but they are worth your time, provided you engage in them.

The Dog (aka, The Pupper) - A poof will be heard, and you will heard a dog barking nearby. A cute German Shepard sitting all by their lonesome! Go ahead and press the interact button to give this pupper all the pettings. If you want a reward, though, there will be floating dog treats that have now spawned throughout the whole map, including areas you've previously visited and secret areas. (Note, these do not spawn in challenge rooms, so unless there's a secret room in said challenge room, don't bother going through looking for these in them). Collect them, bring them back to the dog, and press interact to feed the dog the treats. In return, you will get treasure chests! Absolutely worth your time to get these. Just, don't shoot the dog. Not only will we not be friends, but the game will punish you horrifically for it. Because you're a terrible person.


An image of the Dog Treats in question!


Golden Chickens - Clanking sounds will appear all around you, and golden chickens will fly up to the ceiling, moving around in unpredictable patterns. Time to test your aim! Shoot them in whichever fashion you choose, and for each one you successfully kill, you will get a piece of treasure to drop! Be quick about it, though, for they won't be around forever.


Loot Slime - A cute, golden slime appears! You know the drill, shoot it! The more you shoot it, the more coins and loot will drop, but the faster it will start moving around. Shoot it enough times and you will even get weapons to drop from it! (WARNING: Avoid using weapons with knockback on it, as you might send it bouncing around much more than you want it to. I accidentally launched out off the map at one point, so, yeah.)


Golden Crystals - Several large, golden crystals will appear in various locations around the room. Your goal with this event is to touch every single one of them as fast as you can. The faster you touch them, the more loot the final crystal will drop! If you aren't fast enough though, the remaining crystals will vanish, and you will get NOTHING, Charlie!


The Doctor - A labcoated man with a blur for a face beckons you close. The unearthly howls filter through the air as he gives you one of four choices to take.

- Sell Most Used Weapon: Self explainatory. You can sell your primary weapon for a large sum, which increases with each level having passed as time goes on. The Sell Weapon % Skills also affect this amount, and selling a weapon this way counts towards the selling weapons achievements.
- Make A Rare+ Copy: For a fee, he'll make a bonus copy of whatever weapon you are holding into either a rare or legendary version.
- Change a Weapon Stat: Roll the die for a new stat on your weapon. A great way to roll bad stats off of a weapon on legendaries with 4 stats, however this stat will be replaced with a different negative stat instead. An example is changing a weapon from having Blood Ammo to giving it extra recoil.
- Reroll Stat Value: Changes the values of a specific stat via increasing or decreasing it. Good for improving a stat. If used on the Random Projectile modifier, it will reroll the projectile into a completely different one.


Cleanup Detail - In a wonderful nod to good ol' Viscera Cleanup Detail, the ol' incinerator, bucket, shower, and Mop all pop into existence, where you can grab the Mop and go about cleaning up your mess for coins! There's no time limit, and as the Mop counts as a weapon, you can take it with you if you want.


Barrels O' Fun!

Barrels. So many of them. They come in wooden or rusty metal varieties. They also are clutter, and clutter's good, for clutter houses loot and other things.


Dance Arcade (Simon Says)

An arcade machine drops into existence, where you play a game of Simon Says via moving in whichever direction the machine points on the screen. With each win, you get a bunch of treasure. Upon three wins, the machine poofs and gives you the full reward.

Levels (Episode 1)
This is the entire list of levels that you will go through on your journey, with 27 Stages, 82 Acts and one Tutorial Act each at the beginning of both Episode 1 and 2. Each Stage comprises of three Acts each, and at the end of every third stage, there will be a boss that you must face. Due to these realms taking place in your mind, they will always be in different layouts every time you go through them, so giving a proper layout is impossible. The exceptions to this are the Episode 3 hubs, which includes secret walls, items, keys, powerups, weapon boxes and (usually) enemy encounters. Episode 3 hubs also contain boss encounters from previous episodes as minibosses.

You may quit a level at any time in the main menu and it will return you back to the Hospital.

___________________________________________________________________


The Beginning (Tutorial) - You awake in an enclosed room with chains adorning the wooden walls around you, an unknown voice whispering into your ears. The Nightmare Begins....

This area teaches you how the game works, and is always in the same exact layout, so you won't need to worry about getting lost here. The only enemies you'll face are the Zombies and a Trap Orb, which with the tools that you are given here, should pose no problem for you. You will only see this area once in your current save file.

___________________________________________________________________


Hollow Stone

Encounters: Zombie, Pistol Zombie, Shotgun Zombie, Small Acid Dragon
___________________________________________________________________


The Spore Pit

Encounter: Medium Acid Dragon
___________________________________________________________________


The Immemorial Woods

Encounter: Large Acid Dragon

Boss: Grand Dragon
___________________________________________________________________


The Forsaken Village

Encounter: Wraith
___________________________________________________________________


Sulfuric Mines

Encounter: Exploders
___________________________________________________________________


Disavowed Town (3 Parts)

Encounter: Horned Zombie

Boss: Sorceress
___________________________________________________________________


Putrid Sewers

Encounter: Fire Mage
___________________________________________________________________


Gloom Mansion

Encounter: Brute
___________________________________________________________________


The Descent

Encounter: The Fetid

Boss: The Warlord
___________________________________________________________________

Levels (Episode 2)


The City (Tutorial No. 2) - The second tutorial in the game, this area grants you the almighty Grappling Hook, which you'll be using on the rest of your adventure. Here, you are taught how to use the grappling hook, manhole covers, shaped charges, power cells, hook switches, and how the hook cannot be used over grey water. There are no enemies on this map, and will only appear on your first run through.

___________________________________________________________________


Area One: The Inner City
Encounters:
Sniper
Ice Zombie
Necromancer
Sentinel

Boss: Juggernaut
___________________________________________________________________


Carnage Way

___________________________________________________________________


Gardens of Woe

___________________________________________________________________


Tower of Toil

___________________________________________________________________


Area Two: Industrial Sector
Encounters:
Frost Dragon
Machine Gunner
Plague Doctor
Guppy

Boss: Spider Howitzer
___________________________________________________________________


Murky Docks

___________________________________________________________________


The Vermilion Princess

___________________________________________________________________


Rust Works

___________________________________________________________________


Area Three: The Outskirts
Encounters:
Spider Tank
Auto Shotgunner
Spectre
Shock Mage

Boss: Phantom
___________________________________________________________________


The Void Beneath

___________________________________________________________________


Boulder Penitentiary

___________________________________________________________________


Gibbs Medical Center

___________________________________________________________________
Levels (Episode 3)
Unlike with the City Hub, Episode 3's sub Hubs are actual levels onto themselves, so prepare accordingly. Episode 3 Hubs are also NOT randomized much aside from little things here and there should you end up dying and repeating an Act in one of the Hub worlds. This is especially useful for secret / treasure hunting, as these will not be moved around much if at all.

___________________________________________________________________


The Wastelands [Hub 1]

Encounters:
Eyehead
Worm
Savage
Pain Sphere

Boss: Regal Worm

___________________________________________________________________


Moon Terror

___________________________________________________________________


The Fields of Death

___________________________________________________________________


The Sorcerer's Mansion [Hub 2]

Encounters:
Rail Brain
Outlaw
Plasma Gunner

Boss: The Gunslinger

___________________________________________________________________


The Empty

___________________________________________________________________


The Crushing Depths

___________________________________________________________________


The Buried Ruins [Hub 3]

Encounters:
Frost Mage
Flesh Ninja
Spectoid
Torcher

Boss: ????

___________________________________________________________________


Blood & Brimstone

___________________________________________________________________


The Flesh Pits

___________________________________________________________________
Arenas & Information

The Arena! This area is accessible once you've collected the first keycard and key chain in the Hospital Hub. Down the hallway past the metal grate and making a right before making a left at the room directly across from the stairwell, there will be a bed that you can sleep in. The Arena Hub is a good area to test out newly unlocked abilities, weapons, and other things, as there are no enemies in this area. Each area will become unlocked when you acquire more Arena Sigil's (like the one that appears in front of you in the Arena Hub when you spawn). To exit the Arena Hub, there is a teleport directly underneath where you spawn that can be accessed via a stairwell.

As for the Arena itself, every fifth wave will be an Elite wave, with every tenth being a Boss wave.
There are achievements for reaching Wave 10, 50, and 75 respectively. The game will save your progress after every 10th (Boss) round, and will start you off every 11th wave afterward. Death will result in starting from the 10th round that you last started off on.

Jade rewards at the end of each round progressively rises with each Round successfully completed , and upon completion of the boss wave, you will be allowed to keep a weapon of your choice, much like the end of level screen in normal gameplay. All other weapons will be sold for normal coins, and you will be returned back to the Hospital Hub afterward. With more skill investments, this mode and the higher rounds do become easier to handle. My advice is to take the -20% and -30% Less Damage Taken Pills, as taking half damage is essential for Rounds going above 50.

In addition, your map and minimap alike highlight all enemies in the Arena itself, indicated by red dots shown below. Good luck!


___________________________________________________________________


The Arena Hub

___________________________________________________________________


The Sewers

___________________________________________________________________


The Mansion

___________________________________________________________________


The Streets

___________________________________________________________________


The Cemetery

___________________________________________________________________


The Factory (E1M1)

___________________________________________________________________


The Spaceship

___________________________________________________________________


The Ruins

___________________________________________________________________


The Flesh

___________________________________________________________________
Elites


Introduced with 1.0, Elite enemies are variations of enemies found throughout the game that're bigger, badder, and tougher than the others that have their own attributes indicated by a symbol above their head as to what type they are. This can also happen with boss enemies that spawn in the later levels outside of boss rooms, so you very well could encounter a much more vicious version of a boss you've fought before in one of the Episode 3 Hubs. Elites will always drop ammunition upon being shot, so you will not have to worry about running out. They will drop a guaranteed weapon upon death (unless you've reached the maximum amount of weapons that you can carry in your backpack), so they're worth it even if they can be dangerous.


Elite Variation Symbols:

Flame: These Elites have a radial aura that will set you on fire if you are standing too close. Their attacks are also explosive and incendiary, so watch out!

Ice Crystal: These Elites carry an ice aura that slows you down, along with their attacks dealing frost damage and slowing you further.

Lightning Bolt: Electrical radial aura, with lightning bolts added to their normal attacks that interrupt your attacks and cut out your Grappling Hook.

Shield (Guarded): Super slow, super tanky, hits hard. This one's gonna take a minute. Doesn't seem like a threat on lower difficulties, but on higher ones and intermingled into spawns, it becomes more of a persistent threat that can't be easily killed off while you're dealing with other enemies.

Shuriken (Deadly): The opposite of Shield, this one is fast moving and fast attacking, with extra attack projectiles / melee hits added in. Be quick or be dead!

Circle (Nuke): Fast moving and high in the tanky department, but does not attack normally. Instead, it will charge at you until it's close before blowing up with the force of a nuke. Keep it AWAY.
Enemy Types, Part 1
Your inner demons manifest, they will stop at nothing to kill you. They are relentless, but you're not here to sit down and drink tea with them. You're here to put them down like the beasts they are. Time to show these freaks real horror. Note that you CAN cause in-fighting between all of them, so use this to your advantage!


Zombie - The first enemy you will encounter in the game. They move erratically, making them a tad difficult to hit at times. They attack via closing the distance and clawing at you. Handle them in any manner you see fit.


Horned Zombie - Faster, meaner, and with the ability to lunge at you from a distance, these are normal Zombies on steroids. You won't encounter these until Disavowed Town, but they are pretty nasty. Jumping over them and strafing is your best bet, and don't let them corner you.


Mini Zombie - These are normal Zombies, but tiny! Look at how cute they are-.... Wow, there's a lot of them. They only appear during the Zombie Swarm event, and never are they alone. Explosives are an amazing choice with these critters. Otherwise, bust out a melee weapon of your choice and go to work. Don't ever stand in one place.


Pistol Zombie - Your basic hitscanner type, these Zombies are dressed up in gunslinger outfits, and upon spotting you will start capping you with their six shooters. Thankfully, they are slow moving. Their shots can be avoided if you are moving erratically. Handle them quickly, as each shot will chip off 5 health points. Note that they cannot fire upon you if you are not in line of sight, so take cover if you're feeling too much heat coming.


Shotgunner Zombie - Dressed up in Vietnam era gear and helmets, these guys are not to be underestimated. Armed with a powerful shotgun, they will ruin your day if they manage to close the distance. One thing to note is that not only are they slow at moving, but they have a decently lengthy windup to their attacks. Either pick off at a distance or move in quickly for the kill via strafing and jumping to throw off their aim. Same with the Pistol Zombies, they cannot fire at you if you are not in direct line of sight, so break it by taking cover or corner peeking.


Acid Dragon (Egg) - These are harmless on their own (unless you are hit with one), but do NOT neglect them. Once hatched, they will become Tiny Acid Dragons, where after a short while will become Small variants. Destroying the eggs before they hatch is a good idea, though sometimes you will not get the opportunity to do so.


Acid Dragon (Tiny) - Hatching from the eggs mentioned above, they are little dragons that will slowly close the distance and attempt to bite you if they haven't morphed into Small dragons yet. Kill them quickly before they become...


Acid Dragon (Small) - ...These guys. First encountered in the Spore Pits, they aren't all too fast, but they do spit corrosive acid at you in small globs, globs that linger in the floor for a few seconds afterward. They will also bite if close enough, and upon death spew a small amount of acid onto the floor. Tiny variants also leave the same size acid splotches, so don't step in these if you can help it.


Acid Dragon (Medium) - Do not underestimate these. They're big, and they are VERY deadly. Also found in the Spore Pits, these are top priority targets if you come across them, as not only do they take a good amount of damage to bring down, but also lob a gigantic glob of acid that upon contact with a surface, will spew into smaller globs. They are relatively fast, and their bite is as bad as their bark. DON'T LET THEM GET CLOSE.


Acid Dragon (Large) - The big boys themselves. First appearing in Immemorial Woods, at first glance, you'll notice that they do not move from where they are positioned. They don't need to. Why? Because remember the Eggs I was talking about earlier? These are where those come from. They'll spit them at you from their tails indefinitely, so the longer you take to kill it, the more Acid Dragons it will spawn, not to mention that they also spit large globs of acid akin to the Medium variations. An absolute priority over everything else in a battle, kill it and kill it fast, or you will regret it.


Enemy Types, Part 2


Wraith - Found in the Forsaken Village, these creatures fire semi-homing skull projectiles that do a good job of discouraging strafing from a distance. The easiest way of handling these are baiting the projectiles with sidesteps or leading the projectiles into objects.


Exploder - Found in the Sulfuric Mines and onward, they're large, lumbering horrors that are blue and look like bloated, deformed villagers. KEEP YOUR DISTANCE. While they are slow, if they get near you, they will explode with the force of an explosive barrel, along with leaving two Tentacly's behind in their wake. They will also throw them at you, which is utterly bad for your health. If you are fast enough though, you can dart in and immediately backpedal away, as they won't explode right away on you for a brief moment, or you can shoot them out of the air before they touch you. A fun tip: other enemies can be caught in the explosions, so if they're in the middle of a group, focus the Exploder FIRST to help soften up the rest.

Tentacly - They look like weird, red, tentacled hearts, but they aren't here to give you love of any sort. Often half-buried in the ground, they'll pop up and immediately start working their way towards you to blow up in your face, moving around about as unpredictably as normal Zombies. If you're crazy enough, you can jump over the top of them when they explode, which will launch you a decent bit into the air much like a blast jump, though like a blast jump, you will be harmed.


Fire Mage - Appearing in the Putrid Sewers and on, they appear as red robed humans, standing idly by if you haven't alerted them. However, once they ARE alerted, you will quickly find out two things about them: One, they can teleport, and two, they throw fireballs that cause DoT effects. They make a particular noise when teleporting, and often they will teleport BEHIND you to get the drop on you. Dodging left or right will screw up their aim, allowing you to avoid getting hit, but in tight spaces, that's going to be rather difficult. Once you figure out their patterns, they aren't hard to take down.


Brute - Big, mean, and ruthless, the Brute is one of the most dangerous enemies in the game. Appearing in Gloom Mansion and beyond, they are to be treated as the number one target in a battle aside from Red Crystals. They soak a large amount of damage, and they attack with a large hook and chain that upon being thrown at you and making contact, they will reel you in to slash at you with the aforementioned hook. You can dodge the thrown hook with some tricky strafing, but take heed to keeping your distance from them.


Fetid - Big, slow, and bulky, but firing a bunch of projectiles, here comes the Mancu- I mean Fetid! It's basically your Mancubus alternative that spams white projectiles that can be sidestepped or jumped over. It's when there's a lot of them is when you'll start to really feel them being an issue.


Red Crystal - Throughout the game, there will be instances where you are locked in a room, and multiple giant Red Crystals will appear. At first, they don't seem like a threat.... Until they start spawning enemies. If you are in one of these situations, breaking line of sight with them will stop them from spawning baddies in. These are the most dangerous enemies in the game, even if they cannot harm you even in close proximity on their own. It's the enemies that come out of them is what you should be worried about. Destroy all of them, and you're free to go. (Note that sometimes only one or two will spawn depending on the size of the room.)


The Doomed Marine - One of only two unique types that spawn from random events (the other being Mini Enemy events) the Marine is a homage to that One Man Literally Too Angry To Die, The Dude With the Rip & Tear Attitude, you all know the one. You'll get a laugh at first, for sure, but once he rapidly closes the distance and unloads a fully automatic shotgun in your face, you won't be laughing much after. He has a chance to spawn only from the Golden Bunny event, and ONLY if you choose to shoot the bunnies. If you do, be prepared for a hard fight. Oh, did I mention that multiple of them can spawn? No? Well, now you know.
Upon entering Episode 2, he will now be equipped with a rocket launcher and double barrel as well. Upon entering Episode 3, he sports a heavy laser cannon on top of.
Enemy Types, Part 3

Sniper - The first of the new lineup of enemies, she packs a sniper rifle with a red laser on it that you will see from across the map to pelt you with. It hurts. She shoots where you are standing, however, so if you keep going left or right, she'll miss. She's also liable to throw grenades in your face as seen here, and these can detonate on impact, so best be careful.


Ice Zombie - It's the Horned Zombie, but she pelts ice shards at you from a distance now that freeze and slow you down, making you a perfect target for other enemies along with herself to swarm you. A little tricky to dodge the projectiles, but the freeze effect thankfully doesn't last very long.


Necromancer - A problem maker if there ever was one, you got the Necromancers, whom will throw up a protective shield to take less damage while they constantly raise skeletons to fight for them. These skeletons act much like the ones from the Necro Skull weapon, either clawing you or using a projectile red orb attack from a distance. If you're fast enough, you can catch them offguard before they cast their shield and kill them at a rapid rate.


Sentinel - Fairly fast on their feet, Sentinels utilize two projectile attacks with their hands, along with punching the everloving hell out of you. The first is a small flurry of white fireballs in your general direction. The other is a wave beam attack that can be easily sidestepped, but standing near the impact zone will hit you for splash damage. Strafing is the way to go here with handling them.


Frost Dragon - An even MEANIER version of the medium Acid Dragons, not to mention much more tanky. These will often charge at you without warning, damaging you with the charge in the process. Their other attacks are a short ranged, flamethrower-like breath attack that freezes you in place, while the other is lobbing a gigantic ice orb from a distance at a high velocity like the Scrap Cannon's alternate fire. A nasty boy.


Machine Gunner Zombie - Sporting assault rifles and riot gear, the hitscan zombies come back with a vengeance! Alone, they aren't too big of a problem. When you're getting shot by ten or twenty of them though? Not a fun time.


Plague Doctor - Showing up around the halfway point of Episode 2, you have the insectoid-like Plague Doctors, whose sole attack lies in using a floating, homing fireball that explodes like a grenade once it comes near with a distinct ding. These fireballs can be circle strafed, lured into walls, walked through, or even used to blow up in their faces. What makes them dangerous however is their ability to boost other enemies nearby with damage reduction buffs, along with increasing their size for a short time.


Guppy - Moving at high speeds, these things like to close the distance to chew on you up close. You'll soon realize, however, upon killing it, it explodes, shooting out a Tentacly at you at a high speed to explode as well. They also spit Tentacly's at you. Best to keep them away from you at all times, and use their explosions to damage other enemies.


Spider Tank - Big, lumbering, loud monsters of meat and metal, they sport rocket launcher racks with two different firing modes: One big rocket, or multiple little rockets that have semi-tracking capabilities. Both are painful. Since they're so slow, it's not too hard to avoid their attacks and lure their shots into other enemies.


Biker - Clad in raggity biker clothes and wearing a ballistic mask, the Biker proudly use his AA-12 to absolutely spam you at a short to medium range with pellets. Not even joking. They have a windup time much like their normal shotgunner counterparts, but you'd best be out of sight before they pull the trigger. After a certain range, they will not fire until they get back into it, so you at least have that going for you. Use this to your advantage by keeping distance!


Spectre - The most dangerous enemy of Episode 2 has finally made its appearance. So, they float around and can sidestep out of your shots without too much warning, and they have only a single attack, how bad could it be? Well, it is a homing purple orb that you cannot dodge through, even with the invincibility dash upgrades. It is an attack that the only way to not get damaged by it, is by not going anywhere near the orb by keeping a certain distance or more. This orb WILL follow you around corners, unlike the Plague Doctor's fireball. This attack will also screw your aim up once it hits. Buuuut, with the introduction of the purchasable skill in the Jade Tree that lets you kick back projectiles (and the pet projectile reflection perk), it makes these guys much less of a threat than they once were.

Enemy Types, Part 4


Shock Mage - Think the Fire Mages, but now wherever they teleport from, they leave a large electrical orb much like the Tempest Book's alternate fire behind, shocking you and halting you from firing your weapons and your grappling hook. Their main method of attack is with shooting little electrical balls that semi-hone in on your direction. Just turn around and shoot them in the face when they appear behind you.


Mini Pistol Zombie - It's a mini version of the pistol zombies! Just uh, gather them all into a group and blow them all up for big money momma combos. Yeah.


The Headless Kamikaze - Yup, that's a Serious Sam reference right there, kids! An incredibly deadly one. Found only in secret rooms, you will hear its shrill trilling, and you immediately loosen a brick as you back pedal as fast as you can the way you came. As you should. One shot blows them up, but they have a bit of a range to their explosion, so be careful.


Eyehead - Tuning into your location come the Eyeheads! Sporting TV's for heads that change channels to various expressions depending on their actions, their attacks are leaping at you to claw at you, spraying a burst of electrical balls at you, or launching one large electrical ball at you for extra damage. The BSOD they get from time to time is a nice touch.


Worm - Imagine the Tremors worms, but they can pelt you with a barrage of fast moving projectiles. These nasty buggers like to hide under the ground making distinctive hissings, where upon coming into their vicinity will pop out to ambush you in a group of five at a time. They can also burrow underground to avoid damage.


Savage - The middle brother between the Brute and the Warlord, he has the similar ground stomp and reach as the Warlord, but with less health and not having the whirling chain ability. Their searing hot blades however are not to be trifled with, and their hooks explode wherever they land.


Pain Sphere - Get it? Because they're orbs and sphere sounds like severe, so pain severe- Anyhow, they live up to that by firing a burst of straight lightning at your location, or they will flash black with a white iris, indicating that they are about to ram you at a high velocity.


Rail Brain - Sporting dual rocket launchers and a railgun, these slothful tanks will wreck your day if there's more than a few of them out in the open targeting you at any distance. The recommended tactic? Keep yourself moving, as they're slow to get a lock on if you're not standing still.


Outlaw - Well howdy there, cowboy. Better be quick on the draw with these guys hanging around whistling an old diddy, for they're no slouches in the combat department. Carrying two six-shooters, a sawed off double barrel, and bundles of dynamite, they're here to bring some old-fashioned Western pain into your life.


Plasma Gunner Zombie - Ah, zombies with the Level 3 Plasma Rifles melded into their arms. Yes, they hurt as bad as you think they do. Thankfully, they are about as slow as shotgunner zombies, so they have that going for them.


Enemy Types, Part 5

Frost Mage - The last and final logical step of the Mage enemies, the Frost Mage uses a small trailing burst of slowing frost beams that is immediately followed by one large frost beam that stings a fair bit, but more importantly: it slows you down enough for the other enemies to get their shots in, if not just outright freezing you in place altogether.


Mini Fire Mage - It's a tiny fire mage! .....Usually not alone though, so if you suddenly see one of these poof into existence behind you, expect more to quickly teleport in around you to harass you.


Flesh Ninja - Yup. Ninjas. Fast moving and relentless, they'll jump around throwing kunai at you when they land, or they'll go about with kicks and slashes when close. They might not have much health, but they are excellent at causing a bunch of burst damage on you quickly if not handled.


Spectoid - Mutated and corrupted versions of the Spectres, they exude a large number of the small black hole projectiles much like the Phantom, but lacking the massive black hole attack. Taking cover or reflecting the projectiles back is your best bet here.


Torcher - The last enemy of the game to be introduced, these guys are torture incarnate, having a flamethrower for a mouth to deal a large chunk of damage in a short amount of time if you're within range. Oh, but don't worry, they got an attack that they will use on line of sight from a distance, which is causing a dark red summoning circle to appear under your feet before dropping a massive, explosive fireball right where the circle spawns as a means of keeping you from camping a certain area for too long. This attack happens quite quickly, so best keep moving fast with these around.
Bosses (Episode 1)
This section will cover the three bosses found in Episode 1. As such, if you don't want them to be spoiled, go ahead and skip this section. For those that don't mind or want a general idea of what kind of fun is in store for you, read on! Each boss has three different attack patterns, and each must be handled in their own fashion. They also have melee attacks, which means keep your distance!

The Grand Dragon - Found at the end of Immemorial Woods Part 3, the Grand Dragon's attacks are similar to that of the Large variant of the Acid Dragons, with a notable exception. Along with spewing a massive glob of acid and spewing out small eggs, this dragon also flings out large eggs, which then turn into the Large Acid Dragons. The trick to this fight is both destroying the large eggs before they hatch while strafing back & forth to avoid getting hit by the acid. You must be quick in this fight, as the room will start to fill with more and more dragons, which will eventually overwhelm you.


The Sorceress - Appearing at the end of Disavowed Town Part 3, the Sorceress is nothing to be trifled with. Her three attack patterns consist of lobbing a series of small fireballs one after another (usually three to four of them), a large fireball that explodes much like the Fireball Book's primary fire, and her most deadly attack being sending a massive amount of fireballs in every direction in an arc that will cover the majority of the room that you are in. Think a fire sprinkler and you'll have a good idea of what that looks like. Oh, and she teleports around too to make things worse. Your best bet in this fight is using the surrounding pillars as cover, dipping in and out around the area while unleashing your might against her. Much like the normal mages, she has a habit of teleporting behind you with a distinct sound, so be ready to move when she does!


The Warlord - The final boss of Episode 1, he appears at the very end of The Descent Part 3. Think a normal Barbarian, but three times more nasty. His first attack consists of explosive hops toward you, his second utilizing his chain to snag you (much like the Barbarians), and the third attack involving him swinging his chain in a circle above his head, flinging it outward more and more until it hits a certain radius. Do NOT get caught by the last two attacks, as if he hooks you and draws you in, his melee attack up close deals a whopping 20 damage EACH, while the circle swinging attack will fling you around the room while completely disorienting you in the process. My recommendation? Keep your distance as much as you possibly can, moving around the room while double jumping or using the jump pads to get away, all the while firing on him. His swinging attack does leave him open for a few moments, so take advantage and unload on him during this. Eventually, you will prevail!
Bosses (Episode 2)

The Juggernaut - What starts as a seemingly simple battle against a Sentinel proves to not be when you see that health bar of his suddenly go back to full, his attacks becoming more prolonged and frequent while he himself becomes faster in his second form. Only for him to regenerate into a third form. More flurry attacks, bigger explosions. My advice is to utilize cover as needed, and keep on moving constantly. He'll fall after his third form.


The Spider Howitzer - Your Skill Check Boss has finally arrived at its destination. Armed with rocket launchers and a howitzer, this boss is a hard hitter and will undoubtedly kill you the first time around unless you get lucky. His attack patterns are:

- A small rocket barrage of anywhere from ten to twenty little rockets that semi-hone in on your location. Strafe in either direction to avoid these.
- A large rocket, firing two of them into a V pattern away from him, or firing a rocket directly at you. Tricky to avoid.
- The howitzer shot. You'll hear him load this up with a distinctive "CLANK". When you do, take cover behind one of the four pillars to block the shot, but not close to the aforementioned pillar. You can also jump over the attack as well, though that is a fair bit more difficult to pull off.

Just keep moving and shooting, and stopping when necessary behind cover.


The Phantom - Did you enjoy Wraiths? Well, here's a steroid-fueled one as the final boss for Episode 2.. Hope you're really good at maneuvering yourself around projectiles. His patterns are:

- A gigantic barrage of the dark orbs that hone in on your location for a short distance. Lead the wave left or right, but be ready to jump across to the other side of the area, as he'll fire his second attack a few feet ahead of where you are running.
- This second attack is the Black Hole gun's primary fire, a big orb that sucks in anything while dealing a nasty amount of damage. He'll fire off one or two of these during the large wave of orb to keep you on your toes. Just try to stay away from these as best as you can manage, but if caught, use your grappling hook or dash jump out of the way quickly.
- Final attack is a blinding series of three blasts that screw up your aim much like the normal orbs. Use cover for this one.


Bosses (Episode 3)


The Regal Worm - Did you like the Worms? Do you want... MORE OF THEM?! Because you're about to get a bunch more of them in the near future. Half boss and half monster spawner, it burrows around the arena laying groups of Worms under the ground to lie in ambush, popping out to spray a massive amount of projectiles or attacking when close. The quicker you kill it, the better off you'll be.


The Gunslinger - The Gunslinger rises, agaaaain. So, think a lotta rootin' tootin' shootin' action is about to be had when he comes strolling along. A fast shooter that throws clusters of dynamite bundles at a time. Take cover and send him packing right on back to whatever hell he crawled out of.


(SPOILER WARNING)
???? - Prepare yourself for a two phase battle with.... Yourself! Keep at a distance during the first phase, strafing the fireballs that reign down from above but take care to quickly take care of the second and final phase of the fight, as she takes solid form and fights exactly like you do, including using Powerups. A big tip here is stealing the Nightmare Reaper powerup when it spawns BEFORE the boss does, so keep an eye out for those. With diligence and superior firepower, you will overcome. (Note: After some deliberation, I opted not to put up screen caps of this boss as I'd rather have it experienced as intended.)
New Game +


Once you've gathered up your good pal after beating the game, you can begin New Game +, but FIRST, two conditions must be met:
- Collect all items in the Hospital Hub (If you have not already done so, you can rest as many times in your bed as needed to have all Hospital events occur and complete them, and there are 8 in total).
- Defeat the last Boss of the game and make your choice (as your friend will not be accessible until this is done, no early collecting!).


Here, the later enemy mobs start spawning much earlier in the campaign (as in, right off the bat). With each progressive loop, more enemy groups and Elite variants spawn, along with a rise in durability and damage. Everything carries over, including your skills, guns, and various currencies. There are achievements for looping up to NG+ 3. The x Damage modifier on weapons will now start appearing on Level 1 weapons in both the main campaign and Arena as well starting in Episode 1, along with receiving Episode 3 treasure drops from NG +1 and forward. The x Damage modifier will start appearing on Level 2 weapons once you've reached Episode 2, and finally Level 3 for Episode 3 before jumping to the next tier of x Damage multipliers on Level 1 weapons and so on and so forth. Good luck!

Note: There are a couple of weapons that will be much more difficult to use the higher you go in NG+, such as the mini nukes, as these will end up damaging you badly. Critical hits from certain weapons can cause exponentially higher self splash damage than others. These properties also applies to the Nightmare Reaper powerup, so take extra precaution when using the primary fire around walls or up close.
Protips, Tricks, and Other Useful Information
Now that you've reached the end of the guide, I have some handy tips and tricks to get you along on your journey through NR!


- Bunnyhopping: Yep, it's here! By timing your jumps to a certain rhythm, you can build up momentum and gain speed as a result. I've found it easier to start off on a flat, roomy surface, though once you've acquired some of the walk speed perks, it becomes easier to pull off.


- Rocket Jumping: The old Quake favorite. By jumping upward and firing at the ground at any point with an explosive weapon (the peak of the jump being optimal for least damage taken), you too can become the Soldier Man from TF2. There's skills that will reduce damage for self-inflicted blast damage that can be found on World 3 and 6 for 50% each to help with this, though even without those, I have to recommend the Breach Launcher as my go to for this, as it gives you a good boost without too much damage received. Plus, it's fun to rain death down on enemies while gliding through the air with it.


- Dash Jumping: One of the more useful tools at your disposal, by hitting the dash button and immediately jumping after, you will launch yourself much further than normal than if you were to normally dash. This technique can help you cross gaps with ease, and with the other dash skills purchased, you can basically go from zero to plaid in milliseconds. Do note that you can, from time to time, take fall damage from this until you acquire the full 100% Minus Fall Damage.


- Elevators can be used to launch yourself into the air when you time your jump correctly. This is even implemented in some challenge room puzzles!


- Get creative! There are many useful utility weapons in the game, such as the chained saw along with the Power Boots and Mega Chainsaw that can help you skip some of the harder challenge sections with ease with them; and by experimenting with their primary and alternate attacks along a wall or surface, you can slow your descent and velocity, making these excellent for saving you from pancaking into the floor. AVOID the ones that use Blood Ammo, however. as these can kill you in a heartbeat if you aren't paying attention. The sawblade launcher's alternative fire can be used to negate fall damage or slow your descent as well, and any weapon that uses Kickback or has enough blowback force can help boost you up to places you wouldn't think possible. Try everything!


- As mentioned earlier, you can negate fall damage via utilizing the unlockable Double Jump and Triple Jump skills found in World 4 and 8 respectively of the NR minigame.


- You can make a beeline straight for the Keep Level 2 weapons skill in World 4, which is recommended. You will acquire both the Double Jump and the Dash in the process, as they are required skills needed to get there. You will normally be able to get the Keep Level 2 skill by the time you hit the Sulfuric Mines! Later in World 7, you may keep two weapons to bring with you, and in World 8, the first one will be keeping Level 3 weapons!

- Mentioned earlier on also, you can cause in-fighting amongst enemies by strafing around them and getting them to shoot each other on accident. The enemy that is shot will start attacking the enemy that attacked them to begin with so long as you don't attack that enemy, so utilize this to keep enemies distracted while you focus the more important threats.

- Corner peeking is essential in this game, so use cover as MUCH as you can, whether it be luring enemies in from another room through a doorway, using corners as cover, pillars, you name it. A fun tactic I use is throwing an explosive barrel or firing an explosive weapon into a room to alert enemies, then fall back a bit to draw them into a chokepoint with doors. Note that this cannot be used in arena rooms where you are locked in as soon as you enter. As for those rooms where you have no choice but to move from cover to cover?


- You may also pick up certain light sources (the torch stand, the candlestick, and the house lamp) to help you light up dark areas in case if you accidentally destroy some of the light sources. This is handy if you're searching around for secrets!


- Another mention that should be dropped here is that Ground Pounds cancel out fall damage as well! You can also cancel out of a mid-dash like this.

Abilities / Demonstrations
This section does not cover the more self-explanatory abilities (such as acid / lava immunity and basic movements such as double jumping), but moreso focuses explaining the ones people aren't too sure on how to perform. I've included short demonstration videos and inputs below to help with that.


Dash Jump - Dash button + any direction, then Jump immediately.


Red Barrel Kick (Jade Skill) - Aim anywhere below the tip of the lid and above the middle yellow label, then kick the barrel. This can be done with the barrel lying in place or by being picked up and carried. You can also jump and kick with a held barrel (provided Ground Pound is turned Off). Note: You cannot kick the barrel upward. Kicking can still be done with Power Boots, but you need to be standing much further away for this to work.

Note: Interact and Kick need to be bound to separate buttons in order for this to work.


Ground Stomp / Ground Pound (Jade Skill) - Jump, then Kick to slam into the ground. Do this during a Dash to cancel out of the aforementioned Dash. An important thing about being able to ground pound while Wall Sliding is being able to cancel out of a wall slide or to get yourself out of getting stuck in a ceiling corner.


Wall Kick (Jade Skill) - With Ground Pound turned off, jump up at a wall and Kick repeatedly to go up.
Note: With Ground Pound turned on, you can still perform this, but the angle in which this needs to be done is realllly tight. My suggestion is to turn off GP (if needed) for when you need to solve a treasure room that will not allow your grappling hook and you just so happen to have the bad luck of not acquiring any mobility weaponry.


Tornado Dash (Jade Skill) - Simply Dash at an enemy or object, and you will damage them. This ability will also send tougher objects and enemies flying off in the direction that you hit them, the force of which is risen with every increased Dash Speed skill you acquire.

Note: This ability can detonate red barrels and this WILL damage you unless you have the invincibility dash bought, so keep dashing to negate the damage from the explosion. This may/may not send your view spinning around hard, but DO NOT PANIC. Just keep dashing and you'll soon get back control (provided you aren't flying off into the water or the void).

This ability can also kill the dog, so be mindful of where you dash toward, such as not at the dog.


Ledge Grab / Mantling (Jade Skill) - Press and hold Forward when near a ledge to automatically mantle up atop of it. Note: You cannot mantle backward or sideways.


Grappling Hook Rubberbanding - Press the Grappling Hook (G.H.) button and hold it. Use WASD or movement keys to move around while holding the GH button.


Grappling Hook Swinging - Press the Grappling Hook (GH) button and hold until at crest of swing, then release and Grapple a different point to continue swinging.


Wall Dash - This requires a minimum of the following skills: Double Jump, Air Dash, and Wall Slide. Dash speed / delay reduction skills greatly improve Wall Dashing. To perform, jump, then Dash into a wall before quickly turning to the next one and Dashing into that one.


Time Slow / Instant Transmission - This requires the following Skills: Slow Time Dash, and heavy / complete investment into Dash Speed / Dash Reduction skills in both Jade and NR Skill Trees. To perform, keep hitting the Dash button repeatedly and RAPIDLY, and everything will remain slowed. Due note that you CANNOT SHOOT while you are doing this. To Instant Transmission, press the Dash button repeatedly to build up charge and then stop to release the built up charge, rocketing instantly from one side of a room to the other.


Cut Content
Halloween: From October 25th through November 4th in the first year of Early Access, a new addition was added to the Hospital room sitting along the desk. A pumpkin! Interacting with the pumpkin took you to an early version of the Cemetary Arena. The goal was to succeed for 15 waves before the map would end, with incremental coin rewards in between every 5th wave.


Drudge Village: This set of levels originally took place between the Putrid Sewers and Gloom Mansion, connecting the two with two levels that were a mish-mash of the Forsaken Village, Disavowed Town, and Putrid Sewer level chunks. These were removed as of 1.0. Who knows? Maybe someday, it'll make a return as a NG+ B-Sides level.


Closing Notes / Suggestions
I hope you all enjoyed this guide, as it's been a long journey making this over the past couple of years from Early Access to 1.0 release. Thank you all for reading! If there is anything that I might have neglected to mention or cover (aside from the ones mentioned in the To Do List the very top of the guide), please feel free to comment and let me know. Good luck!

Also big shout outs and thank you's to all those down in the comments section helping out with the feedback, as I've gone ahead and added much of it into the guide!


99 comentarii
Atratus 29 mart. la 4:39 
Amazing guide, helps a lot!
Katakalysmic 27 febr. la 17:54 
are there notes on high the stat mods can go cause i have a 99% leech chance shotty.
Demios 2 ian. la 12:48 
You seem to put a lot of stock on Infinite Magazine stat even if the player can acquire a perk in the jade tree that fully reload any gun that's not being held which take about 0.3 sec to do! flipping the gun acquisition game literally on its head and making guns you would think are garbage utterly god tier because of this!
Ryu 10 nov. 2023 la 9:37 
You are a legend, it's really hard to find much about this game online as I suppose it's fairly niche. Thank you so much for this.
Fuzi ゾグニ 24 iun. 2023 la 17:34 
You're the best 💜 Devs should let you write the game manual for their next title (do they still make those?)
Sysgen 19 iun. 2023 la 10:52 
@Alpha Kenny Body See the Hospital guide (link embedded in the guide) for unlocking the arenas.
A Level Is You!  [autor] 7 iun. 2023 la 17:06 
And added, thank you for that!
Imp Regnius 7 iun. 2023 la 13:44 
Not sure if this has been mentioned, but the Doctor's Reroll Stat Value event works on the Random Projectile stat. It lets you reroll the current projectile into a different one in case you feel the need to.
A Level Is You!  [autor] 23 mai 2023 la 13:41 
For Arena Sigils, those only come at certain points in the campaign, of which I've yet to accurately pinpoint due to the RNG of the Hospital itself being what it is. Most I'd be able to do is give vague time spans that can encompass when those can be unlocked, but still, hard to get down properly.

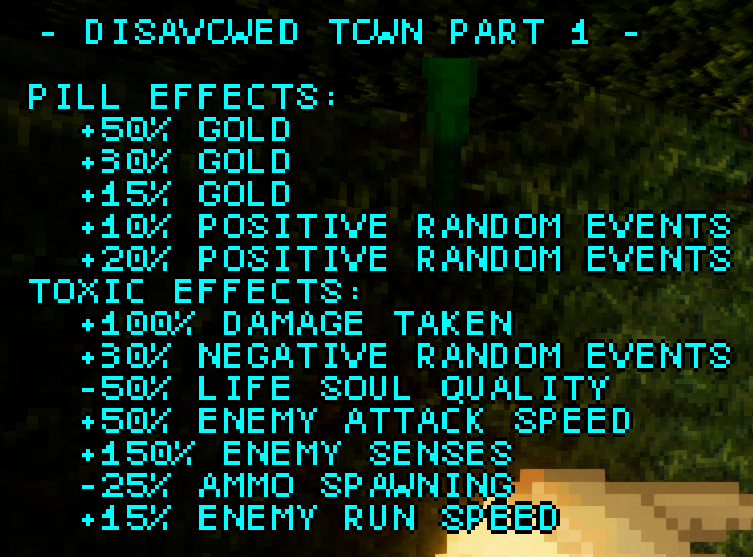
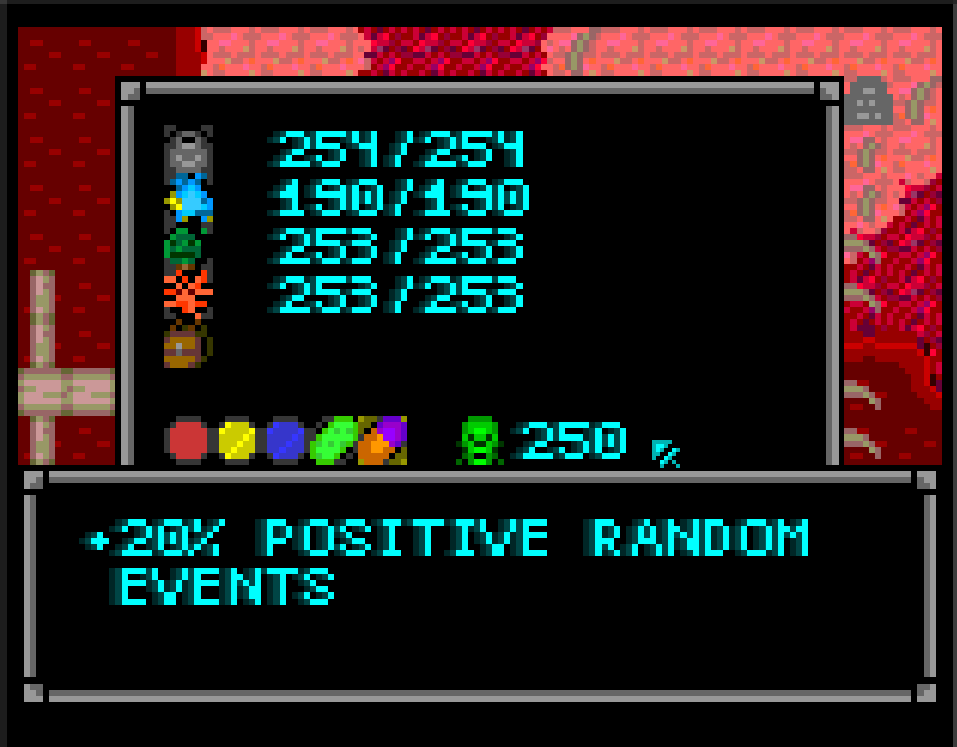
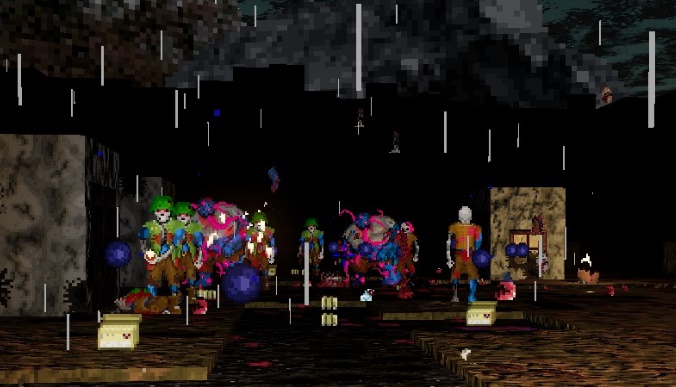
As for the ship pet count, it's still 4, with two being the max being able to be equipped at one time. That hasn't changed from my latest playthroughs from what I can tell, so no updating needed there, I think.
What if we touched tips?👀 23 mai 2023 la 13:24 
Update this guide! It’s a must have but when do you unlock each specific Arena sigil and how about how to upgrade the ship pet count