Team Fortress 2

Team Fortress 2

102 평점
How to use loadout.tf
awesomedog7 님이 작성
Ever wanted to see what your dream weapon/cosmetic set looked like? Want to see what unusual effect or paint you want? loadout.tf is a website that allows you to, simply put, test TF2 loadouts. This guide will teach you how to use it!
2
   
어워드
즐겨찾기
즐겨찾기됨
즐겨찾기 해제
What is loadout.tf?
Note: this guide is almost certainly out of date at the moment.

loadout.tf is a website that allows you to create your own custom loadout on a class of you choosing, so that you can see what it looks like.

It allows you to:
  • Add as many cosmetic items as you want (note only three can be equipped in-game)
  • Select an unusual effect/s for the cosmetics
  • Add paint to items
  • Select weapons to give to your character
  • Add killstreak sheens and skins to weapons, and...
  • Put your character in a pose! (taunt, stand melee, etc.)

Why would I use this?

If you don't know what cosmetics you want, or what cosmetics there are, this website is a great way to experiment with different combinations of hats and other cosmetics to create your ultimate TF2 dream-set.
If you're into making SFM animations or posters, this is a great tool to use for creating characters and testing cosmetics without having to load up SFM itself.SFM can be a bit bamboozling to some people though, and this can be a simple alternative for producing posters and/or wallpapers.

That sounds great! How do I get started?
The first thing you'll need to do is fire up your web browser (I recommend opening this website in a browser that isn't the in-game one available in the steam overlay. It gave me all kinds of nasty error messages last time and it wouldn't load, so you'll be safer using a modern, dedicated browser.)
Then, in the URL bar at the top, enter "loadout.tf" (without the " "), then press enter (or return).


The next thing you will want to do is select a class. Do this by clicking on the image that represents the class you want to select. Once you have selected it, the white background should turn blue. I'll pick Pyro and then we can get started.


To change the team of your character, click on the respective team logo in the top right hand corner of your screen. This will also change any team coloured cosmetics, skins and weapons you have equipped, but not any team-specific paints or killstreaks.
How do I give my character items?
To add items to your character, click on the add item button in the top menu.

A menu should pop up. This is where you can add new items and view your currently selected items. To add an item, simply click on it. As you can see, I have selected the Pyro's Beanie and the Flame Thrower, and they have a blue background to indicate that they are selected. This may take a few seconds to load, so go slowly! Choose the paint or killstreak you want for each item by clicking the small paint can on the image of the item.

War paints can be added by clicking the "init war paints" button.

To remove an item, you can either click on it again, or click on the smaller image up the top (not rocket science).
You can search for an item using the search field at the top if you can't find what you are looking for.

The buttons (eg. Filter per class) are able to be toggled on and off, and they pretty much do what they say on the tin, but here's a run down of their functions:
  • Show selected items only: This will only display the items you have selected.
  • Show workshop items: This will include some featured workshop items in the list, and you will be able to add these to your character. Note that these items are not available in-game.
  • Hide halloween restricted items: This will hide any item that has a halloween restriction. You can tell that an item is restricted because it has got a pumpkin on top of it.
  • Show festiviser: If you add a skinned weapon to your character, this will include the festiviser.
  • Filter per class: If toggled on, only items available for your selected class will be shown.
How do I add unusual effects?
To do this, you will need to go back to the menu at the top and click on the little flame icon.


This is pretty simple to use - click on one of the boxes that say "Add effect", "Unusual taunt", or "Add eye effect" and select the effect you want. The box that says bip_head will determine where the effect is displayed (for regular hat effects I recommend using the "head" area - not bip_head). the sliders allow you to manually adjust the position of the particle effect in each of the three axes. Move them around to get an idea for how it works and hit reset position if you want it to go back to the default position.

To add unusual weapon effects, head back over to the item menu and use the drop-down menu to select an unusual effect. This will be applied to any weapons you apply to your character from then on, but not your current one. To add it to your current weapon, simply select an effect, remove the weapon, the add it again.
How do I put my character in a pose and move him around?
Moving your character around is pretty simple - just click and drag while holding your mouse over them and they should rotate.
Posing your character is also very simple. Above the team logos, you will see a drop down menu - this is where you can select the pose/action you want your character to be doing. If you're not sure what one of the poses is, just click it. It won't hurt (seriously). The worst that can happen is that your character abruptly lies down for a few seconds.
The sliding bar below this menu shows the progress through the animation. Pause the animation by clicking the pause button in the top menu; play it again by clicking the play button.
I want to take a picture!
That's great!

Preparation & Options
First, use the options button from the top menu (look like a cog/gear) to bring up the options for taking pictures. Here, you will be able to change the background colour, toggle lighting, adjust the rotation, and alter the rendering options for characters and silhouettes. The FOV slider is a little bit like zoom, but it will also change your perspective too.
*Note that the options menu also contains the options for recording GIFs*

Taking the Picture
Now, the part you've all been waiting for. If you want a still image, click on the camera icon in the top menu, and you'll instantly get a PNG image of your loadout that you can download. If you want to make your creations move a little bit, loadout.tf does have several options for capturing GIFs of your characters. You will need to click on the cog again to record a GIF, and you have several options.
*Note that if the picture does not appear to have saved, it may be in your downloads folder - check there first. If it isn't there, use a different browser.*

Recording GIFs
To record one of the types of GIF, click on the "options" menu item; it looks like a cog. The GIF options are below the colour picker.

Record gif: This will start recording a GIF when clicked, and stop when clicked again. This is simple to use but isn't great for creating looping GIFs.
Record full animation: This will record one entire loop of whichever animation you have selected for your character. This is ideal for producing loops, but be aware that some animations are longer than others and will take a while to capture.
Record 1 orbit: Your character will spin around once (the website does the spinning for you), and that's what your GIF will be of.

PLEASE NOTE: Recording these GIFs will dramatically slow down your web browser for the duration of the capture. If you desire a faster capture and smaller file size, either shorten the animation, or lower the resolution using the drop-down beside the recording options buttons.


This is just one example of the monstrosities you can create using this tool.
Some quick things you can throw together
Thank you for reading!
Hopefully you now know everything you need to be able to find, equip, customise and capture your favourite cosmetics, dream loadouts, freaks of nature (looking at you, Pyro), and a myriad of smashing combinations that will make your mercenaries the envy of friend and foe alike.

In the extremely rare event that this isn't the case, please let me know by leaving a comment down below. I'll get back to you with an answer as soon as possible. Point out spelling and grammar errors if you are bored and I'll patch them up.
댓글 300
The real driving chicken 2025년 2월 27일 오후 9시 41분 
I want to change my team to blue
Park.Tsai_1990@QQ.com 2025년 1월 3일 오전 12시 41분 
I feel like this website has gone through multiple updates that removed some features because I remember there being a lot more animations to choose from
Snailimp 2024년 7월 12일 오후 9시 57분 
is there a way to a pose characters?
SomeSpookyDumbass 2023년 10월 13일 오전 9시 19분 
I can’t find the record gifs option I just see record video
raw maw 2023년 10월 6일 오후 2시 04분 
duly noted!
awesomedog7  [작성자] 2023년 10월 6일 오후 2시 03분 
@mossfan1
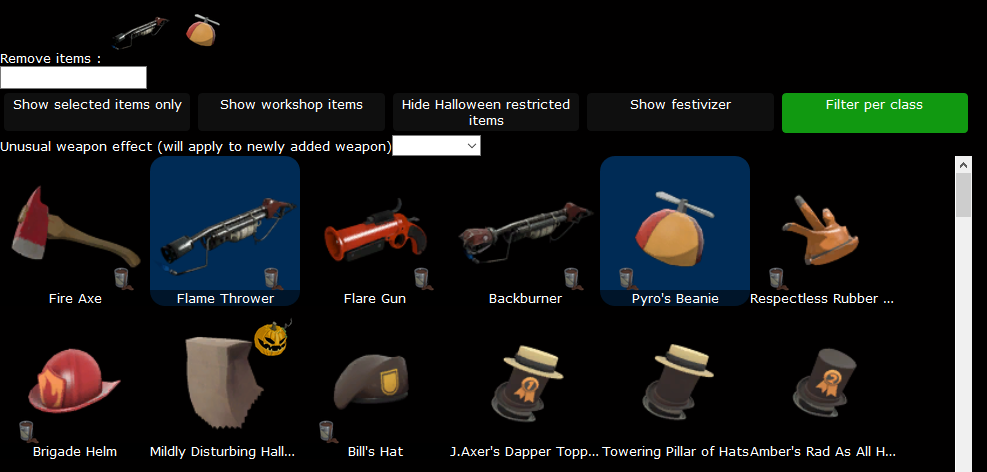
I'm not aware of a way to fix this sort of issue within loadout.tf. You'll need to swap out the weapon for one that does work with the taunt.
If you really want to combine a taunt with a different weapon, then it might be better to do so in Source Film Maker or something else.
raw maw 2023년 10월 6일 오전 2시 58분 
how do i make weapons not break with taunts they're not meant to be in?
Cure Happy 2023년 7월 11일 오후 6시 47분 
How do I make characters look straight forward? They always look at the camera.
Older versions of loadout.tf used to have characters look forward but ever since the update which updated how the eyes work that doesn't happen anymore.
Also, the move eyes left/right/up/down feature doesn't work properly.
debilusTF2 2023년 2월 28일 오전 3시 53분 
Hello ,how can we add the eyelander s 5head effect on our demoman s second eye? i v been looking in the effects menu but can t find it.
OutstandingOutcast 2023년 1월 15일 오전 7시 13분 
is there a way to change the position of like the helmets/hardhat etc or is there also an option to make the characater ubercharged?