Counter-Strike 2

Counter-Strike 2

191 ratings
How to add my own custom anime characters to my steam background.(教你制作steam动漫展柜)
By ❟❛❟ MCWILSON700❟❛❟
In this guide. It will help you to edit or add your own favorite anime characters binding your favorite steambackground.
You should atleast level 10+.

#How To Make A Custom Steam Artwork
#Custom Height Steam Artwork Showcase
#How to make Profile artwork with 2 steam showcases
#Create Steam Background Showcases
   
Award
Favorite
Favorited
Unfavorite
Introduction
This is the result of custom anime characters. If you're not into anime just get out of here.
you're not belong here anymore. This is only for weeaboo's. I dont not own infinite height.
The only thing here is to help how to add custom anime to there own steam background.
The background should be plain or a landscape.

これは、カスタムアニメーションキャラクターの結果です。あなたがアニメや日本の文化を楽しんでいないのならば。 ちょうどここから出てください。 あなたはここに属していません。私は無限の高さをアップロードするガイドを所有していません。ここで唯一のことは、独自の蒸気背景にカスタムアニメを追加する方法を手助けすることです。

这是成果图。如果你不喜欢动画和日本文化,请点返回,你不属于这里。我没有义务帮助每个人制作。 我唯一能做的是教你自己制作steam展柜背景。

My Profile

What background should I use?
You should use the plain background.

プレーンな背景を使用する必要があります。

你必须使用背景透明的图片。

like this.


Find your background. There's a lot of pretty cool background. Find it here.

あなたの背景を見つける。 クールな背景がたくさんあります。 それをここで見つけてください。

steam库存中查看你背景的完整图,链接里有一些比较好看的背景,推荐你使用这些。
http://steamcommunity.com/sharedfiles/filedetails/?id=679503310
Like here


step 1
Go to your steam inventory. Select your background and click fullsize.

あなたのスチームストックに行ってください。 あなたの背景を選択し、フルサイズをクリックしてください。

去steam库存。 选择你的背景并单击完整大小。


Right click and click copy image address.

右クリックし、[イメージアドレスのコピー]をクリックします。

右键单击,然后单击“复制图像地址”。


Go to Steam.design and paste the url. Click change BG (Background)

"steam.design"に行きURLを貼り付けてください。 BGを変更をクリックします。

转到背景裁剪并粘贴网址。 单击更改背景(BG)
Step 2
Click toggle long image.

「長い画像を切り替える」をクリックします。

点击“切换长图像”。


And click Download Zip.

次に、[zipをダウンロード]をクリックします。

然后单击下载zip


Open the files.

ファイルを開きます。

打开文件。


Step 3
Open windows paint.

開いた窓のペイント。

打开windows自带的画图工具或者其他能裁剪图片的都行。


and click resize .

サイズ変更をクリックします。

并点击调整大小。

Horizontal(宽) :610
Vertical (高): 808


Open the avatar_middle. use CTRL+A and copy it.

"avatar_middle"を開きます。 Ctrlキーを押しながらAキーを使用してコピーします。

打开“avatar_middle”。 使用Ctrl + A全选,再Ctrl + C复制。


And paste it to the untitled paint you made before.

それをあなたの無題のペイントに貼り付けます。

粘贴到另一个副本中。


Do the same with avatar_left.

「アバター・レフト」と同じ操作をします。

对“avatar left”执行相同操作。


Paste and fit the left side.

左側を貼り付けてください。

粘贴并贴合左侧对齐。
[Note] The image should between 4pixel.

[注意]画像は4ピクセル以内でなければなりません。

[注意]图像必须在4像素内。


And save it into jpg or png.

jpgまたはpngとして保存します。

保存为jpg或png。
Step 4
The anime picture should be transparent. Just like this.

アニメの画像は透明でなければなりません。 ちょうどこのような。

图像背景必须是透明的。就像这个。


Go to "pixlr.com/editor" . Open image from computer. resize it if it's not fit in the background.

pixlr.com/editor」 にアクセスしてください。 コンピュータから画像を開きます。それが背景に収まらない場合はサイズを変更してください。

打开 pixlr.com/editor 。 从计算机打开图像。如果在背景中不匹配,请更改大小。


The size should be fit to the background.
common size is 800height.resize it if it's not fit in the background.

サイズは背景に合わせるべきです。
一般的なサイズは、背景に収まらない場合は800 height.resizeです。

大小应该与背景匹配。
一般的大小是800像素高,如果它不匹配背景请重新裁剪。


Open the image of the background we edited.

私たちが編集した背景の画像を開きます。

打开我们编辑过的背景图像。


Click layer, open image as layer select your custom anime characters.

レイヤーをクリックし、画像をレイヤーとして開き、カスタムアニメーション文字を選択します。

单击图层,打开图像作为图层,并选择你的人物图。


Click Files and save it into jpg. turn it into 100% quality.

ファイルをクリックしてjpgに保存します。 それを100%の品質に変えてください。

单击该文件并将其保存到jpg。 更改为100%的质量。


Step 5
Open our finished product as paint.

完成した製品を塗料として開けます。

用“画图工具”打开成品。


crop it and paste it to the new paint (plain)
middle should be 506x808 and left should be 100x808.

把多余的白色边框裁掉,中间的图片必须是606x808,侧边的图是100x808。

How to upload my custom artwork?
Just go there and follow this guide.
看这个介绍
http://steamcommunity.com/sharedfiles/filedetails/?id=748624905
Here's a video(这里有视频教学)
14 Comments
wuiopy Jul 20, 2021 @ 9:08am 
Part II:
var num= document.getElementsByName("image_width")[0].value;
document.getElementsByName("image_height")[0].value = num-(num-1);
document.getElementsByName("image_width")[0].value= num*100;
(After keying in the code, press Enter, if the result shows 0, please check if you didn't follow the steps mentioned above. If the result is not equals to 0, confirm the declaration and press upload)

After uploading the images or GIFs you wanna display on your profile, you may proceed selecting them and make your profile looks noice...

Website To Upload Artwork:
https://steamcommunity.com/sharedfiles/edititem/767/3/

Handy Website & Software:
Online Image Editor : pixlr.com/editor (For cropping static images, remove BG etc.)
Online GIF Editor: https://ezgif.com
Nice Website To Obtain GIFs You Want: https://www.tumblr.com
Capture GIFs & Edition: ScreenToGif
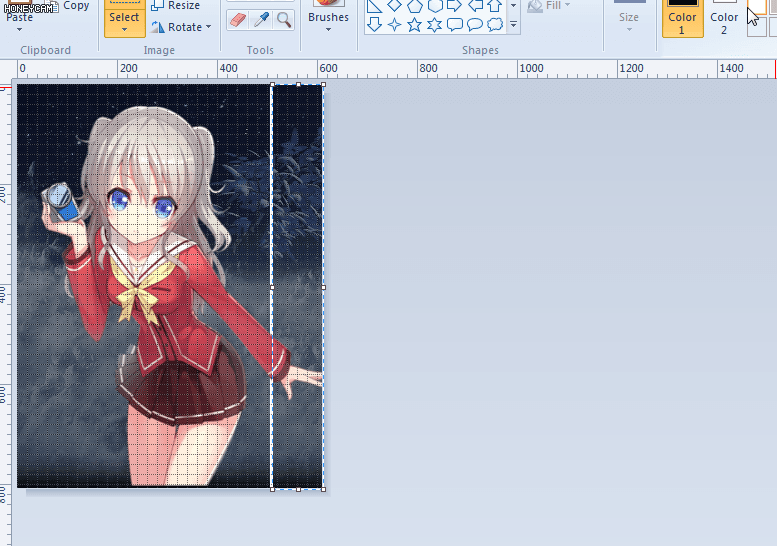
wuiopy Jul 20, 2021 @ 9:08am 
[Screenshot] (This method is only for uploading GIFs, not for static images)

Pixel Size:
All the same as the Artwork.

Code Used: (Jul 2021, Press F12, For Google Chrome Console)
Part I:
document.getElementsByName("file_type")[0].value= 5;
(Key in the code after selecting the GIF you want to upload to artwork, yes, it's the same place you gonna upload the GIFs, not the "Screenshot". Before you declare it's your work and complete the upload process)
(After keying in the code, press Enter, if the result shows 0, please check if you didn't follow the steps mentioned above. If the result is not equals to 0, then proceed to Part II)
wuiopy Jul 20, 2021 @ 9:08am 
Hi guys, this is a summary I made, I think it will help you.
To make your profile looks noice...
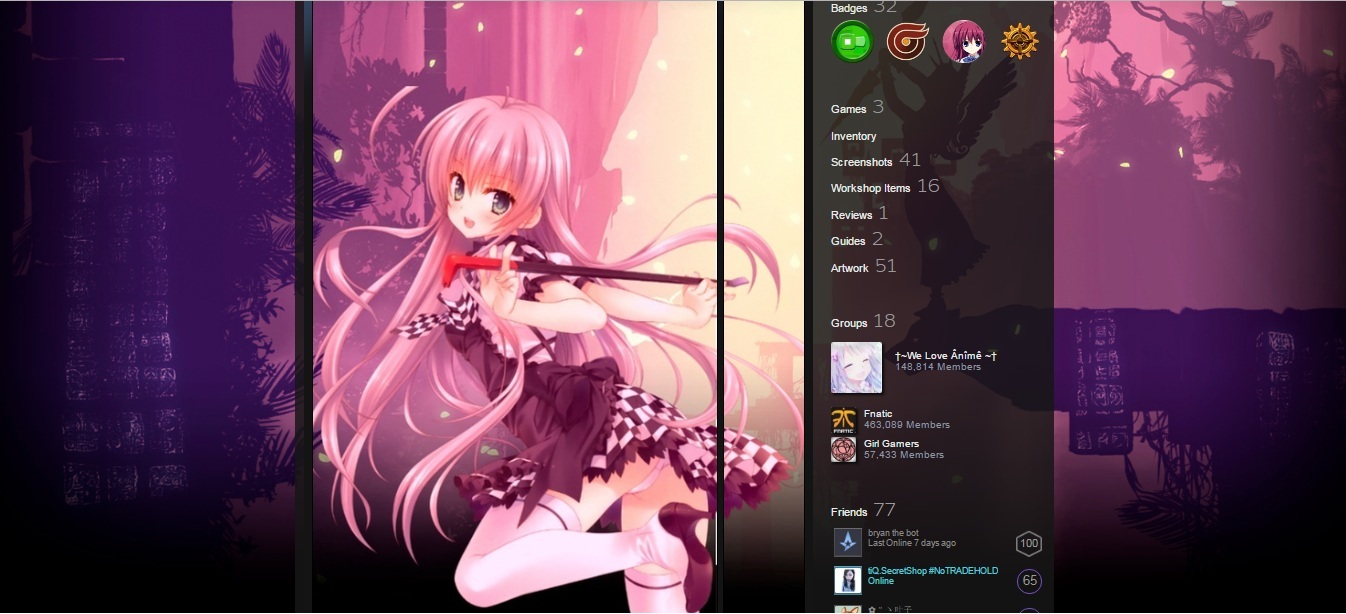
[Artwork]

Pixel Size:
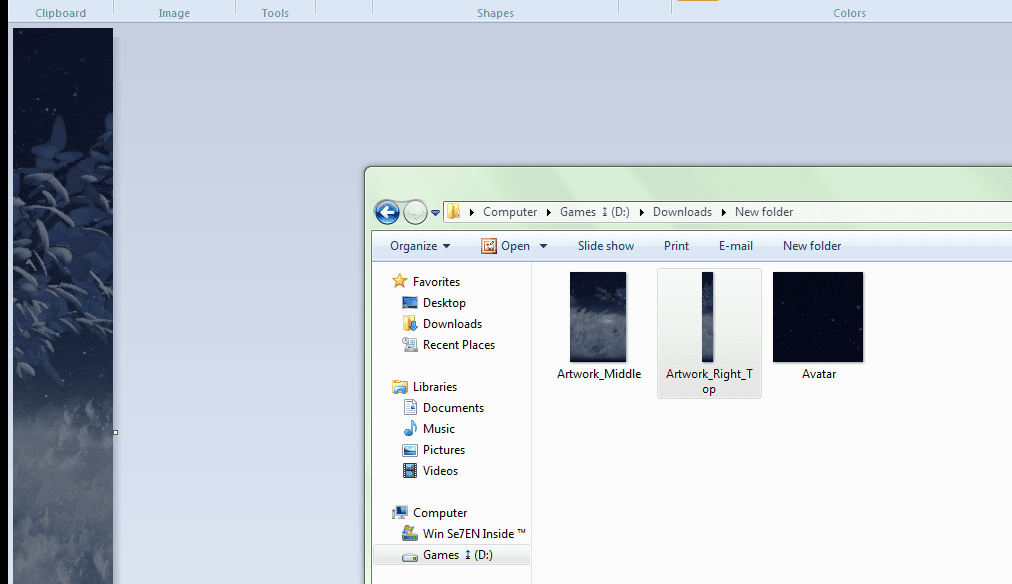
610X808 Original Canvas Size
506X808 Left-side Image
100X808 Right-size Smaller Image
(606 vs 610 = 4 Pixel Gap In the Middle)

Code Used: (Jul 2021, Press F12, For Google Chrome Console)
var num= document.getElementsByName("image_width")[0].value;
document.getElementsByName("image_height")[0].value = num-(num-1);
document.getElementsByName("image_width")[0].value= num*100;
(Key in the code after selecting the image you want to upload to artwork, before you declare it's your work and complete the upload process)
(After keying in the code, press Enter, if the result shows 0, please check if you didn't follow the steps mentioned above. If the result is not equals to 0, confirm the declaration and press upload)
jplie 🌸 Aug 8, 2019 @ 2:16am 
Nice guide
dog 先生。赃物老板 Sep 28, 2018 @ 9:59am 
noice
:hardhat:
Kim Da-hyun Jul 1, 2018 @ 3:34am 
I used this guide but after that, I viewed my profile using my smurf account and my artwork became blurred and has this "Contents may not be appropriate for all audiences" thing. Can someone help to remove that sh*t?
Putechi Apr 18, 2018 @ 11:45pm 
HI, I can't find the toggle long image button, instead there is a cuztomize cropping button.. what should i do?
❟❛❟ MCWILSON700❟❛❟  [author] Apr 8, 2018 @ 1:40am 
if you follow the procedure, there would be any problem.
v1 Apr 7, 2018 @ 11:33pm 
when i paste the animed on artwork the white background was not delete.