Unturned

Unturned

29 ratings
How to Mod Unturned: A Definitive Guide
By BlueFireExplosion
This guide will encompass the needed steps to create any type of mod for Unturned. The guide will be suited for both Mac OSX and Windows operating systems. Content will be updated or added as needed.
   
Award
Favorite
Favorited
Unfavorite
An introduction to Blender
Blender and You as a Potential Modder

Blender will be your best friend during your time creating mods. Although Blender can have it's challenges, such as a steep learning curve, it has many pros, such as being a free application and being able to export into other file types, which we will be essential in mod creation. Below is a little cheat-sheet of sorts in case you forget or haven't learned the essential keybinds and controls of Blender yet.

Selection and Editing Modes


X - Used to delete.

A - Used to select or deselect items in the scene.

Tab - Used to switch between Object Mode and Edit Mode.

C - Used for selection of multiple objects at once. This will be covered in more detail later.

Z - Used to toggle wireframe mode on and off. This is useful to select both sides of a shape.


Navigation and Movement


Scroll Wheel - Used to zoom in and out of the scene.

Scroll Button - Used to rotate the perspective up and down.

Scroll Button + Left Shift - Used to move up, down, left and right in the scene.

5 on the Numpad - Used to select a perspective before pressing the perspective key.

Numpad 3 - Used to change the camera angle into flat mode, useful for mapping out objects.


Object Editing


Left Control + A Allows for the selected object to have a set scale and rotation when imported.

Left Control + J Allows for the selected objects to be joined, making them act as one.

S - Used to change the size of the object, easily remembered by "S is for shrink".

G - Used to pick up objects and drag them around, remembered by "G is for grabbing".

R - Used to rotate objects, easily remembered by "R is for rotate".

R + Scroll Wheel Button Allows for rotation to be snapped to the X,Y, and Z axis.

Numpad 3 - Used to change the camera angle into flat mode, useful for mapping out objects.


That concludes the most essential keybinds and commands required to create the 3D Models for your mods. I have included an image of the map below if you need a visual layout of the keybinds. Note I haven't covered every keybind in Blender, as it would be stupid to confuse users who are new to Blender with countless information they will never use themselves.


Keybind Chart (UK Keyboard layout shown, nearly identical to US Keyboards)


All rights reserved to Kats Bits for the creation of the keyboard layout graphic.


An Introduction to Photoshop (CS4/CS5)
Using Painting Tools to Design Textures


One of the most important aspects of your mod is how it looks. If your shirt looks just like the others, what makes your mod special? In order to create the textures we will need to give our mods the color and personal touch it needs we will have to use some sort of graphic design tool, like Photoshop, Manga Studio, or any other photo and image design tool. While MS Paint (Microsoft Studio Paint) will work for most of the steps of texture creation, it is a much better alternative to purchase yourself a copy of Photoshop, as I highly recommend it for any sort of image creation or art projects.


Important Tools for Texture Creation (Photoshop)


The Paint Bucket - While many people are laughing that I included this, I'm sure theres someone somewhere who doesn't know how to use the paint bucket. For those unlucky few, the paint bucket is used by first selected the paint bucket icon (Shown below), and then clicking where you want the paint to go. Color can be selected in the top right, signified by the rainbow spectrum.


Paint Bucket Icon


Rectangle Marquee Tool - The rectangle marquee tool is by far one of the most important tools in texture making. You can use it to select the area where the paint or brush strokes will go, effectively allowing for your texture to be seperated into different color squares, essentially making it into a functioning texture. A texture isn't a texture without at least two different colors. To use, simply select the icon and drag a box that fits the area you want to fill. Click again with the tool to remove the marquee.

Rectangle Marquee Tool Icon


Exporting Images - When you finish with that beautiful texture, you're going to want to export it in a format other than .psd, which stands for Photoshop Document. In order to do this, we want to utilize the "Save As" function in Photoshop. Click the "Save As" under "File" and look for the option to change file ending (It's above the file name). Select .png, or Portable Network Graphics image, and export your texture to somewhere where you can find it easily.


And that takes care of the basic tools you'll be using in Photoshop to create your textures. For Paint or MS Paint users, don't worry. The tools discussed above will most likely be available in whatever software you are using, and the instructions will apply. However, do take note that your document Must be in .png format so that you will be able to make use of translucent textures, which are essential for shirt and pants textures.
Weapon Mod Tutorial I: Making a Model
Getting A Model

As a modder, it's perfectly acceptable to not create the models you use, as long as they are properly cited and given rights to the work. This can be easily done by saying something like "Thanks to *Model Creator* for the Use of This Model" at the bottom of your Steam page. Do not, however, take work that is not licensed for use. Websites like Thingiverse are perfectly acceptable, and offer a plethora of models for use.


Making Your Own Model

If you choose to make the model yourself, watch these videos by Shift below. He helped me get a much better understanding of Blender, and demonstrates the proper creation of a model well. It also teaches many of the helpful keybinds I discussed earlier.


Weapon Tutorial Part 1 By Shift


Weapon Tutorial Part 2 By Shift


I haven't included the other two simply for sake of time, but you can easily find them on his channel.


Weapon Mod Tutorial II: Texturing A Model in Blender
Making the Texture for Your Model
Using Photoshop CS4 and Blender

The first step is to create a new Photoshop document, with a 128x128 resolution. Leave all other settings at their defaults.


Once you've created your image, click on the rectange marquee tool and have it selected. You will know when the tool is selected when your cursor changes to an image of the rectange marquee tool.


Drag a box with the rectangle marquee tool which encompasses (encloses) about half of your image. Next, select the paint bucket tool. Choose the color you want at the top right in the rainbow slider, and click anywhere in your dotted line box to fill the area. Now, click on the rectangle marquee tool again. Once it is selected, click anywhere on the image to reset your box. Create another box, but this time have it enclose the side of the screen you didn't paint last time. Now, repeat the steps you just did earlier to fill this area with your preferred color. You now have your texture!

Putting Textures Into Blender

Click the "File" option at the top right of the screen.
Weapon Mod Tutorial III: Exporting the Model into Unity
Preparing the Model for Export

The first step to prepare our model for Unity is to decrease the complexity of the model. Doing this will not only make the model look more Unturned like in appearance, but will also allow for less frame rate decrease when the model is spawned or used. There are many different ways to do this, but the easiest way is to use the Decimate feature of Blender.

How to Decimate your Model

First, you're going to want to look to the right side of your Blender screen, with your model selected (A key). You should see a row of icons below the hierarchy of your project. Click on the image of a wrench (Shown below) to enter the Modifiers catagory.
Location of Icons Row


Modifier Icon


An Image of the Modifier Category


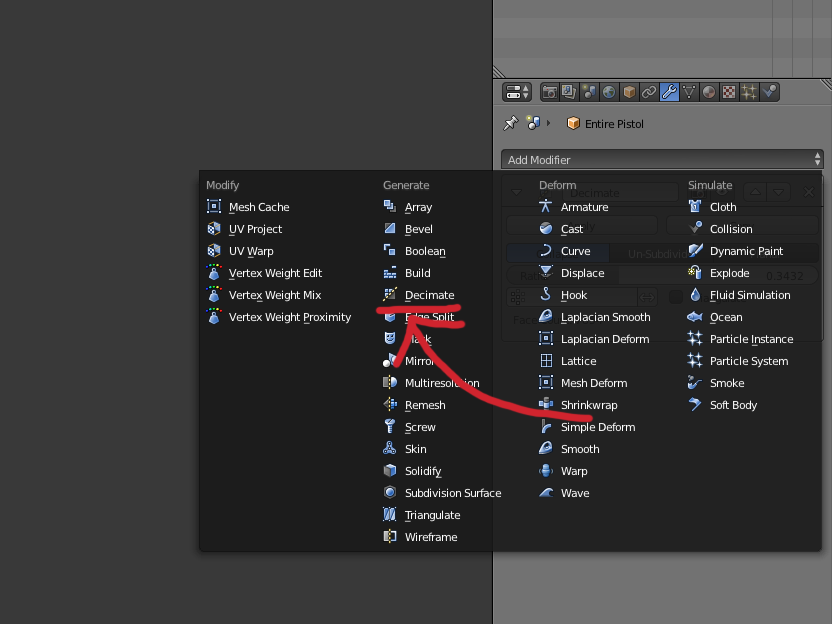
Once in the modifiers category, click the "Add Modifier" button and select the Decimate option from the selection that appears.

An Image of the Modifier Options


Once you have the decimate modifier enabled, you will need to pay attention to the "Ratio" meter at the near bottom of the Decimate box, as well as the "Face Count" number. For those who don't know, face count is how complex your model is, measured by the amount of faces it has. By lowering the Ratio, you decrease the number of faces, which then lowers the owerall complexity of your model. A warning: It is important not to decimate your model less that about 0.1 if you have detailed textures such as stripes or other decals on your model. Doing so will cause the texture to become disfigured and look incorrect. If your model only consits of 2-5 different colors, you do not need to pay attention to this message. This is one of the cons to downloading models off of the internet. Always take a lower poly version of a model over the higher poly, as there is absolutely no need for extremely high resolution models in Unturned, they would look out of place. Once you have simplified the model to your liking (10k or less faces is a must for Unturned as more will lag out your game), you are going to want to enter Edit Mode (Press Tab). When you are in edit mode, press Control + A and select the option "Rotation and Scale" at the bottom of the menu which appears. Do not press Location, as this will mess up your model when you import into Unity 5. Once you have done this, check your model in texture mode by navigating to the near bottom left of your screen where the words "Object Mode" or "Edit Mode" will be.

Solidifying your Model
For models which have interiors, such as vehicles, buildings, and other objects, a Solidify modifier is necessary so that the interior will have a texture and won't be invisible. In order to do this, follow the same instructions as for decimation but this time select "Solidify" instead of "Decimate". You're going to want to play around with the settings some, as depending on your model you may want the decimate scale to be higher or lower. At least a little solidification is usually enough, but adding more can give your model an interesting look.
The Modify Options List

The Mode Selector Box


Change the mode to Texture Mode, and inspect your model for any incorrectly placed textures. When you feel satisfied with your model, begin the next step.

Importing your Model into Unity 5

If you do not already have Unity 5, install it here[store.unity.com]. Choose the personal edition and download the application.

Making a New Project

Open Unity, and select the "New" button at the near top right. You don't have to name your project if you don't want to, but I recommend it in order to keep track of your files.

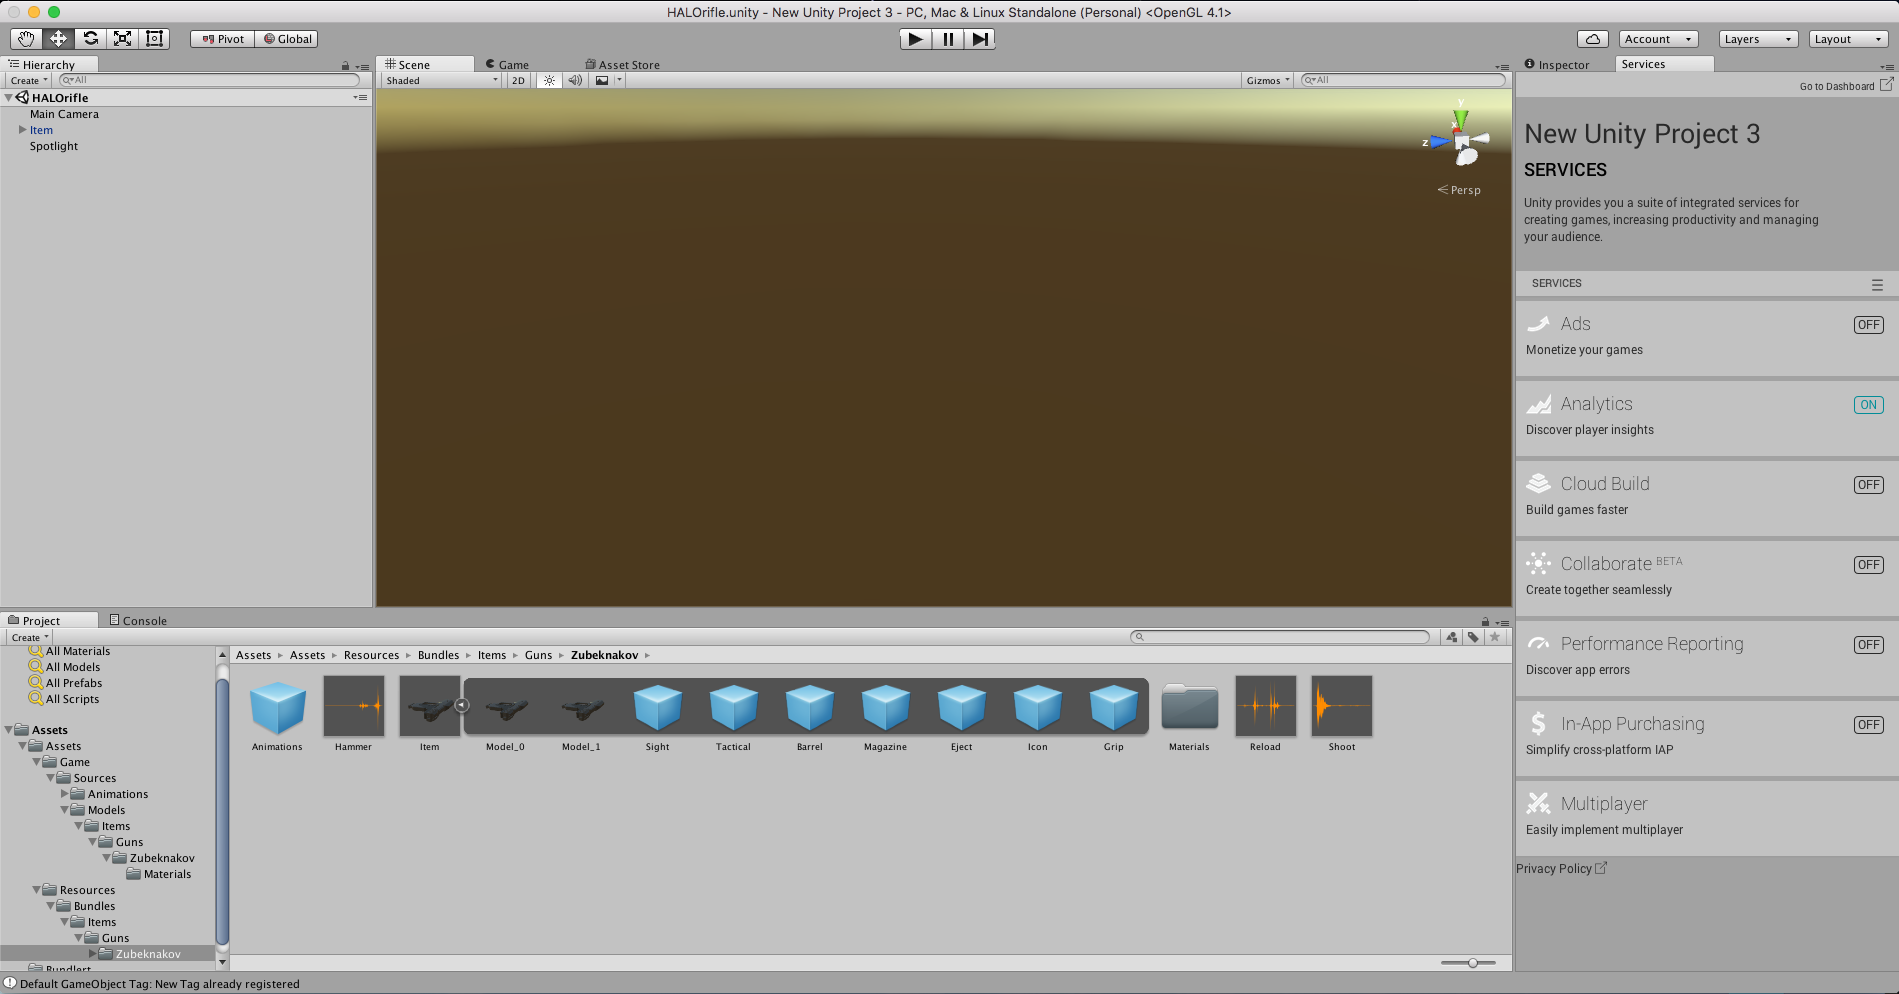
What A New Project Will Look Like


Once you've opened your new project, navigate to the top right of the screen, where you will find the Inspector and Services tabs. You will be default in the Services tab, you want to switch yourself over into the Inspector tab in order to edit the objects.


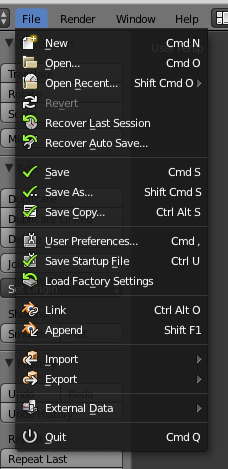
Now, we will actually move the model into Unity. Go back into Blender and select "File" at the top of the screen.


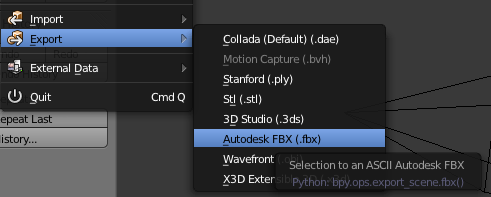
Click the "Export" option and select the Autodesk FBX .fbx file option.


Name your file "Model_0" and save it to your Desktop.


We will actually put the file into Unity in the next step.
Weapon Mod Tutorial IV: Utilizing Example Files
Nelson's Example Files and How They Can Help You

In the Unturned game files, a folder called Sources can be found (Exact location below). Inside of this folder are some extremely important files called .unitypackages. These files are pretty much archives which contain project data. In other words, these files will serve as a exact example of what your finished mod will look like. Since we will be using these files as well as the bundletool.cs file, you want to give credit to Nelson at the bottom of your workshop submission file. This is the most simple way to create mods, as the other ways require much more effort and education on using Unity. I'm choosing to teach this method because it will require almost no real knowledge of Unity and it's workings. If you want to choose the more complex method, this tutorial is not for you.

Mac OSX
/Library/Application Support/Steam/Common/Unturned/Bundles/Sources/Examples

Windows OS
C:\Program Files\Steam\Common\Unturned\Bundles\Sources\Examples

Installing the Bundler Tool

In the Bundles folder, locate the folder Sources. Then find the folder called Tools. Inside you will see a document called "README.TXT" and ''Bundletool.cs''. Go back into your open Unity project, and right click at the bottom of the screen and select create, than Folder. Create two folders, one called Assets and one called Bundler. Go back into your computer files, and drag the bundletool.cs file into the Bundler folder. You will know when the folder is selected by it being highlighted in blue. Once the bundletool file is installed in the Bundler folder, go and click 'Window'' at the top of your screen (At the top of your computer screen not Unity, but still with Unity selected). Click on "Bundle Tool" in the drop down menu and it will open a small window next to your main window. This window should have two options: grab and bundle. We won't be using this yet, but later in the tutorial. Now comes the important part, installing the specific tutorial file that you need.

The Correct Example File For You

Going back to the Sources folder, navigate into "Examples" this time. Since we are doing a weapon tutorial, select the "Gun.unity3d" file and drag it onto your Unity project. When you see the green plus icon you can let go of the mouse and it will select the file for you. A window should pop open, explaining to you what the file contains, with a small button saying "Import" at the bottom. Click this, and your file should import. Once it finishes, you are now almost ready to start the creation process in Unity. But before we do that, some organization should be done to separate the "Bundler" folder from the "Assets" folder. To do this, we will first create a new folder (Right click). Once you have created a new folder, press "Return" with the folder selected and rename the folder to "Assets". As a check to make sure everything imported, you should have two new folders besides "Bundler" and the "Assets" folder you just created. These two other folders should be called "Game" and "Resources". If you don't see these folders, make sure you are in the original "Assets" folder that all of your game files are located in. This is the highest folder, with all the Project files being in there. If you cannot find it, check in the "Models" section to see if any files show up in there. If they do, than your imported data is misplaced, and you will need to locate it. If not, then drag the file into Unity again and select "Import" as before. Once you have the Game and Resources folders, drag both of these into the "Assets" folder you just created. Make sure when you bundle later to select the "Assets" folder next to the "Bundler" folder, and not the "Assets" folder which is containing the previous folders. It's not too much harm if you do, but I wouldn't recommend it.

ADD IMAGE HERE

Now that we have all of the files we need, these files need to be tagged and layered. This will be covered in the next section.
Weapon Mod Tutorial V: Tags, Layers, and Objects
How Unity uses Tags

In just a few words, tags are simply labels which define what Unity interprets the files to be. Without tags, Unturned has no idea what exactly these files do, and either incorrectly tagged or untagged items will cause your mod to crash or error when used, making it broken. Unturned uses around 30 tags and layers to label it's objects, and each specific item or object will have it's own tag and layer to determine what the object does in context. The naming of objects in the hierarchy is also extremely important, as the names also tell the game exactly what the object does in each tag and layer category. For example, the tag and layer "Vehicle' don't tell the game exactly what this section of the vehicle is, but having the object named something like "Headlights" would tell the game that the object is Headlights, and it will then treat the object like so.

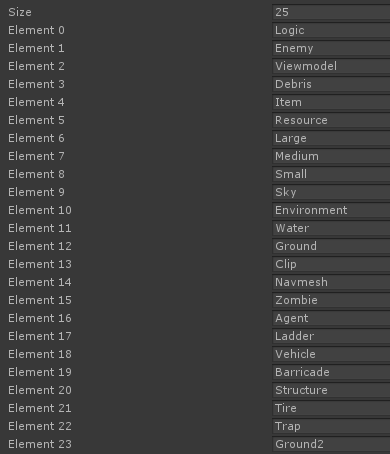
The Original Tag List, From Nelson Himself


How Unity uses Layers

Layers function almost exactly like tags, being a labeling system which is used to mark what different objects in your Scene do. In fact, the name of each tag doesn't matter at all, but the actual number for the tag and label matter much more because this is what the system actually looks for. You can name the tags and layers whatever you want, but I would personally recommend you to name them as they are named in the Tag and Layer images shown. This way, you will be able to remember exactly what each tag and layer is for and how you use them. Names like "Vehicle", "Ground", and other things are reasonably intuitive as to what each of these tags and layers stands for. In order to tag or layer an item, select the item in either the scene or the project manager menu. Navigate to the top of the inspector tab, and look for two different boxes. One should be labeled "Tag" and the other should be labeled "Layer". Select the Tag box first and navigate in the drop down menu to the "New Tag" or "Add Tag" option at the complete bottom of the drop down menu. Select this option and you will be taken to a window which will show a Tag list and a Layer list. The tag list should be completely empty, albeit for a plus icon to add new tags. The layers menu will have around 30 open slots and around 10 locked slots. You are going to interested in the open slots. Refer to the layer and tag images below and fill out both the tag and layer lists. Every time you will create a new project you will have to add these again, so once you have in memory what tags each type of mod will need, you can strategize your tagging and only add tags and layers which your project needs, without any of the other ones. Doing this will save you gratuitous amounts of time if you decide to make a new project for each mod, which I would recommend simply so you can update your mod content if needed without having to recreate it. Once you bundle that file, unity3d files cannot be unbundled or opened and only work with Unturned. Once you have all the tags set up, refer to what each object was originally called in the Tag section (Tag and layer names are always the same) and tag them accordingly.

Objects in Unity

Objects are what Unity uses for pretty much everything. An object is some sort of device used by the game, whether it be a Mesh or a Light. Anything that you see in the project menu would be considered an object. To rename an object or anything else, highlight it and press "Return". This will allow you to rename the object. Remember that when you rename objects the model name does originally matter since it is what Unity uses to define what the object does.


The Rest
This video I made should get you the rest of the way there!


Setting Origin and Rotation in Blender

How to Make Glowing Sights in Unity
https://youtu.be/KIkPxKUqBmo
19 Comments
Kuyosa Mar 18, 2021 @ 5:46pm 
What version of unity was this made in?
DonZekane Jun 30, 2020 @ 8:54am 
Nothing about IDs?
How am I supposed to know what IDs are used by other mods?
Also how do I give the gun an ID, for that matter!?
(I'm only "learning text" for now)
Shinra Dec 20, 2019 @ 7:38am 
Me: I wonder if this still works.. how old is it?
OP: Photoshop CS4
Me: aight gotcha, old
pickle Dec 13, 2019 @ 2:14pm 
great tutorial!
BlueFireExplosion  [author] Feb 7, 2018 @ 12:02pm 
I really do need to update this
shmev Feb 7, 2018 @ 10:52am 
Please make a tutorial on how to make custom items example custom currency.
Conradical Nov 20, 2017 @ 11:21am 
@BOT Blue
There are no exmaples called "Item"
BlueFireExplosion  [author] Nov 20, 2017 @ 10:38am 
Item
Conradical Nov 19, 2017 @ 9:44pm 
@BOT Blue
I am just trying to make a simple craftable currency. What item does that specify as in Nelson's Unity examples?
brian Jul 1, 2017 @ 12:19pm 
The videos don't show up for me.