The Long Dark

The Long Dark

252 ratings
Clothing Comparison Guide and Sets
By Liliel
A guide with a comparison table for the warmth/weight value of all clothing items in the game. Includes premade sets for different purposes in the game and tips on what the most valuable clothes in the game are. v.1.05
3
4
3
   
Award
Favorite
Favorited
Unfavorite
Overview
Hello and welcome to my guide for The Long Dark!

The purpose of this guide was originally to create a handy cheat-sheet for myself to quickly plan different clothing sets fit for different activities withing the game. After I saw a bit of effort to actually make it, I figured other people would also find it useful!
This is especially useful for newer players who might be overwhelmed by the sheer amount of clothing items now in the game and not sure what stats to focus on.

The first section of the guide illustrates the clothing menu currently in-game and explains most of the mechanics of the clothing system.
The meat of the guide is in the comparison chart I've made, it's a simple chart where the warmth and weight of items is used to calculate which items are technically the most valuable. Updated with different tables for the outer and inner layers.
After that I've added a section where I point out some of the "outlier" items; clothes that are very warm for their weight and seem like a clear winner over other items.
And lastly I've added sections with some of my pre-designed sets that I use myself, with stats included and explanations what I'm looking for when making them.

UPDATE NOTE: Updated version of the first section going into outer and inner layers, new separate tables for both, new and improved sets!

Special thanks go to Soldiex for his guide "Parameters of clothing in The Long Dark" which was invaluable in my calculations and planning.
Clothing basics

In the current version of the game, worn clothing is managed through this equipment screen.
The clothing you put on is also visualised on your character, showing you quickly which parts of the body are left vulnerable to frostbite.

Circled in yellow are the slots that make up the Outer layer of clothing, which are the only clothing items adding to your windproofness and protection values. The outer layer of clothing is also the one your character is visualized wearing on the screen. Also consider which clothes overlap, since the character in the picture is wearing a jacket, both the slots for shirts end up as Inner layer clothes, offering less overall benefits than they would without a jacket on.

The head, coat, shirt, pants, underpants and socks slots offer you the ability to layer your clothing, so you can put any item belonging to that slot in both.
Want variety? A hat and scarf works, but two hats on top of each other is just as valid!
It's also always possible to leave a slot empty, and with the duplicate slots this doesn't expose you to frostbite. This is mostly useful when you want to lighten your carried load, but for maximum warmth all slots need to be in use.

The stats you see on the clothes are basic warmth bonus and windproofness. These are calculated to affect your character's "Feels like" temperature, with warmth being the more versatile of the two since windproofness only reduces windchill temperatures.
There's also water-resistance; the higher it is the slower that item becomes waterlogged.
Protection affects how much the clothing items protect you from damage, for example during animal struggles.
And lastly there's mobility; the higher the percentage the more it's taking away from your overall sprint bar. This is always visualized in the equipment window's lower left corner for the items you're currently wearing.

A basic mechanism to keep in mind is that the bonuses from clothes aren't only determined by the item type, but also it's condition.
The worse an item's condition is, the less warmth bonuses it affords the wearer. Weight is unaffected by condition. This sometimes results in technically worse clothing being better to wear if your high-end clothes are all falling apart.

Seen in this picture is the mechanism of clothing wetness. Clothes have an innate water-resistance stat, and as they're worn they become more saturated with water, illustrated in the image as the solid blue coloring filling over the icon. Finally at 100% they begin freezing, in turn represented on the icons as a lighter textured blue filling over the icon.
Wet and frozen clothes weigh more and progressively lose more of their warmth bonuses.
You don't need to fall into water to get wet clothing either, your clothing gets wet as you venture around the world.
Item value calculations
And here's the guide's main point. All clothing items in the game placed in ranked lists according to the slot they occupy on the character.

The value is based on a very simple calculation, where for the outer layer I added the item's warmth and windproof bonuses for an overall warmth value, then divided that with the item's weight. For the inner layer, only the warmth stat was used. This results in a list where you see the items ranked according to how much their warmth bonus is worth, and which items would be the warmest if they were all equally heavy.

The values are calculated based on all items being at 100% condition.

The formula itself is rather simple, meaning the list isn't completely valid at face value, since with the way the clothing in this game is designed this heavily emphasizes lighter clothing.
But the list is very useful in detecting which clothing items really shine in their category and which are the bottom of the barrel.

For detailed item stats go see Soldiex's guide here.
Item Charts
Head:
Outer Layer
Inner Layer
Value
Item name
Value
Item name
15
Cotton toque
10
Cotton toque
15
Wool scarf
10
Wool scarf
14
Balaclava
8
Balaclava
12
Wool toque
8
Wool toque
10
Fleece cowl
6
Fleece cowl
10
Long wool scarf
6
Long wool scarf
5
Baseball cap
5
Baseball cap
5
Cotton scarf
5
Cotton scarf

Hands:
Outer Layer
Value
Item name
15
Wool mittens
10
Fleece mittens
10
Driving gloves
6
Work gloves
4
Rabbitskin mitts
4
Gauntlets
4
Ski gloves

Coats:
Outer Layer
Inner Layer
Value
Item name
Value
Item name
7
Windbreaker
2.7
Expedition parka
6.7
Expedition parka
2.5
Urban parka
4.5
Urban parka
2
Down vest
4
Ski jacket
2
Ski jacket
4
Light shell
1.7
Mackinaw jacket
4
Down vest
1.6
Simple parka
3.5
Mariner's pea coat
1.5
Mariner's pea coat
3.2
Simple parka
1.5
Military coat
3
Old-fashioned parka
1.5
Old-fashioned parka
3
Mackinaw jacket
1.3
Wolfskin coat
3
Military coat
1.2
Bearskin coat
2.7
Wolfskin coat
1
Windbreaker
2.2
Bearskin coat
1
Light shell
2
Sport vest
1
Sport vest

Shirts:
Outer Layer
Inner Layer
Value
Item name
Value
Item name
7
Fisherman's sweater
4
Fisherman's sweater
6
Thin wool sweater
4
Thin wool sweater
6
Sweatshirt
4
Wool shirt
6
Wool shirt
3
Thick wool sweater
6
Dress shirt
2.5
Cowichan sweater
5
Thick wool sweater
2
Sweatshirt
4.5
Cowichan sweater
2
Dress shirt
4
Hoodie
2
Hoodie
4
Plaid shirt
2
Plaid shirt
2
T-shirt
2
T-shirt

Pants:
Outer Layer
Inner Layer
Value
Item name
Value
Item name
4.5
Snow pants
2.7
Combat pants
3.4
Combat pants
2.5
Snow pants
2.7
Cargo pants
2
Cargo pants
2
Deerskin pants
2
Jeans
2
Jeans
1
Deerskin pants
1.7
Work pants
1
Work pants

Underpants:
Both Layers
Value
Item name
4
Wool longjohns
4
Thermal underwear

Socks:
Outer Layer
Inner Layer
Value
Item name
Value
Item name
8
Climbing socks
6
Climbing socks
3
Sports socks
3
Sports socks
2
Wool socks
2
Wool socks

Shoes:
Outer Layer
Value
Item name
3.3
Insulated boots
3
Mukluks
3
Leather shoes
3
Running shoes
2.3
Deerskin boots
2
Work boots
2
Trail boots
1.8
Ski boots
1.3
Combat boots

Accessories:
Wool Ear Wrap : Outside 6 / Inside 4.
Analysis and outliers
What do you do with that information? Well, let's look at all the sections and see what useful knowledge this gives us.

Head
The values on many of the items here are pretty high, meaning this is on the whole a pretty useful slot to fill. Lightweight items with a lot of warmth bonus, so more bang for your buck.
Outer and inner slots end up in the same order, but one thing to keep in mind is that the Balaclava can only be worn on the inside, so stacking anything on top of it negates it's nice windproof bonus. A good set would be to just pair it with a Wool Ear Wrap accessory.
The Cotton toque ends up coming up on top, mostly because it's just so lightweight, but I wouldn't exactly have it as one of my go-to items.
The real winners here are the Balaclava and Wool scarf, both exceptionally warm-yet-light items and staples of all my clothing builds.
The Baseball cap and Cotton scarf are predictably bad and usually headed for scrapping.

Hands
Another high-value slot, and this time with a clear winner in the Wool mittens, all-around great gloves.
A surprise is how low this formula ranks the Rabbitskin mitts, but it's frankly for their really high weight, especially when compared to most gloves.

Coats
Now we're at a slot with more overall heavy items, so their value compared to the previous ones isn't that high.
Especially the low values showing on the inside slot expose this as a slot best left as just one layer with extra warmth better sought from layering lighter items (shirts, for example).
A true outlier here is the Windbreaker, less useful in practice than it seems here. The Windbreaker's warmth bonus is almost all windchill, so it's an exceptional and light-weight coat in windy weather but pretty useless on all-around cold days, and should never be worn as an inside layer.
The coat I would highlight is the Expedition parka, both warm and rather light, so fitting for a lot of purposes.
The crafted coats are again low on the list because of their sheer weight, the bearskin coat weighs 10 times more than several other jackets, but has nowhere near 10 times the warmth bonus. They're still good coats for their purposes, but you'll be definitely slowed down.
The absolute worst is ofcourse the Sport vest, useless in all ways when compared to other coats.

Shirts
Almost always worn under a coat anyway, the inner layer chart is the more handy of the two here. The competition is very steady here, and the none of the items are very high value in the end.
The slim winner on this list is the Fisherman's sweater, wearing 2 of the at a time would give you plenty of warmth for surprisingly little weight. For more lighter-weight builds the Thin wool sweater or Wool shirt are also good choices.
The T-shirt on the other hand can head for the scrap heap.

Pants
Another slot with steady competition. The highest value goes to the Snow pants, and they're the ones that could be most considered a winner here.
This is again a slot with heavy items, so wearing just one pair of Snow pants might be a good idea if carry weight and mobility are concerns.
Surprisingly, the Work pants are even worse than Jeans! The jeans actually have a plus side in being the lightest of all the outside pants.

Underpants
Very simple category, both items have the exact same value. The question this, which and how many to wear? Maximum warmth is 2 Wool longjohns, but you can also mix-n-match however you like. The sky is the limit!
A rarther good value category for layering, since both have pretty good inner layer value when compared to other categories.

Socks
The Climbing socks are the star of this category. They are very warm for their weight, so wearing two pairs at once is a good way to get low-cost warmth bonuses.
While the Sports socks technically out-value the Wool socks, I still tend to pick the wool ones simply because the warmth bonus from the Sports sock is very low in reality.

Shoes
Another neck-to-neck race in this slot. None of the values are very high, making this a low-value slot all around. But you can't run around without shoes!
My overall favourite is the winner: Insulated boots. They're light and warm with good waterproofness. Their only downside is their mobility amount, which itself isn't that high in the end.
A good alternative are the Mukluks, with high value but more nimble than the insulated shoes.

Accessories
There's only one item in this category so far.
The Wool Ear Wrap is a good item all in all, I would recommend always wearing 1 atleast. The best part about it is that it doesn't over-ride the other head items as the outer layer, so it's a very good addition to all combinations of headwear.
Useful sets
And now, to showcase some of the sets I built based on this information.
These are best-case-scenario sets, where you've managed to acquire all the clothing items. In the course of an actual game ofcourse you'll most likely have to improvise and modify the builds based on what items you have available to you.

The Balanced set
This is a good overall set, not too heavy and pretty warm that you can use in most activities during the game.
Head : Balaclava + Wool toque + Wool ear wrap
Hands : Wool mittens
Coat : Expedition parka
Shirt : Fisherman's sweater
Pants : Snow pants
Underpants : Wool longjohns x2
Socks : Climbing socks x2
Shoes : Insulated boots (alt. Mukluks)

Warmth : +24,5 C
Windproof : +12 C
Weight : 6,85 kg
Mobility : -23%
Protection : 19%

Choosing between Insulated Boots and Mukluks is purely up to taste. The set can easily be warmed up or lightened by playing around with different shirt and underpants combos.

The Nimble set
This is a lightweight set suited for trips where you need speed and know where you're going. I've especially used it when moving house to maximize my carry potential while minimizing risks.
Head : Balaclava + Wool ear wrap
Hands : Wool mittens
Coat : Expedition parka
Shirt : Wool shirt
Pants : Snow pants
Underpants : Thermal underwear
Socks : Climbing socks x2
Shoes : Mukluks

Warmth : +18 C
Windproof : +12,5 C
Weight : 5,6 kg
Mobility : -13%
Protection : 21%

One way I've tried to keep the weight down here is by leaving most slots to 1 layer, the coat is the most tricky one to choose here and I still find the Expedition parka to be the best choice. Choices mostly depend on how much you feel you need warmth, the head and hand slots are good for playing around with variation here.

The Survivor's Set
Credit to jonnywalker in the comments for this one. It's mostly an Interloper / lategame Stalker geared set, specialized in consisting of renewable materials. With no craftable hat existing in the game yet, all cloth should go to repairing the toque, while the other pieces can be fixed with leather.

Head : Wool toque
Hands : Rabbitskin mitts
Coat : Wolfskin coat x2
Pants : Deerskin pants
Shoes : Deerskin boots

Warmth : +16 C
Windproof : +11,5 C
Weight : 11,25 kg
Mobility : -45%
Protection : 39%
Single-purpose sets
These are really just gimmick sets, rarely (if ever) useful during normal gameplay.
But they're fun to list out!

The Warmest set
What are the absolute warmest items in each slot? Let's find out!

Head : Balaclava
Hands : Rabbitskin mitts
Coat : Bearskin coat
Shirt : Cowichan sweater
Pants : Snow pants
Underpants : Wool longjohns
Socks : Climbing socks
Shoes : Ski boots

Minimum Warmth : 38.5 C

Alright, it's slow, heavy and defensive. But it's also super warm! And why stop with one item in each slot? Double up on everything! Two bearskin coats is the uniform of champions.

The Lightest set
And what items then are the absolute lightest ones?

Head : Cotton toque
Hands : Wool mittens
Coat : Windbreaker
Shirt : Wool shirt
Pants : Jeans
Underpants : Thermal underwear
Socks : Sports socks
Shoes : Leather shoes

Weight : 2.3 kg
Warmth : 11.8 C

Surprisingly warm for what's basically the worst items! There's a lot of choice in several categories with many of the items weighing the exact same. Not conductive to surviving high-risk situations.

The Defensive set
How to turtle up and become invincible?

Head : Balaclava
Hands : Gauntlets
Coat : Bearskin coat
Shirt : Cowichan sweater
Pants : Deerskin pants
Underpants : Wool longjohns
Socks : Any socks
Shoes : Ski boots

Protection : 55%

Very similar to the warmest set! Heavy and thick clothing also tends to protect you from being gnawed on by wolves.
Now go become a walking fortress by covering yourself in as many bearskins as you can. What could go wrong?
25 Comments
vwstickman Oct 28, 2023 @ 7:39pm 
That layers make more sense now that the windproof/waterproof/armor stats for inner layers only takes effect if no outer layer is present. Still a great guide
Liliel  [author] Oct 28, 2023 @ 1:53am 
@vwstickman Thank you! The guide is a bit outdated atm, the layers graphic in particular is not right these days for the "head" and "accessories" slots, since they updated the outer one to always be on the outer edge from the character graphic.
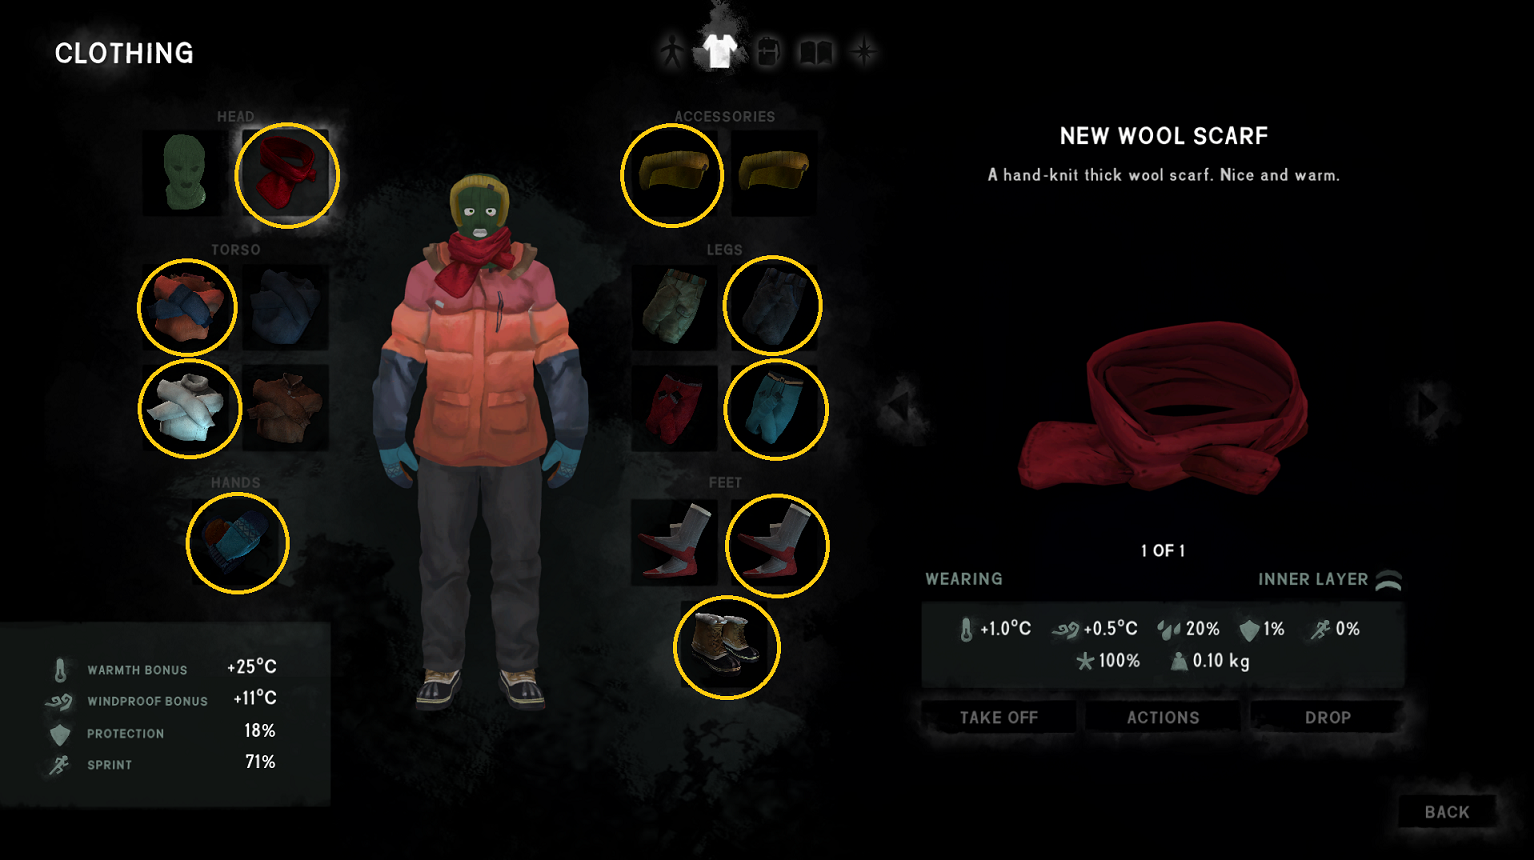
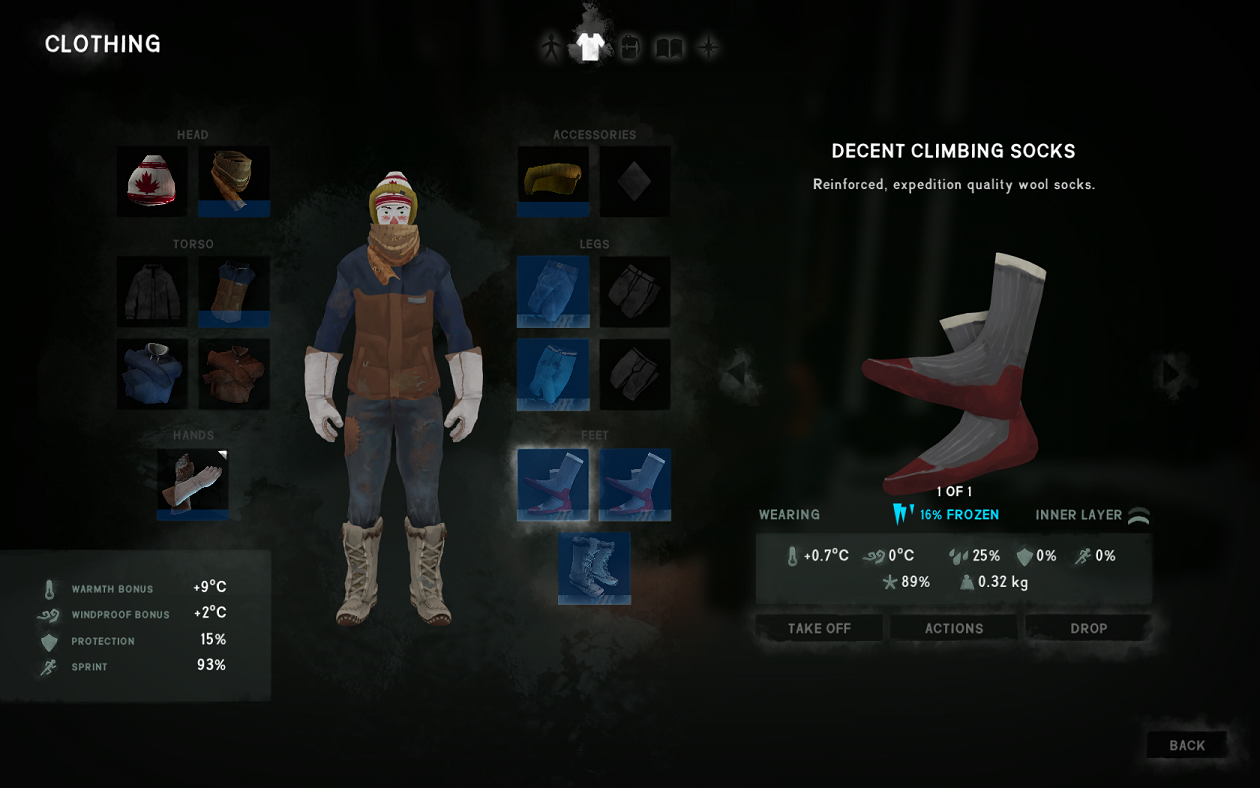
But yeah, even an item that's technically an inner layer will work as an outer layer if there's nothing layered on top of it.
So basically if you've got a pair of longjohns equipped but no pants, the longjohns are the outer layer on the legs, providing windproofness etc. But any pair of proper pants, like jeans, being equipped will override them as the outer layer.
The shirt, longjohn and sock categories are the ones that can be overriden by another category; coats, pants and shoes.
I've tested it out to make sure it works this way, basically you can see it easiest from the windproof, protection and waterproof stats. A really bad item of outer clothes layered on a good inner item can actually make your total stats in those go down.
vwstickman Oct 22, 2023 @ 12:46pm 
This is a great guide, a lot of work has gone into this and it has helped to explain the gear. However is an item considered an outer layer because of where its placed in a group even if it says inner layer? Has this been verified by the devs?
Frick Feb 7, 2022 @ 9:37am 
One thing I want to say, Since of update 1.16 moosen have been added to the game which added the moose cloak provides more protection than the bearskin coat. Also since of update 1.98 the Blackrock region which has the ballistic vest which is heavy but provides a lot of defense so if you wear both of those a long with the regular defensive set you will have really high protection.
Nissahri Dec 22, 2021 @ 12:42pm 
Oh, forgot to say, nice guide. :)
Nissahri Dec 22, 2021 @ 12:37pm 
I would pick the windbreaker over the light shell (for example) in a pinch. I am currently exploring Pleasant Valley (Blizzard Walker badge almost mine) and that 50% waterproofing was a lifesaver. I was lucky enough to find an expedition parka, so it sits in the backup closet now but it did help out a lot when I only had the urban parka.
Skookumsquitch Feb 12, 2021 @ 5:08pm 
This is extremely thorough. Well done!
Chris P. Bacon Jun 17, 2020 @ 7:37am 
Thanks so much for this guide! It really helped me out when I was just starting. Since then, they actually fixed the glitches with the head and accessory slots, so the outside layer is actually the outside layer now.
Liliel  [author] Jun 7, 2020 @ 5:20am 
Thanks for the compliment! I'm actually working on an update atm, to add the new items that are missing from the guide and fix some of the values that are now outdated and rework some of the set suggestions.
_i_hannibal_i_ Jun 7, 2020 @ 3:04am 
Thanks for investing the time. Your guide is very well crafted and it's recorded amongst my few favorites:steamhappy: