HyperRogue

HyperRogue

42 ratings
The Beginner's Guide
By ScytheRider
Some simple notes to help you get started in this strange game.
   
Award
Favorite
Favorited
Unfavorite
Introduction and citations
Edit 3/21/2021: Some small updates have been made to this guide to bring it up to date with the latest version of the game and my understanding of it.

HyperRogue is a brilliant game, but it doesn't do a very good job of introducing new players to its line of thinking. Players starting blind will find themselves thrown into the game with no title screen or tutorial, dying for seemingly no reason and getting hopelessly lost by the warped visual perspective, and then simply giving up. This is easily evidenced by the global achievement stats: only about 25% of the players make it out of the starting ice world, and only about 10% of them make it to the mid-level worlds at all. That’s absolutely abysmal!

With this simple FAQ, I hope to change that, and help a wider audience of new players get acquainted with the weird world of HyperRogue.

Before I start, I need to give some credit where it is due. Most of the advice I will give in this guide is based on my own experience getting to know this game. However, at times, I will be paraphrasing the words of others.

By far, the most helpful source has been Fulgur14’s guide, which I highly recommend referring to as soon as you feel like you have a firmer grasp on the game.

http://steamcommunity.com/sharedfiles/filedetails/?id=390176864

Their guide not only offers reliable annotations of the game’s basic mechanics, but also the basic mechanics of each of the nearly 70 different worlds in the game, which was immensely helpful to me in getting to know the game. This is the closest thing we have to a comprehensive HyperRogue wiki right now, and I recommend bookmarking it for quick reference. Like many roguelikes before, such as Isaac, NecroDancer, Terraria, and many more, there is no shame in having the wiki open on your second monitor during every playthrough.

For absolute newcomers, however, that guide can be notably intimidating in more ways than one, with its long length and use of complex mathematical terms, and with my guide I hope to bridge the gap and offer something a bit more English-sounding.

Also of great help are zeno, the game’s developer, and tricosahedron, the current reigning champion and probably biggest HyperRogue fan in existence right now, who offered tons of useful advice on the steam forums. If you ever have a question that’s not answered here or in Fulgur14’s guide, head for the forums and someone will help you out!

http://steamcommunity.com/app/342610/discussions/

Additionally, there's now a HyperRogue discord where most of the top players hang out, and the developer Zeno is even there!:

https://discord.gg/UKvxhgUZnX

Come on in to ask your questions, make suggestions, report bugs, and whine about your best runs getting ruined by Yet Another Stupid Checkmate!
Disclaimer
I’m not a math expert. I passed Calculus I, but that’s about it. I never studied hyperbolic geometry. So if I say anything in this guide that’s mathematically incorrect, I give the math geeks full permission to correct me. But if you do, try to speak in layman’s terms so as to help me update the guide.
Okay, so what do you even do in this game?
The object of the game is to collect a lot of treasure without dying.

There’s some other stuff involved like magical orbs and infinite circles and crazy enemies, and something about Orbs of Yendor, but you’ll get to that in time. For the overwhelming majority of the game, you’ll be focused on collecting treasure while outwitting enemies and environmental hazards.

You can click on any adjacent tile to move there, provided it’s not an occupied space and it wouldn’t kill you.

Treasures appear as small spinning objects sitting on tiles. Often they will look like stars, but not always. Simply walk over them to pick them up. The top right corner of the HUD will tally the treasure you’ve collected.

Enemies have a wide variety of appearances and behaviors. The majority of enemies (roughly half of the enemies in the entire game) behave the exact same way: they will pathfind around obstacles to find the shortest distance to get to you, but only if a path exists on the visible screen. If there’s no available path on the visible screen, they’ll freeze in place. This is the “basic” enemy, and in almost every world there is at least one type of basic enemy, although they will wear a different costume in every world you visit.

The other half of enemies obey their own special rules, and you’ll have to learn about them from experience and discovery. For instance, in the starting ice land, the yetis are “basic” enemies, while the ice wolves have special behavior: they come straight at you without pathfinding around ice, they only seek the hottest nearby tile (which is often you, but sometimes not) and they cannot leave the ice lands. Refer to Fulgur14’s guide for a full list of every enemy in the game and their special behaviors.
Why doesn’t the game explain this?
Actually, it kind of does.

You can always right-click on any space, object, or enemy, to get a small description of how it works.

Additionally, you can bring up the pause menu to see your current “objectives,” which are hints at how you can progress. For instance, at the beginning of the game, pressing Escape will show you the hints “Collect 30 $$$ to access more worlds” and “Defeat 100 enemies to access the Graveyard.” Following these tips will prod you along in the right direction, but you’ll soon come to memorize the progression anyway and you won’t need them.

Furthermore, sometimes the game will send you some hints through its HUD messages at the bottom of the screen, telling you precisely when you have unlocked certain worlds and whatnot. A lot of the game’s log messages are random and nothing more than flavor text, but some can be helpful if you keep an eye on them.

As of the latest versions of the game, you can access a "guided tour" under "special modes" which explains a lot of what this guide attempts to cover!
How do I fight enemies?
HyperRogue is less like an actual RPG, and more like a game of chess. You only have 1 HP, and so do most enemies. Movement is turn-based, and all the enemies will only take one turn after your turn. If you click on an enemy adjacent to you, you can kill it. Simple as that.

If there are two or more nearby enemies, you can’t kill either of them, because killing one will allow the other to strike the finishing blow on you. So in this case, you will need to run. If you can’t run, you are “checkmated” and the game is over.

The “checkmate” rule will often prevent you from even making a move that would end in your death, meaning that you can’t approach enemies directly. However, you can let them come to you by clicking on yourself to pass a turn.

Due to the complexity of the game, the checkmate rule is imperfect and sometimes won’t kick in, even when it should. That is, sometimes you will find yourself trapped in place not able to make any move, yet the game will not end. If this happens, you can press F5 to start a new game immediately. If you are stuck, you also could try passing many turns, and “wandering ghosts” will fly in to attack you. In rare cases, this could defeat the deadlock and allow your game to continue, but usually the wandering ghosts will kill you.

It should be noted that the checkmate detection usually doesn't work if you have ranged orbs active. So if you're stalemated and want to see the Game Over screen, try to waste all the charges on your ranged orbs.

You can turn off the checkmate rule by enabling Hardcore Mode, which will allow you full reign to suicide however you want.
Help, I die too much! Any tips on fighting?
Probably the most important thing to realize about combat is the importance of the heptagons – the 7-sided floor tiles. In nearly all of the game’s worlds (but not all of them), the world is made of many 6-sided tiles and some 7-sided tiles. If you’re having trouble seeing them at a moment’s notice, you can go to Main Menu -> Basic Configuration -> and click the ‘+’ next to “Draw the heptagons darker” and they will stand out a bit more.


Heptagons kind of serve as “high ground” and will allow you various ways to outsmart enemies. If you are standing on a heptagon with two or more enemies surrounding you, and you can successfully step off the heptagon away from the enemies, the enemies will be unable to all follow you directly, and they will “funnel” down by one.

For instance, if there are two enemies chasing you, and you manage to step off of a heptagon directly away from them, then only one of them can step onto the heptagon, the other will have to wait behind. This can give you the opportunity you need to kill both of them.


In fact, if you have a large mob of enemies chasing you, the heptagons in the terrain will eventually cause them to all form a neat and orderly line, granted that you are able to run away for long enough. Often it’s good enough just to get them away from you so you can whittle down the guys in front before moving on to the next heptagon to thin them out again.

You can also use the terrain to your advantage to funnel the enemies down into a single-file line so you can kill them. You can most easily do this at the “great walls” between worlds: just step through the great wall and cut them all down as they come at you one-by-one. You might also find chokepoints in the naturally-generated terrain where this technique is possible, too. (While this is a highly effective strategy, watch out: sometimes the enemies in back will pathfind to a nearby opening in the wall and try to flank you.)


Speaking of flanks, there is something you need to watch out for if you don’t want to unexpectedly die all the time: if two enemies are coming at you from different angles at the same time, they can scissor-trap you on the same turn, ending your game. To prevent this from happening, you’ll need to side-step towards one of them so that one enemy meets you before the other one does, allowing you an extra turn to kill them.


Don't worry if you feel overwhelmed at first. You'll get a feel for basic navigation the more you play the game. You'll start to instinctively notice when enemies spawn in dangerous places or if you should be worried about their movements.
I’m dying because the enemies are literally appearing out of nowhere.
You’re suffering from sensory overload. The “what the heck killed me?!” syndrome happens to many gamers across many different games. People who have played visually intense games like Beat Hazard or Super Hexagon can readily attest to this.

When playing an unusual or visually cluttered game (both of which apply to HyperRogue), it’s actually possible for your eyes to “delete” an object off of your vision, even if you’re looking directly at it. This is because your brain makes assumptions about what it’s seeing, and those assumptions fill in the gaps of the things you don’t have time to mentally process. It’s like an awful optical illusion. It helps if you think of your mind’s eye like a NES game’s graphics engine, one that is very limited and can only load so many objects on the screen at once. So it’s very often possible to get killed by an invisible enemy – they were literally invisible to your eyes, even if they were right there on the screen.

It’s very similar to the effect of reading a word incorrectly because you assumed it was a different word – your eyes will seem to visually replace the correct word with the incorrect one, making you swear you read it right the first time.

Sensory overload is one of those things that naturally goes away with experience and exposure, so there’s not a lot you can do to counteract it but to keep playing. However, HyperRogue has several very useful graphics options to help you understand what you’re seeing.

Main Menu->Settings->Quick Options->Highlight Stuff will force an outline to be drawn around every monster and item in the game, which is insanely useful for overcoming sensory overload as well as spotting stuff on the far horizon. If you don't want to have highlights turned on constantly, you can hold down Alt to enable highlights on the fly.

Another useful setting is the “camera scroll” setting, found under the "general graphics" menu. Turn it up to speed up the gameplay. With a faster camera, you’ll have more of an opportunity to spot distant enemies coming at you as you're running along. Don’t turn it up too fast, though, or you’ll get a crippiling case of motion sickness…

Note that some enemies can move two spaces in one turn, mostly this applies to some of the bird-shaped enemies. These guys are extra prone to "appearing out of nowhere."

Everyone will have different preferences when it comes to movement and animation speeds. Personally, mine are as follows:

Highlight stuff: on
Mark heptagons: on
Scrolling speed: 0.5
animation speed: -0.16
extra graphical effects -> floating bubbles:all treasures: on

These settings are based on a lot of trial and error in experimenting with different values during casual play (not forcing myself to focus too hard on every single move). With a fast camera scroll speed, you'll see the horizon much faster, allowing you to make decisions based on what's coming up. With slow animation speed, you'll be more likely to notice moving objects on the screen with every step you take. And the floating bubbles (the numbers that appear when you pick stuff up) may help with keeping your eyes on the game board instead of the HUD.

Again, these are just my personal preferences; you might find settings that work better for you. Just remember that you shouldn't judge settings by how nice or comfortable they look, but by how often you die!
Can I save the game?
Kind of.

To save the game, you'll need to collect an "Orb of Safety" and then quit the game before taking more than 7 turns. When you quit, make sure you hit the "Save" button. This will close the game, but will allow you to come back later to continue the same run.

These saves will be deleted after they're re-loaded. Obviously, this won't allow you to save-scum by reloading from a save point after you die, so if that's what you were hoping for, too bad! It wouldn't be a true roguelike without perma-death.

You can find Orbs of Safety by collecting 10 Phoenix Feathers in Land of Eternal Motion, to make them appear in that world and in Crossroads. Like most orbs, you can make them appear all over the game by collecting 25 phoenix feathers.

Alternately, you can also find these orbs in a world called Prairie, which unlocks after collecting $90 total. Run towards the light green grass to find them.

What are these magical orbs I keep stumbling across?
Orbs are useful as weapons and tools, and sometimes can break difficult situations wide open. There is almost one unique type of orb for each world in the game. See Fulgur14’s guide for a full list of orbs and their functions, but for starters, all you really need to know is this:

  • Orbs will not appear in a world until you’ve collected at least 10 of that world’s treasure.

  • Collecting at least 10 of a world’s treasure will also allow the orbs to spawn in Crossroads.

  • Collecting at least 25 of a world’s treasure will allow the orbs to spawn almost anywhere in the game, and will also maximize that orb's appearance rate in Crossroads.

  • Collecting more than 25 of a world's treasure will boost that orb's appearance rate globally, seemingly with no limit. But good luck surviving in a world with more than $25 collected, it starts getting really dangerous!

  • Sometimes multiple kinds of orbs will spawn in a world, but only one of those orbs counts as the world’s special type of orb, the one that will spawn elsewhere. (for instance, you will find both Winter orbs and Flash orbs in the starting ice world, but only the Flash orbs can be made to spawn outside of the ice world by collecting ice diamonds.)

  • Generally, collecting an orb will cause a countdown timer to appear on the right side of the screen next to an ‘o’ which indicates how many turns are left until the orb’s power runs out.

  • Some orbs can be “used” which might drain some or all of the orb’s power at once. For instance, a Flash orb’s power will be completely drained as soon as it is used once.
There are way too many enemies attacking me, how the heck am I supposed to survive this?!
Generally, by not making so many enemies appear in the first place. The spawn rate of enemies in a particular world (biome) increases with the number of treasures you’ve collected in that type of biome. The “intended” way to play HyperRogue is to collect only 10 treasures in each world before moving on to the next. This will keep the world’s difficulty at a reasonable level. If you’re trying to unlock an orb universally by collecting 25 treasures, or worse, if you’re an achievement hunter aiming for 50 treasures… you’re gonna have a bad time. You’ll need to be extra careful with your navigation, and also abuse strategies and orbs to their fullest.

Note that all biomes of the same type will spawn more enemies equally based on your treasure count. That is to say, collecting lots of ice diamonds will make all ice lands extra dangerous. There’s also an individual Steam leaderboard for every single type of treasure in the game, so if you’re a masochist and want to collect 100 ice diamonds, you’ll be recognized for your efforts.

Most monsters appear when you generate new tiles at the edge of the screen, so if you hang around one place, you might get less monsters to appear. Some players in the community call this "gardening strats".

There are also "wandering monsters" which have a chance of appearing at the edge of the screen on any turn whatsoever, even if you're standing still. Wandering monsters should have an almost 0% chance of appearing if you have $0 collected in that world. Additionally, if you have more than $25 collected in any world, it will cause more wandering monsters to appear globally, even in worlds where you have $0 collected. So if you want to collect $200 Elixir of Life to boost the appearance rate of those awesome Orbs of Speed, you'll also have to deal with a lot more wandering monsters everywhere, so be careful.
What’s the Crossroads?
Basically, a warp zone. If you find one, you can run wildly down the hallway until the desired world appears. Your unlocked orbs will occasionally appear in here, too. No enemies spawn here (Unless you're unlocked hyperstones), but you might have to deal with enemies and hazards which like to creep out of various worlds.

There are actually five kinds of crossroads that get unlocked the more your score total increases.

The default red-tiled crossroads is undeniably the best kind, allowing easy and safe access to worlds.

Crossroads II is brown, and it has very narrow hallways. It's actually quite a dangerous place, because those chokepoints might get you trapped by enemies, so be very careful.

Crossroads III is blue. It's a weird world with intersecting walls. It's generally a safe place to wander, and it has the unique property of sub-dividing the rest of the worlds into infinite walled-off regions. If you're looking for a safe place to enter a world, enemies trying to harass you from the other side of a doorway won't be able to enter other regions, So you can just hop down to the next doorway to see if you can find a safer version of the world.

Crossroads IV is a very dangerous but useful place. Appearing at a score of $200, it has no bordering walls, meaning that enemies can crawl out of their worlds at will. But this also makes it easier to run in and snag treasures out of the worlds without getting cornered by enemies, so it’s very useful if you’re hunting for a particular treasure you’re missing. The farther you get into the game, the more dangerous Crossroads IV gets, so you'll want to try unlocking as many orbs as possible so that they'll protect you while you're there.

Crossroads V appears as very tiny clusters of 4 purple tiles. At first it might seem to connect to only 3 words, but there will actually be an infinite line of Crossroads Vs if you follow the wall. So technically it can be used to search for new worlds like any of the other crossroads, but it forces you to stay in the worlds and follow it from the outside, and thus offers no protection. Overall it's not very useful, and mostly serves as an obstacle you will occasionally encounter.
What's up with this “hyperbolic geometry” and what makes it different than just playing on a hex grid?
Here’s the easiest way I can think of to describe your perception of reality in HyperRogue: circles have more than 360 degrees, and there are more than 4 cardinal directions.

Imagine standing in the middle of a crossroads, facing north. Then imagine turning to your right by 360 degrees. Normally, this would make you face north again. But in HyperRogue, this would mean that you’re facing a new, 5th cardinal direction that’s not north.

(Disclaimer: I don’t actually know how many “directions” there are in HyperRogue, I just use 7 to make a point.)

In terms of gameplay, this means that every time you move, tons more paths open to you, more than you can visually comprehend. The horizon is huge and you have many options of where to go.

The hyperbolic-ness is specifically created by the heptagons in the floor. If the floor were made of just hexagons, it would be a normal hex grid. But since there are heptagons jammed in there, it forces the entire world to have a kind of concave curvature, since heptagons and hexagons can't tessellate (seamlessly tile) like this in the real world. As noted in the "guided tour" mode of the game, it's similar to the way the surface of a soccer ball is made of hexagons with pentagons jammed in between. The pentagons give it a convex shape which allows it to be a ball instead of a flat surface.

Recent versions of the game have added extensive support to play with different modes of hyperbolic geometry. So you can see what it's like to play on a board with all heptagons, or with octagons jammed in there instead of heptagons, or an endless variety of weird and artistic combinations. Interestingly, the game does let you play on Euclidean surfaces like a hex grid if you want. It’s interesting if you want a reminder of how different it is to play on a hyperbolic surface.

Other interesting geometry quirks include:
  • Straight lines appear curved from a distance. All “great walls” are straight lines that continue infinitely and (with the exception of the world called Crossroads III) never intersect. In fact, if you define "parallel lines" as lines which never intersect with one another, all great walls are parallel, despite the fact that none of them have the same orientation.

  • Walking in a straight line will make the camera spin, giving the disorienting illusion that you’re walking in circles around a tiny corner that never seems to end.

  • You might try to return to a place you’ve been to before, only to find that it looks completely different – because you’ve gone in the wrong direction and arrived to a completely new place. It’s basically impossible to go back the way you came using intuition alone. You need to keep track of landmarks to navigate back to anything you’ve scrolled off the screen. This is probably the greatest challenge the hyperbolic world offers – and the game actually makes you do this a few times if you want to “win” the game.

  • Circles can get ridiculously huge. In HyperRogue, a circle’s area is much bigger than π * r². You can get seriously lost in even the smallest of circles, not knowing which direction goes toward the circle’s center.

  • The game loves to make use of a shape called a “horocycle”, something that can’t exist in the real world. A horocycle is kind of like a circle with an infinite circumference. The circumference is infinite because the circle's center is always stuck to the horizon, and you can never reach it. When the horocycle’s rim is on the screen, it’ll look like a giant “U” faced in some direction. One property of horocycles is that it’s a bit tricky to walk directly towards their center; one wrong turn and you’ll be walking right out again. This is evident in a place like Caribbean where the islands themselves are horocycles; without a compass to point to the center, you'll find yourself walking right back out into the sea. If you try to walk around the rim, you’ll be walking forever (and since the circle is curved and not a straight line like the great walls, the “walking around a tiny corner forever” illusion is even worse!)
How to I actually BEAT the game?
To “beat” the game, you’ll need to collect an Orb of Yendor. Although collecting an Orb of Yendor is much easier said than done, I'll put one possible solution here, spoiler-tagged in case you want to figure it out yourself. But feel free to look at it if you want; you won't be really spoiling much by knowing how to collect them, since actually collecting them is the real challenge.

  • Collect a total of 30 treasures to unlock some more worlds.

  • Collect a total of 60 treasures to unlock even more worlds.

  • Collect 10 treasures from each of any 9 worlds to unlock Hell.

  • Collect 10 treasures from Hell to unlock Orbs of Yendor.

  • (Optional but highly recommended) Kill 100 enemies to unlock the Graveyard, collect 10 treasures from the Graveyard to unlock Dead Orbs, then collect about 40 Dead Orbs.

  • Find an Orb of Yendor and touch it, follow the beacon to find the key, then navigate BACK to the orb of Yendor once you have the key. You’ll need to drop a breadcrumb trail of Dead Orbs, or otherwise use your leet hyperbolic navigational skillz to find your way back. (There are actually many ways to leave a trail in this game. You can lure an ivy from the jungle, or leave a trail of dead enemies that mark the ground in some form... there are many possibilities, and you'll have to pick which one is most appropriate for the situation. If you play on "Yendor challenge" mode, you'll be forced to learn new techniques for navigating the world)

It should be noted that while you're hunting for a Yendor orb, the spawn rate of wandering monsters will be increased until you collect the orb. The more Yendor orbs you have, the more extra enemies will appear, the longer the distance will be between the orb and the key, and thus the harder it will become to get the next one!

And that’s it. Collecting an Orb of Yendor counts as “beating” the game. However, the game also has an even harder challenge in store: the Hyperstones. To make them appear, you’ll need to unlock EVERY available world, then collect 10 of (almost) EVERY treasure from the game. (I am jealous of players who completed the hyperstone quest in early versions of the game where there were less implemented worlds and this was much easier!)

On the pause menu, you can select “World Overview” to see a long tally of every type of treasure you’ve collected in the current game, and your current high score in every world. This screen is useful not only for keeping track of what you still need for the hyperstone quest, but also for achievement hunting -- which I'm getting to in the next section.

(Important note: if you play on different computers and use steam cloud sync, your high scores on the world overview can take up to 30 seconds to synch from the Steam leaderboards. Before that, they’ll appear very incorrect.)
Any tips for achievement hunting?
Achievement hunting in this game is, in my opinion, a fun and wildly varied adventure.
Most of the game’s achievements are for collecting 1, 10, 25, and 50 of each kind of treasure. Since there are about 40 types of treasures in the game, that’s about 160 achievements just for treasure collection!

The other achievements are for performing various specific stunts in various situations and game modes, but the treasure-hunting achievements will take up the majority of your focus. I could probably write an achievement guide for the stunt achievements sometime, if I ever get to finishing them, but for now I’m only going to talk about treasure hunting.

When it comes to treasures, there’s two small facts I’ve neglected to mention so far:

  • You know how collecting lots of treasure makes the enemy spawn rate increase? The opposite is also true: killing lots of enemies from a certain world makes the treasure appearance rate increase! When hunting for 50 treasures in a world, I like to first go hunting for enemies (without collecting any treasures), exit to a crossroads and find a different version of that same world, then start treasure hunting.

  • There's something called the "great wall rule" which makes it harder to cheese worlds by dipping into them, collecting one or two treasures, and leaving again. If you're in the crossroads, there is a chance that any treasure in a given world will be deleted off the screen if you have more than $10 in that world. If you have more than $20, then every treasure will be deleted, even if you scrolled them off the screen and then came back! This is actually true of any great wall, and it goes by the difference between your treasure counts on one side of the great wall and the other. It just happens commonly in Crossroads because Crossroads is technically a world with treasures (the hyperstones) but you usually don't have any of them collected.

As for actual tips, other than telling you to read Fulgur14’s guide and research every biome before diving in, or encouraging you to strategize and use orbs to their fullest, my only real word of advice is this: when you start a game, set out with a fixed goal, and then never deviate from it. If you’re setting out to collect 50 spice from the desert, don’t get sidetracked into collecting 50 ruby from the jungle. If you’re setting out to get an Orb of Yendor, don’t decide you want to hunt for 50 demon daisies in Hell. Set a track for yourself and stay on it, or else you’ll be constantly punching yourself for stupid deaths and wasted potential. That’s my advice.

For more specific advice, there's a section coming up.
The music gets old pretty fast, can I mod it?
Sure! There's a file called hyperrogue-music.txt in the game directory, which you can modify however you'd like per world. You can even point into subfolders.

It seems that the music must be in ogg format with a bitrate of 44,100 Hz. If the bitrate is different, it will be pitch-shifted in-game and sound quite weird.
Can I mod the graphics, too?
Apparently, but it’s a bit weirder. There’s a “vector graphics editor” on the list with the special game modes, but I haven’t messed with it a lot. The one time I tried, I accidentally made ice diamonds invisible, and then I didn’t have a good time.

You can, however, easily play as a different character, and change your colors too. Check out Settings->Interface->Player character. Nowadays I like to play as the Familiar!
Any other miscellaneous tips?
  • Learn how to run away. It's okay to be a coward in this game. Sometimes there will be something quite tempting only a few tiles away, and you have to learn to give up on it and leave it behind at the first sign of real danger. Just keep going; the world is infinite and you'll find it again.

  • If an enemy appears with a "-" next to it on the HUD, that means the enemy appears in that world. If an enemy appears with a "+" next to it, that means the enemy appears in that world and killing that enemy will increase the appearance rate of treasures there.

  • Sometimes, you can kill some enemies in one world to increase the appearance rate of treasures in another world. Some examples include: Killing hedgehog warriors in Emerald Mines will increase the treasure spawn in Dry Forest, killing Cultists in Temple of Cthulhu will increase treasure spawn in R'lyeh, and killing skeletons in Dungeon or Ruined City will increase the treasure spawn rate in Palace.

  • Abuse golems whenever possible. You can unlock them in Living Cave by collecting 10 gold, then you can make them appear by collecting Orbs of Life. They’ll follow you and kill stuff for you whenever possible, and having the extra protection can only help.

  • Abuse bomberbirds, too. You can unlock bomberbirds in the Minefield by collecting 10 bomberbird eggs and make one appear by collecting an Orb of Friendship. These have a few huge differences over golems: they can fly, so pits aren’t a problem. But they also drop a mine on the floor when they die. And probably the biggest difference is that you can kill them on accident if you’re not careful. If you walk into a golem you’ll trade places, but if you try to walk onto a bomberbird, you’ll kill it and drop a mine. This also means it's easy to get trapped and checkmated by an enemy when surrounded by your own birds. So be careful.

  • In general, the orbs that appear in a world will play the biggest part in helping you to collect 50 treasures in that world, since they have a funny way of always nullifying the world’s gimmick.

  • Stay far away from the pink world – the rose garden – unless you’re actually planning to go inside. The “waves of scent” fan out after passing through small openings, and can kill you by forcing you to walk into a wall. I can’t count the number of times that I’ve seemingly died for no reason at all, only to realize there was a rose garden nearby.

  • If you actually go inside of a rose garden, DON’T STAND NEXT TO THE ROSES.

  • The shadow in the graveyard isn’t as scary as it might seem. It’s invincible, but it doesn’t actually track you! It’s just follows a “recording” of your previous motions.

  • In the minefield, a treasure and a mine will never spawn on the same tile. Unless a bomberbird died on the treasure tile, collecting treasure is always safe. Look carefully at the color of the tile: if there's a green tint, it means the space is safe because there's an object sitting there. Minefield spaces will also turn green if you witness an enemy walking over them without blowing up.

  • Don't just follow empty spaces in the minefield. Use Minesweeper logic! For instance, if a blue dot only has one uncovered space next to it, you know that space is a mine, and all blue dots adjacent to that mine are perfectly safe to walk around.

  • It's a very bad idea to collect any more than 10 bomberbird eggs. Mine generation will skyrocket and enemy bomberbirds will start appearing. Completely unnecessary for a normal run.

  • In Living Fjord, don't approach a water elemental while on a boat. You'll die.

  • The Ratlings in Warped Coast don't move unless you do something. Unlike most other monsters, you can't lure them closer just by passing turns. However, you can cut down trees, which counts as an action. This world is all about parity. Compare what the Ratling is standing on (whether a triangle or heptagon) to the tile you're standing on. If they're different, you can probably kill the Ratling just by walking up to it. But if you're standing on the same thing, you won't be able to kill it and you'll need to chop down a tree to lure the Ratling one step closer.

  • In the palace, don't enter the rooms unless there are green plates inside of them. Even if the doors are already open, an enemy could appear and step on a nearby red plate to lock you in.

  • in the palace, you can hurt Viziers (the purple guys) by walking away from them. But if they have only 1 HP left, you can deal the final blow normally.

  • There are many things which can be pushed, like desert thumpers and stunned enemies. If that object is standing on a hexagon, they'll be pushed directly away from you. But if that object is standing on a heptagon, you can choose which of the two opposite tiles you want to push them onto. Move the mouse carefully over the object and see that you can change the cursor which indicates where the item will be pushed.

  • If you’re sailing in the ocean and you want to return to a land-based world without having to pass through another world first, you have to go a beach (the semicircle areas with rising tides). If you go to a beach after collecting 60 treasures, almost all beaches back to land will turn into R'lyeh. If you go into R'lyeh, all exits will take you back to a beach until you collect 10 Cthulhu statues there. If you want to get back to regular land without getting trapped in R'lyeh, go through Living Fjord or Warped Coast.

  • Don’t go treasure collecting in the Haunted Woods the moment you find it first. You actually have to exit the Haunted Woods before your score will be counted, and that’s harder than it sounds, because there’s only one exit and if you walk too far away from it you’ll basically wander in darkness forever. You’ll have to leave a breadcrumb trail of chopped trees and dead orbs to get back out.

  • Ditto with Dungeon. Tread very lightly in there, because if you fall down off your path, you will be trapped forever with no hope of climbing back out aside from navigating horizontally for a few hours (not always possible) and hoping you find another way to climb up. But if you're going for $50, leap down with reckless abandon and you'll be fine; more treasures appear the deeper down you go.

  • In Dungeon, the bats appear harmless at first. They cannot kill you and they try to stay one tile away from you, much like your friendly bomberbirds. But if there's an enemy nearby, the bats will swoop close and try to trap you! So kill them as soon as possible.

  • The snakes in Red Rock Valley are really dangerous because they move every turn, but they can’t travel on Heptagons or up steep cliffs. Unfortunately, they can still kill you if you're standing on such tiles.

  • If you have ranged orbs active, look carefully at the color of the cursor as you hover over tiles, and the "+" marker that appears on the orb counter. This will indicate which orb will get used if you click there.

  • In Galapagos, the light-colored floor tiles lead to the "home zone" of the tortoise you're carrying, so just keep chasing the light green. If you find an eligible tortoise to adopt the baby, they will have a glowing circle underneath them (looks like an Orb of Shielding).

  • If a world frightens you, try out "Pure Tactics Mode". This is a special game mode that keeps you locked in a single world where you can try to collect as much treasure as you can. You may learn quite a lot about how that world works! The only problem is that you don't unlock Pure Tactics Mode for a world until you've collected $20 there...

  • This game has a lot of easter eggs, especially in the form of "undocumented features" of enemies and orbs. For instance, check out what happens when you walk through Desert or Hunting Grounds with an Orb of Earth active, or what happens when you kill a jungle ivy in Vineyard. Being a roguelike, you'll just have to find a lot of these effects through experimentation!
Closing
Well, I hope I’ve made the world of HyperRogue sound a little bit more reasonable! It’s an awesome coffee-break type game, with plenty of risk and thrill and strategy packed into 5-10 minute runs. I’m very happy I gave it a chance. Hopefully this guide will encourage more people to give it a chance, too.

This has been my first guide, and aside from the clunky MSPaint jobs, I'm quite proud of it and I hope you've enjoyed.
17 Comments
ScytheRider  [author] May 19, 2023 @ 9:00pm 
@godamnsteemsux I think the ability to unlock flocks of bomberbirds, which makes numerous other lands easier, greatly outweighs the danger of making the Minefield slightly more inconvenient. You can always avoid a minefield, the same way you can avoid other undesirable lands.
godamnsteemsux May 19, 2023 @ 8:14pm 
It's a very bad idea to collect 10 bomberbird eggs. Although the Minefield will still be pretty easy to
survive in, it will become infeasible to get through a Minefield in a specified direction. The chance of needing to go through a Minefield to get a key is surprisingly high. So if you're just trying to win, not trying for achievements, don't get 10 bomberbird eggs.

It also bears mentioning that phoenix feathers are the easiest treasure to get a lot of, so easy that it's always worth it to get 25 of them.
Fulgur14 Jan 7, 2017 @ 7:06am 
FatalThonz: Yes, but some work is needed. To save your game, you need to collect 10 Phoenix feathers in Land of Eternal Motion; this will enable Orb of Safety which will teleport you to a new safe place. For a few turns afterwards, a star is displayed around your character; if you quit the game before this effect disappears, the game will be saved.
Ryan Dorkoski Oct 17, 2016 @ 7:57am 
Fantastic guide. Thank you.
zeno  [developer] Aug 1, 2016 @ 6:08pm 
Also maybe it would be better to use the spoiler tag for the solution to the Yendor quest -- some people might want to read the guide to learn about the basic strategies and dangers, and your guide works great here, but still prefer to solve the puzzles on their own. The way it is done now, the puzzle of finding the way to return to the Orb is destroyed for them. Maybe some hint like "By now, you have probably tried to return to a place where you have been previously, and failed, so returning to the Orb of Yendor might seem impossible. But there are many ways to solve this quest without writing down your path precisely or having leet hyperbolic navigation skillz. Travel the world, you should find something. (spoiler)(solution or two, maybe mention Yendor Challenge)(/spoiler)"
zeno  [developer] Aug 1, 2016 @ 6:08pm 
"Sure! It’s quite easy, too. Just replace the ogg files in the game’s directory with ogg files of your own choosing. " -- you can also edit the file hyperrogue-music.txt. This way, you can have different music for each land (thus overcoming the big drawback of the original music that the same track is used for multiple lands).

"This will force an outline to be drawn around every monster and item in the game, which is insanely useful for overcoming sensory overload as well as spotting stuff on the far horizon." -- I think you should also mention [ALT] here, which toggles the high contrast temporarily.

zeno  [developer] Aug 1, 2016 @ 4:23pm 
"If you go to a beach after collecting 60 treasures, you’ll always find R’Leyh" -- actually, not always, the probability is 75% (if you have not yet completed R'Lyeh, otherwise the usual distribution is used). There is also a typo in R'Lyeh.

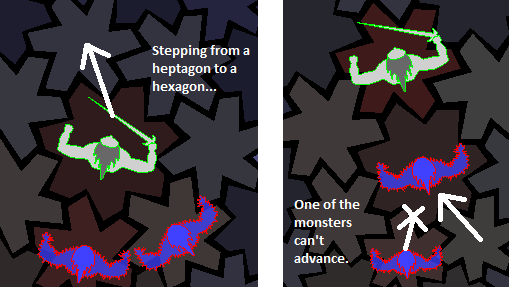
The “waves of scent” can travel through walls, and will kill you by forcing you to walk into a wall. -- they do not go through walls, and thus they never force you to walk into a wall. (Unless there is some bug?) Agreed that you must be very careful, though -- they go through openings, then around walls, then they can force you to walk into a monster.
wilemien Aug 1, 2016 @ 10:52am 
wilemien Aug 1, 2016 @ 10:34am 
sorry had some problems and also problems with the max length of comments.

I don't know where your problem with finding the direction to the centre of an horocycle comes from I think you mistake it with finding the centre of a large circle (Camelot).

The centre of an horocycle is always at the horizon (and out of reach ) but as long as you can see parts of the the horocycle it is easy to guess the general direction.

was puzzeling with the idea of "real world" replaced it with euclidean real what is " real" in game play?
:)
Fulgur14 Aug 1, 2016 @ 10:13am 
The correct ratio of hexagons and heptagons is 7:3.

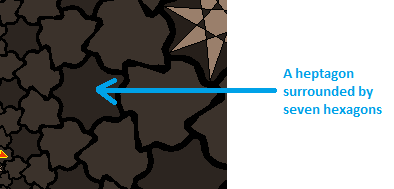
One way to show this is to cut both hexagons and heptagons into 6, respective 7 quadrilaterals with axes of their sides. Two hexagon pieces and one heptagon piece will then fit together to form a triangle with the vertex of the tiling in the middle. Each vertex has 2/6 of a hexagon and 1/7 of a heptagon, and if you multiply these numbers by 21 (to make them both integers at the same time), you get 7 and 3.

All the repeating patterns in HyperRogue that can cover the whole grid are likewise formed from 7n hexagons and 3n heptagons for some n. The smallest pattern, which is the base of Zebra, has just 7 hexagons and 3 heptagons.