ShareX
64 beoordelingen
ShareX Extended User Guide 11.0.1
Door JanVfsx
1. Install, Configure, First Use
2. Using an External Storage location (in preparation)
3. Capture screens and windows
4. Capture screen recording
5. Samples
   
Prijs
Toevoegen aan favorieten
Toegevoegd aan favorieten
Verwijderen uit favorieten
1. Install | Configure | First Use
Of course you did install ShareX and you got stuck...otherwise you was not here...We keep it simple: less words and recognisable pics.
Step 1.1: Install:: ShareX is installed (as you did) in your favorite Steam folder, whatever you decided. As a sample this could be: C:\STEAM\steamapps\common\ShareX
x---------x---------x---------x---------x---------x---------x
You can start the app in different ways:
The long way:
go to your library, select Installed (n); search ShareX, right mouse click on the app and select Launch App...
The short way:
Click in your system tray area on the icon...oeps its working..or
use your desktop shortcut. You can make a shortcut on your desktop using the menu as in The long way above.
Other menu command will be dealt with later.
We keep you up to speed using ShareX

Configure
Whatever you want to capture, either pic's, screens, vid's...you must know where the captures are gone. For simplicity start ShareX with the desktop shortcut. This is what you get:
Left menu column:
First thing you need to do is to define where the screenshots will be stored.
Go to Application Settings and select Paths.
Then press the Browse button and select your favorite place on any hard drive.
Note: You must now Close and Exit ShareX and
Re-open ShareX for this personal folder change to take effect.
Just close this screen with the [x] in the right upper corner.
There you go!
After restart of ShareX you get another pop-up screen telling you that the Hotkey settings are not available:

This is what you get first:
and the result is:
Hotkey Settings
The RED block indicate: no assignments
Click on the first...Select a hotkey...Done..next...up to 4 keys
When ready you have 4 F-keys that:
  • Capture a region (drag with the mouse)
  • Capture entire screen(s)
  • Capture active window
  • Makes a Screen recording
OK... ready for
First use
  • Press your first key (Capture region)
  • Drag a square
  • The moment you release the mouse...done...on your screen
  • In the right under corner a preview is shown.
  • The pic is stored in the location you defined earlier.
  • If you created a folder name, then inside this folder there are 2 sub folders created named:
  • >> Logs and Screenshots
  • In the sub-sub folder Screenshots a monthly folder is created.
+---------+---------+---------+---------+---------+---------+---------+---------+---------+---------+---------+
Now...to make it simple, just use the default Windows location for Pictures.
  • 1. In the ShareX Menu, go to Application Settings and select Paths.
  • 2. Press the Browse button and select Pictures (or fill %MyPictures%)
  • 2. Close and Exit ShareX
  • 3.Re-open ShareX for this folder change
    to take effect.
  • 4. Done ! This is it...Next Chapter.
+---------+---------+---------+---------+---------+---------+---------+---------+---------+---------+---------+


5. Samples
2. Capture | Upload | Workflows | Tools |
Before you start,...the good message is that there is a popping arround help screen, indicating some capture functions.


In the main menu of ShareX you see 4 sections: we discuss here section 1
Capture
  • Full screen:
    that's simple. If you have multiple screens, you get a multiple screen capture!
  • Window >>:
    if you don't want Full screen, select WIndow and then the window from the list
  • Monitor >>:
    here you can select the monitor full screen that you want to capture.
  • Region
    : use your F-key to Capture region and move your mouse (don't click!) to see the different marked square sections in that region. Left click to save.
  • Region (Light):
    is the same as Region ,however without the extra view options. Use this option for drag and capture at any place on your screen.
  • Region (Transparent):
    is like previous, only influences readability of text.
  • Polygon:
    draws a polygon; click three times on different spot and wysiwyg
  • Freehand:
    a little bit shaky? Don't use it.
  • Last region:
    shows you the last pic you captured.
  • Screen recording:
    first thing you need to do is to configure your destination settings. In this sampl ewe use Dropbox. You must have a user account with Dropbox. If so... in themain ShareX menu go to Destinations >> Destination Settigs and select Dropbox.Execute the verification. Close the screen [X]. Then Select from the ShareX main menu >> Capture>> Screen recording. You can manupulate the size of the screen recording; a counter is running below the capture. After STOP...the file (mp4) is saved in your dropbox folder e.g. https://www.dropbox.com/home/Public/ShareX/2016/06
  • Screen recording (GIF):
  • Scrolling capture
  • Webpage capture:
    select this function, set this window @ max. and type or paste the URL; Enter. Press Upload button to capture.
  • Text capture (OCR)
  • Auto capture
Upload
  • Upload file
  • Upload folder
  • Upload from clipboard
  • Upload from URL
  • Drag and drop upload
Workflows
Workflows has to do with the assigned F-keys as we descibed in Chapter 1. Some of the functions in the Capture menu are already linked to one of your F-keys. The most frequent used functions are taking a capture of a full screen, a window or a region from a window or screen. If you have chosen your F-keys already, review them again and decide if that is what you want.
TIP: if you want to make a capture from a predefined square of a region, first select Region and then move the mouse to the part of the region to capture. You will see this highlighted square by square.
Tools
  • Color Picker
  • Screen color picker
  • Image editor
  • Image effects
  • Hash check
  • DNS changer
  • QR code
  • Ruler
  • Automate
  • Directory indexer
  • Image combiner
  • Video thumnailer
  • FTP client
  • Tweet message
  • Monitor test
16 opmerkingen
func_croc 20 nov 2021 om 2:39 
when i try to record my game it shows the game only in a corner and the rest is my wallpaper.
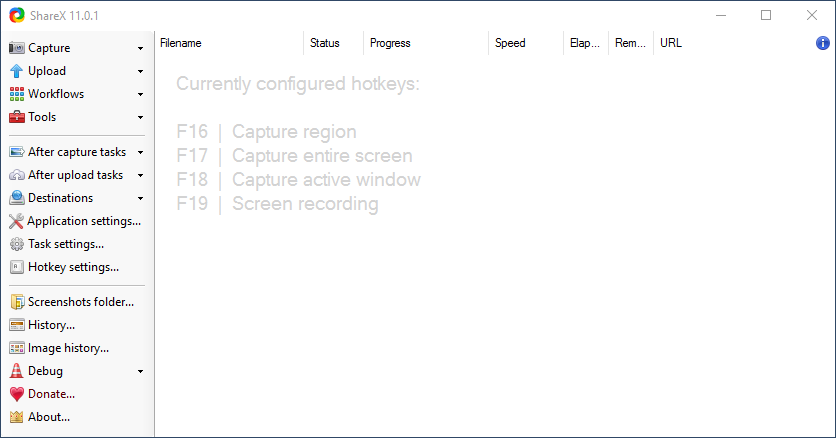
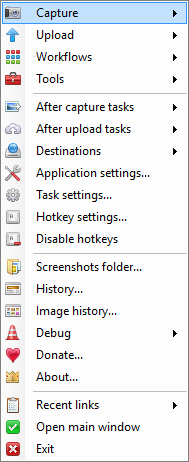
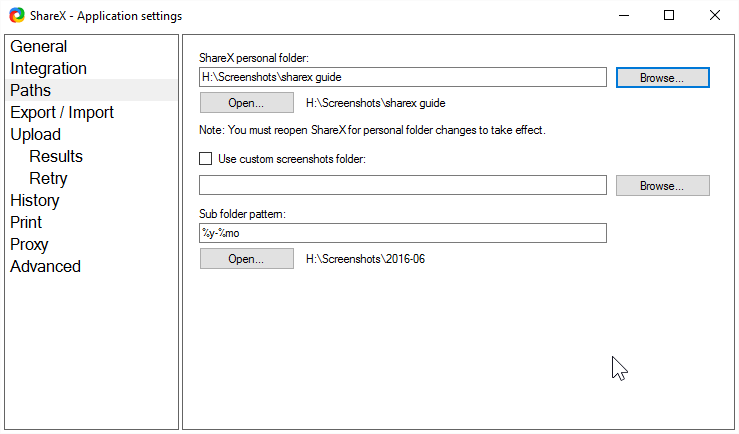
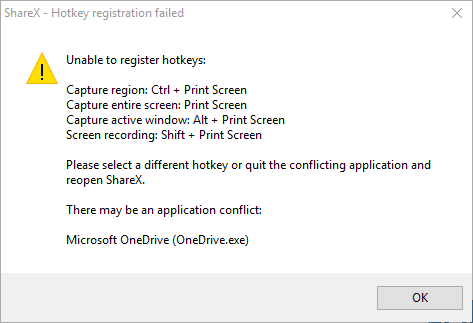
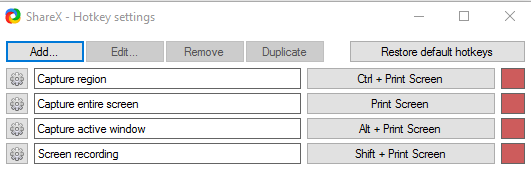
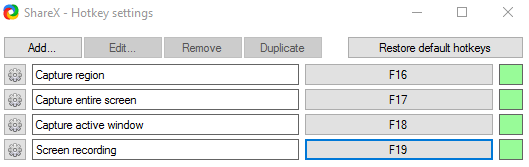
am i doing something wrong?
Snake Eyes ✰ 4 mrt 2021 om 10:26 
@BoilingOil: ShareX should be able to do that... check your hotkey settings and maybe also settings of your os I'd say.
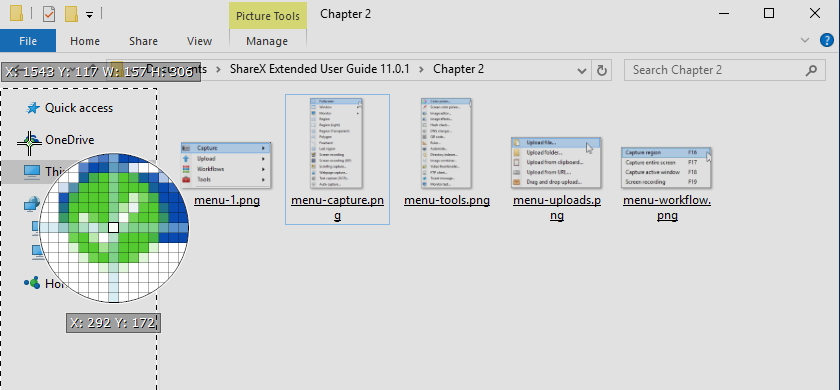
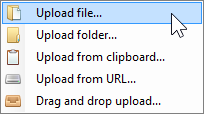
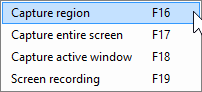
When I press print it just screenshots the whole screen without me needing to select the area... The program gives you like 3 options for screenshotting (active window, full screen, area).
nihility 1 nov 2020 om 11:32 
of course it cant screenshot ur game old man
MagicMarker 6 okt 2020 om 14:11 
With all the complexity in the settings, with all the capabilities of this program, one would think that ShareX is a great program, considering that it's free to use. It does a lot, I'll grant you that.
But for all its features, making screenshots of most of my full-screen games instead of grabbing my Desktop background every time, is apparently too much to expect. And since making screenshots of my games was the main point of me installing a program such as this, I'm not happy with ShareX.

Oh well, no harm done. Fortunately, there are alternatives.
Meswak 4 sep 2020 om 16:11 
@NegaLimbo It should be in the system tray (the up arrow next to the date and time on the right side of the taskbar). Right-click the ShareX icon and click Exit.
NegaLimbo 9 jun 2019 om 18:34 
My ShareX app is still running, even when I'm not using it. When I close the app, I can't reopen it because it's still running. How do I turn the app off when I don't need it at the moment?
lightwo 6 mrt 2019 om 9:44 
How can I configure it to scan for screenshots in a custom Steam screenshot folder? I simply want to use this program to edit game screenshots... and occasionally other screenshots, in which case I believe the default settings would work fine.
KSG第一战队小军 28 nov 2017 om 10:58 
3666
两仪式 29 jun 2017 om 23:18 
good.
chef 14 mei 2017 om 17:38 
@JanV: thank you so much!