SENRAN KAGURA SHINOVI VERSUS

SENRAN KAGURA SHINOVI VERSUS

139 ratings
Downsampling 4K using DSR w/ Anti-Aliasing, Anisotropic Filtering and Ambient Occlusion settings [Updated: 12.07.2016]
By Sly
Can't get GeDoSaTo to work? Don't want to disable Secure Boot just to downscale your games? Check this out, this guide makes use of Nvidia's DSR technology along with the Nvidia Inspector tool in order to introduce advanced Anti Aliasing (MSAA or SuperSampling), Anisotropic Filtering (x8 or x16) and Ambient Occlusion (HBAO, SSAO) settings to make your game look as amazing as can be!

So, why is this a thing? Why not use GeDoSaTo?
GeDoSaTo definitely has more versatility, but some people may not want to disable Secure Boot while others may just have difficulties getting it to work in the first place. Hopefully this guide was pretty easy to follow and now gives you an alternative method run a game at 4K.

Why do I prefer this method personally?
GeDoSaTo won't take 4K/8K screenshots unless you set keybindings to take "full" screenshots, because DSR is running the desktop and game in 4K it means that even using Steam's overlay to take screenshots will give you full 4K screenshots. You can also couple this method with Shadowplay and record the game in full 4K. If you use GeDoSaTo, while the game is being downsampled from 4K, the window resolution is still set to 1080p on the desktop which means you'll only be able to record in 1080p. While you could argue that the image retains 4K's sharpness etc. in my opinion it voids the point of even downsampling the image in the first place, especially if you're a Youtuber who wants to capture the game in the highest quality possible.

As always the guide is WIP and will be updated to include valid contributions and useful corrections by other users.
   
Award
Favorite
Favorited
Unfavorite
Preparing NVIDIA Inspector
1. Required Software/Drivers

2. Extracting/Installing NVIDIA Inspector
  • Create a folder in a memorable place and name it "Nvidia Inspector"
  • Drag the following files of the zip into the new folder so it looks like the GIF below
    "nvidiaInspector.exe.config"
    "nvidiaInspector.exe"
    "CustomSettingNames_en-EN.xml"


3. Updating NVIDIA Inspector
  • Double click on "nvidiaInspector.exe"
  • At the bottom of the window there should be a line of text that says "New Version 1.9.7.6 available. - Update Now!" Click it to update the program
  • After the program has updated there should be 2 new files in the folder
    "change.log"
    "nvidiaProfileInspector.exe"


4. We're ready!
We'll be using "nvidiaProfileInspector.exe" in the next part of the guide to set up the Anti - Aliasing compatibility, Ambient Occlusion and Anisotropic Filtering!
Creating and Modifying an NVIDIA profile for SENRAN KAGURA: SHINOVI VERSUS using NVIDIA Inspector
1. Opening/Creating a profile in NVIDIA Inspector
  • Double click on "nvidiaProfileInspector.exe" to open the profile inspector
  • On the top row of buttons there should be a button which looks like a Sun (Refer to screenshot below for help), click on this and a new window should pop up and ask you to name the new profile.
  • I've named the profile "SENRAN KAGURA SHINOVI VERSUS" for the purpose of the guide.


2. Editing the Senran Kagura Profile
After creating the profile it should now be selected and ready to edit. First we're going to add the games .exe so the profile knows what it should be applying our specified values to.
  • Click the icon which contains a picture of a window with a green plus sign, a navigation window should now appear. (Refer to screenshot below for help)
  • Navigate to where you have installed Senran Kagura Shinovi Versus and select the executable that is called "SKShinoviVersus.exe" and press OK/Open
  • Once you've confirmed that the .exe name is showing in the green bar you can click "Apply Changes" on the right hand side of the window
  • The profile now knows which .exe it needs to apply it's values to when it detects that it is running and should now show the .exe file in the green bar below the buttons. Now we need to edit the values to our specification.


3. Profile Settings - Compatibility
You might want to try out different Ambient Occlusion compatibility options. I've selected Mirrors Edge here randomly. Some compatibility options will look better than others, some could look too intense while others will be too weak to notice. You'll need to go through them all to find the most optimal one, unforunately I haven't had time to test them all myself.


4. Profile Settings - Antialiasing
If you're using a video card that has low VRAM you may want to try a different method of AA. I've personally tried "2x [2x Multisampling]" and "2x2 [2x2 Supersampling (D3D only)]". Supersampling will stress your card out a lot more than 2x Multisampling but using Multisampling will use more VRAM. If both options suck for you, you can try not using AA at all. At 4K you should be able to get away with no AA. Having a small amount e.g 2xMultisampling is preferable though


5. Profile Settings - Texture Filtering


6. Profile Settings - Common


7. Remember to Apply Changes!
Setting up DSR via Nvidia Control Panel
1. Open the Nvidia Control Panel
  • Right click on your Desktop and select "NVIDIA Control Panel" from the context menu to access the control panel.

2. Enabling DSR (fig. 1,2)
Note: you should have a 1080p monitor before attempting this, using a resolution other than 1080p while using different scaling options can lead to odd resolutions and aspect ratio issues
  • On the left hand side of the window, click on "Manage 3D Settings"
  • Scroll down until you see "DSR - Factors" and then click on the dropdown box, tick "4.00x (native resolution)" and then click OK
  • Just below "DSR - Factors" there should be a "DSR - Smoothness" option which you can now modify. Click on it and drag the bar all the way to the left so the smoothness is set to "0%"


3. Changing to the DSR resolution (fig. 3,4)
Note: You don't need to have this resolution set constantly, you can switch back to 1080p when you're not playing the game. Each time you want to play the game though you will need to go back to the 4K DSR resolution.
  • Click on "Change resolution" and make sure your main monitor is selected
  • In the Resolution box, scroll upwards until you see the heading "Dynamic Super Resolution" and a resolution named "3840 x 2160 (4.00x)"
    (I have 2 versions of the 4K resolution, ignore this. It's because I'm using DisplayPort on a 144hz monitor, the "HD" version is forcing 60hz while the normal option I select lets me freely choose my refresh rate. This should not happen for you unless you are also using a 144hz monitor)


4. Small explanation before continuing...

As stated before, you DO NOT NEED to have this 4K resolution running constantly. Only when you intend on playing the game should you enable it. When you're not playing the game I recommend you set your resolution back to 1080p.
Starting the game in 4K
1. Check your resolution
Make sure you have your desktop resolution set to the 4K resolution that we set up.

2. Make sure your game settings are correct
Make sure the game is set to Borderless Windowed mode (The resolution inside of the game will always say "1920x1080". This resolution is for the FULLSCREEN mode which we don't use. When you run the game in Windowed Borderless the resolution that is set inside of the game is ignored and the game uses the resolution of the Desktop instead.

Have fun!
If you've followed everything correctly,
  • Your desktop should be set to 4K
  • The game should be running in Borderless Windowed and running in 4K (ignore the in-game resolution setting)
  • The game should be anti aliased and should look smooth while retaining sharpness thanks to downsampling a 4K Multisampled image (or supersampled image, depending on which AA method you chose)

So, why is this a thing? Why not use GeDoSaTo?
GeDoSaTo definitely has more versatility, but some people may not want to disable Secure Boot while others may just have difficulties getting it to work to start with. Hopefully this guide was pretty easy to follow and now gives you an alternative method run a game at 4K.

Why do I prefer this method personally?
GeDoSaTo won't take 4K/8K screenshots unless you set keybindings to take "full" screenshots, because DSR is running the desktop and game in 4K it means that even using Steam's overlay to take screenshots will give you full 4K screenshots. You can also couple this method with Shadowplay and record the game in full 4K. If you use GeDoSaTo, while the game is being downsampled from 4K, the window resolution is still set to 1080p on the desktop which means you'll only be able to record in 1080p. While you could argue that the image retains 4K's sharpness etc. in my opinion it voids the point of even downsampling the image in the first place, especially if you're a Youtuber who wants to capture the game in the highest quality possible.
Screenshots (For Science)
Example of Ambient Occlusion


4K Screenshots


Changelog
Version 1.02 - 12.07.2016
  • Changed "Application.exe" to "SKShinoviVersus.exe" in the Nvidia Inspector section of the guide to reflect recent game updates

Version 1.01 - 04.06.2016
  • Added 4K Screenshots
  • Minor corrections

Version 1.00 - 04.06.2016
  • Initial Release
54 Comments
Silas551 Nov 27, 2018 @ 4:02pm 
I don't see DSR in the NVIDIA Control Panel.
Detrian Jan 4, 2018 @ 10:29pm 
Going to guess no one found a good ambient occlusion compatibility code?
Honorable_D Mar 18, 2017 @ 2:11pm 
Doesn't seem to be having any effect on the game.

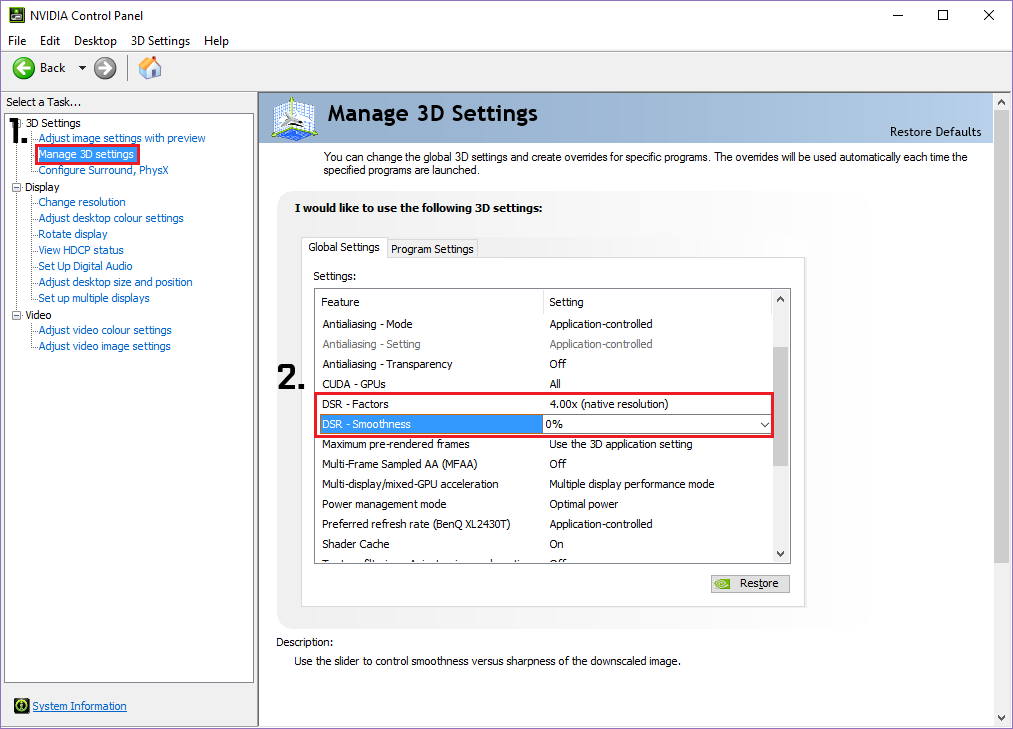
Set everything up pretty much exactly how you have it shown...do you need to leave the inspector/profile inspector minimized (running) or anything?

What compatibility did you use for the AA? The D3 didn't seem to work...
Rarewolf Mar 7, 2017 @ 2:38pm 
windows 10, and i have two GPUs a 970 EVGA and a 650 Zotac
Rarewolf Mar 7, 2017 @ 2:35pm 
well, it keeps crashing when i start it up. crap.
Rarewolf Mar 7, 2017 @ 2:28pm 
well that helps a lot and it explains much, thanks!
Sly  [author] Mar 7, 2017 @ 2:09pm 
Also, the 3D Settings in the Nvidia control panel do not allow you to select a compatibility hex string/anti-aliasing hex string, which is important to get any of the AA/AO fixes/mods to work in the first place
Sly  [author] Mar 7, 2017 @ 2:05pm 
3D settings in Nvidia control panel are global so they would apply for every game which isn't necessary or desired.
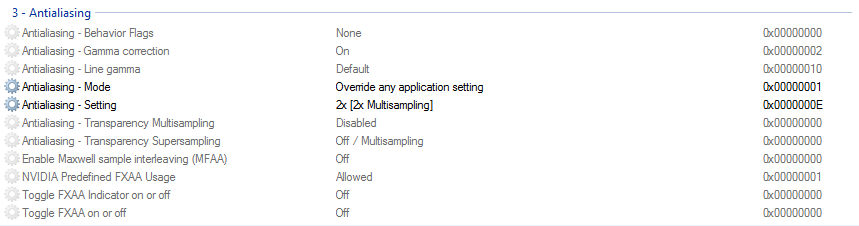
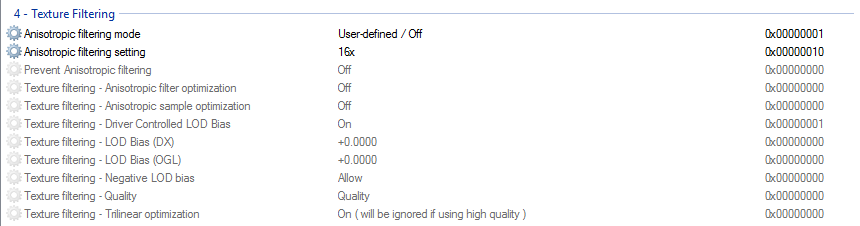
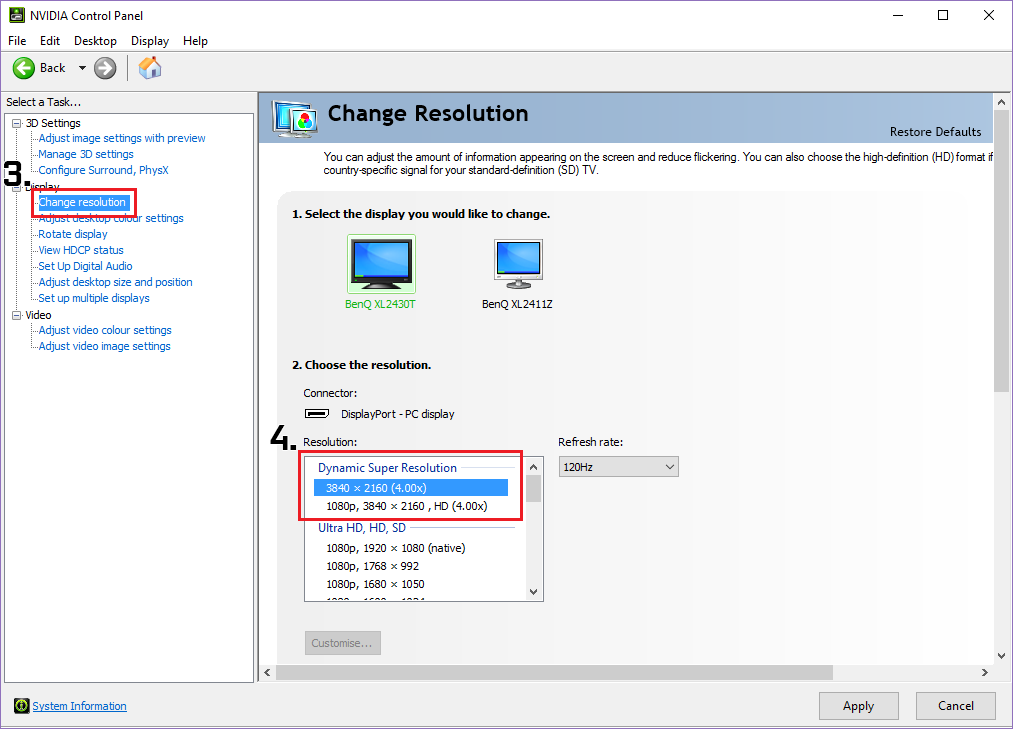
If you use the "Program Settings" tab you can change settings for individual programs like you would in Nvidia Inspector, the only difference being that it's an extremely cut down version and doesn't let you customise anywhere near as much as Nvidia Inspector which lets you make tweaks to some more advanced settings which is useful in trying to get these override style settings to work in the first place.
Rarewolf Mar 7, 2017 @ 3:29am 
alright been looking to play this in higher definition textures, but this looks close enough. i have a few questions.

1: why do we need "nvidia inspector"?
cant we just use 3D settings> manage 3D settings
and for global set ambient Occlussion and anisotropic filtering to max?

2: wont the explanation from 1 work just like that? or does nvidia inspector create something different?
DarkSpartan Mar 5, 2017 @ 8:01am 
Somehow that AA flag doesn't work for me. And I tried everything, even did a clean driver installation. Downsampling with Gedosato was my only solution...