Tom Clancy's Rainbow Six Siege

Tom Clancy's Rainbow Six Siege

129 ratings
The Unofficial Rainbow Six Siege Handbook [OPERATION HEALTH]
By Super Joe
UPDATED 31/05/2017 - An easy to digest guide to the many facets of Rainbow Six Siege's gameplay. This guide will cover Operators, Weapons, Maps (coming soon) and miscellaneous tips that will help you on your way to perfecting at least some of the game's many layers.
   
Award
Favorite
Favorited
Unfavorite
Introduction
Siege combines traits from some of the earlier tactical entries in the series with a much greater focus on modern, easy to learn aspects that players have become familiar with over recent years. If you're at all struggling with certain aspects of Siege's multiplayer at any skill level, I'm hoping this guide can contribute to some kind of self-improvement for you. Say you're the best darn player you know when it comes to attacking on Bank, but you just can't seem to defend it well at all - I hope to give you some sort of a glimpse as to at least one general or specific concept that will help improve your chances of success.

Any relevant questions or constructive feedback? Leave them in the comments.
Changelog
31/05/2017 - The guide has been updated with tips and tricks for the GEO (Spanish) operators Mira and Jackal that were introduced in Operation Velvet Shell. Better late than never! Glaz has been slightly updated with mention of his thermal scope upgrade.

30/05/2017 - Finally updated the guide with guidance on the SAT (Japanese) operators. Made a few tweaks to other operators, and left room for the GEO (Spanish) operators to be introduced to the guide. Content on GEO is currently being drafted.

21/08/2016 - Tips for the new BOPE operators, Capitão and Caveira, have been added to the guide. I'm currently working through all the other operators to make sure they're as up-to-date as can be.

19/08/2016 - Formatting changes to accommodate future updates, including the introduction of the new Season 3 BOPE operators which will be properly added to the guide soon.

28/06/2016 - Updated the guide to reflect changes introduced in Patch 3.3 relating to Kapkan. The changes for Mute from the same patch weren't significant enough to warrant any new information on the guide.

04/06/2016 - Season 2: Dust line has been released since the guide was last updated, so I've made a few tweaks and additions including:
  • Added sections for the new Navy SEAL operators, Blackbeard and Valkyrie.
  • Updated the section on IQ - she's more useful now.
  • Removed mention of losing points if you destroy Rook's bag as a defender - this no longer happens.
  • Edited bullet point about Compensators over Flash Hiders - Flash Hiders aren't the obvious choice anymore.
  • Grammatical fixes, slight layout tweaks.

29/04/2016 - Version 1 of the guide has been published. There is still a lot I want to include in this guide including, but not limited to:
  • Screenshots/Videos/GIFVs to help demonstrate more 'advanced' concepts.
  • Flavour text to make the Operators sections 'pop' a little more, and perhaps link to the individual Operator Videos when readers click the Operator icons.
  • Map tips, including favoured positions for defenders and optimal wall reinforcement placement.
  • General improvements to the layout and formatting of the guide.
  • A section detailing my preferred configurations for each primary weapon.
  • As always, I will attempt to constantly update the Operator section with more information when it comes to me.
Basics
Gameplay Structure
Tom Clancy's Rainbow Six Siege is a 5v5 multiplayer first-person shooter that has one team defending one or more objectives whilst one team attempts to seek out the objective and either eliminate the opposition or complete said objective. Each team can pick from a selection of unique 'operators' that each have their own special abilities and varied equipment. Each operator can only be selected once per team and each team has a different set of operators to choose from depending on whether they are attacking or defending.

The attacking team's operator abilities mainly focus on breaking down walls/floors/ceilings, disabling the defending team's gadgets or creating mobile cover in the form of Tactical Shields. The defending team's abilities are designed around fortifying position. This can be done in a number of ways including reinforcing walls to make them almost unbreachable, preventing the attacking team's gadgets from working or slowing access to certain areas by laying traps.

Once a player has taken enough damage, they are put into a downed state (sometimes know as "Down But Not Out (DBNO)") and must be revived by a teammate if they are to survive. In a downed state, players cannot their weapons or any equipment they have. If not revived after a certain amount of time, the player dies. If a player takes damage in a downed state, they are killed. In Rainbow Six Siege, there are no respawns. If you die, you are taken to a spectator view in which you can see through your team's perspective or view the camera feeds.

Modes/Objectives
There are three objective modes that you will encounter in Siege:
  • B defusal. The defenders have two bombs which they have to defend. The attackers attempt to take a defuser (held by one member of their team) and plant it at one of the two bombs. Once planted, the defuser will defuse the bomb if left successfully defended for a set amount of time.
  • Hostage rescue. Attackers must locate and retrieve the hostage being held by the defenders somewhere on the map. To retrieve the hostage, the attackers must approach and interact with them up close so they can escort them outside to a safe distance. The hostage can be wounded or even killed, and whichever player deals the killing blow will cause their team to lose the round instantly.
  • Secure area. Defenders spawn in a location containing a biohazard container which they must protect. Attackers must enter the same room as the biohazard container and hold it for a set amount of time to win.
In any of these three modes, both teams can win in one of two ways:
  • Eliminating all members of the opposing team
  • Attackers successfully complete their objective/Defenders stop the attackers completing their objective

    More often than not, rounds are won by one team simply eliminating the opposing team. However, with the right strategy and coordination, playing the objectives can be a much more efficient way of achieving victory. I've seen plenty of hostage rescue matches be won by attackers exploiting a blatant weakness in the enemy's defenses and rushing in to grab the hostage.
Key Skills or 'Things to Know'
General
  • Walking (ALT) is important. Though many players tend to simply stay crouched whilst moving (or even go prone), you can toggle walking which is much quieter - even silent in some cases. Toggling walk while crouching is even quieter still. Sure, you'll move slow but that won't matter when you sneak up on an unsuspecting enemy operator.
  • Be aware of your silhouette. A good example of this mantra can be found in Buck. His C8 is a lot shorter than his CAMRS, thus creating a smaller target which is less likely to be seen when coming around a corner. A long rifle barrel poking around the corner is obviously a dead giveaway. This isn't as important as it was in previous Rainbow Six titles as they were much slower games, but it still applies here.
  • Headphones. Sound is incredibly important in this game, so a good pair of ear cans is a must. Find yourself a good headset, or preferably acquire a quality set of headphones paired with a desktop or stick-on microphone. You need to be able to hear everything from loud gunshots and footsteps to the subtle rustling of an enemy operator's equipment. I recommend an 'open' set and if you're fortunate enough to try a few options in a store, remember that comfort is important too!
  • Do you know there is an enemy operator around the corner, but don't know if it is safe to engage? Maybe they know you're there, too! In this case, it can often be beneficial to listen for them swapping weapons or equipping their gadget. For instance, Pulse may well know you're around the next corner - but you do too, so if you hear him getting out/putting away his Cardiac Sensor then you'd better run around that corner and shoot him first!
  • Have the Nitro Cell equipped? Though it may seem sensible to plant the charge and lie in wait for someone to come flying through the window you have it planted below, the beeping sound it makes is really noticeable. Not only that, but IQ will be able to see it either her gadget, Twitch will be able to shoot it with her drone, Thatcher can neutralise it in a second with his EMP Grenades...and anybody can simply shoot it with their weapon of choice. Get used to throwing it towards unsuspecting enemies instead!
  • Shotguns are great for punching holes in walls and floors. Specifically, hatches. Primarily as a defender, if you see a hatch on the floor below you it is often a sound plan to shoot it out. This will give you and your team another sightline that was previously inaccessible. A useful example is pictured below on the map 'House' - from the top floor, you can shoot a hatch on the landing which allows you to see the stairs that lead from the basement up to the kitchen.
Weapons
  • Ammunition is finite in Siege meaning that every shot counts! No operator can replenish ammunition for themselves or their teammates meaning players must try not to rely too heavily on 'spraying and praying' (holding the trigger and hoping they hit something).
  • Headshots are a guaranteed one hit kill with any weapon type - including pistols. Don't be afraid to resort to your sidearm in a firefight, particularly if it's up close.
  • The statistics for each weapon as shown on the operator customisation screen are not entirely accurate and should not be relied upon. The best way to make an informed choice is to simply give each weapon a try for several matches and make up your own mind. Often, a Siege player's choice of weapon is based entirely on preference. A good example of this is Ash - her R4-C rifle is generally considered to be the best especially when compared with the G36C on the statistics screen. However, players have recently found that it's slower rate of fire and greater stability make it a preferred option.
  • Wondering which of the two loud barrel attachments to equip? They have both been tweaked since Season 2 so they are both useful unlike before. The Compensator helps with sustained fire (holding the left mouse button) whereas the Flash Hider makes bursting or 'tapping' the left mouse button more effective. Basically, your choice now depends on how you use the weapon. For example, I tend to equip the Compensator on Ash's G36C and equip the Flash Hider on her R4-C because of the differences between those two weapons.
  • Glaz's OTs-03 marksman rifle can penetrate the windows of the Presidential Plane. Once it breaks the windows of the plane, any operator can shoot through from either side.
  • Laser sights on your weapons are generally considered useless unless you're playing as an operator who is equipped with a shield (Blitz, Fuze or Montagne). The improvement to hip-fire accuracy is negligible - but as a shield operator, hip firing is required if you still want to engage the enemy with your shield up, so even the slightest improvement is welcome. Not only that, but if you're not aiming down the sight in Siege then you're simply asking for trouble.
  • Try the ACOG as the optic on your weapon of choice should it be available. Though it may seem counter-intuitive to choose what is generally considered to be a medium/long range scope on a game focused around close quarters combat, one can become a force to be reckoned with if you practice landing headshots on your enemies whilst using the ACOG. After all, a greater zoom means a bigger target.
  • I find that suppressors on pistols for almost all attacking operators to be invaluable (I tend to leave the pistols of shield operators like Blitz, Fuze and Montagne unsuppressed). You often need to shoot out cameras as an attacker, and you're much better off doing that with a gun that is quiet(er).
BOPE (Brazil) Operators
Tips in this section refer to playing as said operator, playing alongside them or playing against them.

Capitão

  • Capitão's greatest asset is his speed. Much like Ash, he has an armour rating of 1 and a speed rating of 3 making excellent at rushing. His PARA-308 assault rifle, when equipped with an Angled Grip for faster ADS (Aiming Down Sight), is a real beast when used effectively whilst rushing into a room.
  • The Tactical Crossbow, Capitão's unique gadget, allows for varied strategies which are most useful when defending an objective (bomb or biohazard container) or covering the exit of a teammate who is escorting the hostage. It carries two ammo types: Asphyxiating Bolts and Micro Smoke Grenades. The bolts burn oxygen in a small area which is great for blocking entrances either to keep enemies out or lock them in. The micro smoke grenades have quite an obvious use: they obscure vision which help with quick escapes or fast entrances to a room where the smoke will confuse and perhaps fragment the enemy team.
  • Capitão's alternative primary, the M249, isn't a great option. A large ammo pool sounds like it'd be useful (or even fun), but it doesn't have much practical use. The PARA-308 does good damage and is pretty stable, leading to a potential steady influx of easy headshots.
  • Frag grenades - a brilliant choice. Not too many operators have frags as a kit option, but Capitão is one of them. Cook them right (by holding the grenade button for a time before letting go to throw it) and they're a great tool for flushing enemies out from behind fortifications or even some easy outright kills.
Caveira

  • Caveira's ability can be tricky to use, but is an extremely powerful asset. Caveira uses her "Silent Step" skill to make her footsteps much quieter, making it easier for her to employ her true skill: interrogation. If an enemy is downed, Caveira can interrogate the enemy to find the location of all the remaining members of their team. Though you don't see the outline of the enemy operators, you will see their name and operator icon above their head in real-time. The ability to see the enemy locations lasts a decent amount of time and can easily turn the tide of a round very quickly.
  • Whilst using Silent Step, Caveira can only use her pistol - a modified version of an PRB92 (as used by Capitão) equipped with a suppressor and loaded with subsonic ammunition, which makes it super quiet. It doesn't do too much damage but at close range it has high knockdown power, allowing for a Caveira player to more easily put enemies into a down-but-not-out (DBNO) state for interrogation.
  • Whilst in Silent Step, you can use your melee attack to guarantee that your target gets but into a DBNO state instead of outright neutralising them. It can be risky, but if you use corner cover and a good pair of headphones correctly, you may be close enough already to offset the risk.
  • Of course, interrogation isn't always your best option (or an option at all). You can only really use interrogation if you're absolutely sure that other enemies aren't closeby, as the few seconds it takes to interrogate your target could lead to an easy kill for the enemy and the revival of your target. Previously, I've used a downed enemy as bait by waiting for their teammate(s) to appear to seek me out/revive their comrade only for me to throw a Nitro Cell right on top of them for an easy multi-kill. Who needs to know their locations if they're already dead, right?

Operator icons sourced from the Rainbow Six Wikia[rainbowsix.wikia.com].
FBI SWAT (USA) Attacking Operators
Tips in this section refer to playing as said operator, playing alongside them or playing against them.

Ash
  • With her unique gadget, the M120 CREM, Ash can fire a breaching round that will burrow into a surface and detonate automatically. She has two breaching rounds per round.
  • Ash's breaching rounds are excellent on maps like House where windows offer advantageous sight lines. Typically, I like to play Ash alongside a confident Glaz or Buck (equipped with the CAMRS) player who can then engage targets from range using the hole created by the breaching round.
  • Ash is a lightly armoured operator and her R4-C rifle offers a high rate of fire. It's worth capitalising on these two aspects of her character by learning to rush in and try for a quick headshot on any unsuspecting (or slow) foes.
Thermite
  • Arguably the most important attacker. Thermite is the only operator who can break through walls/floors that have been reinforced with his unique Exothermic Charge.
  • Destroying reinforced walls is what Thermite does best, but there are ways defending operators can counter his exothermic charge. For those individuals - there's Thatcher. It's important that Thermite and Thatcher work together as an objective room that's tightly defended and well reinforced can mean a swift end for an attacking team.
  • Just like standard Breach Charges, Thermite's Exothermic Charge can be jammed by Mute's Signal Disruptors and Bandit's Shock Wires can stop Thermite from using his gadget at all.
  • Though the M1014 is currently one of the best shotguns, shotguns don't tend to be a brilliant option for attackers most of the time. Fortunately, Thermite's SIG 556 is a formidable choice. It has impressive range, damage and a solid rate of fire. The range of the 556 really comes into its own if you get used to using an ACOG sight though your sight choice always depends on your playstyle first and foremost.
  • Are you planting your Exothermic Charges only to see them destroyed before your very eyes just as you set them off? If an enemy Bandit is particularly fast and clever, he can quickly attach a battery to the reinforced wall you're trying to blow, thus destroying your charge. Frustrating, but legitimate - many players cry foul play the first few times they experience this due to a lack of understanding.

Operator icons sourced from the Rainbow Six Wikia[rainbowsix.wikia.com].
FBI SWAT (USA) Defending Operators
Tips in this section refer to playing as said operator, playing alongside them or playing against them.

Castle

  • Castle can put up to 3 armoured panels on doorways and windows that are bulletproof. They can be taken out by standard Breach Charges, Ash's M120 (her gadget), Sledge's hammer or 12 melee attacks.
  • Armoured panels can be penetrated by Glaz's OTs-03 marksman rifle. Buck's CAMRS rifle has the potential to also penetrate the panels, though I have not yet tested this.
  • When coupled with Mute's Signal Disruptors, Castle's armoured panels can be extremely effective at funnelling enemies through choke points due to it severely limiting their available entry points.
  • Are you constantly getting frustrated about the Castle on your team who keeps locking you into rooms with his upgraded barricades? Don't worry, you can hold F to tear them down and they will be refunded to him instantly. However, if you remove them by shooting them/blowing them up/bashing them, he will not get it back. What a waste! In the event that you do tear one down, it's typically polite to inform him.
  • Castle's UMP-45 has an extremely forgiving spray pattern and very controllable rate of fire making it one of the best SMGs in the game, particularly if you're adept at getting headshots.
Pulse
  • Pulse's unique gadget is the Cardiac Sensor (Heartbeat Sensor). Though its range is limited, the importance of this tool shouldn't have to be explained - basically, Pulse has in-game wall hacks.
  • The Cardiac Sensor works kind of like Sonar in the sense that it only 'pings' an image to your screen every few seconds (I have yet to time it, but I will). The heartbeat indicator will get clearer and the sound it emits will get louder depending on how close the enemy is. Note that enemies can hear the sound from the Sensor too, so players that are playing close attention may well know you're nearby.
  • Pulse is an exceptional roamer that requires quite a bit of experience to 'get right'. This is because he won't take many hits before going down and his gadget, the Cardiac Sensor, doesn't have great range.
  • Playing as Pulse relies on a very important core skill - knowing when to strike. This will come with experience, but whenever I play as Pulse I often get into situations where moment to moment decision making is crucial. Often choosing to risk it all by running around that corner to take out the enemy on the other side (or shooting through the wall with his M1014) can mean the difference between life and death not just for you, but for your entire team.
  • Both of Pulse's primary weapons are very strong. The M1014 is fantastic up close and has great penetration on walls and floors, which is a brilliant Yin to the Cardiac Sensor's Yang. On the other hand the UMP-45 has almost perfect stability, a good rate of fire and impressive damage for those encounters that are a little further away.

Operator icons sourced from the Rainbow Six Wikia[rainbowsix.wikia.com].
GEO (Spain) Operators
Tips in this section refer to playing as said operator, playing alongside them or playing against them.
Jackal

  • A medium armour/speed operator, Jackal uses his unique Eyenox gadget to see footprints left behind by enemy defenders. The footprints can be 'interacted' with to ping the location of the operator who made them every ten seconds for a minute. The ping is visible by all members of your team.
  • When the Eyenox gadget is activated, the footprints visible on the ground are colour coded depending on the age of the prints. Fresh prints are coloured orange/red while older ones are coloured blue/green (think hot and cold).
  • Getting shot or being disrupted by Mute's Signal Disruptors causes the Eyenox to interfere with your vision if they're equipped/active.
  • Jackal's C7E rifle is a formidable choice, which is part of his main appeal. The damage and rate of fire are some of the highest in the game, though the rifle doesn't handle full-auto too well - so make your shots count.
  • Much like Mira, Jackal has the option of both a primary and secondary shotgun. The secondary shotgun is more compact and does a lot less damage, but is a great weapon for opening up holes in walls/floors. The ability for an attacking operator who isn't Buck or Sledge to punch holes on demand can be extremely valuable. That said, I do still tend to prefer his USP40 for my secondary as my Jackal play style doesn't call for much hole punching.
  • It can be risky, but using the Eyenox's active ability to ping enemies is sometimes best used at the last possible moment. Say you know there's an enemy nearby as you have followed their trail or have heard them - pinging their location if you're close by means you may be able to get a quick down through a wall or other surface before they have time to relocate.
  • It goes without saying that Jackal can be extremely useful on maps like Presidential Plane where roamers can often be difficult to locate or catch off-guard.
Mira

  • Mira's unique gadget is a pair of Black Mirrors. The Black Mirror is deployable on most walls and acts as a one-way window allowing defenders to see clearly through it, but for attackers on the other side to see nothing. There is a canister on the bottom frame of the glass that can be destroyed which pops the bulletproof one-way glass out allowing for the bullets to fly...both ways. This glass cannot be replaced once removed.
  • Destroying the canister to remove the glass takes a couple of seconds and a noise makes it obvious to operators on both sides that the glass is about to be removed - this obviously takes away the element of surprise, so it is often best to only do this when enemies are occupied by something else.
  • It is generally considered essential to deploy the Black Mirror on a wall that has been reinforced so that it isn't easily circumvented. That said, a useful trick is to deploy it on a reinforced wall next to a wall that isn't reinforced. That way if you see an enemy through the glass, you can side step whilst keeping your aim trained on their location and shoot through the non-reinforced wall for some really devilish kills.
  • Mira is a heavy armour operator, meaning she is slow but harder to take down. This is quite fitting for her ability though, as you're more likely to be hanging around the objective with your Black Mirrors than you are roaming around the map.
  • Her unique primary weapon is the Vector sub-machine gun. It fires .45 ACP rounds with an insane rate of fire, so it is definitely a force to be reckoned with. The magazine capacity lets it down somewhat, but I've had a great time with the Vector thanks to decent burst accuracy even at range.
  • Mira, much like Jackal, has the option to take a compact version of her primary shotgun as a secondary. This is a great defensive tool for punching small holes in non-reinforced surfaces. Couple this with the side-step Black Mirror trick mentioned earlier, and you can be a real nuisance to oncoming attackers.
GIGN (France) Attacking Operators
Tips in this section refer to playing as said operator, playing alongside them or playing against them.

Montagne
  • There isn't much to know about Montagne - he's just like a Fuze or a basic Recruit wielding a shield except he can extend his shield to the entire length of his body and out to the side a little. When used right, he can act as great mobile cover or a tremendous distraction. Otherwise, he's average at best.
  • Remember that shield bashing is your friend! If anyone comes up close, smack them with your shield for a quick down.
  • I tend to pick Montagne's P9 over the LFP586 revolver. Though the damage from the revolver is high, the ammo capacity is much lower than that of the P9. The P9 can also spit out rounds quite quickly, acting as a nice deterrent if you're firing from the hip whilst shielded. Some do prefer the revolver, though - it really is down to personal choice.
Twitch
  • Many people play as Twitch purely because of her FAMAS assault rifle - and with good reason. The rate of fire on the FAMAS is unmatched by any other weapon in its class and it does impressive damage to boot. Not the best reason to pick an operator, though.
  • Twitch's gadget is her unique Shock Drone. Just like the drones attackers control in the observation phase at the beginning of each round, the Shock Drone can drive up stairs and through small shafts in walls scattered around the map. However, the Shock Drone cannot jump and moves a little slower.
  • The Shock Drone can shoot out probes that deliver an electric shock. This can instantly destroy Bandit's Shock Wires, Mute's Signal Disruptors, Nitro Cells and Jager's Active Defense Systems as well as stationary cameras. It can also damage players, but it won't kill them instantly - death via shock drone is possible, however.

Operator icons sourced from the Rainbow Six Wikia[rainbowsix.wikia.com].
GIGN (France) Defending Operators
Tips in this section refer to playing as said operator, playing alongside them or playing against them.

Doc
  • Doc's gadget can revive others from range, and you can even revive yourself.
  • Having trouble killing Doc (or someone he has revived) after he's been downed? It may be because he's just revived himself with his gadget. In this state, it appears as though he gains brief invulnerability whilst standing up. Bizarre.
  • Quite often, teammates will ask a Doc to down them so they can be revived straight away. This is because revived players come back with 50 health - so if they have lower than 50 health, it makes sense to be downed on purpose to acquire more health. Be aware that if an enemy is nearby, this can go very bad for Doc and his teammate should they take advantage.
  • If you're playing as Doc and go to revive a teammate with your gadget, be careful you don't try and swap to it too quickly! It may swap back to your previous weapon without you realising before you go ahead and shoot your friend in the face - killing him instead of reviving him. You'd be surprised how often I see this happen.
Rook
  • Rook is a very basic but a really solid choice for any defending team. He has the ability to place a bag of Armour Plates down for players to use (even enemy attackers). When equipped, the armour plates increase your chances of going into a DBNO state as opposed to straight-up dying.
  • As I pointed out previously, Armour Plates can be picked up by attackers - so if you're playing as Rook, don't leave the bag lying around! If, for whatever reason, a member of your team hasn't equipped the plates it may be worth just destroying the bag. You don't lose points for destroying the bag like you used to.
  • A nice little trick the Armour Plates bag is to use it to cover up one of the ventilation shafts in the objective room you're defending. Why, you ask? Drones love to sneak in those little shafts, so it's a good way to cut off one entry point without wasting something like one of Mute's Signal Disruptors.
  • Rook has some good options when it comes to weaponry, but I recommend taking a look at his MP5. Slap an ACOG on it and you've got yourself a mean little SMG that doubles as a nice medium - sometimes even long - range weapon if you're good at tapping or burst firing with a steady hand.

Operator icons sourced from the Rainbow Six Wikia[rainbowsix.wikia.com].
GSG 9 (Germany) Attacking Operators
Tips in this section refer to playing as said operator, playing alongside them or playing against them.

Blitz
  • Blitz can use his unique tactical shield to blind his enemies up to five times per round thanks to the stun grenade-like panel on the front of it.
  • The shield ability can be triggered whether it is raised or lowered.
  • As with all shield operators, Blitz is susceptible to Nitro Cells and Smoke's Gas Grenades. However, with practice, one can get quick enough to shoot these gadgets as they're being thrown.
  • Shields make a whole lot of noise - don't expect to be able to sneak up on people very often.
  • In my opinion, the key to success with Blitz (or any of the other shield operators) is being able to lower the shield, ready your pistol, fire while aiming at the enemy's head, then raise the shield all in very quick succession. With practice, you can be extremely effective at taking threats down in the heat of battle.
  • Being meleed is bad. This is the same for any shield operator - so be careful! Being bashed up close causes you to stumble, meaning you briefly lose the ability to attack or protect yourself with the shield.
IQ
  • IQ used to be considered a total waste of time, despite her having a choice between two excellent assault rifles. However with the addition of the Navy SEAL Valkyrie and her Black Eye cameras, as well as a re-balance to IQ's Electronics Detector, IQ is a stronger option.
  • IQ's Electronics Detector can spot Pulse while he is using his Cardiac Sensor - use IQ's speed to your advantage and attack him if you can!
  • Valkyrie's Black Eye cameras can be a real nuisance to any attacking team because they're small and often hard to detect (unless the enemies are lingering on them for too long, making them glow brighter). IQ can spot these bad boys wherever they may be, whereas operators like Thatcher and Twitch will have a much tougher time of taking them out unlike other gadgets.

Operator icons sourced from the Rainbow Six Wikia[rainbowsix.wikia.com].
GSG 9 (Germany) Defending Operators
Tips in this section refer to playing as said operator, playing alongside them or playing against them.

Bandit
  • Bandit's shock wire stops Breach Charges from being deployed on reinforced walls and damages any enemy players foolish enough to press themselves up against them.
  • Advanced Bandit players have been known to keep one of their shock wires undeployed while they wait to hear an enemy Thermite readying his charge to place on a Reinforced Wall. If done quick enough, Bandit can attach the shock wire to the Reinforced Wall and rid Thermite of his unique Exothermic Charge gadget.
  • Bandit can attach his shock wire to metallic objects, mainly Reinforced Walls or Barbed Wire. However, they can also be attached to Deployable Shields which is a far less common usage for them.
Jäger
  • Jäger is the only defender who has an assault rifle in his loadout making him one of the most deadly combatants. His 416-C, when coupled with an ACOG sight and a steady hand, can make a real mess of the attacking team very quickly. On maps like Presidential Plane and Kanal where long sightlines from inside looking out to the attacking spawns are common, a proficient shooter can often take out the majority of an attacking team very quickly. Tap tap.
  • Jäger's gadget is the Active Defense System (ADS). This deployable (three charges) can be placed on walls or floors and is designed to neutralise any projectiles entering its radius. The ADS is probably the strongest counter to the attacking team's greatest ally - Thatcher's EMP Grenades.
  • Each ADS can only destroy two projectiles each before turning off, which you should always keep in mind especially when you're expect a Fuze to use his Cluster Charge on your team. If you put two or more ADS' close together, they will often intercept the same projectile thus wasting some of your gadget's potential. Spread them out and think carefully about where you put them.
  • As far as I can tell, there is no real 'best spots' to deploy Jäger's ADS. In time, you simply become accustomed to the gadget's strengths and weaknesses and will place them accordingly. For instance, placing them on walls is often more efficient but leads them more open to attack than they would be if they were on the floor.
  • Remember that Jäger's ADS' aren't nailed to the ground - if you need to, you can go back and pick them up to redeploy them at another location.
  • I play Jäger as a roamer most of the time and, as such, I tend to keep one ADS with me at all times. If I am camping a certain spot to try and get some sneaky kills on the enemy, I often deploy one ADS right at my feet just in case there's an enemy operator right close by that I am unaware of who may try to flush me out with a grenade. This has been the case more than once, and my backup ADS has always been worth it.

Operator icons sourced from the Rainbow Six Wikia[rainbowsix.wikia.com].
JTF2 (Canada) Operators
Tips in this section refer to playing as said operator, playing alongside them or playing against them.

Buck

  • It's important to realise that Buck is a side-grade to Sledge (or at least that is how I think of him). He is not better than Sledge or that much worse - he fills the same role of being able to make a hole very quickly without the enemy knowing beforehand using his Skeleton Key underbarrel shotgun. The only thing that makes Sledge a somewhat better option is that he can take down Castle's Armoured Panels. Buck can't.
  • Buck's CAMRS rifle is a fantastic killling machine - if you can get headshots consistently and handle a semi-automatic weapon at close range. Slap an ACOG on it and you have a magnificent rifle that can easily contest with Glaz's OTs-03 (except for Glaz having greater penetration). The added bonus of an underbarrel shotgun as a close-range backup helps, too.
  • Sadly, Buck's C8 isn't that great. It has fairly poor stability resulting in a rifle that can't beat the likes of the SAS's L85A2. Damage is okay, but again, the muzzle climb is pretty obscene making it difficult to use for little benefit. Try the CAMRS!
Frost (JTF2)

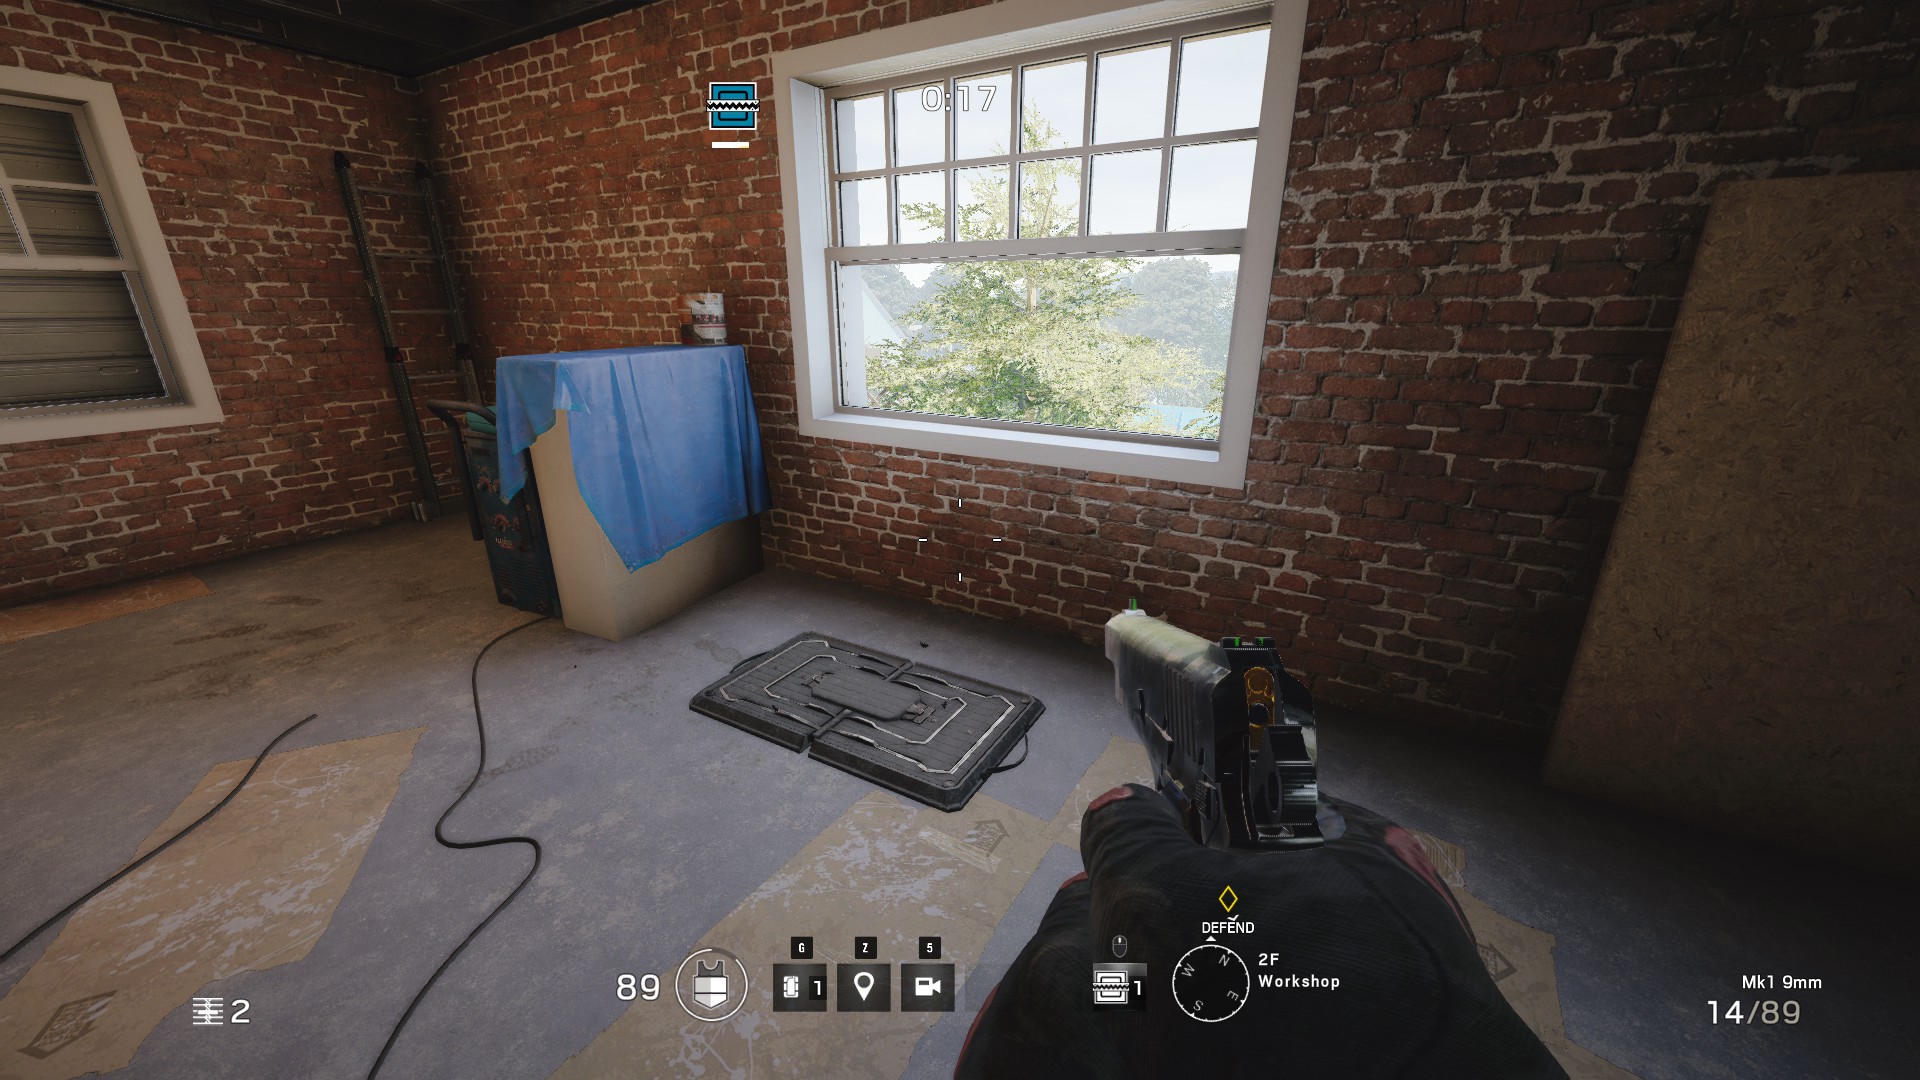
  • Trap placement is important. When deploying Frost's Welcome Mats at a window, you have two viable options. One is to place it with the wide edge against the length of the window (which is the more 'natural' way to do it), but to optimise its effectiveness you need to try and place it a short distance away from the wall. Another way is to place it with the short edge against the window and right up against the wall. Both of these placements ensure a guaranteed kill (there is no 'down' state for players coming through windows, so when they hit the welcome mat they die instantly). Screenshots of both of these placements below:


Operator icons sourced from the Rainbow Six Wikia[rainbowsix.wikia.com].
Navy SEAL (USA) Operators
Tips in this section refer to playing as said operator, playing alongside them or playing against them.

Blackbeard

  • Blackbeard has a shield that he can mount on his primary weapon (the Mk17 or the SR-25) and can take some amount of damage from gunfire before it shatters. The shield does not restrict Blackbeard's vision, but it does slow him down considerably.
  • A handy tip for getting around without unequipping your shield - swap to the Desert Eagle, Blackbeard's sidearm, for full movement speed. This is quicker than taking the shield off your primary only to put it back on later. However, this does make you less effective should you run into combat.
  • After much consideration and testing in genuine matches, I personally think that the Flash Hider is the better option for the Mk17 as opposed to the Compensator. This is the opposite to what I had originally speculated, but due to the low rate of fire and low magazine capacity of the Mk17, making every shot count by tapping or bursting (thus benefiting more from a Flash Hider) makes a whole lot of sense.
  • Try and always position yourself so that you can best take advantage of having a shield covering your face (when aiming down the sight). For instance, a prone position means the shield covers virtually all of your silhouette if you're looking straight at an enemy. Similarly, breaching a wall then peeking whilst crouched through the hole often means that the enemy can't shoot much of you by the time you're shooting at them.
Valkyrie

  • Since the addition of Valkyrie in Season 2: Dust Line, I cannot imagine a defending team without her. She can place up to four of her Black Eye cameras anywhere on the map provided she can throw that far (and boy, can she throw). Her cameras offer an increased field of view when compared to the standard cameras and vision is much clearer. They're also a lot less obvious when 'active' - normal cameras glow bright red when in use, whereas Valkyrie's Black Eyes only have a light-up blue circle appear.
  • Valkyrie can throw her Black Eye cameras outside - this is an amazing ability. You can only do this once the initial preparation phase is over, so I recommend getting a barricade torn down from a window or door ready for when the clock runs down. This way, you can throw the camera outside straight away and close up the door/window before the attackers come knocking. I've found this particularly useful on virtually every single map I've played, though Hereford, House and Oregon spring to mind as choice examples.
  • As players get more savvy with regards to spotting Valkyrie's cameras, you need to be clever about their placement. Sure, putting them up high in the corners of rooms just outside the objective area is fantastic - you can see everyone stacking up outside ready to breach and relay that information to your team for some quick and easy kills - but try something else. Bookshelves, on the ground, hiding in some grass - experimentation is the key, especially when you're trying out places you don't think the attackers are likely to look.
  • Since her introduction, Frost had her Nitro Cells taken away from her - I think this was to balance her as a lot of people complained that Frost's shotgun and the ability to throw a Nitro Cell was just too powerful. But don't worry - Valkyrie is basically the new Frost in this regard! Her SPAS-12 shotgun is excellent, and she can throw a Nitro Cell to take out those pesky shield operators or groups of enemies. Handy!

Operator icons sourced from the Rainbow Six Wikia[rainbowsix.wikia.com].
SAS (UK) Attacking Operators
Tips in this section refer to playing as said operator, playing alongside them or playing against them.

Sledge
  • My favourite operator. He's quite attractive to new players given his simplicity and very strong weapon choice (the L85A2). His sledgehammer can breach anything a standard Breach Charge can, but much faster and without making a sound when deployed like charges do. You can enter a room quickly and get a quick kill off more often than not, or bust open a murder hole for your teammate to use.
  • He's a tremendous solo operator. While operators like Thermite and Thatcher are great when teamed up, Sledge is often at his best when flanking on his own. Think you're safe when you're defending the kitchen in Kafe Dostoyevsky? Think you saw five attackers in the dining hall? Check the meat locker - Sledge is there, and he's already neutralised two of your buddies.
    ]*] Sledge's hammer can destroy standard barricades, Castle's Armour Panels, barbed wire and any destructible surfaces. With one hit.
Thatcher
  • ******* laser sights
  • Arguably the strongest attacker. Thatcher comes equipped with an EMP Grenade (three, actually) which enables him to instantly neutralise all electronics within its radius. This includes Bandit's Shock Wires, Mute's Signal Disruptors, Nitro Cells and Jager's Active Defense Systems as well as stationary cameras.
  • His ability to destroy Mute and Bandit's gadgets makes him an essential partner for Thermite. Always put them together - or at the very least, make sure a Thatcher always stays in constant communication with Thermite.
  • If you know where the objective room is (the most likely location for most electronic gadgets in this game) and it happens to be somewhere you can get on top of, either via a roof or another room in the building, drop your EMP grenade on the floor above said objective room. It will affect the room below where your grenade lands meaning you're less likely to get picked off as many players tend to die trying to deploy the EMP grenades directly outside the objective room.
  • Thatcher has two excellent assault rifles to choose from. I tend to equip the AR33 with a grip, compensator and holographic sight whereas with the L85A2 I use a grip, suppressor and ACOG sight. Even though they're both good options, I prefer the L85A2.

Operator icons sourced from the Rainbow Six Wikia[rainbowsix.wikia.com].
SAS (UK) Defending Operators
Tips in this section refer to playing as said operator, playing alongside them or playing against them.

Mute
  • Mute is able to place down 4 Signal Disruptors per round. These disable drones, stop Breach Charges/Exothermic Charges/Ash's CREM projectiles from being triggered and prevent Blitz from using his flash shield.
  • Playing as Mute is a little...fiddly at first. This is because his set-up phase as a Defender kind of has two stages to it. Firstly, any good Mute player should try and place his Disruptors in spots around (not in) the objective area to prevent the attacking team's recon drones from finding the objective location as well as gathering intel on your defenses. If done successfully and all the drones have been destroyed, Mute should then pick up his Signal Disruptors and redeploy them in spots that will have the best chance of preventing breaches/further reconnaissance.
  • When deploying a Signal Disruptor, you can see a large red circle around it. This represents the radius of the gadget - when placing Disruptors along, say, a long reinforced wall try not to let the circles overlap too much. This will just be a waste of your Disruptors. Be careful, though - leaving too big a gap may just give a lucky Thermite just enough room to place his Exothermic Charge and make a nice big hole.
Smoke
  • Another operator that seems basic at first - he is a medium speed/defense defender with an SMG or shotgun who can throw out gas canisters that are remotely detonated. Simple? Nope! Using his gadget efficiently has a fair bit of minutiae with it. It's not so much a means of killing your foes as it is an area denial device - I've seen bomb defusal games go down to the wire (let's say twenty seconds left) and the attackers are trying to get the bomb down. Fill the room with smoke from your Remote Gas Grenades and they have no choice but to either risk death or get the hell out of there. By that time, you've already won.
  • I see a lot of negativity out there for Smoke's primary SMG, the FMG-9 - but I love it! I don't use an optic with it at all as I love the simple night sights it has, and if you get used to bursting it quickly you can get off multiple kills pretty quickly.
  • Smoke and his MAC-11 have had a lot of heat in the past. Earlier in the life of Siege, players could equip an ACOG sight onto the MAC-11 which would make it easier for players to pick off attackers before they even reached the objective building. While this is still possible now the ACOG option has been removed, it happens far less than it ever did. The MAC-11 is still an amazing secondary that should typically be paired with the primary shotgun for the ability to create killholes often and the ability to get sweet, sweet kills through them.
  • Try roaming with Smoke. I often see far more Pulses, Bandits, Jägers and Kapkans roaming around than I do Smokes but I genuinely think he is one of the better options once you get the hang of utilising his Remote Gas Grenades to their full potential. Strategic roaming can lead to Smoke being able to block off and delay enemy offensives at the most crucial of times.

Operator icons sourced from the Rainbow Six Wikia[rainbowsix.wikia.com].
SAT (Japan) Operators
Tips in this section refer to playing as said operator, playing alongside them or playing against them.
Hibana

  • Hibana is the fast, angrier version of Thermite. She can essentially perform the same role as Thermite with a slight twist, but is also a lot quicker on her feet and can't take as much heat. Players who have enjoyed playing Ash and/or Capitao in the past will probably have a lot of fun with Hibana because of the parallels the three operators share.
  • Her X-KAIROS gadget lets Hibana blast through reinforced surfaces like Thermite's Exothermic Charge - but from range! The trade-off is that the six projectiles the X-KAIROS fires will not cover as large an area as Thermite's gadget, unless multiple sets of the projectiles are planted above/below/alongside one another. One set of Hibana's explosive X-KAIROS pellets is large enough for a window that allows for line of sight into an area, whereas two sets combined (vertically) will give players enough room to crouch through.
  • One shot from the X-KAIROS (six pellets, two rows of three) can take out an entire floor reinforcement (or ceiling, depending on your perspective). This is equal to the amount of charges it takes for Thermite to blast through one, so they're equals when it comes to bursting in through the ceiling.
  • Much like Thermite's exothermic charges, the X-KAIROS takes a few moments to actually explode once deployed and activated as it has to melt through/weaken the surface first. This will give the enemy a heads up that you or your team may be getting ready to make a move or take a shot from wherever your charges are being used. If possible, use them as a distraction or deploy them while your enemy is distracted by something else!
  • Deployed X-KAIROS pellets can destroyed by bullets, other explosives and Bandit's battery. Mute's jammers also interfere with them so they cannot be activated.
  • One set of X-KAIROS pellets are a great counter to Mira's Black Mirrors. Mira will see it coming, but won't be able to do much about it other than pop the Black Mirror open and get rid of what pellets she can see. This, of course, could be used to your advantage to ensure Mira isn't a problem anymore...
Echo

  • Echo is a difficult operator to recommend generally, but in certain situations he can be incredibly effective and almost instantly turn the tide of battle. He's a heavy operator (slow and harder to kill) with pretty average weapons, but his unique Yokai drone can be devastating as one shot from its ultrasonic burst ensures operators are slowed and partially blinded with a skewed perspective.
  • Yokai can use its ultrasonic burst when mounted on the ceiling, but Yokai can attach to the majority of them with exceptions usually being support beams (often quite annoying on Chalet). When ceiling mounted for a few moments, Yokai becomes almost completely invisible except for when firing its ultrasonic charges.
  • Echo's Yokai drone can have up to three charges of the ultrasonic blast ready at any one time, and once fired they do recharge over time.
  • When on the ground, Yokai is louder than other drones thanks to its hovercraft-like nature (fans spinning up) but moves at similar speeds (if not the same, I haven't tested them) as standard reconnaissance drones. Echo cannot use Yokai's ultrasonic blast ability whilst it is moving/on the ground.
  • Echo is completely vulnerable when operating Yokai, as other operators are with their drones - so stay safe!
  • Other operators on Echo's team can see the action from Yokai's perspective, but cannot control it in any way.
  • The basic strategy with Echo is to deploy Yokai without the enemy knowing where it is deployed (try only moving it around post-deployment/observation stage). If enemies happen to walk under Yokai without knowing it is there, let your team know where they are over chat (if possible) and let them know you're ready to stun. From there, your team will hopefully get in position for the kill so you can get ready to stun them.
  • Yokai is vulnerable to damage just like any other drone, so your teammates may need to be careful about how they use explosives around it. My Yokais have been destroyed by many a teammate's Nitro Cell after I stunned two or three enemies with the ultrasonic blast - which is a little disappointing sometimes!
  • IQ's gadget allows her to see Yokai whether it is cloaked or not, so she can be a real nuisance for Echo players. Thatcher's EMP grenades are also a little annoying for Echo, as they temporarily disable Yokai's ability when hit by them. At least it doesn't get destroyed, I suppose!
Spetsnaz (Russia) Attacking Operators
Tips in this section refer to playing as said operator, playing alongside them or playing against them.

Fuze
  • If you're going to use Fuze, please be aware of what mode you're playing. If it's Hostage Rescue, refrain from using his gadget to clear out the hostage room. Sure, you might take out some enemies and/or gadgets with his Cluster Charge but you'll no doubt kill the hostage too. If you do kill the hostage, you'll cost your team the round in an instant. You can get a little braver with this once you know the maps really well.
  • If you're playing against a Fuze, be aware that you can actually shoot the Cluster Charge if you see it. You can see a little part of it breaking through the surface it's planted on - or if you hear Fuze planting it, you can ready your weapon to take it out as soon as it gets activated.
  • Don't be too afraid of Jager when playing as Fuze. His Active Defense System (a gadget that intercepts grenades). Each ADS can only intercept two grenades each (for a total of six) and each of your Cluster Charges fires out five cluster grenades. The likelihood of all of the ADS devices being in close proximity to your Charge's point of origin is slim - and even so, Jager can't catch them all!
Glaz
  • Often underestimated, Glaz is the closest thing to a sniper that Siege has. His OTs-03 marksman rifle is the only gun capable of penetrating some surfaces such as the windows of the Presidential Plane and Castle's Armoured Panels.
  • Glaz's scope has thermal imaging allowing for him to see operators (dead or alive) coloured in bright yellow. This wasn't always the case, but this addition to his scope has made him a lot more useful especially on the night variants of maps.
  • Turning off Bloom and Lens Flare in the graphics options will aid with visibility when it comes to using Glaz's magnifier on the OTs-03. It also helps vision in general, unless you like the eye-candy of course!
  • Many players are afraid of taking Glaz indoors - particularly early on in a round. That's silly, though you do need to be a little bit more careful than you normally would be as his rate of fire with the OTs-03 is very slow. Fortunately, the high damage more than makes up for it in a lot of cases. Just make those bullets count!

Operator icons sourced from the Rainbow Six Wikia[rainbowsix.wikia.com].
Spetsnaz (Russia) Defending Operators
Tips in this section refer to playing as said operator, playing alongside them or playing against them.

Kapkan
  • Kapkan has a really solid submachine-gun to choose and is equipped with heavy armour making him a formidable foe. Though I don't really agree that he should have heavy armour, due to his gadget making him more of a roaming defender, it's never a bad thing to be able to block more bullets.
  • The Trip Wire Traps gadget that is unique to Kapkan had a significant overhaul in Patch 3.3. Before, the traps were easily identifiable by a strong laser beam and a large red bolt that would poke through the side of the door/window they were attached to. However, now the laser is a lot harder to see and the bolt has been completely removed making Kapkan's gadget actually useful and not embarrassing should you be caught crossing the beam.
  • You can choose where exactly to place a trap on a window/door somewhat within a small range to add diversity to your trap placement.
  • Kapkan's Trip Wire Traps are capable of taking out multiple attackers if they're close enough to it when it blows.
Tachanka
  • Listen - Tachanka has some good primary weapon choices and he has heavy armour. A good defender, right? Not really. In a game where an operator's unique ability is basically the most important thing about them, Tachanka really falls short. Though his deployable RP-46 machine gun isn't exactly useless, it is really easily countered. For a start, anyone using is typically stood still unless the target their shooting at is moving around a whole bunch (which is unlikely). This means that, despite his rugged looking helmet, you can take Tachanka (or whoever is using his turret) out instantly. For that reason alone, I tend to just deploy the machine gun for the sake of it and then walk away.
  • The RP-46 machine gun does have something going for it - pentration. It can penetrate two surfaces instead of just one, which has the potential to create some pretty deadly kills through walls. If you're playing as Tachanka and you find yourself being able to work with a Pulse, try setting up an ambush. Communicate with Pulse to find out if anyone is crossing your path, then chew through a wall and mow them down.
  • Tachanka's machine gun can only turn a certain radius, meaning you can't rotate all the way around and back again. You need to take this into account when positioning the gun - try using corners so your back isn't as vulnerable as it would likely be if you slapped the RP-46 down in the middle of a room.

Operator icons sourced from the Rainbow Six Wikia[rainbowsix.wikia.com].
Credits/Final Chapter
Credits
I'd like to thank my good friend cmichaelsheridan for contributing to this guide by being my editor. Typing about Rainbow Six sure does take its toll, and the first thing to degrade in quality when that happens is my writing. Fortunately, he has tried to be there when he can so as not to make me look too idiotic.

I'd also like to thank a friend of mine, Tufteh, for helping me bust a few myths in private matches and aid by setting up a few of the screenshots I've been taking as supplementary material for this guide.

Final Chapter
Liked this guide? Share it with your friends! Hopefully they can find some use for it, too. More importantly, though - please give the guide a Thumbs Up when logged into Steam and I'd really appreciate you adding the guide to your favourites on Steam. This will give me a nice, warm, fuzzy feeling and will give more people a greater chance of finding the guide for themselves.

Thank you for reading, and good luck out there in your future operations!
55 Comments
Meow Meister Apr 25, 2022 @ 2:19pm 
they nerfed jager
A pimp named slickback Dec 16, 2018 @ 5:10am 
update it
Tiro May 31, 2017 @ 10:05am 
Thank you very much for both updating the guide and keeping in touch with the comments we write ^^
May I suggest the adding of one tip about Buck: Unlike Sledge, he can break ceilings and floors very effectively, but sledge can't destroy ceilings as his sledgehammer is too short :) That's why i personally consider them as different operators, and none superior to the other as Sledge is better at taking down walls (both in time and ammo effectiveness)
Super Joe  [author] May 31, 2017 @ 6:39am 
Updates have finally been made to this guide that were due all the way back from the release of Operation Red Crow. Admittedly, I'd fallen off the game a little bit since then except for a brief time when Operation Velvet Shell was implemented. I've since returned to the game and am continuing to have a great time with it. I hope to continue to improve the guide in the coming weeks/months.
Tiro Mar 7, 2017 @ 7:20am 
Of course if anyone else has other suggestions please go ahead
Super Joe  [author] Mar 7, 2017 @ 12:21am 
Roger! I'll prioritise that then.
Tiro Mar 6, 2017 @ 12:17pm 
I think jackal and mira tips are the most important as, if played bad, they can suck and get their team killed
Super Joe  [author] Mar 6, 2017 @ 12:13pm 
I'll do my best! Got a fair bit of catching up to do. Time has been short these past few months but I have kept up playing Siege, so I'm still up to date on my know-how! Thanks for staying interested. Is there anything you'd like to see first?
Tiro Mar 6, 2017 @ 12:12pm 
Update please!
Floppy Sep 14, 2016 @ 8:37am 
In a premade team with valkyrie and pulse tachanka really shines (if they communicate)