Aseprite
Оценок: 319
Using Aseprite to make sprites for RPGmaker projects or gamemaker
От prpl_mage
Do you have some trouble making resources for your RPGmaker projects or gamemaker? Not gonna pay 80€ for Photoshop but still want to work with layers and animation?
This is a guide with tips on how to use Aseprite to achieve the same results.
2
10
4
   
Наградить
В избранное
В избранном
Удалить
Creating a spritesheet
Step 1 of this guide will be how this software will make spriting easier for you.

Working with templates is easier with layers.
Ever tried to work with templates but you keep drawing over them or mesing it up in a different way? Layers is your friend here.

Gamemaker has a well done spiting tool included in it but what it really lacks is layers and that can make spriting difficult, especially the animations.

When you start aseprite open up a template to begin with. in this guide I'll use the RPGM2k3 charset template. The rpgmaker software has set restrictions on size of each set and the file itself after all.
Although this shows a RPGm2k3 file the same process can be applied to the other makers. The difference is that they are more flexible when it comes to sizes and colours.


Like this:


Next up you can create a new layer on top of the first one and import the actual character base, I copied one from a different file here.

You can either choose to have these two as a seperate file or to "flatten them" to merge the layers together. just remember to replace the green with the mask colour. The mask colour is the transparent colour that lets you see the layers below.

Not flattening them is actually the easiest but I did it anyway for this guide.

Actually spriting with layers

so it's time to get to work. First of all create yet another new layer.

Make sure that you choose to work on the upper layer.

Simply draw as you usually would, but use the mask (transparent colour) to erase unwanted pixels or you will have lots of yellow/red when you hide the bottom layer.
If you hide the top layer where you work you'll see what is below
Or you can hide the bottom layer to see what you've actually done.

Keep working until you have your charsets complete.


When your spriting is done
At this point it is a good idea to flatten the layers together or move right ahead to the saving options. Alternatively remove the bottom layer completely. But for this you need to make sure that you have a whole character when the removing is done.

Since I flattened the charset base and coloured background together I had to manually remove the background. This can easily be done with the Replace Colour tool (shift+R). Just make sure that the layer isn't locked. And look out for a too high tolorance that will include more colours than you want to change.


Colour restrictions for importing
As you might already know RPGmakers are rather picky when it comes to colour depth. A file should have no more than 256 colours and have a BPP of 8.
So to achieve this we need to make a palette first of all, simply choose "create palette from current sprite" and it will save all the colours of your picture as the palette on the side.


Next up limit the bpp by changing the colour mode from RGB to Indexed.

And all that is left is to save the file as a PNG

Автор сообщения: dacap
If the image is RGBA, it'll be saved as 24bpp. If it's indexed (Sprite > Color Mode > Indexed), it will be saved with 8bpp.


Importing the file
Open up the maker of choice and go to the import tool, choose the right catagory and import your file.
You can now use them in your projects.
Making animations and testing them out. (not battle animations)
A lot of sprites in the maker is animated as you play. The most commonly seen is the charset. Hence, I'll use the charset I made previously.


I'll add the template in a lower layer as well just to speed things up.


Lining up the sprites in the frames
Next up we are going to use the charset here to test if the walking animation looks fine. Keep in mind that I have about 4 hours of expertice with this software so there might be easier ways to do this.

So we create a new fram by either choosing the frame option from the menubar or by clicking below in the timetable.
Copy a sprite frame from the previous frame into the newly added one. Use the template for precision.


Onionskin
When working with other sprites besides charsets you might want to be able to see the previous frame. To achieve this you can change the transparacy(or opacity as it is used in the software) by clicking "onionskin". It can be activated at the bottom at the timetable, next to it are options you can use to change how it works as well.

Keep doing this until you have used up all the sprite frames. i decided to make 4 frames like the maker does: Middle > left > middle > right > repeat.


Previewing
You can now go to the Frame menu from the menubar and choose "play animation to see how it looks. If you feel like the animation is too long then you can mark all your frames in the timetable and then change the Frame properties.


In the frame properties you choose how long a frame will be displayed before moving on to the next one, that's why it's a good idea to mark all frames before doing this if you want a constant speed.

Done with the testing
If you want to save the animation to show of to friends or post here on steam just remember to save it as a gif.

Gifs will repeat animations over and over. Saving as a PNG will instead save it as 4 different pictures.

The final result may look like this:


Importing to Gamemaker
If you feel happy about your animation and want to use it in gamemaker then you can simply import the GIF and gamemaker will use it.
When you create a new sprite in gamemaker choose "load sprite"

Find your saved gif and move on.

If you go to "edit sprite" you will see that the maker divided the gif into the different frames present. My animaton had 4 frames, therefor there are 4 frames present here. Note that you usually need to change the frame speed when importing and exporting animations between software.
Additional tips and advice to speed up the making of resources
After using this software some more and after the updates I realize that I should probably update this guide to be better. In time I hope it will, until then see this more as a intro.


From PM regarding importing assets.

I've recently been working on doing some menus for a project that I'm doing some touchups in Rpg Maker 2000. So I'm assuming my method should work here as well.

What I do with Aseprite
    
I create my asset in RGB mode
    
Once I've finished designing my asset. I then I create the palette with the "New Palette from Sprite" option. (I also make sure that the "Create new palette, color count limit" is set to 256).
    
When the palette is now created, I then change the "Sprite\Color Mode" from "RGB Color" to the "Indexed" one.

I then save the sprite as a PNG file. (But usually still keep a aseprite file around for future editing)

At first I did try having my own custom palette limited to something below 256 (because I didn't have that much colors), but it was giving me trouble for RM2000. By specifying that the Palette Colors Count is 256 in Aseprite, my assets are importing fine now in Rpg Maker. So I'm assuming that the palette color counts should always be 256, even if you don't use all of the index.

Hopefully this will help you out.
Комментариев: 39
jagholin 10 янв. 2024 г. в 4:05 
Aseprite has "export sprite sheet" option, so I dont know if this old guide is still relevant
prpl_mage  [создатель] 15 июн. 2023 г. в 13:48 
Choose which layer you want to edit and then paste in the picture.
Chaotic_n1cc 14 июн. 2023 г. в 23:36 
How do i add the char template to the new layer?
Spookypizza 2 авг. 2022 г. в 11:02 
Why and how am i still subscribed to this
prpl_mage  [создатель] 2 авг. 2022 г. в 10:58 
@Jengie For 2003 each resource has a set limit, although there are some ways to bypass them slightly. I've made a guide about the sizes and such over in the RPGM 2003 board.

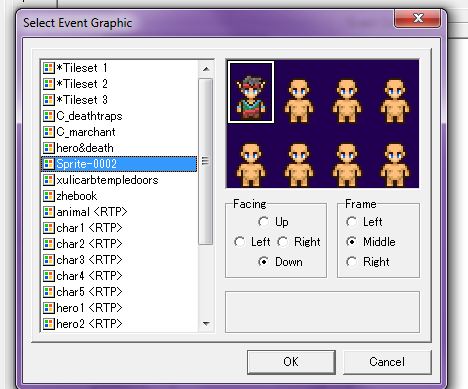
XP, VX and ezpecially MV improved that a lot by giving you a lote more options and freedom.
jengie 1 авг. 2022 г. в 21:33 
are we limited using the spritesheet templates in order to make rpgmaker sprites or can we use any pixel dimension?
TomMakesPodcasts 13 мар. 2022 г. в 10:42 
Nice, this is a good guide.
Spookypizza 18 авг. 2021 г. в 20:02 
i wish i could make games, luckily i cant
prpl_mage  [создатель] 18 дек. 2020 г. в 15:20 
For the RPG Makers all you need to know really is that RPGM2000 and 2003 are the oldest and therefore also the simplest to work in (since there isn't much you can do outside the box, with some exceptions like this guy has proved over and over https://goblin-grotto.itch.io/

Then there was XP, more customizability, RUBY support. Larger sprites, easier to import and a battle system that allowed itself to be tweaked - but also classic dungeon crawler style combat instead of the sideview.
VX was next and basically just improved XP.
And the latest one is MV or something which has a built in hero generator where you pick a few choices and it creates a hero to match that. This latest version also has a lot of script support and in general the best support nowadays being the latest. There are also resource packs you can pay for and such.
Personally too fancy for the hobby that this is for me.
Nothingtosay 18 дек. 2020 г. в 14:10 
Thank you for your response, I'll check it all out. I was considering getting GameMaker to be honest. I also like the look of RPG Maker but so many versions confuse me!