The Sims™ 3

The Sims™ 3

71 Bewertungen
Installing Retail EPs and/or SPs
Von NetPCDoc
A "how to" guide for installing one (or more) of The Sims™ 3 Retail EPs (expansion packs) and/or SPs (stuff packs) so that it works with your Steam version of The Sims™ 3 {base} game.
   
Preis verleihen
Favorisieren
Favorisiert
Entfernen
Introduction
I recommend purchasing and installing the "TS3 Into the Future" DLC from the Steam store, rather than attempting an installation of a Retail version of EP11; as I believe this to be an acceptable trade-off between your time and your money (making Steam & Retail work together that much easier to do).

As this Guide is being offered from Steam, it will be presumed that you will have purchased, downloaded and installed the Steam Version of The Sims™ 3 {base} game (TS3) on your computer.

Other than using a particular customized install point, the "major" difference between the Retail and the Steam installations of The Sims™ 3, is precisely where - in the Registry - each one registers the various The Sims™ 3 products - {base} / DLCs / EPs / SPs. Also worthy of mention is a "minor" item of Steam using Digital Download tagging to remove the CD/DVD requirements.
    Please note:
  • Like the guides for "Getting the Create-A-World tool to work with Steam", the procedure(s) given in this Guide may cause Windows to mis-report a single instance of The Sims™ 3 as two (2) instances thereof.
  • Steam DLCs should not be uninstalled from WIndows' Control Panel > Programs and Features.
  • The author went to great lengths figuring out how to avoid disclosing CD-Key details.
    Warning: Changing the "Effective Version" of your The Sims™ 3 game
  • may cause issues with any installed "store content" from store.thesims3.com.
  • You may want to uninstall such "store content" before installing a higher version EP/SP.
  • Then download and install such "store content", again, after installing such an EP/SP.
    Caution: There are a minimum of four (4) Registry Editing sessions required:
    • the exact number will depend on decisions YOU must make (See Remember below).
  • Two of these sessions are just to Export a Registry Key (and it's contents).
    Keeping a clean (unedited) copy of these "Export" files may serve as your backup.
  • The other two sessions are to use Import to make actual changes to the Registry.
  • The 1st Export & Import set enables installation of Retail product(s).
    • Yes, the Create-A-World tool is just such a Retail product.
  • The 2nd Export & Import set allows Steam to include installed Retail EPs & SPs in TS3.
    Remember: Should you install another Retail product later, this step will need to be repeated!
    The author presumes that any user of this guide:
  • Does NOT have a Retail version of The Sims™ 3 {base} product installed.
    (As this will have additional considerations beyond the scope of this guide.)
  • Does NOT have an Origin client version of ANY of The Sims™ 3 product(s) installed.
    (Again, will have additional considerations beyond the scope of this guide.)
  • Knows what backup precautions are desired.
  • Is familiar with Windows Notepad utility/application.
  • Knows how to edit text files; AND
  • Will make sure that the end result file has the exact same file extension as the original file.
  • Knows when to omit quotes '"' from quoted "values".
  • Understands that Win32 is being used herein to refer to:
    A Microsoft Windows 32-bit Operating System
  • Understands that Win64 is being used herein to refer to:
    A Microsoft Windows 64-bit Operating System
  • Understands what the author is referring to with/by:
      [install point] & [save point]
    • TS3's [save point] is at "%documents%\Electronic Arts\The Sims 3"
      where %documents% is dependant upon your Operating System (Win XP/Vista/7/8/10/etc)
    • [install point] is a fully-path-qualified folder name, that an Installer might install to.
      Please see the table below for the [install points] that Steam uses for The Sims™ 3.
Steam's default The Sim™ 3 "install point(s)":
Reference
Disk Location
Steam Games
C:\Program Files (x86)\Steam\SteamApps\Common...
Reference
Disk Location
Official Display Name
TS3 {base}
...\The Sims 3
The Sims™ 3
EP01
...\The Sims 3\EP1
The Sims™ 3 World Adventures
EP02
...\The Sims 3\EP2
The Sims™ 3 Ambitions
EP03
...\The Sims 3\EP3
The Sims™ 3 Late Night
EP04
...\The Sims 3\EP4
The Sims™ 3 Generations
EP05
...\The Sims 3\EP5
The Sims™ 3 Pets
EP06
...\The Sims 3\EP6
The Sims™ 3 Showtime
EP07
...\The Sims 3\EP7
The Sims™ 3 Supernatural
EP08
...\The Sims 3\EP8
The Sims™ 3 Seasons
EP09
...\The Sims 3\EP9
The Sims™ 3 University Life
EP10
...\The Sims 3\EP10
The Sims™ 3 Island Paradise
EP11
...\The Sims 3\EP11
The Sims™ 3 Into the Future
SP01
...\The Sims 3\SP1
The Sims™ 3 High End Loft Stuff
SP02
...\The Sims 3\SP2
The Sims™ 3 Fast Lane Stuff
SP03
...\The Sims 3\SP3
The Sims™ 3 Outdoor Living Stuff
SP04
...\The Sims 3\SP4
The Sims™ 3 Town Life Stuff
SP05
...\The Sims 3\SP5
The Sims™ 3 Master Suite Stuff
SP06
...\The Sims 3\SP6
The Sims™ 3 Katy Perry's Sweet Treats
SP07
...\The Sims 3\SP7
The Sims™ 3 Diesel Stuff
SP08
...\The Sims 3\SP8
The Sims™ 3 70s 80s & 90s Stuff
SP09
...\The Sims 3\SP9
The Sims™ 3 Movie Stuff
Should you have "customized" your configuration - you will need to "adapt" these instructions to that "customization".

Please Note:
Reliability will be a function of how "clean" any "retail product" actually is!
As in how few/many "Undocumented Features" (that you really don't want) may need to be patched.
    As this guide shows how to link Retail EPs & SPs in at the Local Game Cache level:
  • Steam will NOT be providing any updates for these Retail EPs & SPs.
    Any patching of THESE will be your problem to solve.
Explanations
(For those who like to know why they are being directed to do what they are being directed to do.)

The "Problem" is just where Steam registers TS3 products in the Windows Registry
and just where Retail TS3 Products expect to be registered in the Windows Registry

    As Microsofts's Windows registry editing tool - RegEdit - doesn't provide a nice neat function for copying a Registry Key's contents, the "Solution" that accomplishes this is to:
  • "Export" an existing Registry Key.
    Yes! This is just the way Microsoft recommends one back up a Registry Key.

  • Edit that Registry Key's "Export" file - for the purpose of renaming said Key.
    Caution: Please do NOT save over your backup file: use Save As... & give another name!

  • Create (or "merge" with) the desired Registry Key - by "Importing" the "renamed key" file.
Note: You will need "administrative" authority on the computer you are doing ALL this on.

Installing Retail The Sims™ 3 EPs & SPs so that they work w/Steam's The Sims™ 3 game:
    Enable Installation of Retail The Sims™ 3 EPs & SPs w/Steam's The Sims™ 3 {base}
  1. Export the Steam Key "Sims(Steam)" w/contents.
    "contents" includes a Key for each currently installed The Sims™ 3 product from Steam,
    as there is no reason to overwrite any of these with a Retail The Sims™ 3 EP/SP.

  2. Edit the Steam Key's "Export" file - for the purpose of renaming said Key.

  3. Create (or "heal") the Retail Key "Sims" w/contents by "Importing" the "renamed key" file.
    Note: This should "heal" any problems should you have the "Create-A-World" tool installed.

    Install your Retail The Sims™ 3 EP/SP product(s)
  4. Install one (or more) Retail EP/SP product(s). & "Fix" any potential "version" issues.

    Link currently installed Retail The Sims™ 3 EPs & SPs in w/Steam's The Sims™ 3 game
  5. Export the Retail Key "Sims" w/contents.
    "contents" now including a Key for each currently installed Retail The Sims™ 3 EP/SP,
    in addition to a Key for each of the currently installed The Sims™ 3 products from Steam.

  6. Edit the Retail Key's "Export" file - for the purpose of renaming said Key.

  7. Import new info to the Steam Key "Sims(Steam)" by "Importing" the "renamed key" file.
This "Export - Edit - Import" procedure reduces the chances of introducing problems into the Microsoft Windows Registry; and the "Export" steps provide opportunities for making "Just-In-Case" backups, too.

When installing more than one Retail EP/SP, should you not want to do them all at once, you have the option of using either:
  • a Install, Test, Rinse & Repeat cycle.
    Recommended when too much time passes between Test and Repeat.
    -OR-
  • a Install, Test & Repeat cycle.
    Recommended (ONLY) when Repeat immediately follows Test.
    where:
  • 1-3 (above) are your Rinse steps,
    -AND-
  • 4-7 (above) are your Repeat steps.
1. Export the Steam Key "Sims(Steam)" w/contents.
Or my version of "Getting the Create-A-World tool to work with Steam".
The Sims™ 3 {base} has been purchased and installed from the Steam store.

Win32: Export the Steam Key "Sims(Steam)" w/contents.
    Where Retail TS3 products are normally registered in Microsoft's Windows Registry:
  • HKEY_LOCAL_MACHINE
    • SOFTWARE
      • Sims
    Where Steam normally registers The Sims™ 3 products in Microsoft's Windows Registry:
  • HKEY_LOCAL_MACHINE
    • SOFTWARE
      • Sims(Steam)
    Warning: You want to ignore any "Sims(Steam)" Key found at
  • HKEY_LOCAL_MACHINE
    • SOFTWARE
      • Electronic Arts
        • Sims(Steam)
Step 1: Open your Windows Registry
Run the regedit.exe program. Normally you get to this from your Start Menu -- type it in the "Run" box if your version of Windows has that. On Windows 8 and above, use the Search and type regedit in the box. Click "Yes" at the User Account Control warning.

Step 2: Locate your Steam Sims 3 Registry Entries
These are normally found under:
  • HKEY_LOCAL_MACHINE
    • SOFTWARE
      • Sims(Steam)
The specific location may vary depending on 32-bit vs. 64-bit systems, but this should give you a good idea where to look. If all else fails, hit the F3 key, which will bring up a search menu and, from the top of the registry, search for Sims(Steam).

Step 3: Export your Sims(Steam) Registry Entries
Right-click the Sims(Steam) entry, and choose Export from the menu. Save the file somewhere you will remember because you will need to edit it. (Suggested filename: "Sims(Steam).reg")
    Remember:
  • You will need to find your way back to this position in the Registry,
    after you have installed one or more of your Retail TS3 product(s),
    please make whatever notes are appropriate for this.
    Caution:
  • Should a "Sims" Key exist at this time, for the purpose of a clean (unedited) backup,
    you may want to "Export" it too - before you minimize (or close) the RegEdit Window.

Win64: Export the Steam Key "Sims(Steam)" w/contents.
    Where Retail TS3 products are normally registered in Microsoft's Windows Registry:
  • HKEY_LOCAL_MACHINE
    • SOFTWARE
      • Wow6432Node
        • Sims
    Where Steam normally registers The Sims™ 3 products in Microsoft's Windows Registry:
  • HKEY_LOCAL_MACHINE
    • SOFTWARE
      • Wow6432Node
        • Sims(Steam)
    Warning: You want to ignore any "Sims(Steam)" Key found at
  • HKEY_LOCAL_MACHINE
    • SOFTWARE
      • Wow6432Node
        • Electronic Arts
          • Sims(Steam)
Ursprünglich geschrieben von cruinne:
Step 1: Open your Windows Registry
Run the regedit.exe program. Normally you get to this from your Start Menu -- type it in the "Run" box if your version of Windows has that. On Windows 8 and above, use the Search and type regedit in the box. Click "Yes" at the User Account Control warning.

Step 2: Locate your Steam Sims 3 Registry Entries
These are normally found under:
  • HKEY_LOCAL_MACHINE
    • SOFTWARE
      • Wow6432Node
        • Sims(Steam)
The specific location may vary depending on 32-bit vs. 64-bit systems, but this should give you a good idea where to look. If all else fails, hit the F3 key, which will bring up a search menu and, from the top of the registry, search for Sims(Steam).

Step 3: Export your Sims(Steam) Registry Entries
Right-click the Sims(Steam) entry, and choose Export from the menu. Save the file somewhere you will remember because you will need to edit it.
(Suggested filename: "Sims(Steam).reg")
    Remember:
  • You will need to find your way back to this position in the Registry,
    after you have installed one or more of your Retail TS3 product(s),
    please make whatever notes are appropriate for this.
    Caution:
  • Should a "Sims" Key exist at this time, for the purpose of a clean (unedited) backup,
    you may want to "Export" it too - before you minimize (or close) the RegEdit Window.
2. Edit the Steam Key's "Export" file.
Win32: Edit the Steam Key's "Export" file:
Windows Notepad will work just fine for this.
  1. Using Notepad open the file ("Sims(Steam).reg" ?) that you just "exported" to.
    • The first Key in this file should be the Steam Key "Sims(Steam)" itself,
        Which should look like:
      • [HKEY_LOCAL_MACHINE\SOFTWARE\Sims(Steam)]
    • followed by any SubKeys for Steam's The Sims™ 3 products (w/qualified-names).
        The Key for The Sims™ 3 {base} product from Steam should look like:
      • [HKEY_LOCAL_MACHINE\SOFTWARE\Sims(Steam)\The Sims 3]

      Please Notice: that both of these examples contain "WARE\Sims(Steam)".

  2. Examine the file to verify that "WARE\Sims(Steam)" is where expected.

  3. If NOT replace the "WARE" instances (below) with what is in that position;
    leaving the "\Sims(Steam)" and "\Sims" where shown.
To change only the Key Name and nothing else, from the edit menu select "Replace"
(or use the hotkey: Ctrl+H), and fill in like so:
then use the "Replace All" button to change all instances of the "Key" name in this file.
    Just in case: I recommend using "Save As..." (from the file menu) to save this file
  • giving the save file a different name (Suggested filename: "Sims.reg" or "Sims3.reg")
  • for the "Save as type:" use "All Files (*.*)" - so the file extension is preserved
Make sure you know where you are saving this file to
  • so you can find it when you are ready to Import it into the Windows Registry
then go ahead and use the "Save" button to save the file.

When the save completes you may close this notepad session.

Win64: Edit the Steam Key's "Export" file:
Windows Notepad will work just fine for this.
  1. Using Notepad open the file ("Sims(Steam).reg" ?) that you just "exported" to.
    • The first Key in this file should be the Steam Key "Sims(Steam)" itself,
        Which should look like:
      • [HKEY_LOCAL_MACHINE\SOFTWARE\Wow6432Node\Sims(Steam)]
    • followed by any SubKeys for Steam's The Sims™ 3 products (w/qualified-names).
        The Key for The Sims™ 3 {base} product from Steam should look like:
      • [HKEY_LOCAL_MACHINE\SOFTWARE\Wow6432Node\Sims(Steam)\The Sims 3]

      Please Notice: that both of these examples contain "Node\Sims(Steam)".

  2. Examine the file to verify that "Node\Sims(Steam)" is where expected.

  3. If NOT replace the "Node" instances (below) with what is in that position;
    leaving the "\Sims(Steam)" and "\Sims" where shown.
To change only the Key Name and nothing else, from the edit menu select "Replace"
(or use the hotkey: Ctrl+H), and fill in like so:
then use the "Replace All" button to change all instances of the "Key" name in this file.
    Just in case: I recommend using "Save As..." (from the file menu) to save this file
  • giving the save file a different name (Suggested filename: "Sims.reg" or "Sims3.reg")
  • for the "Save as type:" use "All Files (*.*)" - so the file extension is preserved
Make sure you know where you are saving this file to
  • so you can find it when you are ready to Import it into the Windows Registry
then go ahead and use the "Save" button to save the file.

When the save completes you may close this Notepad session.
3. Create (or "heal") the Retail Key "Sims" w/contents.
Back in your Registry Editor, at the top, click File then Import.
Select the file you just saved, and click Open.

Note: Should the Create-A-World tool have been installed - this should overwrite any bad data, while merging with any good data (from Create-A-World).

You need to close the RegEdit Window, NOW - if you haven't already done so.

Note: This is where the Getting the Create-A-World tool to work with Steam Guide ends.
4. Install one (or more) Retail The Sims™ 3 EPs and/or SPs.


Your Steam TS3 game should now be recognized by the Retail EP's & SP's installers
so they should now be able to install their "packages".

I recommend using the customization options to install Retail EPs/SPs to their respective
Steam's default The Sims™ 3 "install point(s)":
Reference
Disk Location
Steam Games
C:\Program Files (x86)\Steam\SteamApps\Common ...
Reference
Expansion Pack Disk Location
Reference
Stuff Pack Disk Location
EP01
...\The Sims 3\EP1
SP01
...\The Sims 3\SP1
EP02
...\The Sims 3\EP2
SP02
...\The Sims 3\SP2
EP03
...\The Sims 3\EP3
SP03
...\The Sims 3\SP3
EP04
...\The Sims 3\EP4
SP04
...\The Sims 3\SP4
EP05
...\The Sims 3\EP5
SP05
...\The Sims 3\SP5
EP06
...\The Sims 3\EP6
SP06
...\The Sims 3\SP6
EP07
...\The Sims 3\EP7
SP07
...\The Sims 3\SP7
EP08
...\The Sims 3\EP8
SP08
...\The Sims 3\SP8
EP09
...\The Sims 3\EP9
SP09
...\The Sims 3\SP9
EP10
...\The Sims 3\EP10
EP11
...\The Sims 3\EP11
Should you have "customized" your configuration - you will want to "adapt" these locations to that "customization".

If you have more than one Retail The Sims™ 3 EP/SP, you may install any others now.

Version Issues & Digital Downloads
Notices:
  1. Additional instructions for the special case - The Sims™ 3 {base} "Default.ini" are required
    if the highest version of your installed EPs (/SPs?) happens to be for a Retail product.
  2. The rest of this section is provided for the user's convenience (and informational purposes).

The Digital Download "tag" is found in the "Default.ini" file at [install point]\Game\Bin\
The "Default.ini" file - the section that we are interested in here is the "[Version]" section;
usually the last section in this file (all the way down at the bottom).
    Please Note:
  • The Sims™ 3 {base} "Default.ini" is a special case
  • If you have purchased and installed the "Into the Future" DLC from Steam, you shouldn't need to change The Sims™ 3 {base} "Default.ini"
  • else - You need to make sure that The Sims™ 3 {base} "Default.ini" file has values for the highest version EP/SP that you currently have installed; again, if this highest version EP/SP was purchased and installed from Steam, then you are "Golden" (good to go).

    Additional instructions for the special case - {base} "Default.ini":
      Should your highest installed version DLC be a Retail product
    • "GameVersion =" the left three digits of the last six digits should equal the CompatVersion, but should appear as shown in the table below.
    • "CompatVersion =" should be the value of the first 3 digits of the last group of numbers in the "GameVersion" of the highest version EP (/SP?) currently installed (for EP11 "= 24").
    • "WorldBuilderCompatibilityVersion =" should be the "Major Version" of the highest version EP (/SP?) currently installed (for EP11 "= 21").

        Reference
        Version (major value)
        From Steam's DLCs
        {base}
        1
        ???
        EP | SP
        WorldBuilderCompatibilityVersion
        CompatVersion
        EP01
        2
        009
        SP01
        3
        009
        EP02
        4
        009
        SP02
        5
        009
        EP03
        6
        009
        SP03
        7
        010
        EP04
        8
        011
        SP04
        9
        012
        EP05
        10
        013
        SP05
        11
        014
        EP06
        12
        015
        SP06
        13
        016
        SP07
        14
        017
        EP07
        15
        018
        EP08
        16
        019
        SP08
        17
        020
        EP09
        18
        021
        EP10
        19
        022
        SP09
        20
        023
        EP11
        21
        024
      • Sorted by the Official publication/release order.

      Caution: if you needed to change values in the {base} "Default.ini" file:
    • you may need to backup and delete your [save point], then allow the game to re-generate it (to avoid version conflicts with any downloaded "store content" from store.thesims3.com ).
    What I refer to as the Digital Download "tag" is the last three digits in the "GameVersion" number.
  • Retail EPs/SPs - will install with the CD/DVD "Region Code" here (ie - for USA - "001")
  • Should the verifying EP/SP have a Retail "Region Code" here, the game may require that
    EP/SP's CD/DVD in your drive while you are playing TS3.

    Caution: The "Digital Download" code might be different for different regions.

    It is suggested that you check this value in the {base} "Default.ini" file (expected value of 037);
    with a 2nd check in a "Defauilt.ini" file from an EP/SP purchased and installed from Steam (017).
    If these checks DO show the expected values ({base}=037 & EP/SP=017) then
  • You may change the last 3 digits of the "GameVersion" to "017" for all of your Retail EPs & SPs.
  • Should you have found a different value on a Steam DLC (EP/SP) then you may use that value:
    You may change the last 3 digits of the "GameVersion" to that value for your Retail EPs & SPs;
  • otherwise you either live with what is there - or make your best guess at what will work.
5. Export the Retail Key "Sims" w/contents.
After a Retail version of one or more of the above have been installed.
    The author presumes that any user of this guide:
  • Does NOT have a Retail version of the TS3 {base} product installed.
    (As this will have additional considerations beyond the scope of this guide.)
  • Does NOT have an Origin client version of ANY of The Sims™ 3 product(s) installed.
    (Again, will have additional considerations beyond the scope of this guide.)
  • Did use the instructions above to "Create" (or "heal") the Retail Key "Sims"
    (thus overwriting what is in the Steam Key "Sims(Steam)" won't harm anything)
Win32: Export the Retail Key "Sims" w/contents:
Step 1: Open your Windows Registry
Remember: You have done this (above).
Run the RegEdit program. Normally you get to this from your Start Menu -- type it in the "Run" box if your version of Windows has that. On Windows 8 and above, use the Search and type regedit in the box. Click "Yes" at the User Account Control warning.

Step 2: Locate your Retail Sims™ 3 Registry Key
Remember:You did "make whatever notes are appropriate", did you not? OR
You might check the Retail Key's name in the "Import" file (above?) AND
This Key should be very close to where you found the Steam Key "Sims(Steam)"; OR
    This Key is normally found at:
  • HKEY_LOCAL_MACHINE
    • SOFTWARE
      • Sims
Step 3: Export your Retail Sims™ 3 Registry Key
Right-click the "Sims" Key, and choose Export from the menu. Save the file somewhere you will remember because you will need to edit it.
    Cautions:
  • Should you want the import file (from above) as a backup - don't overwrite it
    type in another filename. (Suggested filename: "Sims(Retail).reg")

  • Should you want a backup of the current Steam Key "Sims(Steam)" you may want to "Export" it, before you minimize (or close) the RegEdit Window.

Win64: Export the Retail Key "Sims" w/contents:
Step 1: Open your Windows Registry
Remember: You have done this (above).
Run the RegEdit program. Normally you get to this from your Start Menu -- type it in the "Run" box if your version of Windows has that. On Windows 8 and above, use the Search and type regedit in the box. Click "Yes" at the User Account Control warning.

Step 2: Locate your Retail Sims™ 3 Registry Key
Remember:You did "make whatever notes are appropriate", did you not? OR
You might check the Retail Key's name in the "Import" file (above?) AND
This Key should be very close to where you found the Steam Key "Sims(Steam)"; OR
    This Key is normally found at:
  • HKEY_LOCAL_MACHINE
    • SOFTWARE
      • Wow6432Node
        • Sims
Step 3: Export your Retail Sims™ 3 Registry Key
Right-click the "Sims" Key, and choose Export from the menu. Save the file somewhere you will remember because you will need to edit it.
    Cautions:
  • Should you want the import file (from above) as a backup - don't overwrite it
    type in another filename. (Suggested filename: "Sims(Retail).reg")

  • Should you want a backup of the current Steam Key "Sims(Steam)" you may want to "Export" it, before you minimize (or close) the RegEdit Window.
6. Edit the Retail Key's "Export" file.
Win32: Edit the Retail Key's "Export" file:
Windows Notepad will work just fine for this.
  1. Using Notepad open the file ("Sims(Retail).reg" ?) that you just "exported" to.
    • The first Key in this file should be the Retail Key "Sims" itself,
        Which should look like:
      • [HKEY_LOCAL_MACHINE\SOFTWARE\Sims]
    • followed by any SubKeys for The Sims™ 3 products (w/qualified-names).
        The Key for The Sims™ 3 {base} product should look like:
      • [HKEY_LOCAL_MACHINE\SOFTWARE\Sims\The Sims 3]

      Please Notice: that both of these examples contain "WARE\Sims".

  2. Examine the file to verify that "WARE\Sims" is where expected.

  3. If NOT replace the "WARE" instances (below) with what is in that position;
    leaving the "\Sims" and "\Sims(Steam)" where shown.
To change only the Key Name and nothing else, from the edit menu select "Replace"
(or use the hotkey: Ctrl+H), and fill in like so:
then use the "Replace All" button to change all instances of the "Key" name in this file.
    Just in case: I recommend using "Save As..." (from the file menu) to save this file
  • giving the save file a different name (Suggested filename: "Sims(Mixed).reg")
  • for the "Save as type:" use "All Files (*.*)" - so the file extension is preserved
Make sure you know where you are saving this file to
  • so you can find it when you are ready to import it into the Windows Registry
then go ahead and use the "Save" button to save the file.

When the save completes you may close this Notepad session.

Win64: Edit the Retail Key's "Export" file:
Windows Notepad will work just fine for this.
  1. Using Notepad open the file ("Sims(Retail).reg" ?) that you just "exported" to.
    • The first Key in this file should be the Retail Key "Sims" itself,
        Which should look like:
      • [HKEY_LOCAL_MACHINE\SOFTWARE\Wow6432Node\Sims]
    • followed by any SubKeys for The Sims™ 3 products (w/qualified-names).
        The Key for The Sims™ 3 {base} product should look like:
      • [HKEY_LOCAL_MACHINE\SOFTWARE\Wow6432Node\Sims\The Sims 3]

      Please Notice: that both of these examples contain "Node\Sims".

  2. Examine the file to verify that "Node\Sims" is where expected.

  3. If NOT replace the "Node" instances (below) with what is in that position;
    leaving the "\Sims" and "\Sims(Steam)" where shown.
To change only the Key Name and nothing else, from the edit menu select "Replace"
(or use the hotkey: Ctrl+H), and fill in like so:
then use the "Replace All" button to change all instances of the "Key" name in this file.
    Just in case: I recommend using "Save As..." (from the file menu) to save this file
  • giving the save file a different name (Suggested filename: "Sims(Mixed).reg")
  • for the "Save as type:" use "All Files (*.*)" - so the file extension is preserved
Make sure you know where you are saving this file to
  • so you can find it when you are ready to import it into the Windows Registry
then go ahead and use the "Save" button to save the file.

When the save completes you may close this Notepad session.
7. Import new info to the Steam Key "Sims(Steam)".
Back in your Registry Editor, at the top, click File then Import.
Select the file you just saved, and click Open.

Expanding the "Sims(Steam)" key should show something like this: (click image for larger view)
What your Microsoft Windows Registry should look like with ALL The SIms™ 3 EPs & SPs installed.
    Notes:
  • Sims is the Retail Key for The Sims™ 3 game.
  • Sims(Steam) is the Steam Key for The Sims™ 3 game.
  • The Sims 3 is the Steam Key for The Sims™ 3 {base} product.
  • These 3 Keys are followed by the individual Keys for The Sims™ 3 EP & SP products.
    Uninstalling a Retail The Sims™ 3 EP or SP from Steam's The Sims™ 3 game requires:
    1. You delete the corresponding Key from this list.
    2. Only then may you safely uninstall THAT Retail The SIms™ 3 EP or SP.
    Unlinking a Retail The Sims™ 3 EP or SP from Steam's The SIms™ 3 game is as simple as:
    • deleting the corresponding individual Key for THAT The Sims™ 3 EP or SP product.
      This is very similar to deleting a Windows "shortcut".
    • Recommend: Exporting said Key before "deleting" said Key:
      so you may "import" the "exported key" file to relink THAT The Sims™ 3 EP or SP product.
  • Warnings:
    1. You should exit completely out of The Sims™ 3 before:
      • "Uninstalling",
      • "Unlinking",
      • and/or "Relinking".
    2. Those having (and leaving) the Into the Future EP/DLC installed, may disregard:
      When adding or removing one or more Retail EP(s) or SP(s) causes a change in which DLC, EP or SP (of all such still/currently installed) now has the highest version, you may need to edit the version information in the {base} "Default.ini". For how to do this see step
      4. Install one (or more) Retail The Sims™ 3 EPs and/or SPs.
      (above), the version verification and/or editing information is in:

      Additional instructions for the special case - {base} "Default.ini":
        Should your highest installed version DLC be a Retail product
      • "CompatVersion =" ...
      • "WorldBuilderCompatibilityVersion =" ...
        .
        .
        .
  • The Sims 3 Create a World Key - may be mixed in here for those with the CaW tool installed.

Should you be finished (for now) with copying Retail Key(s), you need to close the RegEdit Window - if you haven't already done so.

Your Retail EP(s)-and/or-SP(s) should now be recognized by Steam's The Sims™ 3 game,
so you should be ready to test whether or not everything worked as expected?
Troubleshooting
Specific Troubleshooting Issues (related to THIS guide):
    Verify Local Game Cache:
    The more The Sims™ 3 EPs & SPs from Steam you have installed the longer this will take.
  1. Right-click on the game title: The Sims(TM) 3.
  2. Select "Properties".
  3. Navigate to the "LOCAL FILES" tab.
  4. Select "VERIFY INTEGRITY OF GAME CACHE...".
    Please allow 30 minutes for Validating The Sims™ 3 Game Cache.
      Normal Results:
    • "4 files failed to validate and will be reaquired".
      • Even directly after completing a Validation of this Game Cache.
    • Will clear Microsoft's Windows Registry of Steam's The Sims™ 3 specfic product entries.
      • Which are queued up to be replaced when Steam's The Sims™ 3 is next played.
      • Any Retail Keys for The Sims™ 3 will be ignored (neither cleared nor replaced).

    Troubleshooting downloaded custom content:
    Steam's The Sims 3 Game Launcher viewing:
  • Riverview downloaded via Origin's TS3 Game Launcher (with brown box),
  • and Dragon Valley downloaded via Steam's TS3 Game Launcher (with a proper image).
    On the download panel of The Sims 3 Game Launcher:
  • A brown box (instead of a proper image) might indicate a version issue - with this item.
    If you have not just downloaded this item, I recommend that you delete & re-download this item.
    Generally: custom content (such as is available at The Exchange) is immune to version conflicts.
  • Unlike "store content" - which is sensitive to version changes.
    "store content" IS version sensitive
  • Installed "store content" (from store.thesims3.com) might not survive a version change;
    and I suspect Create-A-Style items based on "store content" might not survive either.
    Any "store content" may need to be downloaded & installed (again) after a version change.
    • If you didn't uninstall all of your "store content" prior to the version change,
      you may want to download and install to a clean "save point".

Windows 10 Note:
The default CD/DVD drivers (for Microsoft's Windows 10) do NOT recognize (properly process) anti-pirating-schema.
    Options:
  • Install CD/DVD software that does properly process the anti-pirating-schema-s,
  • Or use a previous version of Windows to "unpack" (install) the CD/DVD content, and then copy that CD's/DVD's installation folder to your Windows 10 installation point.

    For the relevant "installation folder" and/or Windows 10 installation point, please see the table in the introduction section.

For General Troubleshooting of Steam's The Sims™ 3 please see:
http://steamcommunity.com/sharedfiles/filedetails/?id=279488894
Collected Notes (for reference purposes).
Origin client's The Sims™ 3:
  1. Rules given herein usually don't apply to products installed via the Origin client application!
    Example: Only the TS3 {base} product installs a "[install point]\Game" folder.
    Making the Origin client's EPs & SPs incompatible with the Steam version of The Sims™ 3.
      Because the Steam version's minimum expectation (for validation) is:
    • a valid "[install point]\Game\Bin\Default.ini" file
    • a valid "[install point]\Game\Bin\skuversion.txt" file
    • a valid "[install point]\Game\Bin\Sims3Launcher.exe" file
    • a valid "[install point]\Game\Bin\TS3????.exe" file -AND-
    • a valid "[install point]\Game\Bin\TS3????GDF.dll" file
      where ???? = corresponding "Reference" value for whichever EP/SP one is referring to.

  2. The Origin client's The Sims™ 3 game will also use the Retail Key "Sims".

  3. And the Origin ciient's TS3 game will use the same [save point] - giving version conflict issues.
    • Unless, when switching between Steam & Origin, you properly "swap" [save point] files.

Phantom Content:
  • While researching this guide, the author managed to link in an [install point],
    but failed to properly link in the "TS3????.exe", and thus had an experience with
      "phantom content"
    • content with no thumbnail, no description and cannot be selected for placement;
      content that just takes up a position in The Sims™ 3 (build/buy) menus.

  • The author did this by directly editing values in Microsoft's Windows Registry.
    • If you follow this guide you should not experience "phantom content".

[save point]
  1. The Sims™ 3 [save point] (for Origin & Retail & Steam) is located at
      %documents%\Electronic Arts\The Sims 3
    • %documents%
      • Electronic Arts
        • The Sims 3

  2. "Achievements progress" is saved to the "ChallengeData.package" file(s).

  3. Create-A-Style saves to the "UserPresets.package" file (in the root of your [save point]).

The Create-A-World tool:
  • Prior to the publication of this guide, the instructions for getting the CAW to work with Steam
    • would (unwittingly ?) have one break the Retail links to Steam's "ergc" information,
      while creating the Retail Windows Registry Key "Sims".
    • IMO - these Retail links to Steams "ergc" information should have been preserved,
      OR: the "ergc" information should have been copied, too.

Windows 32-bit Operating Systems:
  1. The Retail Windows Registry Key "Sims" is usually located at
      [HKEY_LOCAL_MACHINE\SOFTWARE\Sims]
    • HKEY_LOCAL_MACHINE
      • SOFTWARE
        • Sims

  2. Normally you should ignore the Retail Windows Registry Key "Sims" located at
      [HKEY_LOCAL_MACHINE\SOFTWARE\Electronic Arts\Sims]
    • HKEY_LOCAL_MACHINE
      • SOFTWARE
        • Electronic Arts
          • Sims
    (Contains "ergc" information: CD keys are stored directly on the "ergc" Keys, herein.)

  3. The Steam Windows Registry Key "Sims(Steam)" is usually located at
      [HKEY_LOCAL_MACHINE\SOFTWARE\Sims(Steam)]
    • HKEY_LOCAL_MACHINE
      • SOFTWARE
        • Sims(Steam)

  4. Normally you should ignore the Steam Windows Registry Key "Sims(Steam)" located at
      [HKEY_LOCAL_MACHINE\SOFTWARE\Electronic Arts\Sims(Steam)]
    • HKEY_LOCAL_MACHINE
      • SOFTWARE
        • Electronic Arts
          • Sims(Steam)
    (Contains "ergc" information: CD keys are stored directly on the "ergc" Keys, herein.)

Windows 64-bit Operating Systems:
  1. The Retail Windows Registry Key "Sims" is usually located at
      [HKEY_LOCAL_MACHINE\SOFTWARE\Wow6432Node\Sims]
    • HKEY_LOCAL_MACHINE
      • SOFTWARE
        • Wow6432Node
          • Sims

  2. Normally you should ignore the Retail Windows Registry Key "Sims" located at
      [HKEY_LOCAL_MACHINE\SOFTWARE\Wow6432Node\Electronic Arts\Sims]
    • HKEY_LOCAL_MACHINE
      • SOFTWARE
        • Wow6432Node
          • Electronic Arts
            • Sims
    (Contains "ergc" information: CD keys are stored directly on the "ergc" Keys, herein.)

  3. The Steam Windows Registry Key "Sims(Steam)" is usually located at
      [HKEY_LOCAL_MACHINE\SOFTWARE\Wow6432Node\Sims(Steam)]
    • HKEY_LOCAL_MACHINE
      • SOFTWARE
        • Wow6432Node
          • Sims(Steam)

  4. Normally you should ignore the Steam Windows Registry Key "Sims(Steam)" located at
      [HKEY_LOCAL_MACHINE\SOFTWARE\Wow6432Node\Electronic Arts\Sims(Steam)]
    • HKEY_LOCAL_MACHINE
      • SOFTWARE
        • Wow6432Node
          • Electronic Arts
            • Sims(Steam)
    (Contains "ergc" information: CD keys are stored directly on the "ergc" Keys, herein.)

Just in case this was too hard to find (above) - Link to a General Troubleshooting Guide:
http://steamcommunity.com/sharedfiles/filedetails/?id=279488894
49 Kommentare
NetPCDoc  [Autor] 14. März 2022 um 11:18 
@Bregito : the line you refer to is for a WIN32 installation ...
"keys" in this location should be automatically handled during product installation!

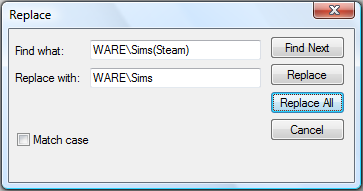
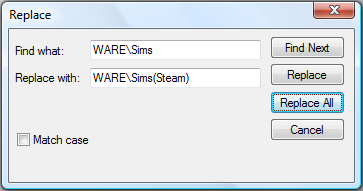
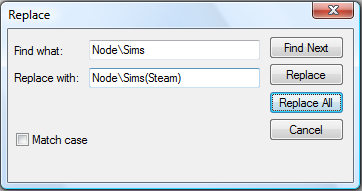
Steam, on WIN32 installations, uses HKEY_LOCAL_MACHINE\SOFTWARE\Sims(Steam),
and Retail products, on WIN32 installations, use HKEY_LOCAL_MACHINE\SOFTWARE\Sims.

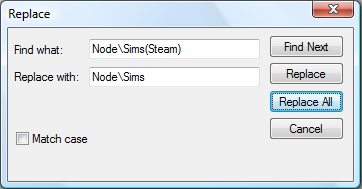
if you see a HKEY_LOCAL_MACHINE\SOFTWARE\Wow6432Node "key"
then you are on a WIN64 installation and should use those instructions.
Bregito 28. Dez. 2021 um 15:18 
it says to ignore the key located at HKEY_LOCAL_MACHINE\SOFTWARE\Electronic Arts\Sims(Steam) but that is the only place I can find the key. Could you elaborate on why that should be ignored and what I could do instead?
The Cerulean Snake 18. Juli 2021 um 6:12 
Excellent guide, very in depth. I was able to install My Katy Perry sweet treats SP as I missed out getting that digitally on steam. However I did run into a snag and had to use the comments to get past it.

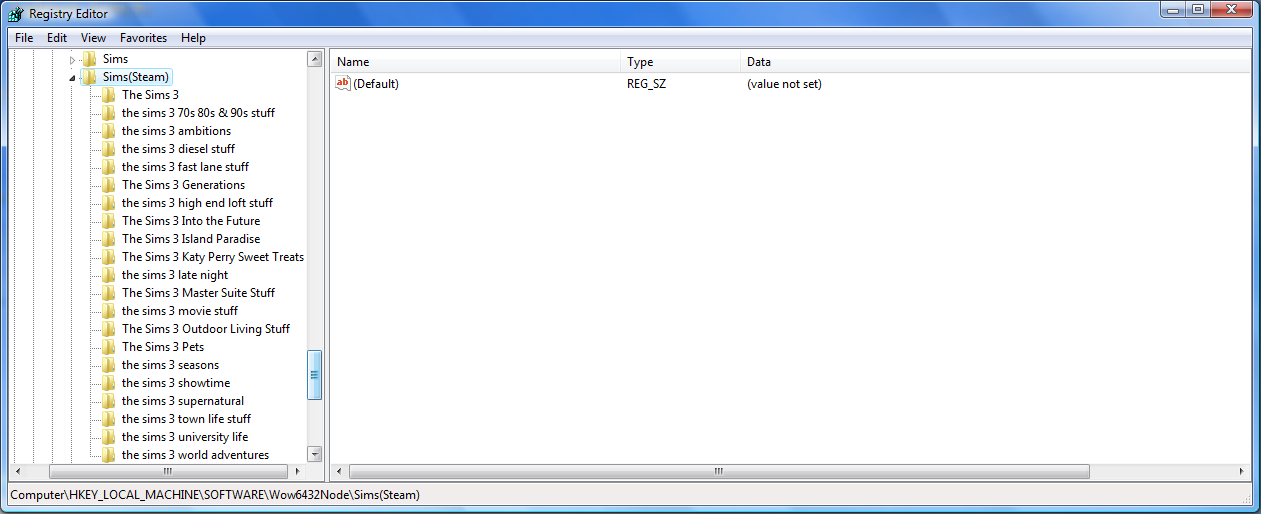
"InstallStart"=dword:00000000 is crucial for the SP to recognize the game to be installed. This seems to be missing on the sims(steam) regkey. It does not need to be added to any other EP/SP sub key, just the base sub key. This needs to be done during the first export.

Example of where I placed the string below:

[HKEY_LOCAL_MACHINE\SOFTWARE\WOW6432Node\Sims(Steam)\The Sims 3]
"displayname"="The Sims 3"
"exepath"="{Install Dir}\\The Sims 3\\Game\\Bin\\TS3.exe"
"install dir"="{Install Dir}\\The Sims 3"
"locale"="en-US"
"country"="US"
"productid"=dword:00000xxx
"sku"=dword:0000000x
"telemetry"=dword:00000000
"InstallStart"=dword:00000000
NetPCDoc  [Autor] 10. Mai 2021 um 1:07 
@Dynamite Adams:
1. Do you have Steam's "The Sims 3" base game installed?
2. Are you looking in the correct part of "RegEdit"? (there are instructions for BOTH win32 and win64 versions of Microsoft Windows.)
Dynamite Adams 9. Mai 2021 um 22:38 
Didn't even get onto the second step of the first section. There's no registry listings for the Sims. At all.
NetPCDoc  [Autor] 24. März 2021 um 14:09 
@ Yarik133 -

From Introduction:
Does NOT have an Origin client version of ANY of The Sims™ 3 product(s) installed.
(Again, will have additional considerations beyond the scope of this guide.)

One additional consideration - at the time I wrote this guide - portions of the game and expansions were being maintained on the Origin Server (i.e. some portions were missing from what was on the local HDD); beyond determining this fact I did not explore further, but rather added the above to this guide's introduction.
★ Sdeck ★ 23. März 2021 um 12:10 
and if I have nothing from the dlc and the game is in origin, then the method will work with origin?
C 26. Dez. 2020 um 11:05 
Hi, i follow step by step, and i installed World Adventure without any issue, but next i install Late Night it showed "The product requires an installed copy of The Sims(TM)3. Please install The Sims 3 before installing this product"
NetPCDoc  [Autor] 24. Jan. 2020 um 13:09 
@Shararamosh: This guide is meant for those playing via STEAM! There are additional considerations that I do NOT want to mess with - in regards to playing via the Origin Client.

For a STEAM install, sections 1 through 3 should cover what is required for the retail disc installers to see that The Sims 3 has been installed; depending on your settings you may need to reboot your computer after completing section 3 (and/or inform your virus protection software of the changes made to your Windows Registry).
Shararamosh 7. Jan. 2020 um 0:41 
Starting with The Sims 3 Ambitions the installer keeps telling me that I need The Sims 3 installed. I've followed all of the guide steps.