Team Fortress 2

Team Fortress 2

Nincs elegendő értékelés
MvM Nightmare Mode 101: Classes, Weapons, Upgrades and more
Készítő: watwat656
A brief guide on how to beat Wave 666 in Mann versus Machine. This guide includes what weapons to use and how to use them, what classes to play and what role they fill, and what to buy in the upgrades shop.

Nightmare mode, or Wave 666, is a completely different gamemode than the regular MvM tours. It centers around endurance and outputting the most raw damage possible. This guide specifically pertains to beating Nightmare mode, and techniques used in this guide will likely not apply to the other tours.

For every class setup that I discuss in this guide, I have tested multiple times in-game, and I have achieved top damage on my team with each setup (except Medic)

YOU MAY DISAGREE WITH MY OPINIONS; I AM NOT ONE OF THE MVM ELITES WHO HAS 1000 TOURS IN TWO CITIES
   
Díjazás
Kedvenc
Kedvenc
Törlés
The Beggar's Conch Soldier
This is arguably the best setup in Nightmare mode. This loadout consists of the Beggars Bazooka, the Concheror, and any melee weapon, but I prefer the Escape Plan because it acts as an easy way to run away to the dispenser or upgrade station.

Role
The Beggar's Conch is the team's primary damage dealer and it is common for him to have the top damage on the team by far. He can do all of the team's jobs well, such as damaging giants, damaging normal robots, damaging tanks, healing the team, and even collecting money. However, the exception to this is killing medics without popping them, which is why anti-medic classes come in handy (e.g., Demoman, Sniper, Spy). In short, he is fast and can deal and take astounding amounts of damage. The Beggar's Conch deals damage by repeatedly shooting rockets out of his bazooka, and gaining his health back with The Concheror. The Beggar's Conch should very rarely load more than 1 rocket into the bazooka, because doing this is both less efficient and more dangerous, because you will be receiving health at a slower rate. He should also move side to side to dodge projectiles.

The Beggar's Conch will run out of ammo very quickly, so it is important to have a dispenser ready for him to use. However, he is generally a close-quarters class because of the bazooka's inaccuracy, so the he will have to constantly be running from the dispenser to the lane and vice versa.
As you can see in the diagram, the soldier fights the robots in the lane until he runs out of ammo and rocket jumps to the dispenser. If you are unable to rocket jump, you can simply run up the stairs to refill ammo.

The Concheror is, simply put, a better version of Mad Milk, so the Beggar's Conch render's Scout's milk completely obsolete, making scout less viable. However, mini-crits greatly benefit the bazooka, so Jarate and Buff Banner work well.

Upgrades
You start out with a whopping $5000, so you must make the most of your starting money. Here is a solid upgrades set that I use. Crit resistance is the best resistance on this wave, because it is cheap, goes up in increments of 30% as opposed to 25%, and many of the robots are crit boosted, so it is very important to buy it. Max reload speed and max ammo capacity are also key upgrades, and without them, your gun is much weaker. The remaining upgrades can be substituted for canteens or other resistances.

As the game goes on, he should buy crit canteens whenever he has enough money and is at the upgrade station. This could be when he dies or is defending the bomb from being deployed. Also, explosive and bullet resistance, health on kill, and health regeneration should be purchased later.
The Heatmaker Sniper
This headshot warrior and the Beggar's Conch form an unstoppable team. Well, they can be stopped be hundreds of robots if they don't have some support, which I will discuss later. This loadout is centered around the Hitman's Heatmaker, but I strongly urge you to use Jarate, because it is the only secondary that has strong benefits, and your team will (or should) thank you. Similar to the Beggar's Conch, any melee will do, but I prefer the Shahanshah.

Role
The Heatmaker Sniper is another spectacular damage dealer has a good chance to have the most kills on the team. He can do all of the kill-based jobs of the Beggar's Conch (not tanking and money) and unlike the Beggar's Conch, he can also kill medics without popping them easily by getting a headshot. The Heatmaker Sniper deals damage by getting a headshot on a robot, thus all surrounding robots receive damage too. Sniper in MvM is nothing without explosive headshot, and it is the reason he is the second best Nightmare setup. The Heatmaker also greatly supports his team with Jarate. Jarate is a better version of the Fan 'o' War because it can easily coat many enemies. Jarate pairs very well with explosive headshot, because if you get explosive headshot damage on a robot covered in Jarate, it does 257 damage to all the surrounding robots (with max damage upgrades).

The Heatmaker Sniper will be targetted by robots, so it is very important to be under cover. This can be in the dispenser spot mentioned in the Beggar's Conch section or inside of the house. You should never be charging up a shot when there are robots alive. Always shoot as soon as you can multiple times for maximum efficiency. You can also no-scope robots if they are near you and you are unable to scope in and hit them. Because the gun will have very fast reload and lots of damage when you upgrade it, you can easily finish off any remaining scout robots with no-scopes.

Upgrades
The basic idea of this upgrade set is to get all the necessities on the gun, then buying resistances and other unimportant buffs with the remaining money.
As I mentioned before, the Sniper revolves around the explosive headshot upgrade. Explosive headshot, reload, and damage are all things that must be bought. If you throw Jarate and manage to coat a group of giants, they will move very slowly and be extremely vulnerable to snipers.
Engineer
Everyone on the team benefits from this guy! He is considered a supporting class in MvM, but he can do some wicked damage with the wrangler.

Role
The Engineer's job is to get the team to the front lines very quickly with teleporters, heal the team and provide ammo with a dispenser, and deal damage with the sentry gun. The teleporter entrance should be right outside of the spawn door anywhere on the wooden platform, and the exit should be on the roof of the main building, behind the wooden barrier. Engineer is considered a supporting damage class, because he can easily pick off small robots like Scouts and Pyros, and do moderate damage against giants and tanks with the Wrangler. It is fine to lose your sentry and dispenser occasionally as long as you quickly replace them with upgrade canteens. You should constantly have upgrade canteens available unless you are using crit canteens to deal tank damage or giant damage.

The Engineer's performance in MvM is all about building placement. Below I have some sentry positions that can be used at different times in the game.

Here is the first place you can set up and Wrangle from. You can set up here before the wave starts, and put the dispenser behind the wall so that it is protected. If you see that the robot holograms before game are going the other way, you can set up in the direction they are going.

Alternatively, you can set up on top of the building on the right, with the dispenser hidden behind the wall.

As the game goes on, you can set up further back. I may go into more detail in these locations later.

Upgrades
I am not the best MvM Engineer, so this upgrade set may not be the very best. However, it offers a strong damage-dealing setup that can support your team. I omitted the two-way teleporter upgrade, but that is purely personal preference. I included the core upgrades, such as wrench swing speed, building health, sentry firing speed, and dispenser range, and added a few resistances with the remaining money.


Support Soldiers
Soldiers are all about damage, and having another soldier in addition to the Beggar's Conch, especially a Buff Banner Soldier, will greatly help the team's damage output. A standard support soldier loadout that I personally recommend for nightmare is Beggar's Bazooka, Buff Banner, and any melee. However, you can use the stock rocket launcher or air strike if you prefer. As Buff Banner Soldier, you should pop minicrits as much as possible, whenever there are enemies. You will be the team's star player if you are able to constantly give everyone minicrits, effectively raising your team's damage output by 35% (sort of). A team with Conch and Buff Banner will seldom need a Scout because it greatly reduces the need for milk and fan, but I once played on a team with a Damage Scout so good that he collected almost all money and had top kills (probably), so do not throw Damage Scout out the window if someone insists on playing it. At the time I am writing this, I have just won a nightmare game and I deployed the Buff Banner 30+ times in just that game, which was one of the reasons we won.
Supporting Snipers
Supporting Snipers are also great damage dealers, and they work well in addition to the Heatmaker Sniper. A solid supporting Sniper setup that I find works well with experienced players is the Bowman Sniper, consisting of the Huntsman, Jarate, and the Bushwacka. He can deal awesome damage on both by getting fully charged headshots and by spamming arrows at the body. A charged bodyshot arrow with max damage upgrade is enough to kill a normal medic in one hit, so it works great as antimedic. The Bowman Sniper should also stay close to the front lines and get ammo from the dispenser. He should be firing lots of arrows to make up for not having explosive headshot.
Support Pyro(s)
Pyro excels in Spy killing and Tank killing, and Nightmare has tons of these. I find that there are two Pyro that work very well in Nightmare: Phlog Pyro and Pusher Pyro.

Phlog Pyro
The Phlog Pyro is better when it comes to doing raw damage. Most of his damage output will come from his stored crit boost, Mmmph. Unlike the Pusher Pyro, he has little need for canteens, and if he ever needs canteens, it will only be an occasional Uber canteen. He can wipe out the many spies and take down tanks easily. I find that the best loadout to use as Phlog Pyro is Phlogistinator, (shocking!) Scorch Shot, and Powerjack. Scorch Shot can be used to light enemies on fire from a distance, and Powerjack is good for moving around quickly. You should put almost all of your money into your Phlog, and spend the rest on resistances. You can get max damage, max ammo, health on kill, and a little bit of burn damage and/or burn time.

Pusher Pyro
The Pusher Pyro is more of a supporter than a damager. The airblast ability, when upgraded, can easily reset the bomb if it is being carried by a light robot by pushing the robot into one of the two holes in the map. The Pusher Pyro will also deal damage from a distance with the Scorch Shot, and after firing several shots into a crowd of robots, they will all catch on fire, increasing your damage dealt by a sizable amount. The best loadout for Pusher Pyro is the same loadout as the Phlog Pyro, but instead of using the Phlog, use the Stock flamethrower. I personally am most successful as Pusher Pyro when I spend my starting $5000 on my flamethrower and resistances, then use the money you get from robots to upgrade your Scorch Shot's reload and firing speed.
Medic
On a team that is playing Nightmare Mode purely to win, with fun as a low priority, Medic is not a core class. However, in a game with random players, Medic is always an enjoyable and fun class, and he offers strong support for your team. The big reason that Medic is not great in MvM is that he cannot do damage. Some will argue that a team will not do any damage if they are dead, so a Medic is necessary to do damage. This seems like sound reasoning on paper, but in practice, the team can usually manage to live for a decent amount of time, and doing plenty of damage during their life. Hiding behind walls and healing at the dispenser can help keep the team alive.

Now that I have described the viability of Medic, I will glaze over the job of Nightmare Medic. By far, the most common setup is using Kritzkrieg, and occasionally using an Uber canteen on the team to survive strong attacks from Giants and such. Experienced players who want to try something new can use the Vaccinator and upgrade Uber rate so they can be Ubering the team for a large portion of the game. If you are new to Medic, like me, you can omit the Canteen upgrades, and spend your starting money on your Medi gun and resistances, but if you are a better medic, you can buy Canteen upgrades and grab some Uber canteens during the game.
Heavy
Heavy shoots robots. Heavy does damage. Heavy kills robots.
You can use pretty much any secondary and melee, just make sure you are using stock minigun or Brass Beast.
Solid team setups?
I'm going to keep this concise.

Standard team setup for easiest win:
Beggar's Conch, Heatmaker Sniper, Engineer, Phlog Pyro, Buff Banner Soldier, Heavy.

Alternative 1: Sniper/Soldier stack
Beggar's Conch, 2 Support Soldiers, Engineer, Heatmaker Sniper, Support Sniper

Alternative 2: Medic
Beggar's Conch, Heatmaker Sniper, Engineer, Phlog Pyro, Medic, Heavy.

These teams can certainly be modified.
It's finally over
This guide is not complete. I still need to revisit the following:
  • Team Setups
  • Engineer Sentry Spots
  • Demoman
  • Practicing
  • Other stuff
18 megjegyzés
sweaty 9 year old 2021. ápr. 8., 16:53 
damn we'll get 'em next time
watwat656  [készítő] 2021. ápr. 7., 22:12 
no
sweaty 9 year old 2021. ápr. 6., 18:45 
update guide
watwat656  [készítő] 2015. dec. 30., 10:25 
thank you very much buster i will eventually improve my guide so it is not a shitstorm lol
Buster 2015. dec. 29., 23:08 
>Sentry spots
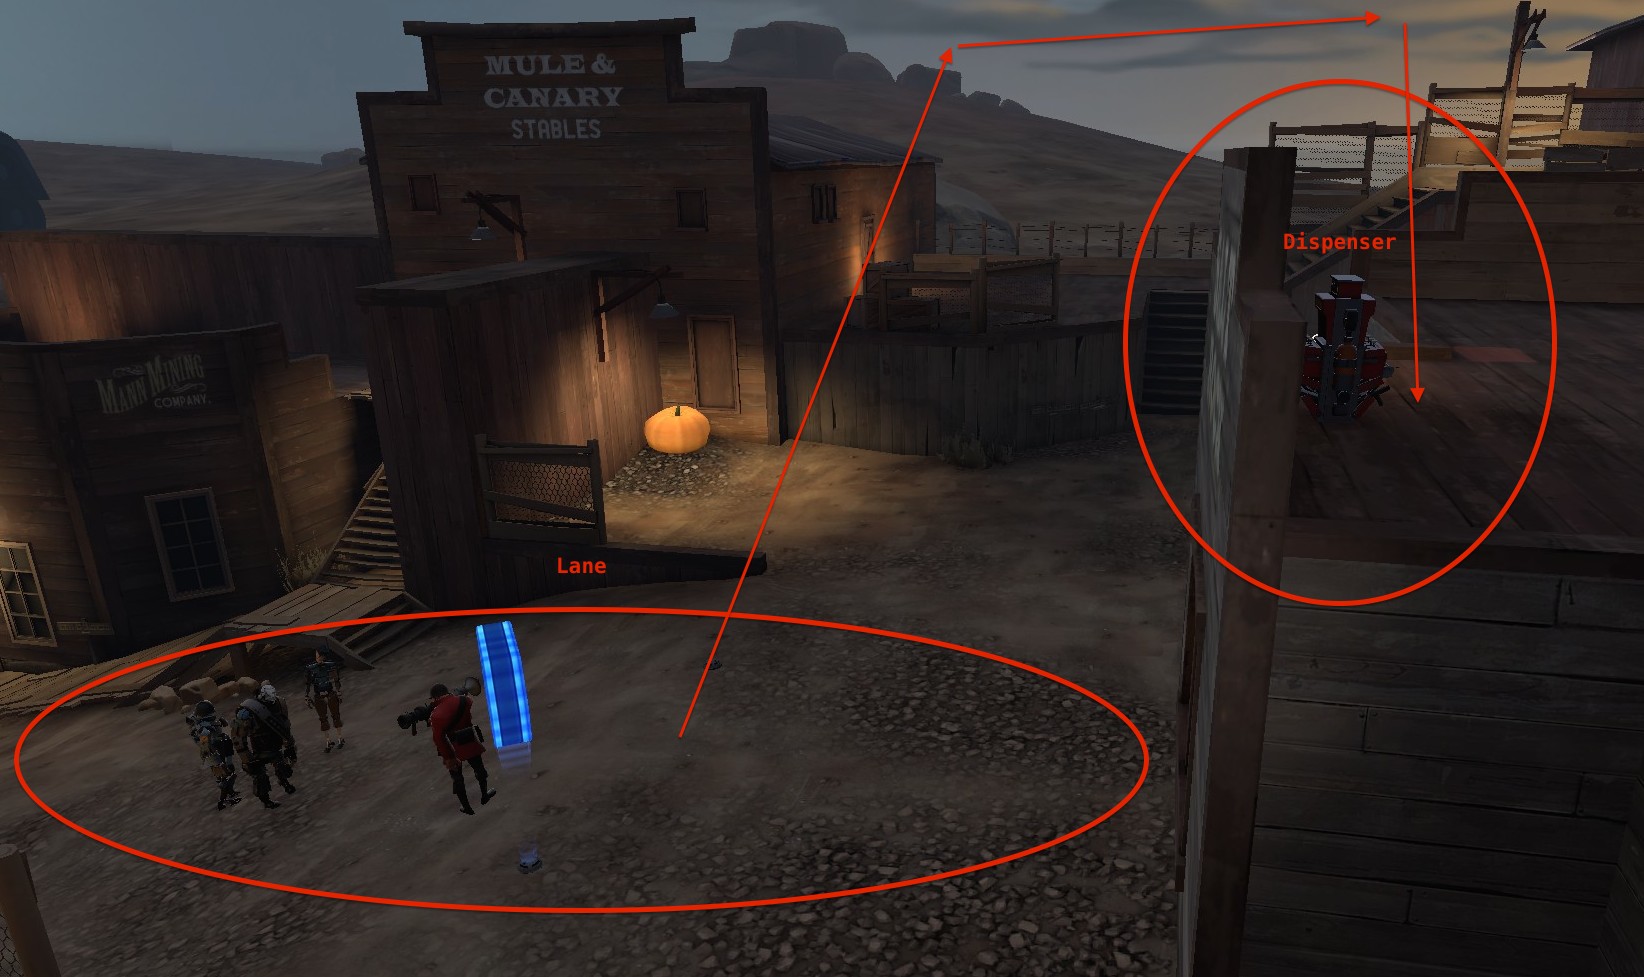
Where sentry is doesn't matter, as long as it fires 24/7.

>Demoman
Bombs away! Highest burst damage in the game and stickyspam. Stay on the floor of one of the buildings and keep making traps.

>Practicing
lol
With standard setup you gave, everyone can win.
Buster 2015. dec. 29., 23:07 
>Medic
Health on kill primarily helps the team stay alive.

>Heavy
...ok, whatever...

>Scout is obsolete
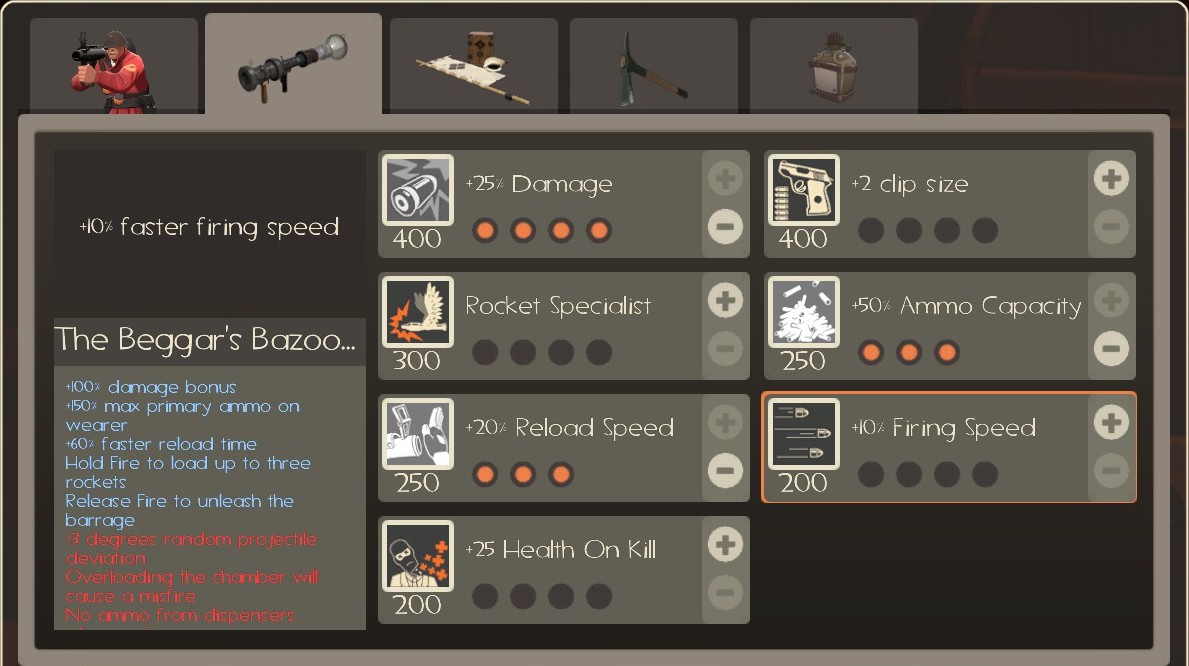
No. Milk still helps, Fan is still as efficient, scatterguns do even better because of all the money (Scout beats non-Beggar's Soldier in everything but crowd control) and collecting money as anyone but Scout is still a major pain in the ass. Heavy becomes obsolete faster because you have Soldier who tanks damage effectively due to Conch and Beggar's high efficiency with health on kill, and has a more effective weapon.

>Team setups
In standard, switch Heavy with Scout.
Buster 2015. dec. 29., 23:07 
>Extra Soldiers
No reason why second Soldier shouldn't use Beggar's.
No, you shouldn't pop minicrits as much as possible, you should shoot as much as possible.

>Extra Snipers
...ok, whatever...

>Pyro
Phlog can do as good as Beggar's.
No, don't take Scorch Shot, there are other flare guns that don't make your team get outrageous because they can't hit anything.
Pusher is obsolete. You have 2+ Snipers which make it downright damaging and the bomb resets itself making it downright useless.
Buster 2015. dec. 29., 23:07 
>Sniper
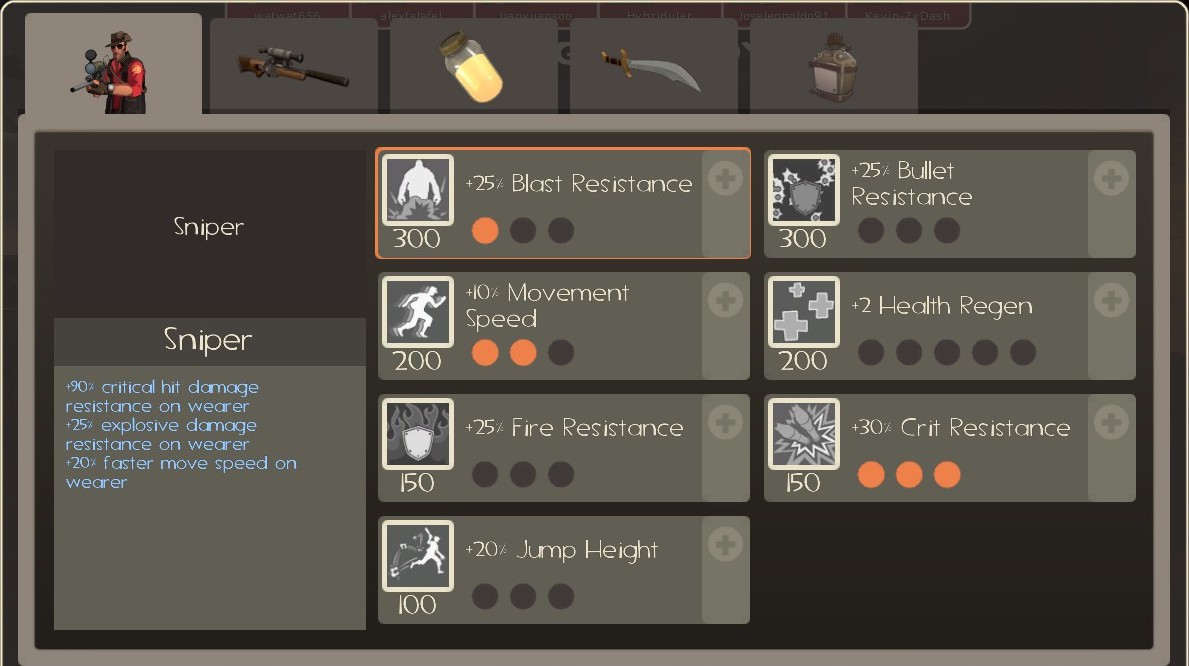
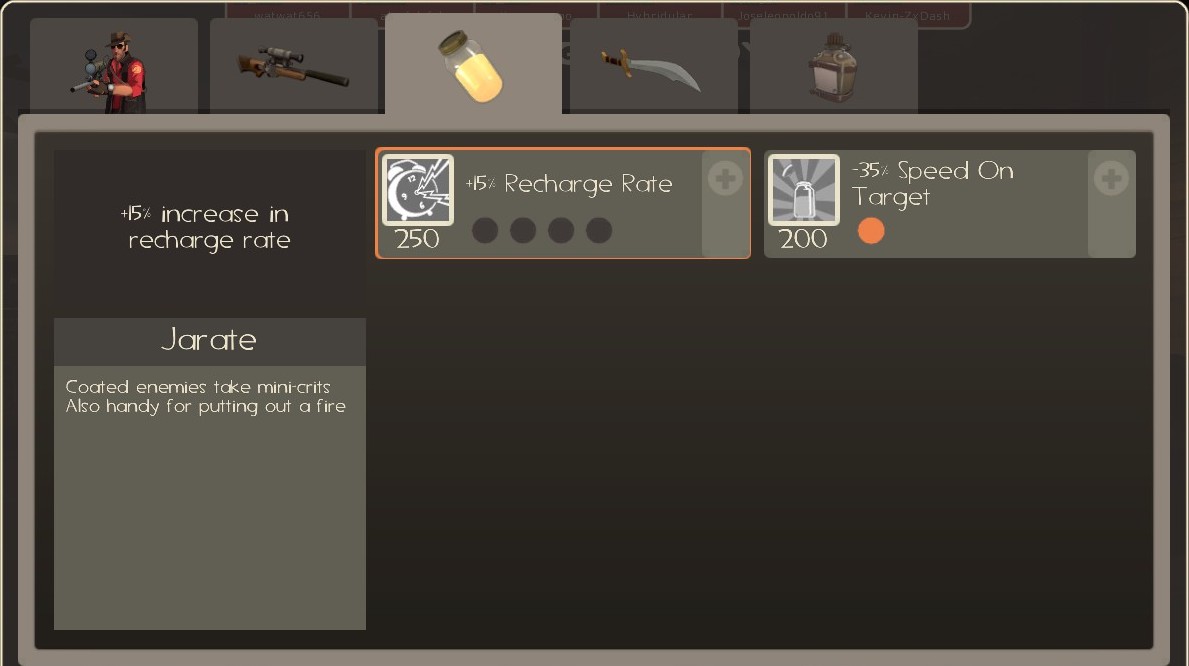
No, Jarate doesn't have strong effects. It's more or less equal to Cozy Camper or Cleaner's Carbine.
Again, you have pointless blast resistance and also pointless move speed. You should invest better in penetration (headshot 2 or 3 bots with 1 shot and you'll see why). If you desperately don't want to have health on kill early on (why tho?) you should take Cozy Camper. The slow down on Jarate is also pointless because there is no Super Scouts in Caper.
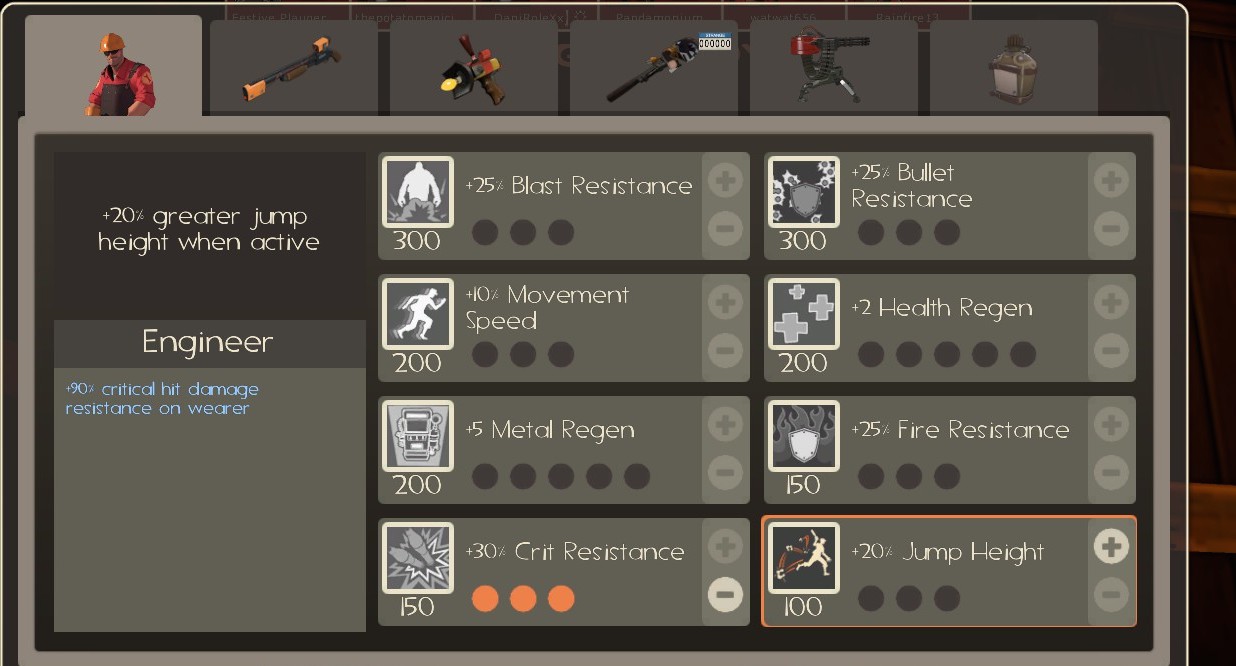
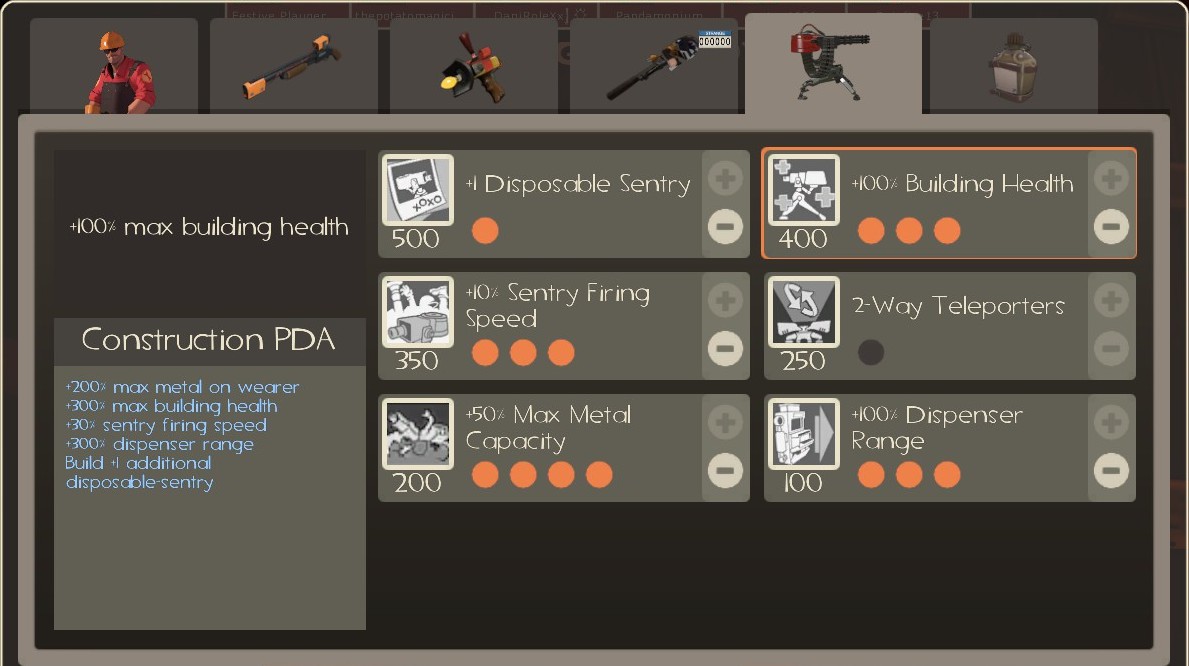
>Engineer
Kill tanks better by letting your sentry loose and hitting the tank with wrench. It's pretty effective.
Engie doesn't need dispenser. Dispenser is for the team, ammo packs are for the Engie.
2-way tele >>>>>>>>>>>> disposable. Because disposable is useless and 2-way lets you buy upgrades.
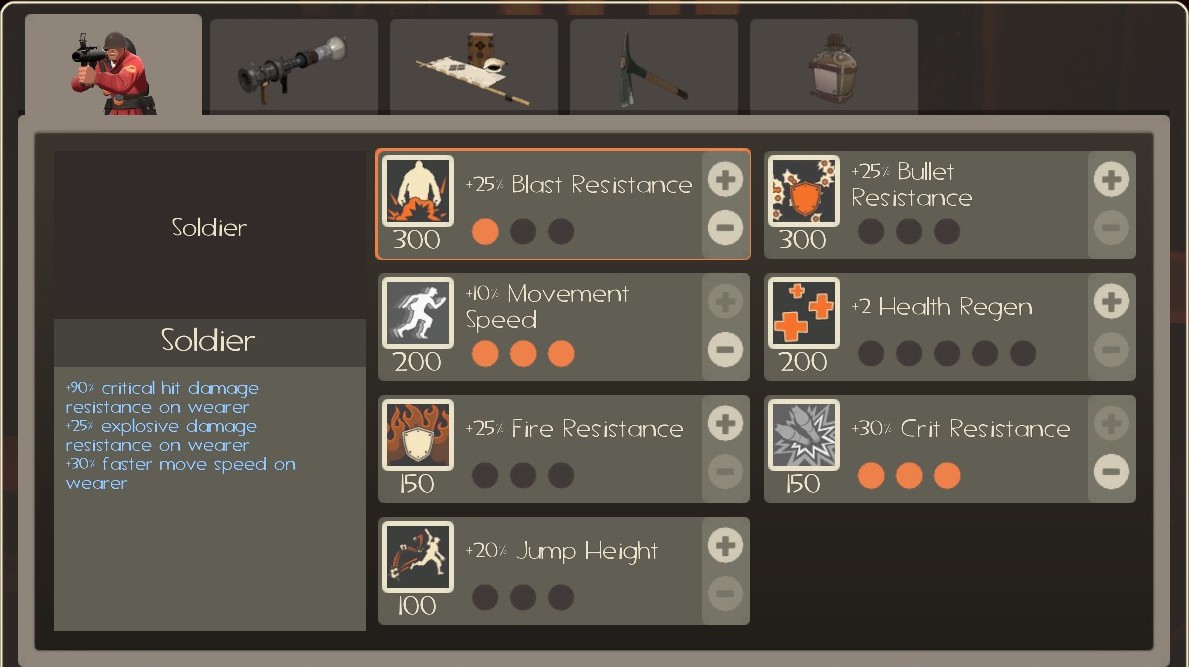
Buster 2015. dec. 29., 23:07 
I wouldn't say Caper is completely different from ordinary MvM. Just a mission with a twist. You can't change classes or restrategise as you feel like, but that's all.

>Soldier
He can drop Medics, he just needs 2 ticks in damage.
You should promote usage of health on kill early on. Competent Soldiers can do without it if they have Conch, but not all Soldiers are competent and it's downright painful. The 1 tick in blast resistance makes no sense tho.
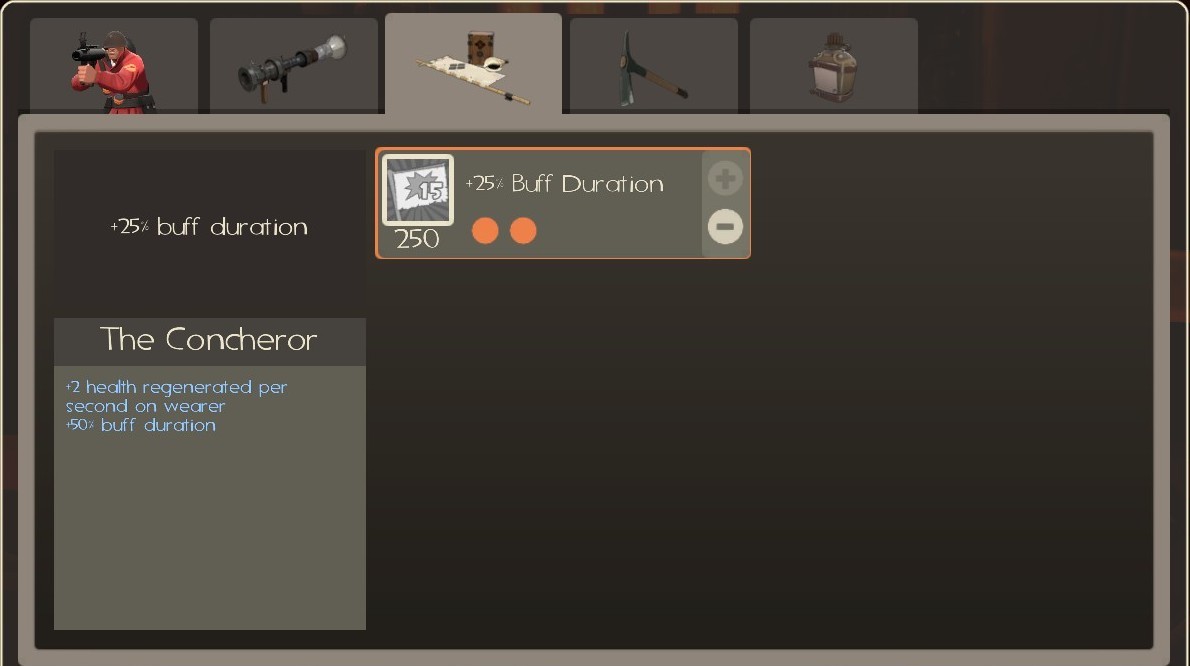
Conch doesn't make milk obsolete. Not all teammates are within range of buff at all times, the healing from conch is less effective, stacks with milk and Soldier might feel like taking Buff Banner instead.
Brother Bigot 2015. dec. 29., 15:29 
Yeah the beggars work me with a krit pocket beat the wave with me doing 300k plus combined damage