Dead Rising 3

Dead Rising 3

422 avaliações
100% Achievement Guide + DLC (by THN)
Por The Horror Network
100% Guide by The Horror Network
2
4
2
   
Premiar
Adic. a Favoritos
Nos Favoritos
Desfavoritar
Introduction


Note: There have been look-a-like copycat guides popping up. If it's not labeled by THN (The Horror Network), it's NOT one of mine and therefore not up to the quality that I aim to provide.

Welcome to the Dead Rising 3 achievement guide.

Seeing as there are a plethora of viable and well written walkthroughs of this game available on Steam and through other sources, this guide is strictly meant for information on how to attain achievements. I have categorized the achievements to the best of my ability.

You will need to prepare yourself for two full playthroughs, and zombie kill grinding once you complete your New Game+ Nightmare (second playthrough) run. While the achievements are not overly difficult by any means, completion will end up eating about 30-40 hours of your time.

*** !!! Super immensely Helpful Tip That Will Make It So You Don't Struggle At All !!! ***
So, even though I've given alternate methods in the achievement descriptions, the absolute hands down BEST weapons for absolutely abolishing all Psychos and zombies alike are:
N.A.R. and Shockblast.
You will need to find the blueprint for N.A.R which if I remember correctly it is within the Police Station and you will only be able to obtain it during and after Chapter 5. However, the Shockblast is available from the start, so stock your inventory with them. They have a low amount of ammo but man oh man do they blast away the zombies like they're nothing! I highly recommend giving the Shockblast to all of your posse, also.

This guide is considered COMPLETE
> If you have anything insightful to add, please leave it in the comments below.
> If you're looking for boosting/co-op partners, feel free to use the comment section.
> IF ANY DLC IS ADDED, PLEASE LEAVE A DETAILED COMMENT SO I CAN CHECK IT OUT.

Story Related
Starter
Chapter 0 completed.
Story related, cannot be missed.

Quarantined
Chapter 1 completed.
Story related, cannot be missed.

Morgue-ified
Chapter 2 completed.
Story related, cannot be missed.

Family Man
Chapter 3 completed.
Story related, cannot be missed.

Happy Camper
Chapter 4 completed.
Story related, cannot be missed.

Day at the Museum
Chapter 5 completed.
Story related, cannot be missed.

The Doctor is Out
Chapter 6 completed.
Story related, cannot be missed.

Nightmare Master
Chapter 7 completed in Nightmare Mode.
Story related, cannot be missed if playing in Nightmare Mode. It is best to complete the Story Mode and then turn Nightmare Mode into your New Game+. Also, if you want, you can obtain this achievement by joining a friends game if they are in Nightmare Mode Chapter 7. Complete the chapter with them and the achievement will unlock.

Them's the Facts
The Facts completed.
At the end of Chapter 7, you will encounter Gary at the Juggs Karaoke Club. You will get two choices, which are either to kill him or get Rhonda to meet with him. You must get Rhonda from her garage to satisfy Gary, so that Gary will tell Annie's father about her, and he will interrupt you at the very end of the game. This is crucial if you want to obtain the next achievement.

Complete Package
Overtime completed.
Once you have completed Dead Rising 3, ther ewill be a post-credits sequence where you chase General Hemlock around the city. As soon as the cutscene finishes, hop off of the roof and grab the assault rifles from the nearby gun shop if you do not have any on you. Ignore the King Zombies entirely to ensure that a lot of droids come out of the ship. The ship will then move from Ingleton to Central City, then to Almuda and then to Sunset Hills. Once you've destroyed the 60th droid, a cutscene will happen and then the final boss battle will ensue. For this fight against General Hemlock, you will want to stay on the platform with him. Keep a medium distance between you and him; if you're too close, he will kick and punch you... if you're too far, he will shoot you and throw grenades at you. Guns are best for this battle, and there are a few around the immediate area. If you run out of ammo, you can always rush him and get off a few quick attacks before rolling away.
Skills and Levels
A Little Ambition
Purchased one Attribute.
Each time you level up, you will gain an Attribute Point. Simply place the point in whichever skill that you prefer. You will not be ablet o use Attribute Points prior to reaching Rhonda's Garage.

Ladder Climber
Purchased 10 Attributes.
The same as A Little Ambition, but now do this ten times over.

Specialist
Maxed out a single attribute.
To max out an attribute, you must obviously put as many points into one attribute as possible. To unlock the last tier of any attribute, you need to reach level 50 and then max out the final tier. Don't worry, though, you will be ablet o max out all attributes eventually.

Apprentice
Level 5 reached.
Refer to Maxed! for more information.

Expert
Level 25 reached.
Refer to Maxed! for more information.

Maxed!
Level 50 reached.
If you kill all of the Psychos and complete all of the side missions, you should be able to reach level 50 by the end of your first playthrough. Once you unlock the more powerful combo vehicles and super combo weapons, levelling will come exceedingly easy. The biggest tip to levelling is to create massive combos. To further boost your combo score, you should consistently use your special execution moves. Also, witnessing Tragic End events and collecting the Limited Frank Statues will net you some PP. If you are having any issue levelling, refer to some of the other guides here on Steam that provide an actual walkthrough of Dead Rising 3.
Survivors
Local Hero
Stranded survivor saved.
Basically, you gain this achievement for saving any one survivor. Taylor will most likely be your first survivor, and you will encounter him after leaving the diner at the beginning of the game. You will head under an overpass, and soon an explosion to your right will open a path through a fence. Taylor will be on the other side of that fence.

Man of the People
15 stranded survivors saved.
While you're roaming around the map, you will come across various people who are fighting off large amounts of zombies. You will be prompted to rescue them by clearing the zombies from around them. You will need to save at least 15 of these survivors throughout the game in order to ensure that you receive this achievement, so save everyone that you come across; no matter how busy you are. Plus, they net pretty good PP and help you to level up.

Help Wanted
5 survivors added to the survivor bulletin board.
As you complete side missions, the survivors will sometimes decide to join your cause. If you look at the side mission menu on the map screen, check to the right of the title of the mission to see if it has the survivor icon (a running man). If it does, this means that you can obtain one or more people involved as a follower. Keep talking to the person once you arrive at the destination and they will end up accompanying you, however some times they will not join you until after the mission is completed.

Gang Banger
Led a full survivor posse.
You will need at least 5 survivors on the survivor board, so make sure to complete Help Wanted first. You will also need to have upgraded the first three tiers of both the Mechanic and Smarts skills. This will allow you to have the +2 Maximum Posse Size that both of the skills have. The best thing to do is wait until you have 5 survivors and then recruit them from the survivor board into your posse; that way you don't run the risk of them inadvertantly dying.
Psychos
Wrathful
Zhi defeated.
Zhi is the first Psycho that you will encounter. You'll get a call shortly after you've reached Rhonda's Garage that will notify you of him being in the Zen Gardens. This Psycho is fast, and he will often leap on top of pillers where you will be unable to melee him. I highly suggest grabbing a few assault rifles so that you can take him out quick and easy, without taking too much damage yourself. If you run out of ammo, there are plenty of handguns and shotguns laying around the area.

Greedy
Albert defeated.
Albert will show up during Chapter 3. You will encounter him while you are burning supplies in Almuda. This Psycho can be a little difficult because he causes Nick to hallucinate. You need to avoid attacking the "fake" hallucinated Alberts; attacking them will cause them to deal a good amount of damage back to you. In order to tell the real Albert apart from the fake Alberts, you need to wait until you see the real Albert trying to drug and dismember someone or wait until you hear their screams. He also "glitches" out from time to time (on purpose). Once you've been clued in to the real Albert, rush him and beat him down or throw organ containers at him.

Gluttonous
Darlene defeated.
Darlene will also show up in Chapter 3, near the end. You will receive a side mission titled "All You Can Eat", which is located at a buffet in Inglewood. Darlene is one of the more easy Psychos to take out. She will roam around the room on her scooter and attempt to charge and stab you. The one irritating thing about this fight is that she will eat food to recover her health. But while she is eating, you will get a prompt to begin beating her up; do not miss this prompt or she will heal. It should only take a good three to four prompts to take her out.

Lusty
Dylan defeated.
So many Psychos in Chapter 3... you will get the "Play Time" mission shortly after you've dispatched Darlene. If you have any followers, you will need to get rid of them because you have to face Dylan alone. This is another fairly simple fight, which is made even easier if you grab a few guns. Dylan mostly focuses on shooting bombs at you and using a "make shift" flamethrower. Since this Psycho likes to play with fire, it's safer and easier for you to used ranged attacks rather than melee.

Prideful
Jherii defeated.
Jherii will appear during the beginning stages of Chapter 5; her side mission is titled "Look in the Mirror". She is powerful and fairly resistant to ranged weapons, but not ranged attacks from melee weapons. If you get in too close, she can take out large chunks of your health if she swings her barbell around though. The best method here is to take one of your most powerful melee weapons, rush her, do a few hits and then roll away. Rinse and repeat.

Slothful
Theodore defeated.
Theodore is also in Chapter 5. Once you receive the side mission, "Remotely Helpful", you will be able to travel to the north eastern part of Sunset Hills and take on this Psycho. Well... kind of, you never actually fight Theodore. Instead, you need to destroy the security power boxes that are in the house while you take out his annoying RC helicopters. The helicopters will follow you around and shoot at you while you're trying to take out the power boxes. A good strategy here is to bring a follower and equip them with an assault rifle so that they can deal with the drones while you worry about the power boxes. Once the security system has been dispatched, head to the basement to finish the fight.

Envious
Kenny defeated!
Kenny is the nerdy little ♥♥♥♥ who was in the construction yard that you rescued and taught how to craft weapons early on in the game (if you did that side-quest). Once you begin Chapter 7, you will get a notification that Kenny has kidnapped someone. While he has a lot of health, he is easily stunned by melee attacks. If you combo a weapon during combat, this will also distract him. After the fight, the end decision is yours to make and the achievement will come either way.
Crafting
Planner
5 blueprints collected.
Refer to Master Builder for more information.

Journeyman
25 blueprints collected.
Refer to Master Builder for more information.

Engineer
50 blueprints collected.
Refer to Master Builder for more information.

Master Builder
100 blueprints collected.
Luckily for you and I, there is no real need for a collectible guide as once you obtain the first tier of the Smart skill, all of the blueprints will be shown on your in-game map. There are over 100 blueprints within the game, but you will need all of the weapon blueprints in order to obtain Duct Tape Master. The blueprints will come naturally through story progression and by retrieving them from the environment, so pick them up whenever you see them nearby in order to cut down on the amount of running around you'll need to do later.

Collector
250 weapons collected in the weapons locker.
Pick up literally everything, from hair dryers to lawn chairs to shotguns. Everything that isn't food in the world of Dead Rising is a weapon of some sort. If you don't need the item, simply drop it again or pick up another item. You'll also thank yourself for doing this when you need to craft a new combo weapon.

T.I.O.D. Disciple
Created 50 combo weapons.
Refer to Duct Tape Master for more information.

Duct Tape Master
Created every combo weapon.
You will need to not only find, but also use, all 101 weapon blueprints. Most of the blueprints will be in a location where you will have access to the necessary materials to create them; so it's a great idea to craft the item when you find the blueprint. You can also use the weapon locker to get ahold of any weapons that you have picked up previously, making the crafting aspect way easier than this tedious achievement makes it seem. Instead of listing all of the combo weapons here, simply go to your in-game menu and access the "Blueprints" screen for a list of all the combo weapons you will need to make.

Customizer
Created 5 combo vehicles.
Refer to Master Mechanic for more information.

Master Mechanic
Created every combo vehicle.
This may seem daunting, but there are only 11 combo vehicles and many of them are unlocked through natural story progression. Only one is unlocked from the skill tree. The rest are found in the environment just like regular weapon blueprints.

Mobile Locker: Van + Van
Junk Car: Sedan + Muscle Car, Sedan + Sedan, Sedan + Forklift
Turret Rig: Steamroller + Sedan
Mini Bike: Motorcycle + Sports Bike, Motorcycle + Forklift
Forkwork: Forklift + Fireworks Van
Rollerhawg: Motorcycle + Steamroller
Junk Truck: Van + SUV
Party Slapper: Street Cleaner + Party Van
Junk Bike: Motorcycle + Sedan, Motorcycle + Van
Shockdozer: Backhoe Loader + Ambulance, Steamroller + Van
Training and Trials
Certified Survivalist
25 Survival Training Bronze medals earned.
Refer to Survival Training Master for more information.

Survival Training Specalist
25 Survival Training Silver medals earned.
Refer to Survival Training Master for more information.

Survival Training Master
25 Survival Training Gold medals earned.
If you look at your map, you will notice some star icons. These particular icons indicate Survival Training challenges that can be completed for huge PP bonuses. Each of the challenges will require you to kill a specific number of enemies with a specific type of weapon or vehicle. The catch is, you only have a minute to complete the training sessions. Many of these challenges can be completed using The Rollerhawg to quickly flatten your foes. The more challenging unarmed training sessions can be completed using the unarmed bonus damage book and knee drop combo. If you're having any issue with completing the Survival Training, there's a really good guide here on Steam detailing them further.

Prestigious
Completed 10 PP Trials.
Refer to Prestige Hound for more information.

Almost Famous
Completed 25 PP Trials.
Refer to Prestige Hound for more information.

Prestige Hound
Completed all PP Trials.
Arguably the hardest achievement in Dead Rising 3, a mere 0.8% of players have earned this achievement thus far. PP Trials are challenge tasks that carry on throughout the longevity of your playthrough. Many of them keep track of how many locations that you may have visited, enemies you've killed, etc. Some of them are available at the beginning of the game, and some of the must be unlocked through story progression so that you can obtain the neessary item to complete the trial. From time to time, you will see your progress pop-up on the screen as you complete trials or get to the next milestone for one. Make no mistake about it, there are tons of PP Trials. Luckily for you and me, the progress for these carries over between both playthroughs and chapter select. There's a great guide here on Steam detailing each PP Trial, go check it out.
Zombie Killing
Zombie Killer
Killed 100 zombies.
This will undoubtedly be your first achievement. Refer to Left 100,004 Dead for more information.

Zombie Butcher
Killed 1,000 zombies.
Refer to Left 100,004 Dead for more information.

Zombie Slayer
Killed 10,000 zombies.
Refer to Left 100,004 Dead for more information.

Master of Massacre
Killed 53,597 zombies.
Refer to Left 100,004 Dead for more information.

Genius of Zombie Slaying
Killed 72,000 zombies.
Refer to Left 100,004 Dead for more information.

Left 100,004 Dead
Killed 100,004 zombies.
While daunting, these kill achievements are a whole lot easier than the ones in previous Dead Rising games. The best way to farm these achievements are in Ingleton while rolling around in one of the more awesome combo vehicles, IE: The Rollerhawg. Make sure to maximize your Mechanic skill so that you can create invulnerable vehicles. Just beware of propane tanks lest you blow your vehicle up.
Misc.
Sideswiped
Completed 20 side missions.
This shouldn't prove to be too difficult. From the time that you get to Rhonda's Garage, you will start getting calls from a mysterious stranger. He will give you multiple side missions for each chapter. Aim to complete them before completing your main objective, as the missions are on a timer. If the timer runs out, you automatically fail the mission. I personally got this achievement sometime during Chapter 5. So if you do happen to miss a few, you will still have plenty of opportunity to obtain this one before the end of the game.

Fashion Plate
100 clothing items collected in the clothing closet.
You will come across clothing items more often than you realize. Don't you know that the Dead Rising franchise was founded on screwed up, funny clothing combos? You'll see shoes, hats, costumes, pants, skirts, go-go boots, etc. Just pick everything up that you come across and make Nick look as silly as possible. If you really hate it, just equip the same garment again to revert to what you were wearing originally. This should come without much grinding.

Driven
20 vehicles collected in the vehicle lot.
For this achievement you will need to drive 20 different vehicles throughout the course of the game. Jump into every vehicle that you come across to have it sent to your garage, or "vehicle lot", so that you may use it in the future and also make headway on this achievement.

Regular Vehicles:
Forklift, Street Cleaner, Steamroller, Backhoe Loader, Sports Bike, Motorcycle, SUV, Muscle Car, Sedan, Sports Car, Police Car, Hearse, Low Rider, Taxi, Sedan [Student Driver], Van, Fireworks Van, Ambulance, Party Van.

Combo Vehicles:
Mobile Locker, Junk Car, Turret Rig, Mini Bike, Forkwork, Rollerhawg, Junk Truck, Party Slapper, Junk Bike, Shockdozer.


Be a D i c k!
Joined a Co-op game.
Simple, just join a co-op game. However, it is not recommended to do a co-op session while finding collectibles such as blueprints, as credit is not always given to the player.
Operation Broken Eagle (DLC)
Note: All of these achievements need to be completed prior to going to the Mayor's Mansion. After that point, you will not be able to obtain these achievements and you will be required to start a new campaign to do so.

Cleaning House
Prep Base Camp for Bravo Team
Story related, cannot be missed.

Delivery Man
Collect Charlie's supplies
Story related, cannot be missed.

Duty or Death
Complete Dead Rising 3: Operation Broken Eagle
Story related, cannot be missed.

Covering the Traces
Collect precious cargo
Early in the DLC campaign, you will reach a helicopter. Pick up the larvae bioweapon container on the ground. This will cause the safe house infecting tutorial to be triggered. It pretty well can't be missed.

Eagle Has Landed
Locate the President
You will need to go to Central City and clear the stage near the Museum. This is where you will get the GPS Tracker. Now, leave Central City and head to the Mayor's Mansion in north eastern Sunset Hills and clear out all of the soldiers. Go to he back yard, head inside the mansion, go upstairs and get the key to the President's Room from a secret service agent near the door. Once you secure the President, the DLC will come to an end.

Counter Terrorist
Infect all Safe Zones
After the aforestated event, you will learn how to deal with terrorist safe houses. There are 8 total safe houses in the campaign and they are in the same locations as in the main campaign. You will be required to walk up to an exterior vent to use the larvae bioweapon that you picked up from the helicopter crash site. This will turn the safe house icon from green to red.

Eyes in the Sky
Hack all ZDC Cameras
There are only 29 cameras placed throughout the game that you will need to hack. These cameras are identical to the ones in the main campaign, however in order to hack these particlar ones you will need to walk up to the base of the camera tower. They will be indicated by yellow circles on your map, and they only appear on your map when you are close to them.

Live to Fight Again
Recover all Squad Members
If you've noticed a pattern with the last two achievements, this one is no exception. Squad Members are the equivalent of Survivors in this DLC. There are only two that you need to help out. First up is Sunshine, who is located on the prison bus in front of Rhonda's Garage in Ingleton. Second, The Dutch, is found in a meat shop at the southern part of Central City.

Rest in Peace
Collect all Dog Tags
You will find Dog Tags on fallen allies. These can be found during the main story, in side missions, and on the main map. Make sure not to forget to loot the Dog Tags after finding them, or killing the party that is carrying the Tag. It may sound a little like finding needles in a haystack, but fallen allies are always near red flares. If you see a red flare/red smoke, head towards it. You will not be able to obtain the final two Dog Tags until after you have picked up the GPS Tracker. A list of locations for the 11 Dog Tags are as follows:

1. Near the entrance to the subway at the start of the campaign.
2. First side mission in Sunset Hills.
3. West end of the northernmost bridge.
4. During the helicopter part of the campaign.
5. In the back of the strip club in south Almuda.
6. Southern gas station in south Almuda.
7. Small Chinese park area just off the highway in southern Ingleton
8. Outside of the yoga studio in southern Sunset Hills.
9. In the street at the southeast corner of Central City.
10. The rodeo type area in western Central City.
11. On the southernmost bridge between Almuda and Central City.
Fallen Angel (DLC)
Talk It Out
Question Winnie
Story related, cannot be missed.

Hall Monitor
Defend the school
Story related, cannot be missed.

Well Stocked
Collect special supplies for the Safe Zone
Story related, cannot be missed.

Shakedown
Interrogate Spec Ops
Story related, cannot be missed.

Angel Gets Her WIngs
Complete Dead Rising 3: Fallen Angel
Story related, cannot be missed.

No Peeking!
Destroy all ZDC Cameras
Like the last DLC, there are 29 cameras around the world. Almost half an hour into the DLC, you will be given four side missions to destroy cameras. Get it done and get the achievement.

Burn Baby Burn
Burn all propaganda Posters
As stated in both the achievement title and the description, these posters must be burned. So bring along a fire weapon or The Rollerhawg. There are a total of 40 Propaganda Posters and they will be marked by a yellow circle with a cross in the middle on your map.

Med Tech
Collect all Medical Supplies
Review your in-game map for 25 locations containing red Medkits. Most are fairly easy to reach, although some are located on rooftops.

Guardian Angel
Rescue all Survivors
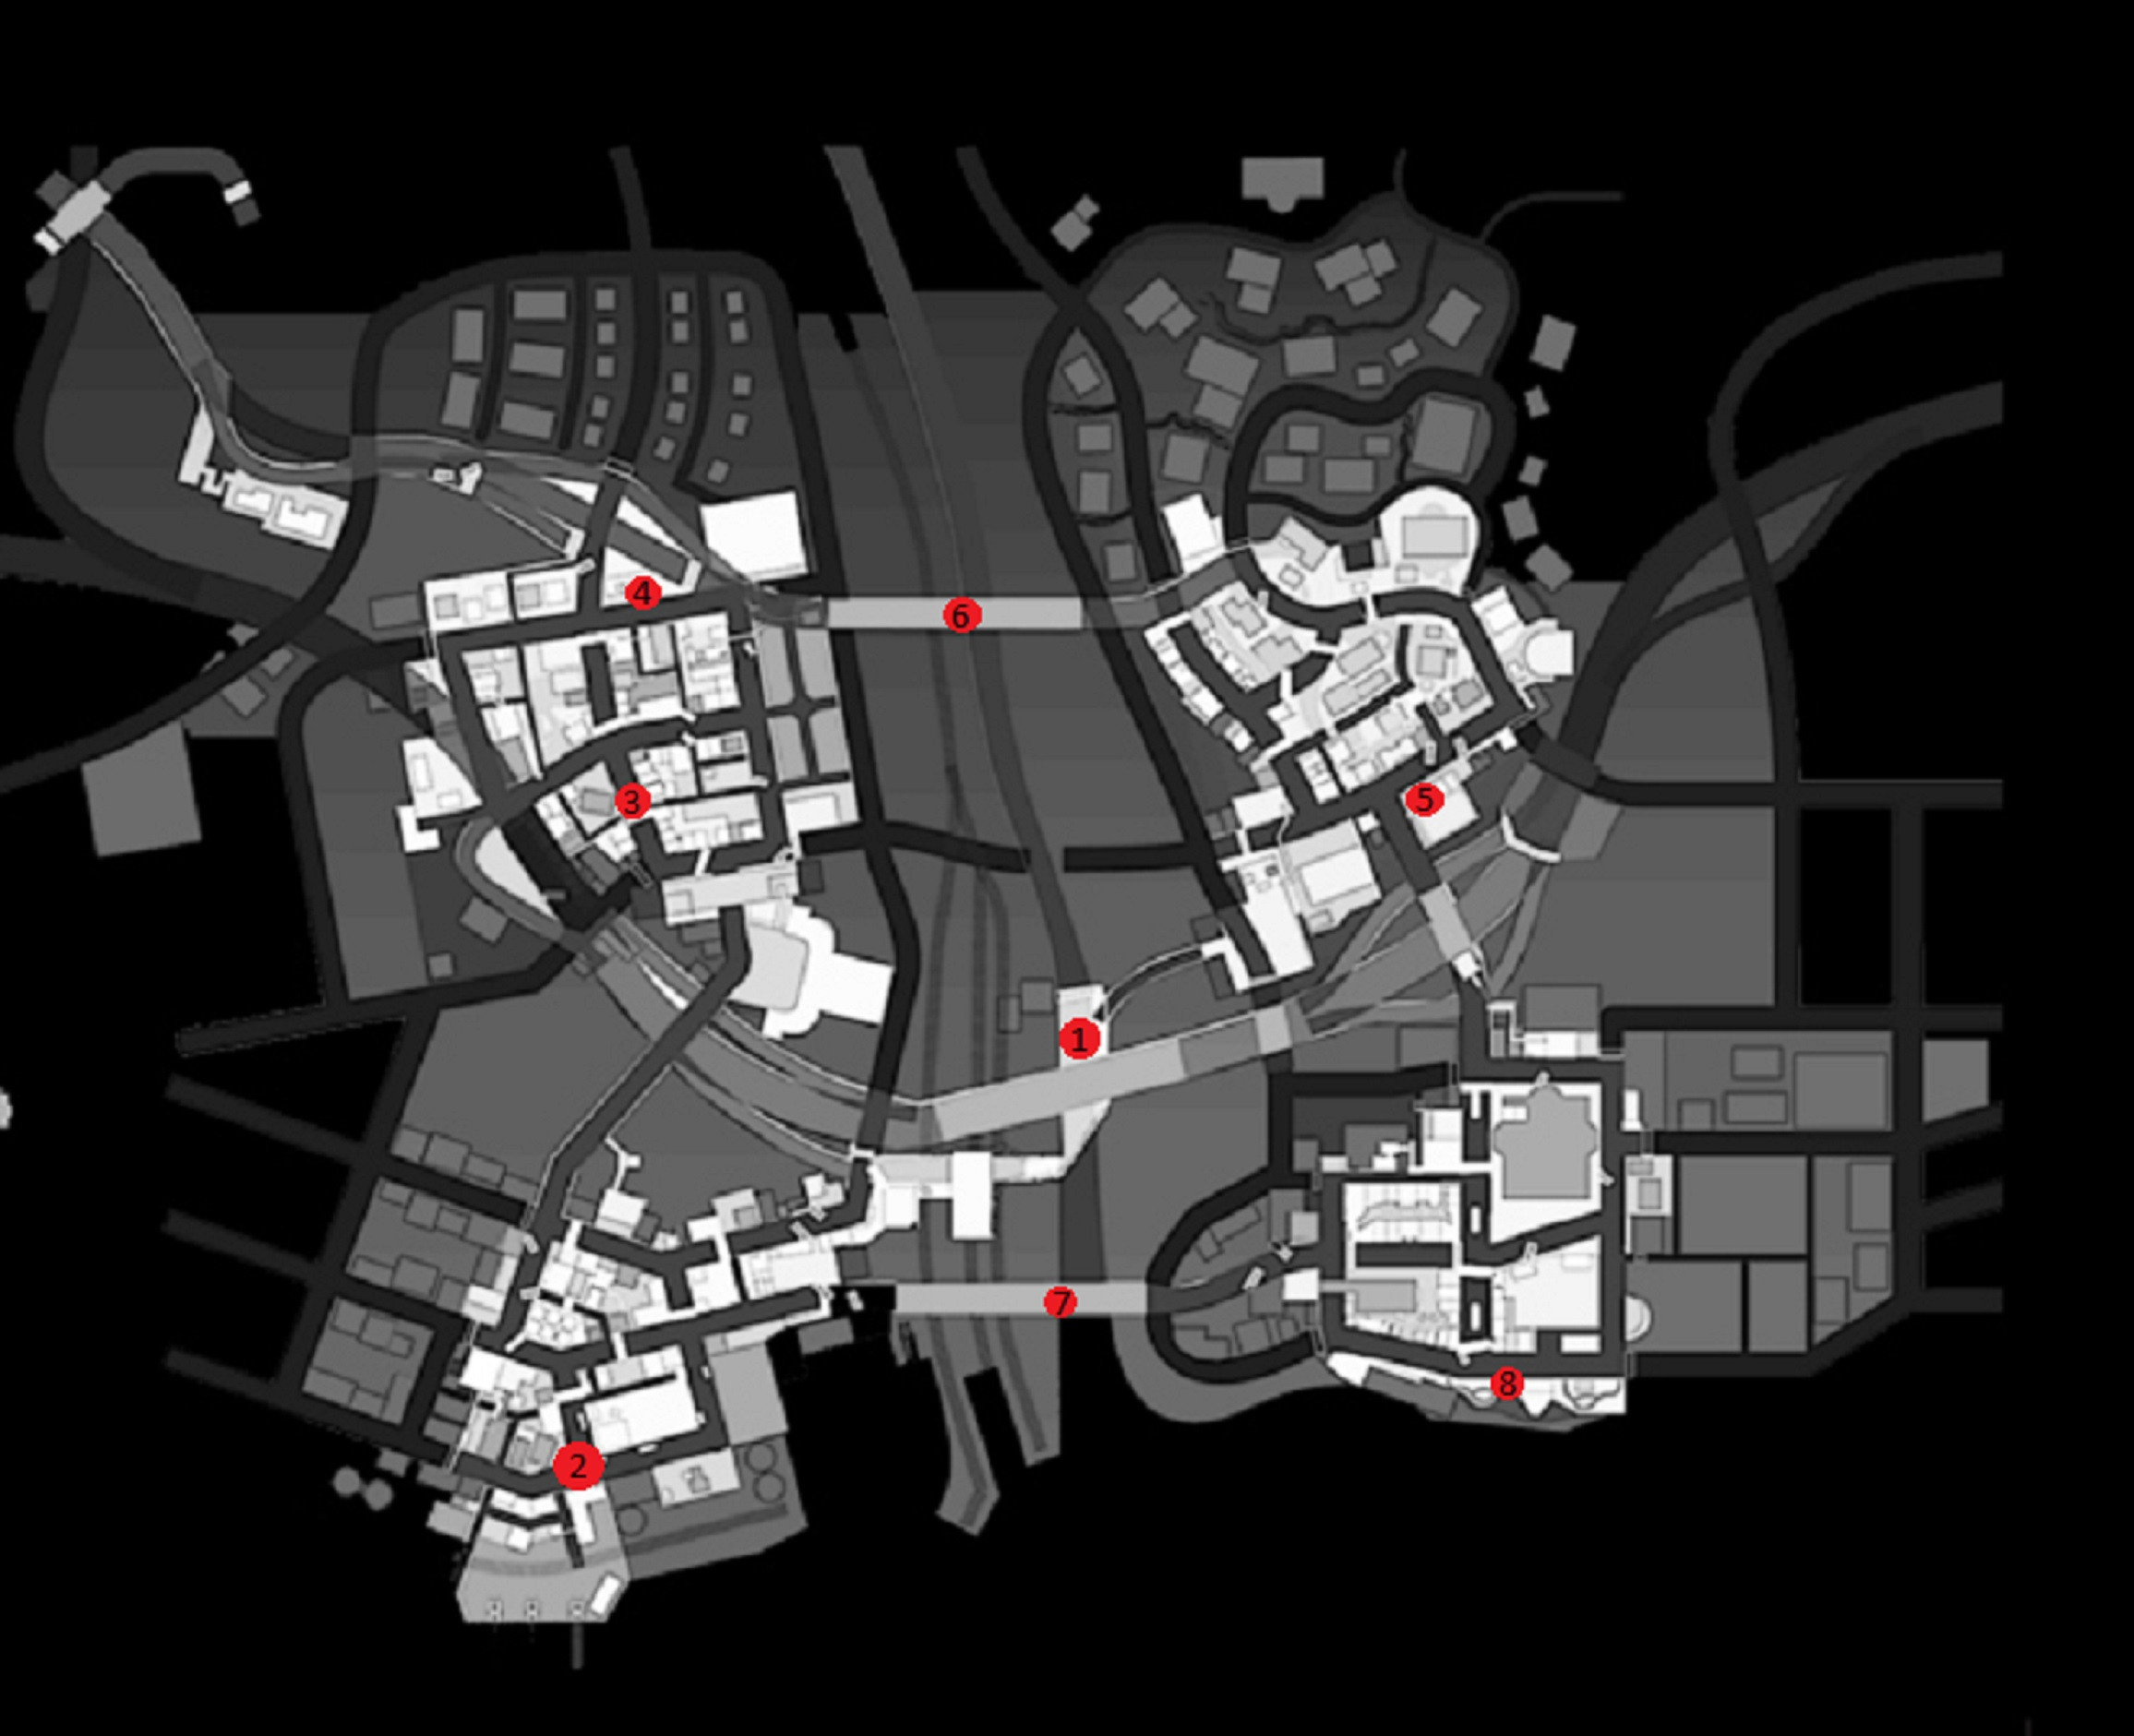
This seems to be the third most daunting achievement in Dead Rising 3, with a whopping 1.1% attainment rate. Now, there are eight total survivor groups and in order for a rescue to count, you must see the Mission Accomplished indication for it to count. If someone dies while they are untied or dies before they are untied, it doesn't matter so long as one of the three in a group survives. Below is a map showing all of the locations. The survivors only begin to spawn once you get closet ot he first group, so stock up before you head out.

Chaos Rising (DLC)
Fly the Coop
Escaped Los Perdidos Police Department
Story related, cannot be missed.

Throwing Down the Gauntlet
Survived Spider's trial
Story related, cannot be missed.

Builder's Apprentice
Helped Torque build a special bike
Story related, cannot be missed.

Hunter and the Hunted
All Captains defeated
Story related, cannot be missed.

Hawg Heaven
Torque's surprise obtained
Story related, cannot be missed.

Fit to Lead
Dead Rising 3: Chaos Rising completed
Story related, cannot be missed.

Stick It to the Man
All Emergency Phones destroyed
There are 20 Emergency Phones that you need to destroy; 5 in each area. They will be marked on your in-game map via a solid yellow dot, however the indicator will only appear when you are close to an Emergency Phone.

The Finer Things
All bottles of Special Reserve Whiskey collected
There will be 30 bottles of Special Reserve Whiskey and they will be marked on your map by a yellow circle with a cross inside of it. These indicators will only appear when you are within range of the item.

Add to the Collection
All Custom Motorcycles collected for Torque
There are a total of 12 Customer Motorcycles within the city. THey will be marked on your map as a blue side-mission indicator. Once you collect a bike, drive it back to Torque at Ironside Cycles. You need to drive the bikes into the showroom and place them in the blue circle marked on your mini map. Otherwise, they may blow up and cause you to miss the achievement, which will cause you to have to restart the DLC from scratch.
The Last Agent (DLC)
Out with the Bad
All Bikers defeated
Story related, cannot be missed.

Hacking the Hacker
Nelson found
Story related, cannot be missed.

Sourced
Source of military signal discovered
Story related, cannot be missed.

Kane's Last Words
Evidence collected
Story related, cannot be missed.

Agent of Justice
Dead Rising 3: The Last Agent completed
Story related, cannot be missed.

Bag of Chips
All ZDC Chips collected
There are 40 ZDC chips around the environment; 10 in each area, to be exact. The Chips will not be available until the side mission is granted to you by Cora. The ZDC Chips will be indicated by a blue side mission marker on your in-game map. When you arrive at an indicated area, you must kill two kings; each will drop a Chip.

Bootleg Operator
All Bootleg Zombrex collected
There are a total of 20 Bootleg Zombrex to collect; 5 in each area. They will become available once you return the first Zombrex back to Cora. They will be marked on your map via a yellow circle with a cross inside of it when you are close to one.

Ashes to Ashes
All Biohazards burned
The second most daunting Dead Rising 3 achievement on Steam... there are a total of 40 Biohazards that you need to burn; 10 in each zone. These will become available after Nelson asks you to wait while he works. They will be marked on your map by a solid yellow circle, when you arrive at the location a green flare will indicate which pile of bodies to burn. To burn a pile of bodies, you must either shoot them or melee them with a fire weapon.

Sworn to Protect
All Survivors rescued
There are a total of 20 Survivors that will need to be rescued; 5 in each area. If a surivor dies, they will not respawn and make this achievement impossible to get. It's best to go for them as soon as you begin this DLC. The Survivors are as follows:

South Almuda - Jack, Mila, Maia, Vicki, Ryan.
Central - Madeline, Bob, Sam, Alec, Jordan.
Sunset Hills - Eva, Greta, Alex, Jasmine, Tracey.
Ingleton - Steven, Kristen, Mike, Scott, Kaliyan.
Wrap Up
Good luck in your achievement hunting!

Achievement Guide written by The Horror Network / Deathless Void.
Do not redistribute this guide without my express permission.

This guide is considered COMPLETE
> If you have anything insightful to add, please leave it in the comments below.
> If you're looking for boosting/co-op partners, feel free to use the comment section.
> IF ANY DLC IS ADDED, PLEASE LEAVE A DETAILED COMMENT SO I CAN CHECK IT OUT.

Note: There have been look-a-like copycat guides popping up. If it's not labeled by THN (The Horror Network), it's NOT one of mine and therefore not up to the quality that I aim to provide.


34 comentários
GamerSpecial 17 de mar. às 14:16 
This guide is considered COMPLETE... 🙄
Nikita Low Tier Smelter 11 dez. 2024 às 19:17 
Are the achievements for Zombie Kills, Blueprints, and all other achievements in the base game where you need to do or find something X amount of times do they carry over to other playthrough?
Checkmate 28 nov. 2024 às 17:35 
..
VodkitaDeus 24 nov. 2024 às 12:45 
Awesome guide, well explained and complete.:steamthumbsup:
May I translate this to Spanish? I will give you entire copyrights.
yoshi 19 mai. 2023 às 11:07 
Anyone able to help with the Stick it to the Man achievement from Episode 3? I don't know where I would've missed one and I've done so much running around to try and find the last one.
Angei 2 abr. 2023 às 20:59 
How can this be solved?
Does anyone know why this is happening? I got stuck on a screen after seeing his father after the male protagonist saves the female protagonist. How to solve it?I play the 3rd generation .It's all over.still stuck on loading.If no one fixes it, I want a refund! !
76561199147945260 8 mar. 2023 às 9:54 
what dlc:melon:
2J丶 2 mai. 2022 às 6:49 
4. Next, it's will be boring. There are four areas, 10 in each area. Check one by one to see if there are corpse piles and green light. If there are, burn the corpse piles. If you've already burned some, let's say, 37, you should check 40 yellow spots, 37 of which only have green light, and the remaining 3 have green light and corpse piles.

There are two precautions. One is that after reaching step 3, don't exit to the main interface or the game, because this will make the yellow dots of all the corpse piles disappear again. Another is there is a pile at the top left corner area, which needs special attention. This pile has no green light, only corpses, it's behind a house.
2J丶 2 mai. 2022 às 6:49 
Here are some experience of mine, about the Ashes to Ashes achievement.

At present, there are bugs in these 40 corpse piles, it's like "some unburned corpse piles will not be displayed on the map". I found that this bug can be temporarily repaired as follows:
1. On the opening interface of DLC, the main menu of the game, choose restart story instead of continue.
2. Since the mainline is reset, you need to do the mainline until you talk to the hacker when the hacker makes you wait.
3. Open the map, you will find that there are yellow dots on the map about the piles of corpses, and they are all 40, even if you've done some of them before. They don't make any difference on the map, but when you reach a pile of corpses you burned before, you will find that there is only green light and no pile of corpses.
Lord Kenya 15 ago. 2021 às 12:23 
That broken eagle dog tag achievement is soo broken i have done it three times and still haven't received the it yet.... agh