Cities: Skylines

Cities: Skylines

194 ratings
Advanced Interchange Geometry
By Koesj
This might well make you go bankrupt!
   
Award
Favorite
Favorited
Unfavorite
Introduction
Having trouble getting your complex interchanges to look just right? Want to upgrade your road game with some real-life design parameters? Then learn to get your stuff looking like this...


...which is exactly the thing what I'll try to teach you right here in this guide!

Building on previous Cities: Skylines Steam Guides that explain how to build highways and interchanges, I’m presenting my tips, tricks, and some theory (bear with me please) on how to do properly 'dimensioned' freeway-type interchanges based on real world conditions.

Why? Well, Cities: Skylines provides a golden opportunity for us players to get our art on! Playing the game in the most efficient manner often means cramming your roads into tiny areas. This of course is a fine way of optimizing your playstyle, but when trying to emulate real world conditions and design parameters you'll get roads which are way more pleasing to the eye. So if you’re looking to up your interchange engineering game for that reason, this guide’s definitely for you.

Finally, to me personally, it’s also the main reason I keep coming back to Skylines: the game’s got great potential for glorious aesthetics. And if you don't want to get into designing this stuff yourself, but do feel like adding some nice-looking interchanges to your city, my workshop page will be intermittently updated with some new ones.

Word count: over 9000 4000? Cripes!
v.9: spelling & grammar, added 'sight lines'
v.8: release
Prerequisites
Before showing how to build interchanges based on real life, let me get some disclaimers out of the way:

  1. Don’t expect to be able to afford all this like in a regular game! I play with Unlimited Money when designing my freeways and you'll probably have to do this as well. Roads are expensive.

  2. You’ll need lots of space, real life designs don’t come cheap in the real-estate department. I’d recommend a mod like All 25 Areas purchasable.

  3. Read some other guides! I'd recommend Soruvisu's guide on basic and intermediate (my words, not his!) road design as required reading, so that you can get going with advanced geometry afterwards.

  4. Some mods are an absolute necessity, others are optional. I'd say that most aesthetic mods (road color, traffic, vehicles) are totally optional, but to follow the rest of this guide there are a couple of hard prerequisites...

  • First of all, get Precision Engineering. Without it, getting the hang of proper interchange geometry is simply impossible.

  • Second, you’ll need Fine Road Heights to get rid of the tbase game limit of changing heights over a maximum of 12 cells, get going with intermediate elevations (no more strict 0m/12m/24m/etc. distinctions), and in order to choose between bridges or embankments (whatever looks best!)

  • Third, I’d highly recommend working with the No Pillars mod. Trying to cram in a pillar under your bridges every 12 cells (the base-game limit) will really cramp your options with regards to design work. Not using No Pillars is basically super hard-mode; so to start off, make everything without pillars first, and add them later by changing road types while in Fine Road Heights's 'elevated construction' mode or connecting pillar-having roads to your no pillar ones. After a while, you'll start to see opportunities in building your roads with 'proper' pillar placement like in the base game.
Geometry 101
Let’s get some basics out of the way first. High speed, limited-access roads (often freeways) are built with a couple of major design parameters in mind. These are, in the order that they'll be addressed in this guide: road hierarchy, design speed, horizontal alignment, vertical alignment, discontinuities and superelevation.

The first and last factors aren’t very relevant to the game. ‘Hierarchy’, when designing a highway or interchange in Cities: Skylines at least, is already pretty explicit. You’re building the biggest road there is in-game. It still has some effects on design speeds, but I'll get to that in a bit.

Superelevation is, unfortunately, not available in-game. As you can see in the picture, this means 'banking' curved roads (which is most easily visible with racetracks). Roads in general are superelevated to give vehicles more traction in curves, providing for a safer and more comfortable ride.


The remaining design parameters are highly applicable to Cities: Skylines though, and are in my opinion key to getting your high-speed roads and interchanges to look just right. Each of these will get a dedicated section explaining the details further below. But first, let me give you the quick down-low on what they are and might mean for your city.

Design speed is probably the most important technical parameter in designing a freeway-type road. After the initial geographical/spatial decisions have been made - where is my road? what's it supposed to do? - you'll first have to decide how fast people should be driving there.

In-game, without speed mods, these numbers are set in stone. Cities: Sylines' Highways will always have a design speed of 100 km/h, and a Highway Ramp will always be 80 km/h. We can adjust our designs by using road hierarchy though; more on that later.

Horizontal alignment is the curvature of the road when looking at it from a top-down view. This type of 'road dimensioning' is very heavily linked to design speed, with the latter setting hard limits on the minimum curve radiuses you can use in your designs (i.e. half the diameter of the curve's full circle) . There are a couple of general guidelines here: when necessary, use straights, otherwise, smooth curves are preferred. And, when 'transitioning' to a minimum radius curve, use a special 'compounded' (i.e. built up from smaller parts) one first, which I'll explain below.

Vertical alignment is the way a road traverses differences in heights and at a certain inclination (height rise percentage level), i.e. its alignment changes when looking at it from a side view. As said, in the base-game version of Cities: Skylines without mods, it's impossible to have a smoother vertical change than 12 cells in length from 0m to 12m. Fine Road Heights fixes this though, and I'll explain how to get the most out of it in the section on vertical alignment.

Discontinuities are the points where roads merge or diverge; i.e. its splits. There are certain requisite design parameters to be used here: minimum weaving distances, sight lines, angles, etc. Also, getting weaving to work in a decent way has always been a bit of a problem with Cities: Skylines. But, if you overbuild your splits - with basketweaves for example - it can be managed to a pretty good degree.


Applied Horizontal Alignment

Design Speed, Curve Radius, and Hierarchy

Remember road hierarchy? We'll be using the Highway and Highway Ramp-type roads in the rest of this guide. and a quick and easy way to get the minimum curve sizes you'll want to be using with these is to look at their design speeds first.

Again, in Cities: Skylines a Highway should have curves designed for a speed of 100 km/h, with Ramps coming in at 80 km/h. As in real life though, these kinds of minimum design standards can't always be reached. Loops for example (or rather, >180° turns) would have to be made so large in-game that they become almost impossible to place.

In these cases, it's best to go down a 'step' in road hierarchy. This doesn't mean that certain connectors should be made from roads with a lower overall standard; please don't start adding zebra crossings and such. However, a lower design speed helps a ton in keeping road footprint to a minimum and in limiting interchange size as well. I've summarized the 'steps' you may take with regards to differing hierarchies in the table* below:

Road
Speed 1
Speed 2
Highway
100 km/h
>80hm/h
Ramp
80 km/h
50-80 km/h
Loop
50 km/h
30-50 km/h

When using Ramp or even looping connectors, constraining maximum design speed is a totally legitimate way of limiting curve size (and therefore footprint). In real life, you'll often see hard or suggested speed limits on connectors for this exact reason. So if there are no other alternatives (like using more space), 'stepping down' the hierarchy ladder is something you'll probably have to do as well. In-game, like in real life, space alone comes at a price premium, and expansive designs cost a lot more money to create too.

What this means is that, whereas an 80 km/h, 90° curve would need a whopping 44x44 cells in-game, it is totally cool to go down to a 50 km/h design speed and therefore a 16x16 cell curve. In general, smoother curves go up in radius exponentially: 50m for a 30 km/h one, 135m for 50 km/h, 900m for 100 km/h. At the bottom of this guide there's a handy reference sheet where minimum curve radiuses are translated to in-game cell dimensions. I've also added the 45° and 15° curve sizes for easy look-up (using basic trig and calculus to compute them). Use it when you need it!

* taken from the Dutch Freeway Design Manual[publicaties.minienm.nl] (p. 2-4), adapted for Cities: Skylines use


Transition Curves

Going 'down' from a 100 km/h Highway to, say, a 50 km/h Ramp is not something that should be done in one go. In other words, a full-speed roadway should never be followed by a lesser speed minimum radius curve. Instead, drivers have to be eased into the follow-up minimum design speed. I'll quote Wikipedia[en.wikipedia.org] here for the explanation on this:

If such easement were not applied, the lateral acceleration of a [...] vehicle would change abruptly at one point – the tangent point where the straight [...] meets the curve – with undesirable results. With a road vehicle the driver naturally applies the steering alteration in a gradual manner and the curve is designed to permit this, using the same principle.

An example: let's start off off with a basic 90° 20-cell curve (design speed is about 55 km/h):

If this were to directly connect to a higher speed road, it would spell trouble for drivers because of too abrupt a design speed change. Instead, we need to compound or split it up to make it into a 'transitioning' one. We might for example cut it in half first, so that one 90° curve becomes two 135° ones. In order to do this, it's easiest to draw a line (or rather: a road) right through the middle of the original curve, and work from there:


Now you can screw around with making these two compounded curves look best. Here I've gone for a pretty tight 11 by 6 cell @ 135° (design speed 45 km/h) one:


And ended up finishing it quick and dirty by doing the same thing from the other side:

As you can see in the second to last and final pics, what this gives you is two transition curves meeting at their shortest ends. Although the difference might not end up looking very big compared to the original curve (right and outside), design speed has gone down as a function of tightening the minimum curve radius. If you were to bring the speed back up again to 55 km/h, those 45° curves would need to meet in 8 cell-length parts.

Let's compare:


Both these curves have the same design speed, but now the elongated outer connector (made out of two 12c by 8c 45° transition curves) is the bigger one. As soon as you start to apply transition curves, you'll need more space!

Loops and making it look good

Another example of using transition curves is with loops. Below, I've shown two differing horizontal alignments for loops within a 24x24 footprint. Both of them have got a design speed of only ~40 km/h - pretty much unavoidable if you don't want them to end up being way too massive for the game - but the one on the right uses 18c by 12c 90° transition curves:


As you can see, the loop on the right looks a bit more natural than the one on the left. Entering a 18c 90° curve, drivers are eased down from between 55-50 km/h into a 40 km/h turn. In real life, ample space would be provided for drivers to slow down before entering these curves too, by ways signposting progressively slower speeds for example (going down from 100 to 50 km/h maybe). In-game, you can kinda simulate this by having enough of a 'run-up' to the connector, so that ample warning time of the impending curve is provided for.

In the end, doing this keeps transition curve length in check as well. When moving in towards a tighter radius in-game, it is generally best to keep the transition scale at about 3:2, with a maximum of it being around twice as long at the 'faster' end. With this, it is easy to end up with good-looking connectors that go from, say, >40 to 35 km/h in tight radius 8c loops, or sweeping 90 to 80 km/h fly-overs (27 by 18) with the stack interchange at the top of this section.
Mastering Vertical Alignment

Okay, horizontal alignment was a long read! Luckily, the vertical dimension of Cities: Skylines' roads and interchanges are a lot more simple. I'll make some basic suggestions here which'll be very easy to parse to in-game situations and don't require much thinking.

  • The base-game height change is, at its maximum, 12 meters in the vertical over (12c * 8) 96 meters in the horizontal. This is a bad thing from a road geometry standpoint: a (12/96*100=) 12.5% inclination is something you'll normally only seen on mountainous roads or very quirkily designed bridges.

  • Again, get Fine Road Heights to fix this! A better way to handle vertical changes would be to stretch the length over which this occurs to twice the base game's distance: from 12 to 24c, if you want to bridge a 12m difference. To me at least this looks way better, works pretty well space-wise in-game, and adds up to a bit more reasonable 6.25% inclination. It's still some ways off from real-life conditions, but we're well into design aesthetics and usability territory from a Cities: Skylines point of view here.

  • Another suggestion is to limit your height differences between different 'levels' of roads a bit. While the base game does these at 12 meters, with Fine Road Heights you can go down to 9, a very useful 25% reduction. While this does lead to some clipping with streetlights on lower-level roads, cutting down the horizontal distance at which you can do good-looking vertical changes, from the 24c I suggested down to 18c, gives you a lot more flexibility in designing your roads. 9 meters is a bit more realistic in any case. Clearance between road surface level and overpasses is almost never any higher than 5 meters in real life, and for most bridging structures the remaining 4 meters of vertical clearance are more than enough.

  • Another consideration when building your interchange is using either embankments or elevated connectors. This is another aesthetic choice made possible through Fine Road Heights. By pressing CTRL + left, or right, you can switch between normal, ground, elevated, and bridge 'construction' modes. Ground level construction has an automatic terraforming function built into it, which means that very good-looking embankments will be added to the roads you're building above ground level (like in the pic above).

  • Another cool feature with Fine Road Heights is going beneath ground level (Page Down), which gives you the opportunity to make sunken roads! A cool-looking freeway in a trench, like in the interchange I posted at the start of this guide, is always a nice addition to your city in my opinion. Do note that the ground construction tool seems to be working best at distances of about 12c at the maximum, so plan your roadworks accordingly.
Handling Discontinuities

If you're not sure of how to connect your new types of curves to each other in a good-looking way (i.e. via splits), I would, again, recommend reading Soruvisu's guide on how to draw and design Highways and interchanges. His section on 'ramps and small tips' and 'long straight ramps' in particular are exactly the kinds of things I use in designing my road 'discontinuities'.

In general: having a Highway Ramp connect to a Highway is best done when the former runs parallel to the latter, at 3c away, and connects to it at the shallowest angle possible (over a length of 11c, at about 31° - use the Curved Road tool for this). Also, when connecting two Ramps towards a merge in the middle, it's best to do this when they run parallel at a distance of 2c, connecting to a road in between at 8c away. All this is shown in the picture below:


In general, I tend to connect my roads by having them run parallel for a bit before merging. To me, this simulates real-life turning and weaving lanes, lane drops, and the length of road needed to indicate a speed change - all things that are regrettably absent from Cities: Skylines' current road setup. As you can see in the picture at the top of this section, consistency in the use of splits, merges, and diverges leads to an overall pleasing aesthetic.

For a normal lane merge, the Dutch Freeway Design Manual[publicaties.minienm.nl] (p. 3-13) states that, on a 100 km/h freeway, 200 meters of merging lane should be used. Since these can't be built in-game, the 11 cell (88m) 'standard' Ramp-to-Highway merge might as well serve as part of the required length, as well as about 6 cells on both ends of the merge to simulate an even more adequate distance. In case of diverging lanes, 110m (~14c) should be enough, which is easily reachable by using the same standard connection with a bit of additional 'easing' length.

Weaving

A big problem in Cities: Skylines is keeping traffic distributed over the entire width of the roadway, i.e. having them use all lanes available to them. Without using computer resource-intensive traffic mods, this can be a pretty hard thing to do. It'll also get really annoying if traffic wants to enter a heavily traveled right lane on which a lot of cars are already waiting to get off a bit later.


This is a real-life problem as well: so-called weaving can mess up an otherwise splendidly designed road system, and is a big reason for why cloverleafs[en.wikipedia.org] are considered to be a low capacity type of interchange these days. In order to combat this, certain minimum amounts of weaving distance are used in real-life designs, and we can apply those parameters to Cities: Skylines as well.

Normally, a length of 250m (30c) could at the minimum be considered safe for a 100 km/h weave between a mainline freeway and two connecting one-lane ramps. When used in-game though, subtracting two times 11c for the 'standard' splits means that only 8c are used to get on and off the freeway. This can lead to some nasty cases of stoppage on the right-most lane; this something that Cities: Skylines just doesn't handle very well.

Adding some more distance between weaves can alleviate these problems a bit, but in many cases you're stuck with traffic that just won't budge. Here, a so-called basketweave might help.


As in real life, these high-capacity interchanges can be used to smoothly distribute traffic over differing roadways. Here, I've been able to make them with so-called 'gate pillars' by duck clog, which are 'ploppable' pillars that can be used when and where Cities: Skylines' pillars couldn't be placed. As an aside, these kinds of situations are exactly why you'd want to use the No Pillars[/b] mod in the first place; solutions like these aren't possible in the base-game.

With basketweaves, it's a good idea to keep them as narrow as possible so that their footprint doesn't become too large. Still, the above example takes about 84c (672m) to get going, and is therefore best suited in only the most dire of congested circumstances. I've used standard lane splits here, to make the exits come off of the Highway pieces, and used 6x6 15° curves to make the turns within the weave. Design speed of those curves is 80 km/h, and I haven't used transitioning ones here since the opposing 6x6 curves size will already just about move the roadway 2c to the side - perfect for connections like these!


In this slightly different example, I've made a nicely sweeping grade-separated weave inside an interchange in order to facilitate heavy traffic towards an important junction downstream. This took me about 35 minutes, and some finnicking around with the ground construction tool in Fine Road Heights to boot, but pretty much solved all weaving problems straight away. When in doubt, grade-separate! traffic will get distributed across your lanes in a much better way, mitigating Cities: Skylines' issues with traffic sticking to certain parts of the road.

A belatedly added quick word on sight lines here: I see people plopping trees right next to freeways all the time in videos and screenshots. While not ideal from a road safety point-of-view even alongside straights, this is especially problematic in case of curves.

When going through a curve, drivers need to be able to see what's in front of them so that they can come to a full stop in case of accidents or incidents. Adding tons of trees totally messes up this safety standard. Check out the screenshots throughout this guide to see where I removed trees near curves. Hint: you can easily do this by going to ground level to 'look through' your curves. Also: use some minimum horizontal clearance when not building Highways with Sound Barriers people! And keep trees out of the median in general, they're a hassle to cut in real life.
In Conclusion

The interchange I showed at the start of this this guide (quite a long read ago) can serve as nice example of both the design parameters I mentioned, as well as my own design philosophy in making more advanced interchanges.

I have gone with 10c by 10c or 12 by 12 minimum radiuses on the indirect, left-hand connectors, meaning that they have a 60 to 65 km/h design speed. The single loop here is rated for only 35 km/h, but this problem is offset by adding some de- and accelerating distance at both ends.

Since Cities: Skylines tends to use real-life dimensions more as a suggestion than a hard design parameter (witness the success of 1:1.5 buildings in the Workshop for example), I feel that the design speed trade-off is a pretty easy one to make. Also, with this interchange, I've gone for a bit of an 'older', more constrained feel anyway. It's close to downtown and plays the role of 'first' interchange in this city, built to lower design standards than later ones.

Transition curves and vertical aligment are bog-standard here: a 3:2 ratio is used for the former, while I've reduced the base game inclination by half with regard to the latter. When keeping all my advice into account, you'll see that the design speed/minimum curve radius-combo is the major driver in Cities: Skylines' road design overall. The other parameters can be made to work with whatever kind of a basic, top-down layout you've chosen to build most of the time anyway. This applies to discontinuities as well: in 90% of the cases, I use standard lane splits and don't bother thinking up more creative solutions. And again, use the reference sheet at the bottom of this guide to see what kind of curve sizes you'd want to be using.

A final note on style and macro-level planning: look for real-life examples and try to recreate them in your city! The first thing I did while building my best one yet - the place that I've used for all example screenshots in this guide - was lay down an inner-city area next to a sunken freeway, with some nice-looking ramps to connect it all. This is not something I came up with all by myself![www.google.com] Get inspired by the solutions used out there in the real world, and try to make the coolest, bestest city there is in Skylines!


So keep building, and let me know in the comments below whether you've got any questions, complaints, or suggestions.
Reference Sheet
Use this table to look up design speed vs. curve radius parameters for your roads.

Speed (km/h)
Rmin (m)
Rmin (c)
seg 45°(x2)
seg 15°(x6)
25
35
4
2x2
-
30
50
6
3x3
-
35
65
8
3x3
-
40
85
11
4x4
-
45
110
14
6x6
2x2
50
135
16
7x7
2x2
55
160
20
8x8
3x3
60
190
24
10x10
3x3
65
220
28
11x11
4x4
70
260
33
14x14
4x4
75
300
38
16x16
5x5
80
350
44
18x18
6x6
90
450
56
23x23
7x7
100
600
75
31x31
10x10
110
750
94
39x39
12x12
120
900
113
46x46
15x15

  • Rmin means minimum radius
  • The units used in the three left-most columns are in-game 'cells' of 8 meters
  • The number of successive curve segments (seg) needed for getting either 45°- or 15°-degree turns into full 90° ones (two, six) is given as well
  • If you want to do your own curve segment calculations, use the complete circular arc calculator[www.handymath.com]
  • Another useful calculator is Angle-Angle-Side[www.calculatorsoup.com], with which you can calculate 'width' to feed back into the arc calculator
18 Comments
Kinoko Aug 19, 2022 @ 7:04am 
If I ever want to become a road designer in real life, I'll finish reading this. This level of design is like doing math problems for fun, and the payoff is minimal.
Fortissimo Jan 18, 2021 @ 7:56pm 
Can someone explain to me how to read the seg 45 and seg 15 portion of the table? what does 6x6 for a 45km/h design speed mean here?
me22ca Oct 15, 2020 @ 10:00am 
@koesj The TMPE folks have a freeway formula from Virginia DoT in https://github.com/CitiesSkylinesMods/TMPE/issues/793#issuecomment-618159042
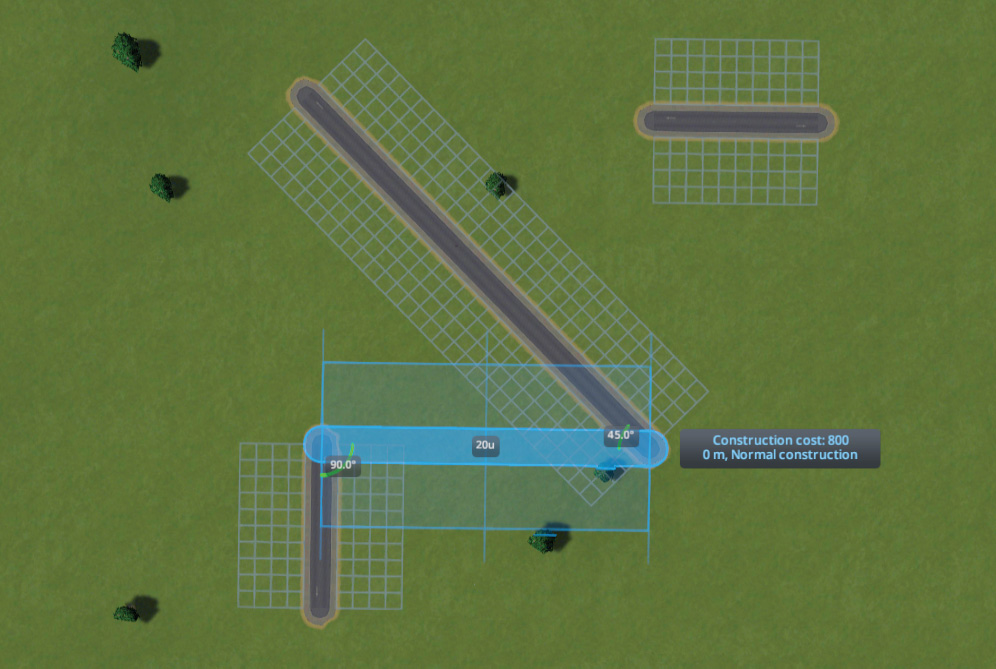
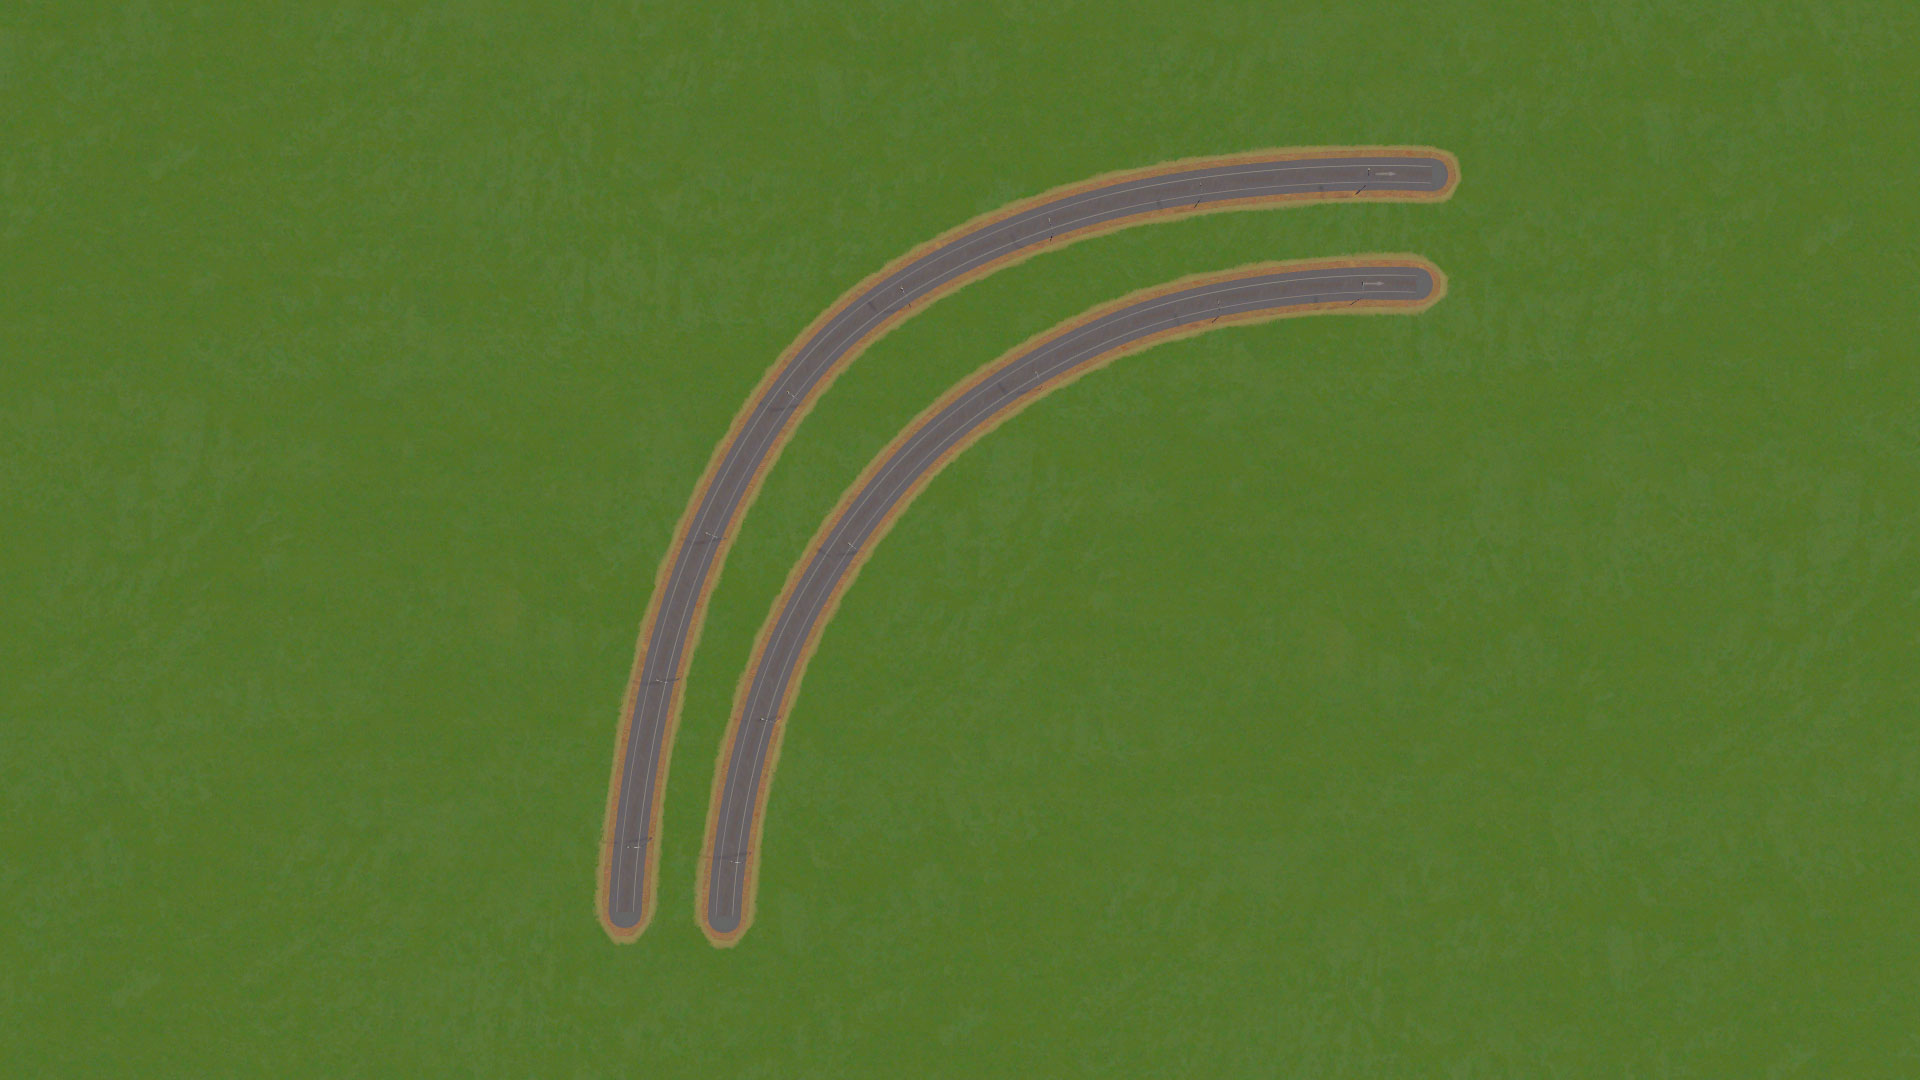
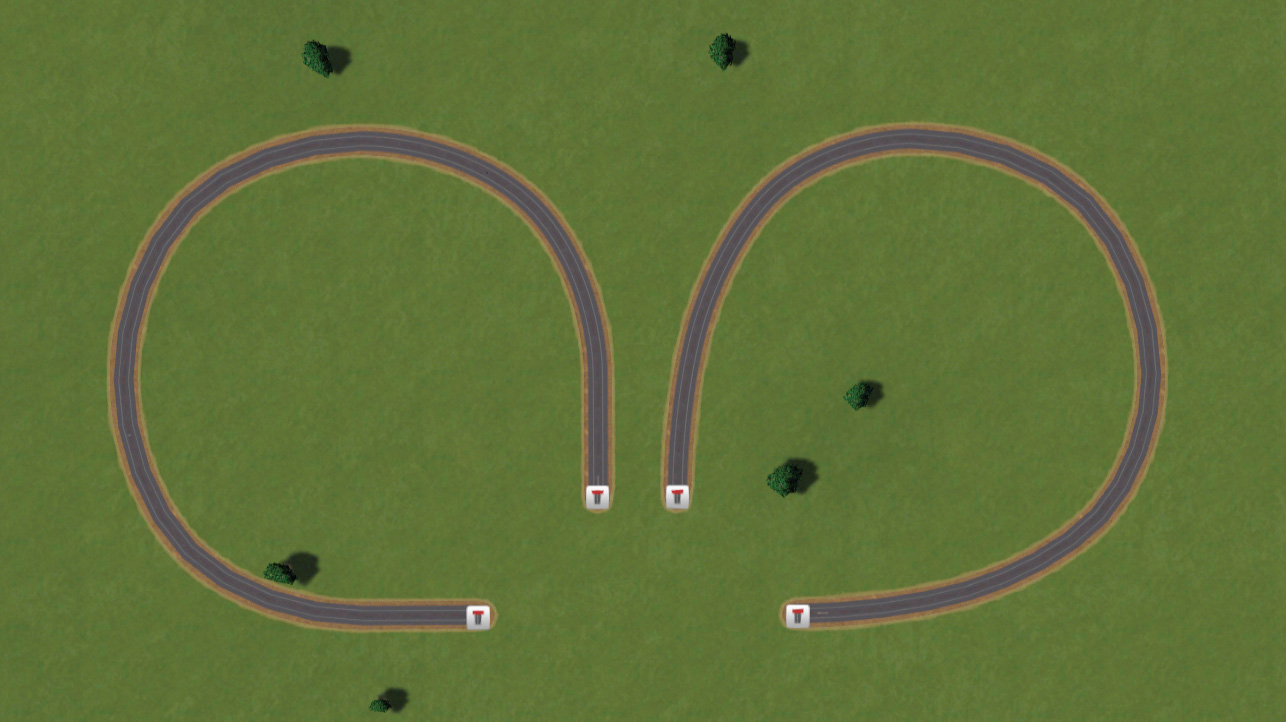
5² m radius => 40 km/h
10² m radius => 60 km/h
15² m radius => 80 km/h
20² m radius => 100 km/h

Looks like that's a bit different from your reference table. Maybe it's assuming some super-elevation, since it's for real life? Even though the game doesn't have it...
Koesj  [author] Oct 15, 2020 @ 1:59am 
@me22ca whoa yeah, never figured
me22ca Oct 14, 2020 @ 7:14pm 
> smoother curves go up in radius exponentially

Technically they go up in radius quadratically.
Koesj  [author] Apr 3, 2016 @ 4:49am 
;)
[RR] bazkie Apr 3, 2016 @ 4:25am 
Nice guide :) I giggled at the AIG logo :p
Koesj  [author] Nov 11, 2015 @ 12:32am 
The game looked different before the expansion, when a ton of visual changes were made!

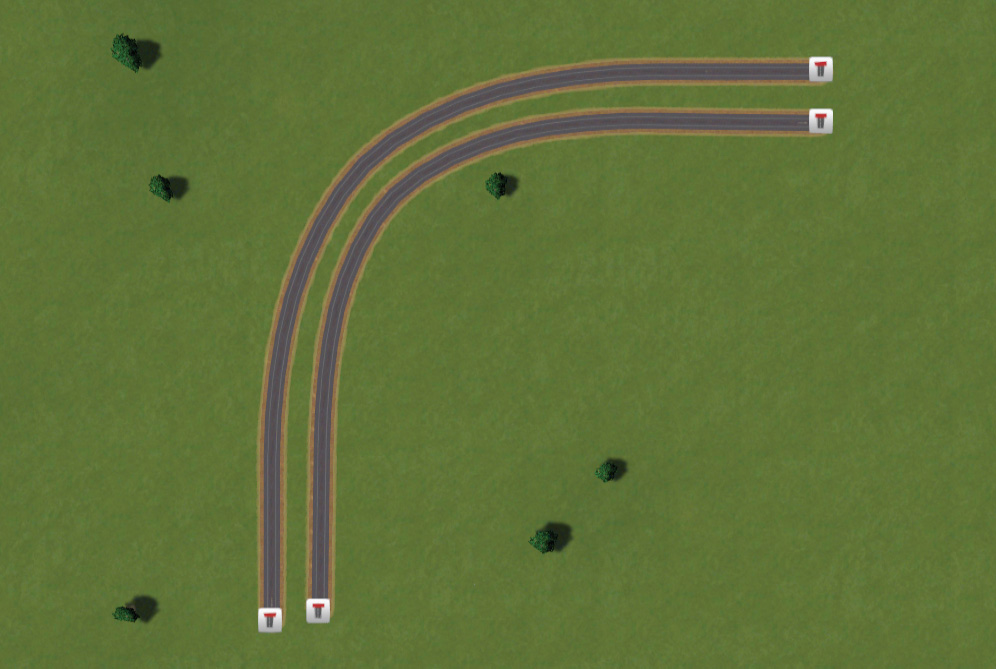
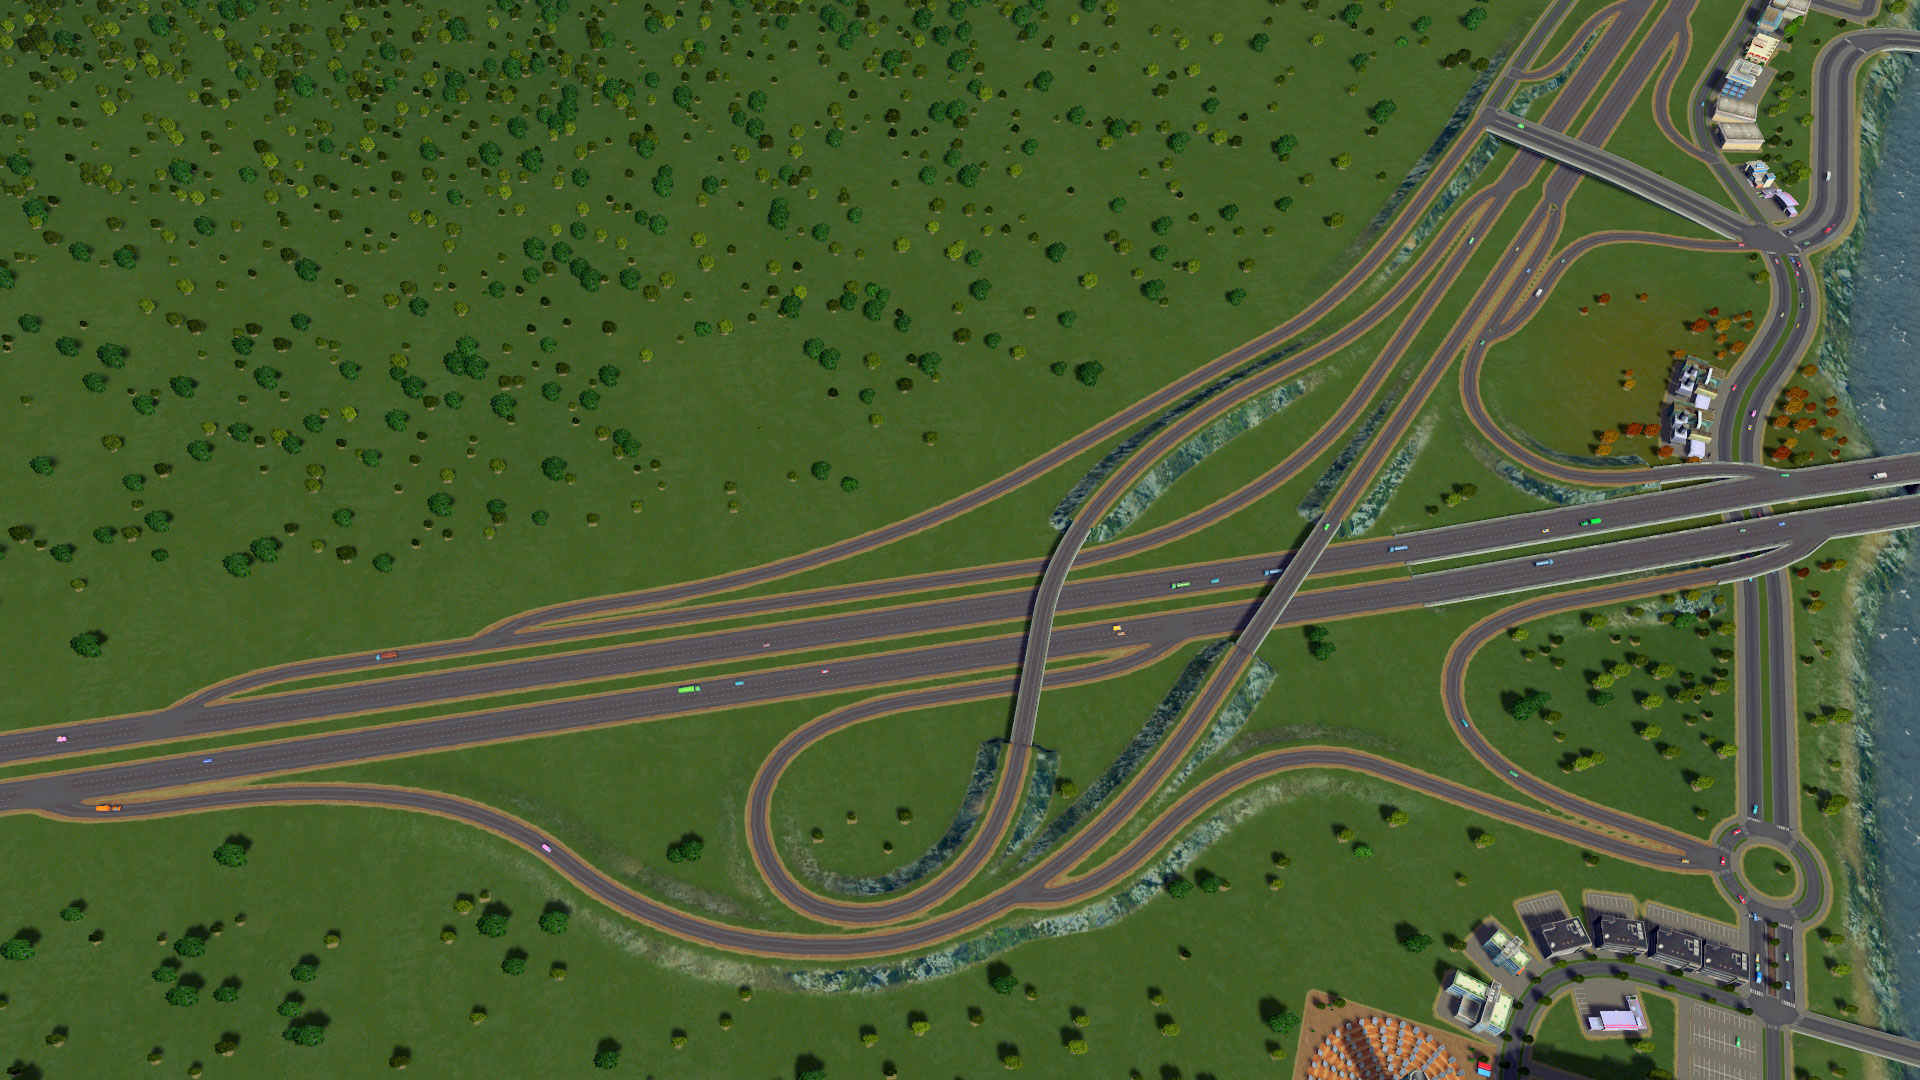
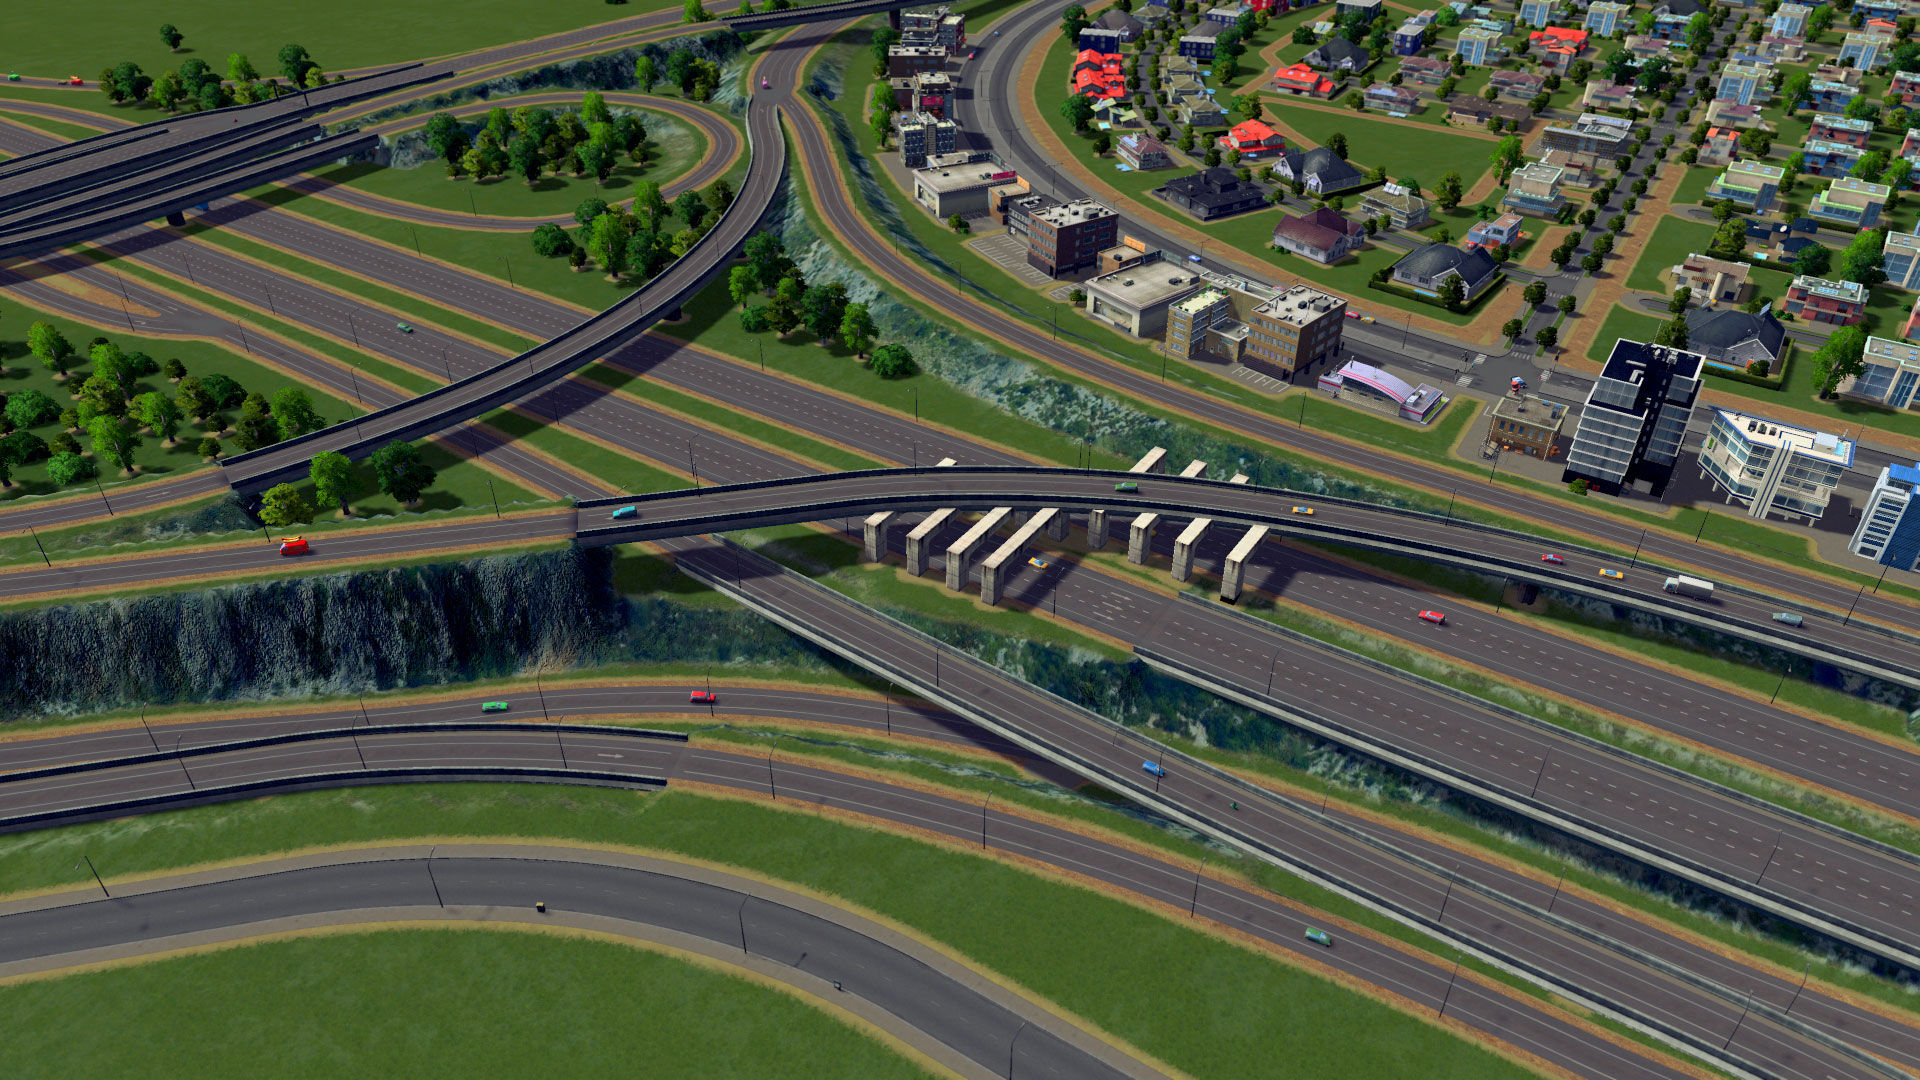
*Maybe* I was running a LUT, but I don't think so, also those screenshots were made with the Dynamic Resolution Mod in order to get rid of jaggies through upscaling.

¯\_(ツ)_/¯
BraveHoneyBadger Nov 10, 2015 @ 12:49pm 
Hmmm, Mind sharing some details? Did you use graphic mods, cause my game looks nothing like that even when it's on max settings.
Koesj  [author] Nov 9, 2015 @ 11:23pm 
'That' is how the game looked before After Dark.